Renovating and extending my wildlife pond
Discussion


Back in the summer of 2014, I dug a pond for wildlife. It turned out to be deeply rewarding, and I blogged about it on a PH thread here: https://www.pistonheads.com/gassing/topic.asp?h=0&...
But for a good few years now the pond has become badly neglected. This is due to a number of mistakes I made in the design and construction. So I’ve decided to tear it down, remove the liner, and extend the pond.
Here are the main mistakes:
Firstly, I have killed the ornamental grass. I did this last spring, spraying it with glyphosate over and over during a period of a month or two. I then left it for the rest of that season, with a plan to delay renovating the pond until I’d seen whether it returned this year, which it hasn’t. When removing the butyl liner, there were countless dead rhizomes that had punctured the liner, particularly in the shallow section which as a result didn’t hold water at all.
I intend to extend the pond to cover the whole area where the ornamental grass once grew. The new shape will be roughly circular, and I’ll dig the new shelves into simple convex shapes. There will be a shallow section, with a sloped “shore”.
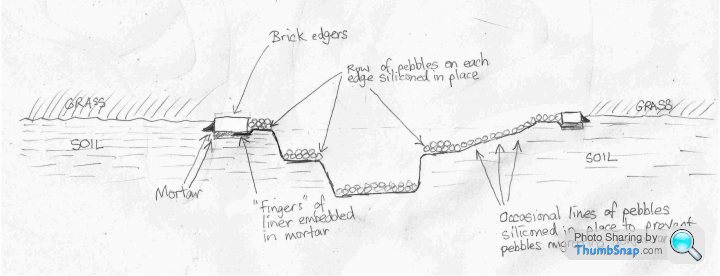
I will do the edge differently. Recently I’ve used driveway paving blocks sunk flush into the ground as an edging for the lawn, so I’ll use those around the pond as well. This will keep the lawn grass back, and because the blocks are roughly flush to the ground I can wheel the mower along them. Around the pond I’ll mortar them in place, trapping the edge of the liner which I’ll cut into finger shapes so that the mortar holds both the blocks and the liner. I’ll do a wedge of mortar on the outer edge to further discourage the lawn grass encroaching.
I’ll use small pebbles as a decorative base for each shelf, and around the outside. To prevent these migrating downwards, I’ll use pond sealant to stick lines of pebbles in place along each edge to hold back the rest of the pebbles.
Before the new liner goes in, I intend to line all the vertical walls and the floors of the shelves with tough bamboo-proof root barrier. I’ll use special tape designed for joining the barrier. It’ll be expensive, but I’m determined not to suffer root penetration again!
I’ll put a pump on an upturned bucket at the bottom of the pond, pointing upwards. Not sure about having a fountain, as that might be a bit “twee” and will increase evaporation. But just having a bit of rolling surface movement might help deter duckweed, which doesn’t like moving water apparently.
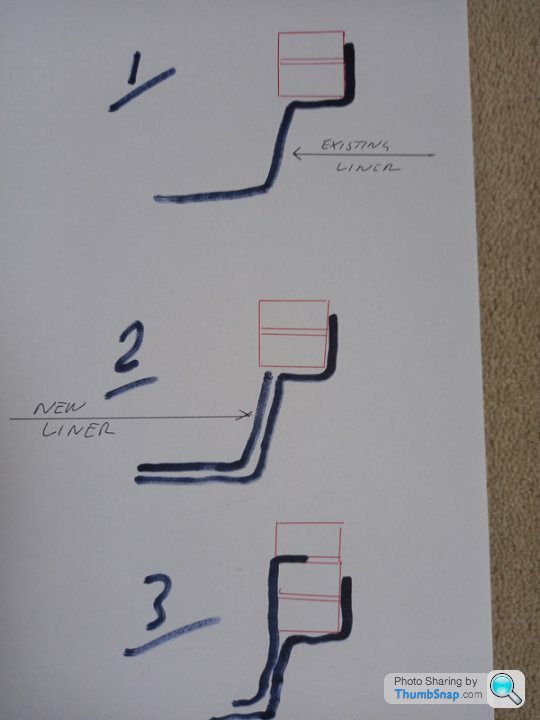
Here’s a diagram of how I’m planning to lay the liner (although I’ve omitted the layer of root barrier). Any comments gratefully received!
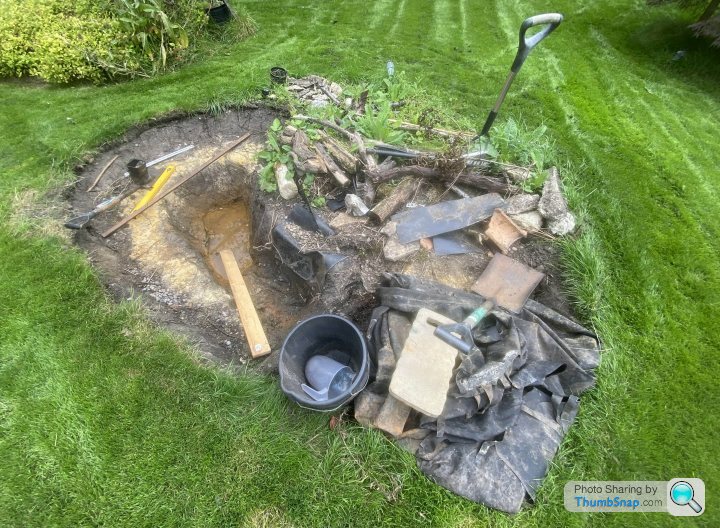
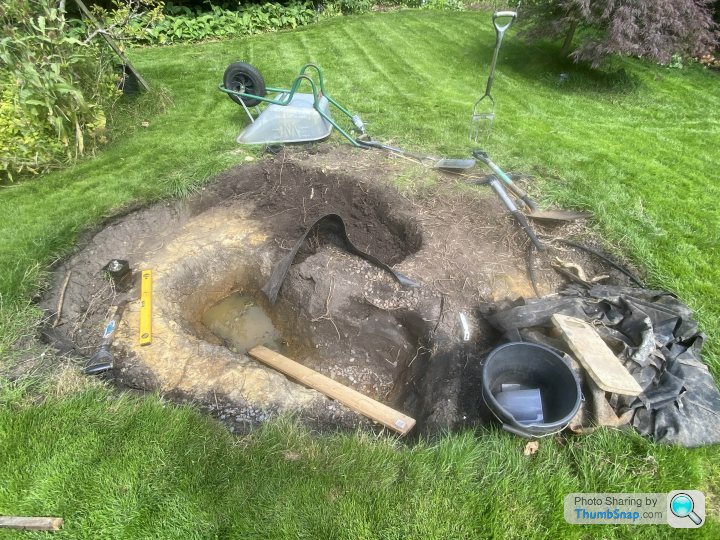
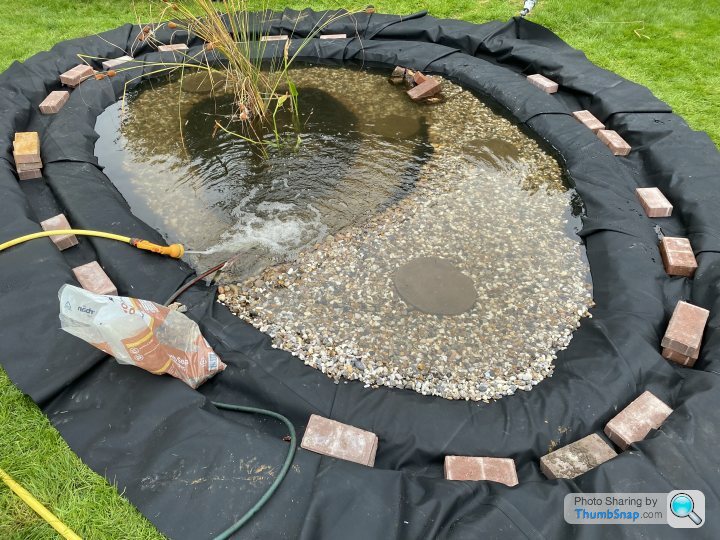
And this is what it looks like at the moment - a bit of a mess!
But for a good few years now the pond has become badly neglected. This is due to a number of mistakes I made in the design and construction. So I’ve decided to tear it down, remove the liner, and extend the pond.
Here are the main mistakes:
- In the original thread, you can see that I put the pond right next to a clump of tall ornamental grass. This turned out to be a massive error, because within months that grass was poking rhizomes right through the liner, just like it wasn’t even there! The liner therefore didn’t hold water, and the problem got progressively worse.
- Having the lawn come right up to the edge was also a bad idea. I hadn’t reckoned on how invasive the lawn grass would be, and it started to invade the pond. I couldn’t believe how well the grass grew as an aquatic plant!
- One or two of the pond plants I chose turned out to be rather invasive. In particular, “marsh woundwort”, whilst being pretty and grew well, tended to spread everywhere and took over.
- The overall size of the pond was unambitious, limited as it was by the presence of that ornamental grass to one side of it. Our garden is moderately big, and I think the pond needs to be bigger to be in proportion. Also, the kidney shape complicated the laying of the liner.
Firstly, I have killed the ornamental grass. I did this last spring, spraying it with glyphosate over and over during a period of a month or two. I then left it for the rest of that season, with a plan to delay renovating the pond until I’d seen whether it returned this year, which it hasn’t. When removing the butyl liner, there were countless dead rhizomes that had punctured the liner, particularly in the shallow section which as a result didn’t hold water at all.
I intend to extend the pond to cover the whole area where the ornamental grass once grew. The new shape will be roughly circular, and I’ll dig the new shelves into simple convex shapes. There will be a shallow section, with a sloped “shore”.
I will do the edge differently. Recently I’ve used driveway paving blocks sunk flush into the ground as an edging for the lawn, so I’ll use those around the pond as well. This will keep the lawn grass back, and because the blocks are roughly flush to the ground I can wheel the mower along them. Around the pond I’ll mortar them in place, trapping the edge of the liner which I’ll cut into finger shapes so that the mortar holds both the blocks and the liner. I’ll do a wedge of mortar on the outer edge to further discourage the lawn grass encroaching.
I’ll use small pebbles as a decorative base for each shelf, and around the outside. To prevent these migrating downwards, I’ll use pond sealant to stick lines of pebbles in place along each edge to hold back the rest of the pebbles.
Before the new liner goes in, I intend to line all the vertical walls and the floors of the shelves with tough bamboo-proof root barrier. I’ll use special tape designed for joining the barrier. It’ll be expensive, but I’m determined not to suffer root penetration again!
I’ll put a pump on an upturned bucket at the bottom of the pond, pointing upwards. Not sure about having a fountain, as that might be a bit “twee” and will increase evaporation. But just having a bit of rolling surface movement might help deter duckweed, which doesn’t like moving water apparently.
Here’s a diagram of how I’m planning to lay the liner (although I’ve omitted the layer of root barrier). Any comments gratefully received!
And this is what it looks like at the moment - a bit of a mess!
Edited by Dr Mike Oxgreen on Saturday 12th August 12:07
Love a pond project, mine was last winter. Clearing some shrubs I found a brick edge, so dug it out. As you do.
New liner, some roof tiles for the edge a few plants and it's all done. Established quickly and after the 1st fill no topping up!

The shallow end was formed by a couple of flagstones on edge, liner going over the top. I knocked any edges off the bricks trapped the liner and layed the roof tiles into the mortar. The nibs on the outside so they overhang the edge and liner not visable.
Would you be able to lay the liner under and up behind the blocks? That way you'll be able to fill the pond above the edge of the blocks and cover the liner completely (visually)
Kinda like (1) below
New liner, some roof tiles for the edge a few plants and it's all done. Established quickly and after the 1st fill no topping up!
The shallow end was formed by a couple of flagstones on edge, liner going over the top. I knocked any edges off the bricks trapped the liner and layed the roof tiles into the mortar. The nibs on the outside so they overhang the edge and liner not visable.
Would you be able to lay the liner under and up behind the blocks? That way you'll be able to fill the pond above the edge of the blocks and cover the liner completely (visually)
Kinda like (1) below
Edited by PositronicRay on Saturday 12th August 17:48
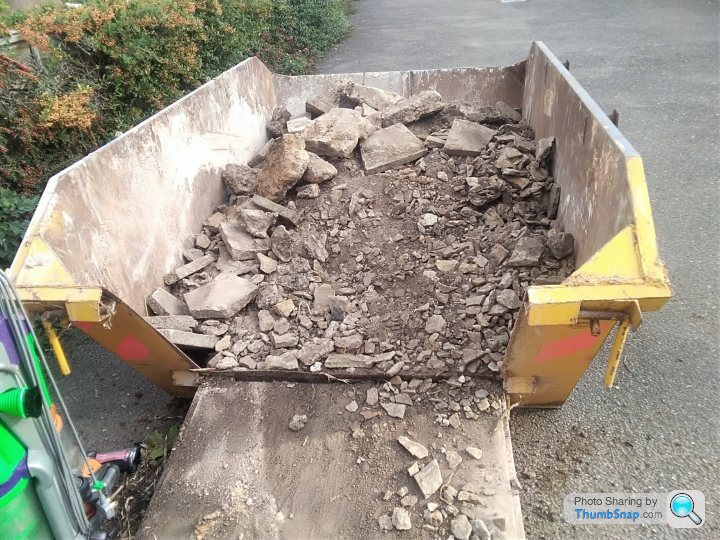
Thanks, I'm pleased with the result. Although was cursing at the amount of spoil and rubble to remove. This was the stage I wished I hadn't started.
Mortar and weight is what holds it together, it's how my pond was originally constructed (not by me). If you think about it not dissimilar to how a damp proof membrane is fitted during house construction.
Good luck.
ETA, I'd try to raise the edge a bit, I know it'll make lawn mowing awkward but it'll help prevent cuttings going into the pond.
Edited by PositronicRay on Sunday 13th August 15:25
Today I finished the digging.
God, it’s awful when you get down to the subsoil. It’s heavy, and incredibly sticky. Pure, solid clay. You’re constantly scraping it off your spade. Nearly enough to make you give up!
Anyway, I’ve now got a big hole in the ground…
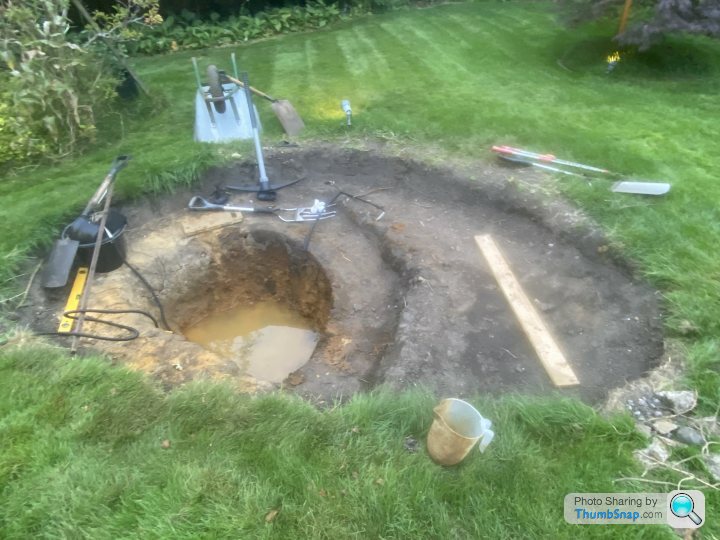
The new liner is arriving in a week or so. I’ll bail out the water from the deepest part, then throw in a few bags of sand to level the bottom before putting the new liner in.
But before that I’ll line the walls and floors with bamboo-proof root barrier. I’m taking no chances with root penetration this time!
God, it’s awful when you get down to the subsoil. It’s heavy, and incredibly sticky. Pure, solid clay. You’re constantly scraping it off your spade. Nearly enough to make you give up!
Anyway, I’ve now got a big hole in the ground…
The new liner is arriving in a week or so. I’ll bail out the water from the deepest part, then throw in a few bags of sand to level the bottom before putting the new liner in.
But before that I’ll line the walls and floors with bamboo-proof root barrier. I’m taking no chances with root penetration this time!
Dr Mike Oxgreen said:
Today I finished the digging.
God, it’s awful when you get down to the subsoil. It’s heavy, and incredibly sticky. Pure, solid clay. You’re constantly scraping it off your spade. Nearly enough to make you give up!
Anyway, I’ve now got a big hole in the ground…
The new liner is arriving in a week or so. I’ll bail out the water from the deepest part, then throw in a few bags of sand to level the bottom before putting the new liner in.
But before that I’ll line the walls and floors with bamboo-proof root barrier. I’m taking no chances with root penetration this time!
Good to have this stage finished. Have you decided about the edge detail yet?God, it’s awful when you get down to the subsoil. It’s heavy, and incredibly sticky. Pure, solid clay. You’re constantly scraping it off your spade. Nearly enough to make you give up!
Anyway, I’ve now got a big hole in the ground…
The new liner is arriving in a week or so. I’ll bail out the water from the deepest part, then throw in a few bags of sand to level the bottom before putting the new liner in.
But before that I’ll line the walls and floors with bamboo-proof root barrier. I’m taking no chances with root penetration this time!
PositronicRay said:
Good to have this stage finished. Have you decided about the edge detail yet?
I think I’m going to stick with my plan; I reckon it should work.hellorent said:
Try dipping your spade in diesel, bit late now
That’s a neat trick - I’ll remember that if I’m ever digging down into the subsoil in future. Not sure it would have been the right thing to do on this occasion, because inevitably I’d have ended up with a small amount of diesel lingering in the bottom of the hole and on the sides, and I’m not sure what effect that would have had on the butyl liner.Over this weekend I intend to fit the root barrier sheeting to the sides and the floors of the hole, although I probably won’t bother covering the very bottom of the deepest bit. I’m pretty sure this is largely unnecessary, because the only thing that punctured the liner were the rhizomes of that ornamental grass, and that is now very dead (and I’ve pulled out loads and loads of rhizomes). But the root barrier will also serve to protect the butyl from any sharp stones I may have missed.
If time and weather allow, I will also start cutting the turf back around the edge. This will naturally result in the edge being an inch or so lower than the lawn level, and hence will also be lower than the top faces of the brick blocks - this will allow for a layer of pebbles to hide the liner.
I’ll post some pictures as I go!
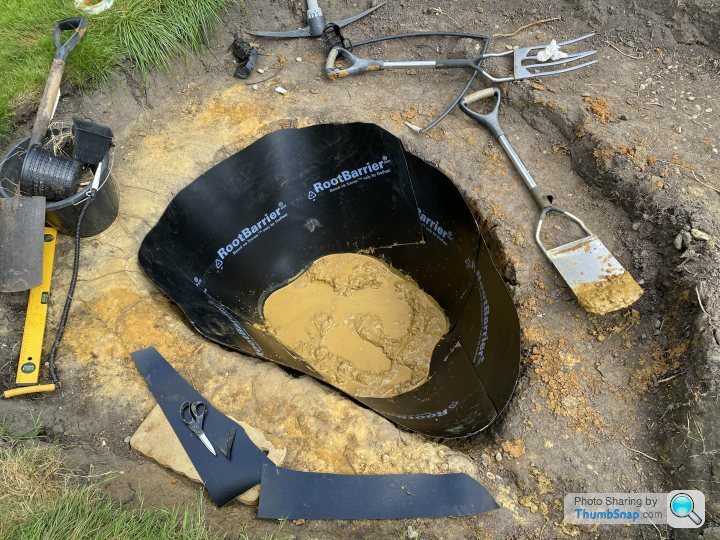
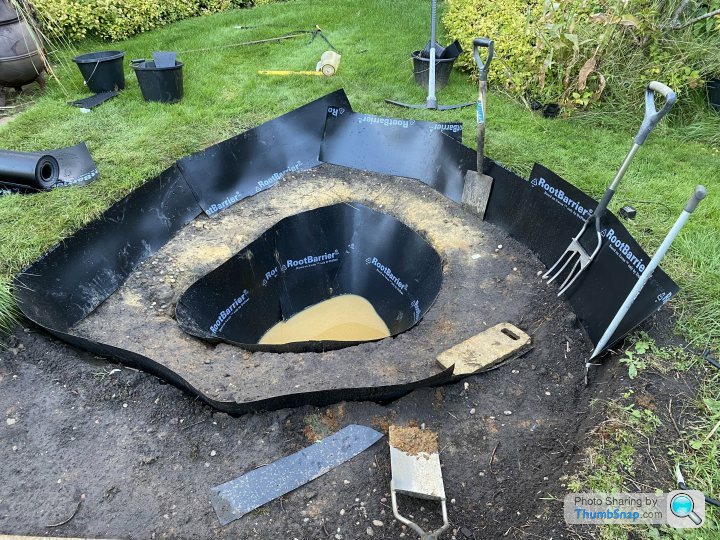
First section of root barrier fitted. I know you’re supposed to fold the ends over themselves, but frankly getting it to fit at all is hard enough!
The special tape is not what I expected: it’s a one-inch strip of very sticky gum with a backing paper. It’s definitely a one-shot job: once it’s stuck, it’s stuck.
The bottom is like quicksand. I can totally see how people get stuck and need rescuing by the RNLI!
The special tape is not what I expected: it’s a one-inch strip of very sticky gum with a backing paper. It’s definitely a one-shot job: once it’s stuck, it’s stuck.
The bottom is like quicksand. I can totally see how people get stuck and need rescuing by the RNLI!
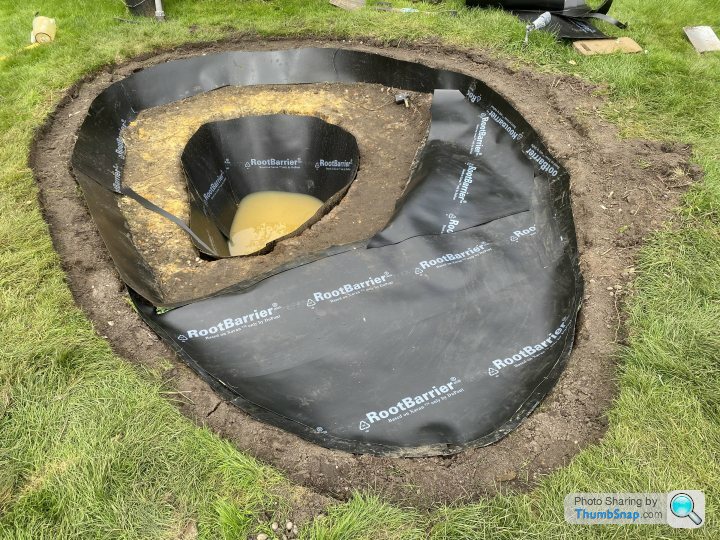
Fairly pleased with today’s progress.
I got some of the vertical walls done before rain stopped play: a couple of +SHRA TSGS came through, so work definitely had to stop!
(It didn’t stop several Farnborough arrivals from ploughing on through the thunderstorms regardless. I know they’ve got weather radar, but they’ve also got much bigger balls than me!)
There’s some trimming to do, but here’s how it looks at the moment…
Edited by Dr Mike Oxgreen on Saturday 26th August 20:02
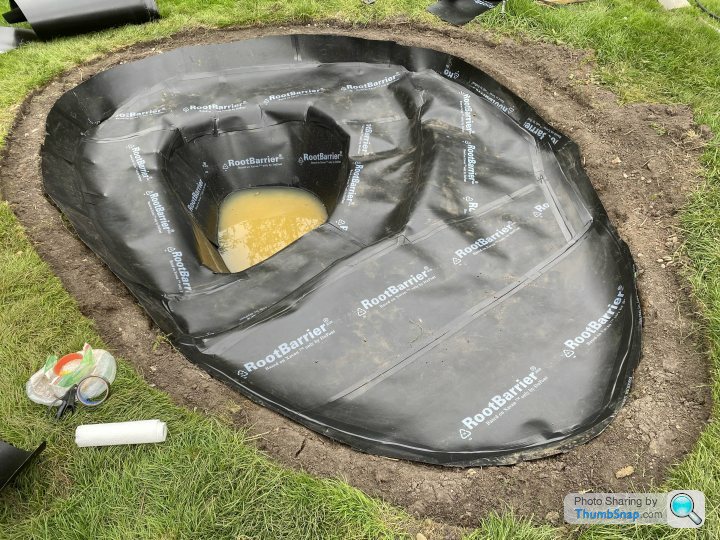
Phew! Finished the root barrier underlay!
Inevitably there’s a slight gap between the sides of the root barrier and the surrounding soil, so I think I’ve decided to fill that gap using a 3:1 dry mortar mix of builders sand and cement. I’ll also apply a layer over the strip of bare soil around the edge (which will be covered by liner, and then by pebbles).
I think a bit of dry mortar will firm everything up in preparation for installation of the liner.
The muddy water at the bottom is from the heavy rain yesterday. I’m very tempted to bail it out, then throw some cement in followed by some builders sand.
Here’s how it looks now:
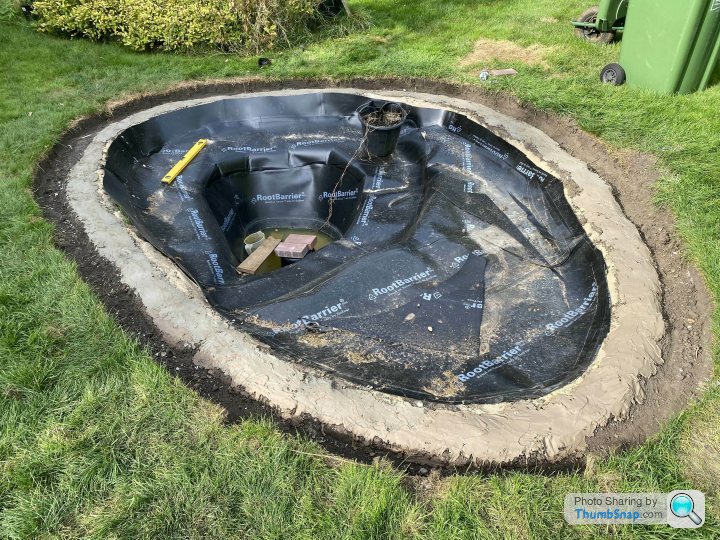
There hasn’t been much progress for a couple of weeks, as work has been busy and Mrs Oxgreen and I spent a long weekend in Wensleydale.
Today I’ve finished the ground works, having dug a small trench around the perimeter, into which the edging blocks will be mortared with the liner tucked underneath. I’ve also coated the exposed soil with a sloppy mortar mix in an attempt to bind it into a more resilient surface.
I’m slightly worried about manoeuvring the liner into place. The package says it’s 45 kg and I haven’t yet attempted to move it from where the delivery guy put it.
Anyway, here’s what it currently looks like…
Edited by Dr Mike Oxgreen on Saturday 16th September 15:37
Work has been busy the last few weeks, so there’s been no progress. But I have this week off and intend to try and finish the job.
Today, the butyl liner is more-or-less in, with the deepest middle section filled. This took 326 litres according to the water meter.
I have put the reed mace (Typha shuttleworthii, if I remember correctly) from the old pond back in. It lives in a bucket, so I’ve been trying to keep its bucket topped up with water. I hope it will recover - it looks a bit sorry for itself at the moment!
There’s a layer of washed stones in the bottom, and I’ve siliconed a row of pebbles around the rim of the deep section. These will hopefully prevent the stones (which I’ll add tomorrow) from tipping over the edge and all ending up in the deep section.
Tomorrow, once the silicone has gone off, I’ll continue filling up to the next level and gather up the creases in the liner further up.
Edited by Dr Mike Oxgreen on Sunday 1st October 15:48
alfabeat said:
I want a pond and have a grand plan, involving a series of waterfalls, linking an upper and a lower pond with the water being recirculated.
The tricky thing about waterfalls and streams is keeping all the water contained, otherwise it’ll find a way to escape and you’ll be forever topping it up.I plan to have a pump, which will simply take water from a deeper section of the pond and it’ll outflow into the shallow section at the “top” of the pond. This will ensure that the shallow part will always have water flowing through it, even if the overall pond level drops due to evaporation and transpiration.
I’m also toying with the idea of having a float valve for topping up. I’m not sure I’d trust it not to fail in the open position and waste loads of water, so I’d probably run it off a clockwork water timer and give it two hours of water whenever I feel the pond needs a top-up, so either the float valve will reach the desired level and shut off, or the water will stop after a certain time anyway.
If you’re planning a waterfall you’ll definitely get more evaporation, so I’d consider a float valve to automate your top-ups.
Lots of progress today! 
I tidied up the rest of the liner, and did a trim of the gross excess, leaving about 8” spare.
I siliconed a line of pebbles around the edge of the shallow section (to the right in the picture below) and gave it a lining of decorative stones.
I decided that I needed some stepping stones to provide access to the middle of the pond for maintenance, and B&Q had some quite nice ones that look fairly convincingly like sections of tree trunk, but they’re concrete. They have convincing rings, splits, and even little woodworm holes. I’ve put these onto the liner without any stones underneath them (to reduce the risk of puncturing the liner), and used some of the underlay material that the liner was wrapped in when it was delivered to provide further cushioning.
One thing I’ve learnt today: “A watched pond never fills!”
So far I’ve put about 1300 litres in, including about 500 litres of rainwater. The latter was a bit murky, so you can’t see the bottom at the moment but it’ll clear, hopefully. And I figure that a bit of organic filth is no bad thing.
Edited by Dr Mike Oxgreen on Monday 2nd October 16:13
alfabeat said:
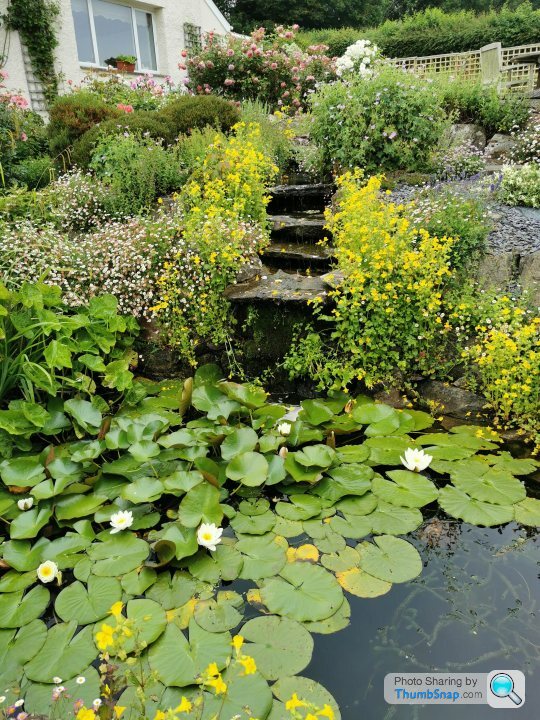
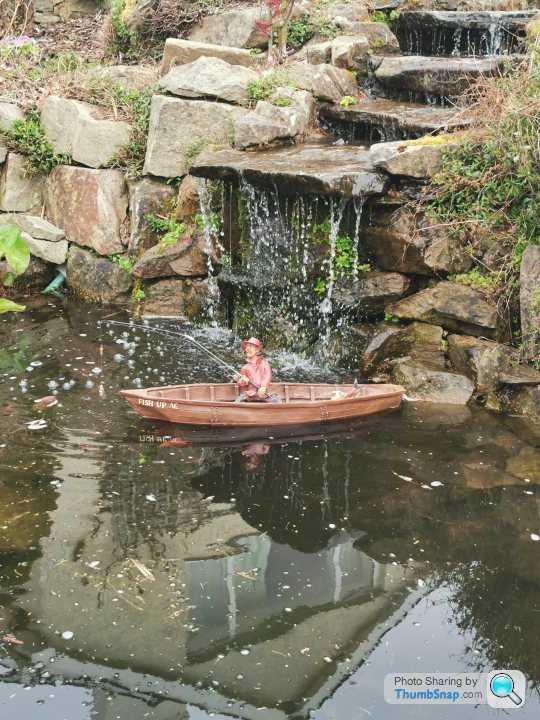
Looking great! My parents have a waterfall pond, which doesn't seem to require too much filling up (maybe because it is always raining here on the Welsh border!)
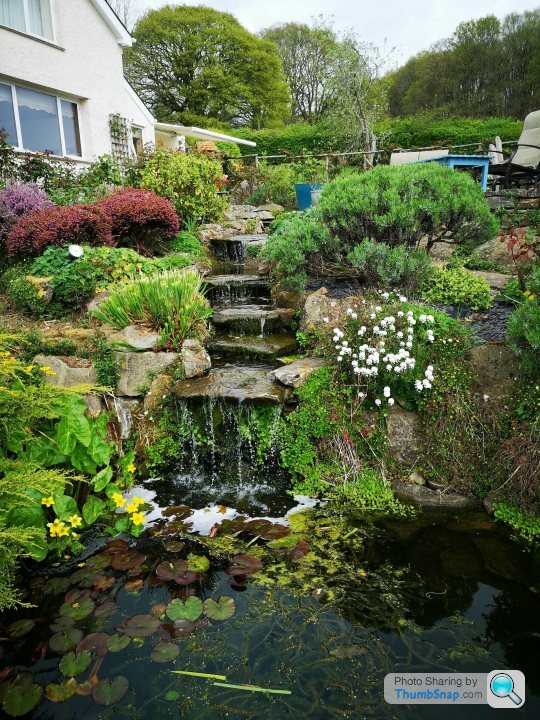
That is stunning!Did they build it themselves? If so, you really need to pick their brains about how they did that waterfall, in particular how they did the sides of it to prevent water escaping.
Gassing Station | Homes, Gardens and DIY | Top of Page | What's New | My Stuff