Tampolli SR2/LMP675 Full Ground Up Rebuild In Pictures
Discussion


bulldong said:
That is f king awesome.
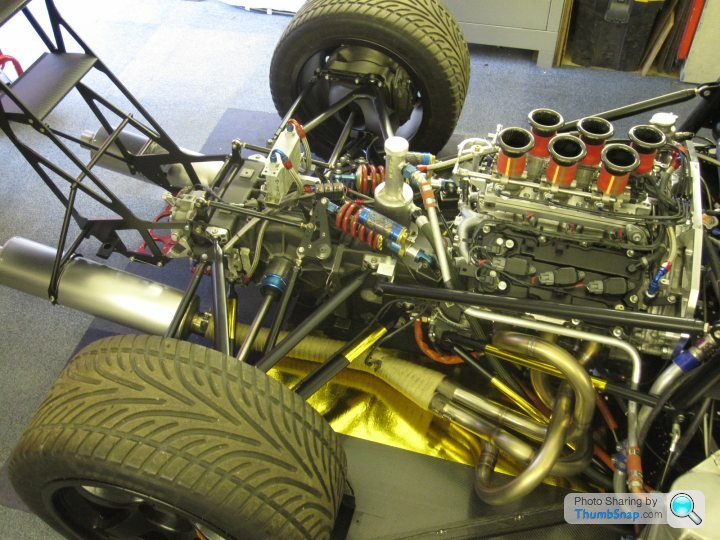
This. It is a thing of great beauty, and lovely engineering.king awesome.However, and I know I'm being a bit thick, but how does the front suspension work?
I've looked at the photo's for ages, zoomed in as far as I can, but there must be another pivot point that I'm missing.
On the brackety-thing (technical term that none engineers may not be familiar with!) there's a pivot point where the lower push-rod joins it, a large pivot point where the brackety-thing joins the chassis, so that up/down movement from the push-rod, rotates the brackety-thing to push/pull on the spring/shock - all good, I'm very happy with that.
But wait! There's another rod running from the bulkhead to the top of the brackety-thing, preventing it from rotating as a result of up/down movement from the push-rod, to push/pull on the spring/shock.
What is this sorcery?
Craig.
cravir said:
But wait! There's another rod running from the bulkhead to the top of the brackety-thing, preventing it from rotating as a result of up/down movement from the push-rod, to push/pull on the spring/shock.
What is this sorcery?
Craig.
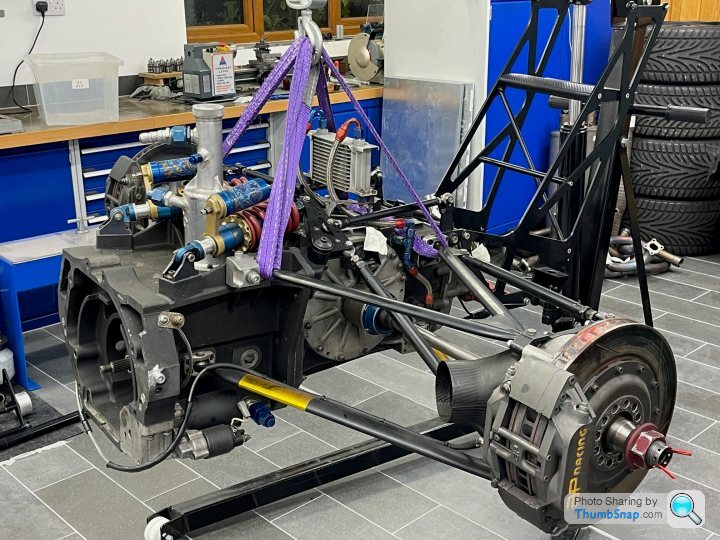
that other bar located at the bulkhead will be an "anti roll bar" or "torsion Bar" or "sway bar" depending on what nationality you are. it will be free to rotate. when both wheel move together when the chassis is going straight up and down this bar just gets rotated forward and backwards and does nothing. when the car rolls on its suspension, one bell crank will move to push the bar, the other will move to pull the bar, and the bar will get twisted preventing the car from rolling over on its suspension. same function as any other sway bar that connects directly to the wishbones/control arms on any other car.What is this sorcery?
Craig.
the rear one is visable at the back of the gear box as well
Frustration
The car had two outings in 2015 and has not been run on track at all in 2016. So sits in professinoal storage.
As such we made a concerted effort to sell her, placing here on all the usual motor sport websites etc
Have been surprised at the level of interest, being quite low.
Someone is going to get a bargain....
hay ho, time to move on
BornAgainGT said:
Frustration
The car had two outings in 2015 and has not been run on track at all in 2016. So sits in professinoal storage.
As such we made a concerted effort to sell her, placing here on all the usual motor sport websites etc
Have been surprised at the level of interest, being quite low.
Someone is going to get a bargain....
hay ho, time to move on
Have you thought about contacting florent moulin? He has a lot to do with the 90s endurance legends and has several car...may be interested?...check out Facebook The car had two outings in 2015 and has not been run on track at all in 2016. So sits in professinoal storage.
As such we made a concerted effort to sell her, placing here on all the usual motor sport websites etc
Have been surprised at the level of interest, being quite low.
Someone is going to get a bargain....
hay ho, time to move on
- * New Project ***
What better than a refresh of the Tampolli - after all it has been in storage for 5 years...
There are some items that need resolving;
Wing mirrors vibrate terrible
Update ECU for proper VVT control
Rear wing supports flex
Dash screen out of eyeline
Downshifting not consistent between 6th/5th
Loom needs an overhaul
And the fluids, tyres, belts, extinguisher etc all need updates
To make it interesting I decided to build a new engine, a TT engine
This time rethinking how the engine mounts to the chassis
Re-engineering the water system as I was never happy with it
Re-packaging the ancillaries to cater for the TT motor
My goal is to keep the original NA engine thus keeping the car correct for the period
But also to have a TT engine for improved performance
I want to engineer the solution in such a way as the engines are interchangeable and able to share the ancillaries, loom etc
We are now developing new parts in Fusion and using 3d printing for prototyping before committing to CNC
With the idea of making parts available to the wider community over time to recoup some of the costs
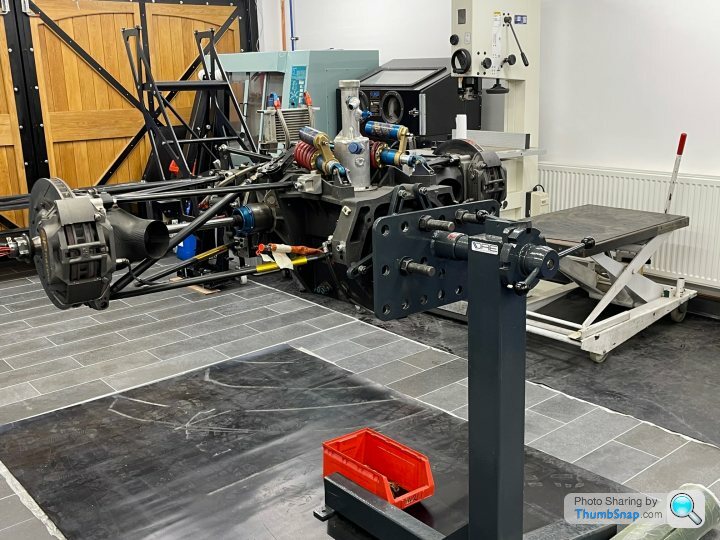
Lets start with some images of the Tampolli arriving in the workshop from storage
 [url]
[url] |https://thumbsnap.com/Qj1DAKij[/url][url]
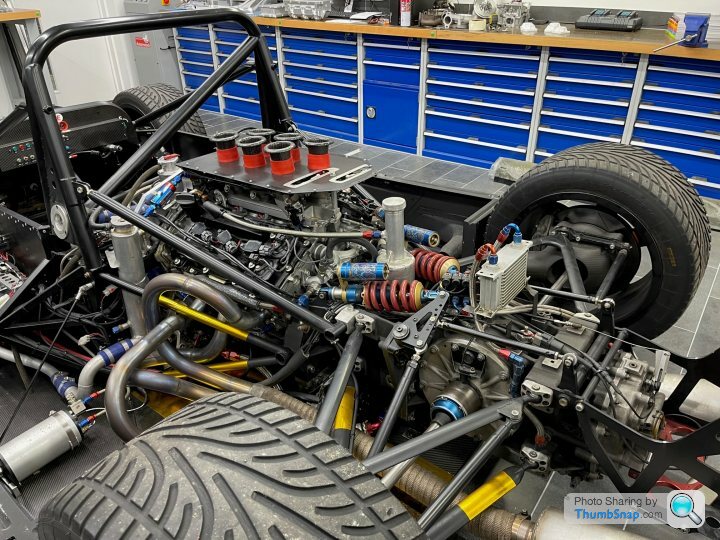 |https://thumbsnap.com/pKHapbRe[/url][url]
 |https://thumbsnap.com/5gwzn3eE[/url]
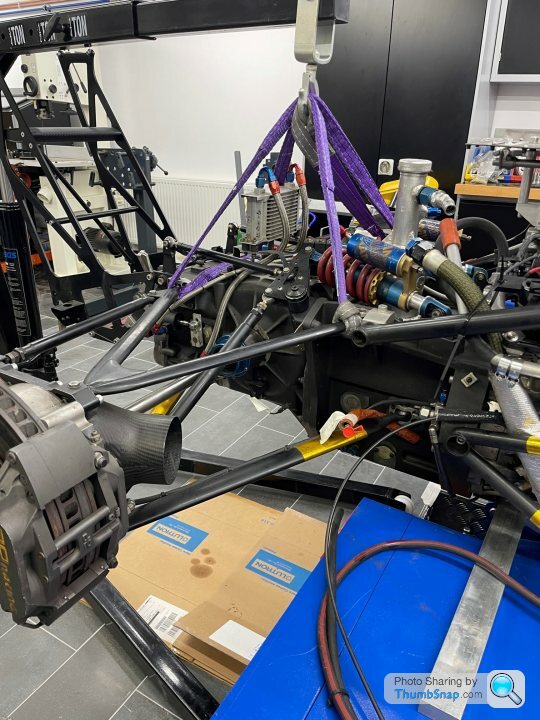
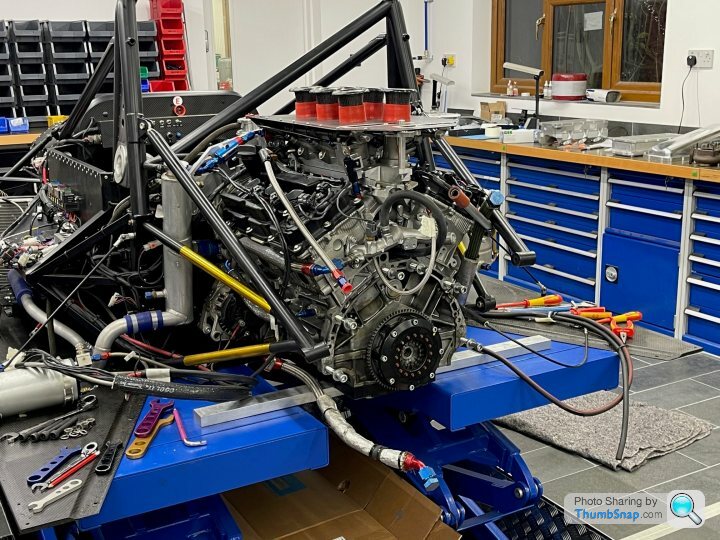
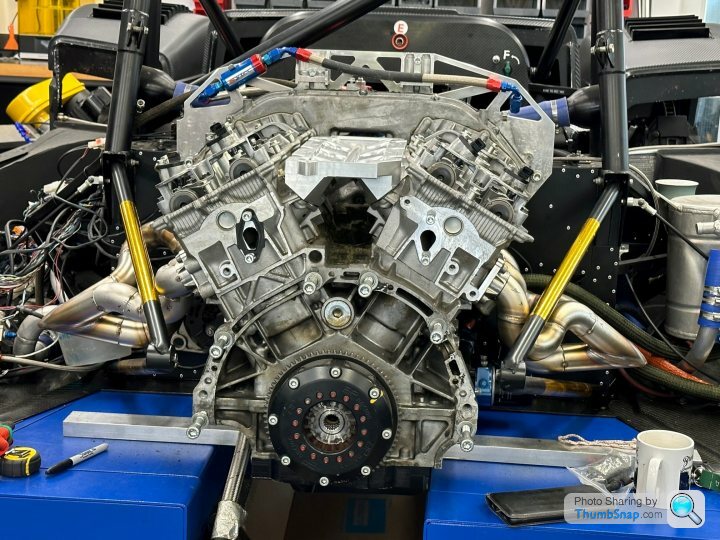
Let's start with short engine
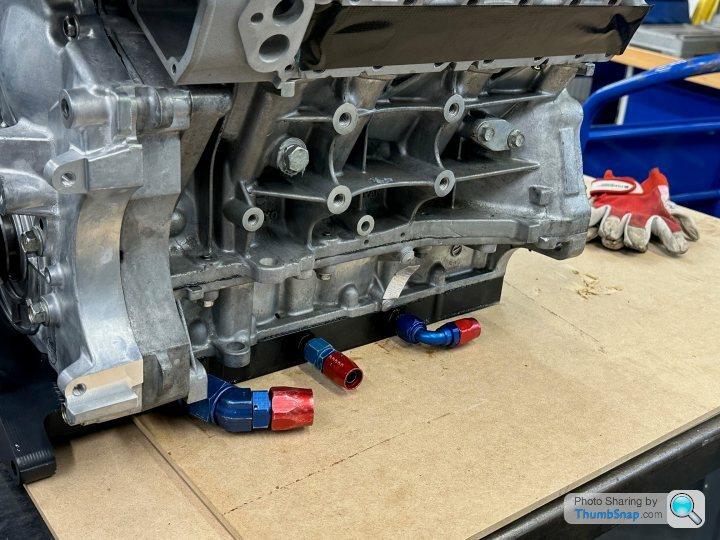
In the previous build we had been very pleased with the quality of the dry sump in particular the custom modifications we had made to incorporate the lower chassis pick up, as the engine is solidly mounted to the chassis. See below original dry sump and the new dry sump during machine cycles.
Internally we are using NISMO pressure pump and externally a multi stage scavenge.
Over the last few years I got to know a well know engine builder who was supplying WSC / endurance teams with VQ based race engines.
Through this connection I have managed to source a GT4 crank and pistons
Also over the same period I have been working with a US machine shop to develop some bespoke versions of parts for my needs.
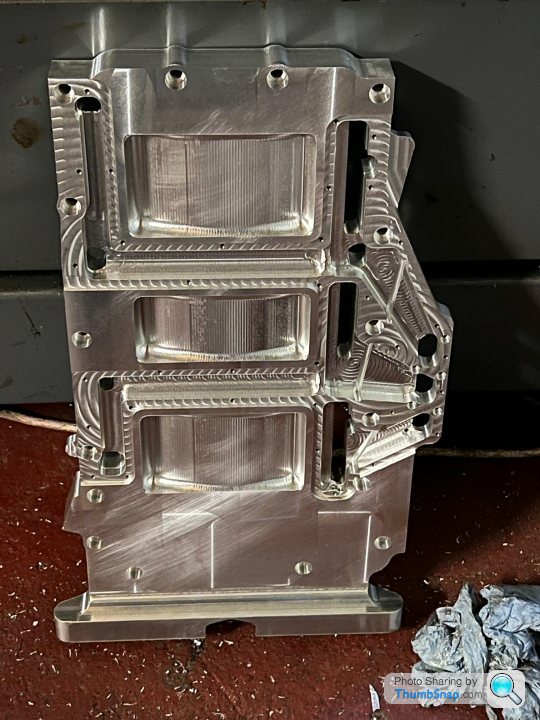
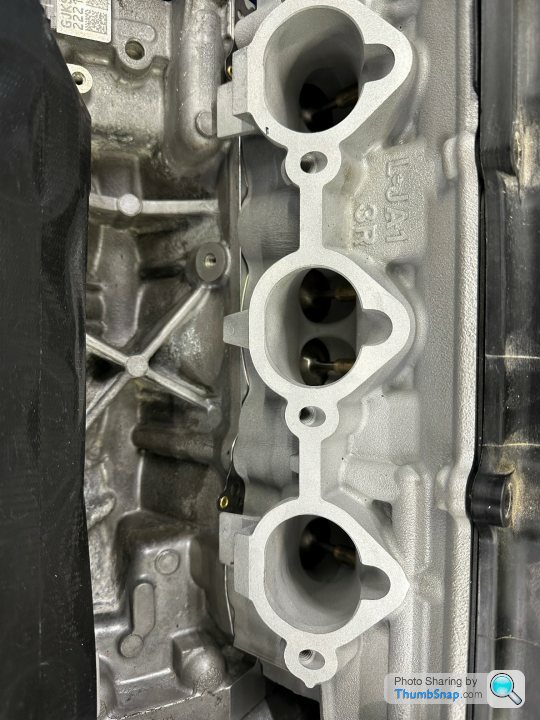
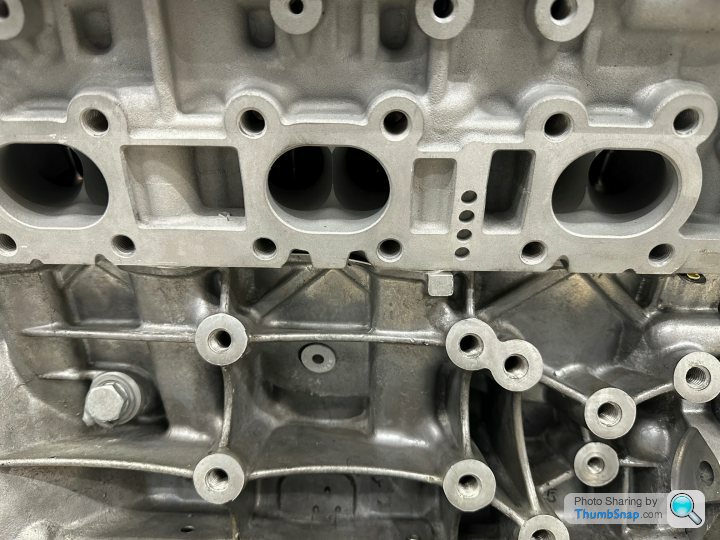
Starting with block we decided to close the deck.
Below are images of the deck inserts and completed block post machining in its delivery crate.

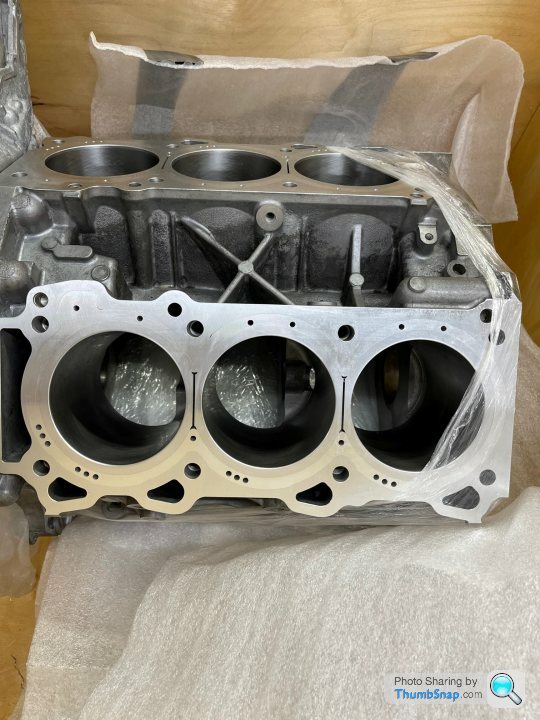
Bespoke Carrillo rods where ordered to meet the required compression ratio.
In the previous build we had been very pleased with the quality of the dry sump in particular the custom modifications we had made to incorporate the lower chassis pick up, as the engine is solidly mounted to the chassis. See below original dry sump and the new dry sump during machine cycles.
Internally we are using NISMO pressure pump and externally a multi stage scavenge.
Over the last few years I got to know a well know engine builder who was supplying WSC / endurance teams with VQ based race engines.
Through this connection I have managed to source a GT4 crank and pistons
Also over the same period I have been working with a US machine shop to develop some bespoke versions of parts for my needs.
Starting with block we decided to close the deck.
Below are images of the deck inserts and completed block post machining in its delivery crate.
Bespoke Carrillo rods where ordered to meet the required compression ratio.
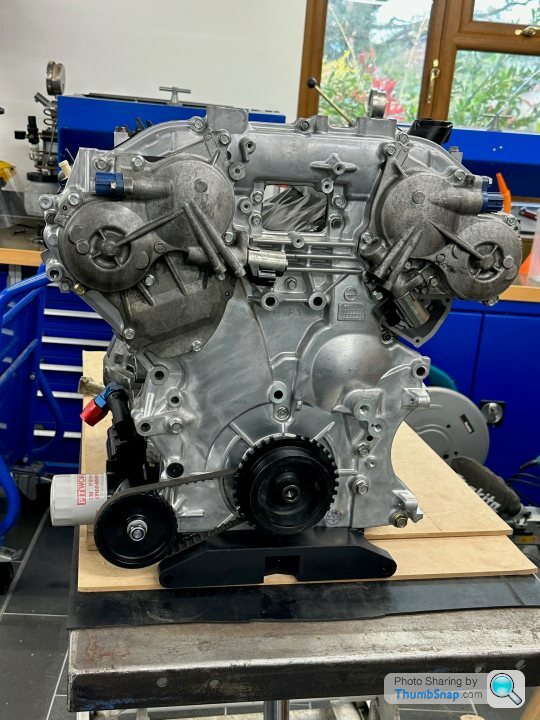
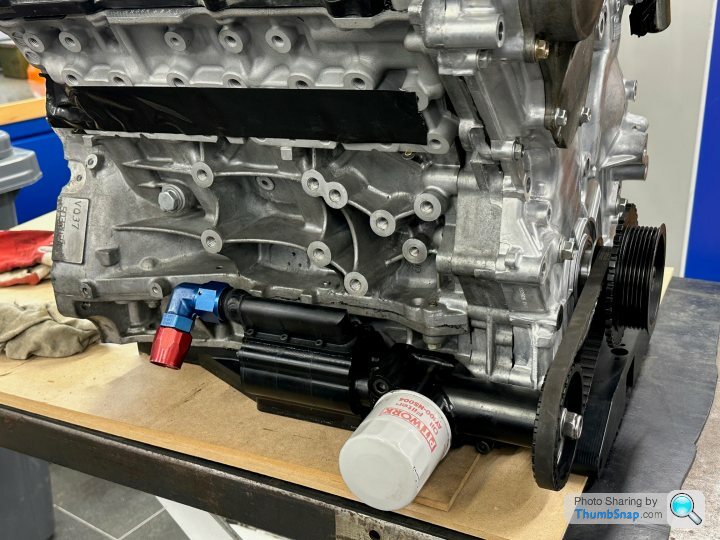

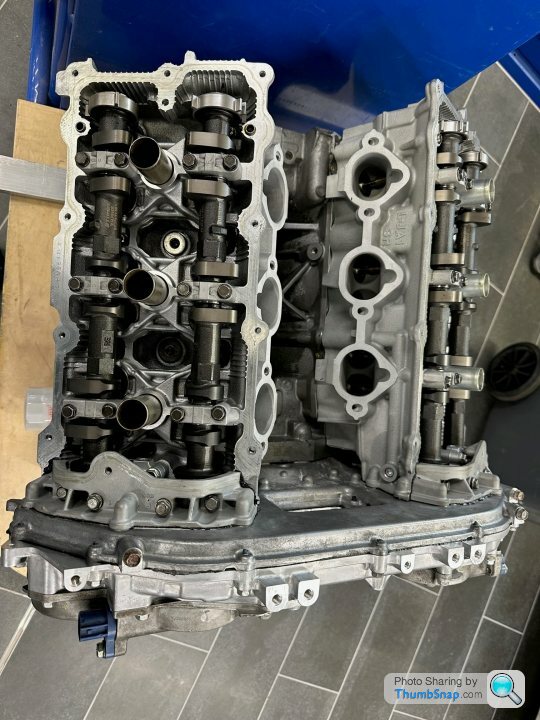
New engine will now be mounted on engine stand for completion as there is a fair bit more fabrication required.
Including new front mounting brace that picks up custom valve covers - see below.
Fusion 360 - such a great tool.
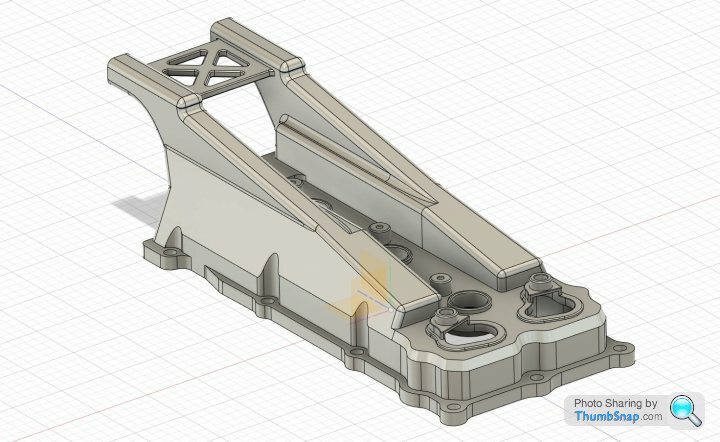
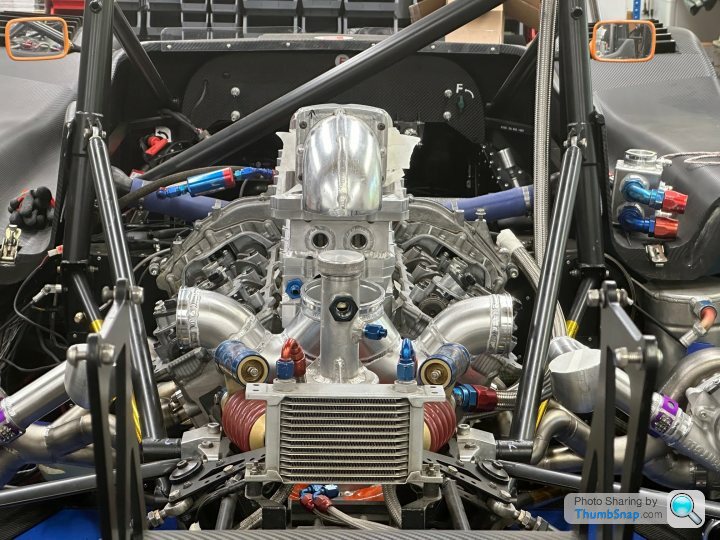
Also custom intake manifold with intercooler mounted in the engine V.
More on this later.
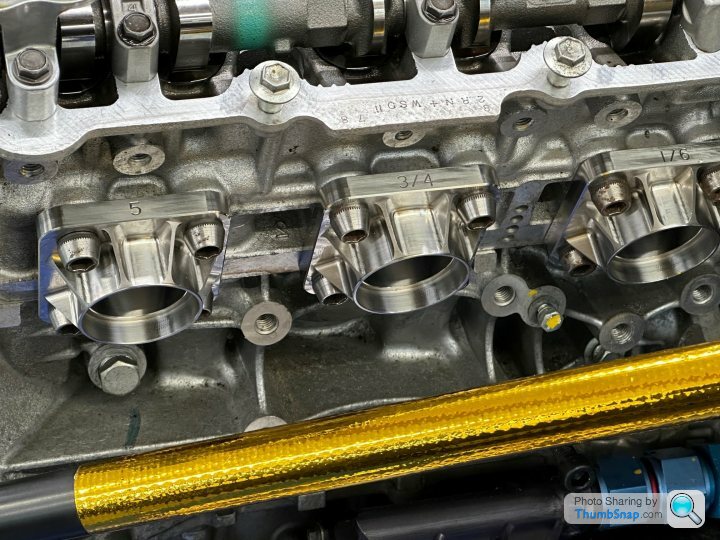
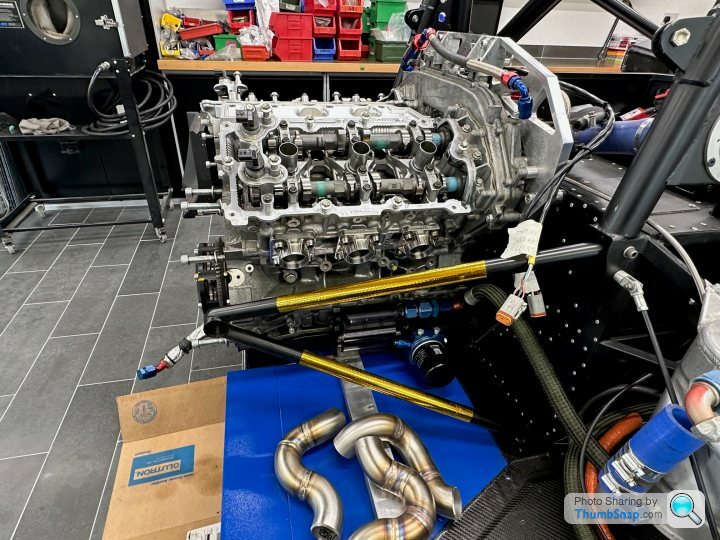
Attention has turned back to packaging the exhaust and turbo hot side using the original engine still in the chassis for mock up purposes.
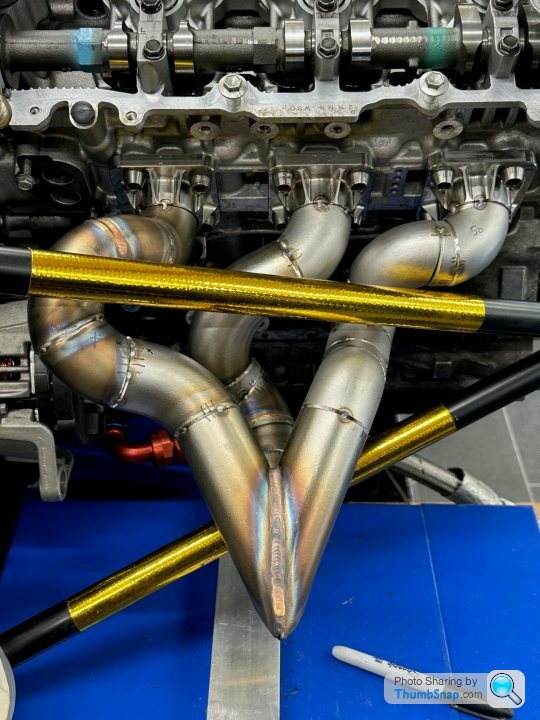
I have developed exhaust flanges that perfectly match the ported profile of the heads transitioning from oval to round, each with a step to seat the primary, they are also ribbed for added strength and use 4 bolts for a uniform seal. Machined from 347 stainless.
With the exhaust flanges in place, we were able mock up the equal length primaries.constructed from 347 stainless with a 2.5mm wall. Had nightmares getting the material - had to come from Australia.


I have gone down the Garrett G series route using a pair of G30-660 .83 A/R and Turbosmart straightgates the boost control will be via a four port valve driven from the ECU. I wanted to package the exhaust and waste gate tightly and exit the side of the body in front of the rear wheels as per the Group C example below.

Many thanks to IWS developments
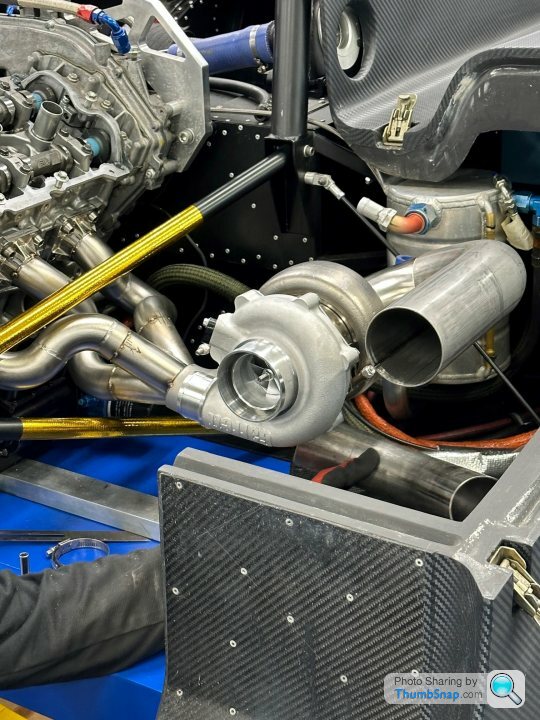
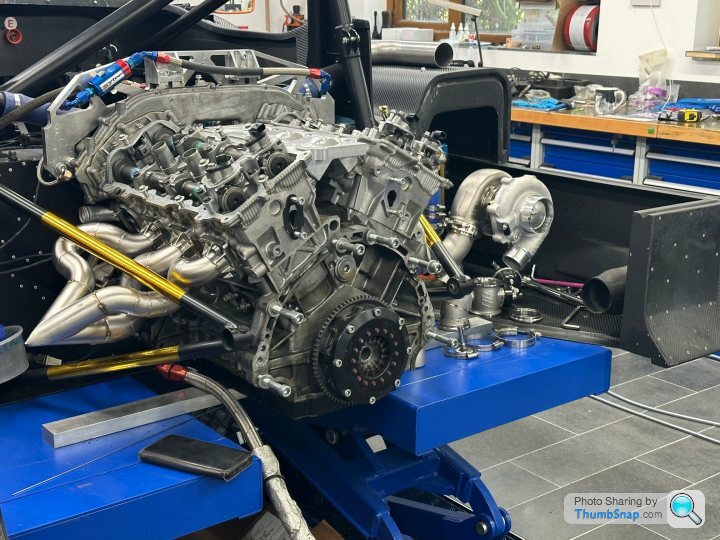
Bank one now mocked up on the hot side, once bank two is mocked up, the transaxle will be re-attached before the mock of cold side begins.
There are many constraints that need to be taken into consideration.
On completion the headers, turbine and exhaust will be cladded in heat shielding.
That's it for now
Including new front mounting brace that picks up custom valve covers - see below.
Fusion 360 - such a great tool.
Also custom intake manifold with intercooler mounted in the engine V.
Attention has turned back to packaging the exhaust and turbo hot side using the original engine still in the chassis for mock up purposes.
I have developed exhaust flanges that perfectly match the ported profile of the heads transitioning from oval to round, each with a step to seat the primary, they are also ribbed for added strength and use 4 bolts for a uniform seal. Machined from 347 stainless.
With the exhaust flanges in place, we were able mock up the equal length primaries.constructed from 347 stainless with a 2.5mm wall. Had nightmares getting the material - had to come from Australia.
I have gone down the Garrett G series route using a pair of G30-660 .83 A/R and Turbosmart straightgates the boost control will be via a four port valve driven from the ECU. I wanted to package the exhaust and waste gate tightly and exit the side of the body in front of the rear wheels as per the Group C example below.
Many thanks to IWS developments
Bank one now mocked up on the hot side, once bank two is mocked up, the transaxle will be re-attached before the mock of cold side begins.
There are many constraints that need to be taken into consideration.
On completion the headers, turbine and exhaust will be cladded in heat shielding.
That's it for now
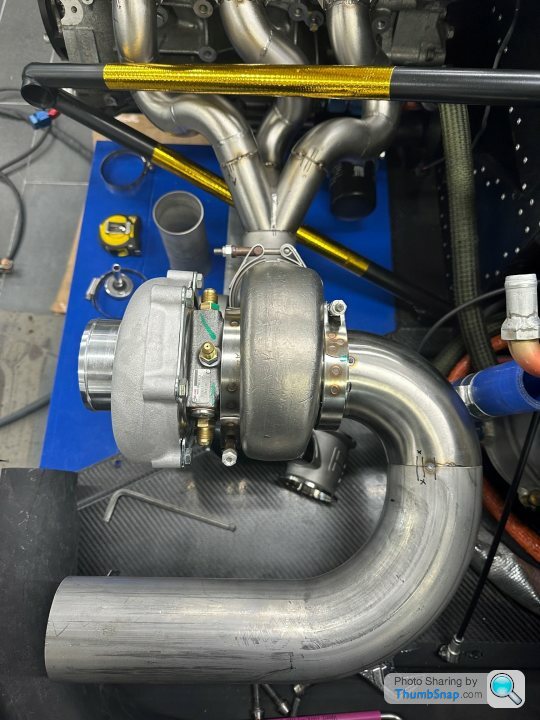
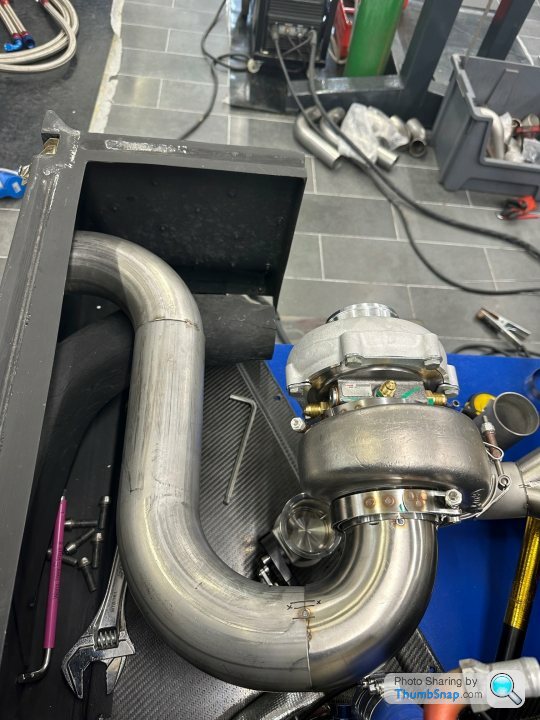
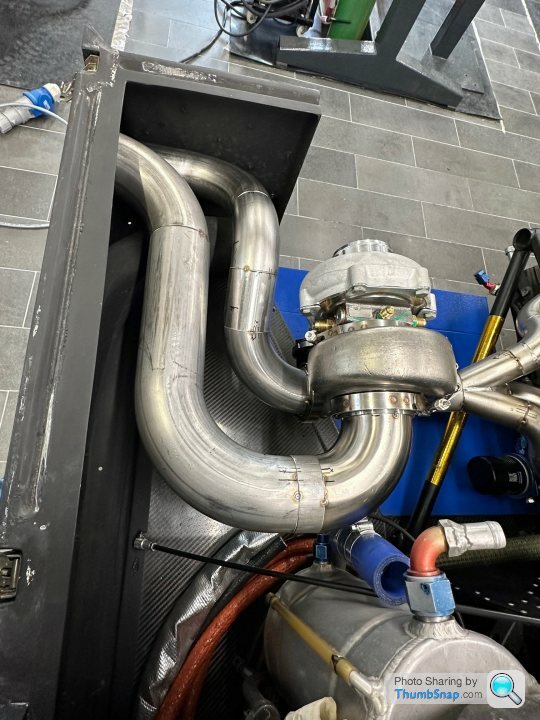
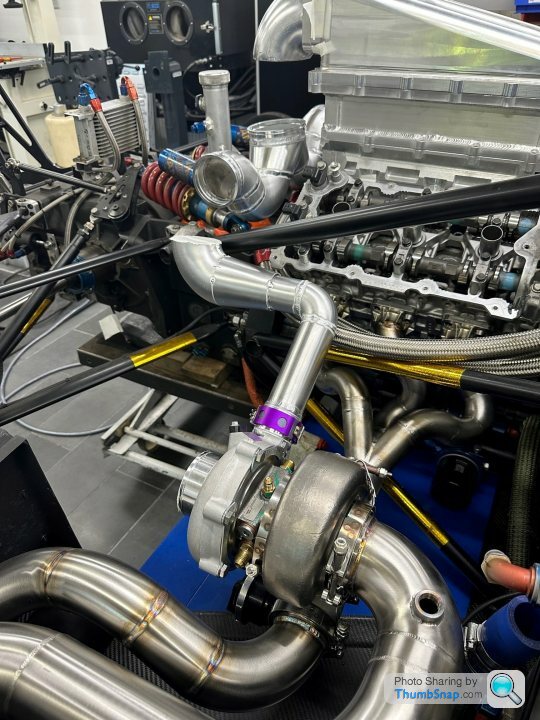
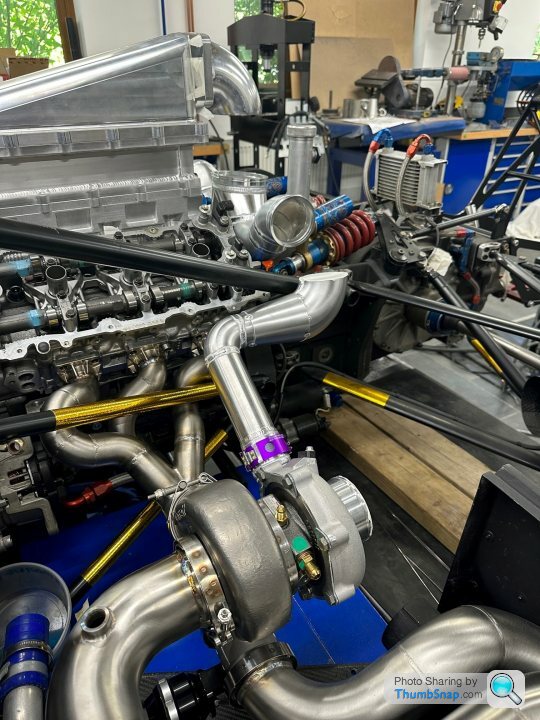
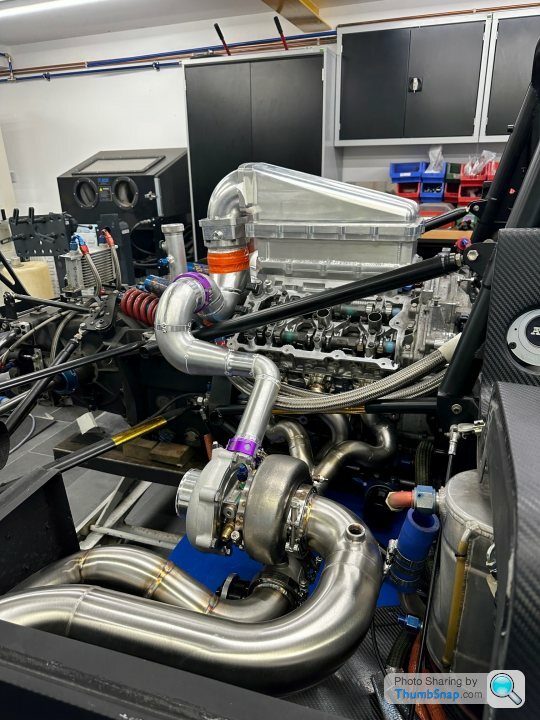
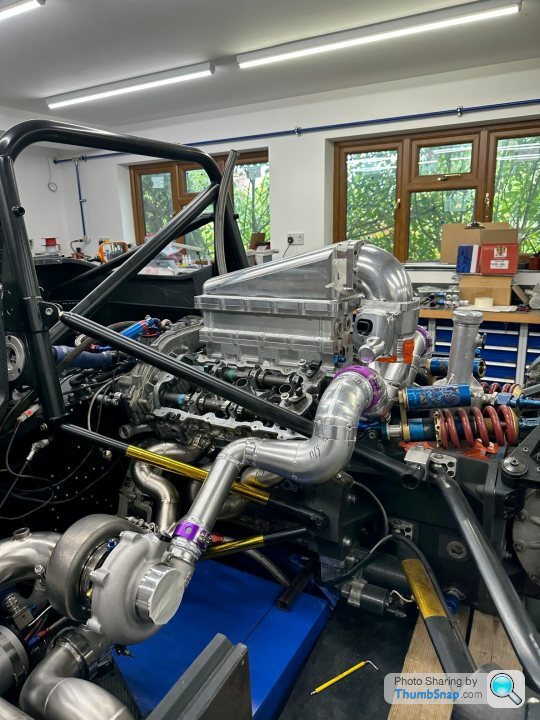
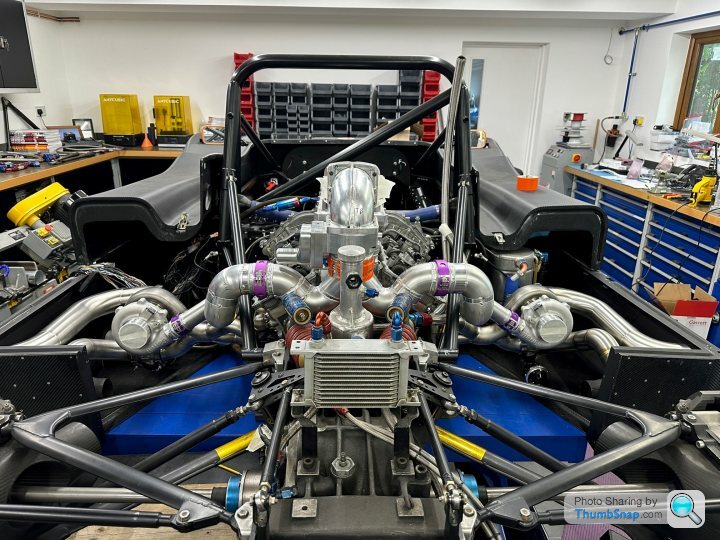
So made a bit of progress on the packaging of the turbo solution.
The hot side is pretty much done, couple of final welds to do, before sending off for shielding to be applied.
Cold side is coming along, had to machine a couple of flanges for the intake interface and throttle body interface and use a donut to get the tight radius required to flip the DBW throttle body 90 degrees. A lot of fabrication needed to bring the two banks together into the single throttle body. All will be removable using Wiggins couplers at the turbos, merge point and throttle body. Once I am happy with the cold side we will do final welds.
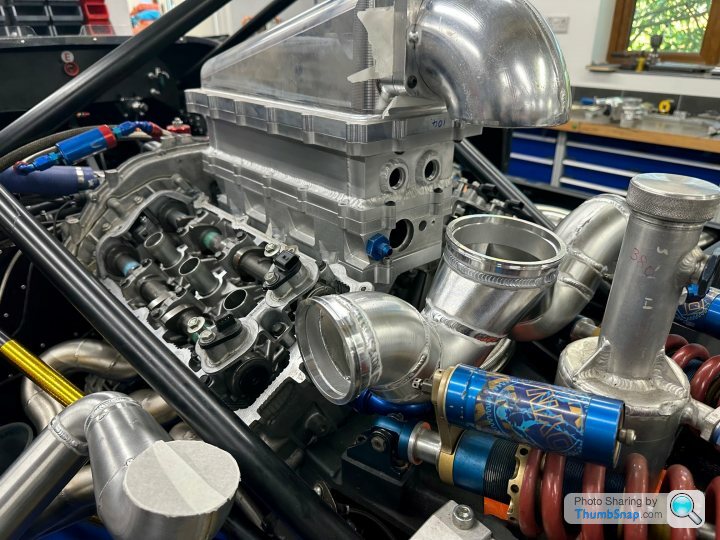
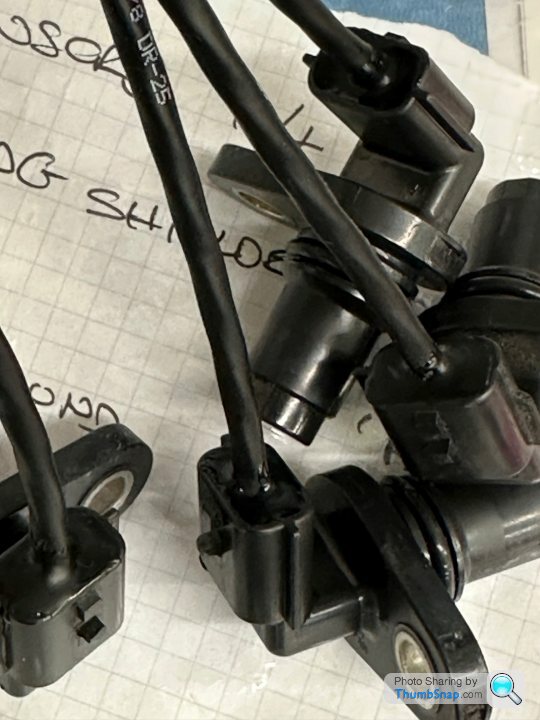
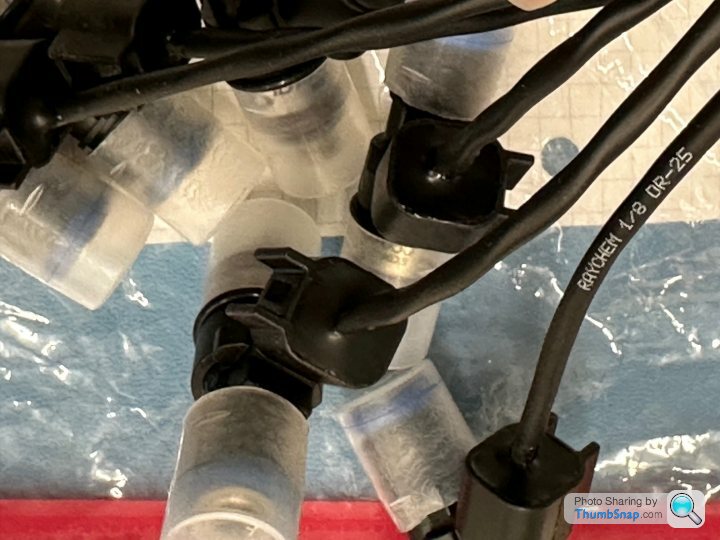
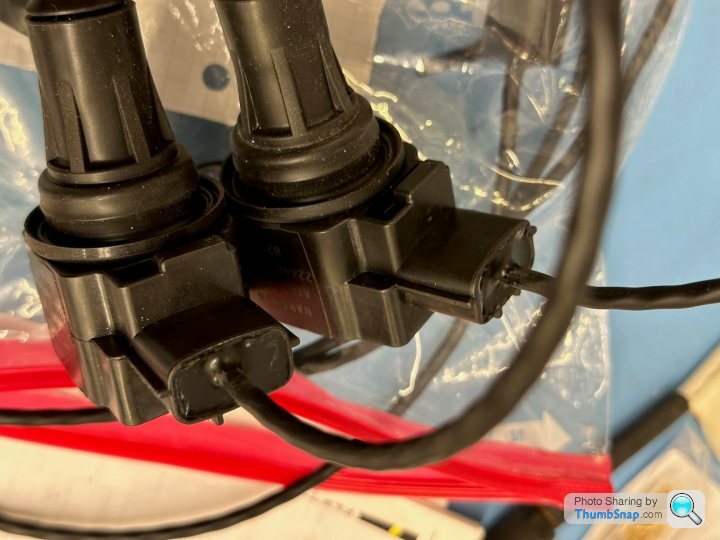
Also been working on wiring loom, in terms of the engine sensors, i.e. potting them and converting over to Deutsch AS connectors. Boots still to be applied.
I am waiting for the revised valve covers to come back from machine shop, as they are needed to confirm pick up points on revised eagle brace. Which also supports revised cooling solution.
Will then build up new motor on stand as engine currently in car is for mocking up purposes only.
Hopefully will start to come together soon.
The hot side is pretty much done, couple of final welds to do, before sending off for shielding to be applied.
Cold side is coming along, had to machine a couple of flanges for the intake interface and throttle body interface and use a donut to get the tight radius required to flip the DBW throttle body 90 degrees. A lot of fabrication needed to bring the two banks together into the single throttle body. All will be removable using Wiggins couplers at the turbos, merge point and throttle body. Once I am happy with the cold side we will do final welds.
Also been working on wiring loom, in terms of the engine sensors, i.e. potting them and converting over to Deutsch AS connectors. Boots still to be applied.
I am waiting for the revised valve covers to come back from machine shop, as they are needed to confirm pick up points on revised eagle brace. Which also supports revised cooling solution.
Will then build up new motor on stand as engine currently in car is for mocking up purposes only.
Hopefully will start to come together soon.
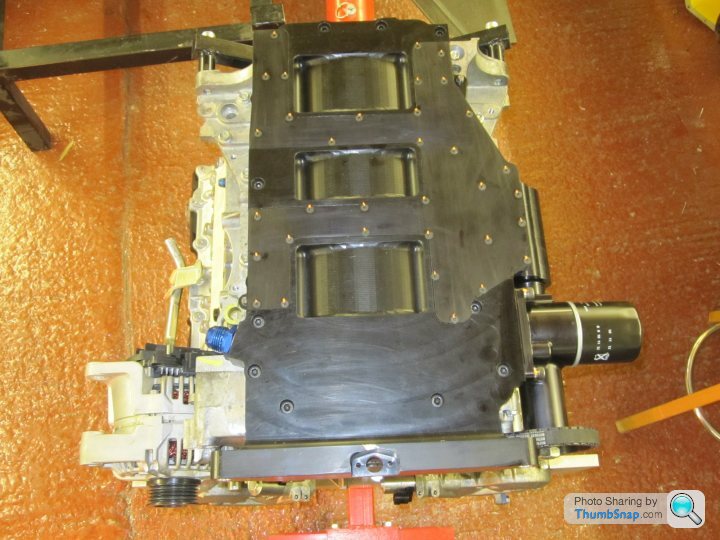
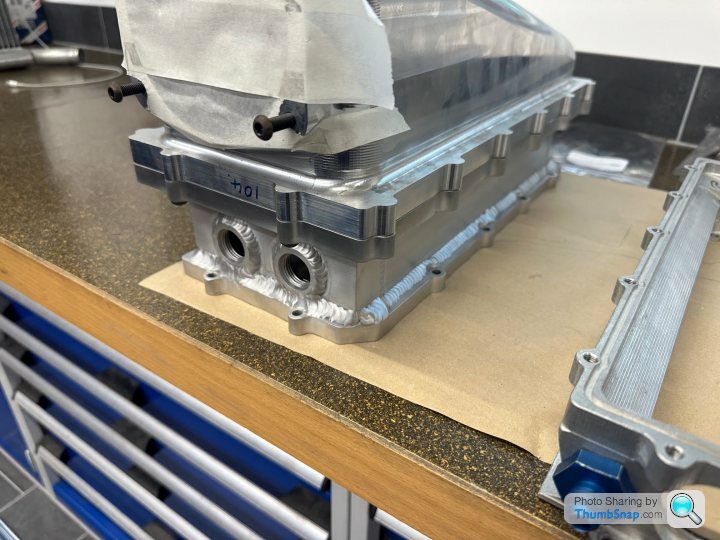
That's correct, there is a water/air intercooler sitting between the upper intake/throttle body and the lower intake manifold.
See below picture of the upper intake body and intercooler standing on the worktop.
First image shows the -10 water inlet/outlets.
Second image showing underside, in which you can see the intercooler core.
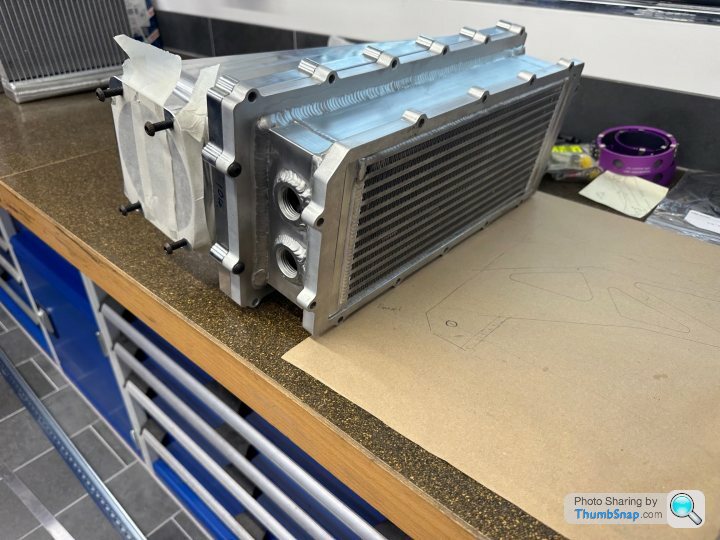
There will be two radiators, one either side and a pump circulating as a closed loop for the intercooler, we will track the intercooler water temp as well as the air temp. I will update with some pictures when this is done.
See below picture of the upper intake body and intercooler standing on the worktop.
First image shows the -10 water inlet/outlets.
Second image showing underside, in which you can see the intercooler core.
There will be two radiators, one either side and a pump circulating as a closed loop for the intercooler, we will track the intercooler water temp as well as the air temp. I will update with some pictures when this is done.
Now the basic packaging has been sorted we can visualise how we are going to control the air.
In terms of getting enough air and what surface to pull it from for the cold side of the turbo.
Also need to plan for air to feed the intercooler rads.
And air for the rear brake ducts.
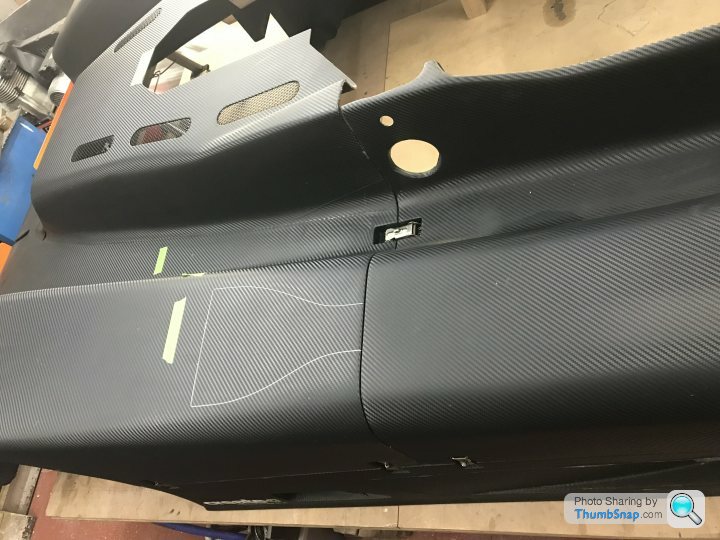
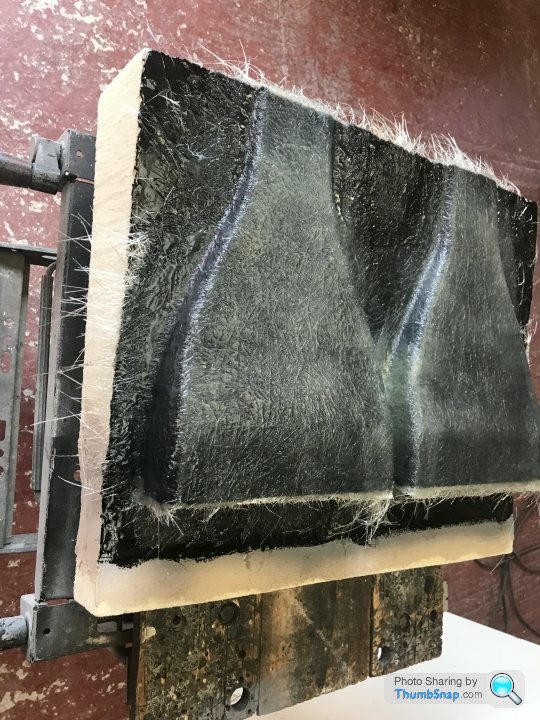
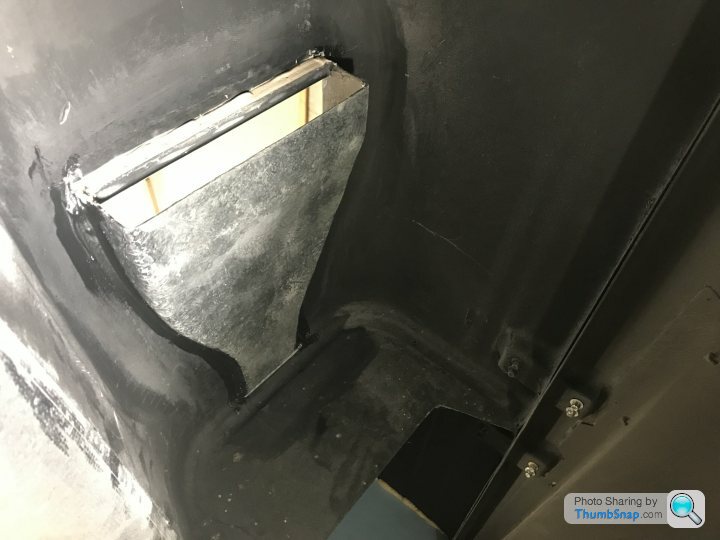
Starting with the cold side of the turbo, we decided to take the air from the top surface of the rear clam.
Necessitating the creation of a new NACA duct.
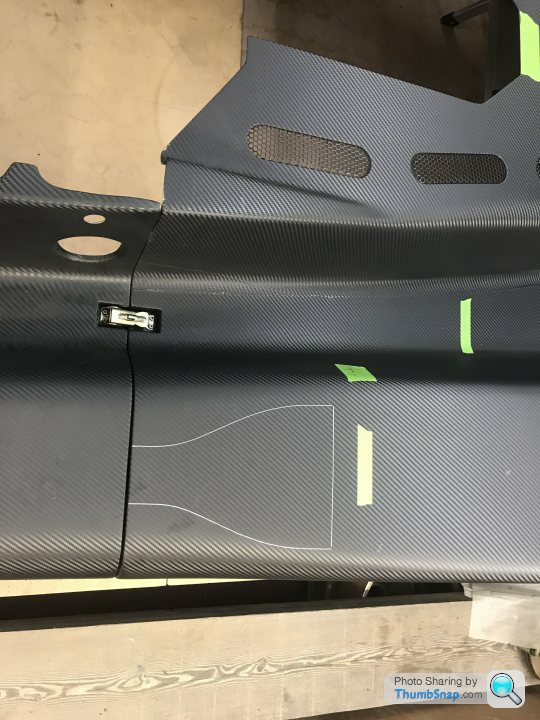
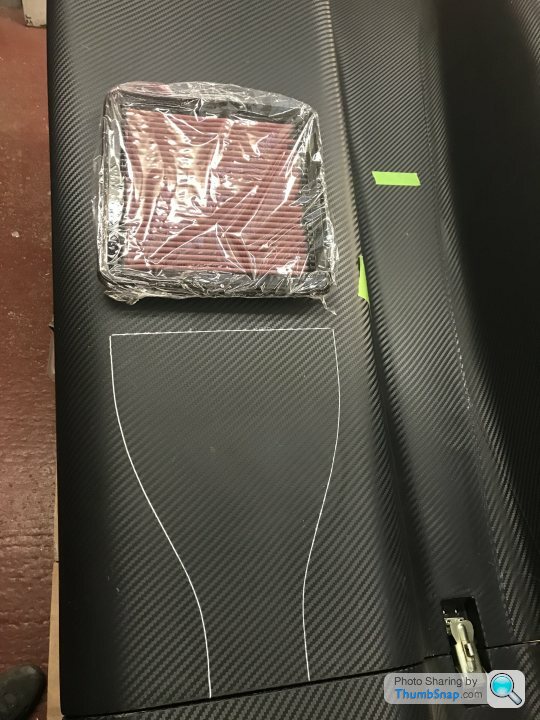
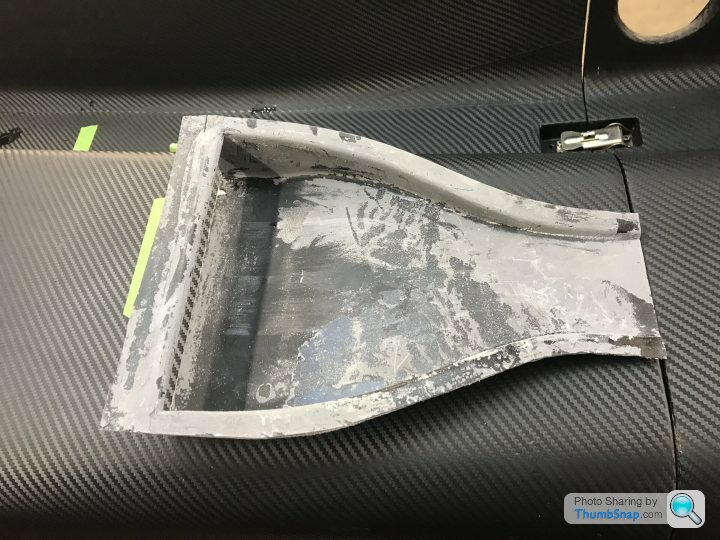
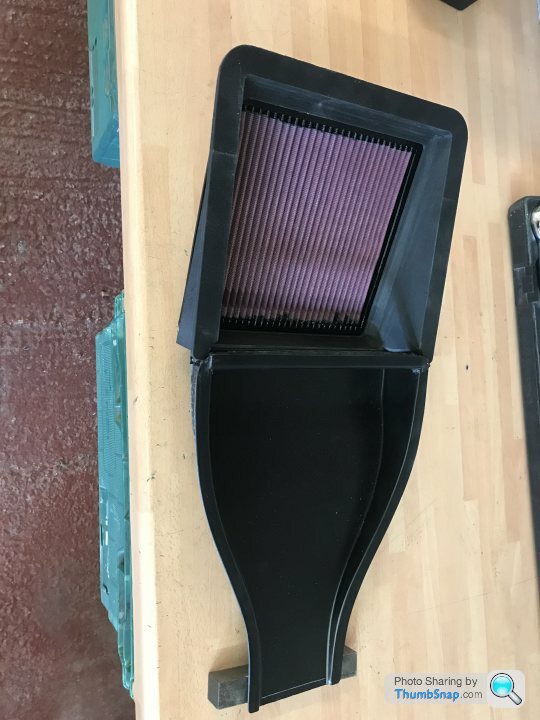
The duct will feed an air box mounted into the rear claim with a 45 degree mounted panel filter.
The air box will be in two halves with a seal, allowing the panel filter to be serviced, a small drain will deal with any water.
The turbo will be fed from the air box with a 3" tube.
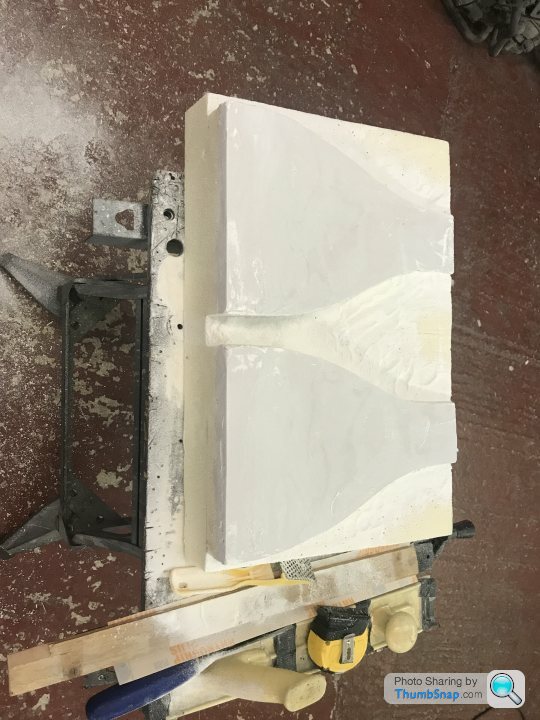
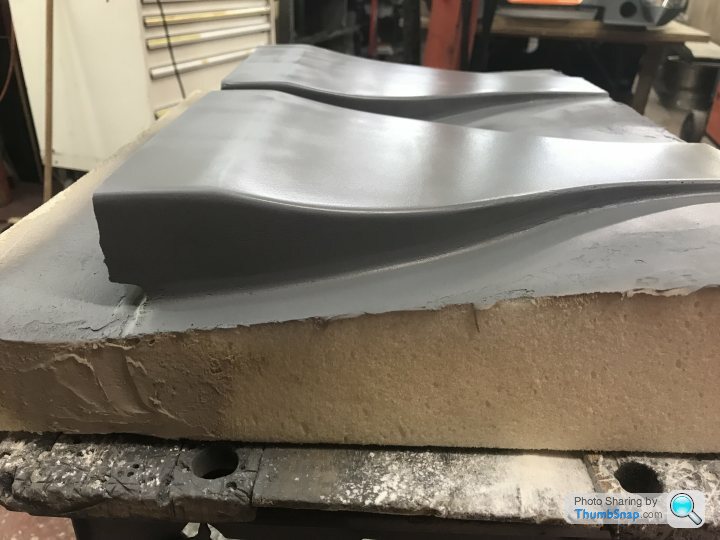
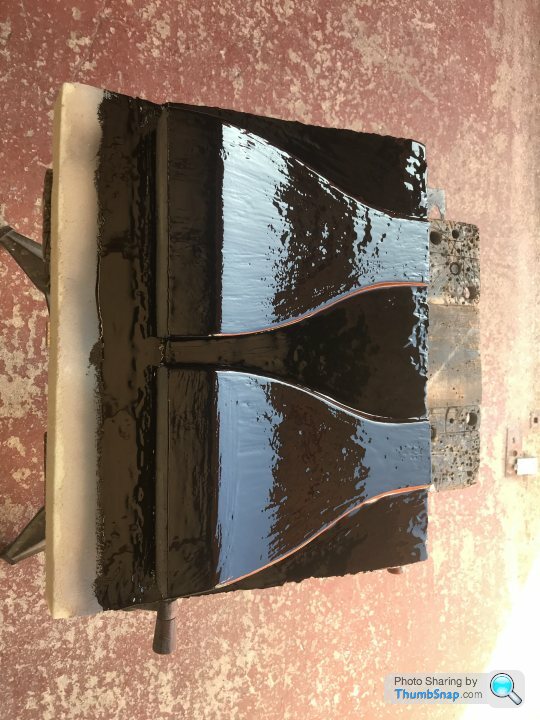
See following pictures for the NACA duct fabrication and fitment.


In terms of getting enough air and what surface to pull it from for the cold side of the turbo.
Also need to plan for air to feed the intercooler rads.
And air for the rear brake ducts.
Starting with the cold side of the turbo, we decided to take the air from the top surface of the rear clam.
Necessitating the creation of a new NACA duct.
The duct will feed an air box mounted into the rear claim with a 45 degree mounted panel filter.
The air box will be in two halves with a seal, allowing the panel filter to be serviced, a small drain will deal with any water.
The turbo will be fed from the air box with a 3" tube.
See following pictures for the NACA duct fabrication and fitment.

Gassing Station | General Motorsport | Top of Page | What's New | My Stuff