Discussion


One of those small projects that ends up taking ages.
Decided to make a coaster for a pal at work. Mug will be purchased to go with it.
So thought I'd personalise it by embedding the initial of her first name into it.

So drew out on a piece of oak, then cut out on band saw.

Cut out the circle from a piece of Ash.

Next job was to chisel out the "L" shape into it.

Started with chisels. Finished removing waste with router.

Frustratingly, due to to the toughness of the ash I exerted to much pressure on the chisels and ended up going wider than the "L". Leaving gaps all around.

So had to mix up some epoxy and add dark ink to it to close up my excessive chiselling and also to affix the "L" into the coaster.
Quick round off using router on edges.

Chiseled surname initial into it and oiled with food safe oil. Not quite the crisp fit i wanted but lesson learned not to use hardwoods for this type of thing.

Decided to make a coaster for a pal at work. Mug will be purchased to go with it.
So thought I'd personalise it by embedding the initial of her first name into it.
So drew out on a piece of oak, then cut out on band saw.
Cut out the circle from a piece of Ash.
Next job was to chisel out the "L" shape into it.
Started with chisels. Finished removing waste with router.
Frustratingly, due to to the toughness of the ash I exerted to much pressure on the chisels and ended up going wider than the "L". Leaving gaps all around.
So had to mix up some epoxy and add dark ink to it to close up my excessive chiselling and also to affix the "L" into the coaster.
Quick round off using router on edges.
Chiseled surname initial into it and oiled with food safe oil. Not quite the crisp fit i wanted but lesson learned not to use hardwoods for this type of thing.
bobski1 said:
Looking for some advice I have a metal sign which I want to mount onto a piece of oak. My initial plan was to follow the outline of the sign and drill through on the corners but it's suggested to leave more wood so that it doesn't split. My thinking was if I pre-drill it shouldn't be an issue. Currently it is a 2mm hole which I will need to drill out for the screw but the centre sits approx 7mm from the edge of the corner radius (approx 10mm)
Hi Bob, Despite reading this a few times, it continues to be swathed in the mists of misunderstanding. I think the answer depends on how big the sign is and how thick the oak is and what size the screws are. Could you post a photo or maybe a sketch ?loughran said:
Hi Bob, Despite reading this a few times, it continues to be swathed in the mists of misunderstanding. I think the answer depends on how big the sign is and how thick the oak is and what size the screws are. Could you post a photo or maybe a sketch ?
The same questions were in my mind. A bit more info would help. 2354519y, I’m sure your colleague will appreciate what you’ve made far more than anything shop bought. If you do another, start your chiselling a mm inside your line, rout out all the waste, then use a series of paring cuts to work back to the line. If you start chiselling heavily on the line, the bevel on the chisel will force it back over the line, leading to gaps, or so Paul Sellers tells me and it must be said, it’s true.
wolfracesonic said:
2354519y, I’m sure your colleague will appreciate what you’ve made far more than anything shop bought. If you do another, start your chiselling a mm inside your line, rout out all the waste, then use a series of paring cuts to work back to the line. If you start chiselling heavily on the line, the bevel on the chisel will force it back over the line, leading to gaps, or so Paul Sellers tells me and it must be said, it’s true.
Amenloughran said:
As above, take the waste out with chisels.
Start the process with saw cuts. For the top cube removal, make three saw cuts on the waste side of your lines then start to remove the waste from above with a chisel, working with the grain. A mallet, or a hammer with a plastic handled chisel, is the way to go, chopping out gently to remove the areas the saw hasn't relieved.
Similarly with the lower slot, two saw cuts, then remove the waste with a mallet and chisel of suitable width.
Work slowly to start with, feel your way as you go. The timber will split easily along the grain and put up more of a fight across the grain. Work to the waste side of your lines and then as Mr Wolfracesonic says, finish of by pairing down to the line with a sharp chisel.
Enjoy the process, it will be time consuming but then the sharper your chisel, the more enjoyable it will be. Securing the workpiece securely is imperative.
(Consider signing up for a Japanese joinery course... eh Mr Greshamst ? )
)
My advice would be not to ask me for advice, given my first attempt… Start the process with saw cuts. For the top cube removal, make three saw cuts on the waste side of your lines then start to remove the waste from above with a chisel, working with the grain. A mallet, or a hammer with a plastic handled chisel, is the way to go, chopping out gently to remove the areas the saw hasn't relieved.
Similarly with the lower slot, two saw cuts, then remove the waste with a mallet and chisel of suitable width.
Work slowly to start with, feel your way as you go. The timber will split easily along the grain and put up more of a fight across the grain. Work to the waste side of your lines and then as Mr Wolfracesonic says, finish of by pairing down to the line with a sharp chisel.
Enjoy the process, it will be time consuming but then the sharper your chisel, the more enjoyable it will be. Securing the workpiece securely is imperative.
(Consider signing up for a Japanese joinery course... eh Mr Greshamst ?
)
My old birdbox blew over two years ago during a bad storm and I stuck it in the corner of stuff to be sorted at some stage.
When I saw some fluff in the grass it seems that even in its abandoned state the birds were still keen to use it judging by the fluff coming out of the hole in the upstairs living department.

Thought I'd give the birds some class and a quick design in my work book has an idea featuring my favourite style.
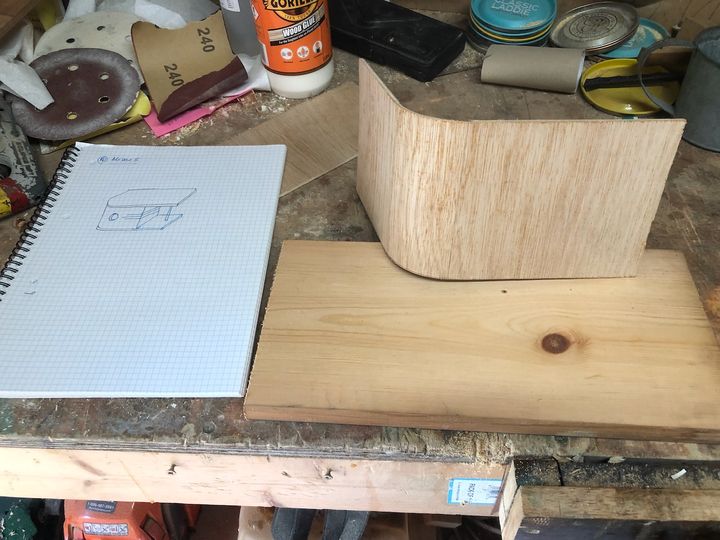
Just need to find a place to put it now. The back removes for clearing out each season. Bonus is, my wife likes it.
Any resemblence the bend has to a bottle of wine is purely co-incidental. Also it may look like an old step, probably because it is.

When I saw some fluff in the grass it seems that even in its abandoned state the birds were still keen to use it judging by the fluff coming out of the hole in the upstairs living department.
Thought I'd give the birds some class and a quick design in my work book has an idea featuring my favourite style.
Just need to find a place to put it now. The back removes for clearing out each season. Bonus is, my wife likes it.
Any resemblence the bend has to a bottle of wine is purely co-incidental. Also it may look like an old step, probably because it is.
crmcatee said:
My old birdbox blew over two years ago during a bad storm and I stuck it in the corner of stuff to be sorted at some stage.
When I saw some fluff in the grass it seems that even in its abandoned state the birds were still keen to use it judging by the fluff coming out of the hole in the upstairs living department.
Thought I'd give the birds some class and a quick design in my work book has an idea featuring my favourite style.
Just need to find a place to put it now. The back removes for clearing out each season. Bonus is, my wife likes it.
Any resemblence the bend has to a bottle of wine is purely co-incidental. Also it may look like an old step, probably because it is.
Bravo CR. That's proper classy. Reminds me strongly of a block of very upmarket apartments in Glasgow that I have long admired. When I saw some fluff in the grass it seems that even in its abandoned state the birds were still keen to use it judging by the fluff coming out of the hole in the upstairs living department.
Thought I'd give the birds some class and a quick design in my work book has an idea featuring my favourite style.
Just need to find a place to put it now. The back removes for clearing out each season. Bonus is, my wife likes it.
Any resemblence the bend has to a bottle of wine is purely co-incidental. Also it may look like an old step, probably because it is.
Did you steam the wood to form the curve?
I have a Clarke 6'' planer/thicknesser, item 1, page 214 in the current Machine Mart book of 'things you must buy'....it stopped working last Monday.
Removing the cover revealed that one of the two ribbed drive belts had worn out and snapped, fortunately there was a part number on the remains so I googled it and found a supplier quite easily. With delivery the cost was well under £10 and the postie popped it through my letterbox mid morning today.
I struggled for a while to fit it, though. It's the main drive belt from the motor that runs to a central spindle where a second belt runs from to turn the cutter drum and also drives a chain to spin up the rollers that pull the workpiece through the machine. Eventually I realised that the motor was mounted via 4 Allan bolts....in slots.....slacking those off gave enough clearance to enable the belt to slide into place and then retension it....thought that this may help another numpty swap a belt!
crmcatee said:
That looks great, I expect the birds moving in to be wearing 1920s clothing and smoking cigarettes in holders.....Question for the group - I need a hard-wearing finish for the camper worktop I posted earlier, I have a big can of melamine varnish, given to me by a neighbour recently, would it be suitable? I know it's usually used by woodturners and I know it's very quick drying so if I were to use it I would thin it a bit, but the question is, is it a suitable finish for a worktop?
If not, what do people recommend, ideally I want to seal the top but not have to reapply so my usual Osmo fallback is out. Polyurethane?
Rustins plastic coating, supposed to be quite good, I think I remember Loughran mentioned using it, could be wrong but he may have advice on it if so.
I always think Plastic Coating sounds a bit grim. Who in their right mind would want to coat their beautiful timber with a plastic coating ?
But then, a rose by any other name....
What it is, is a two pack clear lacquer which cures when you mix the two parts together and gives an impressively impervious finish.
Sure, if you brush it on in lovely thick coats it can look a bit rubbery but then the trick is to apply it in thin coats. Allow each coat to dry for 24 hours and rub back with perhaps a dry lube 240 grit sandpaper like Mirka Caratflex on a cork block or thick felt pad for flat surfaces, foam backed pads for curvy surfaces. 3 coats will usually be enough.
Personally I leave the final coat for a week then finish with a light sand to flat off before moving on to 3M Scotchbrite pads... red, very fine. White, ultra fine. Aiming for a very uniform satin finish.
https://www.3m.com/3M/en_US/metalworking-us/produc...
If you prefer to use steel wool, use only a 0000 grade.
You can burnish the satin finish to a high gloss. Rustins supply a burnishing cream which you can rub with a soft cloth by hand or I use a foam auto detailing pad at slower/medium speeds on an eccentric sander for bigger areas. The kitchen table top I posted last week was finished in this way. ( I actually used a Menzerna 3000 final finish instead of the Rustins burnishing cream because I had some knocking around. )
https://flexipadshop.com/product/hl680
The instructions that come with the plastic coating are nicely comprehensive but as always make up a sample before you commit.
I have used melamine varnish but not for many years. 'Melamine' makes it sounds like it's as tough as old boots but I'm not convinced.
Thanks both, much appreciated.
No, I'm not convinced from what I've read about melamine (hence the question). The word 'melamine' suggests it would be ideal for a worktop but I saw one comment that it can be discoloured by water sitting on it....
I'm going for a gloss finish and I'm not bound by time (the whole van is a bit of a labour of love) so I think I'll take my time with the plastic fantastic - ordered.
Edited by EmBe on Friday 10th May 09:41
Gassing Station | Homes, Gardens and DIY | Top of Page | What's New | My Stuff