Engine Balancing
Discussion


I just want to put in my tuppence worth on balancing the AJP V8's.
I know a lot of people use air flow meters in conjunction with the software - and that's fine if you want to get each cylinder matching the others exactly, but for most people it's not about eking out the absolute maximum performance. It's just about achieving a smooth running engine. For this you just need to get each bank sucking the same amount of air and burning the same amount of fuel - balanced (oh yes!, within adaptive range).
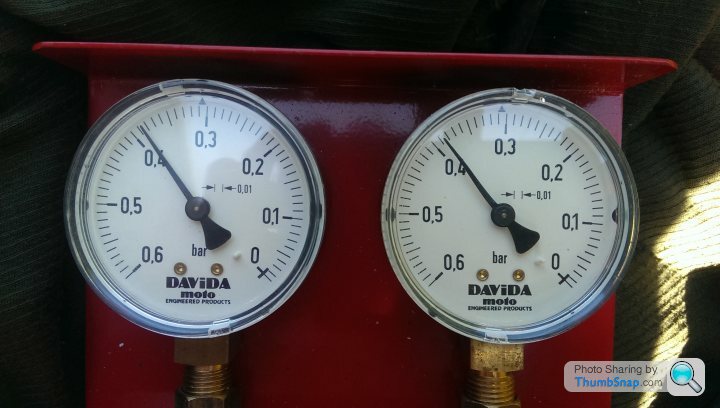
This is really easy if you plug in a pair of vacuum gauges.
I've used these for years to balance carbs on motorbikes. I suddenly realised that the same principal applied to balancing the banks of an AJP V8.
On the 4.2 there are tapings already available for connecting vacuum gauges - the vapour recovery connections at the rear of intake manifolds. (I don't know about the 4.5, but I suspect there are similar tapping's).
Plug in a pair of vacuum gauges and adjust the throttle rod until both gauges read the same.
Now set both throttle pots to the same value. These are at 20.1 - just off picture.
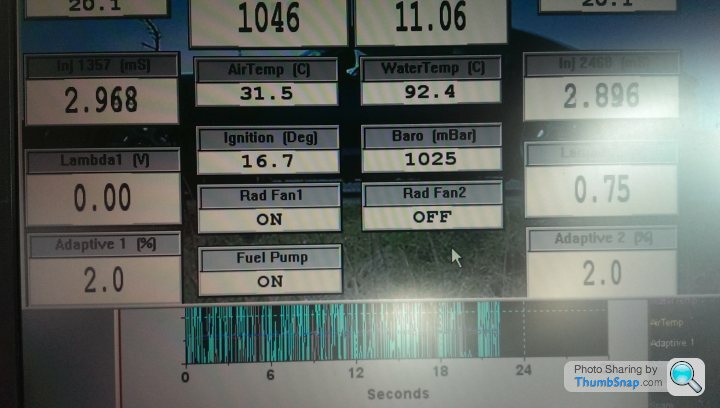
This is an iterative process - so once you reset the throttle pots, you might need to re-sdjust the throttle linkage. When the vacuum gauges read the same, and the throttle pots read the same - both banks are sucking the same amount of air, and burning the same amount of fuel. Simple.
Now - look at the adaptives. If they are positive - it means the ECU is trying to add more fuel. So, increase the throttle angles of both banks (small amounts - 0.2 at a time). If they are negative - decrease the angle of both banks.
I've used this procedure for years - and its really easy. You can balance the engine in about 30 mins - when its warmed up (excluding the removal of panels etc.). It's also totally visible - giving immediate feedback.
The use of vacuum gauges can also indicate other engine issues. Sticky valves etc. Read up about them. They're really useful. Just a thought. . .
I know a lot of people use air flow meters in conjunction with the software - and that's fine if you want to get each cylinder matching the others exactly, but for most people it's not about eking out the absolute maximum performance. It's just about achieving a smooth running engine. For this you just need to get each bank sucking the same amount of air and burning the same amount of fuel - balanced (oh yes!, within adaptive range).
This is really easy if you plug in a pair of vacuum gauges.
I've used these for years to balance carbs on motorbikes. I suddenly realised that the same principal applied to balancing the banks of an AJP V8.
On the 4.2 there are tapings already available for connecting vacuum gauges - the vapour recovery connections at the rear of intake manifolds. (I don't know about the 4.5, but I suspect there are similar tapping's).
Plug in a pair of vacuum gauges and adjust the throttle rod until both gauges read the same.
Now set both throttle pots to the same value. These are at 20.1 - just off picture.
This is an iterative process - so once you reset the throttle pots, you might need to re-sdjust the throttle linkage. When the vacuum gauges read the same, and the throttle pots read the same - both banks are sucking the same amount of air, and burning the same amount of fuel. Simple.
Now - look at the adaptives. If they are positive - it means the ECU is trying to add more fuel. So, increase the throttle angles of both banks (small amounts - 0.2 at a time). If they are negative - decrease the angle of both banks.
I've used this procedure for years - and its really easy. You can balance the engine in about 30 mins - when its warmed up (excluding the removal of panels etc.). It's also totally visible - giving immediate feedback.
The use of vacuum gauges can also indicate other engine issues. Sticky valves etc. Read up about them. They're really useful. Just a thought. . .
Imran999 said:
Suppose I could just drill a hole in each box and screw in a valve?
No, the vacuum is only created behind the throttle butterfly valves - so the tapping must be on the intake manifold between the butterfly valves and the cylinder intake port. On the 4.2 there is a common channel connecting all intakes together. The tapping's are on this.
I don't have any knowledge regarding the 4.5 induction setup, however, from your photo - the four pipes going to the cross connector look like the vapour recovery pipes. One of them should go to the carbon capture tank in the rear offside wheel well. The fourth one should go to the airbox with the crankcase oil vent.
If this is the case, and the connection to no's 1 & 2 trumpets are behind the butterfly valves i.e - between the valves and the inlet ports - then you should get a genuine engine vacuum reading from those tapping's. I've tried to find a more detailed photo of the 4.5 manifolds, but unsuccessfully. Perhaps another PH'r with a 4.5 can confirm this.
My gut feeling is - YES. I don't see any reason why the 4.5 should operate any differently from the 4.2. Just slightly different layout.
Gordon
Just pull the pipes off from the connectors at 1 & 2 trumpets and connect the vacuum gauges there.
The vapour recovery only pulls vapour from the petrol tank due to hot fuel returning from the fuel rail (also pulls oil vapour from the catch tank). It's all part of trying to make the engine more 'green'..
The pipes can be left hanging free when the vacuum gauges are connected. Makes no real difference. Permanent 'T' connectors are not necessary.
natben said:
It would be great to see a short video on this procedure..
Natben - Yeah - I'd like to post a video. Would make it a bit clearer. Unfortunately I'm pulling the engine at the moment. I discovered some 'sparkle' in the oil at the last change, and to be honest I've been nursing the engine for a couple of years. With this year being a complete non-event, I've decided to finally go for a full rebuild. I don't expect to be up and running again 'til next spring.The next time I perform this procedure I'll try to make a vid of it.
I know the issue of balancing the engine keeps popping up - so this post was purely to give my take on it. If it helps someone, then job done.
G.
Bogsye said:
Just need my new lambdas to arrive!
Here's hoping your new lambdas will sort all you probs. I replaced mine last year and it fixed my recurring AFR errors. I was hoping for a good 'Cerbera' year this year, but it's not been what anyone expected. I had the seats re-upholstered last winter and was really looking forward to this years driving. Hey-ho!I think I 'm going to go for a professional build. I've owned this car for 15 years and while I'm sure I could do it myself - I also think there's something I'll probably miss. Also, in terms of equipment and resources, I'd probably need to call on professional help at numerous points in any case. I don't want to start chasing more problems after all the effort. So - top to bottom refurb + new timing chain etc. Oh - and gearbox rebuild/check. There was sparkle in that oil as well. I've just drained it. :-(
Next years going to be fun :-)
G.
If you look back earlier in the thread to the photo I posted of the 4.2 manifold you'll see there are similar Allen screws on the common rail linking the intakes. My initial thought was that these points must be to attach instruments to the individual intakes to finely balance them, but try as i might, I could not budge any of them. I was also slightly concerned that in removing them I might be introducing air leaks behind the throttle valves if I couldn't seal them tightly again.
Not knowing what the original thought process was by the engineers who designed these manifolds - I don't really know what these screws are for. Maybe intended for gauges, or maybe just for access as part of the manufacturing process - then sealed for good.
In the end I just opted for the easy option and removed the vapour recovery tubes - allowing me to balance the banks like a big V-twin.
But, if you manage to remove the Allen screws then potentially you could get vacuum readings for each cylinder. You would need to find an adapter to fit the vacant hole, and screw right down through the common chamber to block any effect from the other cylinders on that bank. However, even if you manage that and get individual reading for each intake - what then. There is no easy adjustment between cylinders on the same bank. You need to start messing with blead screws on the butterfly valves etc. Not for me !!
I would start by just removing the vapour recovery hose from each bank and using 2 gauges from your set of 4 try to balance the engine. If you find this method works for you but you require further refinement - then I would attack the Allen screws. For me though, this seemed like too much work for too little gain.
The vapour recovery hoses on my car are simply held on with jubilee clips - so really easy to remove. The vacuum gauge hoses should slide straight on.
If you do manage to remove any of the Allen screws - I would be interested to know what you find.
Gordon
Gassing Station | Cerbera | Top of Page | What's New | My Stuff