Moto Guzzi Cali Cafe Racer Build thread
Discussion


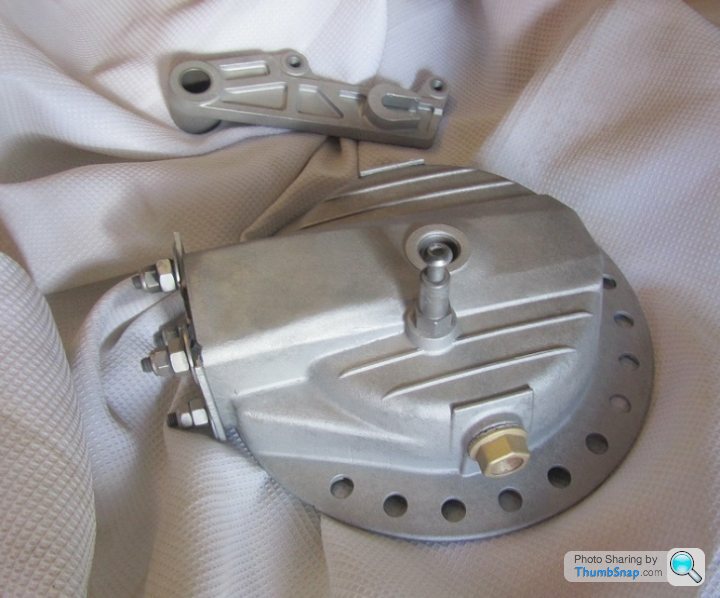
Yesterday I got to use my local machine shop's blasting cabinet to clean up the alloy bevel box and a couple of other parts that will need to be repainted. Total cost was a packet of Hobnobs, a bargain !
The bevel box will need to be painted, otherwise it'll soon start to corrode and its rough cast finish wont stay clean for long. I've ordered some etch primer and 'alloy look' paint, so we'll see how that goes when it turns up.
The bevel box will need to be painted, otherwise it'll soon start to corrode and its rough cast finish wont stay clean for long. I've ordered some etch primer and 'alloy look' paint, so we'll see how that goes when it turns up.
Edited by Merch131 on Wednesday 10th February 17:17
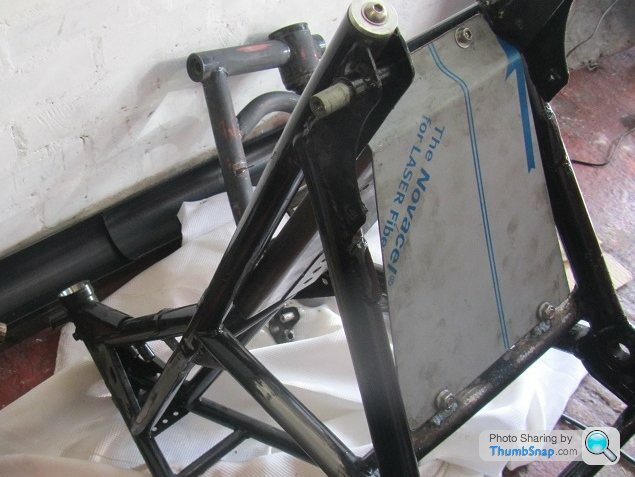
More work done on the frame, first extended the side stand by a couple of inches, as it was way too short before. Guzzis have a few different side stand lengths, I suspect mine must have been the wrong one for the bike.
Next a stainless splash plate was made from 1.5mm plate, which is thicker than I'd normally use, but I may end up bolting stuff to it, so wanted the extra strength. BTW the white and blue writing is just a protective plastic layer that peels off when ready.
Finally some of the flat spots I'd put into a couple frame tubes when grinding off the old brackets have been tidied up, they don't look quite so ugly now.
Also bought a 60mm electronic speedo, which will need mounting on the top yoke..
I stripped the bearings out of the swing arm, in readiness to get the frame powder coated. The big shaft drive support bearing was tricky to remove, as it was so far inside the swing arm. Eventually, I gave up and went to my local bike shop who got the circlip out for me in about 30 seconds using a neat pair of snap-on pliers.
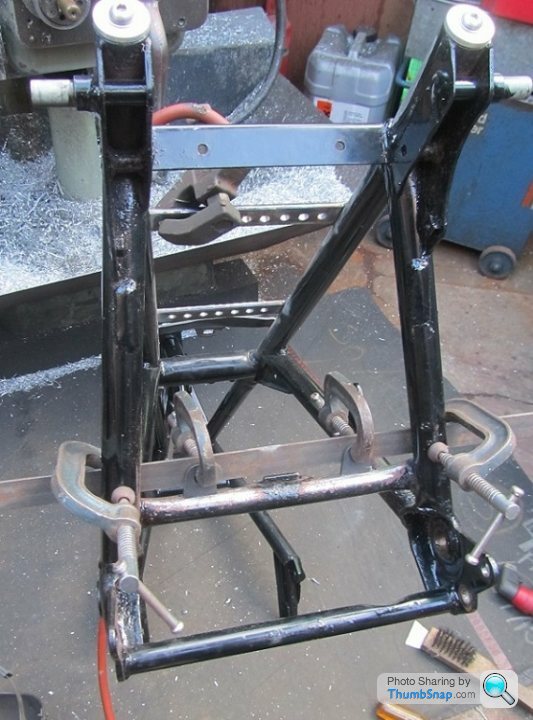
Yesterday I took the frame to Triple S over in Bingley, the plan is to have the frame powder coated gloss black, while the frame lowers and swing arm will be silver. I was a bit shocked at the price £307 incl vat, about twice what I expected. Due in part I was told because the frame had already been powder coated, and that would need more work to remove, as its much harder to remove than OE frame paint. Oh well, its only money, and should be ready for collection in a week or so.
I've also opened my wallet for once and ordered some new shiny bits.. stainless engine mount bolts and stainless pins for the Brembo P8 calipers. Not strictly necessary, but the old rusty ones were annoying me.
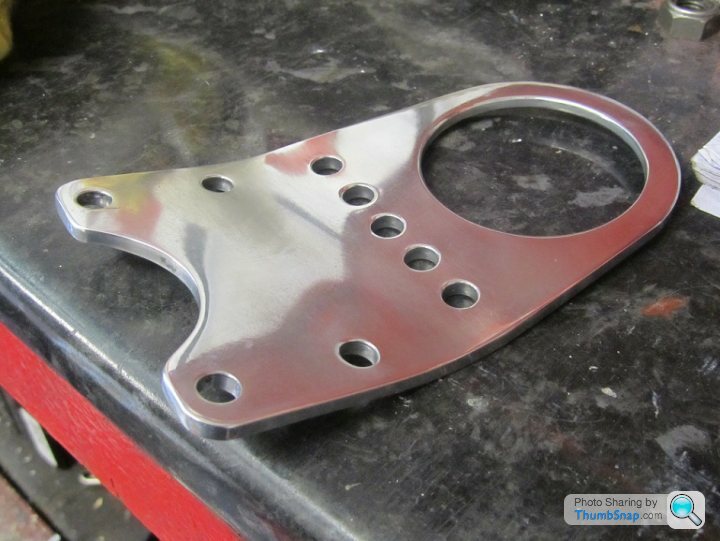
The speedo mount is being made from a scrap piece of 3mm alloy plate, fortunately its going to be shaped by Jeff on his miller when he has time, which will save me a lot of effort with a hacksaw and file. It'll also be drilled to hold five LEDs for the idiot lights, which cost £1.17 incl P&P off Ebay.

I'll be collecting the frame from Triple S tomorrow, so while the frame is away, got a couple more jobs done. First (almost) finished the speedo bracket which will bolt to the top yoke, it needed a lot of heat to put a bend in it, cant just use force, as alloy tends to crack if your not careful. I'm also getting a billet cover machined for the speedo body, which should be ready next week.


Next I spend sometime looking at alternative ways of mounting the rear brake caliper, as I didn't like the way it was positioned below the swing arm, where its perfectly placed to get covered in crap from the road. But the design of the caliper meant placing it where I wanted tricky, and it looked odd too. Gave me the excuse to order a new smaller Brembo which turned up at my local bike shop this morning. It'll need a new alloy mount, which will have to wait till the back end is back together.
While I was at the bike shop, I dropped off the two carbs for a soak in their ultrasonic cleaner, not sure how well it'll work, will wait and see.

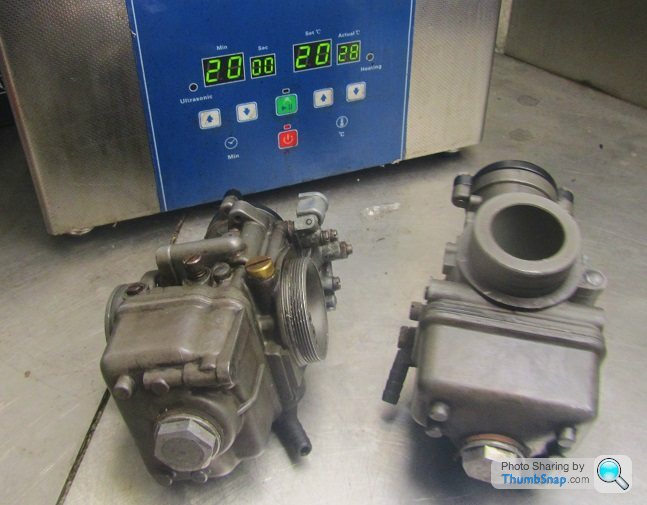
While I was at the bike shop, I dropped off the two carbs for a soak in their ultrasonic cleaner, not sure how well it'll work, will wait and see.
I'm just back from collecting the frame, looks so much better than the first attempt elsewhere. Unfortunately a big pallet arrived last week which is sitting in my garage taking up the last bit of room, so I cant do much assembly work on the Guzzi for now. That's ok, there's plenty of other jobs to do in the meantime. So the frame gets to stay warm and dry indoors for awhile..


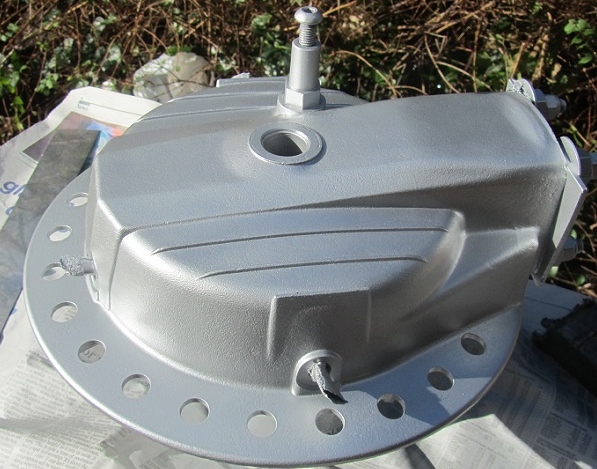
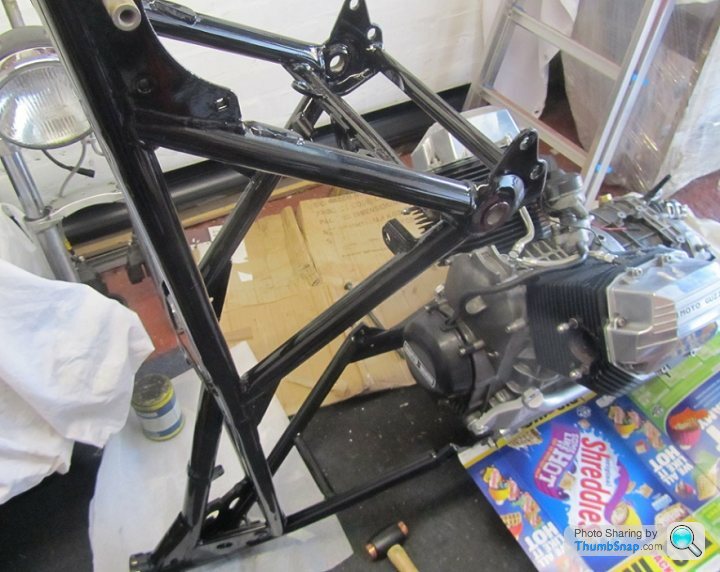
Despite the lack of space in the garage, I decided to press on and try to get the frame back onto the engine today. But first I assembled the rear bevel box and swing arm, cos it was easy and looked like I'd done something. I also replaced the old drain / level plugs with stainless bolts which had their head machined to make them look a bit better.
Ideally an extra pair of hands would've helpful when fitting the frame, but I was working alone so I managed to bolt the front engine mount first, with the frame up ended, then it was a case of pivoting the frame down and bolting up the lower frame rails. This worked surprisingly well with no damage to the new powder coat. The only problem I hit was that the clutch arm on the back of the gearbox needed its adjuster bolt removing to clear the frame as it pivoted down. This little issue turned into a massive nightmare soon after..
It was all going so well, once the frame was on, I decided to remove a few alloy parts and bead blast / polish them before refitting..
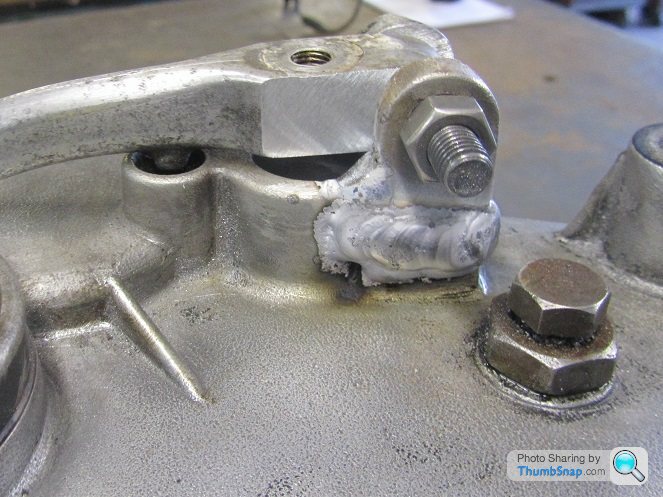
One part I wanted to tidy up was the clutch arm on the back of the gearbox, its not that noticeable, but it all helps. Its held in place by a pivot bolt which in turn is kept secure by a split pin. The split pin was rusty and fell apart when I tried to remove it, ended up having to grind off its remnants, which still left the pivot bolt not wanting to come out. So I used a small drift and hammer to gently knock it out. It was stubborn, but moved eventually, or rather it seemed to move. What had actually happened was that the casting it pivoted in on the gearbox cover had snapped. What I nightmare. I was shocked as I hadn't used much force at all, god knows how it had failed.
I don't know if the gearbox end cover can be removed without first removing the frame, if not I'll have to reverse everything done today to remove the cover and repair the broken mount. At that point, I downed tool, I was too annoyed with myself to carry on today.


Ideally an extra pair of hands would've helpful when fitting the frame, but I was working alone so I managed to bolt the front engine mount first, with the frame up ended, then it was a case of pivoting the frame down and bolting up the lower frame rails. This worked surprisingly well with no damage to the new powder coat. The only problem I hit was that the clutch arm on the back of the gearbox needed its adjuster bolt removing to clear the frame as it pivoted down. This little issue turned into a massive nightmare soon after..
It was all going so well, once the frame was on, I decided to remove a few alloy parts and bead blast / polish them before refitting..
One part I wanted to tidy up was the clutch arm on the back of the gearbox, its not that noticeable, but it all helps. Its held in place by a pivot bolt which in turn is kept secure by a split pin. The split pin was rusty and fell apart when I tried to remove it, ended up having to grind off its remnants, which still left the pivot bolt not wanting to come out. So I used a small drift and hammer to gently knock it out. It was stubborn, but moved eventually, or rather it seemed to move. What had actually happened was that the casting it pivoted in on the gearbox cover had snapped. What I nightmare. I was shocked as I hadn't used much force at all, god knows how it had failed.
I don't know if the gearbox end cover can be removed without first removing the frame, if not I'll have to reverse everything done today to remove the cover and repair the broken mount. At that point, I downed tool, I was too annoyed with myself to carry on today.
It seems the best way of fixing the broken gearbox cover is to dismantle the bike, reversing all the work done yesterday, then remove the whole gearbox, which can be taken to be welded. So that's the plan for next week.
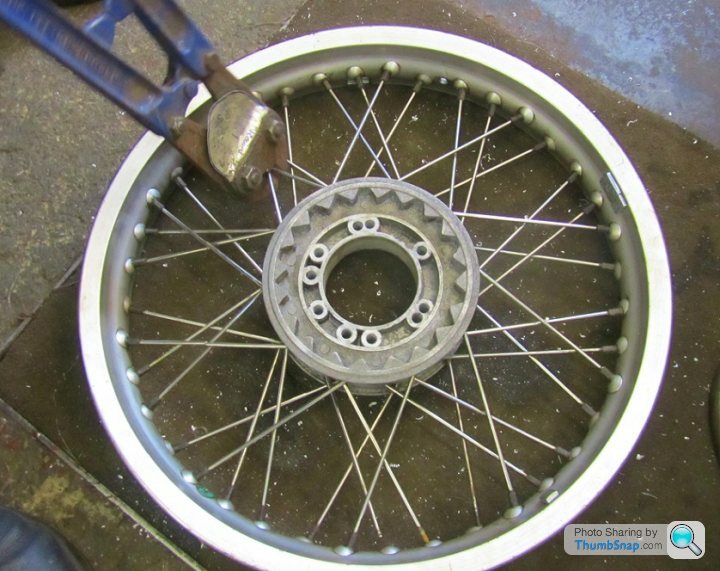
In the meantime, I decided the wheels weren't good enough, the anodised Akront rims were scuffed and scratched, while the hubs had been painted badly along with the rest of the bike by a previous owner. When I got the bike, I tried to remove as much paint as possible, the stainless spokes turned out ok, but it was impossible to clean up the hubs with the spokes in the way.
I'm not sure yet whether the original rims can be restored to a good enough finish to be re-used, if not I'll get new Morad rims. Expensive but worth it. While ideally I wanted to also reuse the stainless spokes, as they looked to be in good condition.
Early this morning I took the wheels to my LBS, who removed the tyres for me, then it was off to my mates workshop to dismantle the wheels, shouldn't take long, just need to unscrew 80 spoke nipples. How wrong could I be ! The first few spokes snapped inside the nipple as I tried to unscrew them. Not good, and a surprise given that the spokes were stainless.
There was nothing more that could be done, but to cut the spokes, as they were beyond saving anyway. At least that didn't take long, five minutes with the bolt cutters and the hubs were free. But my wheel troubles weren't over yet. The spokes were seized solid into the hubs, they didn't want to come out, even applying a blowtorch didn't make any difference. Instead I spend 4 hours
hammering each spoke out of the hubs. What a pita, if I hit the spoke hard enough to move it, it would bend the spoke like a cheap nail. Don't hit it hard enough and its going nowhere.
Eventually, they were all out, and with the old wheel bearings removed, the hubs, rims and disc carriers are ready for the blasting cabinet next week.


Made some useful progress today with the wheels. I took the now dismantled wheels to a local machine shop who let me use their bead blasting cabinet, at the cost of a packet of biscuits and me making everyone cups of tea while I'm there.. a fair exchange !
Here's a couple of pics of the set up, the hose / nozzle which fires out the blasting medium has a heck of a kick to it, you need to hold it tight, they've got a big old compressor that drives it. The shop owner likes bikes too, and keeps his owned from new GS1000S at the shop, though these days it doesn't get ridden much.


Here's a couple of pics of the set up, the hose / nozzle which fires out the blasting medium has a heck of a kick to it, you need to hold it tight, they've got a big old compressor that drives it. The shop owner likes bikes too, and keeps his owned from new GS1000S at the shop, though these days it doesn't get ridden much.
The hubs were blasted, as were the disc mounts, and both came out well, then I moved on to the rims which were anodised, so I blasted the anodising off one rim to see how it looked. At this point I wasn't sure if I could reuse the rims, and whether they should be polished, re anodised, painted or powder coated. While the hubs could be painted or powder coated, I think they are too rough to be anodised. For now, I've sprayed the hubs with etch primer to protect the alloy, until I decide what's the best option.
After cleaning up the first rim, I stopped as it was clear the corrosion pitting in the rim was worse than I thought, they could still be painted or powder coated, but at this point I'm more inclined to order new rims.


After cleaning up the first rim, I stopped as it was clear the corrosion pitting in the rim was worse than I thought, they could still be painted or powder coated, but at this point I'm more inclined to order new rims.
The gearbox was easy enough to remove so I could get the broken clutch arm mount welded. But first had to use heat to get the pivot pin out of the broken casting. The next step was to make a temporary spacer to hold the broken casting in place when it was welded back on. Turned out the pivot pin was 7mm diameter, an odd size, so I reamed the mount and arm out to 8mm so I could use an 8mm stainless bolt to replace the rusted out pin.
Then I took the whole lot to the local welder, who did the job while I waited, just need to polish the arm and fit a shorter 8mm bolt to finish things off..


Then I took the whole lot to the local welder, who did the job while I waited, just need to polish the arm and fit a shorter 8mm bolt to finish things off..
Talking of polishing, I finally got round to polishing the speedo mount and putting it together, it needs a couple of M5 button heads to bolt the speedo in place, which I need to order. I'd hoped to have the ignition barrel in the bracket too, but there isn't enough clearance below...


After all the hassles of the broken gearbox bracket last week, this week the gearbox has been bolted back onto the engine, and the frame reunited with the engine/gearbox. The next big expenditure will be on the alloy tank and new rims / spokes, which will have to wait for a month or two.
In the meantime there are still lots of small improvements to be made, the devil is in the detail..
First I decided the Hammerite gloss black I'd used on the starter motor didn't look quite right. In the end I re-sprayed it satin black, not sure how durable the finish will turn out to be, but it looks better to me now.
Next the two old bolts which fasten the starter to the crankcase were replaced by new stainless bolts, but not before their heads were machined smooth..
Gassing Station | Biker Banter | Top of Page | What's New | My Stuff