Reverse and Forward Cameras
Discussion


So it was a long slog but finally it is all done.
Some of the issues were my fault ... some that fact that the bits come with no user guide so you have to make it up as you go.
It cost me about £550, but i bought some extra bits and then managed to blow up 2 cameras (which was not entirely my fault ... !)
I can be done for the price of the VBB box - Euro 275
http://www.volvotech.eu/product_info.php/products_...
and a forward facing camera from ebay
http://www.ebay.co.uk/itm/161025926088?ssPageName=...
for £15
and about another £10 of other odds and sods.
HOWEVER please be aware that installing this took me about 3 man days over a 4 week period. I know this may sound daft but please believe I was ready to call in the cavalry on more than one occasion. Me telling you how to do it will save time, but please do bear in mind that this is quite a big job involving taking lots of bits off the car. It was all done with no holes drilled anywhere.
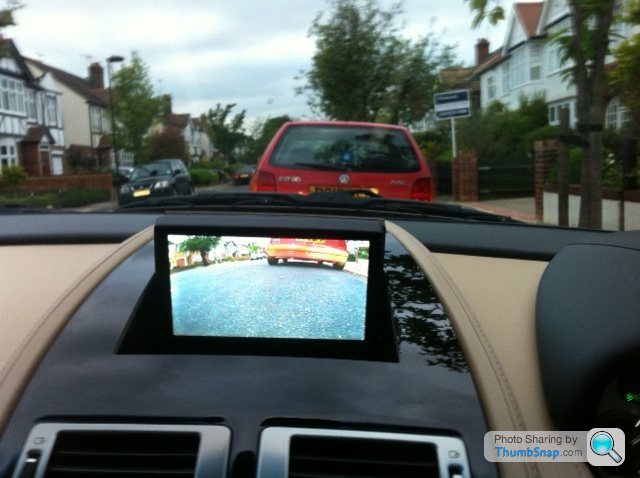
In operation, put the car in reverse and the reverse camera comes on. Put it in drive with the parking sensors on and the forward camera activates. Accelerate sensors go off and the screen reverts to sat nav. There are no buttons anywhere, you can see no wires and can almost not see the cameras. This took time, but I was determined on the no button bit.
I need to publicly thank Paralight for helping my find out where to route the wire to the front of the car. A small plug he charges about £1250 for doing this, I think he uses "clever" cameras that can look left and right, and do bear in mind if you do this yourself and have not done one before I recon on a day and a half. If I did it again knowing what I know now I could probably do it in 6 or so hours.
So.. this is a short guide - but I am happy to answer questions
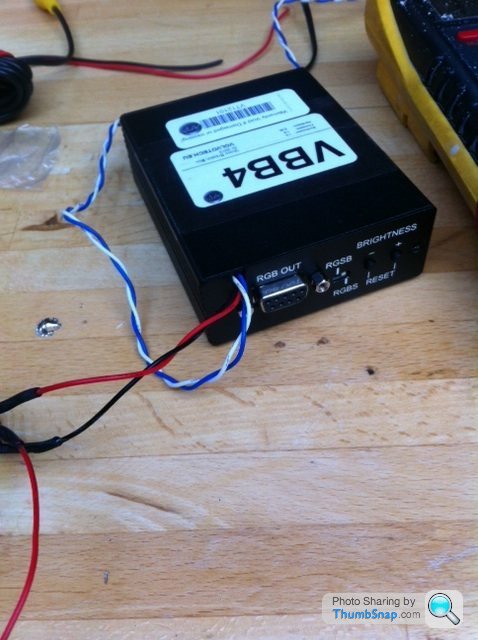
1. The sat nav is inder the rear left seat. Take off the seat ands the kit comes with the connector to simply daisy chain into the sat nav video line.
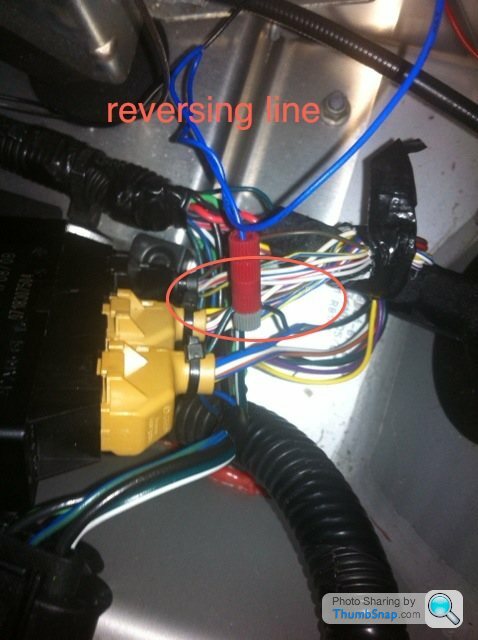
2. Under here is power (big red wire) and also - usefully - the reversing sensor box (badged Jaguar!). The green and blue wire is the reversing sensor on line and is used to fee the VBB box and tell it reverse is engaged.
3. Remove all of the centre consol to access the parking control button. Running to this is a green wire. This goes to +8v then parking sensors are on.
4. Take a lead form here and run to a 5v nominal micro low current relay ( £2 in Maplin), This relay then switches the VBB into front camera mode.
Bear in mind I had to read the circuit diagrams to get this far and take half the interior to bits.
At this point the thing should work and all you need to do it thread the camera wires. Ha Ha!
Rear camera.
1. Remove rear left seat back
2. remove most left hand side interior trim of boot
3. remove left hand read light
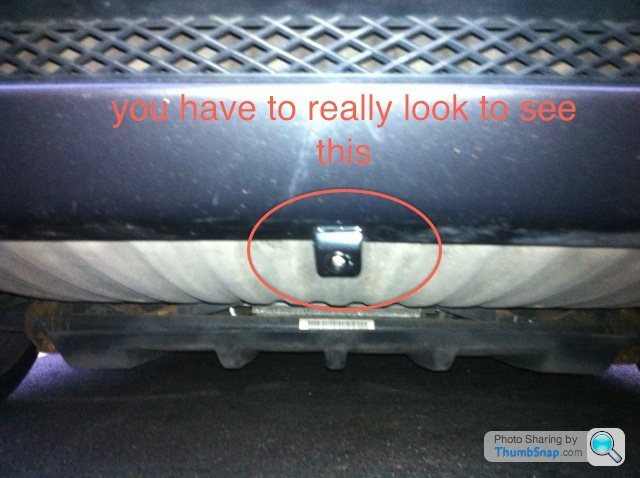
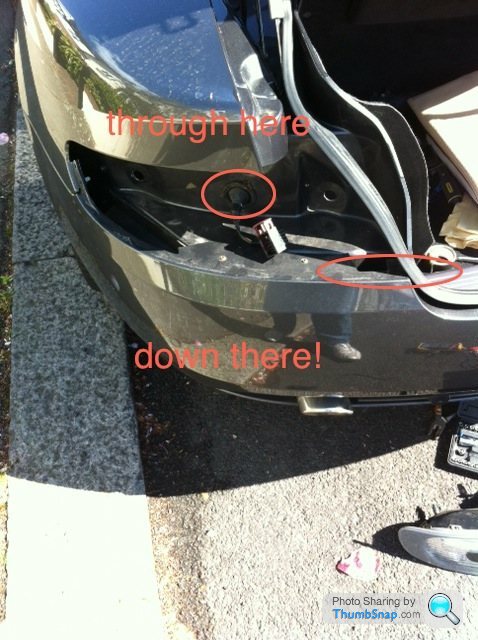
4. kneel on floor and remove centre "bolt" right under the rear bumper of the car.
5. Thread the camera line through this hole and bolt the rear camera in place.
6. Run the lead upto the removed rear light - keep the lead clipped to the bumper as it is next to the exhaust - run the wire through the light gland and into the boot.
7. From in the car gently lift up the rear parcel shelf and look until you see light. Use a stiff bit of wire to pass through to the boot, attach camera wire and pull through
The now have a working reversing camera.
Front Camera.
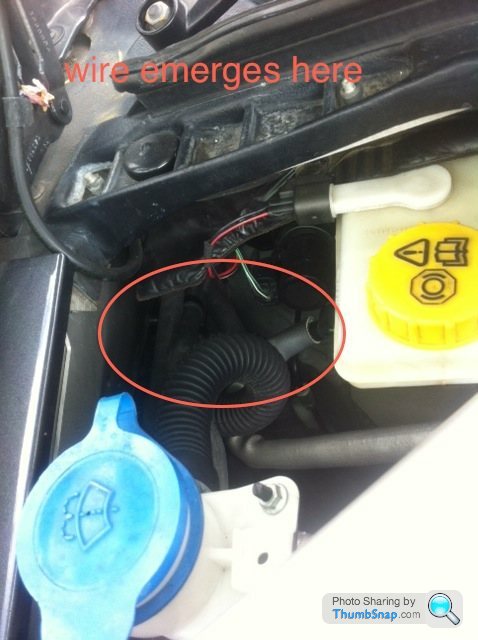
1. The wire is run via the DRIVERS side so remove the drivers rear seat, run a camera lead to the dirivers side, under the carpet of the drivers seat and then in to the drivers foot well.
2.Lift drivers carpet and look where the loom enters the engine area
3. This is a rubber gland - tape the wire to a screwdriver poke it through the gland and pull!
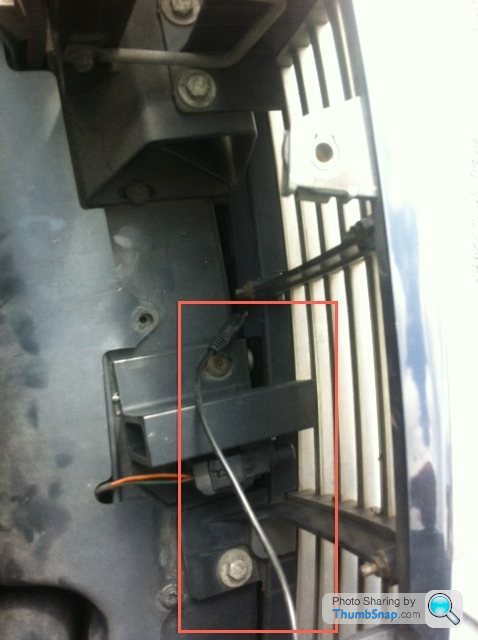
4. Remove radiator cover
5. make wire neat
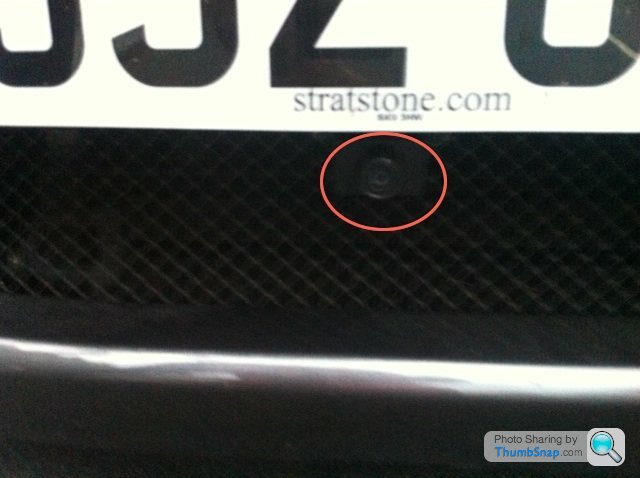
6. attach camera to under number plate area with strong doublesided tape
7. connect
And you are done.
I have missed out some detail.
The kit was supplied with a series of screw in connectors to connect to the loom. I am not a fan of these and most i did not use, but for connection into wires in the car i did ( you will see them on the pics) so that no wires on the car have been tampered with or cut.
it is a big job - worth it - yes.
You will need a soldering iron, decent tool kit and a multimeter together with a decent amount of basic electrical knowledge.
If I can help ask - just do bear in mind it is honestly a big job and I would not want anyone to have their car in bits and not know what to do. Is it difficult . No BUT there is allot of it!
[url]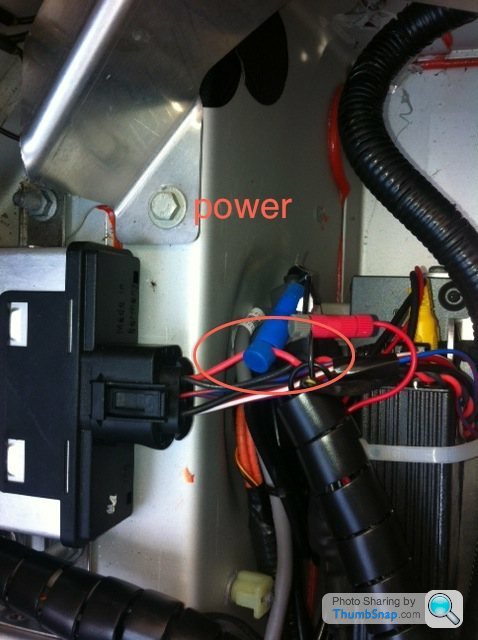 |http://thumbsnap.com/3w21OiNp[/url
]
Some of the issues were my fault ... some that fact that the bits come with no user guide so you have to make it up as you go.
It cost me about £550, but i bought some extra bits and then managed to blow up 2 cameras (which was not entirely my fault ... !)
I can be done for the price of the VBB box - Euro 275
http://www.volvotech.eu/product_info.php/products_...
and a forward facing camera from ebay
http://www.ebay.co.uk/itm/161025926088?ssPageName=...
for £15
and about another £10 of other odds and sods.
HOWEVER please be aware that installing this took me about 3 man days over a 4 week period. I know this may sound daft but please believe I was ready to call in the cavalry on more than one occasion. Me telling you how to do it will save time, but please do bear in mind that this is quite a big job involving taking lots of bits off the car. It was all done with no holes drilled anywhere.
In operation, put the car in reverse and the reverse camera comes on. Put it in drive with the parking sensors on and the forward camera activates. Accelerate sensors go off and the screen reverts to sat nav. There are no buttons anywhere, you can see no wires and can almost not see the cameras. This took time, but I was determined on the no button bit.
I need to publicly thank Paralight for helping my find out where to route the wire to the front of the car. A small plug he charges about £1250 for doing this, I think he uses "clever" cameras that can look left and right, and do bear in mind if you do this yourself and have not done one before I recon on a day and a half. If I did it again knowing what I know now I could probably do it in 6 or so hours.
So.. this is a short guide - but I am happy to answer questions
1. The sat nav is inder the rear left seat. Take off the seat ands the kit comes with the connector to simply daisy chain into the sat nav video line.
2. Under here is power (big red wire) and also - usefully - the reversing sensor box (badged Jaguar!). The green and blue wire is the reversing sensor on line and is used to fee the VBB box and tell it reverse is engaged.
3. Remove all of the centre consol to access the parking control button. Running to this is a green wire. This goes to +8v then parking sensors are on.
4. Take a lead form here and run to a 5v nominal micro low current relay ( £2 in Maplin), This relay then switches the VBB into front camera mode.
Bear in mind I had to read the circuit diagrams to get this far and take half the interior to bits.
At this point the thing should work and all you need to do it thread the camera wires. Ha Ha!
Rear camera.
1. Remove rear left seat back
2. remove most left hand side interior trim of boot
3. remove left hand read light
4. kneel on floor and remove centre "bolt" right under the rear bumper of the car.
5. Thread the camera line through this hole and bolt the rear camera in place.
6. Run the lead upto the removed rear light - keep the lead clipped to the bumper as it is next to the exhaust - run the wire through the light gland and into the boot.
7. From in the car gently lift up the rear parcel shelf and look until you see light. Use a stiff bit of wire to pass through to the boot, attach camera wire and pull through
The now have a working reversing camera.
Front Camera.
1. The wire is run via the DRIVERS side so remove the drivers rear seat, run a camera lead to the dirivers side, under the carpet of the drivers seat and then in to the drivers foot well.
2.Lift drivers carpet and look where the loom enters the engine area
3. This is a rubber gland - tape the wire to a screwdriver poke it through the gland and pull!
4. Remove radiator cover
5. make wire neat
6. attach camera to under number plate area with strong doublesided tape
7. connect
And you are done.
I have missed out some detail.
The kit was supplied with a series of screw in connectors to connect to the loom. I am not a fan of these and most i did not use, but for connection into wires in the car i did ( you will see them on the pics) so that no wires on the car have been tampered with or cut.
it is a big job - worth it - yes.
You will need a soldering iron, decent tool kit and a multimeter together with a decent amount of basic electrical knowledge.
If I can help ask - just do bear in mind it is honestly a big job and I would not want anyone to have their car in bits and not know what to do. Is it difficult . No BUT there is allot of it!
[url]
|http://thumbsnap.com/3w21OiNp[/url]


Paralight said:
Glad you got it sorted Jeremy, at long last 
Give me a ring, again, if you need me, always glad to help.
Mikey,
The Garmin is a different beast altogether....... I have done them, but not as straightforward as the Volvo based system.
All the best,
James
Thanks JamesGive me a ring, again, if you need me, always glad to help.
Mikey,
The Garmin is a different beast altogether....... I have done them, but not as straightforward as the Volvo based system.
All the best,
James
I guessed as much

Anything you could do?


Jockman said:
Excellent review Jeremy 
Just bought Karen an X5 and it comes with the rear camera and distance lines, so quite interesting to see the methodology
The rear camera has reversing bars, the front one did not. The bars are generated by the camera ( not the VBB unit) so to have them on the front is just a case of getting the correct camera ... the only thing to bear in mind is that the front camera must not invert the image and these are generally harder to find as most are designed for reversing.Just bought Karen an X5 and it comes with the rear camera and distance lines, so quite interesting to see the methodology
The front cam was fitted as on 2 occasions I have hit a front kerb in a parking bay and it was only a matter of time until i did some damage. Here parking lines would not really help as you would be well in the red anyway! They look "nice" depending on your view point but the beepers give you ample warning you are getting to close most of the time!

Mine came fitted with what I think is the AM rear camera (is there one?) that activates when I'm in reverse, and a Kenwood front one that I activate with a little switch in the ash tray. It's brilliant at it has a few different angles and can mix the front/rear images split-screen, and a really handy angle that looks straight down allowing me to get the nose right upto the kerb. It also has some coloured lines that show me what I may be about to hit...
.jpg)
Normally it's me adding these kind of things and struggling as it sounds like you did, but this time the previous owner has done it all for me, even the Dension! Result!!!
Normally it's me adding these kind of things and struggling as it sounds like you did, but this time the previous owner has done it all for me, even the Dension! Result!!!
Hi guys I am in Australia Melbourne) and have self installed the VBB4 successfully into my DB9.
I will tell you that the supplier was helpful but was unable to confirm which wire does what in the Aston Db9.
This will confirm that you dont have to go back to the rear lights to get a reverse wire. It is available under passenger side rear seat.
I can say that I have identified the green wire as the reverse signal and power wire easily identified.
I will submit a pic for clarity. If you need more info just email me on joeangelucci@gmail.com
Go for it..
Gassing Station | Aston Martin | Top of Page | What's New | My Stuff