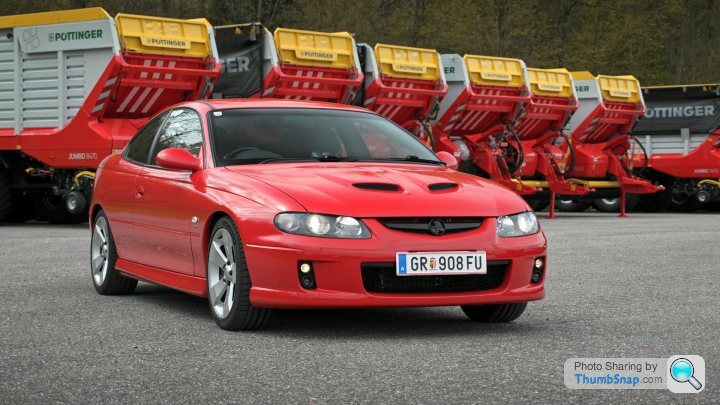
Null's ultimate Dream Car Thread - A CV8 Monaro in Austria
Discussion


granada203028 said:
. I would like a remap as this is discussed allot or at least used to be but would like to see the the results quantified on a rolling road. Not sure I would trust my senses, I would want to know it is better not just be told its better.
You would definitely feel the difference. The original engine mapping was done so long ago when the LS and even programmed FI was new. Happy new year, from my Monaro to yours 
This year's winter project is in full swing - It's time to freshen up the exterior of my now 19-year-old car.
I took off a whole bunch of parts for a refresh:
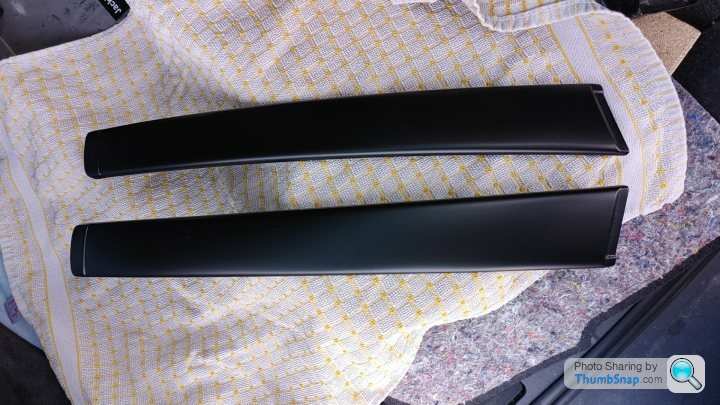
- Wiper arms
- Headlights
- Front bumper & upper grille, fog light bezels, lower grille
- Rear diffuser & fog light cover
- B-pillar trim
- washer nozzles
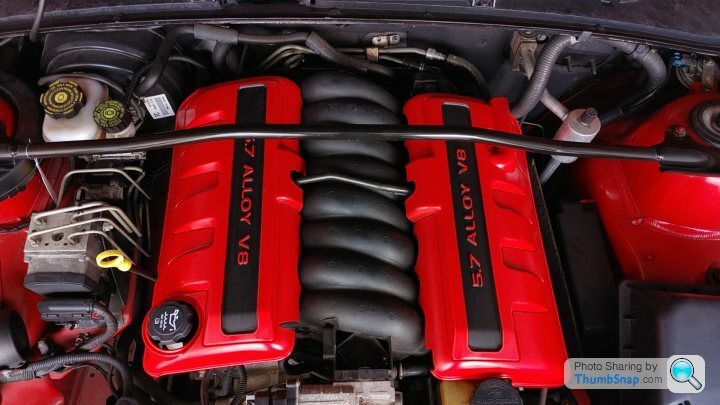
- engine cover
This is the current state of the car, which as you can see is parked up on RaceRamps Flatstoppers, as every year:

This year's winter project is in full swing - It's time to freshen up the exterior of my now 19-year-old car.
I took off a whole bunch of parts for a refresh:
- Wiper arms
- Headlights
- Front bumper & upper grille, fog light bezels, lower grille
- Rear diffuser & fog light cover
- B-pillar trim
- washer nozzles
- engine cover
This is the current state of the car, which as you can see is parked up on RaceRamps Flatstoppers, as every year:

Thanks guys! 
Trust me John, this car is never going anywhere haha
It sucks that I have to garage it for 5 months every year, although to some extent I found out it makes the whole Monaro experience even more special,
knowing I have to consciously take the time to properly enjoy it during the limited time of the year where the weather is nice enough.
The black metal blate/bracket thing that the battery sits on (battery tray?) has some corrosion on the forward facing edge that I need to tackle. Other than that it all looks really good.
But I'll definitely give everything a good clean before the bumper goes back on and even the smallest spot of corrosion will be annihilated!!!
Fred, the power steering cooler is a universal kit from Mishimoto (MMTC-U). When I bought the car the power steering cooler didn't look terribly bad,
but definitely not great either - I figured better be safe than sorry and had it replaced in 2020 at the same time the Pedders quick rack go installed, in preparation for the legalization process.
Do the VT2 HSV GTSes also suffer from badly corroding power steering coolers? On the Monaro it's laughably bad, some owners reported theirs failing after just a couple of years.
Did HSV not bother to replace this crappy part with a higher quality one?
Null, if it makes you feel better quite a few owners in the UK garage their cars up over the winter. I usually take my car off the road from the end of October right up to May.
I removed my battery tray a few years ago and give it couple of Coates of fresh black paint, it’s been fine ever since, you don’t want corrosive acid eating the metal in that area.
Another place to keep clean is the rear of the side skirt in front of the rear wheels. The plastic cover is held on by three screws, remove the cover and clean out all the crud that builds up in there. That is a definite rot prone area if left untreated.
As for the power steering cooler they were all the same across both the CV8’s and HSV’s. They were just made out of steel.
Come to think of it I replaced mine with a standard cooler and again painted it black before spraying it with cavity wax, that was years ago and so far all is corrosion free.
While I’m on a roll…..I removed the round plastic drain plugs from the bottom of the doors and again sprayed the inside of the door with cavity wax. I never bothered to replace the plastic plugs as I couldn’t see the point in them really.
Just a few ideas to keep you busy
Ah yes ,now I remember ,I did also fit the mishimoto one. It was 2020 .
Funnily enough my car is sitting in the same position as yours now, with the bumper off. Its so low now I can only jack it with the bumper off.
Im replacing the PAS pump ,as its leaking., and Ive just had the cooler off to drain the fluid, and Ive fitted an accusump in the gap between the pas cooler and rad.
Time for a big spring update! The car is still safely garaged, but i want to get it back on the road soon.
With the help of my dad, I spent countless hours working on various projects over the Winter.
First off, I proudly present: A fully restored front bumper! Completely sanded down to bare plastic, new primer and color matched paint.
I am so glad I finally found a good automotive paint shop - In a tiny village 30 minutes from my home in the middle of nowhere... They did an outstanding job!
With the paint now looking flawless, I came up with a new license plate mounting solution that uses the existing recess for the small Aussie front plates.
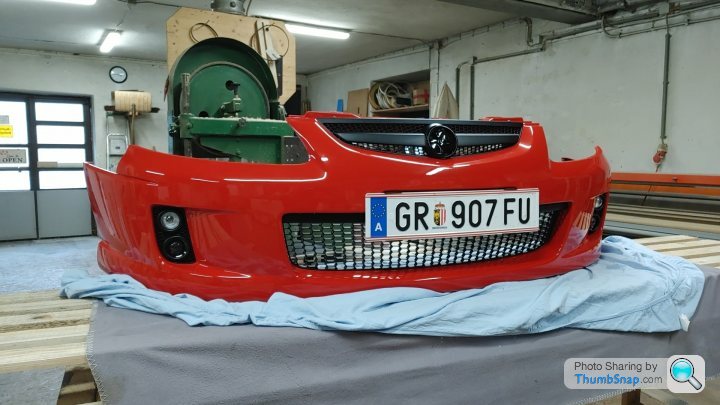
The front bumper is already back together with restored upper grille, lower grille, fog light surrounds and a new gloss black Holden lion badge in place.
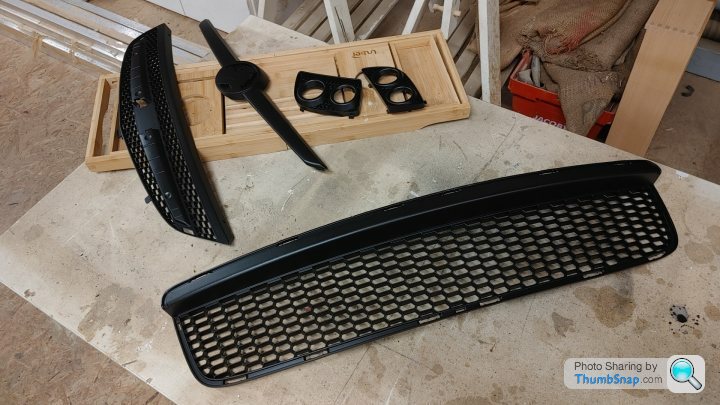
It was about time I got to restore all the faded black exterior plastic parts. I wanted a permanent solution - So I cleaned, sanded lightly, applied primer and matte black paint with rattle cans.
I am very happy with the result. A rich, uniform, matte black tone similar to what I imagine these parts must have looked like when my Monaro left the factory in 2005
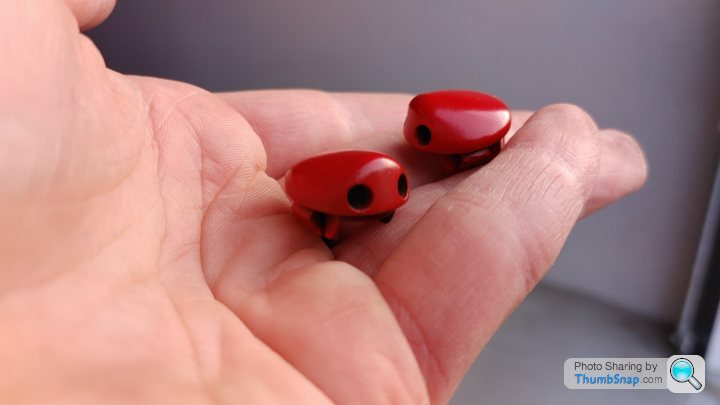
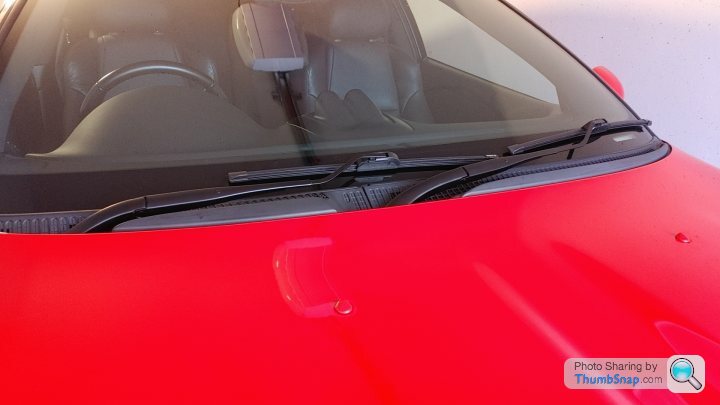
The grey washer fluid sprayer nozzles always bothered me. So I sanded, primed and painted them with an off-the-shelf Duplicolor red that is pretty close to the original Sting Red of the car.
The wiper arms and battery tray were completely stripped with a wire brush drill attachment, sanded, primed and painted matte black.
The B-Pillar trim was really starting to show it's age - It also got the sand/prime/paint-treatment.
Another project was the engine cover. I decided to go the more difficult route - I and wanted the raised lettering to also be red.
After watching a couple of "How to paint raised lettering"-tutorials, I felt confident enough to give it a try with the off-the-shelf Duplicolor red.
The result is "good", but not perfect. Maybe I'll give this another go in the future. I learned a lot from it and think I can do even better next time.
Restoring the headlights proved to be challenging. The lenses were wet sanded with 600, 1000, 1500, 2000 and 2500 grit, followed by compound, polish and a final pass with a super soft pad.
The passenger side headlight came out looking really good, but the driver side headlight showed little improvement even after completing the whole process 3 times!
By then, it became obvious it had some sort of smudge on the INSIDE of the lens. I could barely believe it. This meant having to put it in the oven multiple times
to heat up the butyl sealer and disassemble everything to clean the inside of the lens.
What a mess... the hot sticky butyl was absolutely everywhere. I seriously hope I never have to do this again!
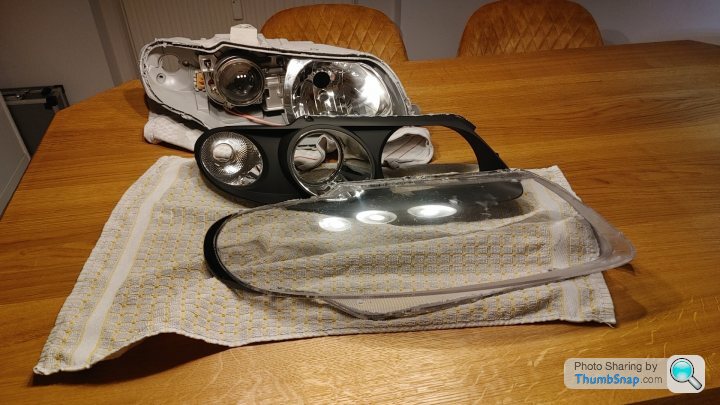
One more thing to do before I can put the driver side headlight back together is refinish the low beam an turn signal reflectors, as the ultra thin OEM chrome coating is starting to peel.
Oh yes, and figuring out a way to permanently seal it up again. But I am confident this will also be done soon.
A couple other things are left to do: I have finished sanding, priming and painting everything except the cowl cover - It is mounted with those dreaded plastic "scrivets" and they have become very brittle with time...
I will have to drill them all out to get the cowl cover off and figure out a new mounting solution.
The rear diffuser & fog light insert are also finished, but the diffuser is mounted with plastic "scrivets" from the factory...
You guessed it, of course a few of them broke when I carefully tried to remove it...
Re-mounting the diffuser with different mounting hardware will be the very last thing to do before I put the car back on the road.
With the help of my dad, I spent countless hours working on various projects over the Winter.
First off, I proudly present: A fully restored front bumper! Completely sanded down to bare plastic, new primer and color matched paint.
I am so glad I finally found a good automotive paint shop - In a tiny village 30 minutes from my home in the middle of nowhere... They did an outstanding job!
With the paint now looking flawless, I came up with a new license plate mounting solution that uses the existing recess for the small Aussie front plates.
The front bumper is already back together with restored upper grille, lower grille, fog light surrounds and a new gloss black Holden lion badge in place.
It was about time I got to restore all the faded black exterior plastic parts. I wanted a permanent solution - So I cleaned, sanded lightly, applied primer and matte black paint with rattle cans.
I am very happy with the result. A rich, uniform, matte black tone similar to what I imagine these parts must have looked like when my Monaro left the factory in 2005
The grey washer fluid sprayer nozzles always bothered me. So I sanded, primed and painted them with an off-the-shelf Duplicolor red that is pretty close to the original Sting Red of the car.
The wiper arms and battery tray were completely stripped with a wire brush drill attachment, sanded, primed and painted matte black.
The B-Pillar trim was really starting to show it's age - It also got the sand/prime/paint-treatment.
Another project was the engine cover. I decided to go the more difficult route - I and wanted the raised lettering to also be red.
After watching a couple of "How to paint raised lettering"-tutorials, I felt confident enough to give it a try with the off-the-shelf Duplicolor red.
The result is "good", but not perfect. Maybe I'll give this another go in the future. I learned a lot from it and think I can do even better next time.
Restoring the headlights proved to be challenging. The lenses were wet sanded with 600, 1000, 1500, 2000 and 2500 grit, followed by compound, polish and a final pass with a super soft pad.
The passenger side headlight came out looking really good, but the driver side headlight showed little improvement even after completing the whole process 3 times!
By then, it became obvious it had some sort of smudge on the INSIDE of the lens. I could barely believe it. This meant having to put it in the oven multiple times
to heat up the butyl sealer and disassemble everything to clean the inside of the lens.
What a mess... the hot sticky butyl was absolutely everywhere. I seriously hope I never have to do this again!
One more thing to do before I can put the driver side headlight back together is refinish the low beam an turn signal reflectors, as the ultra thin OEM chrome coating is starting to peel.
Oh yes, and figuring out a way to permanently seal it up again. But I am confident this will also be done soon.
A couple other things are left to do: I have finished sanding, priming and painting everything except the cowl cover - It is mounted with those dreaded plastic "scrivets" and they have become very brittle with time...
I will have to drill them all out to get the cowl cover off and figure out a new mounting solution.
The rear diffuser & fog light insert are also finished, but the diffuser is mounted with plastic "scrivets" from the factory...
You guessed it, of course a few of them broke when I carefully tried to remove it...
Re-mounting the diffuser with different mounting hardware will be the very last thing to do before I put the car back on the road.

Thanks guys.
Getting the car closer towards the vision I have for it is a slow, but steady process for me, I am constantly learning as I go along. There are some people out there who manage to rebuilt their whole engine over Winter - that's out of my league currently
There are still so many improvements, upgrades and maintenance things that I want to do. I am certain even the current list of plans will keep me busy for a looong time... But then again, we all know with a car like the Monaro, it probaly will never be never truly finished - rather it evolves and ages with you.
Edited by Null.Performance on Wednesday 20th March 22:17
We are back on the road after 169 days!!!
All the parts are back on the car, new EFB battery is in and it fired right up with no issues. I fueled up with 100 Octane and took it for a gentle 65 km spin around the Alpenvorland hills.
I must conclude that after such a long time, I am a bit rusty and need to learn how to "adequately" drive the car again.
The "new" bumper and the restored matte black parts make it look a few years younger, as do the headlights, thankfully - these cost me quite a few sleepless nights!
Now I really need to get the flaking door handles and wheels sorted sooner than later, they stick out even more now.
I'll soon polish the tail lights, drill out the broken plastic scrivets on the cowl cover so I can restore that too an maybe I can do something about the off-center shutlines on the driver's door.
Some pictures of a freshly detailed Monaro:
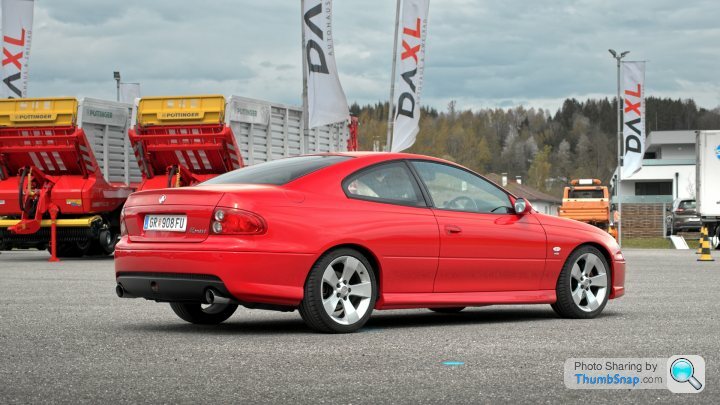

Thank you Roger and John
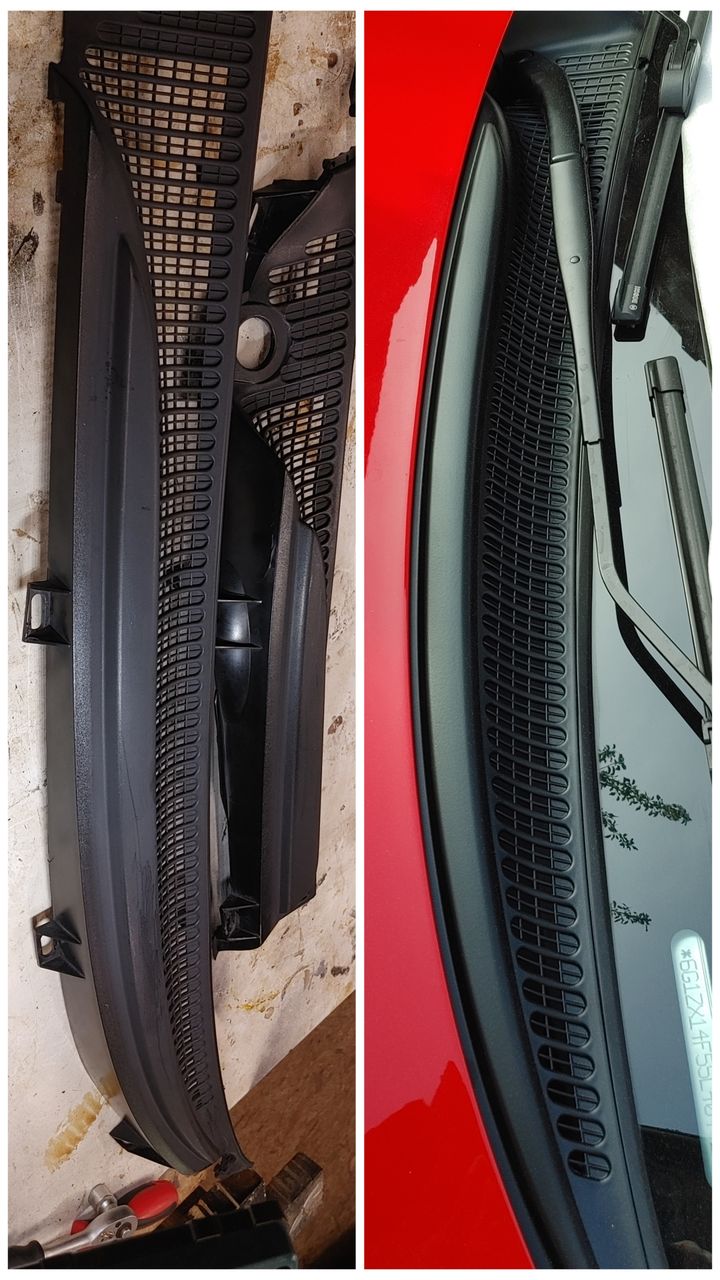
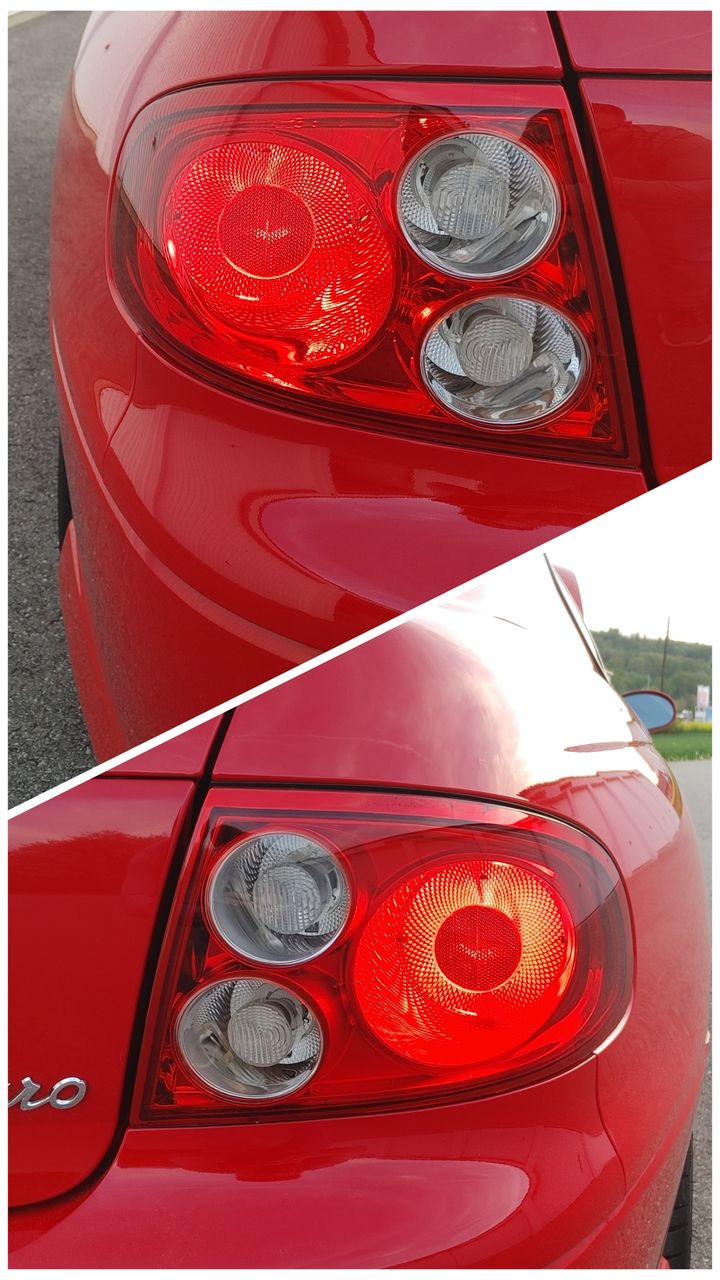
Got some more things done last weekend - restored cowl cover and polished taillights.
On the cowl cover, the before and after is like night and day, and I only had to drill out two of the six scrivets to get it off
The taillights are so shiny now that the cellphone camera has trouble focusing. I'll get some better pictures soon.
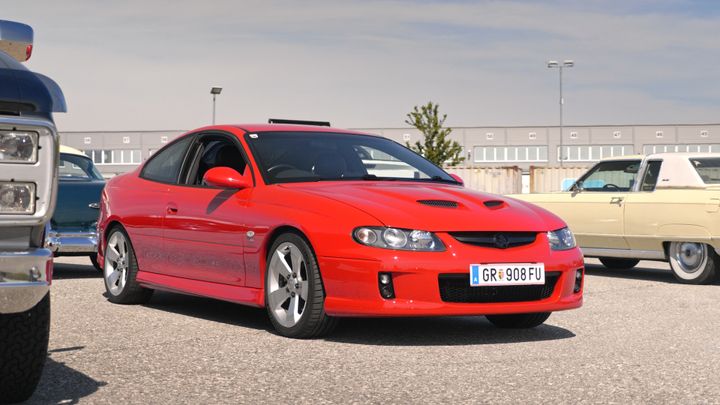
 infact the entire car looks new
On May 1st, I joined the friendly folks at Amerer Air / 1. ÖSTERR. US-CAR CLUB, Austria's oldest and biggest American car club, for the 2024 Season Opening Event.
I brought my Panasonic GH5II video camera and gimbal along. So instead of pictures, please enjoy this video of all the great cars and trucks that were on display. Happy motoring.
I brought my Panasonic GH5II video camera and gimbal along. So instead of pictures, please enjoy this video of all the great cars and trucks that were on display. Happy motoring.
Forum | HSV & Monaro | Top of Page | What's New | My Stuff