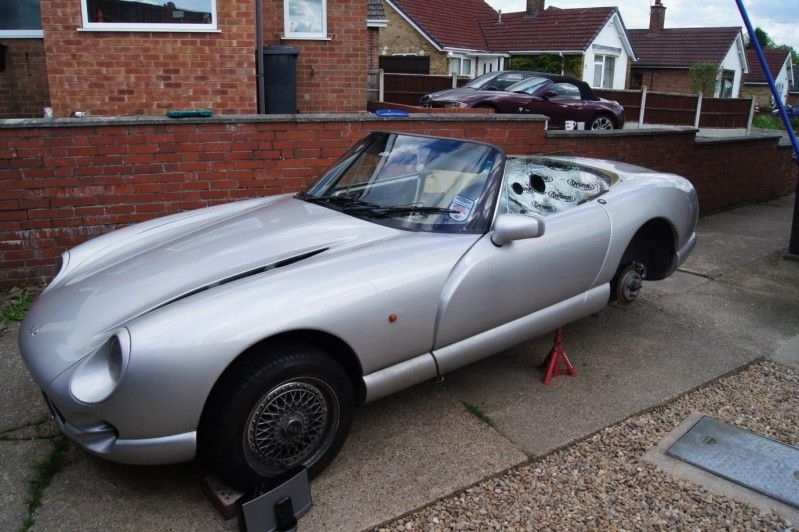
Summer freshing up begins
Discussion


This weekend I wanted to get a lot done but the weather had other ideas, it's really pi$$ed me off, constant heavy showers then sun so i've been in/out the garage.
I made a mount for the ECU on the bulkhead, using the same level of engineering the car was built with lol. I cut a square peice of wood about that fitted into the indentation on the bulkhead where the battery box originally went. I then fixed this to the dynamat with number plate tape (the double sided adhesive foam tape stuff) and sikaflex. Rather nice and snug fit actually. The ECU and relay will be mounted to this and carpet/footboard placed over the front with lots of needed leg room for passengers. I also put some right angled brackets on top of this wooden mount so the heater pipes could be pushed up out of the way and cable tied in place.
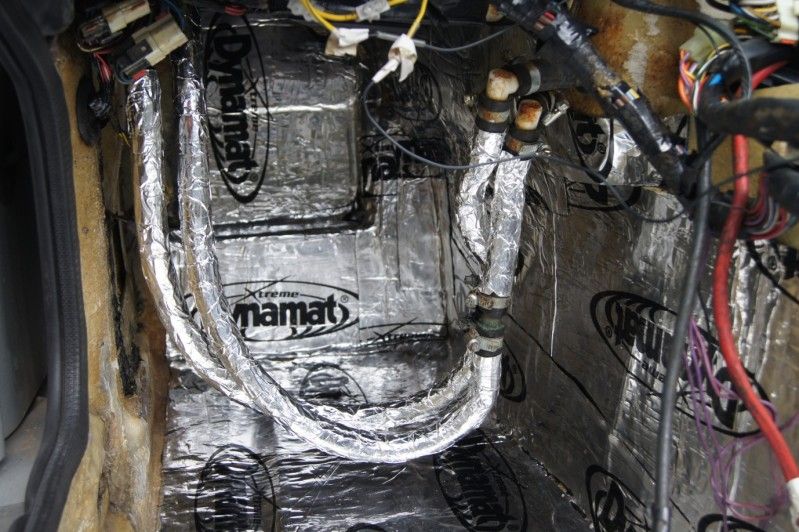
I decided to lag/insulate the water pipes while doing this, might be pointless but I thought I may as well.
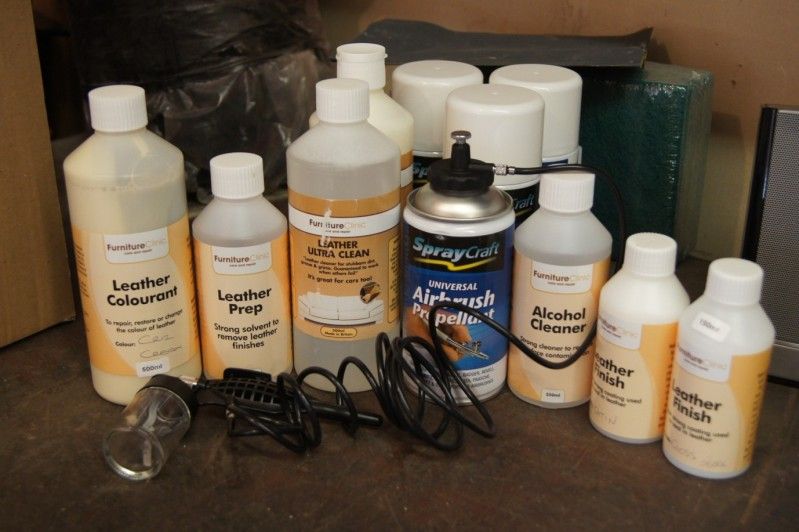
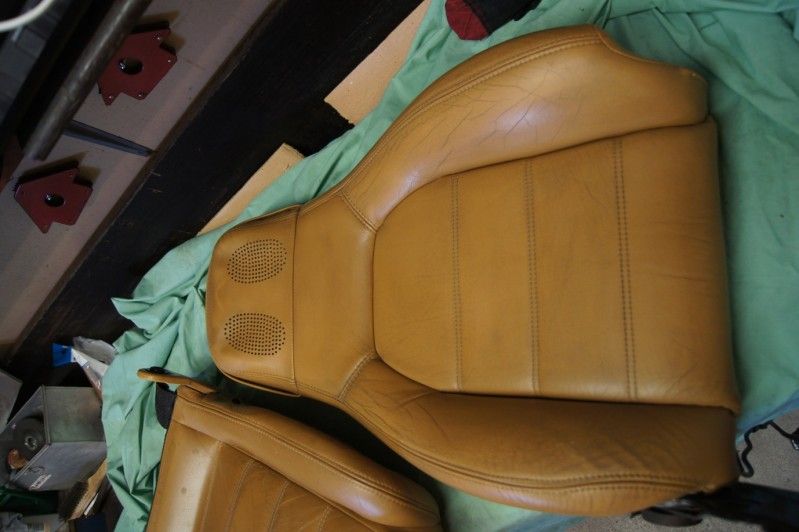
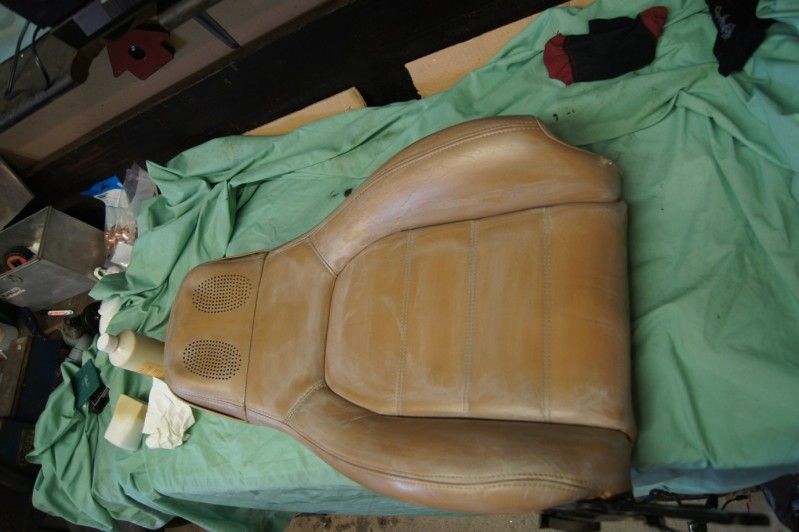
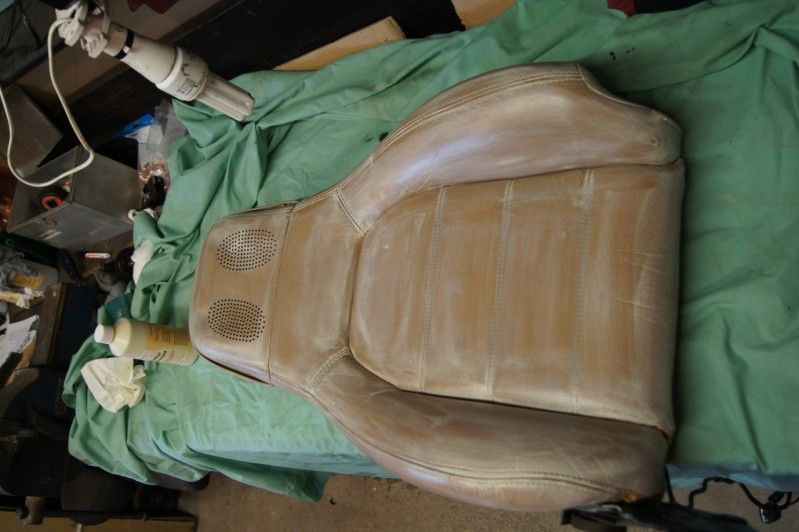
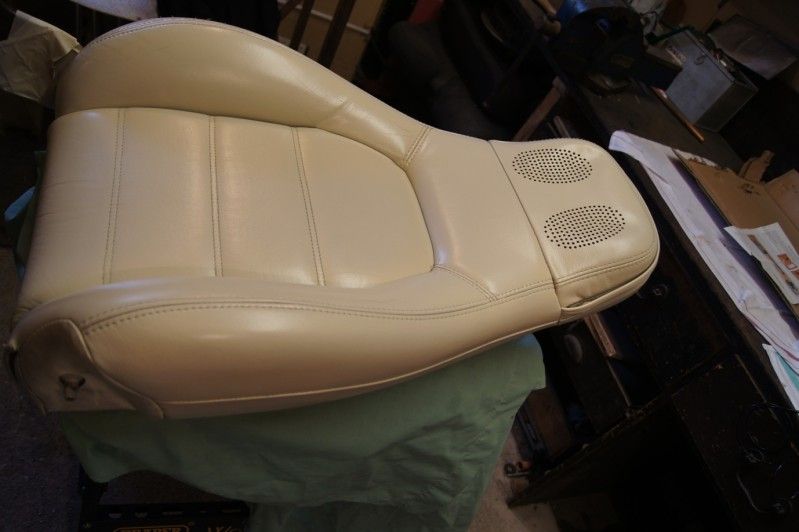
Leather kit from furniture clinic. Their standard cream colour. Pics show the MX5 seats with first coat sponge applied, then another coat and what they look like with 3 sprayed coats. Just need to seal with satin tomorrow. I found this kit surprisingly easy to use, I would recommend to anyone, although if you have a compressor it would be much easier. When you first sponge on the colour it doesn't look like it's doing much so i just worked it into all the hard to reach places and stitching etc. there are some slight cracks on the bolsters still so tomorrow I will sand these down and respray a coat.
I made a mount for the ECU on the bulkhead, using the same level of engineering the car was built with lol. I cut a square peice of wood about that fitted into the indentation on the bulkhead where the battery box originally went. I then fixed this to the dynamat with number plate tape (the double sided adhesive foam tape stuff) and sikaflex. Rather nice and snug fit actually. The ECU and relay will be mounted to this and carpet/footboard placed over the front with lots of needed leg room for passengers. I also put some right angled brackets on top of this wooden mount so the heater pipes could be pushed up out of the way and cable tied in place.
I decided to lag/insulate the water pipes while doing this, might be pointless but I thought I may as well.
Leather kit from furniture clinic. Their standard cream colour. Pics show the MX5 seats with first coat sponge applied, then another coat and what they look like with 3 sprayed coats. Just need to seal with satin tomorrow. I found this kit surprisingly easy to use, I would recommend to anyone, although if you have a compressor it would be much easier. When you first sponge on the colour it doesn't look like it's doing much so i just worked it into all the hard to reach places and stitching etc. there are some slight cracks on the bolsters still so tomorrow I will sand these down and respray a coat.
brett84 said:
Leather kit from furniture clinic. Their standard cream colour. Pics show the MX5 seats with first coat sponge applied, then another coat and what they look like with 3 sprayed coats. Just need to seal with satin tomorrow.
You should really seal with the gloss as it is much more hard wearing.If you want a satin finish, that's fine - simply do 2 coats of gloss and the final one of satin.
Looking good though.

Nosh
Though i'd update what I'm up to in case anyone is in the mood for some more photos.
Been on the car for last couple days when possible.
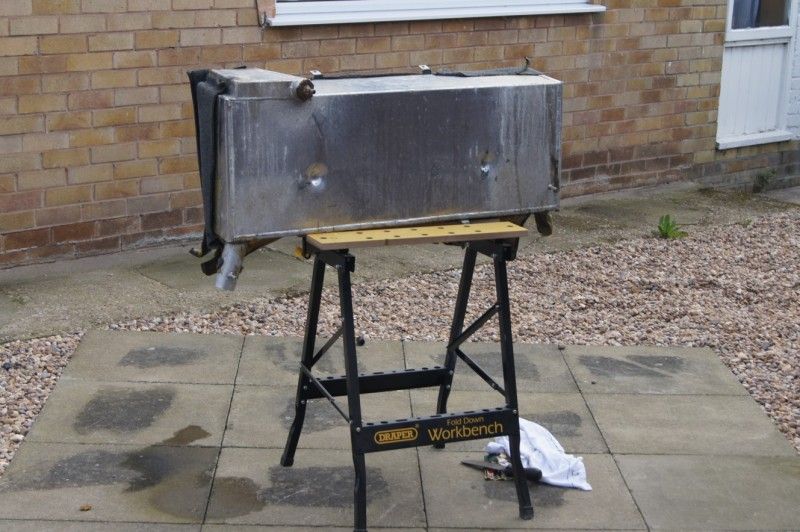
removed fuel tank to enlarge the sender hole so I can fit the VDO sender. It's out, done and back in now but I will change the fuel lines and filer before finishing up.
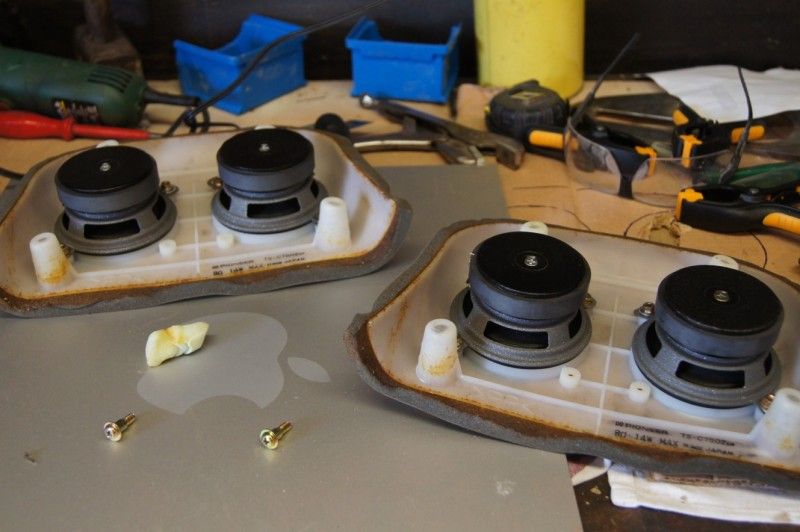
New speakers fitted in the MX5 headrests, they fitted spot on, 3.5" Ground Zero (50w rms), pair per headrest so should sound nice with a 6.5" I will be putting in the rear shelf/bulkhead. I wondered why the MX5 seats had 6 wires going into them, I thought maybe heated seats? But it turns out they have the optional 'thumper' which is inside the seat and vibrates to music. Kind of like a subwoofer effect but no audio comes out, just vibration, but I think it only works with the Maxda headunit so I will be ignorning it. I just thought it was an interesting idea from Mazda and haven't seen/heard of it before.
Most of the interior is now underlayed with dynamat extreme for the important areas (footwells, bulkhead, tunnel, doors and rear shelf will be). Then using cheaper version for the floor, and any other areas that I'm doing.
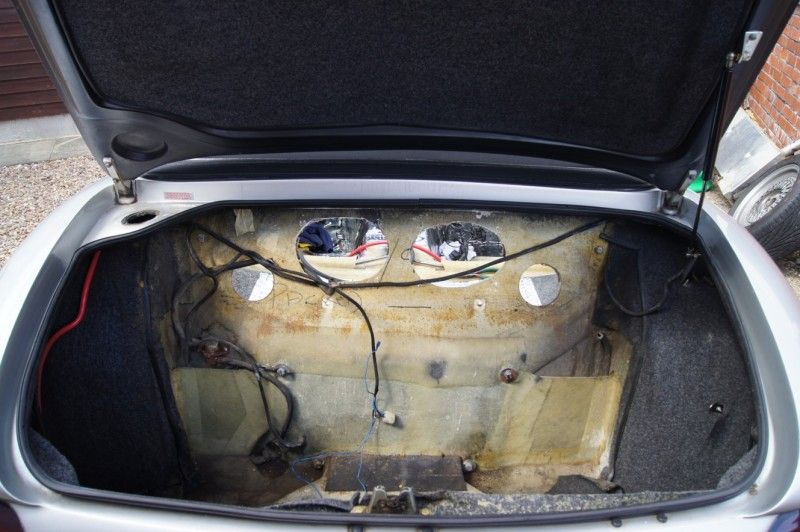
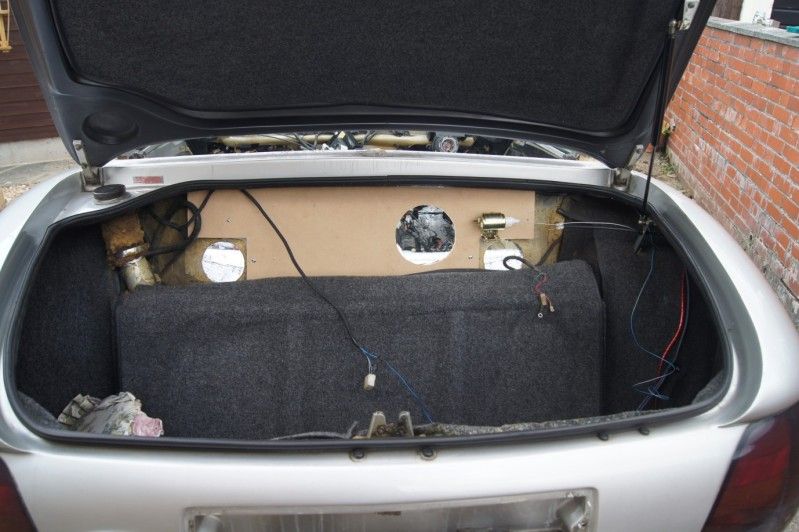
Fusebox moved behind passenger seat, original wiring loom stretched out fine then i've taped it to the tunnel nice and flat. I had to hacksaw the lip from the top of the cubby hole so the fusebox is now about a perfect fit. Battery box sorted for the boot, it will be going in the left hand corner to hopefully balance out the weight from the spare wheel. Earth is the chassis bolt behind fuel tank, crimped and soldered connections.
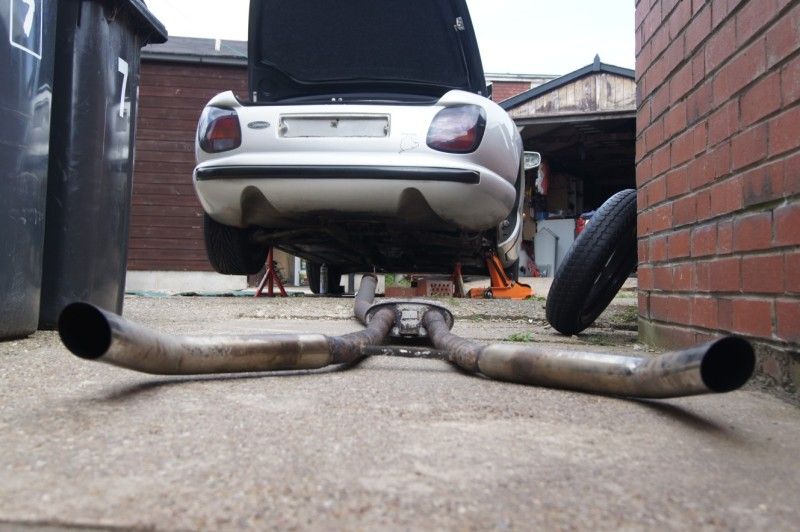
Removed the exhaust so I can fit cherry bombs and change all the mounts, it was doing my head in and kept vibrating/rattling. When I took it off all the rubbers where perished and the previous owner tried to sleeve or do something to the backbox as it's been welded back on a bit rough, I'll sort that next week.
Tomorrow I'm going to start carpeting and also play about with getting solendoids working for door releases. I've planned out a nify system using bike cables and remotely mounted solendoids, in theory it should work, but maybe not?

Been on the car for last couple days when possible.
removed fuel tank to enlarge the sender hole so I can fit the VDO sender. It's out, done and back in now but I will change the fuel lines and filer before finishing up.
New speakers fitted in the MX5 headrests, they fitted spot on, 3.5" Ground Zero (50w rms), pair per headrest so should sound nice with a 6.5" I will be putting in the rear shelf/bulkhead. I wondered why the MX5 seats had 6 wires going into them, I thought maybe heated seats? But it turns out they have the optional 'thumper' which is inside the seat and vibrates to music. Kind of like a subwoofer effect but no audio comes out, just vibration, but I think it only works with the Maxda headunit so I will be ignorning it. I just thought it was an interesting idea from Mazda and haven't seen/heard of it before.
Most of the interior is now underlayed with dynamat extreme for the important areas (footwells, bulkhead, tunnel, doors and rear shelf will be). Then using cheaper version for the floor, and any other areas that I'm doing.
Fusebox moved behind passenger seat, original wiring loom stretched out fine then i've taped it to the tunnel nice and flat. I had to hacksaw the lip from the top of the cubby hole so the fusebox is now about a perfect fit. Battery box sorted for the boot, it will be going in the left hand corner to hopefully balance out the weight from the spare wheel. Earth is the chassis bolt behind fuel tank, crimped and soldered connections.
Removed the exhaust so I can fit cherry bombs and change all the mounts, it was doing my head in and kept vibrating/rattling. When I took it off all the rubbers where perished and the previous owner tried to sleeve or do something to the backbox as it's been welded back on a bit rough, I'll sort that next week.
Tomorrow I'm going to start carpeting and also play about with getting solendoids working for door releases. I've planned out a nify system using bike cables and remotely mounted solendoids, in theory it should work, but maybe not?

Nice job mate 
I would love to move the fusebox behind the seat but it scares me ,it may never start again .
What size cable are you useing for the fuse box feed from the battery.
Are you useing a standard battery ?
Keep the pics coming in .
I would love to move the fusebox behind the seat but it scares me ,it may never start again .
What size cable are you useing for the fuse box feed from the battery.
Are you useing a standard battery ?
Keep the pics coming in .
Edited by SILICONEKID340HP on Sunday 6th May 22:43
I'm using cable from www.vehicle-wiring-products.eu which is I think the 35mm one? thicker than original anyway.
I'm using PC925 battery and sits just right in the boot corner
I'm using PC925 battery and sits just right in the boot corner
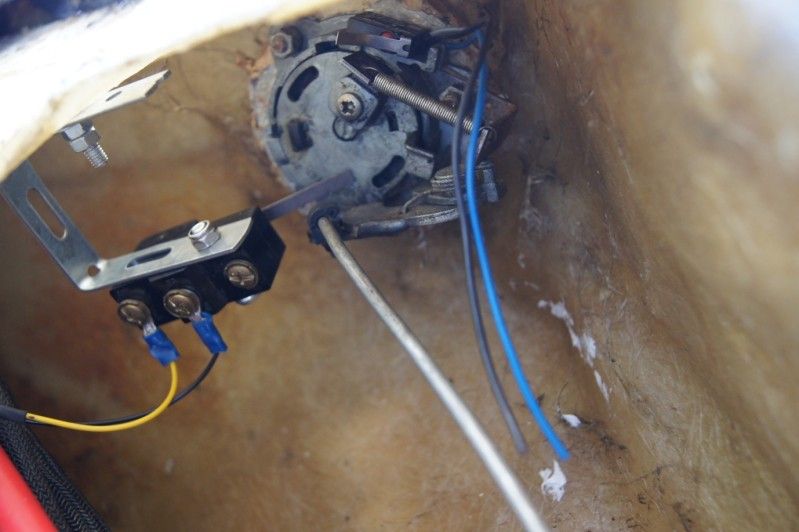
Forgot to say the petrol tank outlet connector is rubbish,its just a piece of pipe welded in to the threaded boss .
It rearly needs to be ribbed ,even tightened up with proper fuel clamps i could still spin the new petrol hose .
I would weld a new nipple.I have one but can`t weld .
It rearly needs to be ribbed ,even tightened up with proper fuel clamps i could still spin the new petrol hose .
I would weld a new nipple.I have one but can`t weld .
Edited by SILICONEKID340HP on Sunday 6th May 22:50

Been playing about with things this weekend as both door locks are a bit 'dodgy', don't always unlock or the key gets stuck sometimes. New lock sets are quite expensive.
So I rang some breakers and for either the wing mirror switches or rear panel switches (mine has key hole) you're look at silly money.
So i've sorted it via solenoids now. This is quite a simple modification if any early Chim owners want door openers instead of the manual push unlocks.
Firstly I needed to fill in the 6x9 holes in the rear shelf anyway as I'm not having them. So I cut a peice of MDF to fit, eventually this will be carpeted to give a smooth blend into the boot so you can't notice the raised section. I will be mounting a 6.5" Kicker sub and small amp on there. But for now just the solenoids are mounted there. I tried this method with some cheap eBay solenoids but they were not strong enough so I bought some bigger ones for about £10each - I think they are 15lb strength. Cable routed through small hole in the boot bracket, through to the door mechanism. Couldn't be simpler to fit as there are spare holes already, next to the existing cable (from centre console).
I wanted something a bit different so for the drivers side I have fitted a reed switch to the inner wing and this is activated by a magnet in my keyring.
The passenger side has a switch which is activated by just pressing down the original door unlock, but no force is needed so it feels much better and works perfect.
Both sides only work when the car is not alarmed so security is not effected, both sides needed relaying to take the load.
Thanks mate, do I remember reading on here you fitted your own carpet? Or are going to?
I bought a set from Coverdale and planned on fitting them yesterday, but I have decided to try and find a fitter instead, looks like a ball ache and I would want the finish be spot on which I might not make it. I think while I'm getting that done I may as well get a new roof with smaller window as mine is really knackered and looks terrible.
But she looks so mucj better without a roof I just want to leave it off, shame I can't afford the hard top conversion
I really just want to get back on the road now.
Brett,
Have you still got the original seats ? I'm desperate to get hold of some. The s2000 seats that were shoved in mine simply do not fit !!
Looks like a hell of a lot of work there but wht's finished so far is looking great. I'm really tempted to move the battery to the boot and have already done the fuse box but i don't have the technical know-how for the battery unfortunately.
Great work !!
AJ
brett84 said:
hi mate
yeah i have the black leather original seats, no runners though as i'm using those on the MX5 seats.
I'm going to put the MX5 seats in first though to make sure they definately fit, so might be a couple of weeks before I know if i'm selling the old ones
Ok cool, well would happily probably take either of them off yours hands (for the right price yeah i have the black leather original seats, no runners though as i'm using those on the MX5 seats.
I'm going to put the MX5 seats in first though to make sure they definately fit, so might be a couple of weeks before I know if i'm selling the old ones
 ) as these ones are unbareable, they rub on everything and just basically don't fit !
 Like the look of the Mx seats in there as well though, i've been looking for some of them myself !
AJ
Nosh said:
brett84 said:
........i'm now even more confused after reading all the posts by people that have already moved it......
My own view is that you will still get an ample increase in moving the battery.......so just do that.But, its your P&J and it is really up to you.
Best of luck!
Nosh
I am 6'3" with long legs and I can almost fully stretch out in the passenger seat with the PC925 installed in the footwell (and the CUX14 ECU next to it) - what more would I want?
I don't like heavy and potentially sparky things on top/right behind the fuel tank, none too happy about having a honking big power cable running the length of the car, either (I did a battery relocation to the boot in my old Saab, but that was made out of Panzer steel and I ran the cable through the middle of the car along the 'transmission' tunnel, also a battery relocation was just about mandatory for that car if you wanted to have a non-restrictive exhaust downpipe from the turbo).
not many photos today but it's been a long day on it again, starting to get fed up now, but hopefully motivation will rear up again tomorrow?
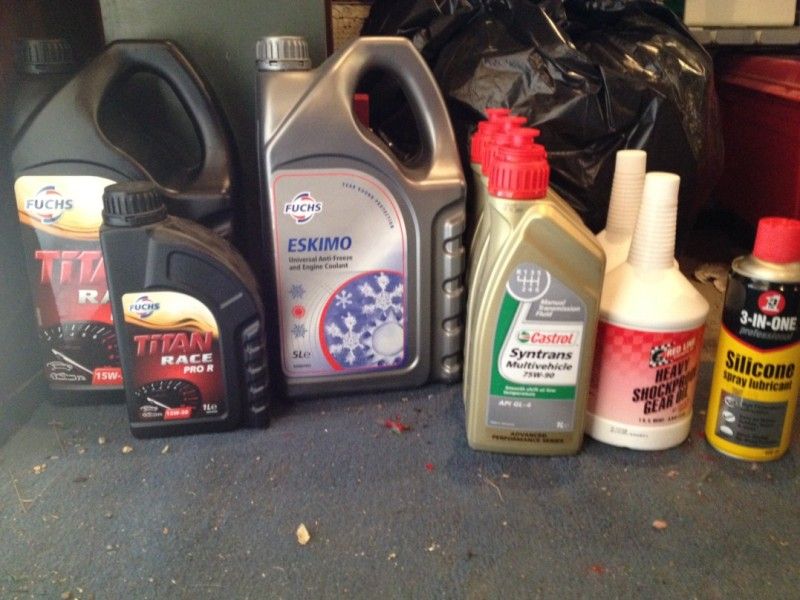
Treated her to a full fluid change as I wasn't 100% sure when it was last done.
Do all the LT77 have magnetic filler plugs? and mine had quite a bit of metal filings on, don't know if this is normal?
Anyway after loads of reading on here I got everything from Opie Oils, went for Red Line Heavy diff oil, Syntrans for the gearbox, Fuchs 15W50 engine oil and Fuchs Eskimo coolant.
Just need to do the breaks now.
How often should I grease the prop joints? I noticed it had fill nipples on it.
I have been making the new dash panel today.
Well I didn't want to completely do a new one as I would need to get some bits just right, like the LED and heat dial holes. I'm changing all the gauges to ETB which are smaller (52mm and 100mm) plus adding an extra gauge and moving the hazard switch to the right hand side of the dash. Swapping the rev counter and speedo around while I'm at it because I prefer the Rev counter on the left, dont know why, but I do?
I'm making a new radio panel from the Ally and covering with 3M stuff as well. Using the Bright 6 warning lights so I can remove the original warning lights and also the LEDs from the dash.
http://www.demon-tweeks.co.uk/performance/dash-war...
Edited by brett84 on Friday 7th September 10:37
Also started the new key/entry system. I never liked the TVR key so I got one of these kits from eBay which has the flip key and remote function. I'm swapping the blade over so the key fits and then putting the original alarm fob circuit into the key. So the key will lock, unlock and have remote door open - quite cool I think?
http://www.ebay.co.uk/itm/55075-Universal-Remote-K...
http://www.ebay.co.uk/itm/55075-Universal-Remote-K...
Gassing Station | Chimaera | Top of Page | What's New | My Stuff