BMW 330CI E46 Build thread
Discussion


Start off straight away with a video link from the afternoon session:
https://youtu.be/u2xm24dwmZY
Wednesday morning Cadwell Park.
Cadwell is a fair old 3+ hour drive for us from the Northwest so we now have a habit of booking a hotel in Louth so it's only a ten minute drive in the morning to get to the circuit.
Cooked breakfast in the hotel to start the day and we were at the circuit before 8 clock.
I had set everything up prior to putting the car on the trailer with cold tyre pressures and damper settings so it was purely a case of rolling it off the trailer and signing on.

Sighting laps went off without any issues and I was straight out on track as soon as the track opened. Not my usual style but I was ready to go and wanted to take a friend who was on his 3rd ever track day and 1st time as Cadwell park for a quick morning session to show him the lines and some tips around the circuit for his first session.
The car felt perfect, the changes to the rear end feeling noticeably more predictable with the tyres staying in contact with the ground given much better drive out of off camber corners.
I did a nice 15 minute stint getting some heat into the car and popped back into the pits to go out as a passenger in his mini and give a few pointers.

Managed to then get a few sessions in on my own and find some reasonable laps with a little bit of traffic. The day was interrupted a little bit with red flags due to the floppies ending up on the circuit and them having to red flag a few sessions to replace them. The car felt so much better than this time last year, change of tyres and a little more aero with the help of the rear wing and the car had noticeably more grip and was far more planted through the corners.

Not long before lunchtime my stomach would catch up with me though, for some reason I've always struggled with sickness at Cadwell. No where else not even Spa. But just before lunch as the car was getting really hot inside I did a little bit of dry heaving driving through hall bends which resulted in a trip to the toilets, some water and some paracetamol. I've often felt sick at Cadwell but never physically been sick but he heat inside the car today was terrible. I dropped the window a couple of inch by taking off the door card and phyiscally lowering it and change from a long sleeve to a short sleeve top ready for the afternoon.
Quick check the logger and cameras were all working fine in the heat and we're ready to go out again.

The afternoon sessions where brilliant, nice an quiet with only light traffic on the laps. Managed to do a few sessions chasing some quicker cars, some of them you've seen me post about before. Jordans E36 and Nigels Pinderwagon. Will finish off the video from the afternoon and post it up afterwards.
The second to last session I managed to get 3 nice clear laps without anyone holding me up. At the time due to the heat and still feeling a little sick I was just focusing on driving smooth not chasing lap times but managed to post some consistent 1:42's. Nicely 2.5 seconds quicker than my best lap times last year. Still lots of time to be found around the circuit as my cornering speeds are still way lower than they should be with the car set up now but it's improving all the time.
I did notice in this session with some clear track on the straights I was looking at the temperatures, oil and fuel pressure, oil pressure seemed a little bit low on the back straight. At the time I made a mental note of a 30-40psi oil pressure and carried out... Continues later...
Completed it. Another fantastic flawless track day at Cadwell Park in prime conditions once again. Time to pack up the car and trailer and head into Louth for a couple of drinks and an indian before driving back home the new day to get sorted for Snetterton.

Reviewing the track day - Data, Data, Data
After the track day I do my usual editing of videos and checking all of the data from the logs. The data logger logs a lot more information than shown on the videos but I when looking at the oil pressure logs I did confirm what I saw when I was out on track was that the engine was only doing high 30's to 40 PSI hot at high RPM.
Looking back at previous logs the car normally runs at 55-60psi Hot at higher RPM. Thought it was a little strange but I checked the oil pressure when It had been left over night and the oil was cold. Started the car and initial oil pressure was 60psi. No trouble I thought until the engine oil got hot again and it settled at 18psi idle which is normal but when reving the engine the highest oil pressure I could get was 40psi. 20psi lower than expected.
I decided to dig deeper into it this morning, despite the fact we set off for Snetterton in two days.
I assumed it was going to be something to do with the oil relief spring or similar. Time to get the sump off and have a look.

It's not the easiest of jobs to get to the oil pump. but when the sump was dropped the problem was obvious straight away and it wasn't what we expected at all...
initial observations shows that the bolts that hold the two sections of the oil pump have backed out, no wonder it was showing lower oil pressure as it was being pumped back into the sump rather than up into the main gallery of the engine.

Second observation, despite my efforts when I built this engine of lock wiring the VAC Motorsport ARP bolt to the gear as this previously has come undone in the past despite the VAC kit being an upgrade for the known weak OEM oil pump shaft, The wire was still holding the ARP tight however the gear has been wearing on the oil pump shaft. This is the second one to do this.
2021

2020

This engine has only ran for 5 full days since it was completely rebuilt so there is something I need to address with this oil pump issue on the M54's. I will come back to this topic later on.
The main priority at the moment is to get the car to be able to work for Snetterton and then address the issues afterwards.
I still had the OEM oil pump shaft in the garage and a friend has a spare gear from an E36 that I could run on it to get me through the next week. However the OEM shafts have a left hand thread nut on them which are known for coming undone and causing zero oil pressure.
I decided the best I could do with leaving to go away in 48 hours was to drill the standard nut and lockwire it on.
Drilled two holes in the nut on both sides to lock wire in place.

Rebuilt the pump back up with high strength lock tight on the bolts and the nut, as well as adding stainless lock wire to the nut to try to prevent it from coming undone. Not the neatest wiring I have ever done but I wanted to make sure that the nut was under preload to try to prevent it from moving

Last job of the day today was to replace the crank pulley, I had a brand new Febi damper pulley on the shelf so I thought it was a good time to get it put on there while the car was in pieces. The old pulley was looking a little tired so hopefully this will help a little bit

Some fresh oil and many hours work today and the E46 is back running on axle stands, there's a few jobs to finish off tomorrow which is waiting on parts to arrive in the post but it should be ready to go onto the trailer tomorrow evening.

Oil pump future
Keeping it short and sweet but here's a list of fixes for the future.
-To fix the oil pump issue I need to fix the harmonic issues with the crank which can only really be dampened with a better quality damper such as a super damper. These are the best part of £1000.
-The oil pump chain is looking a little bit slack so I'm going to replace the chain with a new one.
-While replacing the chain I am going to drill and thread the block to add in a change tensioner similar to those seen on the S50/S54 engines which are designed for revving higher.
-Will probably look at different oil pump kits which offer a more solid key between the shaft and the gear.
Update to follow tomorrow with the final jobs finished - We're getting closer to being ready for Snetterton now.
https://youtu.be/u2xm24dwmZY
Wednesday morning Cadwell Park.
Cadwell is a fair old 3+ hour drive for us from the Northwest so we now have a habit of booking a hotel in Louth so it's only a ten minute drive in the morning to get to the circuit.
Cooked breakfast in the hotel to start the day and we were at the circuit before 8 clock.
I had set everything up prior to putting the car on the trailer with cold tyre pressures and damper settings so it was purely a case of rolling it off the trailer and signing on.
Sighting laps went off without any issues and I was straight out on track as soon as the track opened. Not my usual style but I was ready to go and wanted to take a friend who was on his 3rd ever track day and 1st time as Cadwell park for a quick morning session to show him the lines and some tips around the circuit for his first session.
The car felt perfect, the changes to the rear end feeling noticeably more predictable with the tyres staying in contact with the ground given much better drive out of off camber corners.
I did a nice 15 minute stint getting some heat into the car and popped back into the pits to go out as a passenger in his mini and give a few pointers.
Managed to then get a few sessions in on my own and find some reasonable laps with a little bit of traffic. The day was interrupted a little bit with red flags due to the floppies ending up on the circuit and them having to red flag a few sessions to replace them. The car felt so much better than this time last year, change of tyres and a little more aero with the help of the rear wing and the car had noticeably more grip and was far more planted through the corners.
Not long before lunchtime my stomach would catch up with me though, for some reason I've always struggled with sickness at Cadwell. No where else not even Spa. But just before lunch as the car was getting really hot inside I did a little bit of dry heaving driving through hall bends which resulted in a trip to the toilets, some water and some paracetamol. I've often felt sick at Cadwell but never physically been sick but he heat inside the car today was terrible. I dropped the window a couple of inch by taking off the door card and phyiscally lowering it and change from a long sleeve to a short sleeve top ready for the afternoon.
Quick check the logger and cameras were all working fine in the heat and we're ready to go out again.
The afternoon sessions where brilliant, nice an quiet with only light traffic on the laps. Managed to do a few sessions chasing some quicker cars, some of them you've seen me post about before. Jordans E36 and Nigels Pinderwagon. Will finish off the video from the afternoon and post it up afterwards.
The second to last session I managed to get 3 nice clear laps without anyone holding me up. At the time due to the heat and still feeling a little sick I was just focusing on driving smooth not chasing lap times but managed to post some consistent 1:42's. Nicely 2.5 seconds quicker than my best lap times last year. Still lots of time to be found around the circuit as my cornering speeds are still way lower than they should be with the car set up now but it's improving all the time.
I did notice in this session with some clear track on the straights I was looking at the temperatures, oil and fuel pressure, oil pressure seemed a little bit low on the back straight. At the time I made a mental note of a 30-40psi oil pressure and carried out... Continues later...
Completed it. Another fantastic flawless track day at Cadwell Park in prime conditions once again. Time to pack up the car and trailer and head into Louth for a couple of drinks and an indian before driving back home the new day to get sorted for Snetterton.
Reviewing the track day - Data, Data, Data
After the track day I do my usual editing of videos and checking all of the data from the logs. The data logger logs a lot more information than shown on the videos but I when looking at the oil pressure logs I did confirm what I saw when I was out on track was that the engine was only doing high 30's to 40 PSI hot at high RPM.
Looking back at previous logs the car normally runs at 55-60psi Hot at higher RPM. Thought it was a little strange but I checked the oil pressure when It had been left over night and the oil was cold. Started the car and initial oil pressure was 60psi. No trouble I thought until the engine oil got hot again and it settled at 18psi idle which is normal but when reving the engine the highest oil pressure I could get was 40psi. 20psi lower than expected.
I decided to dig deeper into it this morning, despite the fact we set off for Snetterton in two days.
I assumed it was going to be something to do with the oil relief spring or similar. Time to get the sump off and have a look.
It's not the easiest of jobs to get to the oil pump. but when the sump was dropped the problem was obvious straight away and it wasn't what we expected at all...
initial observations shows that the bolts that hold the two sections of the oil pump have backed out, no wonder it was showing lower oil pressure as it was being pumped back into the sump rather than up into the main gallery of the engine.
Second observation, despite my efforts when I built this engine of lock wiring the VAC Motorsport ARP bolt to the gear as this previously has come undone in the past despite the VAC kit being an upgrade for the known weak OEM oil pump shaft, The wire was still holding the ARP tight however the gear has been wearing on the oil pump shaft. This is the second one to do this.
2021
2020
This engine has only ran for 5 full days since it was completely rebuilt so there is something I need to address with this oil pump issue on the M54's. I will come back to this topic later on.
The main priority at the moment is to get the car to be able to work for Snetterton and then address the issues afterwards.
I still had the OEM oil pump shaft in the garage and a friend has a spare gear from an E36 that I could run on it to get me through the next week. However the OEM shafts have a left hand thread nut on them which are known for coming undone and causing zero oil pressure.
I decided the best I could do with leaving to go away in 48 hours was to drill the standard nut and lockwire it on.
Drilled two holes in the nut on both sides to lock wire in place.
Rebuilt the pump back up with high strength lock tight on the bolts and the nut, as well as adding stainless lock wire to the nut to try to prevent it from coming undone. Not the neatest wiring I have ever done but I wanted to make sure that the nut was under preload to try to prevent it from moving
Last job of the day today was to replace the crank pulley, I had a brand new Febi damper pulley on the shelf so I thought it was a good time to get it put on there while the car was in pieces. The old pulley was looking a little tired so hopefully this will help a little bit
Some fresh oil and many hours work today and the E46 is back running on axle stands, there's a few jobs to finish off tomorrow which is waiting on parts to arrive in the post but it should be ready to go onto the trailer tomorrow evening.
Oil pump future
Keeping it short and sweet but here's a list of fixes for the future.
-To fix the oil pump issue I need to fix the harmonic issues with the crank which can only really be dampened with a better quality damper such as a super damper. These are the best part of £1000.
-The oil pump chain is looking a little bit slack so I'm going to replace the chain with a new one.
-While replacing the chain I am going to drill and thread the block to add in a change tensioner similar to those seen on the S50/S54 engines which are designed for revving higher.
-Will probably look at different oil pump kits which offer a more solid key between the shaft and the gear.
Update to follow tomorrow with the final jobs finished - We're getting closer to being ready for Snetterton now.
Interesting to see the issues with the VAC Motorsport items, though given how long it took for them to get bearings for my build, I'm a bit wary of them.
Of note, the pump upgrade i used was from Achillies , which has a square drive instead of the oval setup yours has, and I've not had any issues with it backing out given it's both wire locked, reverse thread with threadlock.
https://www.achillesmotorsports.com/Achilles-Motor...
As for dampers, I was in the same boat, till i was offered a Alpina B3 item, but i'd manage to find a cheaper alternative to the ATI one that is stupidly overpriced.
https://rossperformanceparts.com/product/bmw-m54-b...
I believe Crest Automotive are in talks to import these over, but when i investigated on shipping, it's cheaper than the ATI damper cost before shipping. Worth a punt on checking them out though.
Sf_Manta said:
Interesting to see the issues with the VAC Motorsport items, though given how long it took for them to get bearings for my build, I'm a bit wary of them.
Of note, the pump upgrade i used was from Achillies , which has a square drive instead of the oval setup yours has, and I've not had any issues with it backing out given it's both wire locked, reverse thread with threadlock.
https://www.achillesmotorsports.com/Achilles-Motor...
As for dampers, I was in the same boat, till i was offered a Alpina B3 item, but i'd manage to find a cheaper alternative to the ATI one that is stupidly overpriced.
https://rossperformanceparts.com/product/bmw-m54-b...
I believe Crest Automotive are in talks to import these over, but when i investigated on shipping, it's cheaper than the ATI damper cost before shipping. Worth a punt on checking them out though.
Great reply as always with some great information. I will have a look at these options, I do prefer to design of the oil pump shaft there as the key is much more defined with a solid fit between the two.Of note, the pump upgrade i used was from Achillies , which has a square drive instead of the oval setup yours has, and I've not had any issues with it backing out given it's both wire locked, reverse thread with threadlock.
https://www.achillesmotorsports.com/Achilles-Motor...
As for dampers, I was in the same boat, till i was offered a Alpina B3 item, but i'd manage to find a cheaper alternative to the ATI one that is stupidly overpriced.
https://rossperformanceparts.com/product/bmw-m54-b...
I believe Crest Automotive are in talks to import these over, but when i investigated on shipping, it's cheaper than the ATI damper cost before shipping. Worth a punt on checking them out though.
Couple more photos from Cadwell Park, because why not!


Aside from the oil pump woes off the back of Cadwell Park I did manage to highlight one smaller issue from the additional grip from the modifications I've been working on recently.
Noticed that mid way through the morning I was getting more and more feedback through the wheel during braking. This normally occurs when there is some play in the suspension on the front end, normally a loose wishbone or worn out wheel bearing.
I had a check over the front end of the car and found this. The inner of the two piece polybush has popped forward, I took it off the car and popped it back in with a hammer and put it back on the car. it stayed put for a couple of sessions but popped back out later in the day, these bushes have been fine for years but I think the additional loading from the grip now is causing the bush to deflect and pop it's self out.

By the time I was home from Cadwell I only had the weekend until Tuesday to get sorted so I needed to find a replacement pretty quickly. I was originally looking to find a set of MRT Solid rose joint control arm mounts but unable to find any in the Uk which could deliver them for Tuesday so from a recommendation from Hack Motorsport the Condor Speed Shop mounts were recommended. These have a much smaller inner bush section which is made from a very hard polyurethane inside a new housing.

Compared with the OEM mounts with Polybush inserts

Looking forward to seeing what difference these make to the feel of the front end and hopefully is the end of the vibrations under braking with solid bushes.

Final few jobs for the day was to get the front end put back together, undertray and splitter and brake cooling ducts fitted, back on it's wheels and washed ready to leave for Snetterton at 9am in the morning.
I forgot to take a picture of it on it's wheels so this will have to do...

Snetterton - August 2021
Snetterton is a fair old 220 miles from me which normally takes around 4 hours driving with the trailer. But I don't mind the traveling down to Snetterton as the circuit is worth it at least once a year. The last two years we've done Snetterton and Cadwell Park one back to back weeks in the summer and it's been great. this year was no exception.
We set off on the Wednesday morning at 9am getting to Thetford for around 2am after some stops at the services, fueled up the cars at Tesco and did a shop for the few days we were away, all set to chill out the night before the track day with us staying in a house only 20 minutes from the circuit.
Thursday morning was my favourite type of conditions for a track day, warm 17-20 degrees, overcast skies and dry. We were at the circuit pretty early which is standard practice for us but there was already a few forum members unloading. I found our garage and popped the car off the trailer.
Few BMW's hanging around waiting for noise testing, funnily enough it turns out there was no noise testing and it was only drive by. It wasn't too bad as I did end up pulling a 99db static at Cadwell Park rising to 106db with a couple of pops on overrun. We spent a bit of time catching up and chatting with friends i haven't seen for months

Usual for me I am always apprehensive to get sighting laps out of the way, to check the car over and see how it feels and it runs correctly, one downside of the car not being on the road is that I don't get to test it like I did with the clio when I've had it in pieces.

First session was red flagged before I managed to get out on circuit but I found myself being the 3rd car in the pit lane ready to go out as the track reoppened.
I had set the tyres to the cold pressure. Stiffened up the rear dampers a few clips from what I had them set at Cadwell and cracked on knowing I could just stay out for the first session and let the car come up to working temperature.
Initial impressions during the first session was how much more mechanical grip the car has from the last time I was at Snetterton the previous year. Massively noticeable through the first corner and around Coram. I did notice the rear of the car a little bouncy in the first couple of sessions so softened off the rear dampers a couple of clicks and let the front full hard.


The rest of the day went off without any issues again for the E46. I checked it over a couple of times during the day but it ran flawlessly once again. Whether the inside of the engine and oil pump is as happy as the rest of the car is unknown, but I'll have a look at that over the next few months.
Spent the day with a lot of passengers onboard which is always good, the additional weight brings the lap times down slightly but I find it's always much better to share the laps with someone, always good fun taking someone new out too who's never been in the car before or not been in it for a while and they can see the progression of the car too,
Here's a video from a session with Ross Woods as passenger.
https://youtu.be/P8bFzkpQmFs
Just before lunch I managed to get out on track with Jonny and F0xy in their E36's which turned out to be one of my favorite sessions of the day.
https://youtu.be/ySd4JrjitQQ
This photo pretty much sums up the Track Obsession day. E46 chasing down various guises of Clio and Meganes. It was good to catch up with some familiar faces and chat to a few new faces too.


So I never look at lap times during the day and I can't seem them without pulling the data off the logger and looking at it on my laptop, but I do always look at it after the day, not always easy to find a clear lap at Snetterton without a passenger on Thursday but I managed a few and was really happy to find a couple of 2:15 laps mixed in there, this is 5 seconds faster than last time I was at Snetterton last august with the same engine, since then I've only been working on handling and mechanical grip so it's good to see the difference in lap times! I had quietly said to myself that I wanted to get down to 2:15 but I wasn't sure if I would be able to.

I've got loads of photos from the track day but I'll leave it there for now. I did my final session around 4:15 and on the final session the circuit was pretty much empty with only a couple of cars on track. This was a nice change from some of the busier track time in the morning. The car felt great and was reliable all day, I've been very lucky with it this year and I hope that it continues.
Few things I have taken away from Snetterton is I think the car would benifit from some stiffer springs now I've moved to AR1's. Snetterton managed to show this with the tight corners causing the car to dip the front end down and roll a little more than it used to, this is something I'll add to the list of changes before it goes out again, I've already got stiffer rear springs I just need to order some fronts to match.
Finish the post off with a pitlane video, I'm obviously biased but I love the straight 6 sound!
https://youtu.be/3CQ8JdplGUA
Snetterton is a fair old 220 miles from me which normally takes around 4 hours driving with the trailer. But I don't mind the traveling down to Snetterton as the circuit is worth it at least once a year. The last two years we've done Snetterton and Cadwell Park one back to back weeks in the summer and it's been great. this year was no exception.
We set off on the Wednesday morning at 9am getting to Thetford for around 2am after some stops at the services, fueled up the cars at Tesco and did a shop for the few days we were away, all set to chill out the night before the track day with us staying in a house only 20 minutes from the circuit.
Thursday morning was my favourite type of conditions for a track day, warm 17-20 degrees, overcast skies and dry. We were at the circuit pretty early which is standard practice for us but there was already a few forum members unloading. I found our garage and popped the car off the trailer.
Few BMW's hanging around waiting for noise testing, funnily enough it turns out there was no noise testing and it was only drive by. It wasn't too bad as I did end up pulling a 99db static at Cadwell Park rising to 106db with a couple of pops on overrun. We spent a bit of time catching up and chatting with friends i haven't seen for months
Usual for me I am always apprehensive to get sighting laps out of the way, to check the car over and see how it feels and it runs correctly, one downside of the car not being on the road is that I don't get to test it like I did with the clio when I've had it in pieces.
First session was red flagged before I managed to get out on circuit but I found myself being the 3rd car in the pit lane ready to go out as the track reoppened.
I had set the tyres to the cold pressure. Stiffened up the rear dampers a few clips from what I had them set at Cadwell and cracked on knowing I could just stay out for the first session and let the car come up to working temperature.
Initial impressions during the first session was how much more mechanical grip the car has from the last time I was at Snetterton the previous year. Massively noticeable through the first corner and around Coram. I did notice the rear of the car a little bouncy in the first couple of sessions so softened off the rear dampers a couple of clicks and let the front full hard.
The rest of the day went off without any issues again for the E46. I checked it over a couple of times during the day but it ran flawlessly once again. Whether the inside of the engine and oil pump is as happy as the rest of the car is unknown, but I'll have a look at that over the next few months.
Spent the day with a lot of passengers onboard which is always good, the additional weight brings the lap times down slightly but I find it's always much better to share the laps with someone, always good fun taking someone new out too who's never been in the car before or not been in it for a while and they can see the progression of the car too,
Here's a video from a session with Ross Woods as passenger.
https://youtu.be/P8bFzkpQmFs
Just before lunch I managed to get out on track with Jonny and F0xy in their E36's which turned out to be one of my favorite sessions of the day.
https://youtu.be/ySd4JrjitQQ
This photo pretty much sums up the Track Obsession day. E46 chasing down various guises of Clio and Meganes. It was good to catch up with some familiar faces and chat to a few new faces too.
So I never look at lap times during the day and I can't seem them without pulling the data off the logger and looking at it on my laptop, but I do always look at it after the day, not always easy to find a clear lap at Snetterton without a passenger on Thursday but I managed a few and was really happy to find a couple of 2:15 laps mixed in there, this is 5 seconds faster than last time I was at Snetterton last august with the same engine, since then I've only been working on handling and mechanical grip so it's good to see the difference in lap times! I had quietly said to myself that I wanted to get down to 2:15 but I wasn't sure if I would be able to.
I've got loads of photos from the track day but I'll leave it there for now. I did my final session around 4:15 and on the final session the circuit was pretty much empty with only a couple of cars on track. This was a nice change from some of the busier track time in the morning. The car felt great and was reliable all day, I've been very lucky with it this year and I hope that it continues.
Few things I have taken away from Snetterton is I think the car would benifit from some stiffer springs now I've moved to AR1's. Snetterton managed to show this with the tight corners causing the car to dip the front end down and roll a little more than it used to, this is something I'll add to the list of changes before it goes out again, I've already got stiffer rear springs I just need to order some fronts to match.
Finish the post off with a pitlane video, I'm obviously biased but I love the straight 6 sound!
https://youtu.be/3CQ8JdplGUA
Edited by tombate911 on Sunday 22 August 22:07
at down this evening with a little bit of time and thought a small update wouldn't go amiss, I've been busy with a house i've bought recently which is a complete renovation back to a bare shell so time is a little thin on the ground at the moment.
It would have been lovely to have been able to park the car up after Snetterton and not have to touch it until the winter Oulton Park date but one thing has led to another, I was going to hold back on posting about this but might as well get the ball rolling...
Parked up on the drive after Snetterton and left it for a couple of weeks, I probably could have left it for a while after rebuilding the oil pump between Cadwell and Snetterton but I wanted to do a few jobs on the engine so rather than leaving it I thought preventative and development was better than trying to piece it back together if something goes again, I was very lucky at Cadwell.

One hour later the front of the car removed

I pulled the engine out and got it mounted on the engine stand, at this point I wanted to do a few jobs before taking the car out again.
-Physically measure the cam lift, duration and centreline to see what the cams are, to find out if they actually match the spec I thought I bought,
-Check over the oil pump after the Cadwell issue, after going back to the standard pump I wanted to see if it was still tight or if any wear had shown from one day on track, considering twice it has been completely knackered after 5 days.
-Replace the oil pump chain, assuming the current chain could be worn / stretched (more on this later)
-I bought a chain tensioner from BMW from the S54 which I am going to fit to the M54.
To do these jobs It would have been a pain in the backside in the car so decided to pull the engine and get it on a stand in the garage so I can work on it properly.
First thing was to pull the sump off and check the oil pump, it was still torqued to what I set it at and there was zero wear between the shaft and the gear unlike I was getting on the VAC Kit, happy this set up is working for the moment.

There is considerable amount of slack in the chain though between the crank and the oil pump. This is something we noticed when the sump was off last month, I ordered a brand new Febi chain. Funnily the chain is exactly the same length as the old one, and you can see how much the chain can be pulled together in the photo here. At least the tensioner I am fitting will take up this slack.
Interesting we compared the M54B30 to a M50/M52 engine and the chain was much tighter on the M50 block as the oil pump seems to sit further away from the crank giving much less slack in the chain... Interesting as I think the slack in the chain was causing the oil pump gear to be snatched putting more force onto the gear/shaft interface.

The next job was to start measuring cam timing
Much easier to do this with it on the stand with the sump off and the rocker cover removed.
We set the engine at TDC with a DTI on the top of the piston to find actual TDC to remove any discrepancies with the single mass flywheel timing pin location.
Glued a timing wheel to the front of the crank pulley and used a piece of welding wire to mark where TDC was on the timing wheel.
We went through the process of putting a digital DTI on the top of the lifter and took a measurement every 3 degrees and input into excel to give the cam profile/lift vs crank angle for both the intake and exhaust.
Schrick list the cams as:
Intake - 272 - 10.9
Exhaust - 256 - 10.4
What we found was the cam duration and lift are pretty much exactly what they say they are. However the issue we did find was that the centrelines of the cams did not marry up with the specification sheets.
Schrick state they should be intake 126 and exhaust 114 degrees in their standard state when timed up.
Intake centreline was 136 degrees and exhaust centreline 111 degrees
Both cams being retarded but by different amounts,
Interestingly when you reach 6 degrees past TDC the timing blocks fall on the end of the cams perfectly.


As you would expect if you put the engine physically to TDC with a DTI a 3d printed 6 degree retarded timing block drops on the end of the cam.

So at the moment the cam timing was 6 degrees off, possibly from the timing pin hole in the flywheel, possibly from some other variables through the vanos system, I did the cam timing myself with the correct tooling and proceedure and when I check the timing when building the engine both blocks dropped on with the pin in the timing hole. There is also still a discrepency between the intlet timing block being a further 4-5 degrees retarded, either way when I time it back up I'll be doing it physically with a DTI and setting the cam centrelines to 114/126 then adjust the cam timing with the vanos. Whether it will make any difference to power when rebuilt, who knows as when on the dyno I did advance the intake cam at the top end and didn't really find much difference at peak rpm, mid range to makes a massive difference to power.
It would have been lovely to have been able to park the car up after Snetterton and not have to touch it until the winter Oulton Park date but one thing has led to another, I was going to hold back on posting about this but might as well get the ball rolling...
Parked up on the drive after Snetterton and left it for a couple of weeks, I probably could have left it for a while after rebuilding the oil pump between Cadwell and Snetterton but I wanted to do a few jobs on the engine so rather than leaving it I thought preventative and development was better than trying to piece it back together if something goes again, I was very lucky at Cadwell.
One hour later the front of the car removed
I pulled the engine out and got it mounted on the engine stand, at this point I wanted to do a few jobs before taking the car out again.
-Physically measure the cam lift, duration and centreline to see what the cams are, to find out if they actually match the spec I thought I bought,
-Check over the oil pump after the Cadwell issue, after going back to the standard pump I wanted to see if it was still tight or if any wear had shown from one day on track, considering twice it has been completely knackered after 5 days.
-Replace the oil pump chain, assuming the current chain could be worn / stretched (more on this later)
-I bought a chain tensioner from BMW from the S54 which I am going to fit to the M54.
To do these jobs It would have been a pain in the backside in the car so decided to pull the engine and get it on a stand in the garage so I can work on it properly.
First thing was to pull the sump off and check the oil pump, it was still torqued to what I set it at and there was zero wear between the shaft and the gear unlike I was getting on the VAC Kit, happy this set up is working for the moment.
There is considerable amount of slack in the chain though between the crank and the oil pump. This is something we noticed when the sump was off last month, I ordered a brand new Febi chain. Funnily the chain is exactly the same length as the old one, and you can see how much the chain can be pulled together in the photo here. At least the tensioner I am fitting will take up this slack.
Interesting we compared the M54B30 to a M50/M52 engine and the chain was much tighter on the M50 block as the oil pump seems to sit further away from the crank giving much less slack in the chain... Interesting as I think the slack in the chain was causing the oil pump gear to be snatched putting more force onto the gear/shaft interface.
The next job was to start measuring cam timing
Much easier to do this with it on the stand with the sump off and the rocker cover removed.
We set the engine at TDC with a DTI on the top of the piston to find actual TDC to remove any discrepancies with the single mass flywheel timing pin location.
Glued a timing wheel to the front of the crank pulley and used a piece of welding wire to mark where TDC was on the timing wheel.
We went through the process of putting a digital DTI on the top of the lifter and took a measurement every 3 degrees and input into excel to give the cam profile/lift vs crank angle for both the intake and exhaust.
Schrick list the cams as:
Intake - 272 - 10.9
Exhaust - 256 - 10.4
What we found was the cam duration and lift are pretty much exactly what they say they are. However the issue we did find was that the centrelines of the cams did not marry up with the specification sheets.
Schrick state they should be intake 126 and exhaust 114 degrees in their standard state when timed up.
Intake centreline was 136 degrees and exhaust centreline 111 degrees
Both cams being retarded but by different amounts,
Interestingly when you reach 6 degrees past TDC the timing blocks fall on the end of the cams perfectly.
As you would expect if you put the engine physically to TDC with a DTI a 3d printed 6 degree retarded timing block drops on the end of the cam.
So at the moment the cam timing was 6 degrees off, possibly from the timing pin hole in the flywheel, possibly from some other variables through the vanos system, I did the cam timing myself with the correct tooling and proceedure and when I check the timing when building the engine both blocks dropped on with the pin in the timing hole. There is also still a discrepency between the intlet timing block being a further 4-5 degrees retarded, either way when I time it back up I'll be doing it physically with a DTI and setting the cam centrelines to 114/126 then adjust the cam timing with the vanos. Whether it will make any difference to power when rebuilt, who knows as when on the dyno I did advance the intake cam at the top end and didn't really find much difference at peak rpm, mid range to makes a massive difference to power.
Part 2
While I was taking the front timing cover off for the fitting of the new chain tensioner you have to remove 3 small head bolts from the front of the block which is part of the head gasket, I decided while I'm this far in I will pop the head off and have a look at the insides of the engine and the bores, I did have a niggling thought in the back of my mind as a friends engine was stripped the week prior and was showing major bore wear after only a couple of track days after being machined... Without going into massive detail there is a thread about all this now in the Piston Heads Engine section.
Head off and the front timing case

Looking down into the bores, my worries were confirmed and all 6 bores have shown signs of wear/polishing. It doesn't show up as well on photos and it more visible on the exhaust side of the engine. I will get some bet photos now the pistons are out of the bores and add them to the thread.

Initially the thought was worn bores but we later confirmed this wasn't the case with the pistons measuring exact BMW specification of 83.95mm, we measured each of the bores in 4 different directions at the top, middle and bottom of the bores and the bore clearance was between a min of 0.057 and 0.070 which is half of the BMW max of 0.15mm cylinder to bore clearance. There has been a lot of discussion around this so I've held back posting about it for now but it turns out 3 engines all honed by the same machine shop are showing the same wear, all with less than 7 days use of them. I'm taking the thought process that is it something to do with hone, depth, quality or similar which is causing issues with oil retention on the walls causing the wear? Possibly? I don't know much about it to be able to be certain. I do know though that I won't be just putting the head back on without doing something about it. At least the bores measure up fine and there is still some material to hone it again and rebuild.
I've since stripped the bottom end down completely, checked over the pistons, rods and bearings, everything looks really good, I was expecting more wear to the rod bearings and main bearings considering I've been reving this engine hard to 7,000rpm with the known harmonic issues, I also thought the lower oil pressure of 30psi at Cadwell Park might have had an impact on the bearings but all seems ok as it's been stripped down.

The next bit of exciting news, I did post this on social media so some people will know about this exciting change, I've spent a lot of time changing and mapping the MS43 standard ECU to work with my set up with the new engine and M50 inlet. I decided to finally order a standalone ECU. Decided to go with the ECU Master black for the following reasons.
On board CANBUS which supports the standard BMW Clocks and will integrate with my CANBUS logger so no need to add a new dashboard to the car.
Dual H bridges so It will work with drive by wire, From what I've seen so far the set up for the throttle mapping to support the Electronic throttle body and electronic throttle pedal is really good.
Ability to work with the Dual Vanos which is full variable on the M54
I have a number of friends now that are using the black and classic with good success, it's good to use products friends are using to share knowledge and experience.


So with moving towards standalone management I didn't want to just buy some of the plug and play adaptors, I've decided to chop off the standard ECU plugs and pin out the wires into the ECU Master plugs, I can make my own changes to the wiring and add in an additional wiring as I work through it, I have been spending time in the evenings working through the pin out, inputting it into excel, testing the wiring of the factory loom assigning the wires to the ECU Master pin out.
Standard engine wiring loom about to go under the knife, I will be removing all the wires that are no longer needed from the loom such as MAF wiring, the emissions wiring and idle control valve which I wasn't using anyway.

The next steps are to organise the rehoning of the engine block so I can work on building the engine back up and continue to work through the wiring and building of a base map to run the car, I've decided to build the base map for the ECU from scratch so I know everything is correctly configured and set up correctly rather than starting with a random file from the internet.
The plan is to run the engine in on the standard ECU and then swap the wiring and ECU over and map it once the engine is ran in and working correctly.
While I was taking the front timing cover off for the fitting of the new chain tensioner you have to remove 3 small head bolts from the front of the block which is part of the head gasket, I decided while I'm this far in I will pop the head off and have a look at the insides of the engine and the bores, I did have a niggling thought in the back of my mind as a friends engine was stripped the week prior and was showing major bore wear after only a couple of track days after being machined... Without going into massive detail there is a thread about all this now in the Piston Heads Engine section.
Head off and the front timing case
Looking down into the bores, my worries were confirmed and all 6 bores have shown signs of wear/polishing. It doesn't show up as well on photos and it more visible on the exhaust side of the engine. I will get some bet photos now the pistons are out of the bores and add them to the thread.
Initially the thought was worn bores but we later confirmed this wasn't the case with the pistons measuring exact BMW specification of 83.95mm, we measured each of the bores in 4 different directions at the top, middle and bottom of the bores and the bore clearance was between a min of 0.057 and 0.070 which is half of the BMW max of 0.15mm cylinder to bore clearance. There has been a lot of discussion around this so I've held back posting about it for now but it turns out 3 engines all honed by the same machine shop are showing the same wear, all with less than 7 days use of them. I'm taking the thought process that is it something to do with hone, depth, quality or similar which is causing issues with oil retention on the walls causing the wear? Possibly? I don't know much about it to be able to be certain. I do know though that I won't be just putting the head back on without doing something about it. At least the bores measure up fine and there is still some material to hone it again and rebuild.
I've since stripped the bottom end down completely, checked over the pistons, rods and bearings, everything looks really good, I was expecting more wear to the rod bearings and main bearings considering I've been reving this engine hard to 7,000rpm with the known harmonic issues, I also thought the lower oil pressure of 30psi at Cadwell Park might have had an impact on the bearings but all seems ok as it's been stripped down.
The next bit of exciting news, I did post this on social media so some people will know about this exciting change, I've spent a lot of time changing and mapping the MS43 standard ECU to work with my set up with the new engine and M50 inlet. I decided to finally order a standalone ECU. Decided to go with the ECU Master black for the following reasons.
On board CANBUS which supports the standard BMW Clocks and will integrate with my CANBUS logger so no need to add a new dashboard to the car.
Dual H bridges so It will work with drive by wire, From what I've seen so far the set up for the throttle mapping to support the Electronic throttle body and electronic throttle pedal is really good.
Ability to work with the Dual Vanos which is full variable on the M54
I have a number of friends now that are using the black and classic with good success, it's good to use products friends are using to share knowledge and experience.
So with moving towards standalone management I didn't want to just buy some of the plug and play adaptors, I've decided to chop off the standard ECU plugs and pin out the wires into the ECU Master plugs, I can make my own changes to the wiring and add in an additional wiring as I work through it, I have been spending time in the evenings working through the pin out, inputting it into excel, testing the wiring of the factory loom assigning the wires to the ECU Master pin out.
Standard engine wiring loom about to go under the knife, I will be removing all the wires that are no longer needed from the loom such as MAF wiring, the emissions wiring and idle control valve which I wasn't using anyway.
The next steps are to organise the rehoning of the engine block so I can work on building the engine back up and continue to work through the wiring and building of a base map to run the car, I've decided to build the base map for the ECU from scratch so I know everything is correctly configured and set up correctly rather than starting with a random file from the internet.
The plan is to run the engine in on the standard ECU and then swap the wiring and ECU over and map it once the engine is ran in and working correctly.
Great approach and a very interesting thread. I posted in the engine wear thread as my first thoughts when seeing photos were that the honing pitch is too acute and the cuts too deep - it just looks wrong. It'll lead to oil draining back to the sump rather than forming a film to help the rings bed in.
On your oil pump, I'm also thinking harmonics, and would look at the single mass conversion. It may be the flywheel or clutch aren't well balanced.
On your oil pump, I'm also thinking harmonics, and would look at the single mass conversion. It may be the flywheel or clutch aren't well balanced.
Small update from this week and weekend.
Got the block dropped off at a new machine shop for them to rehone and have a look at the condition of the bores. The outcome of this was that the current piston to wall clearance is on average 0.06-0.07 but the bores are slightly tapered, not well honed and the machine shop are off the opinion that another 0.1 will be required to get the bores round and cylindrical. Taking the cylinder to wall clearance higher than the 0.15mm max spec from BMW. This would possibly lead to further issues in the future.
Off the back of this I spent the end of the week looking for a replacement block, actually found it very hard to find a replacement, kicking myself that I sold my old engine on for a good price last year! I really wish I hadn't now!
Found myself an engine as finding a decent block with main caps and front timing cover was harder than I expected.
Picked up the engine in the back of van.

Dirty old mess of an engine, according to the seller it was a unopened engine 100k miles.

I know my way around these pretty well now so it was easy pickings to get it stripped down, I just wanted to get a look inside the engine to see what the bores looked like and if the engine was even useable.

Cams out of the way the last step was to pull the head off.

With the head off it was clear to see the inside of the engine was nice and clear with the piston walls looking perfect.

At this point I was feeling pretty positive about the outcome here, however this was to be short lived.
Upon measuring the engine with a bore gauge it was clear that two of the cylinder was completely oval measuring less than 84mm front to back and over 84.2 across the exhaust to inlet side of the block.
We went back, checked the calibration of the equipment, measured the other bores again, still the same readings. Considering my old block had a max bore size of 84.02mm (0.07mm clearance)
Checked the main caps were torqued to spec, no difference to the readings.
We went down the route of exploring how much difference it makes having the head torqued down or using a torque place to simulate the pressure from the head being torqued. To do this with the crank removed I put the head back on with the old crushed head gaskets but dropped in my ARP headbolts with the longer thread engagement for the Aluminum M54 block and started to torque down the head studs so we could measure the bores from the underside with the crank removed.

Ping... Ping... Two of the studs never made it to 100nm as per ARP instructions and two of the threads pulled out of the block. The ARP's with the longer engagement are supposed to stop this, weirdly the two studs which did pull out were right next to the exhaust side of the most oval cylinder so I'm assuming that this engine has seen a lot of head at some point in it's life which has damaged the cylinders leading to them going oval as well as damaging the metal around the threads.

Did a quick measure of the bores from the underside and saw very little change in the bore dimensions, however it wasn't a perfect test due to two studs pulling the threads out of the block.
At the moment I now have reduced confidence in the torqueing down the head on the M54's even with the ARP's, however before that I don't even have a working block at the moment so I'm going to see what the machine shop recommend to stay within the BMW specs as well as keeping my eyes open for another block in the next few days but at the moment the E46 is retired for the remainder of the year until a reliable engine solution can be found and then I can build a new engine and go from there.
Got the block dropped off at a new machine shop for them to rehone and have a look at the condition of the bores. The outcome of this was that the current piston to wall clearance is on average 0.06-0.07 but the bores are slightly tapered, not well honed and the machine shop are off the opinion that another 0.1 will be required to get the bores round and cylindrical. Taking the cylinder to wall clearance higher than the 0.15mm max spec from BMW. This would possibly lead to further issues in the future.
Off the back of this I spent the end of the week looking for a replacement block, actually found it very hard to find a replacement, kicking myself that I sold my old engine on for a good price last year! I really wish I hadn't now!
Found myself an engine as finding a decent block with main caps and front timing cover was harder than I expected.
Picked up the engine in the back of van.
Dirty old mess of an engine, according to the seller it was a unopened engine 100k miles.
I know my way around these pretty well now so it was easy pickings to get it stripped down, I just wanted to get a look inside the engine to see what the bores looked like and if the engine was even useable.
Cams out of the way the last step was to pull the head off.
With the head off it was clear to see the inside of the engine was nice and clear with the piston walls looking perfect.
At this point I was feeling pretty positive about the outcome here, however this was to be short lived.
Upon measuring the engine with a bore gauge it was clear that two of the cylinder was completely oval measuring less than 84mm front to back and over 84.2 across the exhaust to inlet side of the block.
We went back, checked the calibration of the equipment, measured the other bores again, still the same readings. Considering my old block had a max bore size of 84.02mm (0.07mm clearance)
Checked the main caps were torqued to spec, no difference to the readings.
We went down the route of exploring how much difference it makes having the head torqued down or using a torque place to simulate the pressure from the head being torqued. To do this with the crank removed I put the head back on with the old crushed head gaskets but dropped in my ARP headbolts with the longer thread engagement for the Aluminum M54 block and started to torque down the head studs so we could measure the bores from the underside with the crank removed.
Ping... Ping... Two of the studs never made it to 100nm as per ARP instructions and two of the threads pulled out of the block. The ARP's with the longer engagement are supposed to stop this, weirdly the two studs which did pull out were right next to the exhaust side of the most oval cylinder so I'm assuming that this engine has seen a lot of head at some point in it's life which has damaged the cylinders leading to them going oval as well as damaging the metal around the threads.
Did a quick measure of the bores from the underside and saw very little change in the bore dimensions, however it wasn't a perfect test due to two studs pulling the threads out of the block.
At the moment I now have reduced confidence in the torqueing down the head on the M54's even with the ARP's, however before that I don't even have a working block at the moment so I'm going to see what the machine shop recommend to stay within the BMW specs as well as keeping my eyes open for another block in the next few days but at the moment the E46 is retired for the remainder of the year until a reliable engine solution can be found and then I can build a new engine and go from there.
mwstewart said:
Great approach and a very interesting thread. I posted in the engine wear thread as my first thoughts when seeing photos were that the honing pitch is too acute and the cuts too deep - it just looks wrong. It'll lead to oil draining back to the sump rather than forming a film to help the rings bed in.
On your oil pump, I'm also thinking harmonics, and would look at the single mass conversion. It may be the flywheel or clutch aren't well balanced.
I'd agree, I had mine balanced before it went back together, it turned out the pistons were all over the place with the lightest 7 grams lighter than the heaviest. Did the math and at 7000rpm, the difference in mass would be approximately 240N or 24kg thrashing around on the crank, that's not a small amount. On your oil pump, I'm also thinking harmonics, and would look at the single mass conversion. It may be the flywheel or clutch aren't well balanced.
I'm hoping mine beds in all nicely using Millers break in oil and i don't get any issues with oil consumption.
Back to it again. Since the last post I have sourced another bare engine block which was in the similar condition to my standard block and decided on the Saturday to take them down to a new machine shop to compare blocks. In the end we decided to stick with the original block, it was determined that when the engine was machine last year by the old machine shop that the bores were purely deglazed and weren't round as material hadn't been removed from the entire bore.
I left the machine shop with the instructions to do their magic with their honing to get the bores round and to finish with a plateau hone. The clearances would be a little larger than I would have preferred but they measured just inside BMW piston to wall clearance, considering I wasn't going to find a better block and the application I have decided to go with it, to get perfect cylinder wall clearance it would be oversize pistons or liners in the block.
On the Thursday I got back a the block, honed, skimmed and cleaned.

Initial observations are that the hone is much finer, not as deep and course and the angles of the hone look more consistent.

Side by side comparison
[img]https://live.staticflickr.com/65535/51574813664_018454315e_c.jpg[img]
First job of the Thursday evening was to get the cranks in with the new bearings and check the tolerance.


With the crank in the engine the next job was the look at the oil pump, the whole reason I took the engine out in the first place.
I mocked up the oil pump with a new chain and an M54 sprocket
Nice to see the chain looking a lot tighter on the gears again

However I knew the chain was super slack when I had to do the quick oil pump fix before Snetterton. Turns out when comparing the E36 vs the E46 sprockets that there is one tooth difference between them with the E36 being slightly smaller. This accounts for the difference in chain slack.

Little bit of marking out and with the help of a 3D Printing jig I drilled the tapped the block for a BMW Oil Pump Tensioner, at the moment I am keeping with the standard oil pump shaft due to the failure of the two vac shafts.

Popping the pistons back into the block with new rings. Rings gapped up just below the BMW ring tolerance

Head gasket and ARP Studs. I did do a comparison between these M54 ARP head studs and they are slightly longer than the M54 studs in terms of thread engagement and the actual stud length of longer too to suit the M54 heads.

Then came the moment of truth, I dropped the head on into position, making sure all the contact areas were spotless and clean with brake cleaner, applying the correct ARP grease to the head studs and bolts and then started the process to torque down the head.

Little look at the goodness that lies within the head, the VAC Motorsport valve springs and retainers to suit the larger lift Schrick Cams.

The next morning I reassembled the head with cams and added a timing wheel to the front of the engine and set the engine at TDC referencing TDC on the timing wheel to be able to accurately set the cams to the correct centrelines as we found out they are slightly off from advertised in the data sheets.

Some custom printed timing blocks were used to give a reference to how I actually timed the cams up
Exhaust used a 4 degree retard block to bring it to 107 degrees Centreline.

Inlet used a 8 degree advanced to bring it to 126 degree (Funnily the cams are supposed to be 126 degree centerline in the standard timed position - Nope!)

By the Saturday night it was a finished engine ready to go back in the car

Same as usual I assembled as much of the engine as possible outside of the engine bay with the gearbox, manifolds, subframe and gearbox mount all fitted together.

Decided to do everything by the book for this engine and bought some of the Millers running in oil on the recommendation of the machine shop who did the honing to help with the running in process.

Finally by Sunday afternoon around 5pm the engine was back in and the car was running. I ran it for a couple of minutes on the drive to check the leaks, checked the basics on the laptop using INPA, I did have one minor issue with a throttle body fault but it was purely down to a wet connector from putting the engine back in in the rain.

I left the machine shop with the instructions to do their magic with their honing to get the bores round and to finish with a plateau hone. The clearances would be a little larger than I would have preferred but they measured just inside BMW piston to wall clearance, considering I wasn't going to find a better block and the application I have decided to go with it, to get perfect cylinder wall clearance it would be oversize pistons or liners in the block.
On the Thursday I got back a the block, honed, skimmed and cleaned.
Initial observations are that the hone is much finer, not as deep and course and the angles of the hone look more consistent.
Side by side comparison
[img]https://live.staticflickr.com/65535/51574813664_018454315e_c.jpg[img]
First job of the Thursday evening was to get the cranks in with the new bearings and check the tolerance.
With the crank in the engine the next job was the look at the oil pump, the whole reason I took the engine out in the first place.
I mocked up the oil pump with a new chain and an M54 sprocket
Nice to see the chain looking a lot tighter on the gears again
However I knew the chain was super slack when I had to do the quick oil pump fix before Snetterton. Turns out when comparing the E36 vs the E46 sprockets that there is one tooth difference between them with the E36 being slightly smaller. This accounts for the difference in chain slack.
Little bit of marking out and with the help of a 3D Printing jig I drilled the tapped the block for a BMW Oil Pump Tensioner, at the moment I am keeping with the standard oil pump shaft due to the failure of the two vac shafts.
Popping the pistons back into the block with new rings. Rings gapped up just below the BMW ring tolerance
Head gasket and ARP Studs. I did do a comparison between these M54 ARP head studs and they are slightly longer than the M54 studs in terms of thread engagement and the actual stud length of longer too to suit the M54 heads.
Then came the moment of truth, I dropped the head on into position, making sure all the contact areas were spotless and clean with brake cleaner, applying the correct ARP grease to the head studs and bolts and then started the process to torque down the head.
Little look at the goodness that lies within the head, the VAC Motorsport valve springs and retainers to suit the larger lift Schrick Cams.
The next morning I reassembled the head with cams and added a timing wheel to the front of the engine and set the engine at TDC referencing TDC on the timing wheel to be able to accurately set the cams to the correct centrelines as we found out they are slightly off from advertised in the data sheets.
Some custom printed timing blocks were used to give a reference to how I actually timed the cams up
Exhaust used a 4 degree retard block to bring it to 107 degrees Centreline.
Inlet used a 8 degree advanced to bring it to 126 degree (Funnily the cams are supposed to be 126 degree centerline in the standard timed position - Nope!)
By the Saturday night it was a finished engine ready to go back in the car
Same as usual I assembled as much of the engine as possible outside of the engine bay with the gearbox, manifolds, subframe and gearbox mount all fitted together.
Decided to do everything by the book for this engine and bought some of the Millers running in oil on the recommendation of the machine shop who did the honing to help with the running in process.
Finally by Sunday afternoon around 5pm the engine was back in and the car was running. I ran it for a couple of minutes on the drive to check the leaks, checked the basics on the laptop using INPA, I did have one minor issue with a throttle body fault but it was purely down to a wet connector from putting the engine back in in the rain.
Following weekend comes around and it was time for running in. I have booked two slots within two weeks of each other, one to do running in of the engine on the standard ECU, this then gives me time to take the car away, swap the wiring and ECU over and then make sure all the parameters in the new ECU are correctly set up and be able to leave the car idling while I set them up without worrying, this would have been impossible on a brand new engine.
So on Saturday afternoon I took the car back to the usual rolling road to run it for an hour through a range of mixed loads and conditions just with the aim to run in the engine making sure the rings were bedded in correctly. We did 45 minutes of mixed load conditions, creating plenty of vacuum to seal the rings against the bores and followed it up with a couple of power runs at the end of the session, this was interested as I had timed the cams up manually and left the vanos solenoids unplugged so there was very little low down torque but above 5k the engine seems pretty promising.

Power run without any Vanos/VVT so lacking in the torque below 5k. Normally it makes peak torque around 4000rpm with the same torque to power ratio. Zero changes to the map just purely ran in on the old map. The AFR's do lean out around 5-6k which does highlight the fact that we're getting towards the maximum duty cycle for the current injectors but at this stage I just wanted the engine ran in correctly and tested

Ordered a set of Bosch Injectors - 0280158117 - 550cc/min @ 3.5 bar - These have a built in calibration inside the ECU Master black

The compliment this I also ordered some Bosch temperature sensors for water, oil and IAT. Once again these are selectable from the built in calibrations in the ECU.

Prior to building the new engine I had already stripped out my current wiring loom and acquired a spare loom to use for the dyno session. I started by removing all the the excess wiring that wasn't going to be used with the new ECU. I then mapped this out in excel with all the ECU connectors, pin numbers, descriptions and their locations in the engine loom.
From here I was then able to reallocate those pins into new locations on the new ECU.
I wanted to make the engine loom separate from the rest of the car so i've added in some plugs to make it modular.
12 pin connector to connect to the body of the car.
4 pin connector with spare power/ground/2x analog inputs for future use.
6 pin connector with the final connection to the fusebox and signals to relays
6 pin connector the wideband sensor in the exhaust after the collector for the two banks.
I started my new wiring at these plugs and then started to integrate this into the existing wiring loom

These plugs then started to pin into the new ECU connectors. No braid or wrapping of the wiring yet until the loom is tested and the engine is running. I can tidy this up at a later date

Finally this evening I started to introduce the engine wiring harness into the ECU plugs

I have a couple of pins to finish off with the engine loom and complete the connections for common grounds and power but the engine loom is pretty much finished.
Hopefully towards the end of the week I will have the last pieces I am waiting for and I can drop the wiring into the engine bay, start to connect it up and finalise the layout and wire runs before starting to test the ECU functions.
I have spent a number of hours, well more than a hours building a base map for the ECU Master Black. I've used some similar engines for reference but I've built the map from scratch so I know what i've set up is correct and specific to this car.
So on Saturday afternoon I took the car back to the usual rolling road to run it for an hour through a range of mixed loads and conditions just with the aim to run in the engine making sure the rings were bedded in correctly. We did 45 minutes of mixed load conditions, creating plenty of vacuum to seal the rings against the bores and followed it up with a couple of power runs at the end of the session, this was interested as I had timed the cams up manually and left the vanos solenoids unplugged so there was very little low down torque but above 5k the engine seems pretty promising.
Power run without any Vanos/VVT so lacking in the torque below 5k. Normally it makes peak torque around 4000rpm with the same torque to power ratio. Zero changes to the map just purely ran in on the old map. The AFR's do lean out around 5-6k which does highlight the fact that we're getting towards the maximum duty cycle for the current injectors but at this stage I just wanted the engine ran in correctly and tested
Ordered a set of Bosch Injectors - 0280158117 - 550cc/min @ 3.5 bar - These have a built in calibration inside the ECU Master black
The compliment this I also ordered some Bosch temperature sensors for water, oil and IAT. Once again these are selectable from the built in calibrations in the ECU.
Prior to building the new engine I had already stripped out my current wiring loom and acquired a spare loom to use for the dyno session. I started by removing all the the excess wiring that wasn't going to be used with the new ECU. I then mapped this out in excel with all the ECU connectors, pin numbers, descriptions and their locations in the engine loom.
From here I was then able to reallocate those pins into new locations on the new ECU.
I wanted to make the engine loom separate from the rest of the car so i've added in some plugs to make it modular.
12 pin connector to connect to the body of the car.
4 pin connector with spare power/ground/2x analog inputs for future use.
6 pin connector with the final connection to the fusebox and signals to relays
6 pin connector the wideband sensor in the exhaust after the collector for the two banks.
I started my new wiring at these plugs and then started to integrate this into the existing wiring loom
These plugs then started to pin into the new ECU connectors. No braid or wrapping of the wiring yet until the loom is tested and the engine is running. I can tidy this up at a later date
Finally this evening I started to introduce the engine wiring harness into the ECU plugs
I have a couple of pins to finish off with the engine loom and complete the connections for common grounds and power but the engine loom is pretty much finished.
Hopefully towards the end of the week I will have the last pieces I am waiting for and I can drop the wiring into the engine bay, start to connect it up and finalise the layout and wire runs before starting to test the ECU functions.
I have spent a number of hours, well more than a hours building a base map for the ECU Master Black. I've used some similar engines for reference but I've built the map from scratch so I know what i've set up is correct and specific to this car.
Not sure if this will be any use to you, but I saw this when I was looking to possibly turbo my M54 in the future and lots of drifters seem to use it:

https://hopwoodmotorsport.com/shop/m54pump
Might be a solution to your problems. The guy who runs the company seems pretty helpful, so might be worth a call to chat with him.
https://hopwoodmotorsport.com/shop/m54pump
Might be a solution to your problems. The guy who runs the company seems pretty helpful, so might be worth a call to chat with him.
Another week spending my evenings and any free time working on the car once again.
This week has been finishing off the wiring planning and finishing off the engine loom. A lot more time than I thought has gone into the planning of this as well as making of the loom and I was only modifying it not starting from scratch but I've changed quite a bit of it as i've worked through each wire.
So I started off on excel writing down pin by pin the functions of all the wires going to the standard ECU for each plug which went to the ECU. From this I was able to reallocate each of the wires to a new pin on the ECU Master ECU. I decided which grounds were going to be together like the crank and cam signals keeping them separate from all other sensors. The splitting the remaining sensors, EGT and Knock over the remaining grounds, doing the same with 5v feeds.
Here's an extract from the document to give you an idea.

One thing I wanted to do with this loom was have it easily removed from the engine bay so I decided to add in some addition plugs so the ECU loom could be separated from the body and power.
The grey plugs in the photos
12 pin is all body control, fan thermostat, throttle pedal etc
6 pin is for power to the ECU, fuel pump and main relay activation
4 pin is spare analog inputs 2x, sensor power and ground should they be needed in the future.
Black 4 pin plug covers starter motor and alternator
White is power for Injectors and Coils and addtional 12v power to the engine loom
2x Exhaust Gas Temp for Type K termocouples in the exhaust

I also added wiring for the Wideband sensor, luckily when I made the exhaust in 2018 I added a sensor bung after the collector for a wideband knowing I would probably need on in the future.

Marked out a plate the same size as the factory ecu on some 2mm aluminium

Cut this out on the band saw and tidied up the edges to make a mounting plate for the ECU as well as functioning as a heat sink for the casing

Finished the loom with some of the sections braided. I have not finished the main section of the wiring loom with anything as this will be inside the engine bay fuse box and just incase I need to change anything in the future it is easily accessed. I have added in the 6 pin braided wiring and connector for the wide band too.

This is only a mock up but you can see that everything fits nicely inside the standard fuse box. Including USB for programming and vac line for the inbuilt MAP sensor

I know that I should be right a max of the duty cycle of the injectors I am using with the M50 manifold so I've swapped to some Bosch items that are 580cc @ 3.5bar
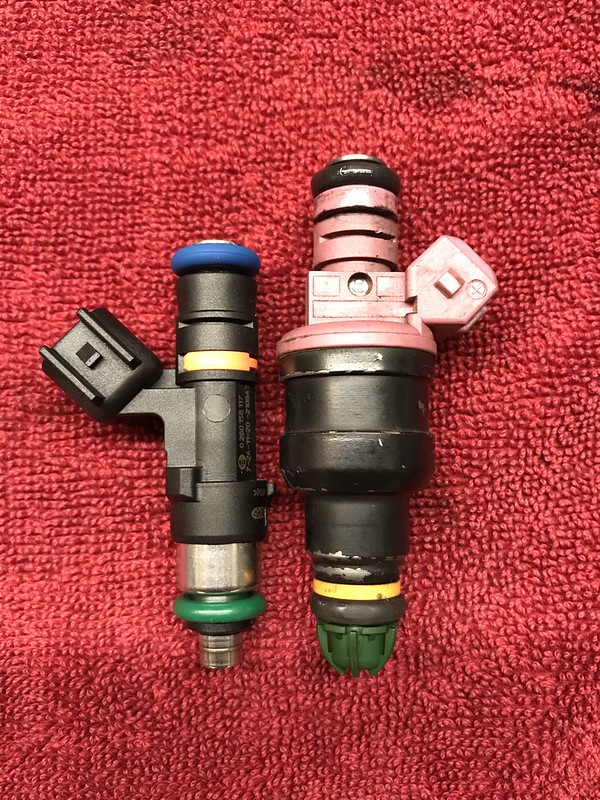
This meant a swap of injector plugs was needed and this section of wiring has always annoyed me due to how BMW laid out the wiring to fit in the standard injector tray the wires have always been a little short. I decided to cut of off and make a new injector section from scratch

Braided and finished, so much tidier and better fitting

Final job today was to get everything back into the engine bay and fitted. It did take me all day to get to the point of having the car running properly but I am happy with progress made. I ran into two wiring issues, one being what was labeled as a ignition live which I used for one of the ECU powers wasn't in fact an ignition live it was a switched live from the main relay. I obviously need to power the ECU with ignition live prior to turning on the main relay, so I rejigged some of the wiring in one of the plugs and added a ignition live feed from the interior fuse box.
The second small issue was the radiator fan not functioning this was down to the PWM being voltage based for the fan control not PWM grounding as per the ECU so I changed the wiring in the engine bay and added a suitable relay to turn the fan on by the ECU

We made it this far. The car is calibrated and running on a base map I made myself from scratch, well I did have some similar engine maps from friends with similar set up's to look at for reference but I wanted to start off with my own base so I knew that each section was correctly set up for the car and calibrated properly as all sensors, throttle body etc require calibrating for the items used.
A little screen shot of the ECU Master black software, seems to be working well and quite user friendly.
Really good to see the CANBUS working correctly for the standard clocks as well as my logger screen on the dash. I will in the future start to modify the CANBUS steam with additional data

Final things to get set up this week is the vanos. I currently still have the cams set at a fixed position so I am going to use this to set the cam angles before retiming the engine and plugging in the solenoids so I know what cam angle I should target to achieve the current fixed centrelines.
This week has been finishing off the wiring planning and finishing off the engine loom. A lot more time than I thought has gone into the planning of this as well as making of the loom and I was only modifying it not starting from scratch but I've changed quite a bit of it as i've worked through each wire.
So I started off on excel writing down pin by pin the functions of all the wires going to the standard ECU for each plug which went to the ECU. From this I was able to reallocate each of the wires to a new pin on the ECU Master ECU. I decided which grounds were going to be together like the crank and cam signals keeping them separate from all other sensors. The splitting the remaining sensors, EGT and Knock over the remaining grounds, doing the same with 5v feeds.
Here's an extract from the document to give you an idea.
One thing I wanted to do with this loom was have it easily removed from the engine bay so I decided to add in some addition plugs so the ECU loom could be separated from the body and power.
The grey plugs in the photos
12 pin is all body control, fan thermostat, throttle pedal etc
6 pin is for power to the ECU, fuel pump and main relay activation
4 pin is spare analog inputs 2x, sensor power and ground should they be needed in the future.
Black 4 pin plug covers starter motor and alternator
White is power for Injectors and Coils and addtional 12v power to the engine loom
2x Exhaust Gas Temp for Type K termocouples in the exhaust
I also added wiring for the Wideband sensor, luckily when I made the exhaust in 2018 I added a sensor bung after the collector for a wideband knowing I would probably need on in the future.
Marked out a plate the same size as the factory ecu on some 2mm aluminium
Cut this out on the band saw and tidied up the edges to make a mounting plate for the ECU as well as functioning as a heat sink for the casing
Finished the loom with some of the sections braided. I have not finished the main section of the wiring loom with anything as this will be inside the engine bay fuse box and just incase I need to change anything in the future it is easily accessed. I have added in the 6 pin braided wiring and connector for the wide band too.
This is only a mock up but you can see that everything fits nicely inside the standard fuse box. Including USB for programming and vac line for the inbuilt MAP sensor
I know that I should be right a max of the duty cycle of the injectors I am using with the M50 manifold so I've swapped to some Bosch items that are 580cc @ 3.5bar
This meant a swap of injector plugs was needed and this section of wiring has always annoyed me due to how BMW laid out the wiring to fit in the standard injector tray the wires have always been a little short. I decided to cut of off and make a new injector section from scratch
Braided and finished, so much tidier and better fitting
Final job today was to get everything back into the engine bay and fitted. It did take me all day to get to the point of having the car running properly but I am happy with progress made. I ran into two wiring issues, one being what was labeled as a ignition live which I used for one of the ECU powers wasn't in fact an ignition live it was a switched live from the main relay. I obviously need to power the ECU with ignition live prior to turning on the main relay, so I rejigged some of the wiring in one of the plugs and added a ignition live feed from the interior fuse box.
The second small issue was the radiator fan not functioning this was down to the PWM being voltage based for the fan control not PWM grounding as per the ECU so I changed the wiring in the engine bay and added a suitable relay to turn the fan on by the ECU
We made it this far. The car is calibrated and running on a base map I made myself from scratch, well I did have some similar engine maps from friends with similar set up's to look at for reference but I wanted to start off with my own base so I knew that each section was correctly set up for the car and calibrated properly as all sensors, throttle body etc require calibrating for the items used.
A little screen shot of the ECU Master black software, seems to be working well and quite user friendly.
Really good to see the CANBUS working correctly for the standard clocks as well as my logger screen on the dash. I will in the future start to modify the CANBUS steam with additional data
Final things to get set up this week is the vanos. I currently still have the cams set at a fixed position so I am going to use this to set the cam angles before retiming the engine and plugging in the solenoids so I know what cam angle I should target to achieve the current fixed centrelines.
shalmaneser said:
Fascinating stuff, looking forward to seeing how the engine performs with the new ECU!
Does the motor use two lambda sensors as standard and can the ECUmaster Black handle that?
Yeah me too. Interested to see how the engine responds to a more refined map than what I was able to do on the Ms43 by logging and adjusting. Does the motor use two lambda sensors as standard and can the ECUmaster Black handle that?
So the ECU Master black has built in facility for one Lambda sensor, one wideband either LSU4.2 or 4.9 or you can have addition sensors if you use an additional control and input the voltage from the controller into one of the analog inputs.
I had sort of planned for this when I made the exhaust as I put the S50 manifolds with a two into one collector and added a bung in that section to future proof it.

Weekly round up.
Thursday evening was a early finish from work to try and get on with the car before it went dark, these darker nights aren't very good for working on the car unfortunately as well as the colder weather.
Now I have got the engine running on the new ECU with the cams timed up in their static position from the running in this measured at 107/126 centrelines I was able to read the cam trigger angle and create and offset in the ECU so that in their current position the cams read zero degrees so this is a known good target position for the cams.
With that done I started by stripping off the rocker cover

When the vanos unit it removed it is crucial to use the front timing plate on on the front of the engine to keep the vanos helical gears in the correct position, I used a DTI on top of piston 1 to set the engine to TDC as we found out the timing wheel mark and the pin on the flywheel wasn't 100% on TDC.

I dropped on the 3d printed blocks to confirm the cam timing, Inlet 8 degree advanced, Exhaust 4 degree retarded which Is what I needed to get the 107/126 centrelines, despite the cams having a data sheet saying the should be 126 degree centreline they needed advancing to get them anywhere close, but weirdly I did find a small hand engraving on the cam that says 132... The plot thickens regarding these cams as I never bought them new but at least now I know a lot more about them.

From here I decided to leave the exhaust cam in it's retarded position and run this as a fixed cam and set the inlet cam back to it's "stock" timing with standard BMW Timing Blocks. When starting the car and reading the cam timing from the scope it was showing an offset of -6 degrees which is close enough and proves the inlet car is over retarded in it's standard form.
I roughed in some values for the Vanos control with Min/Max/Stead Duty Cycle for the Vanos solenoid as well as setting up the target table for the inlet cam which can then be tuned properly on the dyno. I have taken the values from my previous map on MS43 and adjusted them to suit the new base cam angle.

The ECU Master has a quite a nice logging feature built in when connected to the laptop. The screenshot shows the Cam 1 angle following the target and the duty cycle at the bottom controlling the vanos position. Really happy to have this set up and working for the moment.

The final job for the week was to make some changes to the exhaust, this is something which I've wanted to do for ages but never had the time of the motivation/need to get stuck in and do it, but getting this sorted before mapping was perfect timing.
I started off ordering a bunch of pre bent 2.5" exhaust tube with various flared ends, some single, some double with 45 and 30 degrees.

The main reason behind this is because when I first built the car I sent it to a local exhaust company and asked for a 2.5" exhaust making from the V Band on the manifold backwards. However when they did it the bending of the tubes was less than satisfactory but I was only running a standard engine then and it made good power 245bhp or there abouts on a standard engine.
Here's the offending bends with the reduced radius and the diameter of the pipe is considerably smaller on the bends

First job was to cut all the bends out of the current exhaust trying to retain as much of the straight pipe as possible, I mounted the exhaust sections back to the car and started to link them back together using the new bends and tack weld the piece together on the car

Once the full section was built up on the car I removed it and started to weld it together, it's been a few years since I've done any welding but It's good to get stuck in and do a bit, quite satisfying to built my own exhaust to a lot better quality than what I originally paid someone to do.


That's it for photos from this week so far, I was due to be on the dyno yesterday but they have had to move the mapping session back to Thursday. In the mean time I have been setting up the CANBUS on the logger and the small data screen on the dash to show the temps from the ECU, really happy that at the moment everything is working as intended.
Thursday evening was a early finish from work to try and get on with the car before it went dark, these darker nights aren't very good for working on the car unfortunately as well as the colder weather.
Now I have got the engine running on the new ECU with the cams timed up in their static position from the running in this measured at 107/126 centrelines I was able to read the cam trigger angle and create and offset in the ECU so that in their current position the cams read zero degrees so this is a known good target position for the cams.
With that done I started by stripping off the rocker cover
When the vanos unit it removed it is crucial to use the front timing plate on on the front of the engine to keep the vanos helical gears in the correct position, I used a DTI on top of piston 1 to set the engine to TDC as we found out the timing wheel mark and the pin on the flywheel wasn't 100% on TDC.
I dropped on the 3d printed blocks to confirm the cam timing, Inlet 8 degree advanced, Exhaust 4 degree retarded which Is what I needed to get the 107/126 centrelines, despite the cams having a data sheet saying the should be 126 degree centreline they needed advancing to get them anywhere close, but weirdly I did find a small hand engraving on the cam that says 132... The plot thickens regarding these cams as I never bought them new but at least now I know a lot more about them.
From here I decided to leave the exhaust cam in it's retarded position and run this as a fixed cam and set the inlet cam back to it's "stock" timing with standard BMW Timing Blocks. When starting the car and reading the cam timing from the scope it was showing an offset of -6 degrees which is close enough and proves the inlet car is over retarded in it's standard form.
I roughed in some values for the Vanos control with Min/Max/Stead Duty Cycle for the Vanos solenoid as well as setting up the target table for the inlet cam which can then be tuned properly on the dyno. I have taken the values from my previous map on MS43 and adjusted them to suit the new base cam angle.
The ECU Master has a quite a nice logging feature built in when connected to the laptop. The screenshot shows the Cam 1 angle following the target and the duty cycle at the bottom controlling the vanos position. Really happy to have this set up and working for the moment.
The final job for the week was to make some changes to the exhaust, this is something which I've wanted to do for ages but never had the time of the motivation/need to get stuck in and do it, but getting this sorted before mapping was perfect timing.
I started off ordering a bunch of pre bent 2.5" exhaust tube with various flared ends, some single, some double with 45 and 30 degrees.
The main reason behind this is because when I first built the car I sent it to a local exhaust company and asked for a 2.5" exhaust making from the V Band on the manifold backwards. However when they did it the bending of the tubes was less than satisfactory but I was only running a standard engine then and it made good power 245bhp or there abouts on a standard engine.
Here's the offending bends with the reduced radius and the diameter of the pipe is considerably smaller on the bends
First job was to cut all the bends out of the current exhaust trying to retain as much of the straight pipe as possible, I mounted the exhaust sections back to the car and started to link them back together using the new bends and tack weld the piece together on the car
Once the full section was built up on the car I removed it and started to weld it together, it's been a few years since I've done any welding but It's good to get stuck in and do a bit, quite satisfying to built my own exhaust to a lot better quality than what I originally paid someone to do.
That's it for photos from this week so far, I was due to be on the dyno yesterday but they have had to move the mapping session back to Thursday. In the mean time I have been setting up the CANBUS on the logger and the small data screen on the dash to show the temps from the ECU, really happy that at the moment everything is working as intended.
Thursday 28th October 2021 - Finally, I didn't think this was going to ever arrive, I couple of milestones reached for the E46. The first big on being to have the car running on stand alone ECU and the second was sorting out the engine issues issues which all resulted in building the new engine.
So after Mondays mapping session being cancelled I parked the car on the drive and waited for Thursday to roll around, nervously waiting to get it on the dyno and see what would happen. I wasn't expecting anymore gain in power but I was expecting to be able to get correct and accurate control of the cam timing, ignition and fueling. The ECU opens up a lot more options for the future too.
I didn't take any photos from the evening as I was more bothered about the car working correctly. but it probably looking something similar to this...

We started the session off with a chat about what I had already set up in the ECU, what needed calibrating and what I wanted from the ECU. Then mapping session went on for two hours, with only a few stops along the way for a chat about car set up. Chris started off with full load mapping to find the sweet spot for the inlet cam timing and moved it through the full range of travel across the RPM range, then started to work on some lighter throttle mapping but the engine was a little hesitant on initial throttle opening. We changed the ignition outputs to change the firing order of the engine and the problem was resolved and Chris carried on tuning, as a result much less fuel was needed on tip in and the ignition characteristics needed some tweeking, getting a little bit above my understanding but interesting to work through it.
After another 30 minutes tweaking the car sounded really crisp with the limiter set at just over 7000rpm we finished off with a couple of power runs just to check everything was still ok from the initial full load tuning. We tried a few additional degrees of timing and it was still picking up power to 270bhp but decided the timing required wasn't worth it so settled at....
Not necessarily the highest figures from the session as we did over 25 dyno runs but the last power ran gave. This is pretty much what I expected this engine combination to do and finished the evening with a big smile on my face knowing all the effort was worth it.

I often get asked, normally by PM's rather than posts on forums about how things compare vs one another so I've scanned in some graphs and put some over lays together to give some comparisons of what I've learnt along the way.
Starting from the beginning.
2018 - Standard M54 Engine with S50 Manifolds

2019 - I fitted an M50 inlet manfiold and did back to back comparisons
M50 helped out in the mid range...But I stuck with it for simplicity sake as it's a much simpler manifold

2020 - Saw the building of the new engine with Schrick Cams
On the running in/Dyno day I had a failed exhaust cam sensor which meant no Variable valve timing but it made reasonable top end power
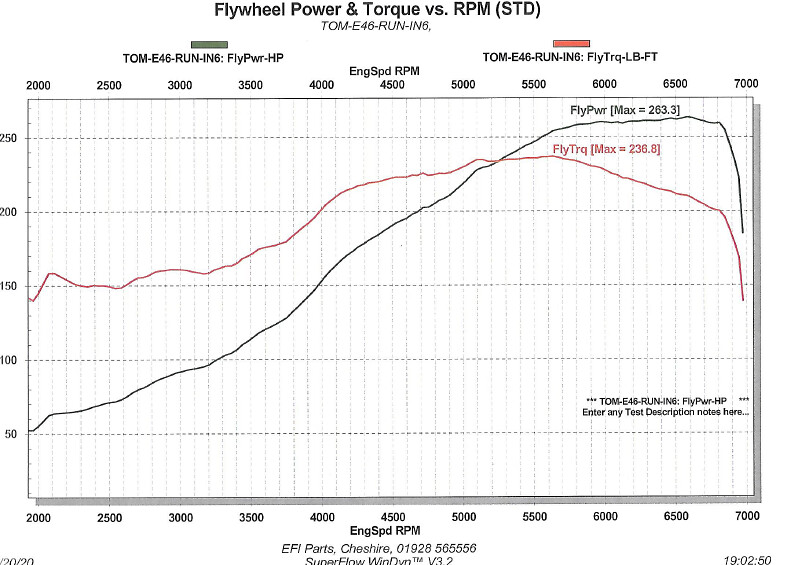
Same graph as above but compared against the standard Dyno plot from 2019, only really shows the difference the cams make at the top end as not VVT.

March 2021 - I went back to EFI as I wanted to try and M54 manifold on the new engine with Cams.
I expected this to be a good evening potentially making more top end power with good bottom end torque, weirdly I seemed to have lost 10bhp generally across the rev range but peak power still strong.

April 2021 - For comparisons sake I popped back with the M50 refitted just to see if it was the manifold or the engine.
I found that yep the figures were down, something wasn't 100% happy. The background being a comparison against a dyno run from 2018 on a standard engine, cams make a clear difference above 5000rpm though!

I continued to use the car through the summer of 2021 - Cadwell, Snetterton no issues at all and the car performed really well, I did mess with the exhaust cam timing but never got to test it on the dyno but It pulled well and managed to keep up with some faster cars so who really knows what the power was doing but the engine was rebuilt.
Oct 2021 - New engine
This graph shows the effect of the Vanos advancing the inlet cam through the mid range in black vs a fixed cam position in red. Make a massive difference in mid range torque, this is one reason I was very keen to get onto stand alone ECU so the cam timing being full variable over a 20 cam degree range could be dialed in perfectly.

Final comparison
Blue - New Engine Oct 2021
268bhp/258ftlbs
Bold Red and Black - March 2021 (Same engine set up as current on standard ECU with standard cam timing)
253bhp/255ftlbs
Faint Red and Black - 2018 - Standard Engine with S50 exhaust manifolds
240bhp/242ftlbs

Finally...
Oulton 13th November, it looks like the car is going to get there anyway, it will be a test for the new set up and no doubt that'll give me something to talk about after it.
So after Mondays mapping session being cancelled I parked the car on the drive and waited for Thursday to roll around, nervously waiting to get it on the dyno and see what would happen. I wasn't expecting anymore gain in power but I was expecting to be able to get correct and accurate control of the cam timing, ignition and fueling. The ECU opens up a lot more options for the future too.
I didn't take any photos from the evening as I was more bothered about the car working correctly. but it probably looking something similar to this...
We started the session off with a chat about what I had already set up in the ECU, what needed calibrating and what I wanted from the ECU. Then mapping session went on for two hours, with only a few stops along the way for a chat about car set up. Chris started off with full load mapping to find the sweet spot for the inlet cam timing and moved it through the full range of travel across the RPM range, then started to work on some lighter throttle mapping but the engine was a little hesitant on initial throttle opening. We changed the ignition outputs to change the firing order of the engine and the problem was resolved and Chris carried on tuning, as a result much less fuel was needed on tip in and the ignition characteristics needed some tweeking, getting a little bit above my understanding but interesting to work through it.
After another 30 minutes tweaking the car sounded really crisp with the limiter set at just over 7000rpm we finished off with a couple of power runs just to check everything was still ok from the initial full load tuning. We tried a few additional degrees of timing and it was still picking up power to 270bhp but decided the timing required wasn't worth it so settled at....
Not necessarily the highest figures from the session as we did over 25 dyno runs but the last power ran gave. This is pretty much what I expected this engine combination to do and finished the evening with a big smile on my face knowing all the effort was worth it.
I often get asked, normally by PM's rather than posts on forums about how things compare vs one another so I've scanned in some graphs and put some over lays together to give some comparisons of what I've learnt along the way.
Starting from the beginning.
2018 - Standard M54 Engine with S50 Manifolds
2019 - I fitted an M50 inlet manfiold and did back to back comparisons
M50 helped out in the mid range...But I stuck with it for simplicity sake as it's a much simpler manifold
2020 - Saw the building of the new engine with Schrick Cams
On the running in/Dyno day I had a failed exhaust cam sensor which meant no Variable valve timing but it made reasonable top end power
Same graph as above but compared against the standard Dyno plot from 2019, only really shows the difference the cams make at the top end as not VVT.
March 2021 - I went back to EFI as I wanted to try and M54 manifold on the new engine with Cams.
I expected this to be a good evening potentially making more top end power with good bottom end torque, weirdly I seemed to have lost 10bhp generally across the rev range but peak power still strong.
April 2021 - For comparisons sake I popped back with the M50 refitted just to see if it was the manifold or the engine.
I found that yep the figures were down, something wasn't 100% happy. The background being a comparison against a dyno run from 2018 on a standard engine, cams make a clear difference above 5000rpm though!
I continued to use the car through the summer of 2021 - Cadwell, Snetterton no issues at all and the car performed really well, I did mess with the exhaust cam timing but never got to test it on the dyno but It pulled well and managed to keep up with some faster cars so who really knows what the power was doing but the engine was rebuilt.
Oct 2021 - New engine
This graph shows the effect of the Vanos advancing the inlet cam through the mid range in black vs a fixed cam position in red. Make a massive difference in mid range torque, this is one reason I was very keen to get onto stand alone ECU so the cam timing being full variable over a 20 cam degree range could be dialed in perfectly.
Final comparison
Blue - New Engine Oct 2021
268bhp/258ftlbs
Bold Red and Black - March 2021 (Same engine set up as current on standard ECU with standard cam timing)
253bhp/255ftlbs
Faint Red and Black - 2018 - Standard Engine with S50 exhaust manifolds
240bhp/242ftlbs
Finally...
Oulton 13th November, it looks like the car is going to get there anyway, it will be a test for the new set up and no doubt that'll give me something to talk about after it.
Oulton Park Prep.
Leading up to Oulton there was a few last minute jobs to get boxed off, I wanted to make sure I had done everything I could think of prior to the track day.
Throughout the year I've had an annoying number of vibrations through the car under braking, one of them was from the front end when the polybush was working it's way out which I sorted after Cadwell with the new solid mounted wish bones on the front. The second was through the drive line which was more apparent when the car had more rear end grip as I was shifting the brake bias towards the rear and increasing braking force.
I did a couple of measurements of the rear discs and hubs, back left had a little bit of run out so decided to do some maintenance, I replaced the hub on the rear left

To be sure everything was perfect on the rear I also swapped the rear discs for new ones.

Nice and fresh hopefully no braking vibrations to be found at Oulton.

Picked up some spares for the track day box. A spare fuel pump, I also carry a spare in tank pump in the track day box.
15L of Shell oil. I did a oil change after running the engine in and mapping on Millers running in oil. The car takes a total of 8L now.

Friday night before the track day I gave the car a quick wash, I hadn't touched it since Snetterton so it was due a good clean, No splitter fitted for Oulton so we'll see how it drives.

Arrived at the circuit at 7:30 and fitted the wet tyres to the car, It has rained until the early hours of the morning leaving the track wet for sighting laps and a few mornings sessions.
Nervously went out to complete sighting laps in the car totally unknown what it was going to be like since the rebuild, the only confidence inspiring bit was the engine had already done 3 hours on the dyno.
I left the car to idle and get up to temperature saw in the garage be doing out for sighting laps, Car felt good on sighting laps despite cruising around at slow speeds, I have set up engine protection on the new ECU with very low rev limiters for oil and coolant temps both high and low.
Noise tested the car and it was in the high 90's, 98-99db, not too bad!
I got a couple of sessions under my belt but as I started to build up some speed on the rainsports I could feel a little bit of vibration through the foot plate on left hand corners. I cut my second session short and headed back to the pits. Jacked the car up and did a bolt check of the front end, I expected to find a bolt loose on the wishbone or the new lolly pop bushes, turns out I could get some movement on the wheel, strange as I had only checked it when I did the rear wheels the week before.
Caught in the action, I pulled off the caliper, disc and wheel bearing, I should add this wheel bearing was replaced when the car was built 3 years ago so not too bad. It's the front left that has had a couple of failures.
I do carry a spare wheel bearing so I grabbed that from the van and set about replacing it, also pulled the angle grinder out of the van to split the old inner race before fitting the new bearing and swapping over the wheel studs into the new hub.


I decided it was a good time to get the wheels swapped to the AR1's as a quick look at the pit straight was showing some drying patches

Out I went for a couple of sessions on the drying track.
Video from before lunch catching up a BMW M2 and E46 M3
https://youtu.be/i48vRH6iA44

As the day was a MSV day I asked a friend who does a little bit of photography if he wanted to pop down and take some photos. MSV unlike any other TDO's charge for their photos from their days and typically aren't good quality.


Lunch time came around, I checked the logs from the car, everything was looking good so far. I made some small changed to the logger to get a proper wheel speed reading, checked the cameras were recording the antics from the morning, nervously checked the oil level to find a full dip stick, this was a relief! Finally I put 20L of fuel in ready for the afternoon.
After lunch I got out with Chris in his E36 Turbo. This turned out to be a great session with some nice clear afternoon laps.
I had been aiming to do a 2:00 minute lap around Oulton with the previous best lap being a 2:03 if I remember correctly from Oulton in 2020 from a drying circuit.
I don't have any lap timing in the car and the lap times are purely taken from the GPS data at the end of the day so I was really pleased to see a couple of 1:58 laps with a couple of laps of 1:59 with a passenger as ballast! Really happy.
Video Link
https://youtu.be/_gsuKttv4dE
Quiet afternoon lapping as the sun was setting


I ran the car pretty much right up to the flag, I brought the car in a 3:45. Really happy with the performance of the car, handling feels really good, feeling really confident on the brakes, the car was really confidence inspiring, little bit of understeer on some of the faster corners, this could be possibly down to the lack of front splitter on this day. It will be back after some maintenance over winter.
I had spent a lot of weekends and late nights working on the car leading up to this track day. At some points I was ready to leave it, cancel the day and finish the rebuilding over winter but the car working so well at Oulton made all the effort worthwhile! Finished the day with a big grin! This track day was also booked by roughtly 12-14 other friends I know through track days which also made it a great social event, always great to see so many people at Oulton at the end of the year. Really did finish on a high!
Sunday morning, the down to earth side of track days, is always at least half a day, sorting out the van, car and trailer.
Unloaded it early in the morning still covered in in dew from the cold morning

Wet wheels getting a wash. Still running staggered 225/255 Rainsports on MV1's

AR1's - 255 square set up on TD's 1.2

I have been asked a few times how the AR1's are holding up. These have done 4.5 days on circuit now. Holding up better than I thought on the wear front, I have only rotated them once after 2 days from side to side, running 29-30psi in them, seems to be giving a good balance of grip, feel and tyre wear.


That brings this years trackdays to a close. It's been a great year with some great UK trips away in the car.
I have a few things planned for winter but I'll see what people think before I start discussing those and no doubt documenting the process along the way.
Where do we go next? What do we change?
Leading up to Oulton there was a few last minute jobs to get boxed off, I wanted to make sure I had done everything I could think of prior to the track day.
Throughout the year I've had an annoying number of vibrations through the car under braking, one of them was from the front end when the polybush was working it's way out which I sorted after Cadwell with the new solid mounted wish bones on the front. The second was through the drive line which was more apparent when the car had more rear end grip as I was shifting the brake bias towards the rear and increasing braking force.
I did a couple of measurements of the rear discs and hubs, back left had a little bit of run out so decided to do some maintenance, I replaced the hub on the rear left
To be sure everything was perfect on the rear I also swapped the rear discs for new ones.
Nice and fresh hopefully no braking vibrations to be found at Oulton.
Picked up some spares for the track day box. A spare fuel pump, I also carry a spare in tank pump in the track day box.
15L of Shell oil. I did a oil change after running the engine in and mapping on Millers running in oil. The car takes a total of 8L now.
Friday night before the track day I gave the car a quick wash, I hadn't touched it since Snetterton so it was due a good clean, No splitter fitted for Oulton so we'll see how it drives.
Arrived at the circuit at 7:30 and fitted the wet tyres to the car, It has rained until the early hours of the morning leaving the track wet for sighting laps and a few mornings sessions.
Nervously went out to complete sighting laps in the car totally unknown what it was going to be like since the rebuild, the only confidence inspiring bit was the engine had already done 3 hours on the dyno.
I left the car to idle and get up to temperature saw in the garage be doing out for sighting laps, Car felt good on sighting laps despite cruising around at slow speeds, I have set up engine protection on the new ECU with very low rev limiters for oil and coolant temps both high and low.
Noise tested the car and it was in the high 90's, 98-99db, not too bad!
I got a couple of sessions under my belt but as I started to build up some speed on the rainsports I could feel a little bit of vibration through the foot plate on left hand corners. I cut my second session short and headed back to the pits. Jacked the car up and did a bolt check of the front end, I expected to find a bolt loose on the wishbone or the new lolly pop bushes, turns out I could get some movement on the wheel, strange as I had only checked it when I did the rear wheels the week before.
Caught in the action, I pulled off the caliper, disc and wheel bearing, I should add this wheel bearing was replaced when the car was built 3 years ago so not too bad. It's the front left that has had a couple of failures.
I do carry a spare wheel bearing so I grabbed that from the van and set about replacing it, also pulled the angle grinder out of the van to split the old inner race before fitting the new bearing and swapping over the wheel studs into the new hub.
I decided it was a good time to get the wheels swapped to the AR1's as a quick look at the pit straight was showing some drying patches
Out I went for a couple of sessions on the drying track.
Video from before lunch catching up a BMW M2 and E46 M3
https://youtu.be/i48vRH6iA44
As the day was a MSV day I asked a friend who does a little bit of photography if he wanted to pop down and take some photos. MSV unlike any other TDO's charge for their photos from their days and typically aren't good quality.
Lunch time came around, I checked the logs from the car, everything was looking good so far. I made some small changed to the logger to get a proper wheel speed reading, checked the cameras were recording the antics from the morning, nervously checked the oil level to find a full dip stick, this was a relief! Finally I put 20L of fuel in ready for the afternoon.
After lunch I got out with Chris in his E36 Turbo. This turned out to be a great session with some nice clear afternoon laps.
I had been aiming to do a 2:00 minute lap around Oulton with the previous best lap being a 2:03 if I remember correctly from Oulton in 2020 from a drying circuit.
I don't have any lap timing in the car and the lap times are purely taken from the GPS data at the end of the day so I was really pleased to see a couple of 1:58 laps with a couple of laps of 1:59 with a passenger as ballast! Really happy.
Video Link
https://youtu.be/_gsuKttv4dE
Quiet afternoon lapping as the sun was setting
I ran the car pretty much right up to the flag, I brought the car in a 3:45. Really happy with the performance of the car, handling feels really good, feeling really confident on the brakes, the car was really confidence inspiring, little bit of understeer on some of the faster corners, this could be possibly down to the lack of front splitter on this day. It will be back after some maintenance over winter.
I had spent a lot of weekends and late nights working on the car leading up to this track day. At some points I was ready to leave it, cancel the day and finish the rebuilding over winter but the car working so well at Oulton made all the effort worthwhile! Finished the day with a big grin! This track day was also booked by roughtly 12-14 other friends I know through track days which also made it a great social event, always great to see so many people at Oulton at the end of the year. Really did finish on a high!
Sunday morning, the down to earth side of track days, is always at least half a day, sorting out the van, car and trailer.
Unloaded it early in the morning still covered in in dew from the cold morning
Wet wheels getting a wash. Still running staggered 225/255 Rainsports on MV1's
AR1's - 255 square set up on TD's 1.2
I have been asked a few times how the AR1's are holding up. These have done 4.5 days on circuit now. Holding up better than I thought on the wear front, I have only rotated them once after 2 days from side to side, running 29-30psi in them, seems to be giving a good balance of grip, feel and tyre wear.
That brings this years trackdays to a close. It's been a great year with some great UK trips away in the car.
I have a few things planned for winter but I'll see what people think before I start discussing those and no doubt documenting the process along the way.
Where do we go next? What do we change?
Gassing Station | Readers' Cars | Top of Page | What's New | My Stuff