The 3D Printer Thread
Discussion


Russ35 said:
Personally I would put the G28 & G29 lines between the M190 and M109 lines,
That way you are doing the bed level on the bed after any thermal expansion that it has done, where as the way you have it, it may have not have reached final temperature while your doing the bed level, or depending on how many points you check it may be below temperature for the first half of the level and at temperature for the second half.
I've no idea how much thermal expansion occurs on a print bed but assume there is some.
I suppose you would have the same issue with the nozzle expanding which would affect readings on a printer that uses the nozzle to do the bed level, but if you have the G28 & G29 after both M190 and M109 you would then have oozing issues from the nozzle, which may then affect the level readings.
Any expansion on that thin sheet of steel would prob be outwards - I'll test what you have suggested if I run into 1st layer problems. Not had them in a long time!That way you are doing the bed level on the bed after any thermal expansion that it has done, where as the way you have it, it may have not have reached final temperature while your doing the bed level, or depending on how many points you check it may be below temperature for the first half of the level and at temperature for the second half.
I've no idea how much thermal expansion occurs on a print bed but assume there is some.
I suppose you would have the same issue with the nozzle expanding which would affect readings on a printer that uses the nozzle to do the bed level, but if you have the G28 & G29 after both M190 and M109 you would then have oozing issues from the nozzle, which may then affect the level readings.
Russ35 said:
Personally I would put the G28 & G29 lines between the M190 and M109 lines,
That way you are doing the bed level on the bed after any thermal expansion that it has done, where as the way you have it, it may have not have reached final temperature while your doing the bed level, or depending on how many points you check it may be below temperature for the first half of the level and at temperature for the second half.
I've no idea how much thermal expansion occurs on a print bed but assume there is some.
I suppose you would have the same issue with the nozzle expanding which would affect readings on a printer that uses the nozzle to do the bed level, but if you have the G28 & G29 after both M190 and M109 you would then have oozing issues from the nozzle, which may then affect the level readings.
I agree you shouldn't be doing homing or ABL with a cold bed, when I was still using Marlin this was my start Gcode from a a few pages back (the homing was one I used to do with a cold bed, I was wrong, I have changed this below)That way you are doing the bed level on the bed after any thermal expansion that it has done, where as the way you have it, it may have not have reached final temperature while your doing the bed level, or depending on how many points you check it may be below temperature for the first half of the level and at temperature for the second half.
I've no idea how much thermal expansion occurs on a print bed but assume there is some.
I suppose you would have the same issue with the nozzle expanding which would affect readings on a printer that uses the nozzle to do the bed level, but if you have the G28 & G29 after both M190 and M109 you would then have oozing issues from the nozzle, which may then affect the level readings.
G92 E0 ; Reset Extruder
M104 S{material_standby_temperature} ; Start heating up the nozzle most of the way
M190 S{material_bed_temperature_layer_0} ; Start heating the bed, wait until target temperature reached
G28 ; Home all axes
G29 ;Auto Bed Level
G1 F600 Z5 ;Move the nozzle up
G1 F6000 X0 Y0 ;Move to the left front corner
M109 S{material_print_temperature_layer_0} ; Finish heating the nozzle
G1 Z2.0 F3000 ; Move Z Axis up little to prevent scratching of Heat Bed
G1 X0.1 Y20 Z0.3 F5000.0 ; Move to start position
G1 X0.1 Y200.0 Z0.3 F1500.0 E15 ; Draw the first line
G1 X0.4 Y200.0 Z0.3 F5000.0 ; Move to side a little
G1 X0.4 Y20 Z0.3 F1500.0 E30 ; Draw the second line
G92 E0 ; Reset Extruder
G1 Z2.0 F3000 ; Move Z Axis up little to prevent scratching of Heat Bed
G1 X5 Y20 Z0.3 F5000.0 ; Move over to prevent blob squish
I would also leave out the below start gcode, these should be configured on the printer once and can be adjusted as and when
M201 X500.00 Y500.00 Z100.00 E5000.00 ;Setup machine max acceleration
M203 X500.00 Y500.00 Z10.00 E50.00 ;Setup machine max feedrate
M204 P500.00 R1000.00 T500.00 ;Setup Print/Retract/Travel acceleration
I would leave out Jerk as MOST printers will ignore this anyway
M205 X8.00 Y8.00 Z0.40 E5.00 ;Setup Jerk
As long as the feed and flow rates are set in the slicer again you shouldn't need to reset this every time as the gcode for the print will contain that. Feed and flow rates should be calculated per filament and can change even between roles of the same colour filament but generally more between say PLA or PETG.
M220 S100 ;Reset Feedrate
M221 S100 ;Reset Flowrate
Distilling your gcode it could look something like this:
M190 S{material_bed_temperature} ; start heating the bed to what is set in Cura and WAIT (UNTIL THE TEMP IS REACHED an important distinction in machine code)
G28 ;Home
G29 ;ABL
M109 S{material_print_temperature} T0 ; start heating hotend to what is set in Cura and WAIT
G92 E0 ;Reset Extruder
G1 Z2.0 F3000 ;Move Z Axis up
G1 X10.1 Y20 Z0.28 F5000.0 ;Move to start position
G1 X10.1 Y200.0 Z0.28 F1500.0 E15 ;Draw the first line
G1 X10.4 Y200.0 Z0.28 F5000.0 ;Move to side a little
G1 X10.4 Y20 Z0.28 F1500.0 E30 ;Draw the second line
G92 E0 ;Reset Extruder
G1 E-2 F1800 ;retract 2mm at 30mm/s
G1 Z2.0 F3000 ; Move Z Axis up little to prevent scratching of Heat Bed
G1 E1.8 F1800 ;retract 2mm at 30mm/s
Don't forget to do your temp and retraction towers, again this should be done every time you change filaments (obviously once you have a known good figure for that roll there isn't a need to do it every time you change back to it, I note them on the side of the spool)
Oh and M109 and M190 the wait commands are just for it to wait until the temp is reached before the next line of G code is processed
ETA - You would also be surprised how long it takes for the heat to permeate across the below. This gives you some detail but essentially you should be preheating your bed for a few minutes before printing etc https://www.youtube.com/watch?v=gGQCv4xmjgs
I just copy and pasted the code from github. Mine actually is this:
M201 X500.00 Y500.00 Z100.00 E5000.00 ;Setup machine max acceleration
M203 X500.00 Y500.00 Z10.00 E50.00 ;Setup machine max feedrate
M204 P500.00 R1000.00 T500.00 ;Setup Print/Retract/Travel acceleration
M205 X8.00 Y8.00 Z0.40 E5.00 ;Setup Jerk
M220 S100 ;Reset Feedrate
M221 S100 ;Reset Flowrate
M140 S{material_bed_temperature} ; start preheating the bed WITHOUT wait to what is set in Cura
M104 S{material_print_temperature} T0 ; start preheating hotend WITHOUT wait to what is set in Cura
G28 ;Home
G29 ;Auto level
M190 S{material_bed_temperature} ; start heating the bed to what is set in Cura and WAIT
M109 S{material_print_temperature} T0 ; start heating hotend to what is set in Cura and WAIT
G92 E0 ;Reset Extruder
G1 Z2.0 F3000 ;Move Z Axis up
G1 X0.1 Y20 Z0.28 F5000.0 ;Move to start position
G1 X0.1 Y200.0 Z0.28 F1500.0 E15 ;Draw the first line
G1 X0.4 Y200.0 Z0.28 F5000.0 ;Move to side a little
G1 X0.4 Y20 Z0.28 F1500.0 E30 ;Draw the second line
G92 E0 ;Reset Extruder
G1 Z2.0 F3000 ;Move Z Axis up
Pretty minimal and works perfectly for me
My end Gcode is:
G91 ;Relative positioning
G1 E-2 F2700 ;Retract a bit
G1 E-2 Z0.2 F2400 ;Retract and raise Z
G1 X5 Y5 F3000 ;Wipe out
G1 Z10 ;Raise Z more
G90 ;Absolute positioning
G28 X0 Y0 ;Present print
M106 S0 ;Turn-off fan
M104 S0 ;Turn-off hotend
M140 S0 ;Turn-off bed
M84 X Y E ;Disable all steppers but Z
Octopi then powers off the power socket when the printer has been idle for a short while - its a nice touch :-)
I'll check out what my machine accel, jerk etc is and look at removing teh gcode - I just used what came with Cura, it worked, so I left it alone.
I'm off to print a bed adhesion test now with the "probing whilst warming gcode"
Edited by Griffith4ever on Tuesday 24th October 16:07
Edited by Griffith4ever on Tuesday 24th October 16:08
Griffith4ever said:
I just copy and pasted the code from github. Mine actually is this:
M201 X500.00 Y500.00 Z100.00 E5000.00 ;Setup machine max acceleration
M203 X500.00 Y500.00 Z10.00 E50.00 ;Setup machine max feedrate
M204 P500.00 R1000.00 T500.00 ;Setup Print/Retract/Travel acceleration
M205 X8.00 Y8.00 Z0.40 E5.00 ;Setup Jerk
M220 S100 ;Reset Feedrate
M221 S100 ;Reset Flowrate
M140 S{material_bed_temperature} ; start preheating the bed WITHOUT wait to what is set in Cura
M104 S{material_print_temperature} T0 ; start preheating hotend WITHOUT wait to what is set in Cura
G28 ;Home
G29 ;Auto level
M190 S{material_bed_temperature} ; start heating the bed to what is set in Cura and WAIT
M109 S{material_print_temperature} T0 ; start heating hotend to what is set in Cura and WAIT
G92 E0 ;Reset Extruder
G1 Z2.0 F3000 ;Move Z Axis up
G1 X0.1 Y20 Z0.28 F5000.0 ;Move to start position
G1 X0.1 Y200.0 Z0.28 F1500.0 E15 ;Draw the first line
G1 X0.4 Y200.0 Z0.28 F5000.0 ;Move to side a little
G1 X0.4 Y20 Z0.28 F1500.0 E30 ;Draw the second line
G92 E0 ;Reset Extruder
G1 Z2.0 F3000 ;Move Z Axis up
Pretty minimal and works perfectly for me
My end Gcode is:
G91 ;Relative positioning
G1 E-2 F2700 ;Retract a bit
G1 E-2 Z0.2 F2400 ;Retract and raise Z
G1 X5 Y5 F3000 ;Wipe out
G1 Z10 ;Raise Z more
G90 ;Absolute positioning
G28 X0 Y0 ;Present print
M106 S0 ;Turn-off fan
M104 S0 ;Turn-off hotend
M140 S0 ;Turn-off bed
M84 X Y E ;Disable all steppers but Z
Octopi then powers off the power socket when the printer has been idle for a short while - its a nice touch :-)
I'll check out what my machine accel, jerk etc is and look at removing teh gcode - I just used what came with Cura, it worked, so I left it alone.
I'm off to print a bed adhesion test now with the "probing whilst warming gcode"
What printer are you using?M201 X500.00 Y500.00 Z100.00 E5000.00 ;Setup machine max acceleration
M203 X500.00 Y500.00 Z10.00 E50.00 ;Setup machine max feedrate
M204 P500.00 R1000.00 T500.00 ;Setup Print/Retract/Travel acceleration
M205 X8.00 Y8.00 Z0.40 E5.00 ;Setup Jerk
M220 S100 ;Reset Feedrate
M221 S100 ;Reset Flowrate
M140 S{material_bed_temperature} ; start preheating the bed WITHOUT wait to what is set in Cura
M104 S{material_print_temperature} T0 ; start preheating hotend WITHOUT wait to what is set in Cura
G28 ;Home
G29 ;Auto level
M190 S{material_bed_temperature} ; start heating the bed to what is set in Cura and WAIT
M109 S{material_print_temperature} T0 ; start heating hotend to what is set in Cura and WAIT
G92 E0 ;Reset Extruder
G1 Z2.0 F3000 ;Move Z Axis up
G1 X0.1 Y20 Z0.28 F5000.0 ;Move to start position
G1 X0.1 Y200.0 Z0.28 F1500.0 E15 ;Draw the first line
G1 X0.4 Y200.0 Z0.28 F5000.0 ;Move to side a little
G1 X0.4 Y20 Z0.28 F1500.0 E30 ;Draw the second line
G92 E0 ;Reset Extruder
G1 Z2.0 F3000 ;Move Z Axis up
Pretty minimal and works perfectly for me
My end Gcode is:
G91 ;Relative positioning
G1 E-2 F2700 ;Retract a bit
G1 E-2 Z0.2 F2400 ;Retract and raise Z
G1 X5 Y5 F3000 ;Wipe out
G1 Z10 ;Raise Z more
G90 ;Absolute positioning
G28 X0 Y0 ;Present print
M106 S0 ;Turn-off fan
M104 S0 ;Turn-off hotend
M140 S0 ;Turn-off bed
M84 X Y E ;Disable all steppers but Z
Octopi then powers off the power socket when the printer has been idle for a short while - its a nice touch :-)
I'll check out what my machine accel, jerk etc is and look at removing teh gcode - I just used what came with Cura, it worked, so I left it alone.
I'm off to print a bed adhesion test now with the "probing whilst warming gcode"
Edited by Griffith4ever on Tuesday 24th October 16:07
Edited by Griffith4ever on Tuesday 24th October 16:08
So yeah in your scenario my start code would look like this:
M190 S{material_bed_temperature} ; start heating the bed to what is set in Cura and WAIT
G28 ;Home
G29 ;Auto level
M109 S{material_print_temperature} T0 ; start heating hotend to what is set in Cura and WAIT
G92 E0 ;Reset Extruder
G1 Z2.0 F3000 ;Move Z Axis up
G1 X0.1 Y20 Z0.28 F5000.0 ;Move to start position
G1 X0.1 Y200.0 Z0.28 F1500.0 E15 ;Draw the first line
G1 X0.4 Y200.0 Z0.28 F5000.0 ;Move to side a little
G1 X0.4 Y20 Z0.28 F1500.0 E30 ;Draw the second line
G92 E0 ;Reset Extruder
G1 Z2.0 F3000 ;Move Z Axis up
End G code is fine its just to turn stuff off and move the bed to where you want it. Octopi is cool, loads of really good plugins for it, Octolapse and Spool manager were my favourites

Ender 5 pro.
I've got filament break and jam sensors - both the one with rollers, and the microswitch one - it's bloody brilliant - can resume a print after a jam or break.
Just tried a test 1 layer adhesion print and got a perfect hexagon, from cold probed bed. PETG.
Now printing a new temp tower.
I've got filament break and jam sensors - both the one with rollers, and the microswitch one - it's bloody brilliant - can resume a print after a jam or break.
Just tried a test 1 layer adhesion print and got a perfect hexagon, from cold probed bed. PETG.
Now printing a new temp tower.
Hi, I need a 3D printer that can print a rubber type flexible material, can anyone recommend the best printer and filament to use please, I only need a few small parts making but they need a bit of flexibility probably 90 shore hardness would be ideal.
Oh it also needs to be reasonably easy to use!
Oh it also needs to be reasonably easy to use!
classicaholic said:
Hi, I need a 3D printer that can print a rubber type flexible material, can anyone recommend the best printer and filament to use please, I only need a few small parts making but they need a bit of flexibility probably 90 shore hardness would be ideal.
Oh it also needs to be reasonably easy to use!
You'll need something with a direct drive extruder, most of this will depend on your budget, most are now direct drive (but not all) the Sovol SV06 and SV07 review pretty well for example and seem to do ok with flexibles etc.Oh it also needs to be reasonably easy to use!
classicaholic said:
Hi, I need a 3D printer that can print a rubber type flexible material, can anyone recommend the best printer and filament to use please, I only need a few small parts making but they need a bit of flexibility probably 90 shore hardness would be ideal.
Oh it also needs to be reasonably easy to use!
I've successfully printed a few operational parts now from 90 shore TPU. Oh it also needs to be reasonably easy to use!
It's not particularly easy or cheap stuff to print. Do you have a model already?
Yazza54 said:
classicaholic said:
Hi, I need a 3D printer that can print a rubber type flexible material, can anyone recommend the best printer and filament to use please, I only need a few small parts making but they need a bit of flexibility probably 90 shore hardness would be ideal.
Oh it also needs to be reasonably easy to use!
I've successfully printed a few operational parts now from 90 shore TPU. Oh it also needs to be reasonably easy to use!
It's not particularly easy or cheap stuff to print. Do you have a model already?
classicaholic said:
Yazza54 said:
classicaholic said:
Hi, I need a 3D printer that can print a rubber type flexible material, can anyone recommend the best printer and filament to use please, I only need a few small parts making but they need a bit of flexibility probably 90 shore hardness would be ideal.
Oh it also needs to be reasonably easy to use!
I've successfully printed a few operational parts now from 90 shore TPU. Oh it also needs to be reasonably easy to use!
It's not particularly easy or cheap stuff to print. Do you have a model already?
geeks said:
classicaholic said:
Yazza54 said:
classicaholic said:
Hi, I need a 3D printer that can print a rubber type flexible material, can anyone recommend the best printer and filament to use please, I only need a few small parts making but they need a bit of flexibility probably 90 shore hardness would be ideal.
Oh it also needs to be reasonably easy to use!
I've successfully printed a few operational parts now from 90 shore TPU. Oh it also needs to be reasonably easy to use!
It's not particularly easy or cheap stuff to print. Do you have a model already?
classicaholic said:
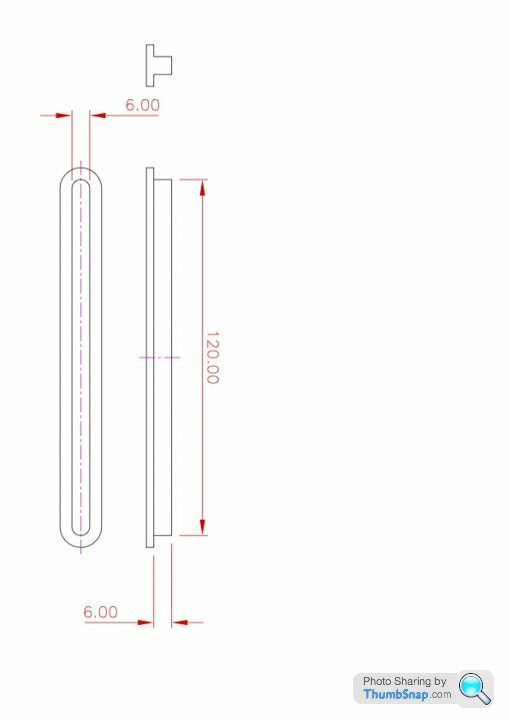
We normally have this part moulded from rubber but the company that has our tooling has gone bust and the tool has gone missing, we only use 50 of these parts a year so would be very interested in finding someone that could do it for us but a 3D printer looks a good thing to have as well!
Fair one, what's the budget? If you can be a bit "spendy" then I would be looking at a Bambu P1S if you want to be more spendy then the X1C after this things get very spendy.I think that would print in TPU which is reasonably flexible but difficult to get a high quality finish. If you look on Youtube for 3D print & TPU you should get a good idea if it will be good enough for your application.
If it's ok then most 3D printers should handle it (mine's a Creality CR6SE) and someone who prints commercially would easily knock out 50 or so for you.
If it's ok then most 3D printers should handle it (mine's a Creality CR6SE) and someone who prints commercially would easily knock out 50 or so for you.
Yazza54 said:
I managed a good finish from TPU 90 shore (overture) but it took a lot of fettling and trial and error with settings and machine setup. Gotta print slow too.

Very nice!Thanks for the help on this part I need, I will look into it but the machine recommended at about £850 seems good, Thanks.
classicaholic said:
Yazza54 said:
I managed a good finish from TPU 90 shore (overture) but it took a lot of fettling and trial and error with settings and machine setup. Gotta print slow too.
Very nice!Thanks for the help on this part I need, I will look into it but the machine recommended at about £850 seems good, Thanks.
julian64 said:
classicaholic said:
Yazza54 said:
I managed a good finish from TPU 90 shore (overture) but it took a lot of fettling and trial and error with settings and machine setup. Gotta print slow too.
Very nice!Thanks for the help on this part I need, I will look into it but the machine recommended at about £850 seems good, Thanks.
geeks said:
classicaholic said:
We normally have this part moulded from rubber but the company that has our tooling has gone bust and the tool has gone missing, we only use 50 of these parts a year so would be very interested in finding someone that could do it for us but a 3D printer looks a good thing to have as well!
Fair one, what's the budget? If you can be a bit "spendy" then I would be looking at a Bambu P1S if you want to be more spendy then the X1C after this things get very spendy.classicaholic said:
geeks said:
classicaholic said:
We normally have this part moulded from rubber but the company that has our tooling has gone bust and the tool has gone missing, we only use 50 of these parts a year so would be very interested in finding someone that could do it for us but a 3D printer looks a good thing to have as well!
Fair one, what's the budget? If you can be a bit "spendy" then I would be looking at a Bambu P1S if you want to be more spendy then the X1C after this things get very spendy.bobski1 said:
classicaholic said:
Thanks Geeks, just ordered in black Friday deal at £499 - now I will have to try and make it work!
where did you get it for £499?ETA TPU doesnt need an enclosure so I guess the P1P will be fine
Edited by geeks on Friday 17th November 13:49
Gassing Station | Computers, Gadgets & Stuff | Top of Page | What's New | My Stuff