Nut and Bolt rebuild - sensible mods
Discussion


I have been firing off various contributions to this forum over the last year or so but am now planning my ‘nut and bolt’ rebuild to start early January on my 1995, turquoise Griff 500. It’s got a serpentine engine with the T5 box.
I want to carry out ‘sensible’ mods to the car that will enhance it but not change its character. So far I have the following ideas:
I will document and take pictures of the re-build for all. Pete
I want to carry out ‘sensible’ mods to the car that will enhance it but not change its character. So far I have the following ideas:
- Weld in reinforcing brackets/cold rolled steel profiles to reinforce the seat fixings
- Weld in reinforcing brackets/cold rolled steel profiles to reinforce the battery fixings
- Galvanise and powder coat the chassis – I’ve considered the pros and cons and I think the pros outweigh the cons. I’m interested to hear people’s experience of galvanising but not from the doomsayers who have had no first-hand experience. I think the chances of the chassis warping are minimal providing it is done properly and the structural advice I have had is that the stresses introduce to the chassis by drilling are small and should be outweighed by the integrity of the chassis following galvanising – experiences and recommendations gratefully received
- Uprate brakes – my green Griff has grooved and drilled discs with Greenstuff pads. I think the callipers are standard. Unless I get any better ideas I will repeat as the braking is good with good feel.
- Stainless braided hoses etc. for the brakes
- Uprate suspension – my green Griff has Nitrons. I think they are quite old and may well need re-setting up. I don’t really have anything to compare against so suggestions gratefully received on this one
- Polybush all round. I’ve read the pros and the cons and I think the pros outweigh the cons but they will need to be set up right. Suggestions/experiences?
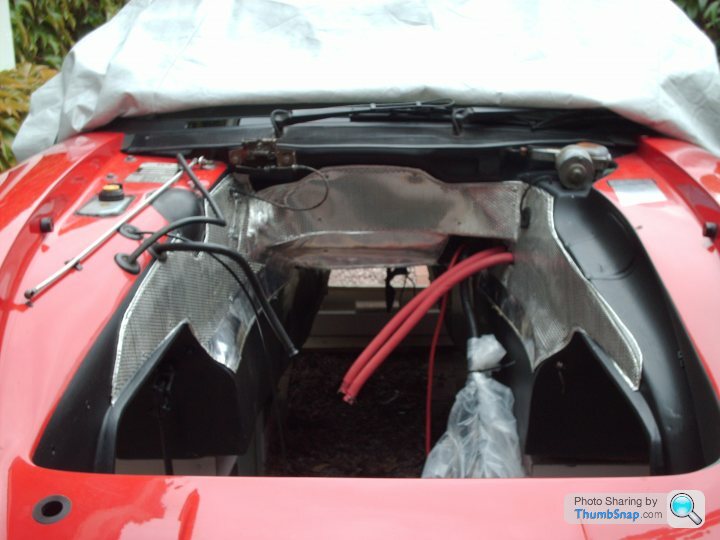
- Battery – I am planning to leave the battery where it is. I’m not that tall, 5’ 9” so it doesn’t give me or my family leg room problems but am planning to reinforce the fixings as well as drilling out the pop-rivets to the battery box cover and using rivnuts and stainless button screws – any other ideas?
- ECU and Fuse Box – this has got to be moved, I can’t have that ECU rolling around in footwell but to where? It needs to be sensibly accessible. Behind the passenger seat seems sensible. Can anybody recommend a suitable housing for them?
- 14CUX ECU – I’ve been following this thread but it is way beyond my knowledge and experience. I need to get into this, perhaps with the Rovergauge software and this may include re-chipping.
- 100 Amp Fuse – I would like to move this to the under bonnet area. I also plan to upgrade the feed cables to minimise losses. Separate thread on this.
- Fuel Pump – I was wondering whether there is a plastic cover out there to protect from water, road dirt and corrosion – something like a waterproof cable joint. Has anybody looked at this? Does the pump require airflow to cool it?
- Brake and clutch master cylinder covers – I am planning to fabricate a cover for the brake master cylinder and re-fabricate the clutch master cylinder cover. I will fix using rivnuts and stainless button machine screws and make up gaskets either from sheet or foam silicone. I want to remove all those smears of silicone from under-bonnet. Has anybody done this and got a mould for the brake master cylinder? If not then when I’ve finished I should have a mould for both so if anybody else is interested..!
- Gearbox – I was planning to rebuild myself. You can buy some very comprehensive T5 World Class rebuild kits
- Differential – I would like to rebuild myself but kits don’t seem to be available. I can probably do it by buying individual bearings and oil seals and then it is down to the condition of the teeth on the various cogs
- Engine – Get required machining done then rebuild myself. Sensible mods, probably camshafts only – suggestions?
- Cooling system – I like those ACT stainless pipes and silicone hoses. Stainless clips and anodized hose finishers all round.
- Radiator – not sure yet. It is currently aluminium. Probably just re-core/refurbish – 3-core
I will document and take pictures of the re-build for all. Pete
spikep said:
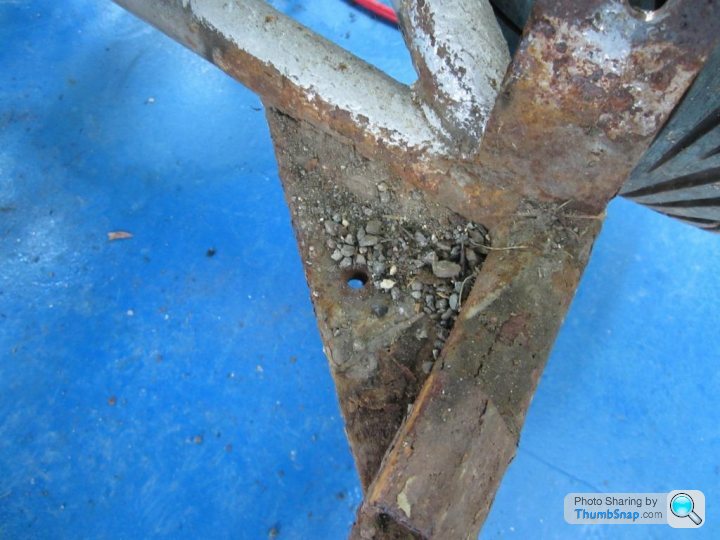
If you have the outriggers replaced, make all the corner plate gaps bigger to enable easy cleaning and removal of stones. I would upload a picture but can't seem to do it from iPad (if it's possible please tell me).
A good one. When you get the chance pictures would be welcome. Not sure I can help on the iPad thoughswisstoni said:
Chimaera body.

I said sensible mods, I don’t think devaluing the car would be sensible…….. 
Podie said:
My list would add...
I shall check these all out. Side vents on the bonnet make sense. Not sure about the CliveF manifolds being available, I’ve read a lot about them and they look great- WMS brakes - http://www.wms-brakes.co.uk/
- Later (SE) headlamps - http://www.sportmotive.com/partsales/headlamp.html
- Vented bonnet - http://www.damagedtvrs.co.uk/products/part/16
- CliveF manifolds (if he still does them)
V8 GRF said:
7 " headlight upgrade.
Keeps the original looks, actually improves them imo as it makes the front look ;stronger' by filling the pods and the added bonus is you can actually see when you drive at night.
As above, makes a lot of sense.Keeps the original looks, actually improves them imo as it makes the front look ;stronger' by filling the pods and the added bonus is you can actually see when you drive at night.
One other thing I was going to do was to replace the bonnet stay. I’m thinking Steve Heath bonnet stay. I have some ideas but need to find a fabricator, not my top priority right now. Does anyone have a Steve Heath stay they want to sell me?
cindydog3 said:
Manual boot release to accompany electric one?
Why not battery AND fuses/relays in boot?
Should have said that I was planning to put fuses, ECU and relaysWhy not battery AND fuses/relays in boot?
somewhere else, probably behind the seats. Still not sure about battery though but there again I've got relatively short legs and so has Mrs M.
matt-man said:
Enjoy! Its a great experiance! Dont want to highjack your thread but hope this gives you some extra enthusiasm!
i'm just coming to the end of mine and its been (mostly!) great fun! Its frightening how much rust lurks beneath!!
I had my chassis zinc blasted and the powder coated...you cant really dip it as any weaknesses will fail and you need to drill loads of holes...the blasting is supposed to be super effective.
the powder coating over the top is actually unnecessary but its pretty so everyone does it. I went for red
The body went back on with no problems. I had the chassis work done by Southways Automotive and they were excellent - thoroughly reccomend them
The most upseting thing is when you put the body back it looks exactly the same... here is a before and after body off with the heavies who helped me lift the body off....WOW they are heavy!
Enjoy
Happy to be hijacked. Chassis looks great, can't say the same for your mates...! I'm still going for the galv. Not convinced on hot zinc spray, especially with that pile of road sh!t sitting between the body and the outriggers. To be inwardly debated over the next couple of monthsi'm just coming to the end of mine and its been (mostly!) great fun! Its frightening how much rust lurks beneath!!
I had my chassis zinc blasted and the powder coated...you cant really dip it as any weaknesses will fail and you need to drill loads of holes...the blasting is supposed to be super effective.
the powder coating over the top is actually unnecessary but its pretty so everyone does it. I went for red
The body went back on with no problems. I had the chassis work done by Southways Automotive and they were excellent - thoroughly reccomend them
The most upseting thing is when you put the body back it looks exactly the same... here is a before and after body off with the heavies who helped me lift the body off....WOW they are heavy!
Enjoy
Alexdaredevils said:
Reinforce the weakest part of the chassis around the gear stick area to stop any twist
Brembo upgrade front brakes
Braided fuel lines on a different route
Depends on budget..... How far you want to go
Don't know much about the weak part of the chassis, any tips, guidance?Brembo upgrade front brakes
Braided fuel lines on a different route
Depends on budget..... How far you want to go
Front brakes upgrade yes, Brembo not sure, will look at that.
Braided fuel lines on different route, I like that one
TJC46 said:
This  but also a good idea to fit a fine gauge aluminium mesh over the top. It helps to stop them from being damaged in the future, and also looks rather smart.
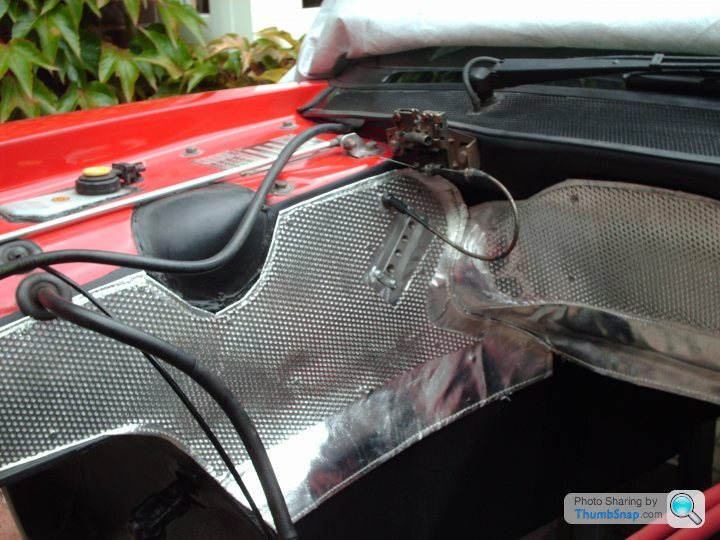
I like those heatshields, was planning to do something like this. but also a good idea to fit a fine gauge aluminium mesh over the top. It helps to stop them from being damaged in the future, and also looks rather smart.Got to do something about those silicone snail trails as well - sorry, I've got a thing about them, there has got to be a better way.
Rob_the_Sparky said:
If it were my car I'd be moving the battery and replacing the ECU with a full ignition/fuel control one (junking to old mechanical distributer), but then I'd probably also be fitting a tweaked engine...
I like the idea of the outrigger corner plate mods but was thinking that it would be good to add something to protect the ends of the chassis from the road grit off the tyres. I.e. stop it hitting the chassis in the first place. However, not got a solution yet.
I'm going to spend a bit of time thinking about those chassis mods. As I said I am definitely going to cross brace the seats and the battery box, which I am still thinking of leaving in the same place.I like the idea of the outrigger corner plate mods but was thinking that it would be good to add something to protect the ends of the chassis from the road grit off the tyres. I.e. stop it hitting the chassis in the first place. However, not got a solution yet.
I am pretty well sold on galvanising, it just makes so much sense and guarantees me a rustroof chassis but I also like the idea of deflecting the stones and road crap and being able to clean behind.
I am going to have to do quite a bit of learning on ECUs etc. This is not my area of expertise. I like the idea of sensible engine mods but I won't be racing the cars apart from the odd track day.
I really do want to move the ECU, Fuses and relays to somewhere sensible.
Rob, if you have any ideas on deflecting the stones, come and show me as you are a Berkshire boy as well.
dnb said:
Hope the inane rambling is of some use.
I really appreciate everybodies contribution to this. I do like to plan these things out and given the many options, it is better to have a very good idea of what is and what is not practical. I have responded to quite a few but taken on board all of them.I will try and document as much of the rebuild as possible because I am sure many of you either have already done what I am going to do or are planning to do it and to be honest, there is not a great deal of documentation around and you can't buy a Haynes Manual for a TVR Griffith.
Because I work a 4 week on and 4 week off rotation in Kazakhstan, you will probably find my contributions to these threads far greater for 4 weeks in every eight.
dnb said:
The loom is quite short to move the fuseboard. Have you considered a smaller battery to give better access to the existing fuseboard and space to mount the ECU?
Here's my battery box:

When I put in the new brake pipes etc, I used short lengths of rubber hose to sleeve them where I attached them to the chassis, so that there wasn't a metal-on-metal contact point to cause problems later.
Agree totally with things like the 7" lights and decent heat shielding. Don't overlook doing the transmission tunnel!
Brake upgrades - I went for Brembos. They are complete overkill but look nice.

It's a small thing, but I found the seat rails were getting past it on my car. So I got some replacements from car builder solutions. They latch on both rails so feel much better to use. (Not that I've done much of that this year )
)

Hope the inane rambling is of some use.
You know I like most if not all of what you have done. I just find that mess of wires, realys and the ECU wrong and I am planning to have a big tidy up there, that's why I am interested in ideas. I would move them and let in new wire if I could find a sensible mounting and box to put it all in - I'm not there yet.Here's my battery box:
When I put in the new brake pipes etc, I used short lengths of rubber hose to sleeve them where I attached them to the chassis, so that there wasn't a metal-on-metal contact point to cause problems later.
Agree totally with things like the 7" lights and decent heat shielding. Don't overlook doing the transmission tunnel!
Brake upgrades - I went for Brembos. They are complete overkill but look nice.
It's a small thing, but I found the seat rails were getting past it on my car. So I got some replacements from car builder solutions. They latch on both rails so feel much better to use. (Not that I've done much of that this year
)Hope the inane rambling is of some use.
Seat rails are important especially as I want Mrs M to be able to drive the car (yes, I rally do..!) she is not very big and I need to move the seat forward so she can get a bit of power to the clutch, which she finds heavy.
Good point on brake pipes.
Will look at Brembos. Agreed they look fantastic, down to 'bang for buck'. Whatever I do I will be powdercoating the callipers myself.
I am planning to blast and powdercoat all small items myself. I've bought an old 900mm oven on fleabay, so should be able to get many items in there. I just need to get the blast cabinet and powdercoating kit.
Hoover. said:
Have you considered nylon coating the chassis ??
Tom's Dad done this to his chassis, it looks a very substantial protection..... I come across powder coating a fair bit in the construction industry, and I am not that impressed to be honest in terms of durability
No but mainly because I had never heard of it until you brought it up. Googled it, looks interesting. Looks like powder coating but with a Nylon powder rather than polyester. My chassis could be nuclear bomb proof if you put this over galvanising......Tom's Dad done this to his chassis, it looks a very substantial protection..... I come across powder coating a fair bit in the construction industry, and I am not that impressed to be honest in terms of durability
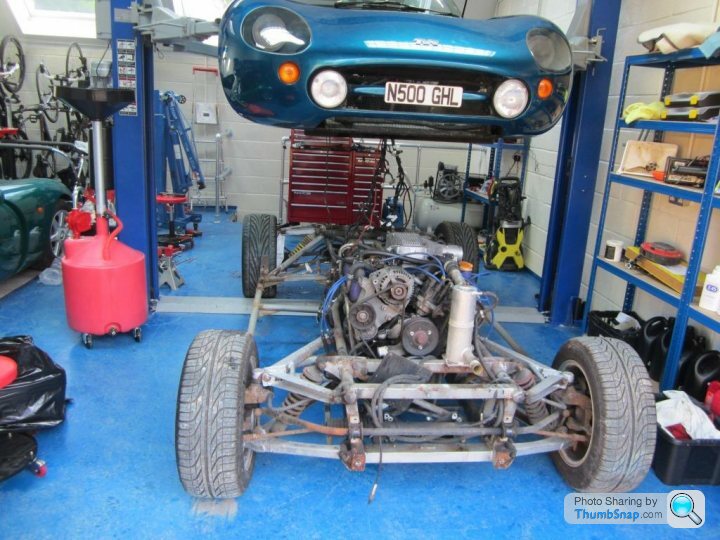
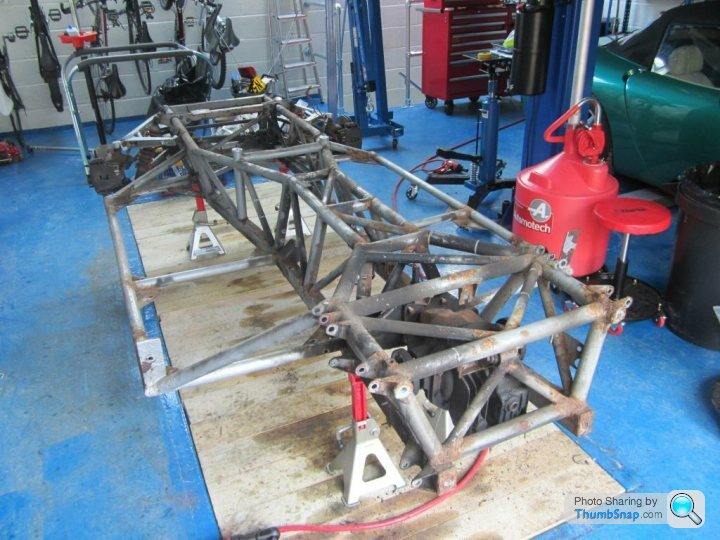
Body came off the chassis today:
Lessons I learned:
I was surprised. A lot of surface rust but chassis looks in better nick than I expected. Anyway I'll have it stripped down in the next few days and off to be blasted and that will tell me how good or bad it really is.
I have copious photos of the strip down and as I take the car apart, many of those things that weren't obvious, now become obvious as you see the car in its full glory.....
Tell me if you are interested and I will keep posting progress.
Lessons I learned:
- You may think you've undone all those bolts but there are always a couple you didn't notice. The two I didn't notice where the ones under the dash. I managed to lift the whole car on those two (only by a couple of centimetres) before I realised - what a plonker
- However hard you look, there are always one or two things you didn't disconnect (wires mainly although it becomes clear as the body goes up)
I was surprised. A lot of surface rust but chassis looks in better nick than I expected. Anyway I'll have it stripped down in the next few days and off to be blasted and that will tell me how good or bad it really is.
I have copious photos of the strip down and as I take the car apart, many of those things that weren't obvious, now become obvious as you see the car in its full glory.....
Tell me if you are interested and I will keep posting progress.
I have taken copious photos so if anybody wants to know 'what connects to what' I might be able to help.
Just about to go out and take the engine and gearbox out, strip off the suspension and extract those two rusty chassis bolts that sheared off.....!
More photos and commentary to follow.
Just about to go out and take the engine and gearbox out, strip off the suspension and extract those two rusty chassis bolts that sheared off.....!
More photos and commentary to follow.
Didn't get as much done today as I wanted to. A few domestic chores then had to nip to Swindon Machine Mart to pick up a Load Leveller. Anyway got back, load leveller on engine and engine out. No real hassles:
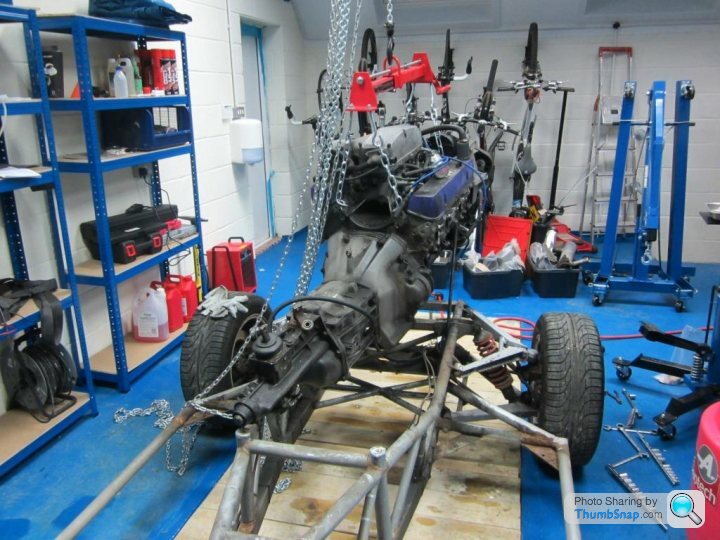
Lowered engine down to basement dungeon/workshop:

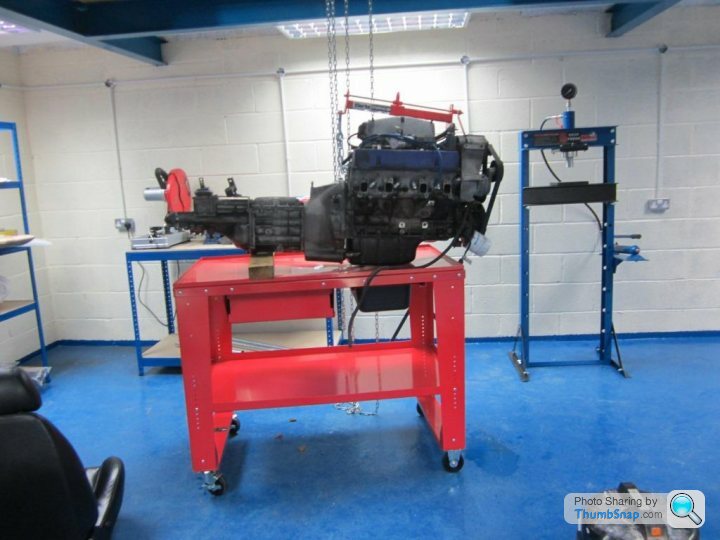
And stored on table ready for splitting engine and gearbox at later stage for rebuilding:
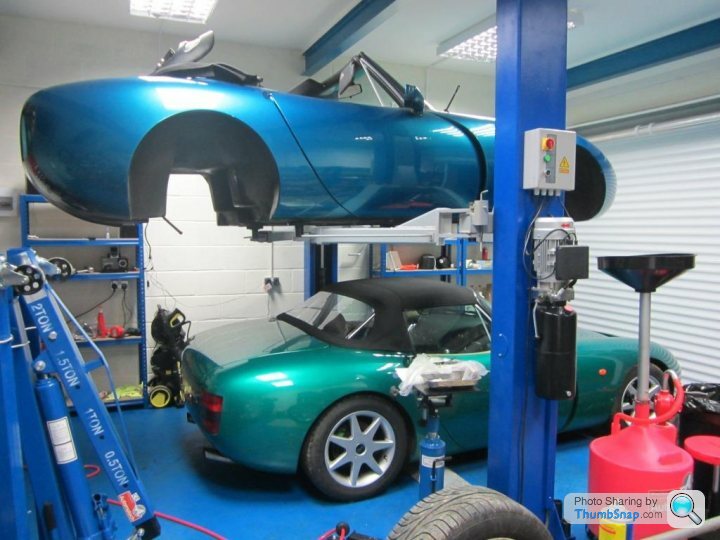
Body safely stashed above the 'Green Meany' again for another day.
Focus is on the chassis for now, which I put up on stands ready for tomorrow:
Tomorrow will be stripping chassis, especially suspension ready for blasting. I have soaked all the nuts and bolts in copious quantities of penetrating oil, which I have to say I am not a huge believer in but why do I think tomorrow is going to be a right s t of a day when it comes to undoing those wishbone bolts.
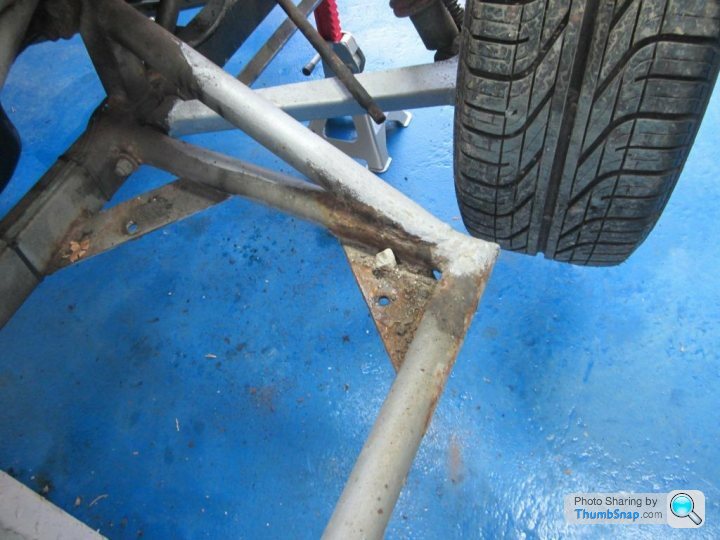
Although chassis looks better than expected, I am not so sure about the wishbones. Anybody got a spare set they want to sell me, front and back?
Anyway out for a well deserved beer tonight. Unfortunately none of my mates are petrolheads, have to find something else to talk about .......
Lowered engine down to basement dungeon/workshop:
And stored on table ready for splitting engine and gearbox at later stage for rebuilding:
Body safely stashed above the 'Green Meany' again for another day.
Focus is on the chassis for now, which I put up on stands ready for tomorrow:
Tomorrow will be stripping chassis, especially suspension ready for blasting. I have soaked all the nuts and bolts in copious quantities of penetrating oil, which I have to say I am not a huge believer in but why do I think tomorrow is going to be a right s
t of a day when it comes to undoing those wishbone bolts.Although chassis looks better than expected, I am not so sure about the wishbones. Anybody got a spare set they want to sell me, front and back?
Anyway out for a well deserved beer tonight. Unfortunately none of my mates are petrolheads, have to find something else to talk about .......
carsy said:
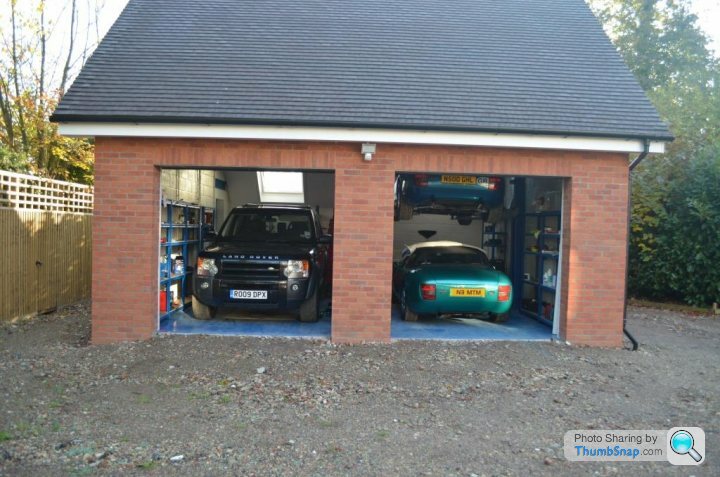
I WANT I WANT I WANT THAT GARAGE. Very envious. 
Thanks guys, your praise much appreciated, concept and execution was very much mine, Berkshire Planners wouldn't allow me to go outwards so the only way was to go down in the ground. I have to say the whole lot has worked beyond expectations.This is not a 'trinket' as you see I am making real use of the garage. I am not sure I would like to undertake the body off without my 2-post lift (not a 4-post lift) as I seemed to be constantly in the engine bay and then below the car and then using it to lift the body was faultless (I followed the Edd China method from Wheeler Dealers for the Cerbera). I am not short of mates but I don't have many 'petrol head' mates so I would have struggled to assemble 5-8 sturdy blokes who would have been happy to stand around whilst I undid all the last bits and pieces.
As for the lift, have a look on Automotech site, they are not expensive (£1,099 plus VAT) very easy to install but all you need is the head height.
Unfortunately there is not much room for the day to day cars although I did stack the Griffs and put the Disco next door, before I started the strip down.
swisstoni said:
I'm also impressed with garage. Care to name-check the architect / builders? I live in Berkshire too so would be helpful to know for future ref.
Hi swisstoni, Not wanting to hi-jack this thread with the garage but most important were the builders, I brought in 3 guys from Suffolk, who have worked for my brother off and on for the last 20 years. I paid them by the hour plus b&b and managed the work myself (cheapest and best way),I bought all the materials myself and 'managing' the boys basically meant making sure all the materials were there when required. I would recommend them anytime and execution of the job was fantastic - 3 months start to finish and I am not the biggest fan of builders.Structural engineer next. There was a lot of steel and the details for the 2-post lift were very important, although in the end I more or less told him how I wanted the rest of the steel and he did the calculations.
Architect was fine but the whole concept was mine so he turned it into plans and submitted it for planning. Planning was a nightmare, partly due to me initially cutting corners on the architect.
I pretty well knew what I wanted, I used my own tanking (waterproofing) system (Firestone EPDM) - highly successful as I didn't want a pump in the basement. I started off by thinking all I needed was a hole in the floor to make a 'pit' and then very soon realised that a 2-post lift was a very viable idea as well, which led to the idea of lowering stuff into the basement.
I am happy to share contact names, drawings, costs. I have all the construction photos (surprise, surprise) etc. E-mail me and let me know what you want. We can discuss on the phone or you can come and have a look if that suits you
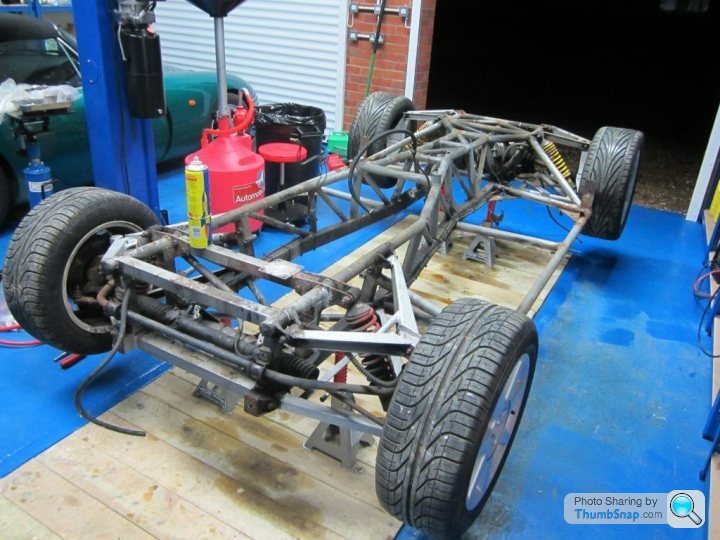
This is were I was last night, although diff was actually removed:
but I now have a plan as follows:
So far Aston has been fantastic in helping me through the blasting, galving, powder coating process, I'll let you know how he does when it comes to doing the work but I have high hopes.
I asked Aston about 'Nylon Coating', mentioned earlier in this thread. He reckoned it was OK but because it is more of a 'plastic' coating, once chipped it was very difficult to repair. I suppose on a galvanised chassis this wouldn't matter. I will almost certainly go the powder coat route as it is purely cosmetic and would be much easier to repair.
I haven't selected a galvanizer yet but when I do I will let you know. I anybody has any suggestions then let me know. If you are interested in chassis galvanizing then you might be interested in this thread:
http://www.pistonheads.com/gassing/topic.asp?h=28&...
I did quite a bit of research on it.
This is today's work:
However it is elder daughter's 21st today so I think my mind might be elsewhere this weekend
but I now have a plan as follows:
- I am planning to galvanise the chassis, chassis cross pieces, the wishbones, the 3 diff mounting brackets and the chassis plate that sits under the gearbox
- Once I have fully stripped the chassis, extracted the 3 sheared bolts and pushed the bushes out of the wishbones (there is also a bush in the chassis holding the diff. I haven't worked out how I am going to push that out yet....!), I am going to get all the pieces aggressively shot blasted to get rid of all the surface rust as well highlight any required repairs (fingers crossed...)
- I will bring the chassis back, offer it up to the body and weld in a cross piece for the battery box and cross pieces for seat runners. These are going to be a bit more complicated than I originally envisaged as the seats sit on recesses in the glassfibre so the cross piece will need to have raised 'top hats' on them (don't worry I will take measurements and photos to explain later)
- I will drill the chassis tubes for the galvanizing and then get the pieces galvanized
- Once galvanized I will fettle the chassis (chase all the threads and grind off all the zinc snots) and then prepare the chassis for powder coating by de-greasing it (apparently galv has a lot of tallow)
- I'll then get the whole lot powder coated (probably white) not so much because it is original colour but more because I can hang nice coloured bits off it
So far Aston has been fantastic in helping me through the blasting, galving, powder coating process, I'll let you know how he does when it comes to doing the work but I have high hopes.
I asked Aston about 'Nylon Coating', mentioned earlier in this thread. He reckoned it was OK but because it is more of a 'plastic' coating, once chipped it was very difficult to repair. I suppose on a galvanised chassis this wouldn't matter. I will almost certainly go the powder coat route as it is purely cosmetic and would be much easier to repair.
I haven't selected a galvanizer yet but when I do I will let you know. I anybody has any suggestions then let me know. If you are interested in chassis galvanizing then you might be interested in this thread:
http://www.pistonheads.com/gassing/topic.asp?h=28&...
I did quite a bit of research on it.
This is today's work:
However it is elder daughter's 21st today so I think my mind might be elsewhere this weekend
TJC46 said:
First point its the old fashioned way im afraid. I tried various ways of pushing
out the diff bush but in the end, its burn out the rubber so the centre tube
falls out and then carefully cut with an hacksaw blade and tap out.
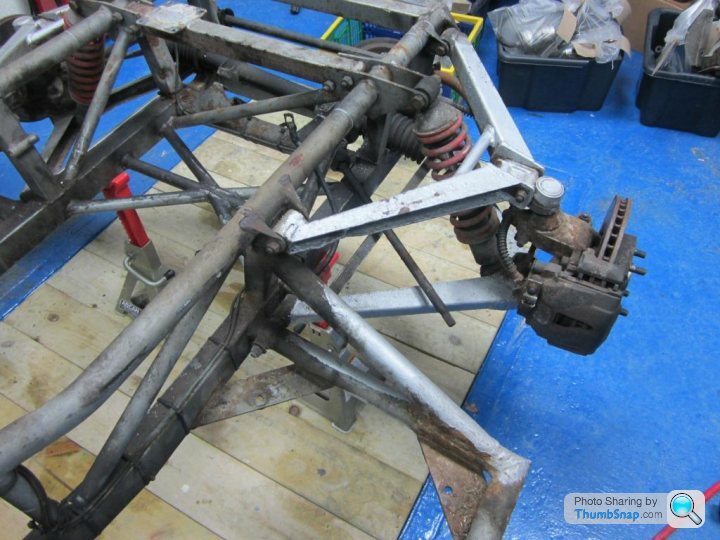
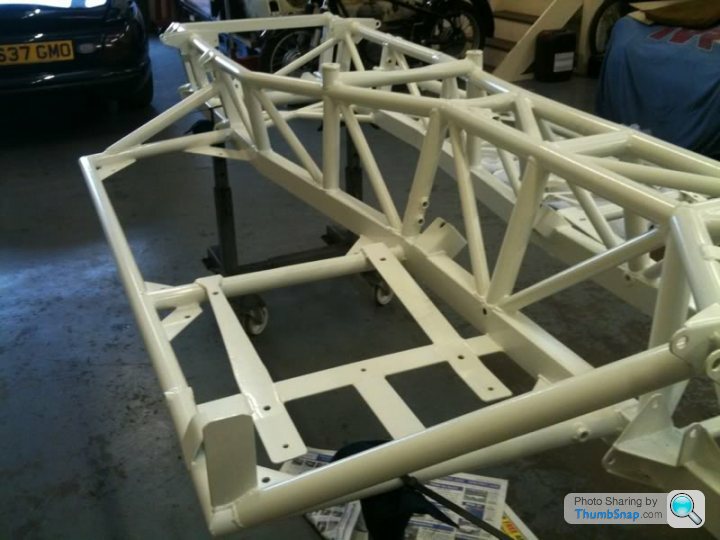
2nd point. Not my chassis. just a pic showing someone elses idea of securing the seats to the chassis.
Peter seriously consider painting the chassis after galvanizing.
Yes powder coat looks a great uniform finish when done, and although you will not have corrosion problems because of galvanizing, the powder coat can still chip
easy.
It would be far easier with paint to touch up any stone chips.
Like my car, im sure your Griff will be a"keeper" and ongoing maintenance over the coming years is obligatory.
Since my bodyoff i have removed the diff for a refurb ,removed the front wishbones for bush replacement, rear wishbones for welding in a new antiroll bar fixing plate, and many other jobs i cant remember.
Point is, if my chassis was powder coated, then whilst doing any of the above jobs it would have been very easy to chip and damage the powdercoat.
Welding in new antiroll bar plates would have meant shotblast and repowder coating of the rear wishbones.
As it was, i simply cut away the damaged plates, ground away the paint to expose nice shiney metal to weld to, and afterwards repainted the whole wishbone.
Job done and perfect colour match to the rest of the chassis.
As stated earlier, powder coating looks fantastic when first done, but I.M.O it is not a practical solution to live with, on a car that will always require ongoing maintenance.
Thanks, I've noted all your points. For the bush I was going to try some studding, two sockets and two nuts to try and ease it out but if that doesn't work, it looks like I will have to resort to burning out and the good old hacksaw.out the diff bush but in the end, its burn out the rubber so the centre tube
falls out and then carefully cut with an hacksaw blade and tap out.
2nd point. Not my chassis. just a pic showing someone elses idea of securing the seats to the chassis.
Peter seriously consider painting the chassis after galvanizing.
Yes powder coat looks a great uniform finish when done, and although you will not have corrosion problems because of galvanizing, the powder coat can still chip
easy.
It would be far easier with paint to touch up any stone chips.
Like my car, im sure your Griff will be a"keeper" and ongoing maintenance over the coming years is obligatory.
Since my bodyoff i have removed the diff for a refurb ,removed the front wishbones for bush replacement, rear wishbones for welding in a new antiroll bar fixing plate, and many other jobs i cant remember.
Point is, if my chassis was powder coated, then whilst doing any of the above jobs it would have been very easy to chip and damage the powdercoat.
Welding in new antiroll bar plates would have meant shotblast and repowder coating of the rear wishbones.
As it was, i simply cut away the damaged plates, ground away the paint to expose nice shiney metal to weld to, and afterwards repainted the whole wishbone.
Job done and perfect colour match to the rest of the chassis.
As stated earlier, powder coating looks fantastic when first done, but I.M.O it is not a practical solution to live with, on a car that will always require ongoing maintenance.
Good one on the seat reinforcement. I planned to put them laterally but longitudinally makes a lot of sense, in fact I think I can do one better by using a narrow channel (stronger) just wide enough for the nut and washer to sit inside but narrow enough to fit into the floor pan channel (I'll do photos).
As for powder coating versus paint, I just haven't decided. If I wasn't galvanizing then I wouldn't touch powder coating as that was the downfall of the original TVR chassis, however because of the galv, I can safely touch up the powder coat without any corrosion concerns as even in the unlikely event of the galv getting scratched it is sacrificial and will self heal. Whatever I do, I will give it some real hard thought and keep you posted. To me the chassis is the absolute backbone of this rebuild, literally.........
Gassing Station | Griffith | Top of Page | What's New | My Stuff