V8S Rebuild begins!
Discussion


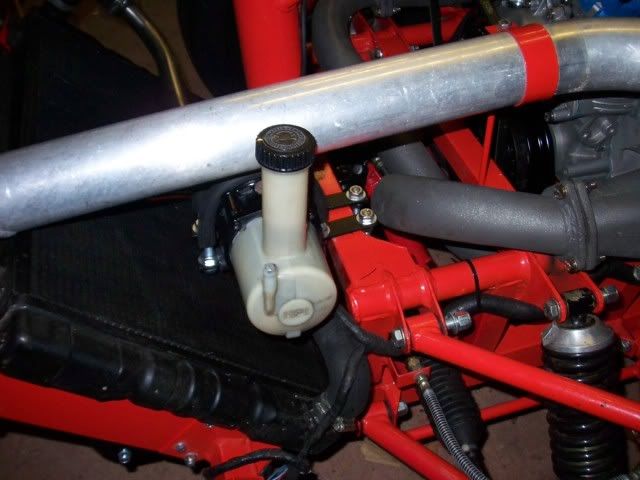
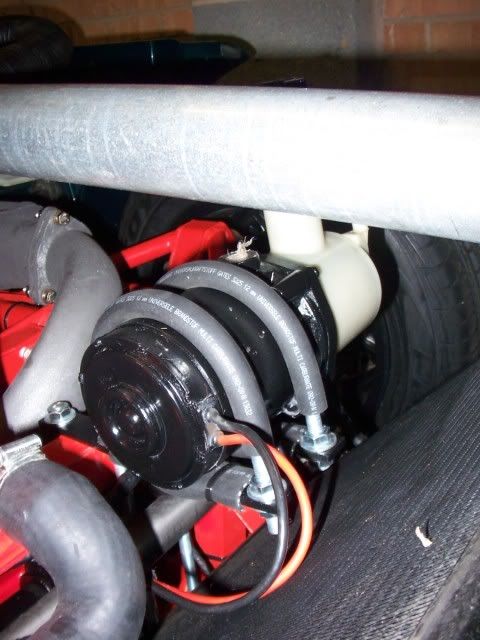
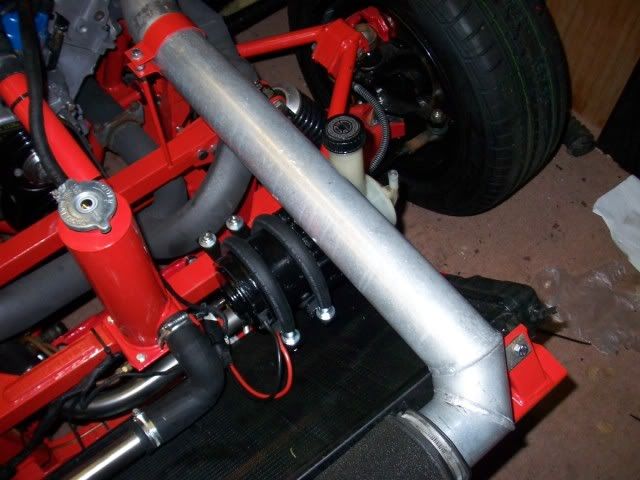
I've given mounting the Power Steering Pump a bit of attention today.
I think I said previously that it is a Citroen Saxo / Peugeot 106 electrically powered hydraulic pump - as fitted to Sagaris / Tamora and a few other late cars I think.
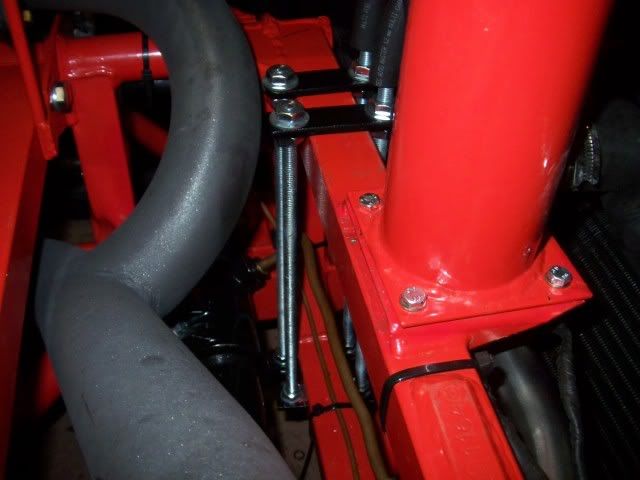
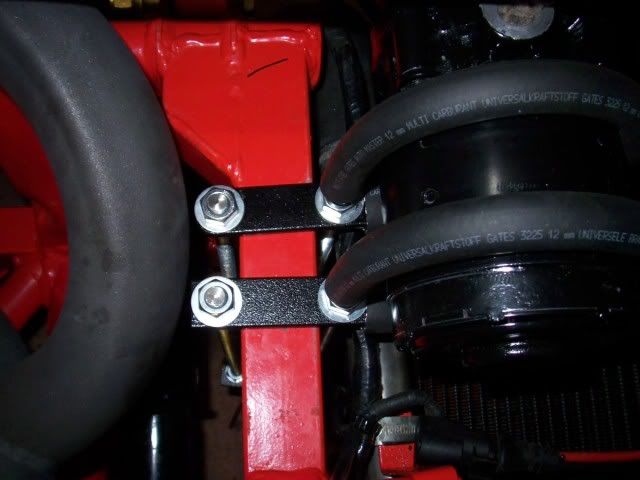
I am getting the hang of this TVR Lark - I made all the mounting brackets from stuff I had kicking around in the garage just like TVR - 10mm threaded rod, nuts & washers, a couple of bits of flat steel, a bit of rubber hose and a quick squirt of gloss black aerosol.
I hope the pics speak for themselves, what I've done is pretty straightforward - 2 lengths of 10mm threaded rod bent to a hockey stick shape with a bit of rubber hose over the end - and a couple more bits of straight 10mm rod.
There's also a bit of opened & flattened rubber hose underneath the pump cabletied to the bracket with TVR precision.
The bracket is a bit closer to the exhaust than I'd like but I'll see how it goes.
If you are not aware the big aluminium pipe is the air intake on the V8.

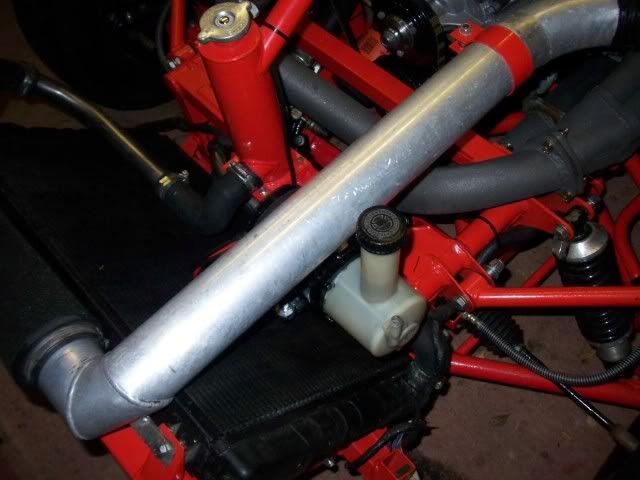
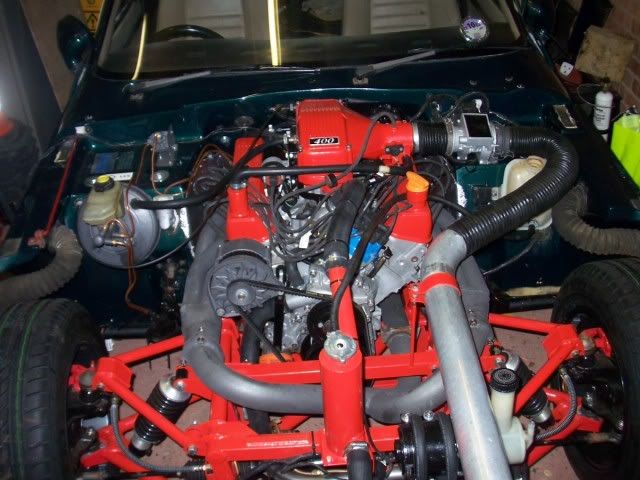
and its about time we had a new engine shot!
I think I said previously that it is a Citroen Saxo / Peugeot 106 electrically powered hydraulic pump - as fitted to Sagaris / Tamora and a few other late cars I think.
I am getting the hang of this TVR Lark - I made all the mounting brackets from stuff I had kicking around in the garage just like TVR
- 10mm threaded rod, nuts & washers, a couple of bits of flat steel, a bit of rubber hose and a quick squirt of gloss black aerosol.I hope the pics speak for themselves, what I've done is pretty straightforward - 2 lengths of 10mm threaded rod bent to a hockey stick shape with a bit of rubber hose over the end - and a couple more bits of straight 10mm rod.
There's also a bit of opened & flattened rubber hose underneath the pump cabletied to the bracket with TVR precision.
The bracket is a bit closer to the exhaust than I'd like but I'll see how it goes.
If you are not aware the big aluminium pipe is the air intake on the V8.
and its about time we had a new engine shot!
Edited by Barkychoc on Sunday 6th June 19:25
Edited by Barkychoc on Sunday 6th June 19:31
Hi Chris,
Like many said before, excellent rebuild. Just an advise : it would be easy to fit a heat shield between the exhaust and the PS system. The frontpipe is hot enough (radiation) to reduce the "lifespan" of hoses and reservoir. I wouldn't take the risk driving it without a heatshield.
Keep up the good work !!
Br, Han

Got seats & seat belts fixid in the car properly today - thats the good news.
The bad news is the master cylinder is leaking


I am getting fluid leaking at the servo end - I have some wet staining on the servo where the fluid is running down behind the flange.
I have a spare master cylinder, I can't decide whether to try that or just go for a new one.
Oh and the bloody reversing lights aren't working either.
The bad news is the master cylinder is leaking
I am getting fluid leaking at the servo end - I have some wet staining on the servo where the fluid is running down behind the flange.
I have a spare master cylinder, I can't decide whether to try that or just go for a new one.
Oh and the bloody reversing lights aren't working either.
Edited by Barkychoc on Sunday 13th June 19:10
Thanks Dave - you're thinking clutch master cylinder and I need a brake master cylinder - unfortunately they aren't the same, but thanks for the thought.
I actually have a spare brake master cylinder - I bought a servo and it came attached, and its the right one off an XR2i so I might give that a go first.
It does look in good clean condition on the outside.....
I actually have a spare brake master cylinder - I bought a servo and it came attached, and its the right one off an XR2i so I might give that a go first.
It does look in good clean condition on the outside.....
Chris - If I was you I'd strip one and replace the seals - it is a 10 minute job if off the car and will ensure the second hand one is good before you put it on. The seal sets are only about £15 from a motor factors.
To strip it the first bit just pulls out, the second bit is held in by a little clip that has to be pulled out from the hole where the reservoir sits (grip it with long nose pliers and pull up gently) and it isn't very visible until you remove the rubber. Once the pin is out, so to speak, then the second section of the piston arrangement can be blown out with a bit if compressed air.
HTH
Mark
Bigg Red can supply rebuild kits http://www.biggred.co.uk/ and this might help, i'll email the instructions as well as formatting/pics have been lost!
Master cylinder - removal, overhaul and refitting
1 Syphon out as much fluid as possible from the master cylinder reservoir using an old battery hydrometer or a poultry baster. Do not drip the fluid onto the paintwork or it will act as an effective paint stripper.
2 Disconnect the pipelines from the master cylinder by unscrewing the unions.
Master cylinder and hydraulic pipe connections
3 Disconnect the leads from the level warning switch in the reservoir cap. Remove the cap.
4 On models not fitted with a brake servo unit, unclip and remove the trim panel beneath the facia on the driver’s side to give access to the brake pedal. Extract the brake pedal-to-pushrod clevis pin retaining clip and withdraw the pin.
5 Unbolt and remove the master cylinder. On non-servo models, remove the cylinder from the bulkhead whilst, on servo equipped models, the master cylinder is removed from the servo unit.
Overhaul
1.4 litre and XR2 models from early 1986
6 From the beginning of 1986, all XR2 models and 1.4 litre models are fitted with a brake master cylinder of a new design. The new master cylinder is identifiable by its small size and its smooth cylinder body appearance.
Exploded view of master cylinder - XR2 and 1.4 litre models, early 1986 on
A Secondary piston seals
B Secondary piston
C Protecting ring
D Seal support ring
E Return springs
F Retaining ring
G O-ring seal
H Reservoir seals
J Primary piston
K Support ring
L Cap seal
M Primary piston fluid housing
7 The overhaul procedure is as follows:
8 With the master cylinder removed from the car, drain the remaining brake fluid from the reservoir, then remove the reservoir from the cylinder body.
9 Using a screwdriver, lever off the primary piston fluid housing
Levering off the primary piston fluid housing
and withdraw the fluid housing and primary piston assembly from the master cylinder. Be prepared for some fluid spillage during this operation.
10 Separate the primary piston from the fluid housing and remove the fluid housing seal.
11 Tap the master cylinder on a block of wood to eject the secondary piston, then remove the secondary piston assembly from the master cylinder.
12 Prise off the fluid housing retaining ring and remove the O-ring seal from the cylinder body.
13 Extract the two reservoir seals from the master cylinder ports.
14 Carefully remove the two secondary piston return springs, the seal support ring, seal protecting ring and the fluid seals from each end of the piston.
15 Examine the cylinder bore for signs of scoring or wear ridges. If evident renew the master cylinder. If the cylinder appears satisfactory, obtain a repair kit which will contain new secondary piston and cylinder body seals and a complete new primary piston assembly.
16 Lubricate all the seals, the cylinder bore and the pistons with clean brake fluid, then reassemble as follows.
17 Refit the seals, support ring, protecting ring and springs to the secondary piston, then carefully insert the assembled piston into the master cylinder bore.
18 Fit the two new reservoir seals to the cylinder ports.
19 Fit a new seal to the fluid housing and fit the primary piston to the housing.
20 Fit a new O-ring to the end of the cylinder body, followed by the fluid housing retaining ring.
21 Carefully assemble the primary piston and fluid housing to the master cylinder, pushing the piston and housing in until the fluid housing is flush with the cylinder mounting flange.
22 Refit the master cylinder reservoir.
All other models
23 To overhaul the master cylinder fitted to these models, first clean away external dirt and then detach the fluid reservoir by tilting it sideways and gently pulling. Remove the two rubber seals.
24 Secure the master cylinder carefully in a vice fitted with jaw protectors.
25 Pull the dust excluder back from around the pushrod and using circlip pliers, extract the circlip which is now exposed.
26 Remove the pushrod, dust excluder and washer.
27 Withdraw the primary piston assembly, which will already have been partially ejected.
Master cylinder primary (A) and secondary (B) piston assemblies
28 Using a small diameter rod, insert it into the end of the cylinder and push the secondary piston in so that the locking pin can be extracted.
Master cylinder secondary piston stop pin
29 Tap the end of the master cylinder on a block of wood and eject the secondary piston assembly.
30 Examine the pistons and cylinder bore surfaces for scoring or signs of metal-to-metal rubbing. If evident, renew the cylinder complete.
31 The primary piston unit cannot be dismantled and must be renewed as a unit.
32 Prise free and remove the secondary piston seals, noting their orientation. Once removed the seals must be discarded and a repair kit obtained for their renewal.
33 Cleaning of components should be done in brake hydraulic fluid or methylated spirit only - nothing else.
34 Using the new seals from the repair kit, assemble the secondary piston, making sure that the seal lips are the correct way round, as noted during dismantling.
35 Dip the piston assemblies in clean hydraulic fluid and fit them to the cylinder bore.
36 Fit the pushrod complete with new dust excluder and secure with a new circlip.
37 Engage the dust excluder with the master cylinder.
38 Depress the pushrod and locate the secondary piston lockpin.
39 Locate the two rubber seals and push the fluid reservoir into position.
40 It is recommended that a small quantity of fluid is now poured into the reservoir and the pushrod operated several times to prime it.
Refitting
41 Refit the master cylinder by reversing the removal operations.
42 Do not overtighten the hydraulic line unions and take care that they are clean and not crossthreaded when reconnecting. Refer to the specifications for the torque wrench setting.
43 Bleed the complete hydraulic system on completion of the work.
Thanks Norman, that would be useful.
I just have to confirm my replacement master cylinder is the right one, it does at least still have the ford cable tie type thing with the id numbers on it.
I slackened off the nuts and pulled it away from the servo and it is losing fluid into the front of the servo. (not much, but enough to strip the paint job off the servo)
I just have to confirm my replacement master cylinder is the right one, it does at least still have the ford cable tie type thing with the id numbers on it.
I slackened off the nuts and pulled it away from the servo and it is losing fluid into the front of the servo. (not much, but enough to strip the paint job off the servo
)Well as I'm just so busy at the moment I've taken a simpler approach to the master cylinder.
1. Drain & remove master cylinder.
2. Fit spanking new Master Cylinder.
3. Fill system with fluid and bleed.
Yes I decided to buy a new one - I bought it from brakeparts, it was about £80 including Vat & delivery.
There may be cheaper places I'm sure you'll tell me - but they have been excellent when I've rang them and I'm sure we've all used their website to look up various brake parts so time for a bit of loyalty.
We are also talking about brakes here - so I don't regret the extra cost for a moment - my kids will be passengers in the car.
1. Drain & remove master cylinder.
2. Fit spanking new Master Cylinder.
3. Fill system with fluid and bleed.
Yes I decided to buy a new one - I bought it from brakeparts, it was about £80 including Vat & delivery.
There may be cheaper places I'm sure you'll tell me - but they have been excellent when I've rang them and I'm sure we've all used their website to look up various brake parts
so time for a bit of loyalty.We are also talking about brakes here - so I don't regret the extra cost for a moment - my kids will be passengers in the car.
 )
)Got the power steering hoses made up today at Pirtek, filled the pump with fluid, connected 12v to the pump. Nothing. Pump not working.
I decided that if its no good I might as well take it to bits.
There are 4 brushes inside - its clearly had a bit of moisture in there and 2 of the brushes were stuck - a clean up with a small wire brush, a bit of emery on the commutator and we have some motor action!
I haven't got the pump back together yet - but hopefully tomorrow we will have working power steering.
Also the new master cylinder has arrived - If time allows I'll get that on too.
Pump not working.I decided that if its no good I might as well take it to bits.
There are 4 brushes inside - its clearly had a bit of moisture in there and 2 of the brushes were stuck - a clean up with a small wire brush, a bit of emery on the commutator and we have some motor action!
I haven't got the pump back together yet - but hopefully tomorrow we will have working power steering.
Also the new master cylinder has arrived - If time allows I'll get that on too.
Well folks I've done it!
The power steering is working!!
I need a bit more thought as to what triggers the relay that drives the pump - I tried it off the alternator light but it wasn't having any of it - the charge light just stayed on.
I have for now just done an ignition feed - I think I'll probably used a feed from the fuel pump feed, as that doesn't energise until the engine is running apart from the quick run to pressurise the fuel rail before startup - that won't give me a problem.
I don't want it running without the engine running as it draws loads of current.
I have also replaced the master cylinder, the pedal is solid but braking performance isn't that great at the moment - I've run out of time and patience today so that will have to wait for another day.
Edited by Barkychoc on Sunday 27th June 21:10
Gassing Station | S Series | Top of Page | What's New | My Stuff