Another body off!
Discussion


After rounding up a few enthusiastic bodies at last night's TVRCC meet a dozen of us did the lift with ease, started off using a jack and blocks and once we where sure the body and chassis where happily separated 10 of us lifted the body clear while the other two shoved the chassis out and pushed the body dolly in. Job done and time for a beer.
Pictures to follow and a big thanks to the east Yorks tvr gang, especially Duncan for his guidance (having done this before)
Pictures to follow and a big thanks to the east Yorks tvr gang, especially Duncan for his guidance (having done this before)


So here we go..
To recap the original task was a gearbox replacement and a replacement of leaky / old fuel and oil lines and a bit of a clean up so having got the chassis to this

I then found this

So having considered the options we carried on stripping, as the engine and box where out already a couple of evenings work had the body bolts out all wiring disconnected and a dolly made up to put the body on so we could move it easily.

A number of volunteers where then assembled and we started jacking the body off the chassis and using blocks, this made sure everything was disconnected and meant the starting point for the lift was a bit kinder on our backs !
Stage 1

Stage 2

Stage 3

No picture for the next bit but we had 5 bodies down each side and two spotters / chassis / dolly movers, the body was lifted, chassis pushed out of the way then the body dolly pushed under the shell and then the body lowered onto the dolly.

Then the bar opened !

Car parking was abit of an issue though, my father is considering loaning out his garage for future TVRCC meetings..

Body shell secured outside and chassis ready for further attention

A bit more poking about found that the corrosion did extended further than could be seen with the body on but generally the chassis is not too bad, a couple more sections are a bit on thin side so both box section outriggers will be replaced.

We also found that some lazy t**t has chopped out the gearbox mount and re welded it rather than do the job properly, this was on top of castellated nuts without split pins, and one rear calliper bolt having almost fallen out due to having no lock wire fitted.

I then started on the rear end

While my father who is well practised in Cortina spring removal got on with the front.

After a day of heaving, levering and not too much sweary words we have a chassis almost ready for blasting
[URL=http://s885.photobucket.com/user/400wedge/media/My%20TVR/DSC_0455.jpg.html]
 [/URL]
And a considerable pile of "spare chassis"


We also found that some lazy t**t has chopped out the gearbox mount and re welded it rather than do the job properly, this was on top of castellated nuts without split pins, and one rear calliper bolt having almost fallen out due to having no lock wire fitted.

I then started on the rear end

While my father who is well practised in Cortina spring removal got on with the front.

After a day of heaving, levering and not too much sweary words we have a chassis almost ready for blasting
[URL=http://s885.photobucket.com/user/400wedge/media/My%20TVR/DSC_0455.jpg.html]
[/URL]And a considerable pile of "spare chassis"

Edited by B@man on Sunday 18th May 12:16


Yes, well-done and some quality pics to boot.
Hope you have chance to document the putting back together also. Particularly interested to know if and how you align the tub, as I have seen a number of bodyoff's including my own car, prior to me owning it, being out slightly on the back end. Which meant the Split-Rims appear noticeably out on each side.
Good-luck and plz keep the thread going, well-done guys.
Edited by beacon on Wednesday 11th June 22:10
gmw9666 said:
This actually looks better than my old chassis lol
Fingers crossed it doesn't come back in a carrier bag, much testing with a hammer found that both box section outriggers need replacing, ones rotted out and the other is a bit thin so I'm doing both sides plus coilover conversation while doing the weldathon! The chassis was delivered this morning and the shot blaster has done a great job and it's back to bare steel in all but a couple of places and more importantly no further nasty surprises uncovered. Due to EDF kindly emptying my bank account while I have been on Holiday not much will happen for a few weeks so for now the chassis has been sprayed with light oil to keep the rust down.
Can anyone confirm the specification of the steel used, the tubes appear to be 1.5" or 38mm and the outriggers are 40x40 box - can anyone tell me the wall thickness so I can at least order some steel ?
Can anyone confirm the specification of the steel used, the tubes appear to be 1.5" or 38mm and the outriggers are 40x40 box - can anyone tell me the wall thickness so I can at least order some steel ?
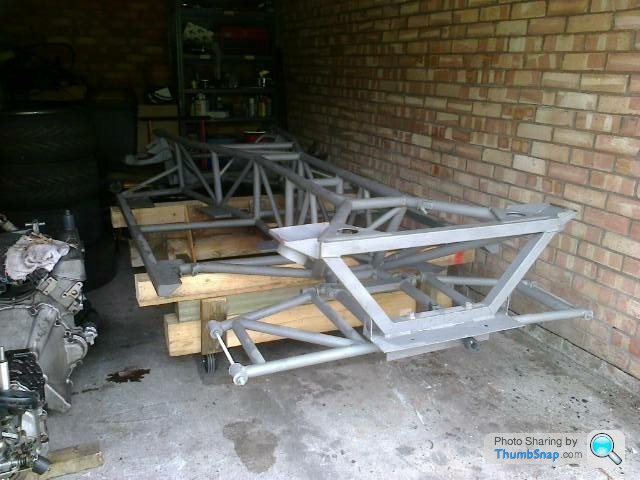
Slow progress Resurrected my dads clarke mig by replacing the complete torch so I don't have to use it gasless all the time. I've also sorted out an account with BOC and this morning collected a bloody great bottle of Argoshield Light, which works out cheaper than rent free. Did s service on the Celica then went back to bed (only had two hours sleep  ) while my dad and a neighbour moved stuff about in the lock-up and got the chassis mounted on it's jig / dolly
I've also confirmed that the TVR spec steel is 1.6mm or 14 AWG and got some on order.
) while my dad and a neighbour moved stuff about in the lock-up and got the chassis mounted on it's jig / dolly I've also confirmed that the TVR spec steel is 1.6mm or 14 AWG and got some on order.
Edited by B@man on Saturday 12th July 20:39
Was that shot blasted with the suspension arms on?
Also, what did you do about any threads to protect them from the shot? I ask that not knowing whether there are any, but I know we used to put blanking stickers over the holes when I worked on commercial mowers. On an old chassis it would be necessary to then re-tap the threads for ease of re-assembly.
Adi
Hi All,
It's been bead blasted and I left the suspension arms on mainly to preserve the various rubber bushes but a hint of laziness crept in too, it's come out pretty good actually, the only bits with old powder coating left are the rear spring locators and they are getting chopped off anyway. The threads look OK but Most of the suspension bolts will get binned during the rebuild anyway and those that aren't will get a tap ran down them before re-use - interestingly the front upper wishbone bolts have not had split pins fitted since I had the car and it's passed 4 MOT's
Thanks for the heads up on steel thickness, I got mixed up on AWG vs mm, luckily steel store quotes both....
Gassing Station | Wedges | Top of Page | What's New | My Stuff