Refurbishment of my Maserati Mexico
Discussion


Mexico074 said:
Hi Paul...
Your Mexico is looking fantastic!!! Excellent work!!! I am looking forward to hearing how she does on the road!
I will be posting some questions for you soon, specifically regarding the headlights.. My low-beams work, but my high-beams do not!
Mike
Headlights are a strange one Mike. I spent many hours (with help) chasing wires and checking switches, there are two relays in the system and the fault on mine ended up being due to one of the terminals in the indicator switch stalk which wasn't allowing the low-beam relay to switch off. If you send me an email message via my Pistonheads profile, I can send you a correct headlight wiring diagram fully coloured up with the correct wire colours including the relays. I've also got a coloured-up diagram of each dashboard switch including original 'Lucas' references so you can check you have the correct switches and that they are correctly wired. My lights now work correctly although the switching sequence is strange, but apparently right! Your Mexico is looking fantastic!!! Excellent work!!! I am looking forward to hearing how she does on the road!
I will be posting some questions for you soon, specifically regarding the headlights.. My low-beams work, but my high-beams do not!
Mike
The wipers are the next problem as they work but don't 'park'. I've checked the 'park' switch in the wiper motor and that is working fine and I'm now checking the earths and the dashboard switch / foot pump switch. Oh and my drivers door electric window has just stopped working too


I've taken the plunge and booked mine in for some professional tuning and at MOT test in 3 weeks time, that will allow me to get it UK registered and then hopefully, drive it despite still not having the last sections of carpet

misterp said:
Just wondering if the park on your Mexico is the same as in the Jensens. To park, the actual wiper motor supply is reverse polarised (so runs in reverse) until it hits the park switch.
The Jensen is a Lucas system so yours is unlikely to be the same make/model etc. being Italian, but it might use the same theory of operation?
Anyway..congrats on a stunning car. Now get out and enjoy it
Thanks, and thanks for the suggestion on the park switch, it is actually all 'Lucas' including the wiper motor and toggle switches, and as the MK 1 Interceptor was made alongside the Mexico by Vignale the wiring is probably pretty similar. I'll have to dig out my trusty volt-meter and crawl back into the footwell!The Jensen is a Lucas system so yours is unlikely to be the same make/model etc. being Italian, but it might use the same theory of operation?
Anyway..congrats on a stunning car. Now get out and enjoy it
Cheers
Paul

Hi Mike
The car is booked in for it's tune-up and MOT on Tuesday next week but I may have to put it back to Thursday as there are a few items I need to sort before it goes in. I can't install the door seals until the carpets are complete as they lap under the rubber before the aluminium edge trim is pressed home and I don't want to be driving if without door seals and I've also got leak on one of the exhaust joints which will need sorting before it goes it.
I just can't wait to get it on the road, the waiting is driving me nuts!
I hope those diagrams help you sort out the headlights on yours
Paul


TooMany2cvs said:
The Surveyor said:
The car is booked in for it's tune-up and MOT on Tuesday next week but I may have to put it back to Thursday
Well...?Mexico074 said:
Hi Paul..
.... I will begin preparing my Mexico for a July 18th show in Lexington, KY.. It will be
about a 400 mile round trip, which I will do all in the same day! I will keep you
informed on my lighting progress...
Mike
Good luck with the lighting and the trip Mike. I clearly have some way to go to build a collection of Maserati like your, so very impressed. Of all the cars which wear the Trident badge, its the original Ghibli that gets me every time. It's just so beautifully timeless and yours looks like a proper restoration job..... I will begin preparing my Mexico for a July 18th show in Lexington, KY.. It will be
about a 400 mile round trip, which I will do all in the same day! I will keep you
informed on my lighting progress...
Mike
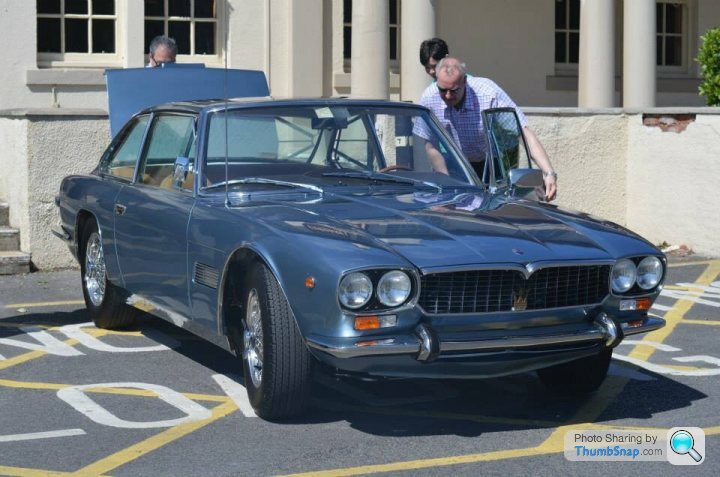
As a little thread update, I drove mine today for the first time ever! Not 400 miles, but a whopping 6 miles from home to the garage who are going to spend some time getting the engine running properly, setting the steering geometry and sorting things for it's MOT tomorrow. 6 miles isn't that far, but it was far enough to come to the conclusion that it's bloody terrifying.... Brakes are OK, the pull from the engine is nicely spirited but the steering is awful! Hopefully that will be sorted by the adjustments.
Couldn't resist getting a quick picture on the drive:-
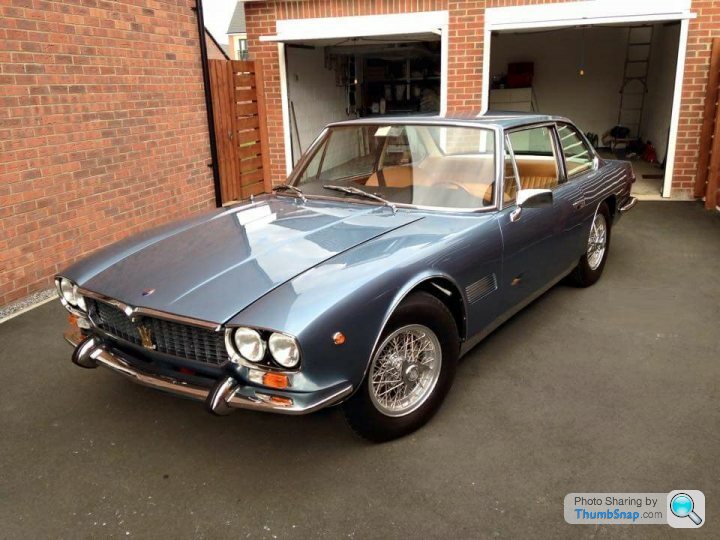
and one when I'd arrived:-
neilbauer said:
So glad you didn't go for the spots, the front looks fantastic as does the whole car ( Are you getting MOT prep work done on a farm  )
)
Lol... Not on a farm as such. HWR Motorsport who are skilled race engine and car prep specialists who look after a mates Ginetta track car amongst other exciting stuff. An old Messer should be nice and easy for them ( Are you getting MOT prep work done on a farm )Mexico074 said:
Hi Paul...
I wanted to ask you another question, if I may.. The info you sent on the lighting schematic (Sch 19)
and the switches (Sch 11) are invaluable. Do you have more such info for the Mexico? I pretty much
have most of the other manuals (parts, both user manuals), etc.. Also, not sure you know, but
check out www.thecarnut.com ... There is a lot of potentially useful Maserati info there. The
owner of this site is a friend of mine and lives about 3 hours from me...
Mike
Hi Mike, those wiring schematics came off that excellent 'carnut' site so when you next see your friend, can you thank him from me. I extracted the relevant pages from the downloads and cross checked the wire colours with my car and added the actual colours to help identification when lying upside down in the footwell! I'm just doing another sheet at the moment to try and get the wipers to work properly including the self-park function. I wanted to ask you another question, if I may.. The info you sent on the lighting schematic (Sch 19)
and the switches (Sch 11) are invaluable. Do you have more such info for the Mexico? I pretty much
have most of the other manuals (parts, both user manuals), etc.. Also, not sure you know, but
check out www.thecarnut.com ... There is a lot of potentially useful Maserati info there. The
owner of this site is a friend of mine and lives about 3 hours from me...
Mike
Cheers
Paul
Mexico074 said:
Hi Paul...
I have begun working on my lighting, or namely lack of high beams (main beams)... The first think I notice is an issue with the documentation.
In the Mexico manual, it indicates fuses 1 and 2 are for the main beams, and fuse 4 is for the dipped beams. The wiring diagrams 1 and 6 indicate fuses 1 and 2
are for the low beams (dipped beams). Which is correct?
I removed the main beams (high beams here in the US - the two inner lights) to check the wiring and find some interesting things. First each main beam
has two wires going to it, whereas the diagrams show only one, but I believe the second is for ground, or so I hope. Secondly, the left main beam wire
connector is set up for 3 wires, with one of the three wires not connected. The right main beam has the two wires directly connected via male and female single
spade connectors. What type of connectors did you use?
When I tested the lighting, my results were as follows. 1. Dipped beams (outer headlights) work fine. 2. When the lighting stalk is pushed towards the
dash to engage the main beams, nothing happens. But I do hear a clicking sound. 3. When I check for power at the main beams, when the stalk is pushed towards
the dash, there is no power there.
I will check the fuses tomorrow, just in case. But chances are I would have noticed a blown fuse. What amp fuses did you use for 1,2 and 4? I will then
proceed to remove the dipped lights and check the wiring there.
How are things with you? Have you been driving the Mexico?
Mike
Hi MikeI have begun working on my lighting, or namely lack of high beams (main beams)... The first think I notice is an issue with the documentation.
In the Mexico manual, it indicates fuses 1 and 2 are for the main beams, and fuse 4 is for the dipped beams. The wiring diagrams 1 and 6 indicate fuses 1 and 2
are for the low beams (dipped beams). Which is correct?
I removed the main beams (high beams here in the US - the two inner lights) to check the wiring and find some interesting things. First each main beam
has two wires going to it, whereas the diagrams show only one, but I believe the second is for ground, or so I hope. Secondly, the left main beam wire
connector is set up for 3 wires, with one of the three wires not connected. The right main beam has the two wires directly connected via male and female single
spade connectors. What type of connectors did you use?
When I tested the lighting, my results were as follows. 1. Dipped beams (outer headlights) work fine. 2. When the lighting stalk is pushed towards the
dash to engage the main beams, nothing happens. But I do hear a clicking sound. 3. When I check for power at the main beams, when the stalk is pushed towards
the dash, there is no power there.
I will check the fuses tomorrow, just in case. But chances are I would have noticed a blown fuse. What amp fuses did you use for 1,2 and 4? I will then
proceed to remove the dipped lights and check the wiring there.
How are things with you? Have you been driving the Mexico?
Mike
I'll get back to you with a detailed responce later, however one thing that completly threw me was that the relays wouldn't click over if I had the battery conditioner connected.
If you're looking at the headlights operation, make sure you disconnect the car from any charger / conditioner.
Cheers
Paul
It sounds like progress Mike, you'll be ready for that beer soon!
I typed a long response yesterday but got the dreaded 'Pistonheads has a problem' and the text was lost. Regardless, it sounds like you are getting to the bottom of the problem which is good. The wiring on mine is just as that coloured wiring diagram I sent you earlier, with fuses 1 and 2 serving the high beam, one via a grey wire and one being grey / black. At the headlight end, the black wires to the moulded plugs are 'earth' and the green / black wire serving the low beams.
The operation of the headlights on mine is correct (according to McGrath Maserati) although it doesn't appear to be logical....
With the headlight switch in the 'off' position, the outer lamps flash when the indicator stalk is pulled back, nothing happens when the stalk is pushed towards the dash.
With the headlight switch in the middle (side-lights) position, the rear lights come on, the under-bonnet and boot lights come on (when open), the side lights at the front as well as all the dash-lights. The indicator stalk operates in the same way as above.
With the headlights fully on, all is as above except the stalk operates differently. With the stalk in the middle position, both high and low beam (inner and outer) lamps are illuminated along with the dashboard warning. Pulling the stalk back flashes off the outer lamps, and when the stalk is pushed away them only the low beam lamps are illuminated.
Meaning, when you switch the headlights on fully to get the low-beam lamps, you also have to push the stalk away otherwise you end up with high beam. I'm going to call it 'character' lol.
Best of luck Mike
Paul
Evening Mike
I'm still waiting for the UK registration proces to come through to allow the car to be used properly, but hopefully pictures will follow.
The horns are separate, with the 'country' air horns working from the centre of the steering wheel and the smaller electric 'town' horn working off the end of the indicator stalk.
I'll look to get you that photograph in the morning. Cheers
Paul
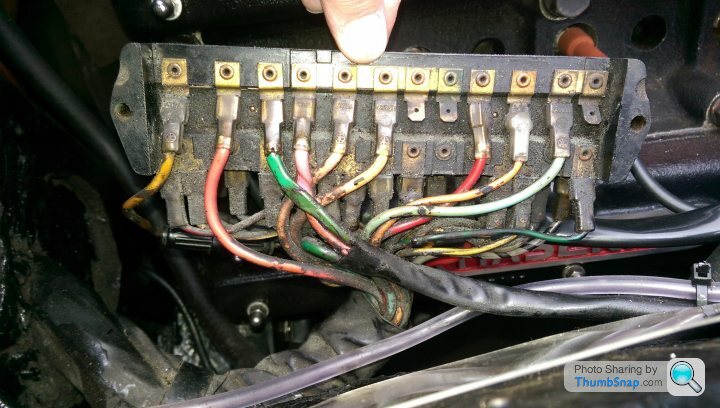
interesting Mike.
Looking at the two, the pale green lead which supplies fuses 1 and 2 on mine at the top right, looks like it's connected to the bottom of fuses 1 and 2. Could it be that it's been connected to feed direct?
The yellow / black wire to the left which is missing from yours feeds throug a separate fuse holder although I'm not sure what that feeds. I'll check later although I think it feeds the engine cooling fans. Are yours connected to a different fuse?
Mine is body number 224, chassis ref AM 112 462, late 1968.
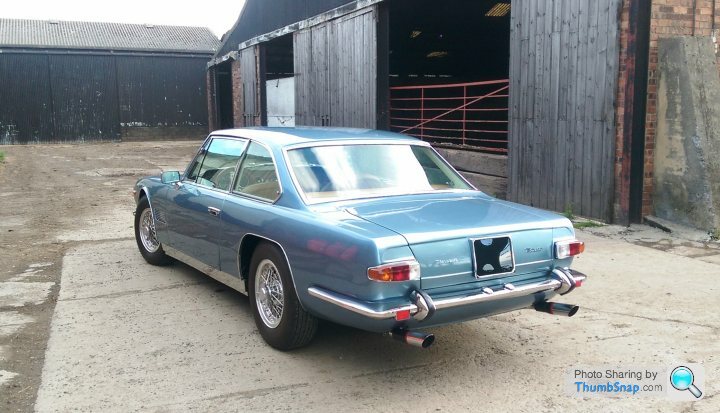
Took mine out today for a meeting with some other car clubs (TVR and Ferrari guys) and it ran beautifully, nice a smooth and I'll post some pictures later. Felt really good to get it out in the sunshine, although true to form, the drivers side electric window died again......
Cheers Mike, and thank you for the separate email.
Paul
Looking at the two, the pale green lead which supplies fuses 1 and 2 on mine at the top right, looks like it's connected to the bottom of fuses 1 and 2. Could it be that it's been connected to feed direct?
The yellow / black wire to the left which is missing from yours feeds throug a separate fuse holder although I'm not sure what that feeds. I'll check later although I think it feeds the engine cooling fans. Are yours connected to a different fuse?
Mine is body number 224, chassis ref AM 112 462, late 1968.
Took mine out today for a meeting with some other car clubs (TVR and Ferrari guys) and it ran beautifully, nice a smooth and I'll post some pictures later. Felt really good to get it out in the sunshine, although true to form, the drivers side electric window died again......
Cheers Mike, and thank you for the separate email.
Paul
Getting the switches out is a real pain, sometimes it's easier to switch the switch 'on' and partially rotate, but it's just time and wriggling them individually, it is easier if you take them out from the outside inwards so try starting with the interior light switch and work towards the fuel tank switch.
Your car looks great Mike. Here are mine from today:-

Thanks to Mark Lee for some of the pics,
Paul
Your car looks great Mike. Here are mine from today:-
Thanks to Mark Lee for some of the pics,
Paul
Mexico074 said:
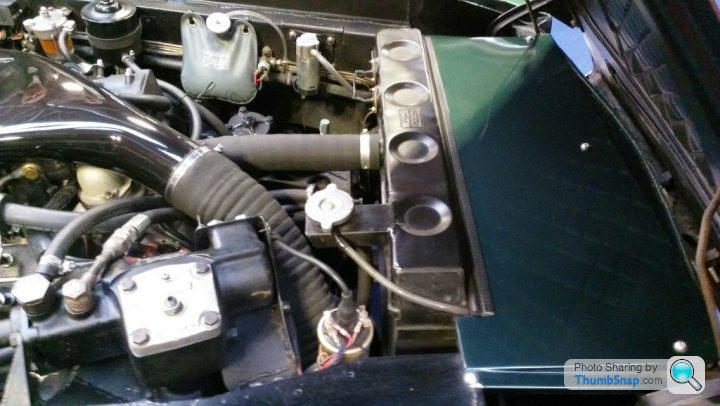
My car does not have the original fans.. They are some kind of replacement units. I will need to check on the wiring for it.
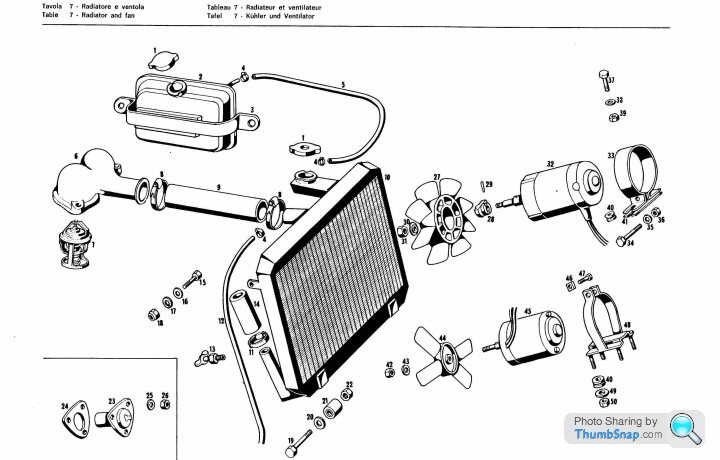
These are (apparently) the original fans. This is a photograph of them before any dismantling works commenced and as you'll see, they're different but they do match the drawings in the Ghibli parts manual from the same era.
Any help?
Paul
Mexico074 said:
Hi Paul...
When I bought my Mexico, it had one original fan and some kind of non-original, not even close to original looking fan. I replaced both with what you see in the picture below. Your question on the different fan blades is interesting. There is no information in the Mexico parts manual regarding the fans. So, I went to the Quattroporte I parts manual, for which the Mexico parts manual is a supplement of. In the cooling section illustrations, it shows one motor and fan blade unit, but shows a quantity of 2. This indicates to me that the fan motors and blades should be identical. But, from what I have seen and heard about from those days, Maserati sometimes used whatever was in the parts
bins. Thus, it is not impossible for the two fans on your car to be different. Do you have the shroud that goes along the top of the radiator, basically enclosing the fans? I think this is needed to ensure no fan air is easily moved over the top of the radiator...
Mike
Hi MikeWhen I bought my Mexico, it had one original fan and some kind of non-original, not even close to original looking fan. I replaced both with what you see in the picture below. Your question on the different fan blades is interesting. There is no information in the Mexico parts manual regarding the fans. So, I went to the Quattroporte I parts manual, for which the Mexico parts manual is a supplement of. In the cooling section illustrations, it shows one motor and fan blade unit, but shows a quantity of 2. This indicates to me that the fan motors and blades should be identical. But, from what I have seen and heard about from those days, Maserati sometimes used whatever was in the parts
bins. Thus, it is not impossible for the two fans on your car to be different. Do you have the shroud that goes along the top of the radiator, basically enclosing the fans? I think this is needed to ensure no fan air is easily moved over the top of the radiator...
Mike
Back from Le Mans (which was excellent) and I'm picking up on thread. My car doesn't have the radiator shroud so i'll need to look at getting one fabricated to ensure I get a proper flow of air through the radiator. I knew mine should have had one based on the screw holes, and from the attached photo I took of John Jacksons RHD Mexico a few years ago. Should be easy enough to replicate!
Also, here is the extract from the Ghibli Parts Manual which shows two different types of fan being used on those, and the fan blade pattern looks to match the two 'original' ones on mine. This was why i'd assumed mine were original, although as you say it may have been simply what they had on the shelf on the day that the car passed that section of the production line!
Regards, Paul
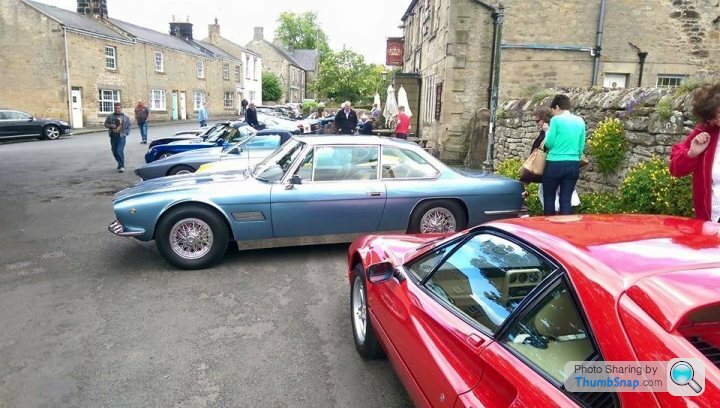
Xpuffin said:
Having followed this thread for some while as it's been a real interesting read I find myself the proud new owner of a 60s Maserati myself.
It's in need of a total restoration eventually but initially I'd like to recomission and run it for a year, allowing me time to sell a few body parts to finance said build.
I have a feeling I'm going to be asking a fair few questions over the next few months as the project progresses if that's ok chaps.
Ask away and we'll try and help if we can.It's in need of a total restoration eventually but initially I'd like to recomission and run it for a year, allowing me time to sell a few body parts to finance said build.
I have a feeling I'm going to be asking a fair few questions over the next few months as the project progresses if that's ok chaps.
Looking at your profile, is it the 1962 3500GT that you've just bought in which case have you seen the other thread started by SprintSpeciale on the restoration of his 3500GTi:-
http://www.pistonheads.com/gassing/topic.asp?h=0&a...
It may give you some inspiration or scare you half to death! As Mike said before, lets see some pictures and it may be worth starting a whole new thread so others can find it. Also, don't underestimate how helpful the specialists can be, my refurbishment wouldn't have progressed without the help and guidance from Chris McNabb (parts manager) at McGrath Maserati. They may not always be the cheapest but the knowledge of such specialists is often worth paying that little bit more for IMHO.
Cheers, Paul
Gassing Station | Classic Cars and Yesterday's Heroes | Top of Page | What's New | My Stuff