26 years and never turned a crank! Porshe 928
Discussion


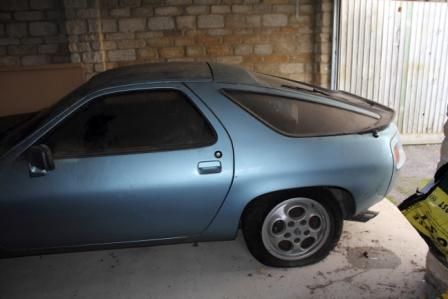
Gents, some advice from the experts please. I have just picked up a 1980 928 that has not run for 26 years!!
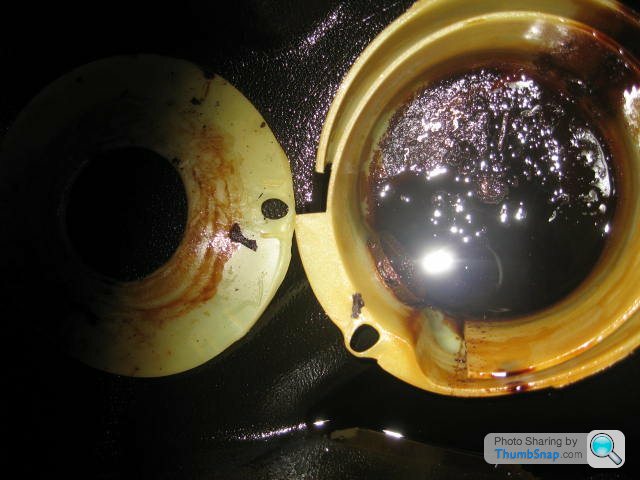
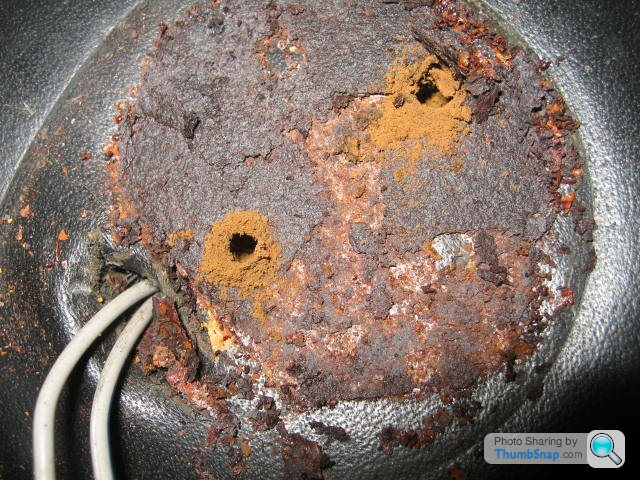
Now, I know what I need to do in relation to a lot of things including draining all fluids, however having examined the oil filler I note that the oil in there has "dried out" to a slightly crusty oozy mess.
My worry is that this will have happened throughout the engine and when I go to drop the oil all I will get is a tarry drip.
My question is this therefore, has the oil in the filler simply had contact with air and thus dried up and things in the sump should be better, or
is there something I can pour in to help dissolve the oil back to a fluid before I attempt to drop the oil?
PS starting the engine to "warm it through" is a no no due to lack of fuel lines at the mo!!
Gents, thanks for all the kind advice. Some points to cover as requested:
Background, the car was manufactured in 1980 and went to Ireland for two years before returning to the UK and being registered here on a X plate. It then had 6 owners in as many years, one of whom in 1985 decided to upgrade the look of the car to a 928s by the addition of the front and rear spoilers ( to the tune of £726 in 1985, he must have been desperate to keep up with the Jones!!)
In 1988 it was sold to the gentleman I bought it off. This gent was in the habit of keeping lists, and in May 1988 noted that having put 61 litres of fuel into the car it cost him £22 !!!!
However from early 1989, for various reasons non car related, he ended up putting the car away into the garage, and there it stayed.
Last year I purchased a Guards Red 928 for a "Top Gear Challenge" run to a friends wedding in the Czech Republic, and on taking it to work one day, one of my colleagues just had to announce that her FIL had one of "those" cars tucked away in his garage. The rest as they say was history!
Some pictures for those interested:
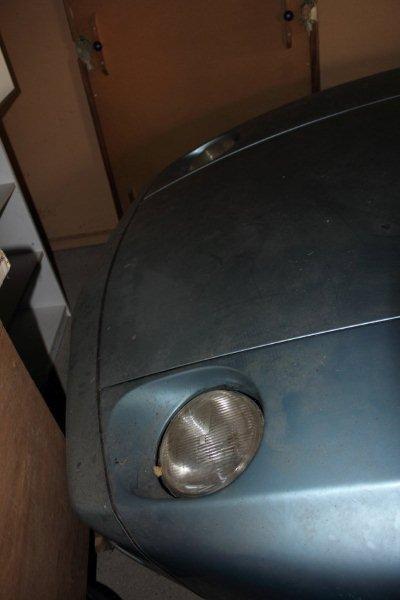
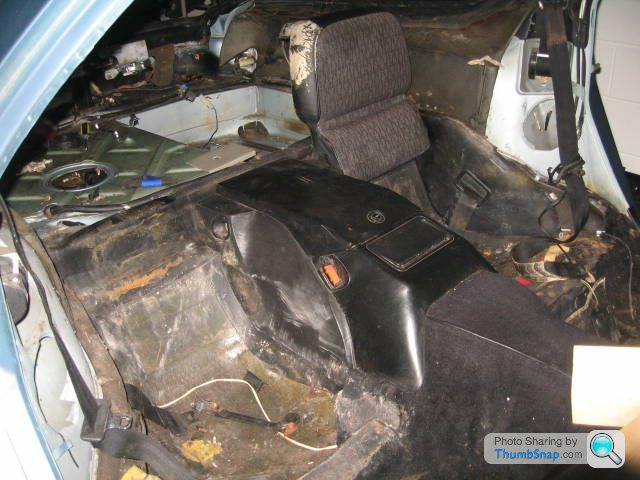
As usual most of my pictures are too big to load! Will attempt to sort later. As you can see the car is in a fetching shade of blue, unfortunately both the colour & option stickers are missing. The interior as you can see has suffered badly during her sleep, with mildew prevalent on the cloth and leather, and many of the the interior fixings rusted. However, the bodywork is in very good condition with little or no rust. And for me the main thing is that the car is a manual!!!
So, on to the mechanicals:
The engine has turned by hand quite smoothly, my first priority as I wanted to have this car as a runner and there seemed little point in progressing further if the engine was seized.
Fuel system is shot, so both pumps & filter, all "soft pipes" will be replaced, dropping fuel tank for cleaning and hard pipes flushed through.
Coolant is a big issue on these cars in terms of eating away at the aluminium engine, so drop and flush planned.
Oil, as indicated in my first post is , from first indications of the the oil filler, "manky" so thanks for the options presented above.
As the 4.5 is a non interference, belts are scheduled, but want to see if the engine will run under it's own power first.
Electrics on these beasts are always an issue, and a clean of all grounds, removal of the fuseboard, new battery etc will be done
On 928UK and Rennlist ( where they never seemed phased by cars in even worse condition than this) so lots of good advice, but the crap oil question is one best answered by those who have come across it before I feel!
Thanks for your contributions to date, I know I will be chasing further info and advice and I thank those people who take the time to reply in advance!


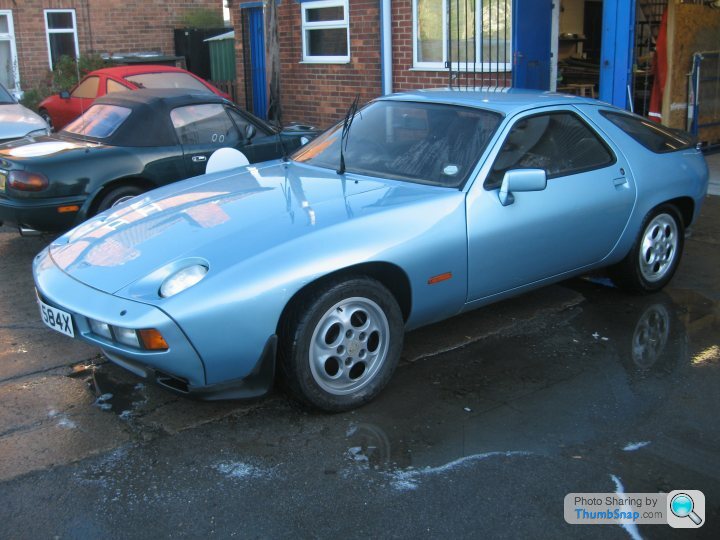
(this shot is of my red one, but gives you some idea!)
Background, the car was manufactured in 1980 and went to Ireland for two years before returning to the UK and being registered here on a X plate. It then had 6 owners in as many years, one of whom in 1985 decided to upgrade the look of the car to a 928s by the addition of the front and rear spoilers ( to the tune of £726 in 1985, he must have been desperate to keep up with the Jones!!)
In 1988 it was sold to the gentleman I bought it off. This gent was in the habit of keeping lists, and in May 1988 noted that having put 61 litres of fuel into the car it cost him £22 !!!!
However from early 1989, for various reasons non car related, he ended up putting the car away into the garage, and there it stayed.
Last year I purchased a Guards Red 928 for a "Top Gear Challenge" run to a friends wedding in the Czech Republic, and on taking it to work one day, one of my colleagues just had to announce that her FIL had one of "those" cars tucked away in his garage. The rest as they say was history!
Some pictures for those interested:
As usual most of my pictures are too big to load! Will attempt to sort later. As you can see the car is in a fetching shade of blue, unfortunately both the colour & option stickers are missing. The interior as you can see has suffered badly during her sleep, with mildew prevalent on the cloth and leather, and many of the the interior fixings rusted. However, the bodywork is in very good condition with little or no rust. And for me the main thing is that the car is a manual!!!
So, on to the mechanicals:
The engine has turned by hand quite smoothly, my first priority as I wanted to have this car as a runner and there seemed little point in progressing further if the engine was seized.
Fuel system is shot, so both pumps & filter, all "soft pipes" will be replaced, dropping fuel tank for cleaning and hard pipes flushed through.
Coolant is a big issue on these cars in terms of eating away at the aluminium engine, so drop and flush planned.
Oil, as indicated in my first post is , from first indications of the the oil filler, "manky" so thanks for the options presented above.
As the 4.5 is a non interference, belts are scheduled, but want to see if the engine will run under it's own power first.
Electrics on these beasts are always an issue, and a clean of all grounds, removal of the fuseboard, new battery etc will be done
On 928UK and Rennlist ( where they never seemed phased by cars in even worse condition than this) so lots of good advice, but the crap oil question is one best answered by those who have come across it before I feel!
Thanks for your contributions to date, I know I will be chasing further info and advice and I thank those people who take the time to reply in advance!
Edited by Mattlan on Tuesday 22 October 09:27
(this shot is of my red one, but gives you some idea!)
Edited by Mattlan on Tuesday 22 October 10:30
Edited by Mattlan on Tuesday 22 October 10:54
Comes with timewarp alpine radio cassette inc. equalizer and having finally got into the glovebox last night, a further blaupunkt graphic equalizer tucked away in there with all round "trio" speakers including tweeters in the back!! And quite honestly, I would be delighted to find her tucked behind one of the seats!
http://images.starpulse.com/pictures/2007/10/23/pr...
http://images.starpulse.com/pictures/2007/10/23/pr...
Edited by Mattlan on Tuesday 22 October 13:13
Gents,
re the oil issue, of course I finally realised that the oil in the sump could be assessed via the dipstick! Seems good so just the oil filler pot to clean out! Finally got some pictures that are below 2Mb!
Pick up day, wet and cold, but she managed to drag herself out of her garage with minimum fuss for the long drive home. Me, like a boy in a candy shop, rushing all around checking paintwork, old paperwork etc!
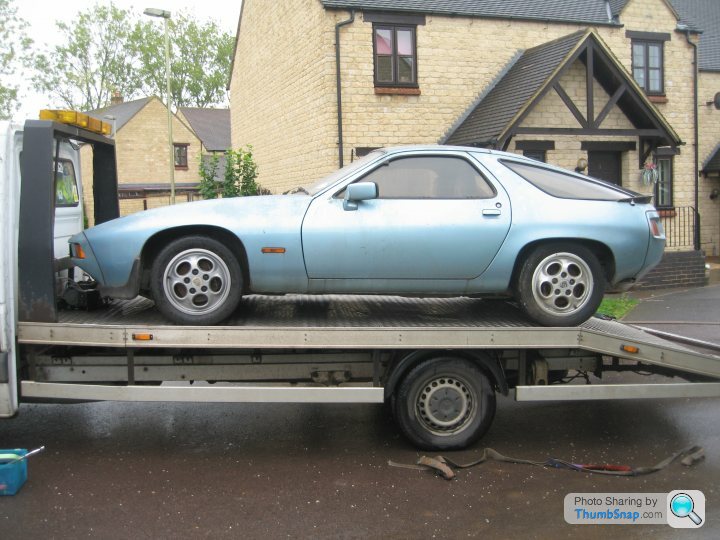
Amazing the level of interest she generated on the way home despite the foul weather! First job, carefully remove the 26 years of assorted crud off her to reveal a lovely metallic blue that whilst in reasonable condition will benefit from a professional mop at some point in the future.
Then onto the interior, cough, cough! Mask used to prevent ingestion of 26 years work of mildew, dead spiders etc etc
Cash found to date £1.20 + 2 old 10p coins, bit disappointing for a Porsche from the 80's! Would have expected to find a couple of bags of white powder and a rolled up £20 quid note!!
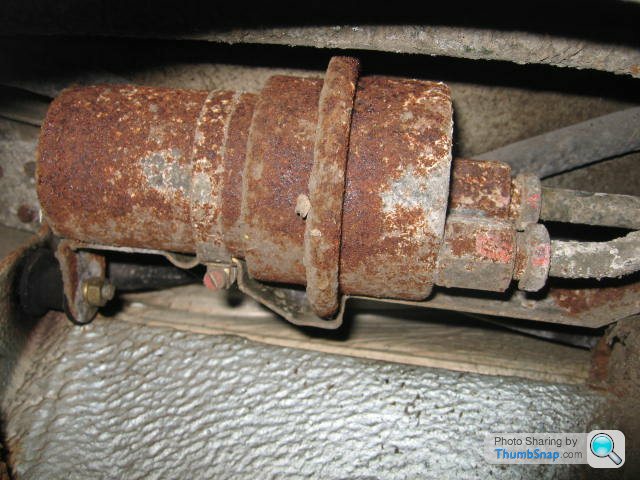
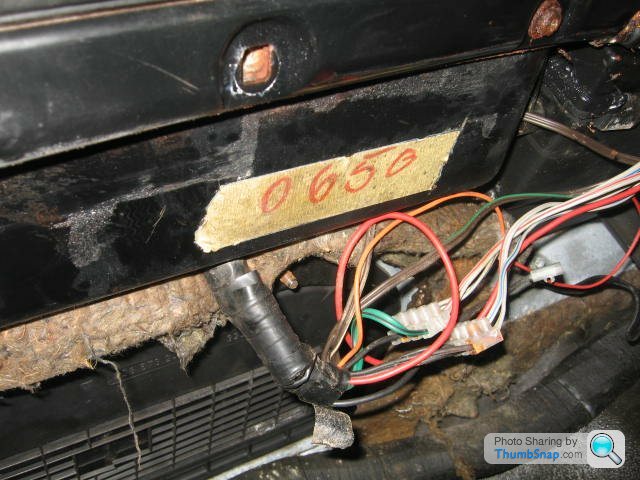
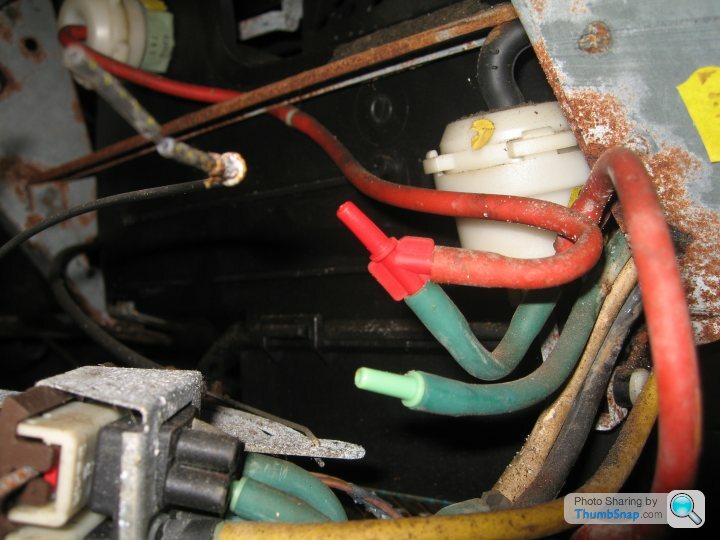
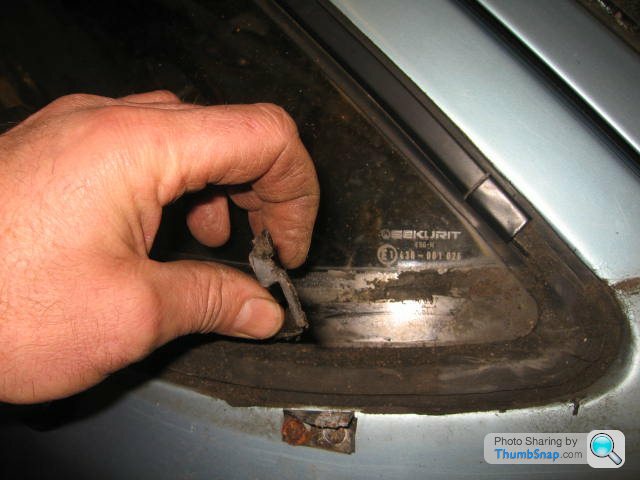
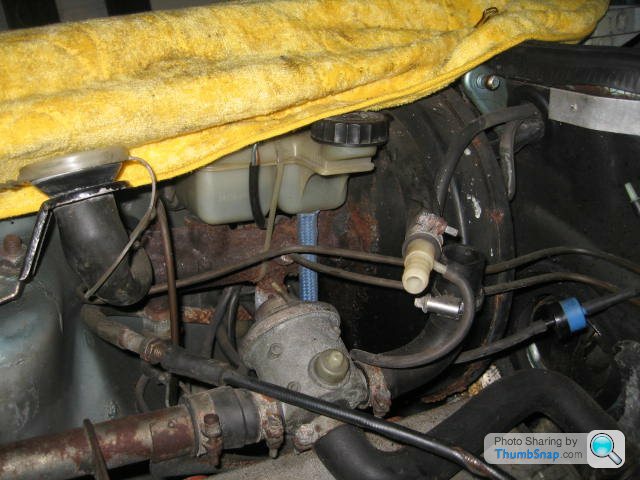
Undertank pump/filter cover missing and both items fubared. Have been soaking the filter to hard line connections for a week now and still cannot break the connection. Note that all the hard lines are distinctly fragile and will need to be replaced as well as the rubber lines and other items such as the fuel accumulator all the way up to the engine bay.
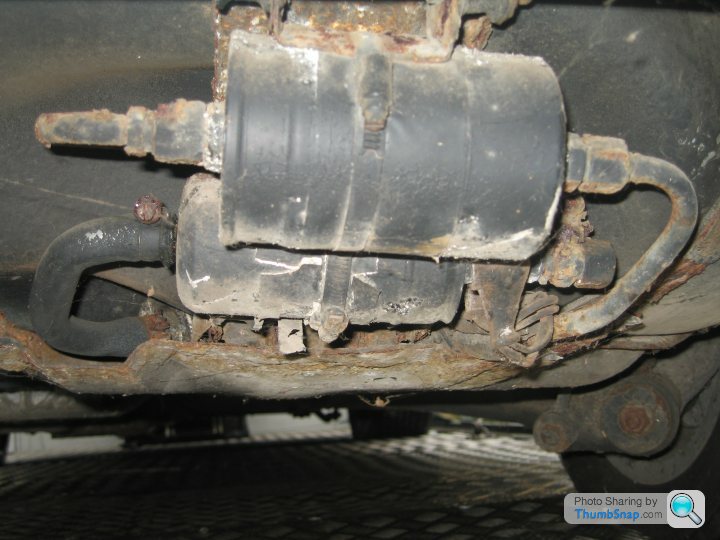
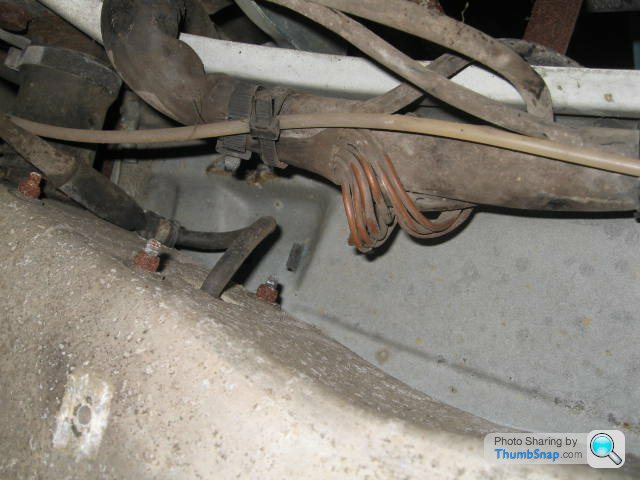
This return line had just decayed away and fell off in my hands

re the oil issue, of course I finally realised that the oil in the sump could be assessed via the dipstick! Seems good so just the oil filler pot to clean out! Finally got some pictures that are below 2Mb!
Pick up day, wet and cold, but she managed to drag herself out of her garage with minimum fuss for the long drive home. Me, like a boy in a candy shop, rushing all around checking paintwork, old paperwork etc!
Amazing the level of interest she generated on the way home despite the foul weather! First job, carefully remove the 26 years of assorted crud off her to reveal a lovely metallic blue that whilst in reasonable condition will benefit from a professional mop at some point in the future.
Then onto the interior, cough, cough! Mask used to prevent ingestion of 26 years work of mildew, dead spiders etc etc
Cash found to date £1.20 + 2 old 10p coins, bit disappointing for a Porsche from the 80's! Would have expected to find a couple of bags of white powder and a rolled up £20 quid note!!
Undertank pump/filter cover missing and both items fubared. Have been soaking the filter to hard line connections for a week now and still cannot break the connection. Note that all the hard lines are distinctly fragile and will need to be replaced as well as the rubber lines and other items such as the fuel accumulator all the way up to the engine bay.
This return line had just decayed away and fell off in my hands
Edited by Mattlan on Wednesday 23 October 09:07
Seems to be a cap on photo's in each post so Cont'd:
Quick dip under the bonnet to remove the old headlining, this stuff deteriorates to the point that if it's touched it collapses and gets everywhere, but it clogs up the hoover so removal by dust pan is the order of the day!
Mechanically, first job was to review the fuel system as these cars are very sniffy about accurate delivery of fuel.
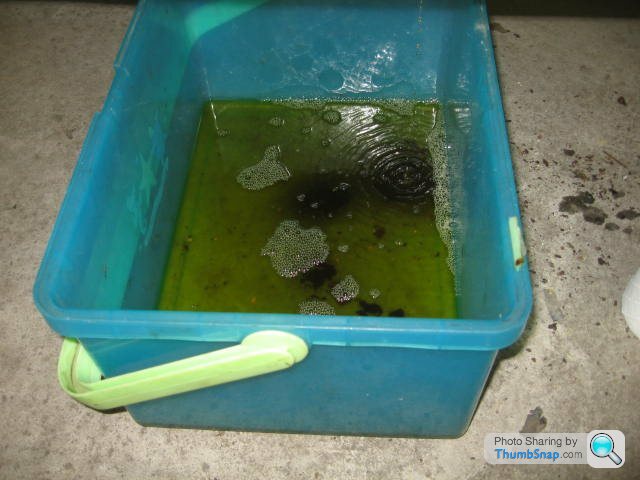
First up drop the old fuel, I love the smell of rotten 4 star in the morning!! See the black stuff, that's fuel tar!
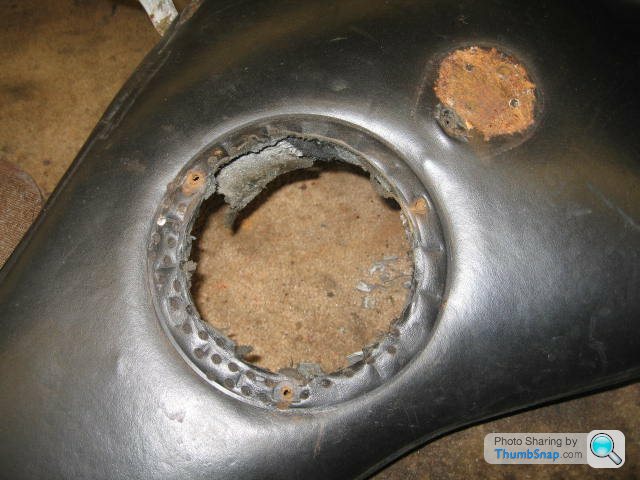
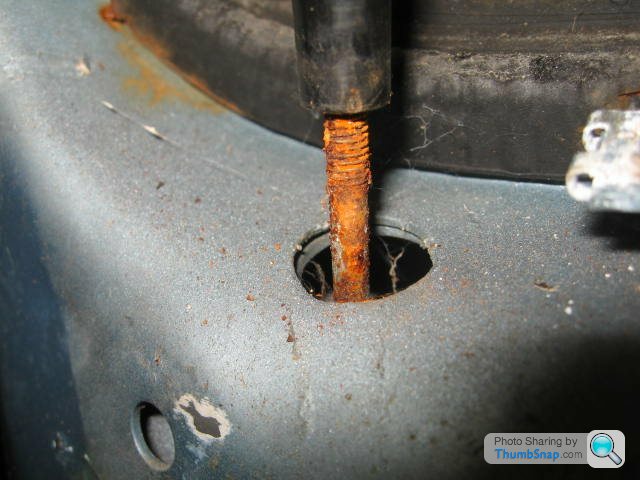
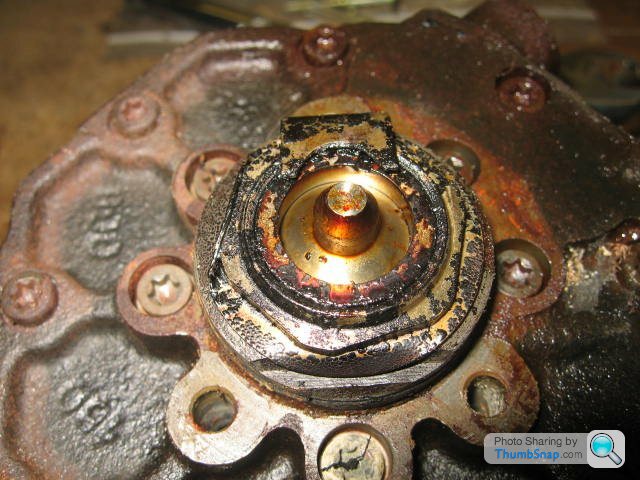
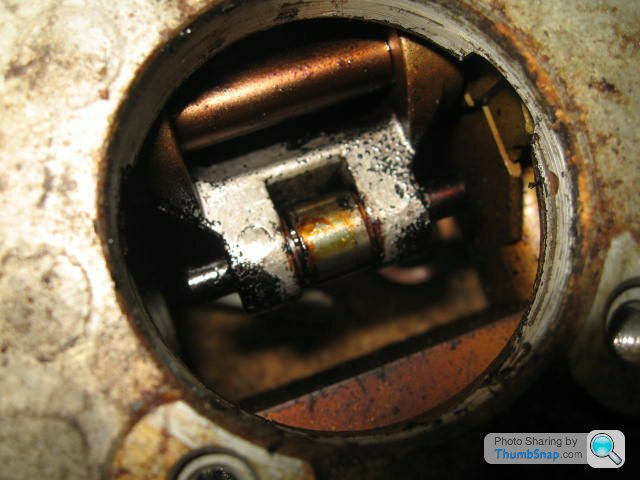
Hoping for some ramp time in the garage next door over the weekend so will be dropping the fuel tank and associated lines then to make an assessment of condition. Fuel sender pin looks okay here doesn't it!

Bugger, two of the three pins rusted solid and bakelite casing rotten = broken casing! Must learn to slow down a little!
Speaking of the fuel sender, even twisting the securing ring off was a pain, and it refuses to lift out of the fuel tank without trying to bring up the bottom pan, I guess the fuel has become like glue in there over the years, never mind a job once the tank is out I guess!
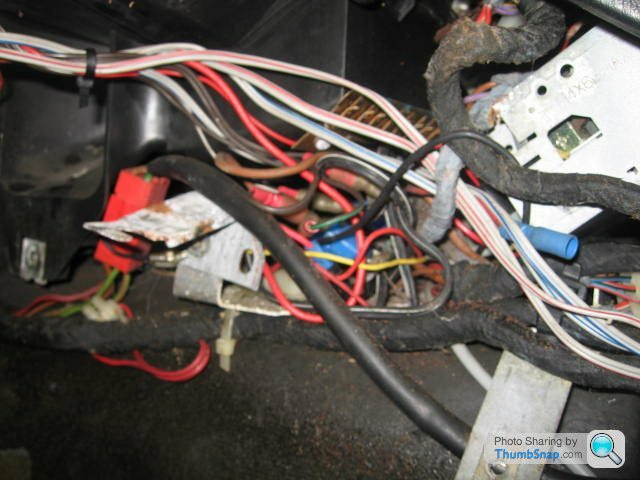
On my 1982 car, this set of grounds is mounted to the reverse of the front crossmember, accessable if a little fiddly to get to. On the blue car, I have had to remove the front grill just to get physical access to the wires and then drop the loom down to see where they are bolted to the chassis, whilst upside down of course!
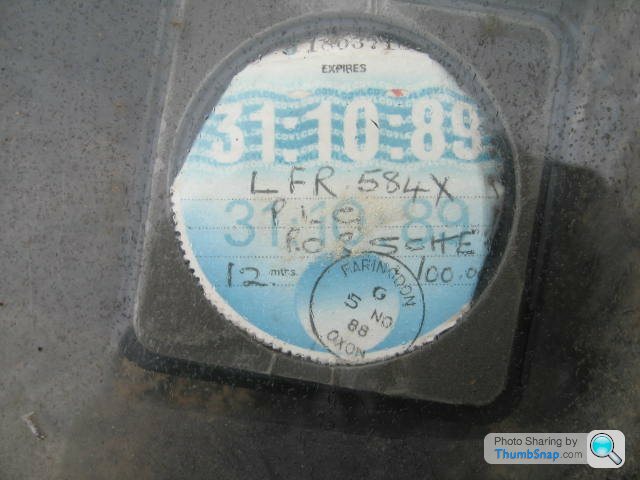
Lastly, check out the tax disc, yes that's £100 road tax for the year!
Quick dip under the bonnet to remove the old headlining, this stuff deteriorates to the point that if it's touched it collapses and gets everywhere, but it clogs up the hoover so removal by dust pan is the order of the day!
Mechanically, first job was to review the fuel system as these cars are very sniffy about accurate delivery of fuel.
First up drop the old fuel, I love the smell of rotten 4 star in the morning!! See the black stuff, that's fuel tar!
Hoping for some ramp time in the garage next door over the weekend so will be dropping the fuel tank and associated lines then to make an assessment of condition. Fuel sender pin looks okay here doesn't it!
Bugger, two of the three pins rusted solid and bakelite casing rotten = broken casing! Must learn to slow down a little!
Speaking of the fuel sender, even twisting the securing ring off was a pain, and it refuses to lift out of the fuel tank without trying to bring up the bottom pan, I guess the fuel has become like glue in there over the years, never mind a job once the tank is out I guess!
On my 1982 car, this set of grounds is mounted to the reverse of the front crossmember, accessable if a little fiddly to get to. On the blue car, I have had to remove the front grill just to get physical access to the wires and then drop the loom down to see where they are bolted to the chassis, whilst upside down of course!
Lastly, check out the tax disc, yes that's £100 road tax for the year!
Good morning gents, once again thank you for all your kind comments!
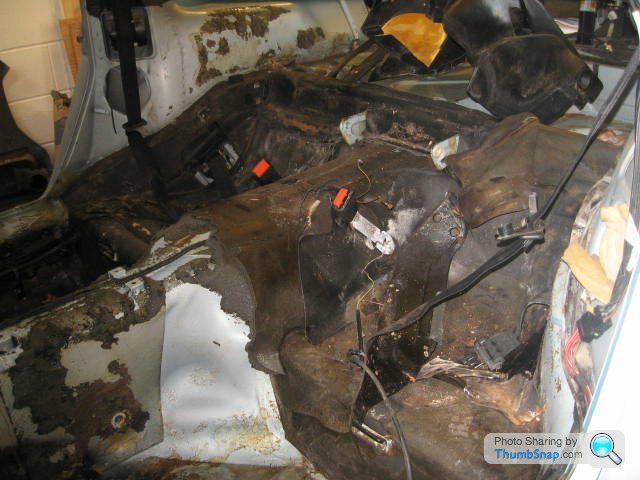
Slowly working through the interior removing everything as the mildew has sneaked underneath carpets etc and without removing and proper cleaning I'm concerned about reappearance and the smell lingering.
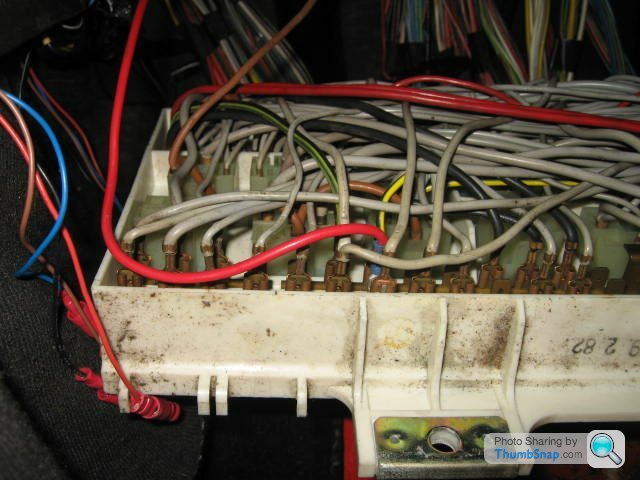
Opened up the passenger footwell to review the main fuseboard. As you can see whilst there is surface rust on the base of the frame, the floorpan seems to be ok.
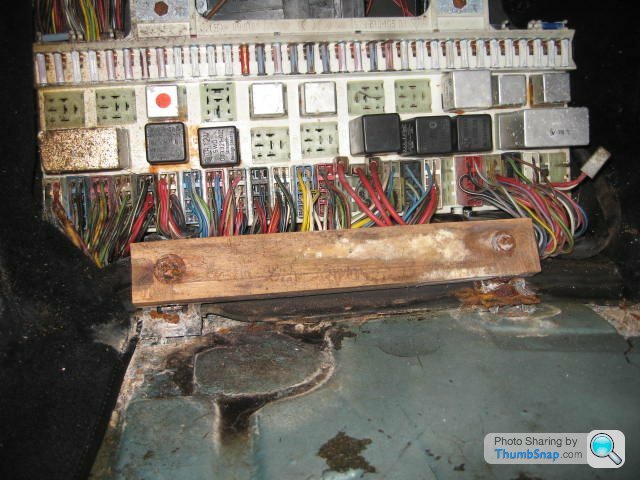
Will be reviewing and replacing all relevant relays and fuses where necessary. Incidentally the rear of these boards is magnificent in its complexity, especially if you do not want to remove it from the footwell and end up working upside down in the footwell! ( I'm 6.3 and well built, it's a bit of a squeeze!!)
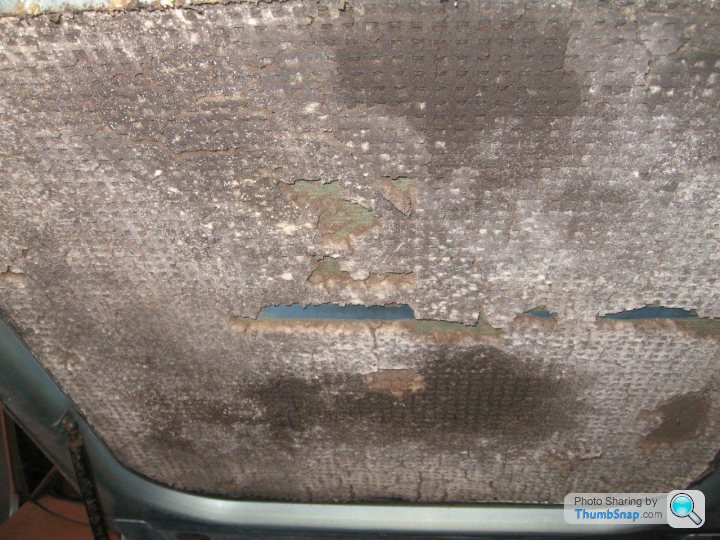
Also, as you can see here the rear seats in particular have suffered badly from mildew, with the material held together by rusty staples only.
I'm debating whether to remove the material carefully, buy new fabric and recover, or simply handwash the existing in relevant fluids as I am concerned about colour matching with sun bleaching of the original material
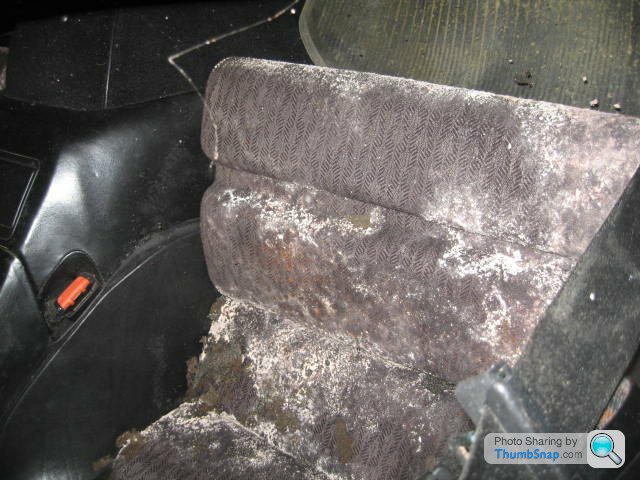
Main issue is that the foam has a covering of mildew; any top tips for cleaning these parts of the seat without getting them soaking wet or destroying their integrity?
Lastly, what one always wishes to see when getting into one's car!!!
Slowly working through the interior removing everything as the mildew has sneaked underneath carpets etc and without removing and proper cleaning I'm concerned about reappearance and the smell lingering.
Opened up the passenger footwell to review the main fuseboard. As you can see whilst there is surface rust on the base of the frame, the floorpan seems to be ok.
Will be reviewing and replacing all relevant relays and fuses where necessary. Incidentally the rear of these boards is magnificent in its complexity, especially if you do not want to remove it from the footwell and end up working upside down in the footwell! ( I'm 6.3 and well built, it's a bit of a squeeze!!)
Also, as you can see here the rear seats in particular have suffered badly from mildew, with the material held together by rusty staples only.
I'm debating whether to remove the material carefully, buy new fabric and recover, or simply handwash the existing in relevant fluids as I am concerned about colour matching with sun bleaching of the original material
Main issue is that the foam has a covering of mildew; any top tips for cleaning these parts of the seat without getting them soaking wet or destroying their integrity?
Lastly, what one always wishes to see when getting into one's car!!!
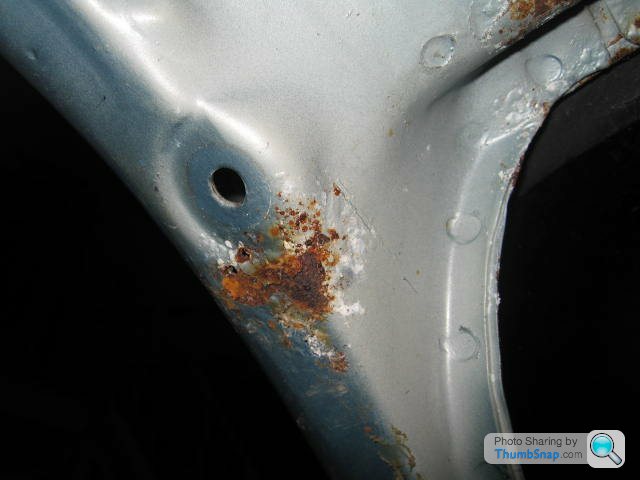
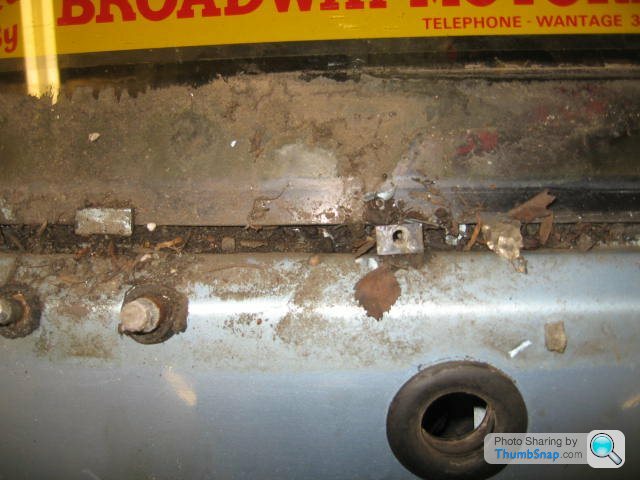
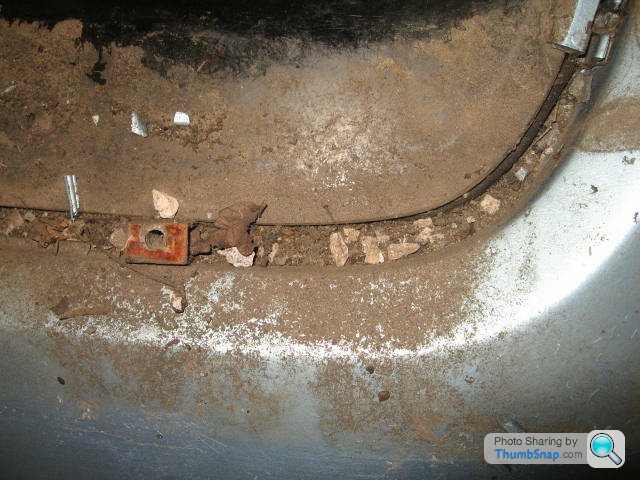
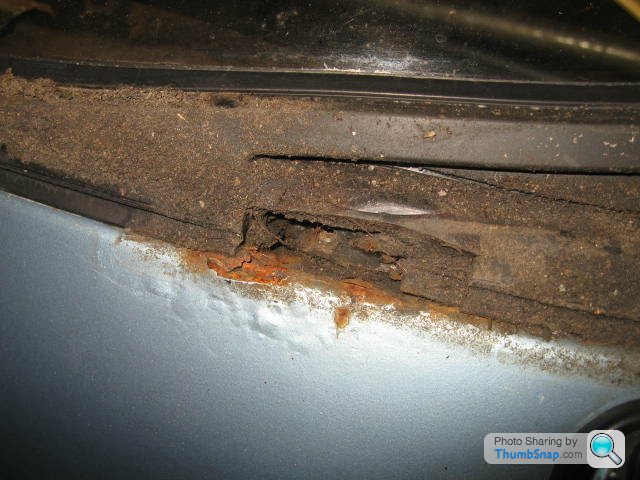
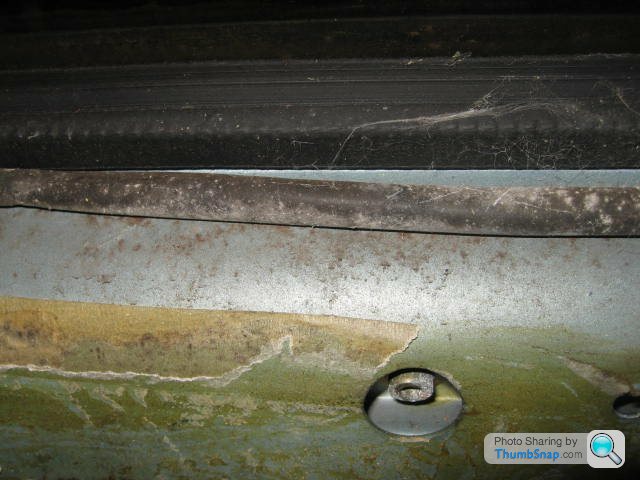
Following some contemplation over the last couple of days, I decided that without removing all of the carpeting throughout the interior I would never be free of the mildew smell. This was quite a big decision as the trim carpet is glued into place and it means that all of the carpet will need re glueing once I have cleaned it with a wet vac. However it was clear on removal that this was the right thing to do as there was evidence of spoil under most parts of the material. It also allowed me to find this issue:
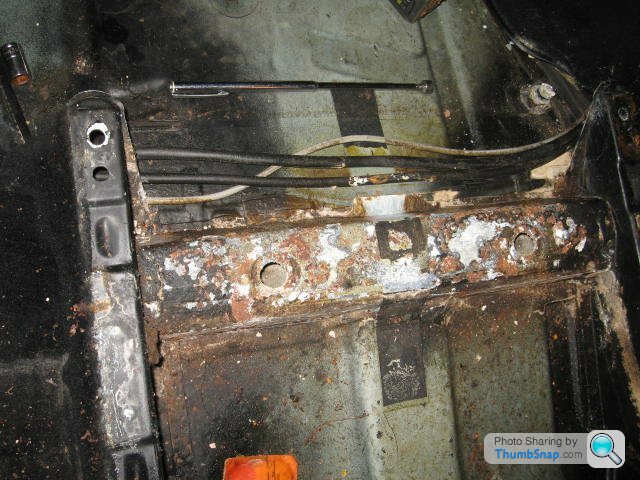
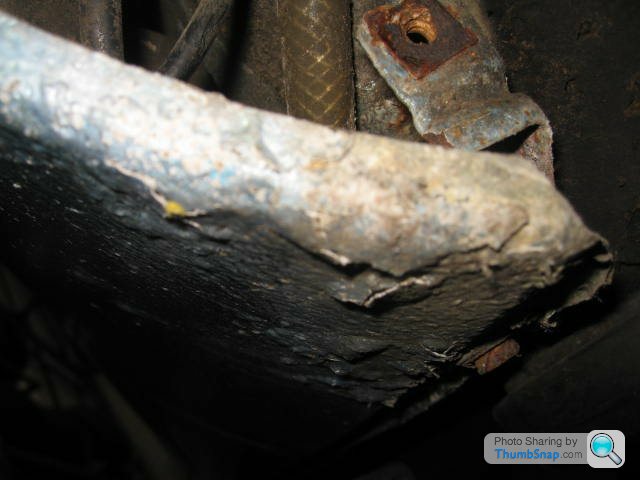
The crossmember ( and sill) on the passenger side looking rather ropey! Another little job to add to the list!
Electrics scare me, particularly when you come across later additions to the original wiring loom!
Guessing this has something to do with the Blaupunkt graphic equalizer tucked in the glove compartment ( that I still haven,t been able to open fully courtesy of the rusty screw top right!)
Having taken the sides off the central console, I do not believe that a single further thing could be squeezed into this area, and I know I will have to "go in" to fix the heating system at some point! Gulp!
Rear Passenger seat upright......grrrrrr! This little sucker is all that's keeping me from finally removing the rest of the interior trim. Catch on the side enables one to drop the seat down to make a quite usable flat area in the boot, but as you can see from the driver's side mechanism ( finally let go with quite a twang!) they have suffered badly from rust , and despite soaking in release agent (50/50 acetone and atf fluid as recommended by those good old boys on Rennlist) it just doesn't want to let go!

Anyway, ramp time this weekend, and that means the first proper inspection underneath and dropping the fuel system in it's entirety.
Wish me luck!
The crossmember ( and sill) on the passenger side looking rather ropey! Another little job to add to the list!
Electrics scare me, particularly when you come across later additions to the original wiring loom!
Guessing this has something to do with the Blaupunkt graphic equalizer tucked in the glove compartment ( that I still haven,t been able to open fully courtesy of the rusty screw top right!)
Having taken the sides off the central console, I do not believe that a single further thing could be squeezed into this area, and I know I will have to "go in" to fix the heating system at some point! Gulp!
Rear Passenger seat upright......grrrrrr! This little sucker is all that's keeping me from finally removing the rest of the interior trim. Catch on the side enables one to drop the seat down to make a quite usable flat area in the boot, but as you can see from the driver's side mechanism ( finally let go with quite a twang!) they have suffered badly from rust , and despite soaking in release agent (50/50 acetone and atf fluid as recommended by those good old boys on Rennlist) it just doesn't want to let go!
Anyway, ramp time this weekend, and that means the first proper inspection underneath and dropping the fuel system in it's entirety.
Wish me luck!
Edited by Mattlan on Friday 25th October 08:45
So, this weekend I managed to blag some ramp time next door. Took all three of us to push her in due to inherent weight, rusty brakes and flat spotted tyres, but once there she revealed a very clean rust free undercarriage excepting both front wings
The aim of the weekend was to drop the entire fuel system to assess the damage caused by her standing around for so long. Despite some rusty fixings, the tank came out okay only to reveal a mess of sticky treacle like fuel deposits:
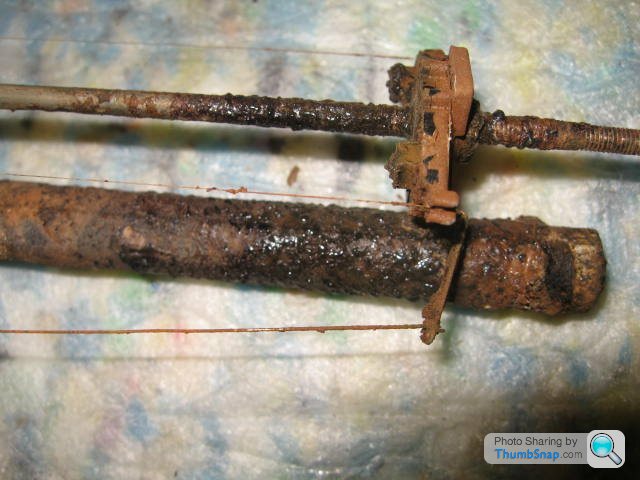
The in tank filter is beyond redemption, as is the fuel tank sender that for some reason decided to rust inside out! These are the filament wires on which the float slides up and down, and whilst I like a cleaning challenge even I have to say this has gone too far to save!
The 928 fuel system has, post pump, hard line all the way into the engine bay, except for a 10" hose tight up in the bay to allow for some flexing of the engine.
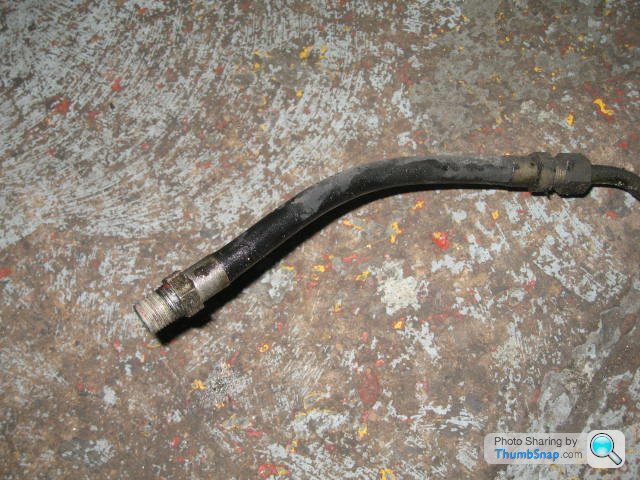
Every website I have visited insists that if you do not have the provenance to these pipes, you must change them as running under the pressure they do even a pinprick has fuel spraying out onto the exhaust manifold leading to total loss. Problem is, 34 year old connections do not like to come apart easily, and whilst access to the top connections is difficult but possible, the other end is almost impossible buried deep alongside the cam towers. So, how to overcome this issue? I know, drop the entire hard line!
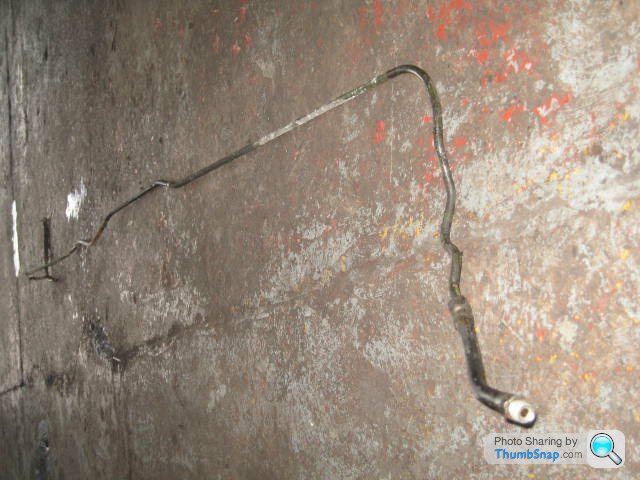
Seems a little dramatic I know, but to be honest the hard lines were poor, particularly towards the rear of the car, and if I'm going to get this car back into good working order, they need to be renewed.
Once that job had been undertaken, I took advantage of clear access to sort out all of the grounds underneath the car, and open up all of the wheel arches to see what lay beyond; generally in good order although the cold air sensor I was expecting to find in the nearside front doesn't seem to be present, I'll need to look into that a little more;
The aim of the weekend was to drop the entire fuel system to assess the damage caused by her standing around for so long. Despite some rusty fixings, the tank came out okay only to reveal a mess of sticky treacle like fuel deposits:
The in tank filter is beyond redemption, as is the fuel tank sender that for some reason decided to rust inside out! These are the filament wires on which the float slides up and down, and whilst I like a cleaning challenge even I have to say this has gone too far to save!
The 928 fuel system has, post pump, hard line all the way into the engine bay, except for a 10" hose tight up in the bay to allow for some flexing of the engine.
Every website I have visited insists that if you do not have the provenance to these pipes, you must change them as running under the pressure they do even a pinprick has fuel spraying out onto the exhaust manifold leading to total loss. Problem is, 34 year old connections do not like to come apart easily, and whilst access to the top connections is difficult but possible, the other end is almost impossible buried deep alongside the cam towers. So, how to overcome this issue? I know, drop the entire hard line!
Seems a little dramatic I know, but to be honest the hard lines were poor, particularly towards the rear of the car, and if I'm going to get this car back into good working order, they need to be renewed.
Once that job had been undertaken, I took advantage of clear access to sort out all of the grounds underneath the car, and open up all of the wheel arches to see what lay beyond; generally in good order although the cold air sensor I was expecting to find in the nearside front doesn't seem to be present, I'll need to look into that a little more;
With the fuel system dropping easier than expected I have continued to make inroads into the interior. As I investigated the electric board, I noticed that most of the fixings in the cabin have rusted out, making the decision to remove the complete interior to review the damage a lot easier. So the headlinings, A pillars, centre console and dash are coming out over the next few days. This may seem rather dramatic , but the mildew has made it's way right into the gaps between windscreen and dash, and I think that unless this is sorted now, it will continue to smell and spread:
Finally managed to release the rusty screw on the glove box to reveal this in all it's 90's glory:

Looking pretty bare in there now, the pod would have to come off anyway to check the connections behind, and I would have to take the centre console out to address the heating system, which if it's anything like my 1982 car will be inoperative as well!
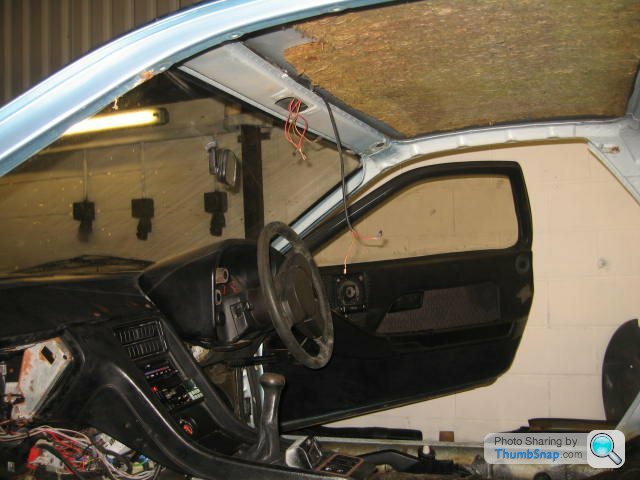
Oh, and I couldn't help but remove the "padded" grip to the steering wheel....methinks a full refurb of that is going to be required!

Finally managed to release the rusty screw on the glove box to reveal this in all it's 90's glory:
Looking pretty bare in there now, the pod would have to come off anyway to check the connections behind, and I would have to take the centre console out to address the heating system, which if it's anything like my 1982 car will be inoperative as well!
Oh, and I couldn't help but remove the "padded" grip to the steering wheel....methinks a full refurb of that is going to be required!
Further delving into the interior has prompted me to remove everything as the mildew & rust has snuck under the dash, headlining and even into the instument pod
along with rust on most fixing points
Even the glovebox lock pins have corrosion leaving them unable to slide in and out as they should.... lots and lots of cleaning/ rubbing down to do on this car...if anyone knows where I can buy dremel style "wire wheels" in bulk without having to buy the other stuff included at the same time I am all ears!
Just for sh*its and giggles I worked up a price list for fuel parts to date. Many items now NLA but from in-tank fuel filter (and not including the tank) to fuel accumulator ( hard lines forward of this are NLA) the list price is $2159!!!!!
Highlight's include a fuel level sender inc plastic nut $185, and my particular favourite Genuine Porsche fuel pump, only $629.75!!!!!!
So off to Ebay it is then! I am really trying to minimize the spend on this car until I know that the engine runs if nothing else!!
More pictures ( everyone loves a good picture!)
Anyone know where these go?
Even the foam has died!
Edited by Mattlan on Friday 1st November 11:04
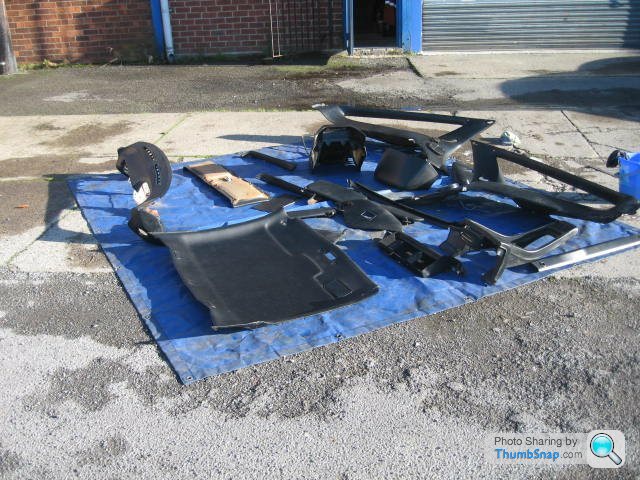
Busy weekend, spotted this pile of 928 stuff being advertised as a job lot down south.
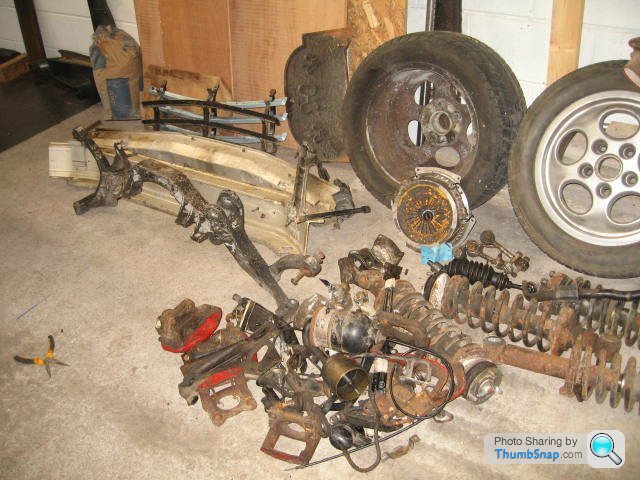
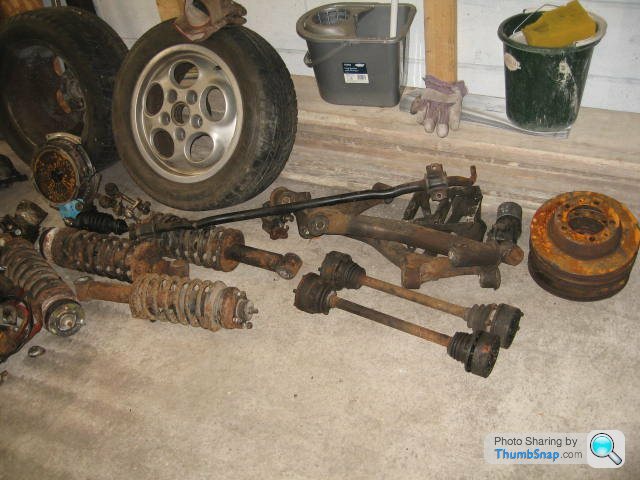
No other bids, £75 for the lot. 2 wheels, 4 shocks, discs, calipers, rear subframe, engine mounts and supporters, bonnet struts, fuel sender, and a host of other bits and pieces. Off at 5.30am, home for 1.30pm, Saturday morning on the A1 from York, an absolute pleasure with good weather, considerate drivers and most importantly few artics, whose overtaking antics are what generally snarl up the road ( you know the situation, he's doing 55mph, I can do 56mph and therefore will take 3 miles to get past him, don't get me wrong I know they have a job to do, but on dual carriageway it's the kiss of death for making progress)
It generally remains to be seen if any of this stuff will be needed in the end. The plan is to make a temporary fueling rig next weekend with a view to attempting to start the car. This will obviously depend on the electrics being in good nick and I have to date cleaned all of the grounds.
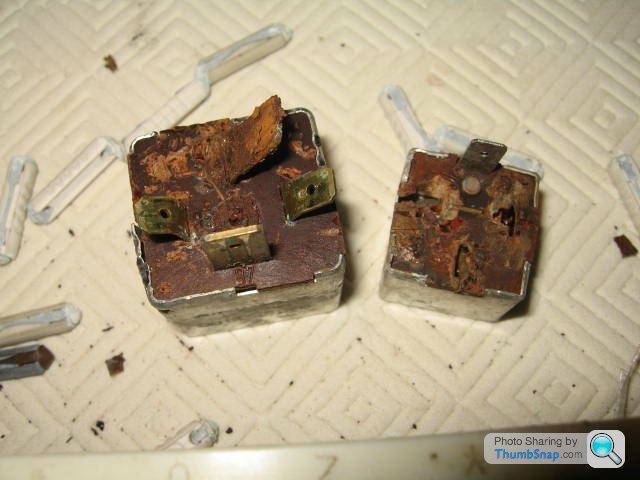
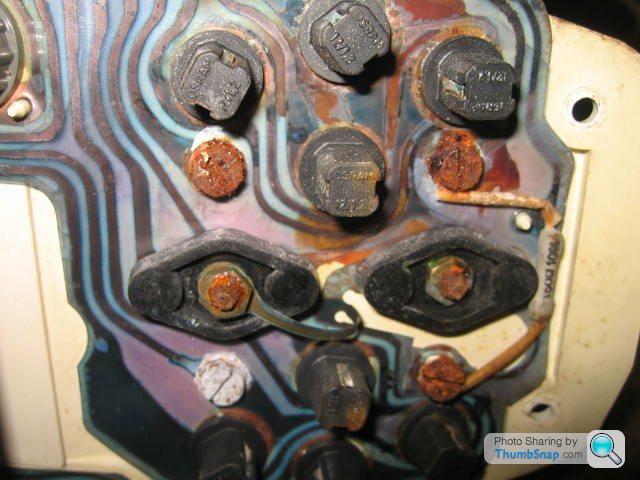
However I set about the fuse board on Sunday morning. What on first sight seemed like a R & R job of cleaning all the connections turned into a bit more of a job. The fuses, whilst corroded, could be gently prised from the fuse holder however when I came to easing the relays out it was another story altogether. Nearly all of the relays have rusted internally , and in doing so, "welded" themselves to the main fuse board. Not a pretty sight
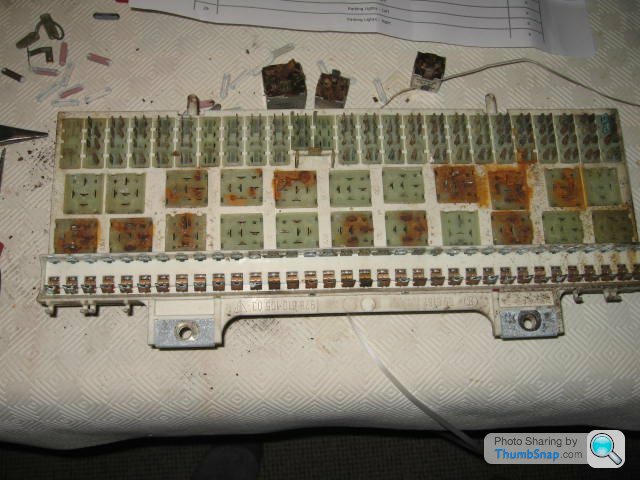
A shot of the relays :
So I have two choices, repair the board (time consuming but possible) and replace the relays ( expensive) or find a second hand board including relays ( most likely option at the moment except there were as far as I can ascertain changes made nearly very year to the layout) For the weekend I might just pull the board from my '82 to swap in , haven't decided yet.
In other news, I finally managed to persuade the rear passenger seat release mechanism to give up its hold on life
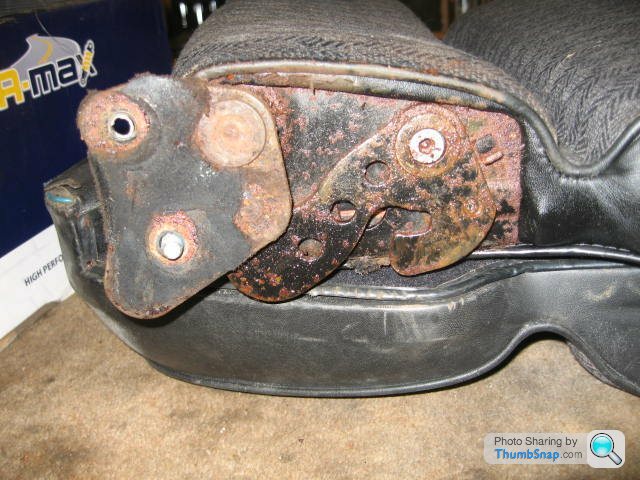
and in doing so freed up the final part of the interior trim removal process.
Lastly, it seems that people have differing conceptions as to what I am hoping to achieve with this project.
In no way do I have the skills, commitment or cash as the gent who has renovated the beautiful BMW or Barchetta Boy with his lovely blue 928.
I haven't got a huge amount of money in this project yet, and until I know it runs I will not be spending masses. I have however, mentally committed myself to spending some £1000's but my aim is to simply rescue the car and get her back on the road in the first instance. Whilst the interior appears to be a big issue, much of that can be resolved with time and care as opposed to ££, and there is at the back of my head the concept of a quasi road legal racer style motor!!
Anyway, my thanks to everyone who has contributed so far to this thread, I have found it in parts encouraging, sympathetic and realistic in it's approach, which is why I slipped it into this sub forum as opposed to Readers Cars.
No other bids, £75 for the lot. 2 wheels, 4 shocks, discs, calipers, rear subframe, engine mounts and supporters, bonnet struts, fuel sender, and a host of other bits and pieces. Off at 5.30am, home for 1.30pm, Saturday morning on the A1 from York, an absolute pleasure with good weather, considerate drivers and most importantly few artics, whose overtaking antics are what generally snarl up the road ( you know the situation, he's doing 55mph, I can do 56mph and therefore will take 3 miles to get past him, don't get me wrong I know they have a job to do, but on dual carriageway it's the kiss of death for making progress)
It generally remains to be seen if any of this stuff will be needed in the end. The plan is to make a temporary fueling rig next weekend with a view to attempting to start the car. This will obviously depend on the electrics being in good nick and I have to date cleaned all of the grounds.
However I set about the fuse board on Sunday morning. What on first sight seemed like a R & R job of cleaning all the connections turned into a bit more of a job. The fuses, whilst corroded, could be gently prised from the fuse holder however when I came to easing the relays out it was another story altogether. Nearly all of the relays have rusted internally , and in doing so, "welded" themselves to the main fuse board. Not a pretty sight
A shot of the relays :
So I have two choices, repair the board (time consuming but possible) and replace the relays ( expensive) or find a second hand board including relays ( most likely option at the moment except there were as far as I can ascertain changes made nearly very year to the layout) For the weekend I might just pull the board from my '82 to swap in , haven't decided yet.
In other news, I finally managed to persuade the rear passenger seat release mechanism to give up its hold on life
and in doing so freed up the final part of the interior trim removal process.
Lastly, it seems that people have differing conceptions as to what I am hoping to achieve with this project.
In no way do I have the skills, commitment or cash as the gent who has renovated the beautiful BMW or Barchetta Boy with his lovely blue 928.
I haven't got a huge amount of money in this project yet, and until I know it runs I will not be spending masses. I have however, mentally committed myself to spending some £1000's but my aim is to simply rescue the car and get her back on the road in the first instance. Whilst the interior appears to be a big issue, much of that can be resolved with time and care as opposed to ££, and there is at the back of my head the concept of a quasi road legal racer style motor!!
Anyway, my thanks to everyone who has contributed so far to this thread, I have found it in parts encouraging, sympathetic and realistic in it's approach, which is why I slipped it into this sub forum as opposed to Readers Cars.
So, just a quick update, I was unable to order my new fuseboard last week as the seller had gone away . So any chance of an engine start this weekend was off the cards. In the meantime I have been cleaning out the interior, grinding away surface rust on the fixing points and generally clearing up so I can work efficiently.
I had originally decided to leave the rear spoiler alone, but glancing up from inside the car I couldn't abide the amount of dirt trapped underneath. The main piece is screwed on from inside, however the last two fixings on the uprights are bolts through the body.
Broken glass under the spoiler, how the hell has this got there? I know from the records that the car has had a drivers side window shattered, but the glass was everywhere within the car, but under the rear spoiler?
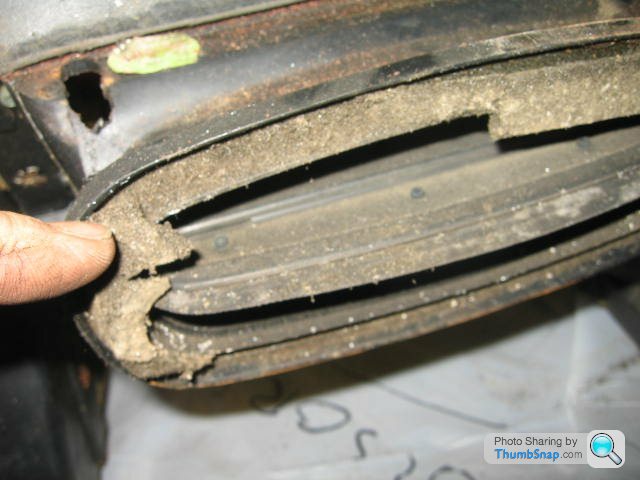
The amount of dirt trapped here and all the way up each side in the channels is ridiculous, even on a non spoiler car the design is such that the water pools at the base of the rear windscreen as there are no drain channels , ripe for leaks in later years through the glass mastic.
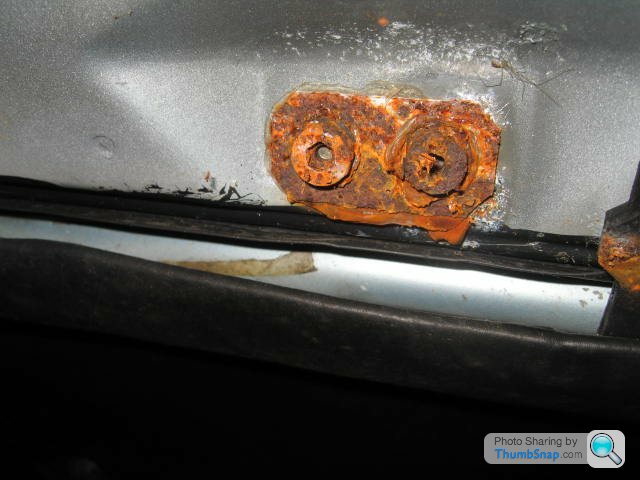
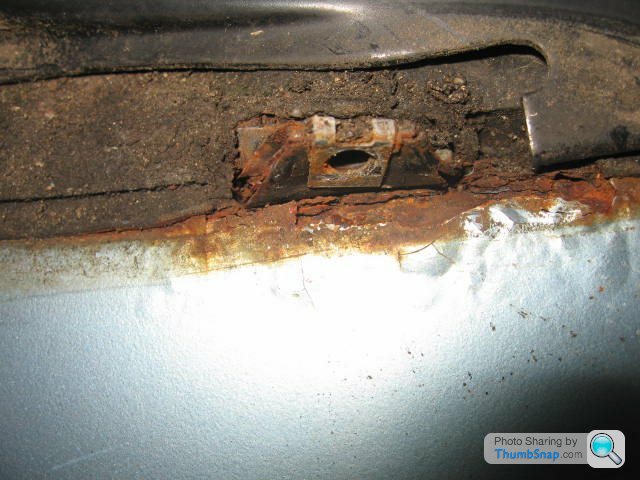
The side wings have three fixings, a bolt that can be seen to the thick end, two internal bolts at the thin end that come through the window lip and were rusted solid, and for good measure, a screw secured to a bracket that is then attached to the bodywork. This screw is only accessable by bending the edge of the spoiler out and up to see it! As you can see the thin end fixing area has rusted badly on both sides
There is a revised window seal incorporated to the quarter light. You can also see the bracket screwed directly into the bodywork here
I then spent 30 crippling minutes cleaning up the two internal bolt heads for the drivers side spoiler, only to discover that the fitter had used screws from the outside on that spoiler! Grrrrr! Again the rust is prevalent:
Whilst my need to remove and clean up has been satisfied, I think I will have to abandon my plan to revert her back to standard as there are over twenty fixing points to secure the spoiler = leak points! so it will have to go back on eventually with new fixings and mastic.
In other news, is it any wonder that it costs up to $10,000 to recover a 928's interior in leather (including the seats but you get my point!!)
Took advantage of the good weather to wipe over all the interior pieces with biological wash to get rid of the mildew and then left them to dry in the sun. Whilst there is some marking left still, at least the interior will be a healthier place to be!
Lastly, I tried to remove the speakers from the rear cards as their weight was making the cards bend.
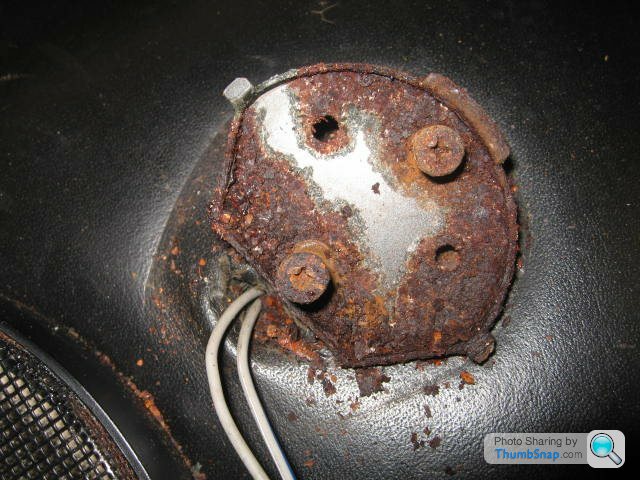
Always interesting trying to fathom out how things have been installed. As you can see the tweeters sit on a metal ( rust) fixing that had practically bonded itself to the leather
The larger speaker needed the grill taking off to get to three screws securing the mounting through the card.
I think that I will cut the speaker away from the casing and re install just the casing for now so I don't have a big hole in the card!!
I still have to tackle the door furniture, no point doing everything else and leaving that as it continues to smell! so that's this weeks project, bit scared really as my research indicates they are a pain in the backside!!
I had originally decided to leave the rear spoiler alone, but glancing up from inside the car I couldn't abide the amount of dirt trapped underneath. The main piece is screwed on from inside, however the last two fixings on the uprights are bolts through the body.
Broken glass under the spoiler, how the hell has this got there? I know from the records that the car has had a drivers side window shattered, but the glass was everywhere within the car, but under the rear spoiler?
The amount of dirt trapped here and all the way up each side in the channels is ridiculous, even on a non spoiler car the design is such that the water pools at the base of the rear windscreen as there are no drain channels , ripe for leaks in later years through the glass mastic.
The side wings have three fixings, a bolt that can be seen to the thick end, two internal bolts at the thin end that come through the window lip and were rusted solid, and for good measure, a screw secured to a bracket that is then attached to the bodywork. This screw is only accessable by bending the edge of the spoiler out and up to see it! As you can see the thin end fixing area has rusted badly on both sides
There is a revised window seal incorporated to the quarter light. You can also see the bracket screwed directly into the bodywork here
I then spent 30 crippling minutes cleaning up the two internal bolt heads for the drivers side spoiler, only to discover that the fitter had used screws from the outside on that spoiler! Grrrrr! Again the rust is prevalent:
Whilst my need to remove and clean up has been satisfied, I think I will have to abandon my plan to revert her back to standard as there are over twenty fixing points to secure the spoiler = leak points! so it will have to go back on eventually with new fixings and mastic.
In other news, is it any wonder that it costs up to $10,000 to recover a 928's interior in leather (including the seats but you get my point!!)
Took advantage of the good weather to wipe over all the interior pieces with biological wash to get rid of the mildew and then left them to dry in the sun. Whilst there is some marking left still, at least the interior will be a healthier place to be!
Lastly, I tried to remove the speakers from the rear cards as their weight was making the cards bend.
Always interesting trying to fathom out how things have been installed. As you can see the tweeters sit on a metal ( rust) fixing that had practically bonded itself to the leather
The larger speaker needed the grill taking off to get to three screws securing the mounting through the card.
I think that I will cut the speaker away from the casing and re install just the casing for now so I don't have a big hole in the card!!
I still have to tackle the door furniture, no point doing everything else and leaving that as it continues to smell! so that's this weeks project, bit scared really as my research indicates they are a pain in the backside!!

Well it's been an interesting week. A second hand fuse board and fuel pump arrived via ebay which allowed me to rig this up
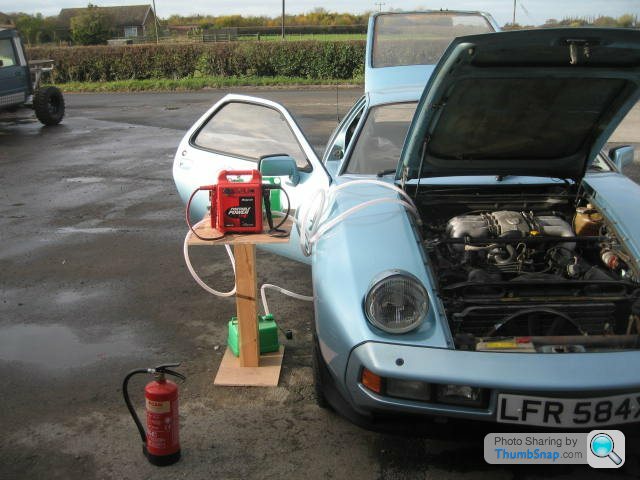
Few seconds of priming to get fuel flowing through the system , turn of the key and "ROAR" , she burst into life
she wouldn't continue to run once the ignition key was released however, but at least I know that the engine turns over !! I'm told by those who know that this was probably the cold start valve giving it the beans, so I have a lot to review now!
In other news, the door furniture is now off the car, debated whether this was really necessary but once off it was apparent that the mildew had worked its way behind the door cards
All untreated metal in the car has suffered to some degree, this is the door button!!
It would seem that the rear seats are beyond redemption, the rust you can see here are the staples used to secure the fabric to the padding, except that the staples have effectively melted away into blobs of rust and refuse to come away from the material without ripping it
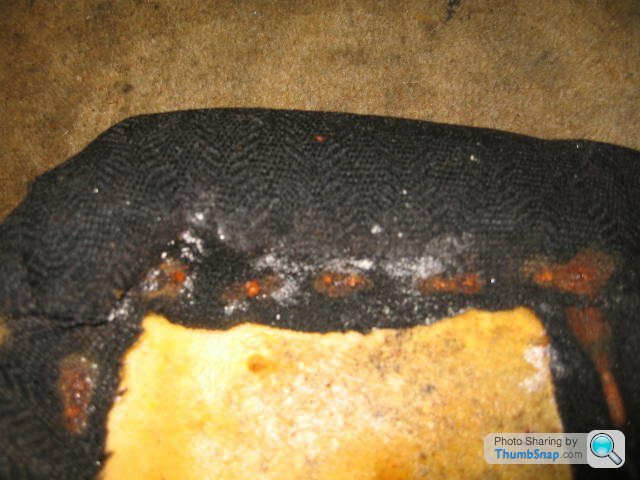
As you can also see the padding itself has mildew that won't wipe off.
A final casualty last night was the infamous rear seat locking mechanism. To remove it from the seat squab, the allen coach bolts? have to be undone. Unfortunately one of them was not prepared to relinquish its hold, and given that I couldn't even get the allen key in I decided to drill it out. It didn't go well, and tiredness / frustration ensured that I managed to deform the seat squab when I "went in" with the large screwdriver and forced it off!!
So at least I have established that the engine runs, I can start to contemplate the " to do" list and the shopping list now if nothing else!
Few seconds of priming to get fuel flowing through the system , turn of the key and "ROAR" , she burst into life
she wouldn't continue to run once the ignition key was released however, but at least I know that the engine turns over !! I'm told by those who know that this was probably the cold start valve giving it the beans, so I have a lot to review now!
In other news, the door furniture is now off the car, debated whether this was really necessary but once off it was apparent that the mildew had worked its way behind the door cards
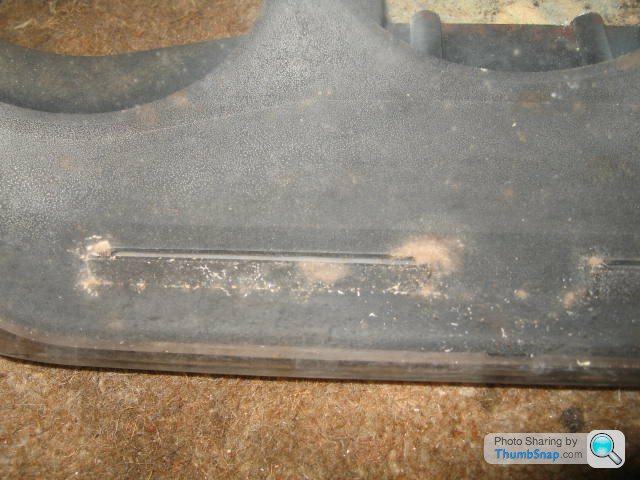
All untreated metal in the car has suffered to some degree, this is the door button!!
It would seem that the rear seats are beyond redemption, the rust you can see here are the staples used to secure the fabric to the padding, except that the staples have effectively melted away into blobs of rust and refuse to come away from the material without ripping it
As you can also see the padding itself has mildew that won't wipe off.
A final casualty last night was the infamous rear seat locking mechanism. To remove it from the seat squab, the allen coach bolts? have to be undone. Unfortunately one of them was not prepared to relinquish its hold, and given that I couldn't even get the allen key in I decided to drill it out. It didn't go well, and tiredness / frustration ensured that I managed to deform the seat squab when I "went in" with the large screwdriver and forced it off!!
So at least I have established that the engine runs, I can start to contemplate the " to do" list and the shopping list now if nothing else!

Loving the link above, although anyone who has tried to push these vehicles about would know that Joel wouldn't stand a chance of slowing it down on that banking!!
The car, as far as I am aware, stood unused for 6 months to a year outside until the PO moved house, at which point it was garaged with the intention of it being pulled out after 6 months. This would explain I think to some degree the lack of preparation before it went into the ( unheated ) garage. Coupled with a bit of damp in the car, either by spillage or leak, this has led over the years to it developing into the state it is in now.
Despite the jubilation this weekend with it firing up, on tackling the instrument pod last night, the wave of despair swept over me again
The pod looked manky in the first instance with evidence of mould inside
On turning it over it was clear that the VDO circuit board had seen better days also, with many of the screws and bolts rusted
As some of you may know, a known fault on the car is that the final cog on the speedo rots away to a material resembling earwax for want of a better description. This stops the odometer working leading to many 928's having a discrepancy on their mileage / MOT papers. I have replaced this cog on my red 928 twice now ( due to attempting to avoid paying $30 for the product and $30 for shipping / customs from the USA, the Australian one was $11 AU dollars delivered but I now know why!)
As you can see, this one was actually in reasonable condition physically ( until I broke a couple of spokes trying to turn it!!) but the dreaded funk had got to it and the fixings etc.
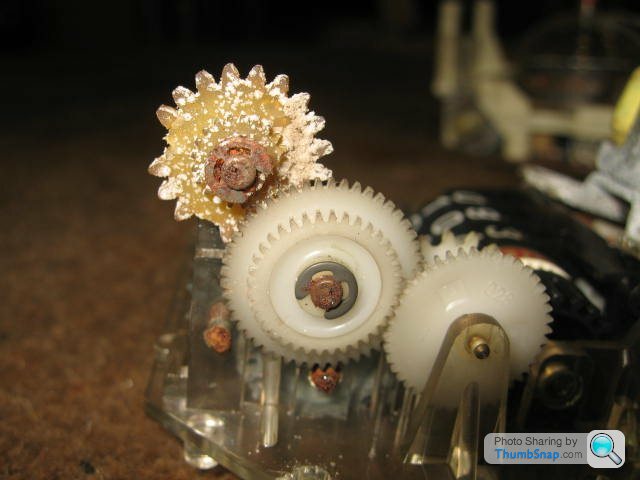
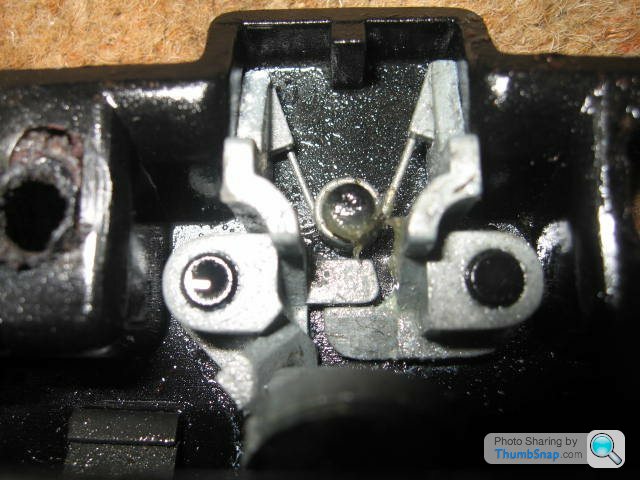
In my experience everything in a speedo / odometer needs to be as smooth as silk for it to work properly. I couldn't even remove the needle from the front as it had corroded onto the tiny pin you can see sticking up here!
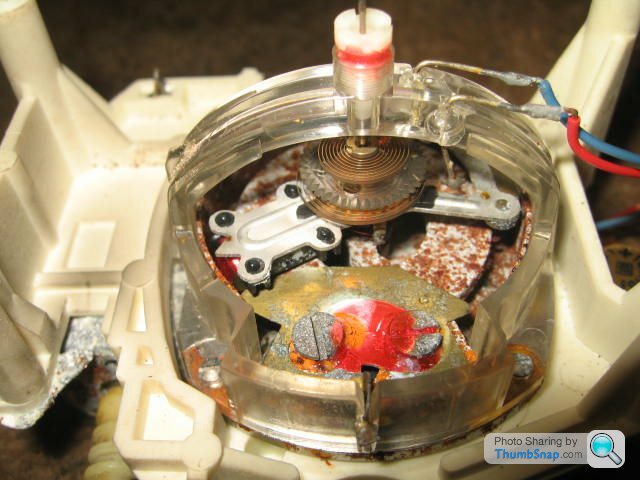
Looking into the depths of the speedo you can see rust / oxidisation . I am ,as you know, trying to bring this car around sensibly financially, and have to say that cleaning / fixing things is , for me, a good way to unwind. However I believe that the cost / benefit involved does not make sense in this case, so it was onto Ebay again last night and the 928S that gave up its CE board last week has now donated ( I wish) it's instrument panel!! ( I ought to speak with the vendor and get a job lot as it seems that there will be other things required!!!!)
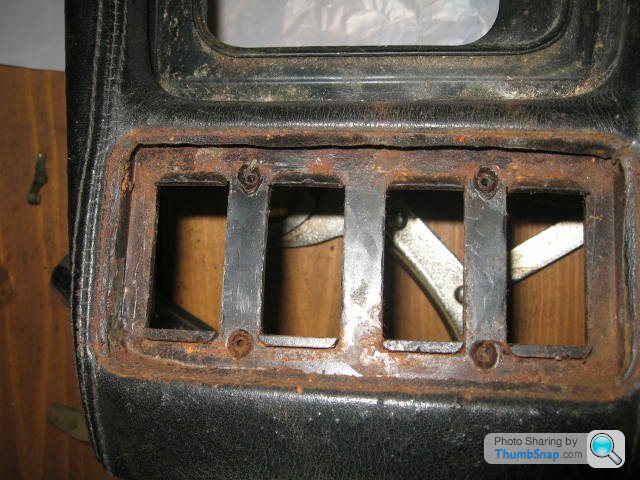
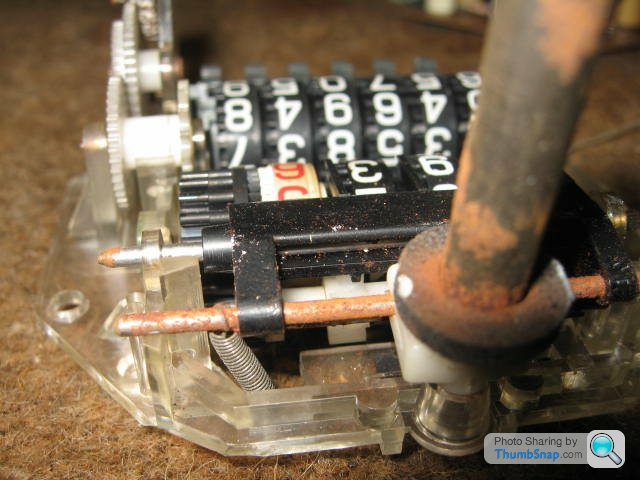
Lastly, as a point of interest, you can see here the mechanism to reset the trip, including the rusty metal bars etc. Needless to say it doesn't work now, but as an aside this mechanism should not be operated on the move otherwise it bu**ers it up.
The car, as far as I am aware, stood unused for 6 months to a year outside until the PO moved house, at which point it was garaged with the intention of it being pulled out after 6 months. This would explain I think to some degree the lack of preparation before it went into the ( unheated ) garage. Coupled with a bit of damp in the car, either by spillage or leak, this has led over the years to it developing into the state it is in now.
Despite the jubilation this weekend with it firing up, on tackling the instrument pod last night, the wave of despair swept over me again
The pod looked manky in the first instance with evidence of mould inside
On turning it over it was clear that the VDO circuit board had seen better days also, with many of the screws and bolts rusted
As some of you may know, a known fault on the car is that the final cog on the speedo rots away to a material resembling earwax for want of a better description. This stops the odometer working leading to many 928's having a discrepancy on their mileage / MOT papers. I have replaced this cog on my red 928 twice now ( due to attempting to avoid paying $30 for the product and $30 for shipping / customs from the USA, the Australian one was $11 AU dollars delivered but I now know why!
)As you can see, this one was actually in reasonable condition physically ( until I broke a couple of spokes trying to turn it!!) but the dreaded funk had got to it and the fixings etc.
In my experience everything in a speedo / odometer needs to be as smooth as silk for it to work properly. I couldn't even remove the needle from the front as it had corroded onto the tiny pin you can see sticking up here!
Looking into the depths of the speedo you can see rust / oxidisation . I am ,as you know, trying to bring this car around sensibly financially, and have to say that cleaning / fixing things is , for me, a good way to unwind. However I believe that the cost / benefit involved does not make sense in this case, so it was onto Ebay again last night and the 928S that gave up its CE board last week has now donated ( I wish) it's instrument panel!! ( I ought to speak with the vendor and get a job lot as it seems that there will be other things required!!!!)
Lastly, as a point of interest, you can see here the mechanism to reset the trip, including the rusty metal bars etc. Needless to say it doesn't work now, but as an aside this mechanism should not be operated on the move otherwise it bu**ers it up.
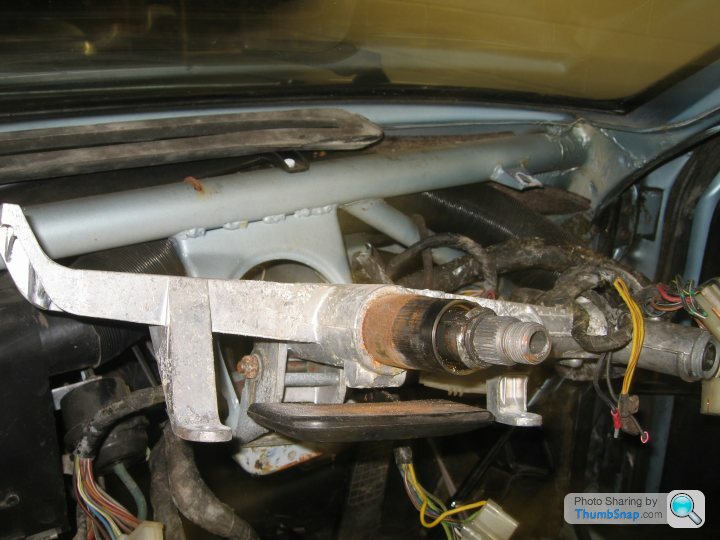
Another weekend, and looking for a little stand alone project , I decided to remove the heater blower as it's clear there has been leakage down into the passenger footwell in the past, and going on past experience of this car, its mechanism will be stippled with rust.
Well what a pain in the backside that was, not so much from the top as the fact that the bottom grill nuts were all rusted to bu*gery on the captive bolts, four of which run along the back behind the big wiring loom, that's stiff as a stiff thing to move, tucked away right behind the CE board. Also, having searched the web for reminders on how to remove the heater , indications were that there was a fixing through the grill that would release the heater.
So, one snapped captive bolt later, all the bottom bolts were released. But would the heater come out, like hell it would. It twisted, it turned but it was clear something was holding it in from below. Back round into the passenger footwell to confirm all the bolts were free, yep, but still stuck. So one infantile rant later a lightbulb goes on. So imagine this at the Porsche factory 35 years ago : ~~
yes Hans, in order to remove the heater in future years we will make it so that the 6 foot three man has to lie in the passenger footwell on his back with the CE bracket digging into his neck, whilst attempting to hold open a resisting flap not 3 inches from his nose, hold a torch with his teeth AND insert a screwdriver to release the rusty screw that doesn't want to turn that's just a blurry thing because of his failing eyesight .......funny ja!!
Anyway rant over, having finally managed to wriggle the heater out, sure enough the fan was stiff as anything due to corrosion. I then took the chance to clean out the bulkhead, using compressed air to force all the debris from under the windscreen wiper mechanism.
This appeared :
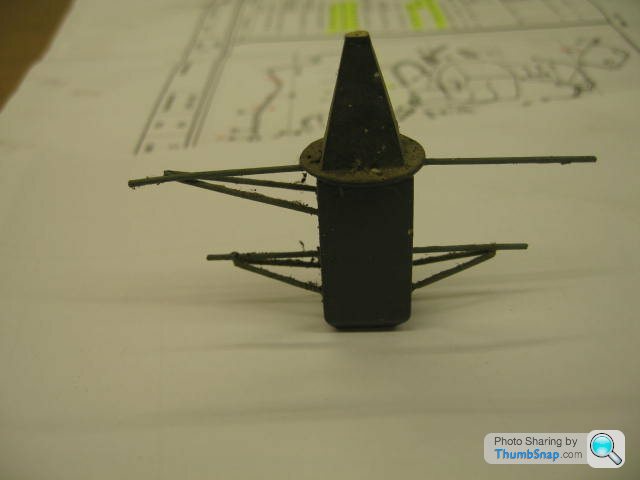
made out of balsa wood, with prongs similar in size to a paper clip.....what the hell.... does anyone recognize this part...... is it a vital part of the mechanics of the car which will cause me to die horribly in a fireball, or have I a secret society living in a minnature village in my bulkhead?
Sunday I decided to get oily and remove the intake, whilst the car starts at the moment 35 year old seals, gaskets and vacuum lines would probably mean it would not run very well, so the "spider" was removed
to reveal this:
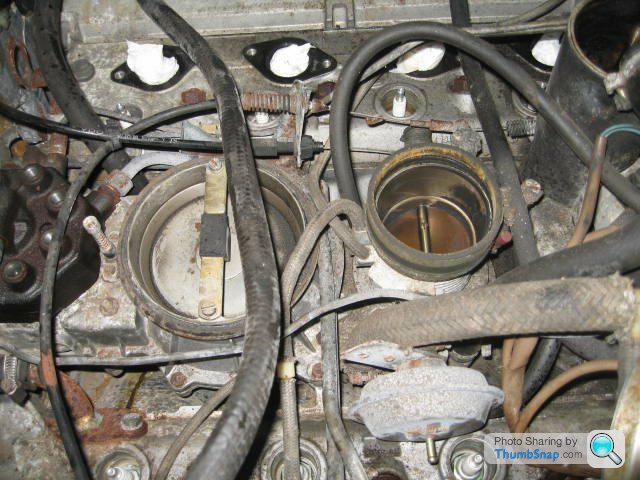
So that's the oil cooler lines, no wait, fuel, hang on a vacuum line, damn it, no, air
Well what a pain in the backside that was, not so much from the top as the fact that the bottom grill nuts were all rusted to bu*gery on the captive bolts, four of which run along the back behind the big wiring loom, that's stiff as a stiff thing to move, tucked away right behind the CE board. Also, having searched the web for reminders on how to remove the heater , indications were that there was a fixing through the grill that would release the heater.
So, one snapped captive bolt later, all the bottom bolts were released. But would the heater come out, like hell it would. It twisted, it turned but it was clear something was holding it in from below. Back round into the passenger footwell to confirm all the bolts were free, yep, but still stuck. So one infantile rant later a lightbulb goes on. So imagine this at the Porsche factory 35 years ago : ~~
yes Hans, in order to remove the heater in future years we will make it so that the 6 foot three man has to lie in the passenger footwell on his back with the CE bracket digging into his neck, whilst attempting to hold open a resisting flap not 3 inches from his nose, hold a torch with his teeth AND insert a screwdriver to release the rusty screw that doesn't want to turn that's just a blurry thing because of his failing eyesight .......funny ja!!
Anyway rant over, having finally managed to wriggle the heater out, sure enough the fan was stiff as anything due to corrosion. I then took the chance to clean out the bulkhead, using compressed air to force all the debris from under the windscreen wiper mechanism.
This appeared :
made out of balsa wood, with prongs similar in size to a paper clip.....what the hell.... does anyone recognize this part...... is it a vital part of the mechanics of the car which will cause me to die horribly in a fireball, or have I a secret society living in a minnature village in my bulkhead?
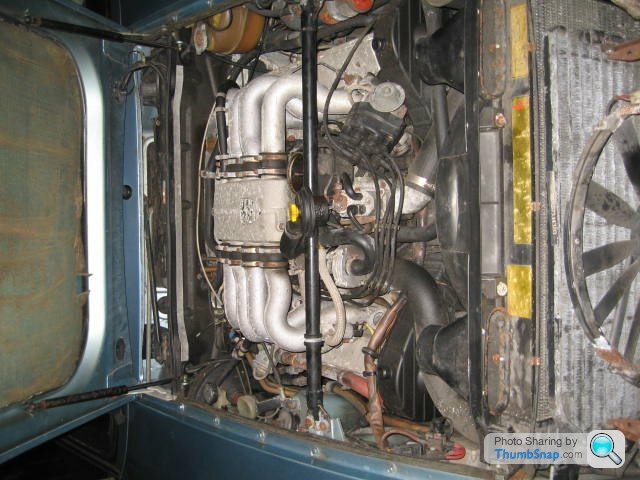
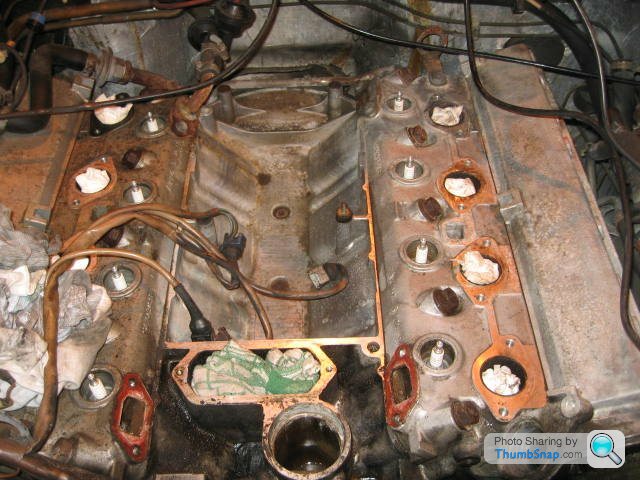
Sunday I decided to get oily and remove the intake, whilst the car starts at the moment 35 year old seals, gaskets and vacuum lines would probably mean it would not run very well, so the "spider" was removed
to reveal this:
So that's the oil cooler lines, no wait, fuel, hang on a vacuum line, damn it, no, air
Gents, quick update as I have not posted for a while.
Car sits now with all intake, water bridge and oil lines out and being checked over. Injectors , warm up valve and fuel distributor
sent out for recommissioning, throttle body and air mass flap
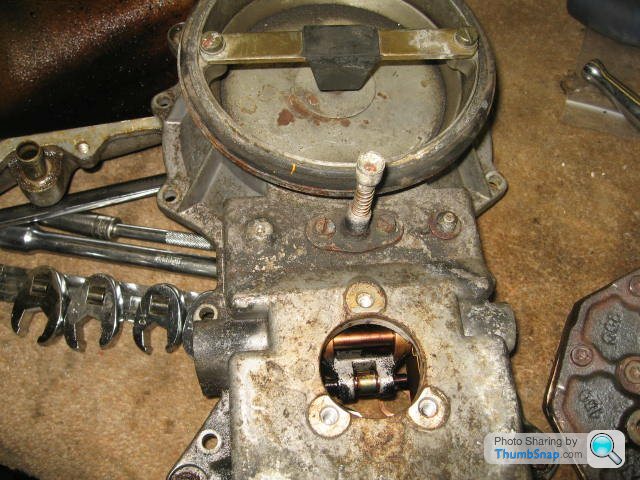
having an ultra sonic paddle so I am left with an engine looking like this:
The more you take off to clean however, the more you want to take off........"cleaning"... it's the crack cocaine of the car enthusiast!
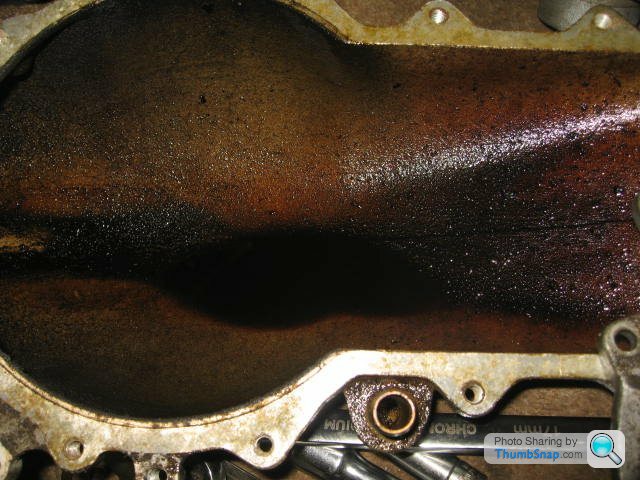
It has become apparent as the front of the engine has been stripped down, that the engine has suffered either camshaft oil seal or crankshaft oil seal failure. Under the camshaft covers it is absolutely thick with baked on oil which has made its way round and underneath the engine leaving a thick sticky gritty mess that is a s*d to clean off....very tempted to take next door's steam cleaner to it, but that would involve replacing all the oil feeder pipes, dragging her out into the cold light of day, and then getting completely drenched in smelly oily water as I tried to get into all the nooks and crannies!
Just waiting on delivery of new seals, gaskets and pipework from the good old US of A, so that the oil seals, cambelt and bridge / intake can be put together. In the meantime I am reading up on the way to renovate in this corner of the car!!
Thanks for looking, all comments gratefully received, although I was a little distraught by the comments in another thread that I must have "balls like space hoppers" !!
Car sits now with all intake, water bridge and oil lines out and being checked over. Injectors , warm up valve and fuel distributor
sent out for recommissioning, throttle body and air mass flap
having an ultra sonic paddle so I am left with an engine looking like this:
The more you take off to clean however, the more you want to take off........"cleaning"... it's the crack cocaine of the car enthusiast!
It has become apparent as the front of the engine has been stripped down, that the engine has suffered either camshaft oil seal or crankshaft oil seal failure. Under the camshaft covers it is absolutely thick with baked on oil which has made its way round and underneath the engine leaving a thick sticky gritty mess that is a s*d to clean off....very tempted to take next door's steam cleaner to it, but that would involve replacing all the oil feeder pipes, dragging her out into the cold light of day, and then getting completely drenched in smelly oily water as I tried to get into all the nooks and crannies!
Just waiting on delivery of new seals, gaskets and pipework from the good old US of A, so that the oil seals, cambelt and bridge / intake can be put together. In the meantime I am reading up on the way to renovate in this corner of the car!!
Thanks for looking, all comments gratefully received, although I was a little distraught by the comments in another thread that I must have "balls like space hoppers" !!
And JDY's post sums up one of the best things about tinkering with 928 porsches....their owners!!!! none of the preciousness of the air cooled brigade, and always always happy to talk about their cars and fixing them. Thanks JDY for your input, I am expecting a Christmas box from Roger that's just been sent....very excited to be receiving new gaskets and intake refresh stuff!!! Sad i know!
Gassing Station | Classic Cars and Yesterday's Heroes | Top of Page | What's New | My Stuff