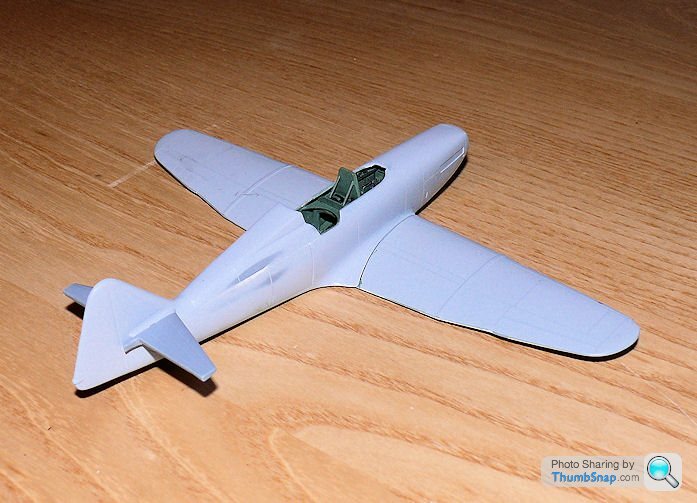
1:72 MPM Boulton Paul Defiant Mk.1
Discussion
So here's the finished turret test fitted:
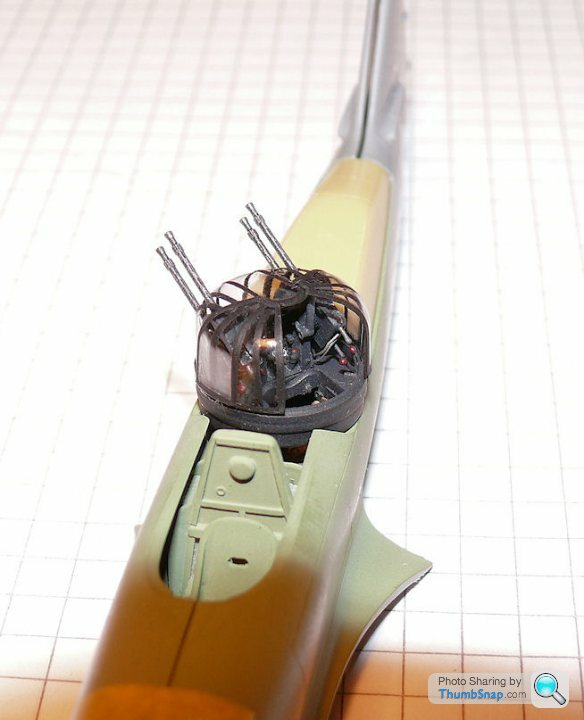
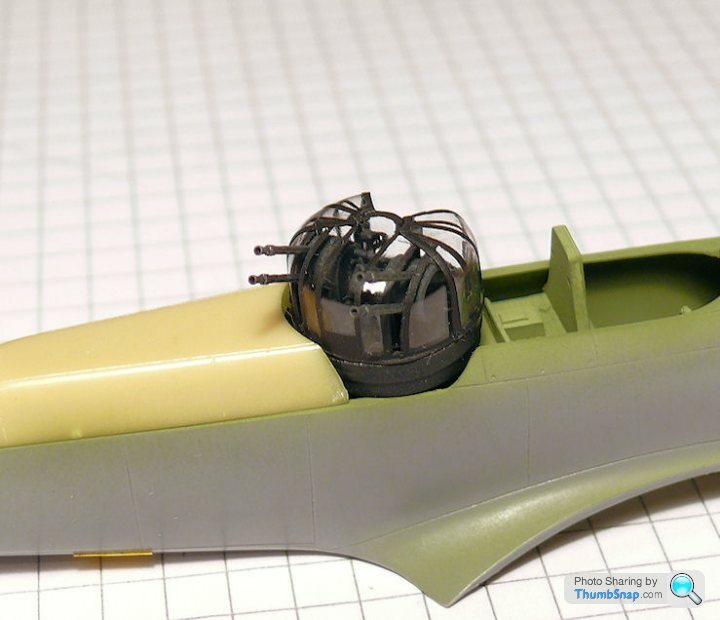
And as a complete unit:
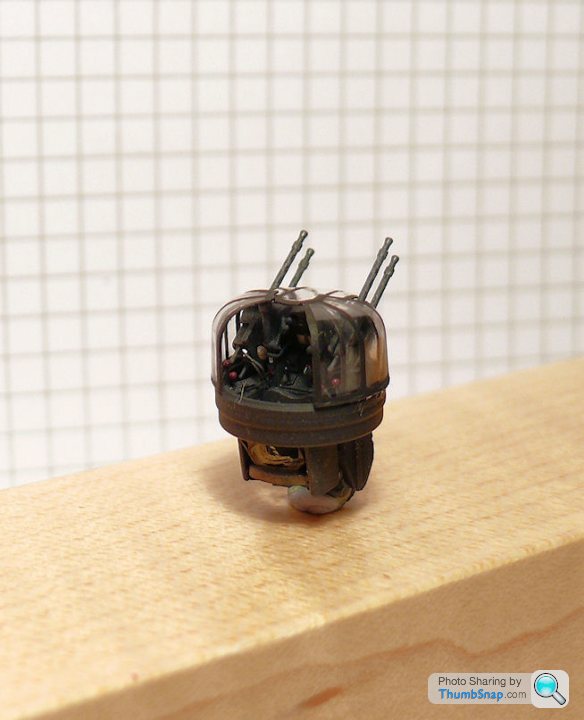
Here it is without the glazing:
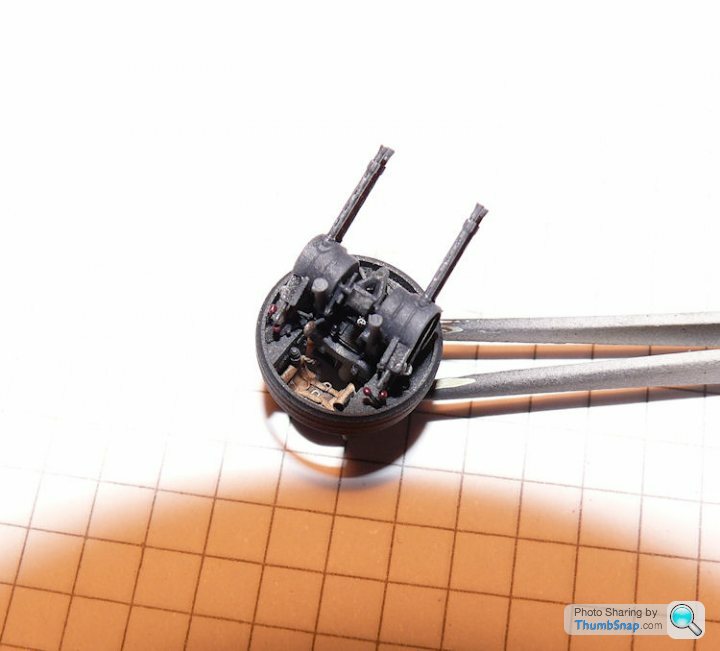
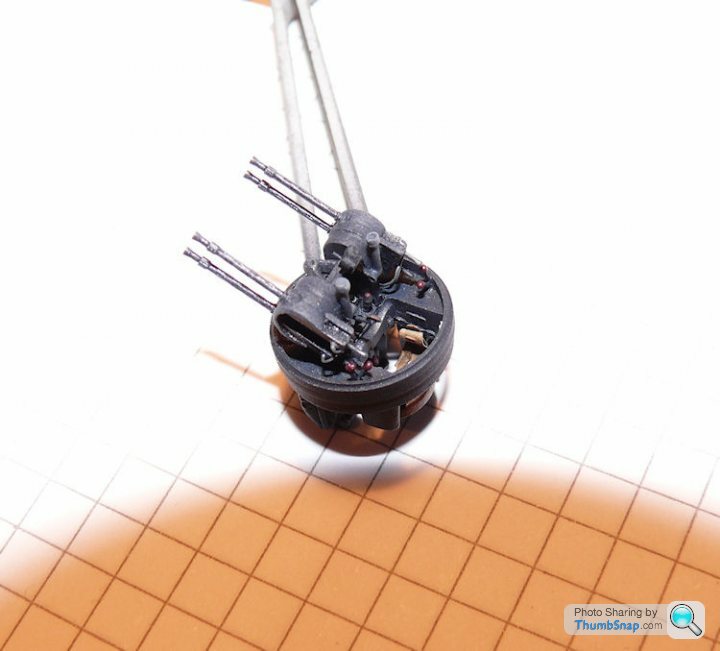
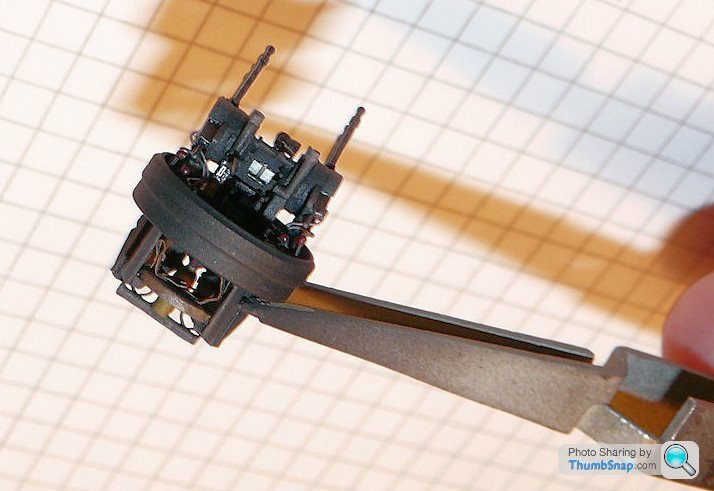
I went to town a bit on this becasue to me, a Defiant is all about the turret. As far as scratchbuilding goes, I've added the door knobs & gun control, decals for the air gauges and nameplate, gun wiring and rear extensions, hydraulic elevation piston & pipework, gunners notepad (& pencil!), Mk.IIIa gunsight and mechanism, front hinged table and brackets, turret lifting struts, stbd. electrical panels and the suit heating & radio pigtails. Also hacked the Falcon vacform canopy to have the doors open. ETA also gunners head-pad.
Since pretty much everything is "black" I've tried to use various shades, weathering and degrees of matt/satin to give some depth. I've also used some licence in colouring some of the knobs dark 'bakelite' red. the guns are brushed over with Tamiya powder "gunmetal" and "light gunmetal"
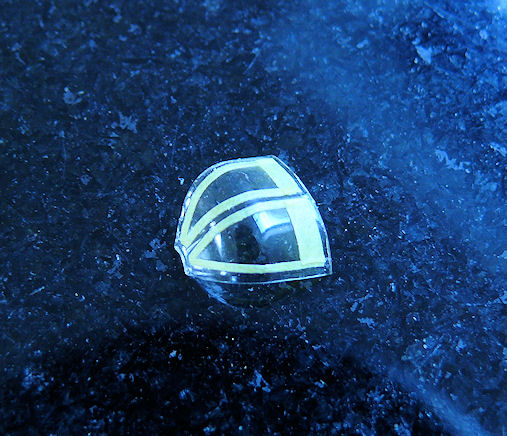
Quick 'how to' for masking for anyone interested (maskingis the only way to get a good effect in most scales):
1) Coat the canopy with Klear and allow to dry overnight. Then, using a new blade, cut narrow (<1mm) strips of Tamiya tape and lay them next to the moulded-in framing. Use the freshly cut edge to form the masked edge, then press the edges down with a toothpick:
2) Infill the rest with a mosaic of tape. Using narrow strips of tape allows you to bend the tape along curved edges - to an extent:
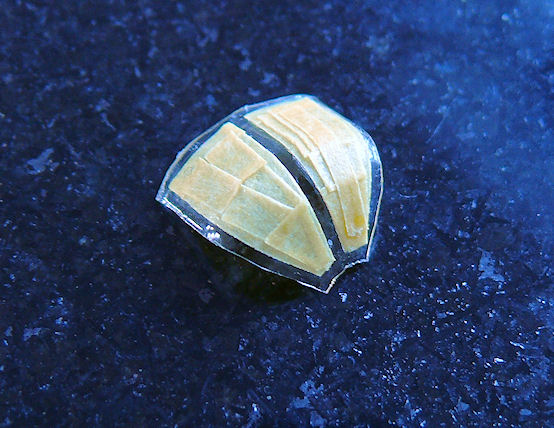
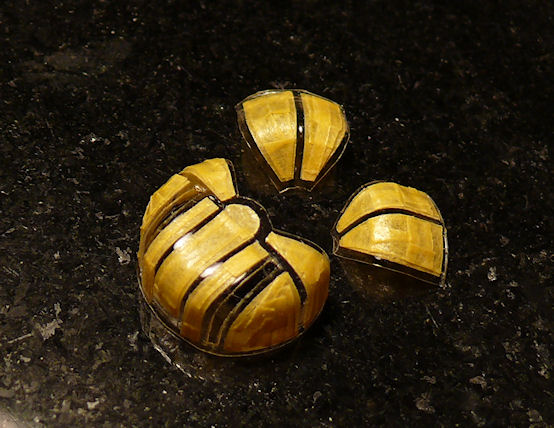
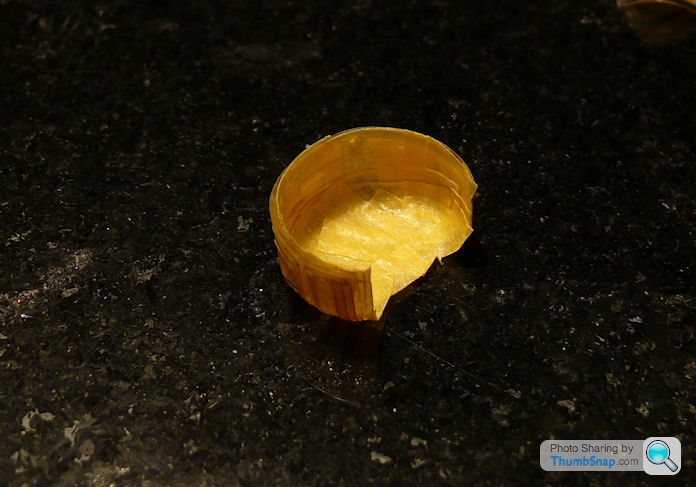
3) Cover the inside of the transparency with tape to prevent overspray:
4) Spray several coats using an airbrush with a fairly thick mix of paint, and use the airbrush to flash the paint off as you go (assuming you have a double action airbrush). These measures will help prevent paint creeping under the tape. Finally, remove the tape and have a well deserved cup of tea:
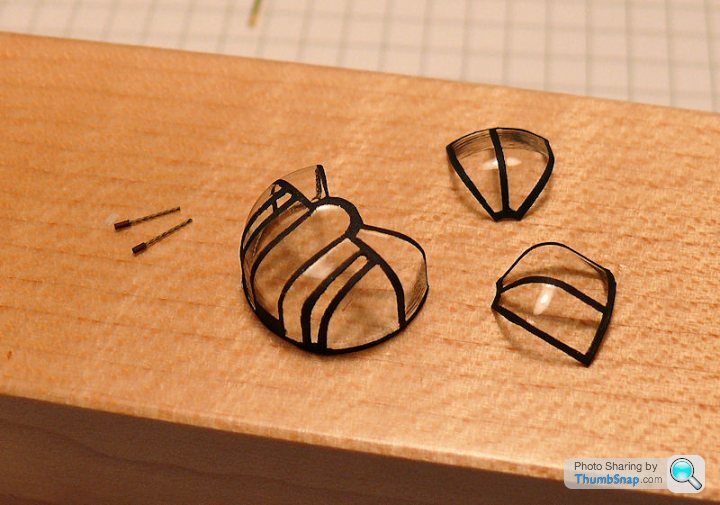
The wires in the photo are the pigtails for the gunners radio and suit heater connections. I made these out of twisted copper wire and brass tube.
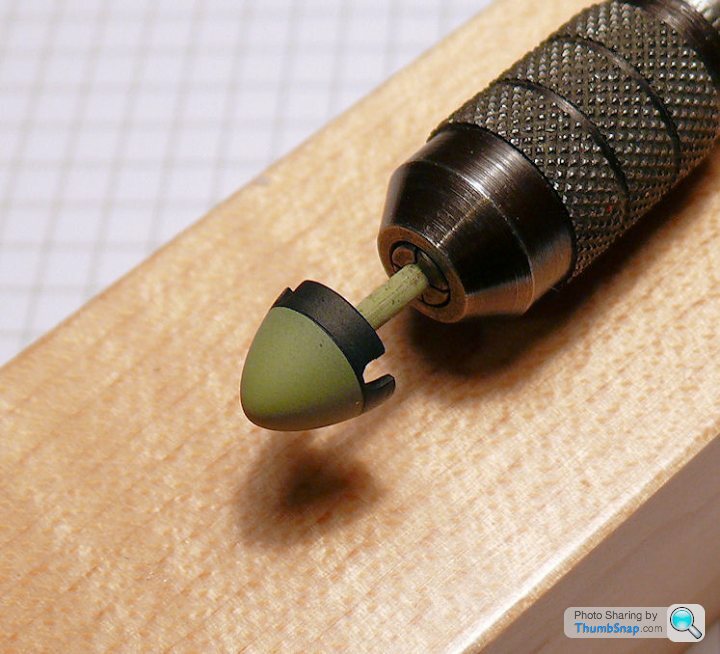
Finally tonight, painted the spinner. I find the best way to paint perfect demarcations on cones is to spin the in the lathe and brush paint the darker colour with a fine brush:


And as a complete unit:

Here it is without the glazing:


I went to town a bit on this becasue to me, a Defiant is all about the turret. As far as scratchbuilding goes, I've added the door knobs & gun control, decals for the air gauges and nameplate, gun wiring and rear extensions, hydraulic elevation piston & pipework, gunners notepad (& pencil!), Mk.IIIa gunsight and mechanism, front hinged table and brackets, turret lifting struts, stbd. electrical panels and the suit heating & radio pigtails. Also hacked the Falcon vacform canopy to have the doors open. ETA also gunners head-pad.
Since pretty much everything is "black" I've tried to use various shades, weathering and degrees of matt/satin to give some depth. I've also used some licence in colouring some of the knobs dark 'bakelite' red. the guns are brushed over with Tamiya powder "gunmetal" and "light gunmetal"
Quick 'how to' for masking for anyone interested (maskingis the only way to get a good effect in most scales):
1) Coat the canopy with Klear and allow to dry overnight. Then, using a new blade, cut narrow (<1mm) strips of Tamiya tape and lay them next to the moulded-in framing. Use the freshly cut edge to form the masked edge, then press the edges down with a toothpick:

2) Infill the rest with a mosaic of tape. Using narrow strips of tape allows you to bend the tape along curved edges - to an extent:


3) Cover the inside of the transparency with tape to prevent overspray:

4) Spray several coats using an airbrush with a fairly thick mix of paint, and use the airbrush to flash the paint off as you go (assuming you have a double action airbrush). These measures will help prevent paint creeping under the tape. Finally, remove the tape and have a well deserved cup of tea:

The wires in the photo are the pigtails for the gunners radio and suit heater connections. I made these out of twisted copper wire and brass tube.
Finally tonight, painted the spinner. I find the best way to paint perfect demarcations on cones is to spin the in the lathe and brush paint the darker colour with a fine brush:

Edited by dr_gn on Monday 7th October 00:08
perdu said:
dr_gn said:
Eric Mc said:
It must have been awfully claustrophobic in that turret.
And did anybody ever successfully bale out of the turret?
I think they did. I e-mailed the Boulton Paul Association to see if they had any better details images of the turret than there are online. The archivist (also a keen modeller and IPMS member) sent me a ton of reference material and drawings (and other info). What I didn't realise was that there was another way out of the turret by moving it into the "guns forward" position, lifting the seat and kicking out an access panel in the rear fuselage. The gunner could then (in theory) drop out that way. Defiants apparently always took off and landed with the turret forward so that the gunner had a chance of getting out underneath in the event of the aircraft overturning. Looking at the drawings and photographs I still can't figure out how there was room to do that. This fuselage panel was also used for groundcrew to re-arm and empty the cartridge collector bags.And did anybody ever successfully bale out of the turret?
I think it is a fascinating aircraft.
The archivist, is it my old friend Les still?
If so he is a truly great modeller too, I have fond memories of his work back in the seventies and eighties.
Here's the instrument panel:

OK, it looks a bit flaky, and the photo reveals that the top edge needs a bit of sanding level, but it is smaller than my thumbnail!
Same with the cockpit sidewalls: They look rubbish at this stage with indistinct colour boundaries and blotchy matt/gloss bits. This is just the first stage though. After a coat of Klear, a dark wash, some dry brushing and matt varnish they will look much more subdued and consistent:

Eric Mc said:
Yes - total rubbish 
Do you REALLY believe that?
Of course they are not rubbish - given that they are 1/72. And will be mainly invisible once installed. They look jolly good to me.
What I mean is that they'll look better when they're done. It doesn't show up in the photo very well but the satin black dried blotchy (as usual).
Do you REALLY believe that?
Of course they are not rubbish - given that they are 1/72. And will be mainly invisible once installed. They look jolly good to me.
So here are the fuselage internals ready for fitting:

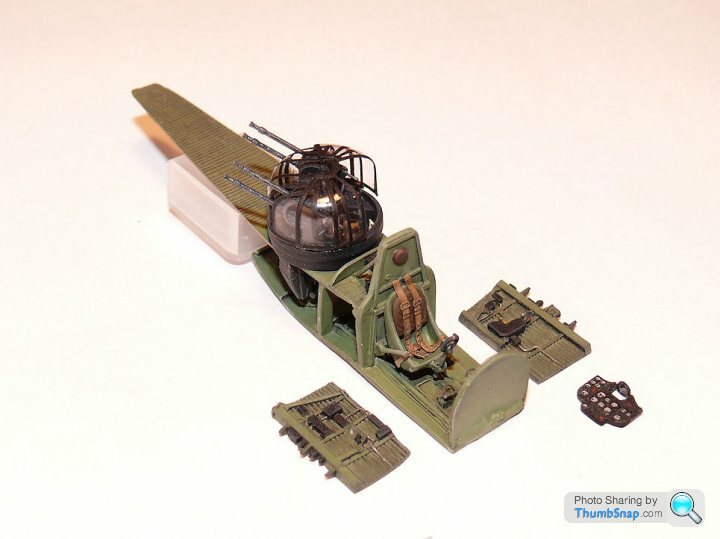
I've treated them to a dark wash and weathering powders, followed by Humbrol matt varnish.
I've added:
Head armour supports (plastic rod)
Circular plate next to headrest (photoetch rivet)
Rear fairing air cylinder body (brass tube)
Radio box retaining strap (Tamiya tape)
Correct spade grip (from spares box)
Wheel brake lever (scrap photo etch)
Throttle lever knobs (PVA)
And I omitted the rear deck support (doesn't fit and not needed anyway)
The wheel wells are totally wrong, with moulded-in stiffeners. The reality is that the wells were pretty much flat with the odd stiffening crease, plus a fair amount of hydraulics.
I'm attempting to correct this, the simplest method appearing to be to cover the majority of the wells with plastic card plates. I scraped the heaviest details away with a blade:
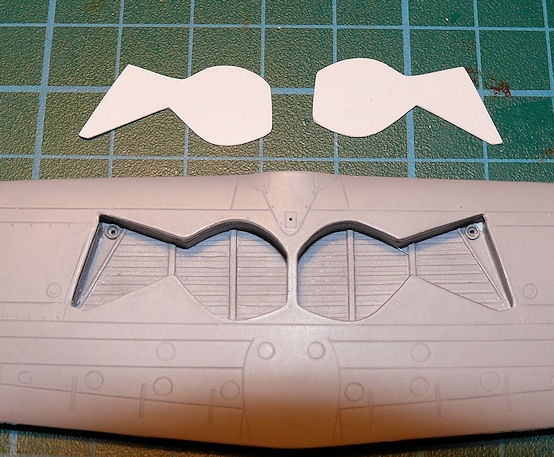
I've drawin on the position of the main features and will build these up with scrap photo etch and plastic before fitting the whole lot and adding the undercarriage leg assemblies:

The holes I drilled for the legs will remain, and also visible is a hole I drilled for the forward aerial mast.
I'm attempting to correct this, the simplest method appearing to be to cover the majority of the wells with plastic card plates. I scraped the heaviest details away with a blade:

I've drawin on the position of the main features and will build these up with scrap photo etch and plastic before fitting the whole lot and adding the undercarriage leg assemblies:

The holes I drilled for the legs will remain, and also visible is a hole I drilled for the forward aerial mast.
Edited by dr_gn on Sunday 13th October 11:53
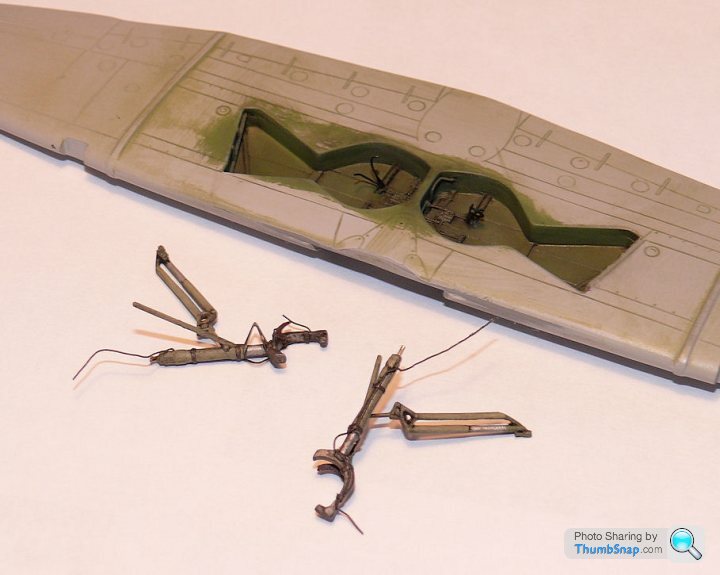
So bar a bit of cleaning up, overcoating in interior green and doing the usual wash/weathering, the wheel wells and u/c legs are done:

I scratchbuilt everything in the wheel wells including hydraulic valve blocks (plastic rod and p/e nuts) pipes (lead wire), well bulges (sliced the ends off a couple of spare Airfix Gladiator gun pods), U-stiffeners (scrap p/e) and plastic rod stiffening braces. The stiffeners in the roofs are scribed lines. The legs are complex structures, and I added a valve block (plastic off-cut), tension spring (scrap resin) and main leg extension (brass tube) to each one. The tyre brushes and scissor joints were from the original kit - nice touches that make all the diffeence:

As ever, not perfect, but better than the original:


I scratchbuilt everything in the wheel wells including hydraulic valve blocks (plastic rod and p/e nuts) pipes (lead wire), well bulges (sliced the ends off a couple of spare Airfix Gladiator gun pods), U-stiffeners (scrap p/e) and plastic rod stiffening braces. The stiffeners in the roofs are scribed lines. The legs are complex structures, and I added a valve block (plastic off-cut), tension spring (scrap resin) and main leg extension (brass tube) to each one. The tyre brushes and scissor joints were from the original kit - nice touches that make all the diffeence:

As ever, not perfect, but better than the original:

Edited by dr_gn on Wednesday 23 October 23:08
The Defiant had two access steps on the stbd. side: one pull-out spigot step in the fuselage, and another pull and drop section in the wing root. I've not seen them on many other Defiant models (none that I can find in fact). It was a simple matter of folding some scrap photo-etch and shaping some plastic strip for the wing root step, and a bit of brass tube with a p/e rivet stuck on the end formed the fuselage spigot. There was a bit of work required to form the tapered cut-out in the root fillet, and there is a corresponding recess under the wing for the back of the step.


Finished the u/c legs and wells now. After overcoating everything with Klear, I add a dark wash making sure it gets into all the nooks and crannies, then allow to dry for an hour:

Then the tricky bit - what I can only describe as "reverse painting" the excess was away:
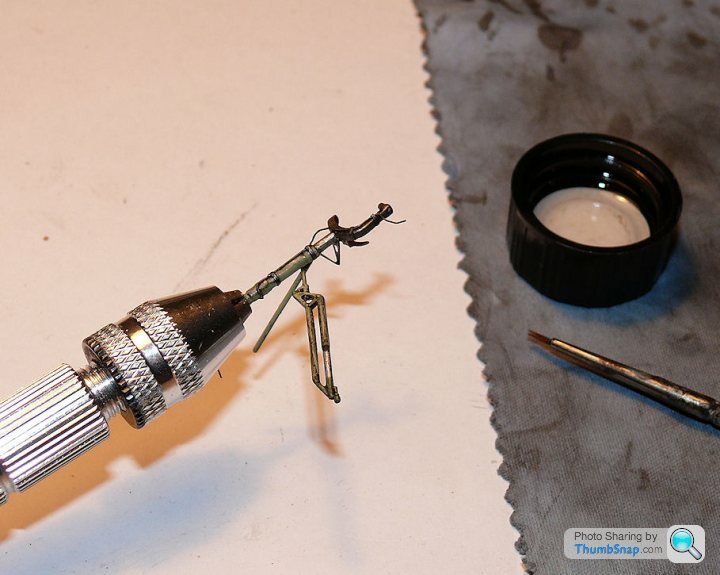
Then a quick brush over with Tamiya powders to highlight some raised detal, followed by matt varnish:
And how they will look fitted (bar a bit of fettling and attaching the hydraulic lines:

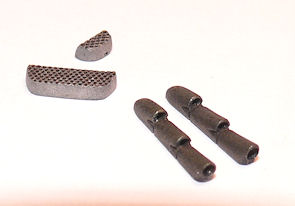
Also completed the radiator matrices and the exhaust stubs (drilled out of course...)

Then the tricky bit - what I can only describe as "reverse painting" the excess was away:

Then a quick brush over with Tamiya powders to highlight some raised detal, followed by matt varnish:

And how they will look fitted (bar a bit of fettling and attaching the hydraulic lines:

Also completed the radiator matrices and the exhaust stubs (drilled out of course...)

Edited by dr_gn on Sunday 27th October 13:53
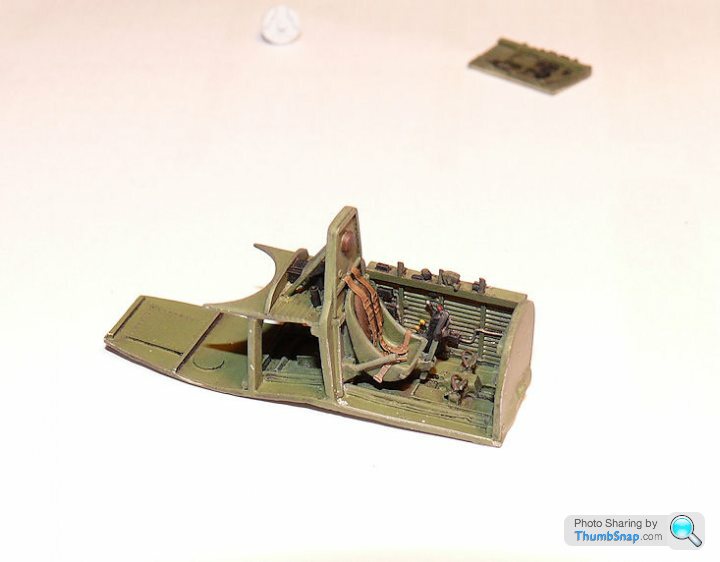
I usually glue the cockpit sides to the fuselage, but in this case it's easier to assemble them to the floor before fitting. Reason is the pronounced overhang of the cockpit sides on this aircraft - you can't see any potential gap between the resin and the plastic. Note the control column is pushed slightly forward...
I've got this thing about having propellers free to spin. On this kit its all a bit DIY, so I modded the propeller boss to take a spigot, and made said spigot out of - I think - an Airfix Mk1a Spitfire propeller plate. Strange how these crappy bits of Airfix kits keep coming in handy.

I scratch built the radiator flap out of old photo-etch so I could pose it open:

And finally, separated the elevators from the tailplane so I can droop them (remember the control column is pushed forward slightly?)...it's the little things that make the difference!


I've got this thing about having propellers free to spin. On this kit its all a bit DIY, so I modded the propeller boss to take a spigot, and made said spigot out of - I think - an Airfix Mk1a Spitfire propeller plate. Strange how these crappy bits of Airfix kits keep coming in handy.

I scratch built the radiator flap out of old photo-etch so I could pose it open:

And finally, separated the elevators from the tailplane so I can droop them (remember the control column is pushed forward slightly?)...it's the little things that make the difference!

Roy Lime said:
dr_gn said:
Eric Mc said:
Did anybody ever successfully bale out of the turret?
I think they did. 
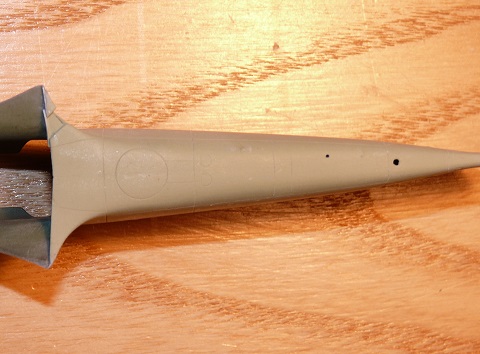
Fuselage halves are together now. Fit was fairly good, some filler required, especially on the underside. Unfortunately this obscured most of the nice panel lining, so I've had to re-scribe it all. The circular feature is the emergency escape/turret maintenance hatch. Strictly speaking it's not really circular, it should be slightly egg-shaped, but this proved too tricky to scribe so I went with a circle. Oh well. Also visible is the recess for the access step in the port wing root. Needs a bit of filling yet. The offset hole is one I drilled for the rear aerial mast. Obviously the aerial couldn't be mounted on top of the fuselage because of the turret, so a ventral aerial system was devised. When on the ground the rear mast retracted into the fuselage, and when airborne it was extended. All these little details were very nicely engineered...at the expense of ever more weight:
In the end I went with the 'rear fairing up' option. With the turret and guns pointing where I intend, I'm pretty sure it's valid from an operating point of view, and if not, the term 'maintenance' covers a whole host of configuration possibilities. Whatever: I like my Defiants with a bit of meat on them, and the retracted fairing option makes the aircraft look a bit thin to my eyes.
The fit of this rear deck part doesn't seem that good, I've begun to fill the join using Milliput. After a preliminary sand and flat I'll spray on a guide coat to see the real story. Pretty sure it's not far off now. Shame, the resin 'rear fairing down' option was a much better fit.

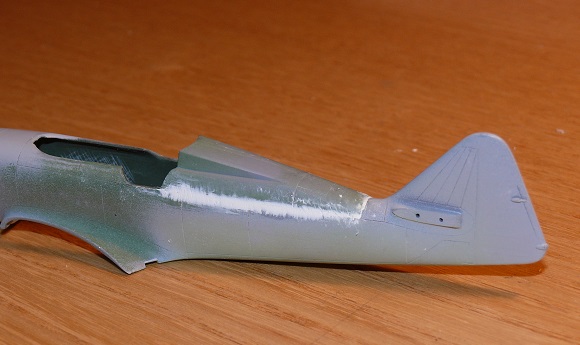
I'm enjoying this build; it's definitely more towards the "model building" rather than "kit assembly" end of the modelling spectrum.

In the end I went with the 'rear fairing up' option. With the turret and guns pointing where I intend, I'm pretty sure it's valid from an operating point of view, and if not, the term 'maintenance' covers a whole host of configuration possibilities. Whatever: I like my Defiants with a bit of meat on them, and the retracted fairing option makes the aircraft look a bit thin to my eyes.
The fit of this rear deck part doesn't seem that good, I've begun to fill the join using Milliput. After a preliminary sand and flat I'll spray on a guide coat to see the real story. Pretty sure it's not far off now. Shame, the resin 'rear fairing down' option was a much better fit.


I'm enjoying this build; it's definitely more towards the "model building" rather than "kit assembly" end of the modelling spectrum.
GJB said:
Apparently the Dornier recently recovered from the Goodwin Sands was brought down by a Defiant.
The only remaining Dornier of this type and we have the Defiant to thank for it. Am I right in thinking there's only one Boulton Paul defiant in existence?
There's an original at Hendon (just been restored):The only remaining Dornier of this type and we have the Defiant to thank for it. Am I right in thinking there's only one Boulton Paul defiant in existence?
http://www.rafmuseum.org.uk/research/collections/b...
and a full size representation (wood and aluminium) built by volunteers from the Boulton Paul Association for the B-P factory museum (which also contained some remains of one of several Defiants lost in the Peak District):
http://www.bbc.co.uk/news/uk-england-birmingham-22...
The factory museum closed earlier this year, so the replica was moved to Cosford.
Flatted the filler now, and given it a guide coat, which revealed a few pores. After a bit more fettling and shaping, and a final guide coat, I've dotted some Mr. Surfacar 1200 (basically a filler primmer that I tend to use purely as a filler) into the flaws. When that's set I'll flat it again and start rescribing the panel lines.


Flatted the first stage of surfacer and made a start on rescribing the missing panel lines:


A few more flaws caused by the rescribing needed more surfacer which will need re-flatting. The long horizontal line along where the filler was, crosses regions of filler, plastic, glue and surfacer, so it's difficult to get a consistent depth of line. It's not far off now though.
I drilled a hole just behind the fairing for the dorsal light which I will make out of a blob of clear sprue. On the second photo you can see the wing root cut-out I filed for the access step. Hopefully tomorrow the fuselage will be ready for fitting the cockpit assembly, wing and tailplanes/elevators. Then canopy and windscreen and...paint.
Radiator ducts now fitted and filled with Surfacer. Also a guide coat of Sky to see how my rescribing went. Answer, not too bad, but some of the trickiest compound curves need doing again, that's why there's some white Milliput is smeared around the wing joint:

Also masked and painted the inside bits of the canopy framing that will be seen when the canopy is open (if you undercoat the outside of the canopy interior green it shows as gloss when viewed internally, not matt). All canopy secions are vacform:

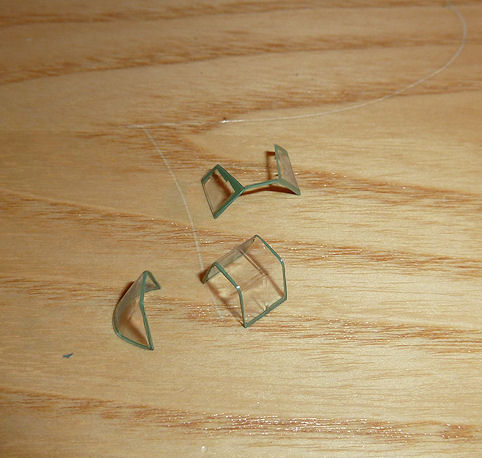

Also masked and painted the inside bits of the canopy framing that will be seen when the canopy is open (if you undercoat the outside of the canopy interior green it shows as gloss when viewed internally, not matt). All canopy secions are vacform:


HoHoHo said:
It's coming together and looking good dr_gn 
Ta - it's slow though.
Very tempting to slap some camo on it and see how it looks, but there is a fair bit of work to do on things like the u/c doors yet. I'd end up doing two or three airbrushing sessions if I painted it now, so I'm going to wait until everything is ready.
Vacform windscreen and rear canopy fitted. Tricky to fit, but I've got a good technique sorted now:
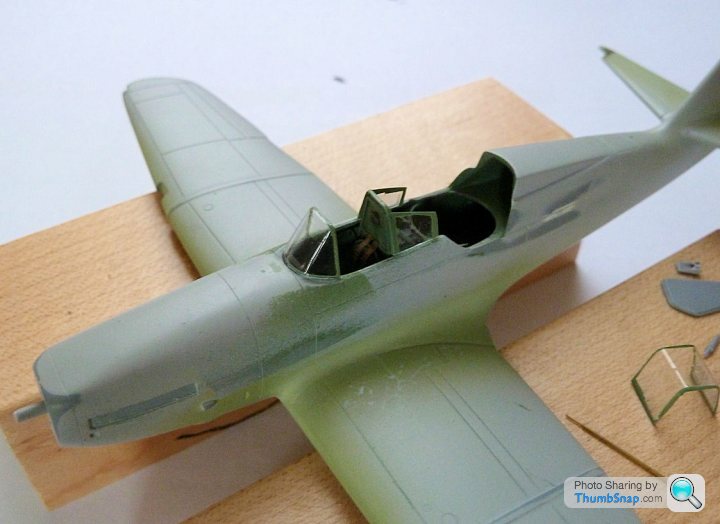
And here it is ready for masking, along with all the other parts that need painting at the same time:
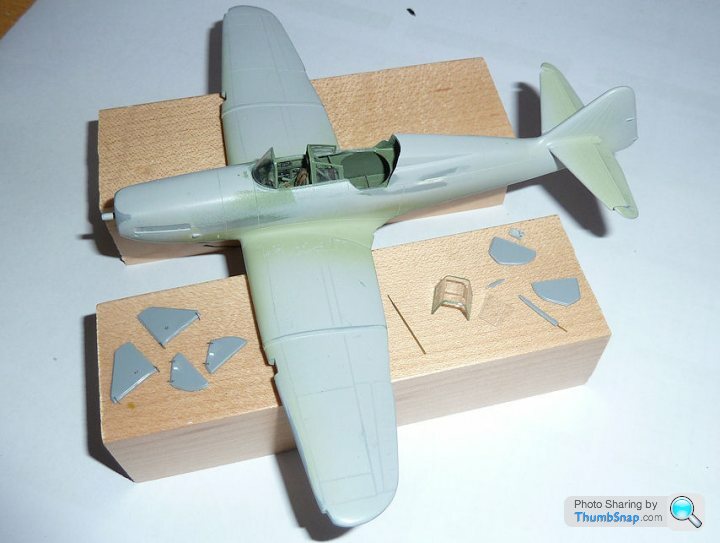
u/c doors are fitten with some stiffener plates (p/e rivets) and hinges (lead wire). Pitot tube is two diameters of brass tube slid into each other to form a step.

And here it is ready for masking, along with all the other parts that need painting at the same time:

u/c doors are fitten with some stiffener plates (p/e rivets) and hinges (lead wire). Pitot tube is two diameters of brass tube slid into each other to form a step.
Gassing Station | Scale Models | Top of Page | What's New | My Stuff


