1:72 Tornado GR4, Dambusters70th Anniversary
Discussion


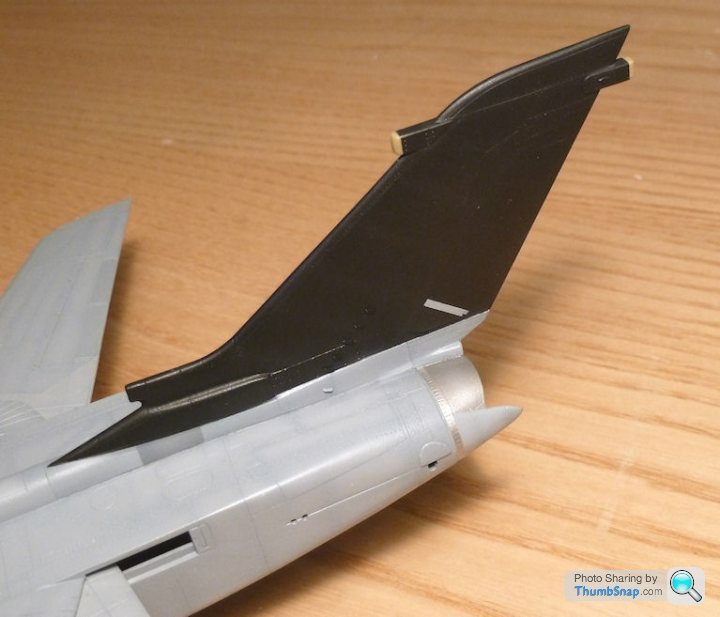
Bit of detail airbrushing tonight. ECM covers on the top of the fin, and the silver/grey covers on the rudder:
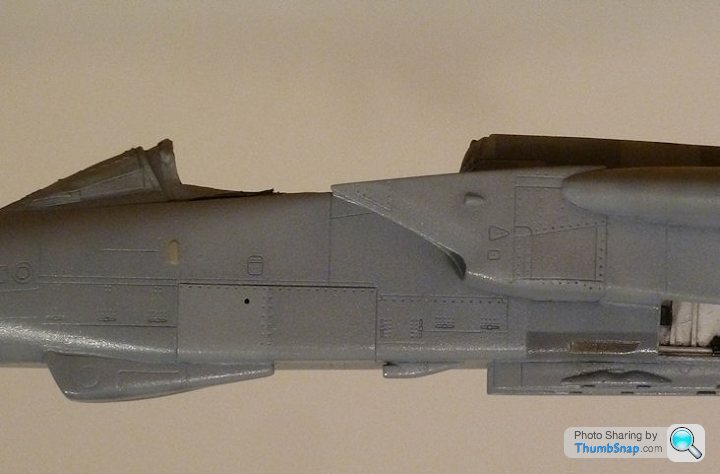
The IFR nozzle appears to have a green anodised portion, so I used Tamiya clear green over Vallejo aluminium. It will look better once it's got a dark wash around it all. Also painted the small rectangular panels under the canopy buff/grey. Not sure what they are:

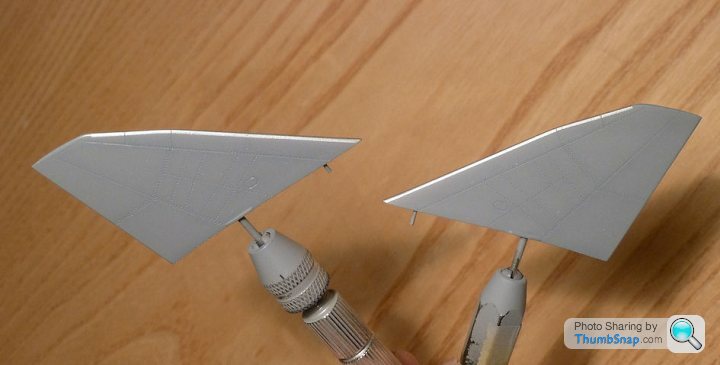
Also leading edge strips on the tailerons:
and finally the missile rail on the inner port wing pylon was painted white grey, and the rails in steel:
The IFR nozzle appears to have a green anodised portion, so I used Tamiya clear green over Vallejo aluminium. It will look better once it's got a dark wash around it all. Also painted the small rectangular panels under the canopy buff/grey. Not sure what they are:
Also leading edge strips on the tailerons:
and finally the missile rail on the inner port wing pylon was painted white grey, and the rails in steel:
Yertis said:
Those pin-chucks – where did you get them? I've been looking online but could only find cheap chinese items. Lost mine years ago and only now realise how useful they are.
I think I got them from Antics in Sheffield. The best is the large one - the chuck reduces to pretty much zero, whereas the other one has intercangable jaws which is pain in the arse dismantling it, then trying to figure out which you need. I invariably get the wrong one.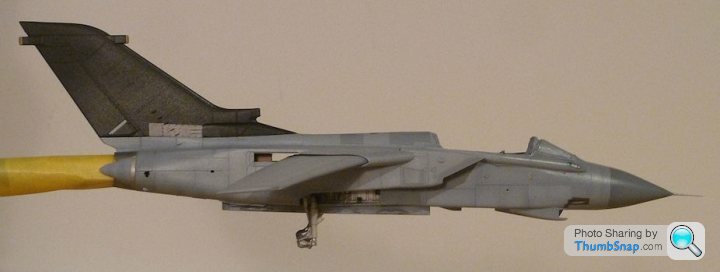

OK, so here's the big screw-up:
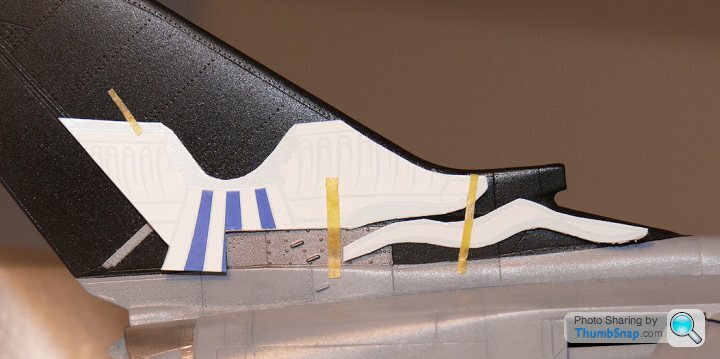
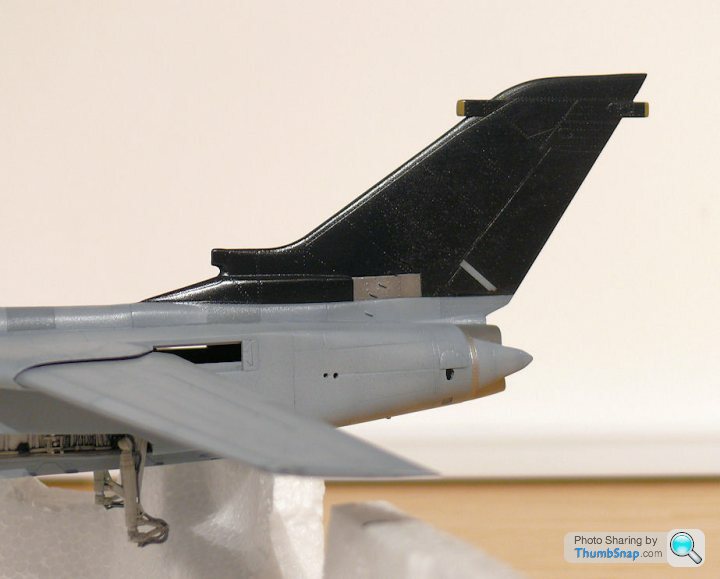
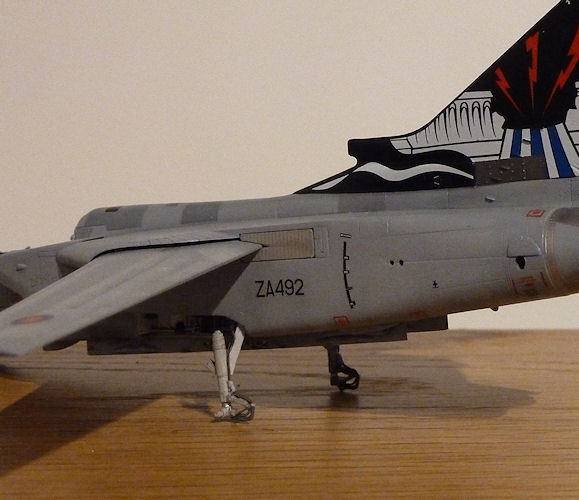
the exhaust duct on the side of the fin isn't long enough on the Revell kit. It should extend to about half the length of the airbrake panel (to where the masking tape is approx), but it's modelled too far forward. I realised this early on, but didn't realise the full consequences. The main decal fits, but I had to extend the steel coloured panel back a bit to compensate for the duct length error, but now I just realised the wave graphic is way too long for the duct, and ends up partly on the silver panel:
Dammit.
The options are:
1) Paint the steel panel black behind where the duct ends, to the vertical masking tape (not ideal)
2) Extend the duct and blend somehow (risky at this stage)
3) Shorten the "wave" decal (this still leaves the 'dam' decal misplaced slightly)
4) Other options I've not thought of yet - Anyone?
Obviously, I wish i'd have noticed this inaccuracy with the kit earlier.
The Airfix fin is similar, but appears to have had an additional block of plastic shoved behind the duct to make the length look right, even though the profile is wrong.
I'm a bit stuck as to what to do next.
Skii said:
Option 2.
Mask the fuselage to protect the paintwork, re-spray the fin. s t happens, you are more than capable of fixing it.
Otherwise it'll tick you off every time you look at the finished model.
Yeah, I guess.Mask the fuselage to protect the paintwork, re-spray the fin. s
t happens, you are more than capable of fixing it.Otherwise it'll tick you off every time you look at the finished model.
I've got a spare fin from another kit. I could cut the duct and add it to the back of the original. Trouble is it is quite a complex shape (not parallel) with tapers and slight undercuts at the base. Oh well.
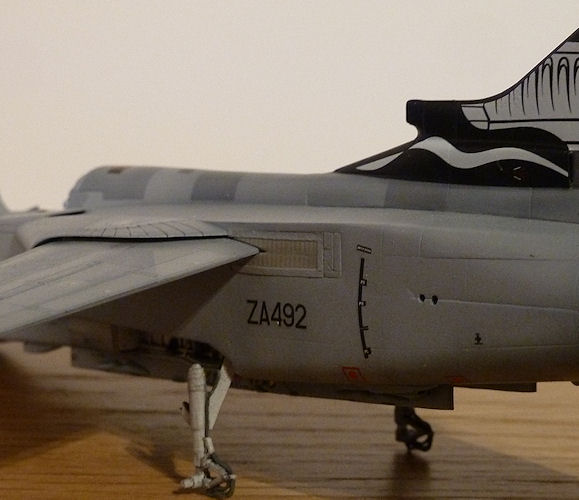
Made up some duct extensions from a scrap fin. The top blend radius and the interface with the original duct need a good seeing to with Milliput - that will sort the minor mismatch with the steel colourd panel that can be seen in the photo. At least the decals are now a perfect fit, and I suppose the model is a bit more accutate than it was. Time will tell if the surgery is obvious when the paint is re-done. I think it will be OK.

I'm going to use the kit canopy, at least for starters. I sprayed one of my spares grey in anticipation of having to cut it up for crach moulding new glazing, but I've chickened out for now. Anyway, I annealed the Aires p/e mirrors and internal framework and used that canopy as a buck for bending into shape ready to fit inside the real one:
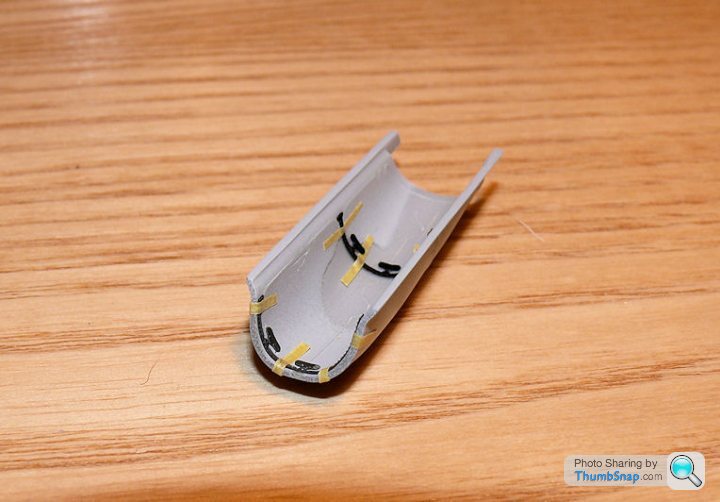
I'm going to use the kit canopy, at least for starters. I sprayed one of my spares grey in anticipation of having to cut it up for crach moulding new glazing, but I've chickened out for now. Anyway, I annealed the Aires p/e mirrors and internal framework and used that canopy as a buck for bending into shape ready to fit inside the real one:
Murph7355 said:
Looking at images of the real thing, I think I'd do Option 1. The duct looks to finish further back to me anyway...
http://s9.photobucket.com/user/TVM-Scarlet/media/2...
https://www.google.co.uk/search?q=dambusters+torna...
http://www.airforcesmonthly.com/central/images/art...
I'd also think this would be the easiest thing to try to see how it looks?
It's a little bit late now...http://s9.photobucket.com/user/TVM-Scarlet/media/2...
https://www.google.co.uk/search?q=dambusters+torna...
http://www.airforcesmonthly.com/central/images/art...
I'd also think this would be the easiest thing to try to see how it looks?
sad61t said:

Hi dr_gn, looking at some of the pics of the aircraft (as above) what I see is that the line of strakes seem to be too far forward on the model. They're correctly located on the third panel in from the back, but the second panel is too long on the model. Extending the exhaust is going to exacerbate the visual effect by placing the strakes forward of central on the brown panel. Could you leave the exhaust and hand-paint the white wavy line?
ETA: Ah, a second "too late now".
Edited by sad61t on Friday 30th January 15:30
Thanks for the comment - it's a good reference image too.
HoHoHo said:
dr_gn said:
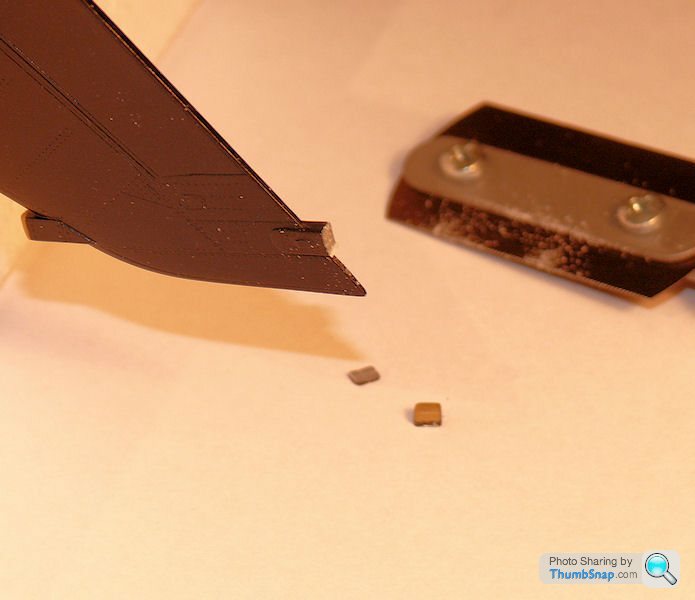
They probably look wrong because theyre not fitted yet. The jet pipes and exhausts are separate assemblies that fit into the two holes at the rear. All there is at the moment are the thrust reverser buckets and two open holes.
That makes sense and my intention was by no means to be rude.Still looks bloody brilliant to me!
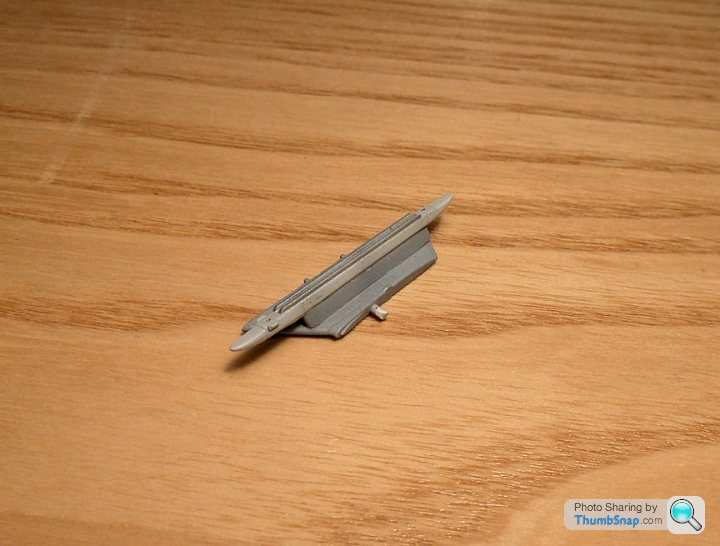
Here's an image of an assembled exhaust (although its 180 degrees off as shown), and the components in pieces. the silver block represents the thrust reverse bucket gears, and the photo etch is supposed to be an afterburner ring:
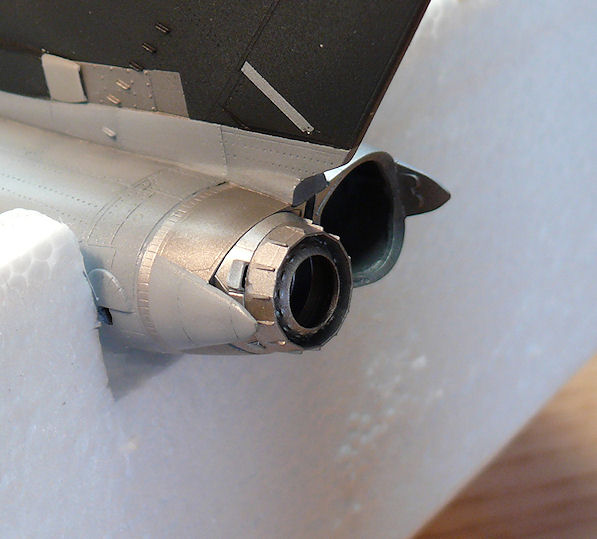
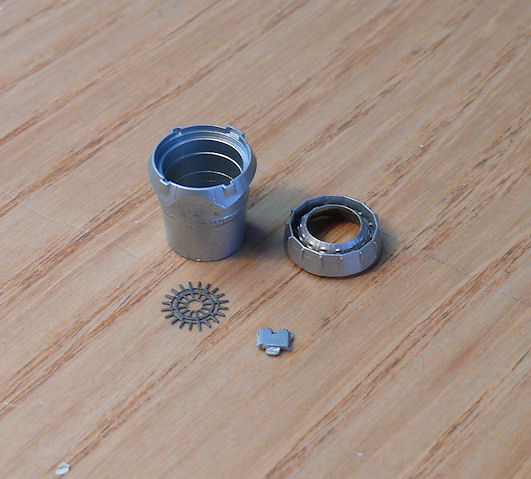
They all need overspraying with Alclad "jet exhaust" to darken them a bit.
perdu said:
The new extension to that exhaust duct looks as if it will do the job nicely when you fair it in doc
Do you remember I said I have the Airfix MRCA kit in a box here?
Looks like I have to mould a canopy for that if I ever build it, I must have used the old one for that GR1 I made a century ago...
Time fuggit dunnit
Back on track, this really is becoming good
Shame the decalcomanies are letting you down
As you know, I've got two of the Airfix GR4's - if you want one of those canopies? I was looking at the Airfix F3 hanging in my son's room yesterday, and it has a completely different canopy from the GR4 version. I'd guess the GR4 transparency (which only represents the top glazed part) would be the same as the MRCA?Do you remember I said I have the Airfix MRCA kit in a box here?
Looks like I have to mould a canopy for that if I ever build it, I must have used the old one for that GR1 I made a century ago...
Time fuggit dunnit
Back on track, this really is becoming good
Shame the decalcomanies are letting you down
15peter20 said:
Doc, fyi - the green bit on the probe is actually tape wound around a frangible collar and is there to try and prevent any of the metal debris / rivets dropping off into the righthand donk in the event that the probe is snapped off. Looks great by the way!
Thanks for that info - is it a transparent green tape?Do you know what the small rectangular bulged panels below the probe are? They are each side of the fuselage in that area. I've painted them buff/light grey colour.
Ta.
15peter20 said:
No, It's solid like electricians tape.
Those panels are aerodynamic additions to try and improve accuracy of the three static ports on each side (just ahead of the panels) through the transonic range
Ah well, I think my clear green is just about opaque enough to pass at this scale.Those panels are aerodynamic additions to try and improve accuracy of the three static ports on each side (just ahead of the panels) through the transonic range
Interesting about the bumps. Presumably then, the short tubes on the extensions (if that's what they are) either side of the cockpit, and on the nose probe are not pitot-static tubes, just pitot tubes? Is it just for instruments, or are they part of the flight control system too?
15peter20 said:
Those short tubes provide AoA data - they physically rotate. The placement of the probe means that the righthand under reads by a unit
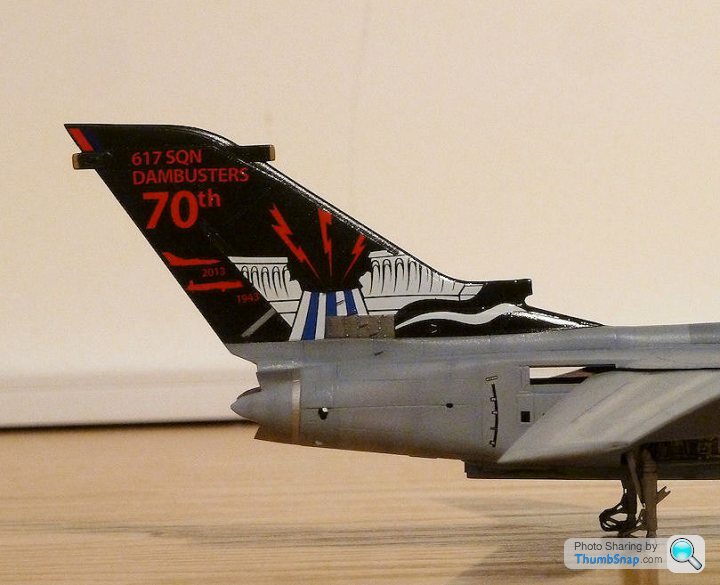
Yes the AoA probes Ive got, but there are also what look like pitot tubes further back mounted away from the fuselage on short protrusions aligned with the airflow.So after much pratting about (including dropping it and snapping the windscreen off!) I've now extended the fin ducts and blended them in:
The decals now fit much better than they did, so little or no trimming should be needed.
The plan is to now weather the metallic panels with a dark wash and some light gunmetal, Klear them and then get the decals on this weekend.
The decals now fit much better than they did, so little or no trimming should be needed.
The plan is to now weather the metallic panels with a dark wash and some light gunmetal, Klear them and then get the decals on this weekend.
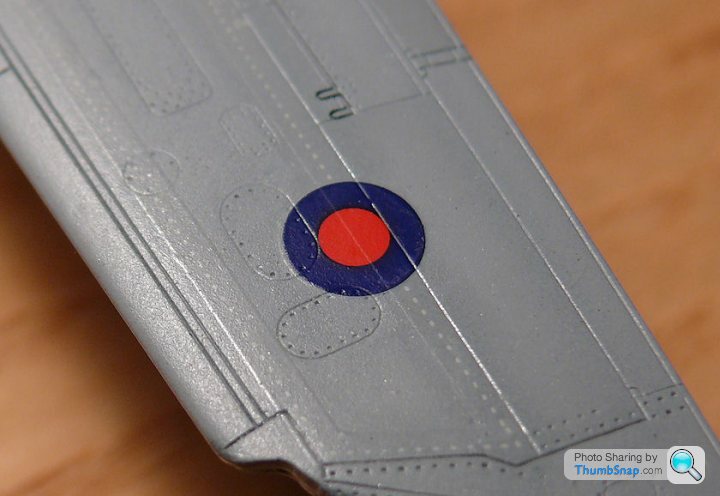
So to give myself some motivation to get it done, I began applying the decals. I started with the wing walk lines, which I thought would be a silvering nightmare. I used my usual method of dissolving all the adhesive of the decals, then capilliaring Klear under them once tacked in place with water, then applying a mixture of Klear and Microsol on and around them. The dashed lines are just the right contrast - ie barely visible. The carrier film will disappear completely when overcoated with a film of Klear and matt coat:
The port tail decals weren't too bad, but I noticed too late that the text at the top was slightly angled down. I've since removed it, and will correct the paint tomorrow before applying a spare decal. I've noticed a few builds of these aircraft where the text is not aligned properly. Now I see why - it's a critical and deceptive alignment to get right:
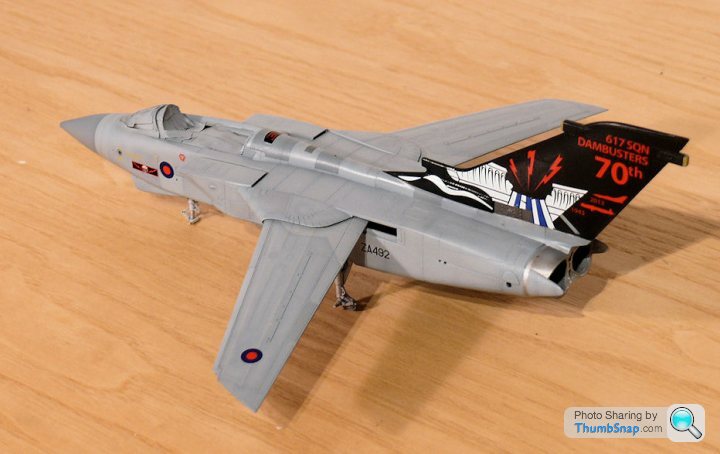
The port tail decals weren't too bad, but I noticed too late that the text at the top was slightly angled down. I've since removed it, and will correct the paint tomorrow before applying a spare decal. I've noticed a few builds of these aircraft where the text is not aligned properly. Now I see why - it's a critical and deceptive alignment to get right:
johnS2000 said:
This build is something else  but I have to ask,being not quite up to date with brass etch/rod /Hannents /masks/ Tamiya tape seatbelts Etc Etc .
I see references to"Klear !! I assume this is old Johnsons Future as opposed to "new formula klear" ?
Is it as good ?
I've got Humbrol Clear but am in 2 minds about it and also have something called Lakeland Floor Polish which does the same thing .
I would be interested in your technique for decal application as I currently am in the process of building the 3rd of 10 1/72 Red Arrow Hawks and ,although pleased enough so far with the first 2 , your Tornado is inspiring especially the roundal in your pic that does look painted on .
Regards John.
Ta very much. The Klear I'm using is the old formula - I've got a few bottles in stock. I've heard conflicting stories about the new formula, and have never used Revell Clear, so I can't comment from experience. I'd assume that Revell Clear is intended to be a direct replacement for Johnsons Klear. but I have to ask,being not quite up to date with brass etch/rod /Hannents /masks/ Tamiya tape seatbelts Etc Etc .I see references to"Klear !! I assume this is old Johnsons Future as opposed to "new formula klear" ?
Is it as good ?
I've got Humbrol Clear but am in 2 minds about it and also have something called Lakeland Floor Polish which does the same thing .
I would be interested in your technique for decal application as I currently am in the process of building the 3rd of 10 1/72 Red Arrow Hawks and ,although pleased enough so far with the first 2 , your Tornado is inspiring especially the roundal in your pic that does look painted on .
Regards John.
With decals with a large carrier film e.g. small stencils or linear graphics like the walkway lines, the problem is if you get dry patches under the film. The only guaranteed way of ensuring no air gets trapped in these pockets is to flood them with a thin clear varnish (ie Klear). It also acts as a glue. What I do is place the decal with plently of water, and keep the area moist so I can position it accurately. Then once in place, gently lift an edge with a scalpel blade and wick klear under the deal with fine brush. You can see capillary action flooding underneath. When this is done, paint over with a layer of Klear (including along edges) and then Microsol, and leave well alone until completely dry. The roundel in the picture was dipped in Klear, the excess wicked off with a brush then placed directly in place. Add Microsol (may need a couple of coats over the course of 5 miuntes or so), then leave to fully dry. That's it.
There's a load of guff written about applying decals to avoid silvering, with all kinds of potions like microset, but fundamentally, if you get air underneath transparent carrier film, it will look terrible. Get rid of the air and it will look fine. some people say never let a decal float of it's backing before applying becasue it gets rid of the glue. With my method I find it easier if they do float off; the decal is easier to position with no adhesive on it (doesn't drag), and if you use the Klear method it acts as a glue and ensures you will never get silvering. You don't even need to have a particularly glossy surface to apply the decals to either with this method, although it does make it easier to fine position the decals.
Im not suggesting it's an easy way of doing it, but it works for me!
Edited by dr_gn on Saturday 7th February 10:33
johnS2000 said:
Thanks Dr ,I'll try that on the next Hawk (started this am ).
Another question if I may ?
Brass tube . I cannot picture how big (or small ) 2mm 3mm Brass tube is as I can only find it mail order . What size would you suggest for 1/72 work . I ask as I've Just finished a Tiger tank and was looking with envious eyes at the brass tube on your Tornado t ailerons when it became apparent that the drive wheels would stay straight (track tension )with some brass tube as an axle !
If I'm a nuisance please say so but I have picked up so much from your builds including putting your new airbrush into my ever growing wish list .
I'm going to state the obvious here...2mm brass tube is 2mm in diameter, 3mm is 3mm in diameter etc. The size depends what you're modelling. Another question if I may ?
Brass tube . I cannot picture how big (or small ) 2mm 3mm Brass tube is as I can only find it mail order . What size would you suggest for 1/72 work . I ask as I've Just finished a Tiger tank and was looking with envious eyes at the brass tube on your Tornado t ailerons when it became apparent that the drive wheels would stay straight (track tension )with some brass tube as an axle !
If I'm a nuisance please say so but I have picked up so much from your builds including putting your new airbrush into my ever growing wish list .
If you buy a micro drill set (Maplins etc) then you can easily get a visual indication of diameters from them.
A lot of the pitot tubes/guns/antennae are fractions (e.g. 0.3mm, 0.5 mm) in diameter at 1:72. If it's to stiffen or replace a structural part, use the largest diameter you can while leaving a decent wall thickness in whatever you're drilling out to take the tube. You can get a bit of extra strength if you use solid rod.
Albion alloys do a range of tubes that telescope into adjacent sizes if required. Many model suppliers stock this stuff:
http://www.albionalloys.co.uk/wp-content/uploads/W...
Little cars do a wide range of metal wire, rod and tube:
http://www.little-cars.co.uk/list2.html
My advice would be to estimate what you want, get some and have a play about with it to get an idea of sizes. If you're building a few models it always comes in handy. Oh yes, and be careful when cutting - offcuts in the eye do hurt I can tell you.
Had a go at the wing seals tonight - another fiddly aspect of the Tornado. The ones in the kit only fit in the swept position, so there's not much choice but to make some to fit the open wings. I started by making some profiled plates out of plastic card:
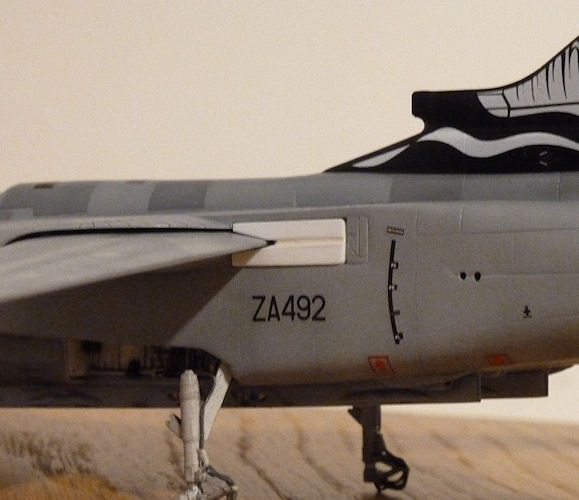
Then printed out some lines on paper to represent the convolutions in the fabric:

Glued them to the plasticard inserts:
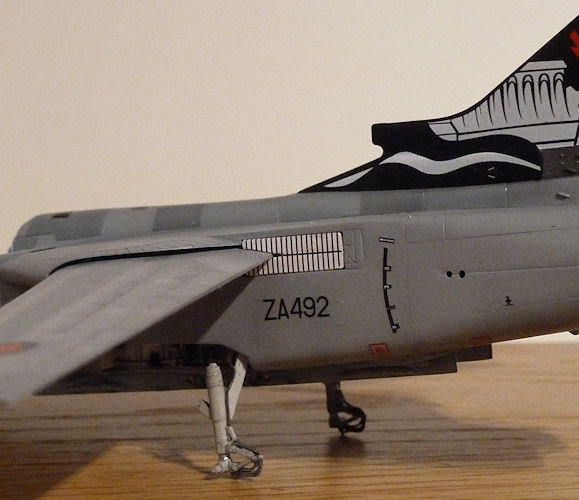
Sprayed so that the lines just show through:
And edge them with painted Tamiya tape to cover the gaps and make them a more realistic depth:
A blob of coloured pva to fill the small gap at the trailing edge and they will look OK, at least better than the originals.
Then printed out some lines on paper to represent the convolutions in the fabric:
Glued them to the plasticard inserts:
Sprayed so that the lines just show through:
And edge them with painted Tamiya tape to cover the gaps and make them a more realistic depth:
A blob of coloured pva to fill the small gap at the trailing edge and they will look OK, at least better than the originals.
Gassing Station | Scale Models | Top of Page | What's New | My Stuff