1:250 Scale Paper Model: Multi-Purpose Vessel "Mellum"
Discussion


dr_gn said:
Small diameter tubes are by far the worst things to do. I've been thinking of an easier solution for a while, but for now I roll the strip around a small drill, and hold it together with a strip of de-tacked Tamiya tape. Remove the drill, then liberally apply pva along the internal join and leave to dry. When you remove the tape, it sometimes peels the outer printed layer off the tube, so you have to stick it back down again.
I'm thinking of making a clear perspex jig - basically a load of different sized holes to stick the tubes in to apply the glue. That would get around the peeling issue, but would probably result in the finished tube being stuck in the jig. A split jig would be ideal I guess.
The number of small items that have Edge-to-edge joins with no tabs have had me thinking.I'm thinking of making a clear perspex jig - basically a load of different sized holes to stick the tubes in to apply the glue. That would get around the peeling issue, but would probably result in the finished tube being stuck in the jig. A split jig would be ideal I guess.
I've tried a couple of test parts today where I've wet some tissue with PVA and pressed this inside the join with a needle (nothing else quite small enough)
Seems to have held quite well and almost blends to invisibility
The end is in sight - I think. You never know with this one.
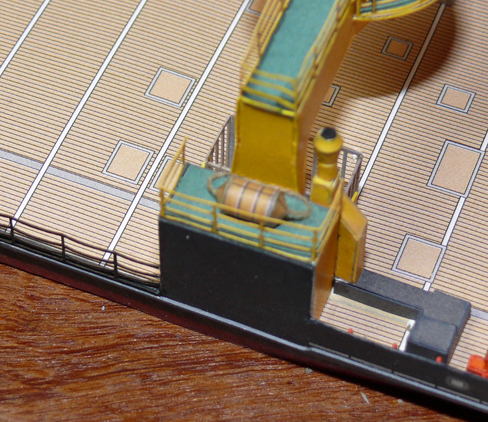
The lifeboats (which I completed last March!) and derriks fitted, they still need cables attaching, and a few other bits adding to the jibs. Also fitted the life raft pods and launch rails:


Foredeck pretty much done, mast stil needs lamps attaching:

Final two ladders completed and fitted:

The RIB and a few bits of furniture added to the rear deck and bridge roof:


The lifeboats (which I completed last March!) and derriks fitted, they still need cables attaching, and a few other bits adding to the jibs. Also fitted the life raft pods and launch rails:
Foredeck pretty much done, mast stil needs lamps attaching:
Final two ladders completed and fitted:
The RIB and a few bits of furniture added to the rear deck and bridge roof:
Thanks for the encouragment  Final push to get it done...
Not the best picture, but foremast completed with navigation lights, and a small lamp near the base.

Just needs an antenna adding to the top, and the rigging.
Forgot to post this yesterday:

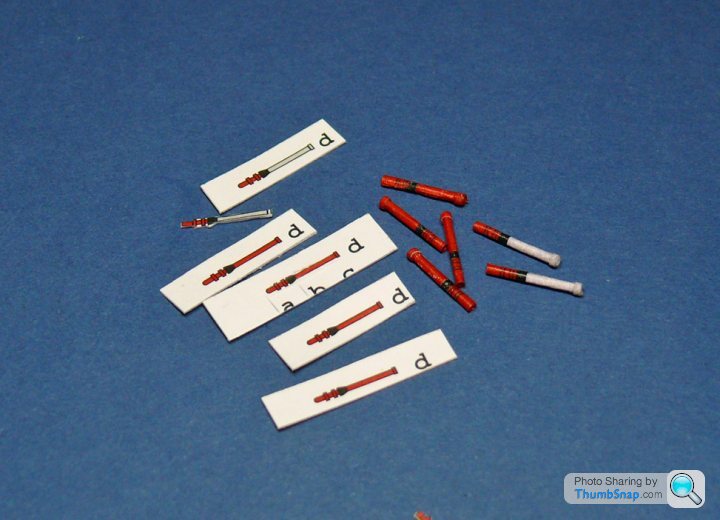
One disadvantage of laser-cut parts is that there is no printing on them. I tried to duplicate it on these lifeboat derricks before fitting.
Final push to get it done...Not the best picture, but foremast completed with navigation lights, and a small lamp near the base.
Just needs an antenna adding to the top, and the rigging.
Forgot to post this yesterday:
One disadvantage of laser-cut parts is that there is no printing on them. I tried to duplicate it on these lifeboat derricks before fitting.


RacingPete said:
dr_gn said:
It's 290 mm long.
Ta.
You sure you are not just really far away from it? Looks from the photos and detail on it that it should be 1 metre long. Ta.


perdu said:
Now I know it can go to Huddy
It looks bl**dy good dr_gn, I would love to see it at the show, no doubt taking accolades there too
Finishing it with lots of time to go too
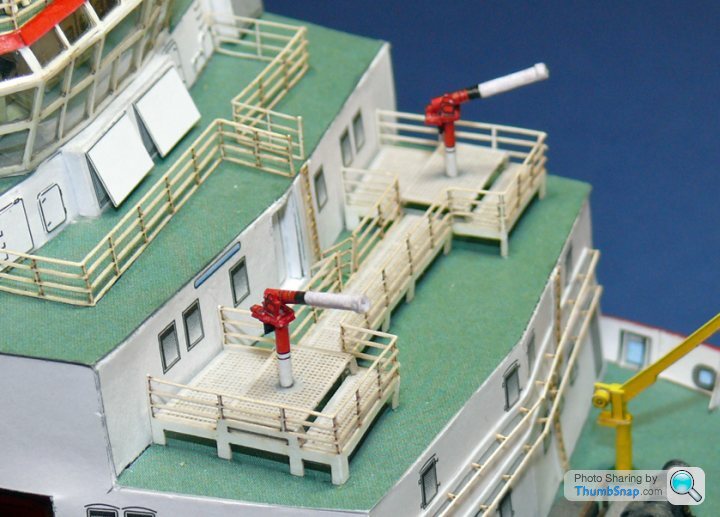
I love how you turned flat 'thingies' into water cannon, excellent
Thanks! there's a lot still to do though believe it or not.It looks bl**dy good dr_gn, I would love to see it at the show, no doubt taking accolades there too
Finishing it with lots of time to go too
I love how you turned flat 'thingies' into water cannon, excellent


The rear deck has taken quite a beating over the months, with various things being dropped on it, and it being a bit wrinkled from the PVA. Problem was, the three containers that sit on it looked terrible with all their top faces being out of parallel with the deck and each other. I've tried to solve this by attaching them to a flat steel rule (which also acted as a spacing guide), and blobbing pva under each one:

Then upturning them and lining them up on deck, with a pair of wood strips as guides to get them more or less central longitudinally, and a cocktail stick as a sight to get them parallel to the deck:

Once set, it seemed to work pretty well. Of course the gaps at the bases are not uniform, but it's not half as noticable as the top surfaces being off:

Then upturning them and lining them up on deck, with a pair of wood strips as guides to get them more or less central longitudinally, and a cocktail stick as a sight to get them parallel to the deck:
Once set, it seemed to work pretty well. Of course the gaps at the bases are not uniform, but it's not half as noticable as the top surfaces being off:
Gassing Station | Scale Models | Top of Page | What's New | My Stuff