Help me build an aluminium racing toboggan....
Discussion


Bill said:
I'm genuinely very immpressed with that How much does it weigh so far?
I've no idea! How much does it weigh so far?Once the paint is properly dry, I'll see if I can get some scales to measure it. At a guess, around 8-10Kg. Light enough to glide, heavy enough to be strong.
The new model should be a bit lighter, there's a little less material going in to it.
rhinochopig said:
maser_spyder said:
rhinochopig said:
Very very impressive. One tip though, remove the paint from the runners and use some soap and a buffing wheel to get a mirror finish. It'll run much better.
Totally off-topic. Are you still involved with ride-on? If you are, what's last realistic date to order for delivery for Christmas.
Ah, the runners is another thing entirely! Totally off-topic. Are you still involved with ride-on? If you are, what's last realistic date to order for delivery for Christmas.
Getting some ultra high density PE strips made, the same material as ski bases, so it should be very fast....
Ride-ons, get your order in ASAP! Plenty of stock, but it leaves time for error if you order early. Our last shipping date is technically the 21st, but I'm hoping there won't be too many this late!
PH discount available if you put it through me, just drop me a pm.
 excellent. You will of course be waxing them then as well
Re the suspension, you should be able to pick up some cheap springs with a lower spring rate which will make the ride more compliant - they're cheap shocks so they shouldn't cost you much. Check out scrapped children's bikes for a source. If they're oil damped you may also want to fill with a heavier weight oil as they're typically a bit under-damped as standard.
I'll PM you re the jeep when we've finished arguing about proper toys or educational ones.

The springs on there are 750lb, too much. Ideally I need around 300 - 400lb instead (I guess). I'll take a look around to see what I can get hold of cheaply.
Jeeps are very popular this year!
rhinochopig said:
maser_spyder said:
rhinochopig said:
maser_spyder said:
rhinochopig said:
Very very impressive. One tip though, remove the paint from the runners and use some soap and a buffing wheel to get a mirror finish. It'll run much better.
Totally off-topic. Are you still involved with ride-on? If you are, what's last realistic date to order for delivery for Christmas.
Ah, the runners is another thing entirely! Totally off-topic. Are you still involved with ride-on? If you are, what's last realistic date to order for delivery for Christmas.
Getting some ultra high density PE strips made, the same material as ski bases, so it should be very fast....
Ride-ons, get your order in ASAP! Plenty of stock, but it leaves time for error if you order early. Our last shipping date is technically the 21st, but I'm hoping there won't be too many this late!
PH discount available if you put it through me, just drop me a pm.
excellent. You will of course be waxing them then as well Re the suspension, you should be able to pick up some cheap springs with a lower spring rate which will make the ride more compliant - they're cheap shocks so they shouldn't cost you much. Check out scrapped children's bikes for a source. If they're oil damped you may also want to fill with a heavier weight oil as they're typically a bit under-damped as standard.
I'll PM you re the jeep when we've finished arguing about proper toys or educational ones.
The springs on there are 750lb, too much. Ideally I need around 300 - 400lb instead (I guess). I'll take a look around to see what I can get hold of cheaply.
Jeeps are very popular this year!
You'll need to measure the ID and the un-compressed length and specify the spring rate you want and tell them you need them "closed&ground"
It's not that urgent, the springs can be changed pretty easily with the units installed, so I could always chop and change to suit the course!
RacingPete said:
Dear maser_spyder_santa,
I have seen your new designs on the Internet and would like to make offer a proposal for purchasing one of your highly custom M_SMk3 sleds. Please, by return, inform me of the said purchase price of vehicle...

Well, you're not bouncing on my knee I'm afraid. I have seen your new designs on the Internet and would like to make offer a proposal for purchasing one of your highly custom M_SMk3 sleds. Please, by return, inform me of the said purchase price of vehicle...
Seriously though, what would you charge for a home made toboggan?
rhinochopig said:
maser_spyder said:
RacingPete said:
Dear maser_spyder_santa,
I have seen your new designs on the Internet and would like to make offer a proposal for purchasing one of your highly custom M_SMk3 sleds. Please, by return, inform me of the said purchase price of vehicle...
Well, you're not bouncing on my knee I'm afraid. I have seen your new designs on the Internet and would like to make offer a proposal for purchasing one of your highly custom M_SMk3 sleds. Please, by return, inform me of the said purchase price of vehicle...
Seriously though, what would you charge for a home made toboggan?
 Harumph.
£10? Works out at about 1/6 of the cost of the materials I've ruined.
911motorsport said:
Wow!
That's not just any toboggan.........
That's an MS (Maser Spyder)super lightweight, hand crafted, fully sprung Aluminium Toboggan
Ah, funny you mention that, I need a 'brand name'!That's not just any toboggan.........
That's an MS (Maser Spyder)super lightweight, hand crafted, fully sprung Aluminium Toboggan
Any suggestions? Name/logo would be great, I'll run it off the vinyl printer and stick it on the runners!
eliot said:
I notice that many of your welds have black smoke around them. Presumably you have either touched the welding rod onto the tungsten or touched the tungsten onto the job. If this happens, you should stop and clean up the weld area and the regrind the tungsten and start again.
If you simply carry on, you will notice all that black crap still floats around your weld pool and doesn't go away.
Also are you using the correct tungstens for ally - typically its red for steel and white for ally.
Hey, yes, it's where I've mistakenly touched the weld with the tip.If you simply carry on, you will notice all that black crap still floats around your weld pool and doesn't go away.
Also are you using the correct tungstens for ally - typically its red for steel and white for ally.
It's the hardest part about aluminium welding actually, too far away and you get a 'blowtorch' effect with far too much heat, just right (1-3mm away) and you get perfect control over the weld puddle, but a tiny shake and the tip can touch the weld, which gives you the black stuff (and frightens the bejesus out of you).
Practice and practice would help, but it's good enough for what I'm doing with it.
You should have seen the earlier ones....

Streetrod said:
maser_spyder said:
BoRED S2upid said:
That looks fantastic, what an effort. Gutted if you got to a practice slope and a kid on a plastic sledge flies past you, still yours will look ace. I hope you will be kitted out top to toe in Oakley designer snowboarding gear.

Spyder ski gear!
I might even get a race suit.

What you will need is one of these as worn by all the top F1 pit crews and also available as a snowboard helmet.
White for the Stormtropper look:
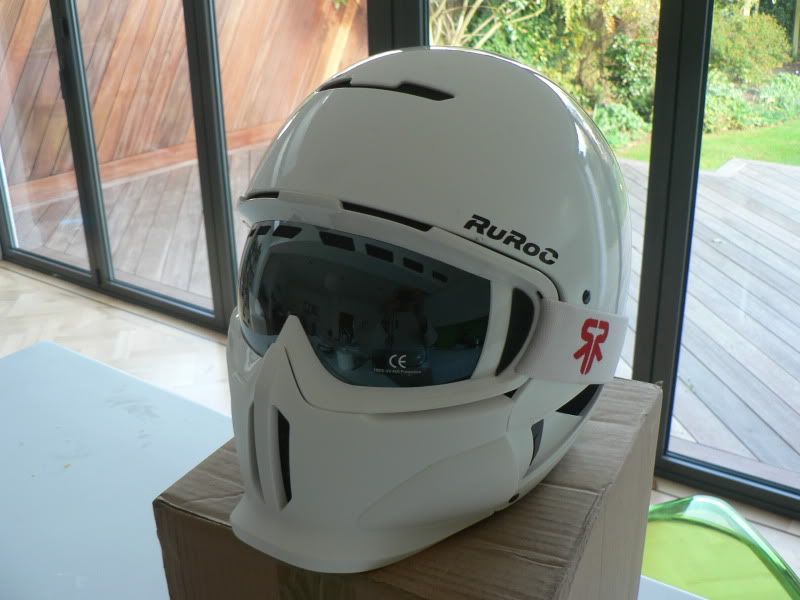

That is my arm by the way and not my neck as some people thought
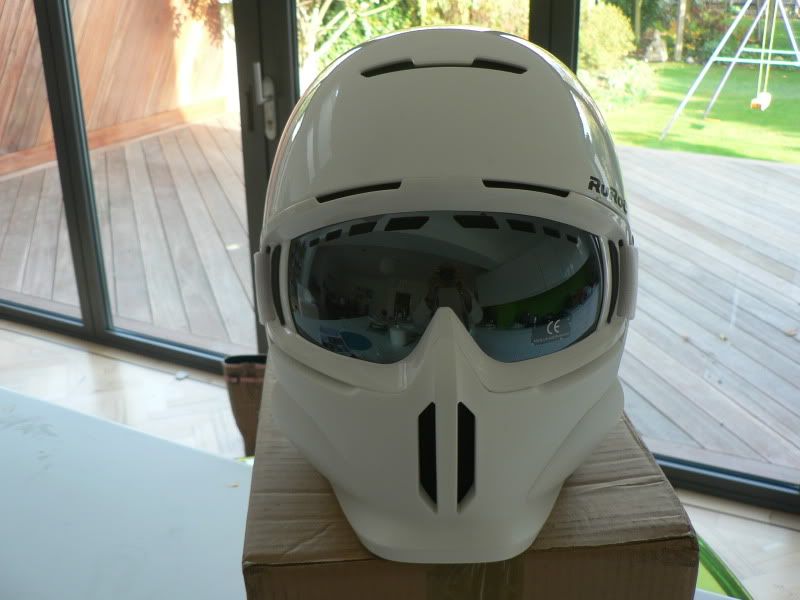
Or Black if you fancy that whole Darth Vader vibe:


Great project by the way, keep it up...
Edited by Streetrod on Monday 22 November 19:36
I bought a new jacket recently (well, I thought it was recently, but it was actually seven years ago), but have bought another new one for this season.
Last year, I complained to my mate that my trousers weren't waterproof any more. Perfectly warm enough, just not waterproof, which is a problem tobogganing because you get covered in snow!
Not a problem skiing, because I seldom fall over.

Anyway, he asked me how long I had owned them, I thought about it..... Well, it was either sixteen or seventeen years, I'm not 100% sure. Time for some new ones!
So this year, I'm the Spyder kid.
Not sure about your helmets though, maybe a bit overkill! I've never actually worn a helmet for skiing (or tobogganing), it's my 28th skiing year this coming season, and I've never once needed one. The only damage I ever did was in the board park in Tignes, where I over-shot a landing a fractured three of my vertebrae (and a helmet would have made bugger all difference).
I am thinking about it for this year though, I might have been pushing my luck all these years!
filski666 said:
bit late (probably) but this website will create you a paper template for cutting round tube so you can join it together properly (if you don't have a dedicated notching machine) and will give you less gap to fill with weld.
http://www.metalgeek.com/static/cope.pcgi
example from its use:
http://www.metalgeek.com/archives/2004/04/06/00002...
What a brilliant site, cheers.http://www.metalgeek.com/static/cope.pcgi
example from its use:
http://www.metalgeek.com/archives/2004/04/06/00002...
Edited by filski666 on Tuesday 23 November 11:32
I did mine by measurement and then grinding the centre out a little where it was a pipe-to-pipe connection, and there were also 'double' angles on the pipes too, which didn't help!
Still, I did have a couple where I had to fill out a little to make the weld good. Interesting to know how it would be done 'professionally'.
Thanks!
Well put a red nose on me and call me Rudolph, I've got my timings exactly right!
Just about to finish the seat on the first one, and not far off finishing the second, work starts (and should end) on the third/fourth this weekend, and we're due for a rather serious 'cold snap'!
http://www.bbc.co.uk/news/uk-11827592
I wasn't planning on getting any use out of this until Austria next year, but I might be up at Cleeve Hill this weekend!

Right, here goes. It's a bit pic-heavy, sorry!
So, first tobogoff is waiting on me sanding and flatting the seat, ready to make a mould for the carbon fibre seat. Tedious work, nowhere near as much fun as bending metal and welding (the manly stuff). So I'll do that later.
So, Mk2 had the 'hinge' welded to the front, similar to the Mk1. My welding's got a bit better. Still not great, but tidier than the first one.


Matey's pipe bender - £37 on ebay!

And what it's capable of. Wish I'd had it before!

I decided to make the seat in two parts, just in case one went wrong! So the first sides done....

And the last bends....

and finally welded together at the back. Innit prettier than the first?

Nicely symmetrical, our pipe bending skills took some honing, but not unsuccessful.

And welded in to place on the hinge.

The rear suspension units were a bugger. Had to get the angles just right on the rear support (which is solid rod rather than tube - so very strong), so that the spring unit doesn't bend in either direction when it goes up and down. I'm sure there's an equation for this, but I did trial and error with the springs removed, to work out where it 'sat' best. Brackets cut and ready for welding on.

Me welding the brackets on!

One down, one to go.

And finally, pretty much finished. It even stands up on the back end!

OK, the springs are far too hard, but I'll be taking some advice off here, and getting some less stiff ones to fit (easy).
I've got some Kevlar to make a seat for the Mk2, but it's so boring making the plug/mould/sanding/etc. I might cheat and just make it from fabric! Will see where the enthusiasm takes me....
More to follow!
So, first tobogoff is waiting on me sanding and flatting the seat, ready to make a mould for the carbon fibre seat. Tedious work, nowhere near as much fun as bending metal and welding (the manly stuff). So I'll do that later.
So, Mk2 had the 'hinge' welded to the front, similar to the Mk1. My welding's got a bit better. Still not great, but tidier than the first one.
Matey's pipe bender - £37 on ebay!
And what it's capable of. Wish I'd had it before!
I decided to make the seat in two parts, just in case one went wrong! So the first sides done....
And the last bends....
and finally welded together at the back. Innit prettier than the first?
Nicely symmetrical, our pipe bending skills took some honing, but not unsuccessful.
And welded in to place on the hinge.
The rear suspension units were a bugger. Had to get the angles just right on the rear support (which is solid rod rather than tube - so very strong), so that the spring unit doesn't bend in either direction when it goes up and down. I'm sure there's an equation for this, but I did trial and error with the springs removed, to work out where it 'sat' best. Brackets cut and ready for welding on.
Me welding the brackets on!
One down, one to go.
And finally, pretty much finished. It even stands up on the back end!
OK, the springs are far too hard, but I'll be taking some advice off here, and getting some less stiff ones to fit (easy).
I've got some Kevlar to make a seat for the Mk2, but it's so boring making the plug/mould/sanding/etc. I might cheat and just make it from fabric! Will see where the enthusiasm takes me....
More to follow!
And the Tobogoff Mk3.
This was made out of one piece of specially purchased aluminium (for the runners), and the rest is offcuts and leftovers.
Started by bending two more pairs of runners (there's a Mk4 in the offing!), one pair came out absolutely perfect, one pair came out slightly less than perfect (but not bad).
The Mk3 was only ever going to be a 'scrap' made one, so we used the less-perfect runners (they're still pretty good though).

And trimmed them down to make them the same length and curve.
Fitted to the jig, ready to weld. Note the new, metal angle pieces (the wooden ones served their purpose well, but were pretty knackered), these are slightly less angled at 20 degrees.

We used the leftover bits from the runners to make uprights (1 x 2.5m length of aluminium, 2 x 1.05m runners, leaves just enough!), and welded in to place.

My welding on flat-to-flat bits isn't actually that bad. I noticed that most of my welding so far has been awkward curves and angles, this was much easier!


Bending the side seat rails, precision engineering.

A bit of 'hinge' leftover made the two crossmembers. Very strong (actually too strong, and a little too heavy, but it'll do for a fat b d to use, and it's all I had left over), and also the side seat rails resting in place, ready for welding.

Welded up, pretty much finished, just needs a seat to be made!

Mk3 in primer, along with Mk1 and Mk2 alongside.


I've bought some 'Cordura' to make a basic seat, and will pop out in a minute to pick up the Mk3 from the workshop, and bring it home to start sewing (I'm multi-talented, you see!). I'll hopefully get the bulk of the seat made up tonight and ready to fit once I've got the final coat of paint on.
This was made out of one piece of specially purchased aluminium (for the runners), and the rest is offcuts and leftovers.
Started by bending two more pairs of runners (there's a Mk4 in the offing!), one pair came out absolutely perfect, one pair came out slightly less than perfect (but not bad).
The Mk3 was only ever going to be a 'scrap' made one, so we used the less-perfect runners (they're still pretty good though).
And trimmed them down to make them the same length and curve.
Fitted to the jig, ready to weld. Note the new, metal angle pieces (the wooden ones served their purpose well, but were pretty knackered), these are slightly less angled at 20 degrees.
We used the leftover bits from the runners to make uprights (1 x 2.5m length of aluminium, 2 x 1.05m runners, leaves just enough!), and welded in to place.
My welding on flat-to-flat bits isn't actually that bad. I noticed that most of my welding so far has been awkward curves and angles, this was much easier!
Bending the side seat rails, precision engineering.
A bit of 'hinge' leftover made the two crossmembers. Very strong (actually too strong, and a little too heavy, but it'll do for a fat b
d to use, and it's all I had left over), and also the side seat rails resting in place, ready for welding.Welded up, pretty much finished, just needs a seat to be made!
Mk3 in primer, along with Mk1 and Mk2 alongside.
I've bought some 'Cordura' to make a basic seat, and will pop out in a minute to pick up the Mk3 from the workshop, and bring it home to start sewing (I'm multi-talented, you see!). I'll hopefully get the bulk of the seat made up tonight and ready to fit once I've got the final coat of paint on.
eliot said:
maser_spyder said:
Me welding the brackets on!
Welding standing up and bent over like that is making your life hard as its difficult to keep the torch steady. I weld sitting down on a high stool with my forearm/wrists on the bench. I have a piece of steel on the bench (although some ally would be fine too) - which stops me burning the bench and also grounds my work piece. I'm limited with what I can set up in there, since the lease expires at the end of the month, and I have to move out. It's not worth setting up any more than it already is. I might set up my new workshop a little more suitably, there's more space for starters, and I'll have a whole new (proper) workbench, etc. The fully earthed bench would certainly be a bonus!
Anyway, tonight has been another new adventure. If you thought welding aluminium was difficult, I've had to get my head around something completely new.....
A sewing machine.
My God, I thought the welder was difficult, but it's simple compared to a sewing machine! Anyway, not entirely unsuccessful (just untidy), and I now have some seat straps, and a basic cordura seat for Mk3.
Just off to put another coat of paint on it before the sun goes down.
Mk4 and carbon fibre seat still to come.
Sandy0728 said:
Hi,
Impressive work especially from a beginner welder!!
I'm now hunting for scrap material at work to make myself one!
One point I've noticed regarding the twin shock version;
You say there's not much movement from the shocks, that's because you have two shocks linked to the same solid platform at both ends, yet the shocks are out of alignment so are trying to work in different directions.
Does that make sense?
Basically, they are angled so will be binding & trying to rip the mounts off the frame work.
You need to relocate the mounts so the shocks are aligned vertically and parallel to each other.
If you remove the springs and cycle the movement with just the shocks you should find that the full stroke is restricted.
Sorry to be the bearer of bad news.
I'll try to find an example or diagram to explain.
Sandy.
Hi Sandy,Impressive work especially from a beginner welder!!
I'm now hunting for scrap material at work to make myself one!
One point I've noticed regarding the twin shock version;
You say there's not much movement from the shocks, that's because you have two shocks linked to the same solid platform at both ends, yet the shocks are out of alignment so are trying to work in different directions.
Does that make sense?
Basically, they are angled so will be binding & trying to rip the mounts off the frame work.
You need to relocate the mounts so the shocks are aligned vertically and parallel to each other.
If you remove the springs and cycle the movement with just the shocks you should find that the full stroke is restricted.
Sorry to be the bearer of bad news.
I'll try to find an example or diagram to explain.
Sandy.
I thought that, but it doesn't. There was quite a lot of trial and error fitting those mounts, I removed the springs from the shocks to get full travel with no resistance, only that way could I get the angles right. Mounted straight, the unit would tilt over on the bracket, but angled slightly at the top, it only swings on the bottom mounting. The two securing bolts are not parallel, hence it works.
It was a right faff though, so I appreciate what you're saying!
911motorsport said:
Fantastic effort 
Sandy is right about the shocks though
I've tried to illustrate below what he's referring to.
As you compress the shocks the points at which they are attached at the top need to become further apart.

HTH
Yes, but that assumes the angles of the bolts at the top and bottom are the same. I totally agree, and this was the hardest part of the design, to get the shocks to move without bending on the mounting brackets.Sandy is right about the shocks though
I've tried to illustrate below what he's referring to.
As you compress the shocks the points at which they are attached at the top need to become further apart.
HTH
But you're assuming above that the top and bottom angles of the shock bolts are the same, when they're not. The angles at the top are slightly different, to allow for the travel up and down, whilst keeping the bracket angle (almost) completely straight.
For example, take your model above, and move the top shock bracket pointing 25 degrees outwards, then re-assess the travel, you'll see what I mean...
I know what you mean from the diagram, I'd worked this out before I started work, but believe me, you can change the angle of the top mounting bolt, which allows for up/down travel with only a swinging forward movement on the bottom mount, no tilting over.
The only travel in the shock is to tilt over forwards (on the same angle as the bolt mount), but because of the angle on the top mount, it doesn't create any stress points.
There's actually little travel in the shocks on this one, so it's not going to make a huge difference anyway, but it does work.
It was a bugger to get the angles right, but it does work....
You buggers will never believe me though, I'm going to have to get some video footage to prove it I can see!
filski666 said:
this thread just gets better every time I come back to it!
Where did you get all the aluminium from?
aluminiumwarehouse.co.ukWhere did you get all the aluminium from?
That's a free plug for them!
They are very cheap, but they are slow.
If they got a new warehouse system in place, they'd be an excellent internet company. Unfortunately, people don't want to wait over a week to receive goods that are supposed to be 'in stock', we're children of the instant gratification McDonalds generation, we expect things to arrive instantly....
But excellent friendly service, I fully recommend them. Just get your orders in much earlier than you need to receive the metal!
filski666 said:
maser_spyder said:
filski666 said:
this thread just gets better every time I come back to it!
Where did you get all the aluminium from?
aluminiumwarehouse.co.ukWhere did you get all the aluminium from?
Can't wait for Mk4 - are you planning on selling these - or are you going to turn up at the slopes and do a compare and contrast of the different designs??
And it, well, snowballed.

Gassing Station | Homes, Gardens and DIY | Top of Page | What's New | My Stuff