Our Little Durham Restoration Project...
Discussion


The other side of the roof has more steel to support the weight of a dormer, we have the steel ready to go in, so the next job was to get the padstones in.
Laser levelled the formers and concrete poured and reinforced with threaded bar:

10mm steel plate on top with bolts set into the concrete:

Then repeat front and back of th ehouse:


Laser levelled the formers and concrete poured and reinforced with threaded bar:
10mm steel plate on top with bolts set into the concrete:
Then repeat front and back of th ehouse:
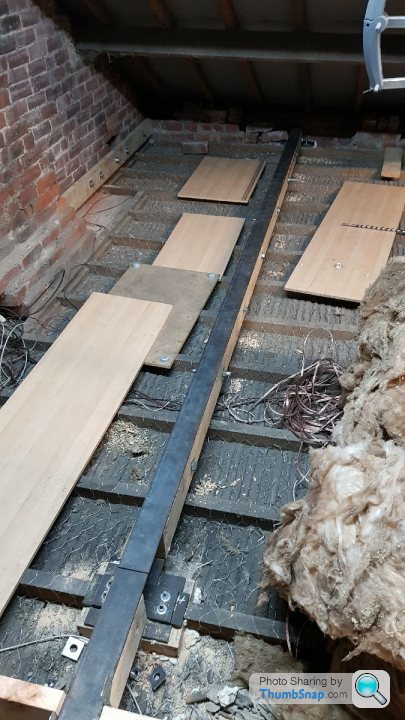
Steels moved onto the pads, bolted down and wood-lined ready for joists:

Joists in:


Double triimers around the chimney and insulation goes in now just to get it out of the way as much as anything:

Now there's roughly half the floor done from a structural point of view, so a much better place to work:

Then I moved on to the next quarter, steel bolted down and prepared for joists:
Joists going in:

Plates going in to the rear - this wasn't done with the front end because out of shot has been a huge pile of insulation that was stripped out and I was trying to minimise the number of times I had to move it as it's filthy!

Done and more joists in:

Trimmed around the chimney:
Joists in:
Double triimers around the chimney and insulation goes in now just to get it out of the way as much as anything:
Now there's roughly half the floor done from a structural point of view, so a much better place to work:
Then I moved on to the next quarter, steel bolted down and prepared for joists:
Joists going in:
Plates going in to the rear - this wasn't done with the front end because out of shot has been a huge pile of insulation that was stripped out and I was trying to minimise the number of times I had to move it as it's filthy!
Done and more joists in:
Trimmed around the chimney:
With it being difficult building the floor without a, er, floor to stand on, I've worked round from the loft access getting something to work off, next I work back from the far corner fitting noggins and the old insulation over the new to get finished off.
Roped my Dad in for a few days to help with this, then bashed a lot of nails:

First quarter all done:

And insulated:

Onto the next quarter, same again, then boards on top, so everything can be moved and we can work back to the loft hatch:

Looks a lot like this with one side done!

Roped my Dad in for a few days to help with this, then bashed a lot of nails:
First quarter all done:
And insulated:
Onto the next quarter, same again, then boards on top, so everything can be moved and we can work back to the loft hatch:
Looks a lot like this with one side done!


In the back ground there's lots of measuring and planning going on so I can get stuff ordered and delivered long before I need it. Getting stairs in is a bit complicated because the top of the landing is determined by the need to have consistent step heights all the way up, the bottom of the bottom of the landing is restricted by the height of a window.
Loads of measuring and a healthy bit of Excel and we had a working design, so the stairs were ordered and eventually they sat blocking my hallway for a couple of months!
Loads of measuring and a healthy bit of Excel and we had a working design, so the stairs were ordered and eventually they sat blocking my hallway for a couple of months!
The last quarter of the floor hadn't really been touched due to the pile of old insulation that was there and the need to get the stair design and location reasonably fixed before working that out. So next up was bashing through that with the chickenwire, insulation, joists, noggins, more insulation, and boards:


Timber in around what will be the stairs opening:

Noggins and insulation:

Timber in around what will be the stairs opening:
Noggins and insulation:
Next up I moved various wires around, and made sure everything was below the King Truss Chord, then onto opening up the stairs. I couldn't work out if the new ridge beam woudl fit up the opening the steel went up - 6m vs 4.8m - so I made a mess:

Then I had a bit of hassle getting my beam as the local branch asked head-office to glue my Glulam together, then head office said they could only deliver on an arctic and did I have a fork-lift? Yeah right! Eventually they decided to deliver to the local branch would would then deliver it on a sensibly proportioned truck.
For some reason I wasn't told when it was coming, so it was lucky that I was in and lucky that the driver was happy to help lift the bugger off and in:
At this point I hadn't really worked out how to get the 90kg 6m lump 6m up into the loft. After walking past it all week I started to worry that it wouldn't fit. My plan was to lift it in a U shaped path in the front door, up the stairs and back on itself into the loft. But if that didn't fly I've no idea how it would go in!
At the weekend I decided to see what I could do to get a better idea of whether it fits. So I dragged it up the stairs into the bathroom:

Then I lifted it onto the bannister:

This wasn't really conclusive, so I then thought it would be sensible to get a strap on it and see what it looked like poking into the loft. At this point I was very definitely still getting some help next week:


Then I started to get carried away. That end just sits nicely on the window sill doesn't it?

At this point I measured the length in the loft and realised the centre of gravity was about half a metre outside the loft. So I lifted it under the bathroom door reveal and it tried to tip itself into the loft:

Which meant I could let go of the beam and go back to the loft for one last yoink:

We're in!
Quick check for length and back to whatever it was I was supposed to be doing:

At the weekend I decided to see what I could do to get a better idea of whether it fits. So I dragged it up the stairs into the bathroom:
Then I lifted it onto the bannister:
This wasn't really conclusive, so I then thought it would be sensible to get a strap on it and see what it looked like poking into the loft. At this point I was very definitely still getting some help next week:
Then I started to get carried away. That end just sits nicely on the window sill doesn't it?
At this point I measured the length in the loft and realised the centre of gravity was about half a metre outside the loft. So I lifted it under the bathroom door reveal and it tried to tip itself into the loft:
Which meant I could let go of the beam and go back to the loft for one last yoink:
We're in!
Quick check for length and back to whatever it was I was supposed to be doing:


Wasn't really sure how to get the beam on top, so I tried to lift it up to see how far it would go and what I'd need to do with King Truss to finish the job:


It's vaguely in the right place, but can't go much more until the Truss is hacked at.
We're now heading into the height of the summer, which was slowing things down a fair bit!

It hit 45 degrees the following week!
It's vaguely in the right place, but can't go much more until the Truss is hacked at.
We're now heading into the height of the summer, which was slowing things down a fair bit!
It hit 45 degrees the following week!
So next up it was time for decisive action, a load of scaffold went in:


Then I fannied about for a couple of days, terrified the roof would collapse! My Dad was available to help for a day, asked what the plan was and didn't bat an eye lid when I relayed my daft plan to hack and hope. So I figured that was good enough and got the saws out......
Then I fannied about for a couple of days, terrified the roof would collapse! My Dad was available to help for a day, asked what the plan was and didn't bat an eye lid when I relayed my daft plan to hack and hope. So I figured that was good enough and got the saws out......


 |https://thumbsnap.com/T0nYK7Ly[/url]


Part of the King Truss was re-purposed to help support the front lower Pulrin, which is being retained as it's in roughly the right place:

All the old woodwork (roof went on in 1906) is Pitch Pine, it's incredible stuff!
The new post was reinforced with 145 x 45 C24 each side to finish off, though I've not got a pic of that for some reason!
Then the new roof looked like this:

All the old woodwork (roof went on in 1906) is Pitch Pine, it's incredible stuff!
The new post was reinforced with 145 x 45 C24 each side to finish off, though I've not got a pic of that for some reason!
Then the new roof looked like this:
I had a roofer booked in to fit the Velux windows, so I had a week off, my Dad came over and we supervised that while we got on with the stairs.
As I said earlier, there were complications with the landing as top and bottom heights were defined by other considerations. The result was a maximum thickness of 100mm! So first up was some more 10mm steel pate and some flitch beams:


Wall plates on:

Bannister removed:

Flitch Beam trial-fitted:

As I said earlier, there were complications with the landing as top and bottom heights were defined by other considerations. The result was a maximum thickness of 100mm! So first up was some more 10mm steel pate and some flitch beams:
Wall plates on:
Bannister removed:
Flitch Beam trial-fitted:
Then we built the stair kit for the kite winders at the bottom:

And lifted the stairs up on to the landing. The wrong way.
Then we carried them back out into the street, turned them around and carried them back up. These are 32mm pine, 900mm wide and weigh a tonne, so I was roundly berated over this.

Hacked the carpet:

Then we realised that a 900 stair doesn't fit past a newell post fitted to a 900 stair. Many swearwords were deployed at this point.
So the floor was opened up, the newell unbolted, and it's face lost an inch via my bandsaw:

And lifted the stairs up on to the landing. The wrong way.
Then we carried them back out into the street, turned them around and carried them back up. These are 32mm pine, 900mm wide and weigh a tonne, so I was roundly berated over this.
Hacked the carpet:
Then we realised that a 900 stair doesn't fit past a newell post fitted to a 900 stair. Many swearwords were deployed at this point.
So the floor was opened up, the newell unbolted, and it's face lost an inch via my bandsaw:
- *** IF YOU WORK IN HEALTH AND SAFETY, PLEASE LOOK AWAY NOW *****

Propped:

Bottom box on:

Dropped onto the flitch beam, bolted to the wall and all screwed up:
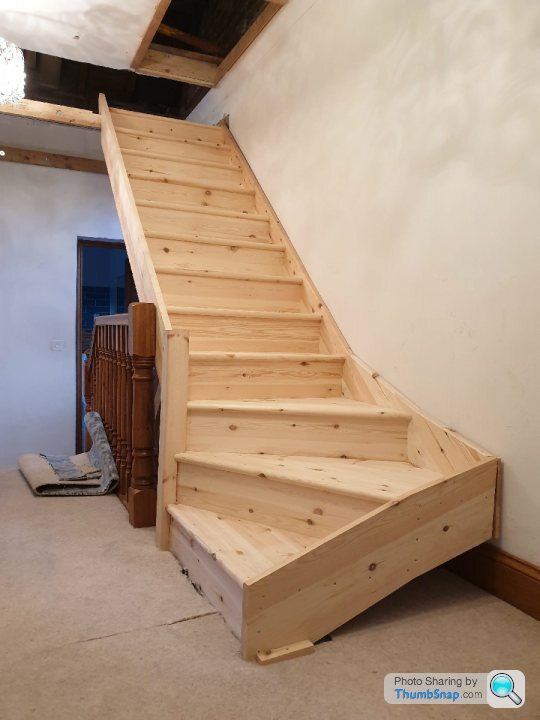
Newell post back in. not worked out exactly how to detail all this, that's a job for another time:

The rest of the flitch Beams went in, with a few noggins to finish off the landing:

Floorboards on top:

Plasterboard so it's vaguely neat:

A few issues along the way, but really pleased with how these have gone in and really glad I can think about blocking up the loft hatch now!
 Rather you than me but makes for brilliant reading. Looking forward to the next instalment.
Gassing Station | Homes, Gardens and DIY | Top of Page | What's New | My Stuff