My garage - tips, ideas and recommendations please
Discussion


52classic said:
Nice thread and a job well done Robert.
Just a thought that you're missing some useful space in the garage loft. I hadn't spotted the pitched roof until the most recent photographs.
I scrounged some 6x2's which I bolted to the existing 4x then used some loft decking to make a mezzanine. An extra light on the upper level means I don't loose too much stuff and painting the underneath white gives some useful reflected light to the bench area.
My thinking is that with some decent storage bins I can switch the workshop between configurations for woodworking, mechanical work, body repairing, valeting etc. However, in practice I have never managed to be quite so tidy!
Thanks Just a thought that you're missing some useful space in the garage loft. I hadn't spotted the pitched roof until the most recent photographs.
I scrounged some 6x2's which I bolted to the existing 4x then used some loft decking to make a mezzanine. An extra light on the upper level means I don't loose too much stuff and painting the underneath white gives some useful reflected light to the bench area.
My thinking is that with some decent storage bins I can switch the workshop between configurations for woodworking, mechanical work, body repairing, valeting etc. However, in practice I have never managed to be quite so tidy!

Yup, there is a lot of space up there which I intend to use. Thing is, I want it accessible and don't want to get the ladder our everytime I need something...
I like your idea about painting the underside though, and switching configurations *goes to hatch plan*
matts4 said:
Great job, looks a load better/more practical.
Thanks! It is definately more practical having tools to hand rather than hunting through a huge box!I recently purchased garage floor tiles for £9 a sq mtr from this ebay listing 110558916830. They were used in the A1 gp series so are 2nd hand. They have holes in them so I laid them over weed control fabric to stop the dust coming up through. Might not be right for every one but at £9 a meter they are much better than a cold dusty floor.
JFReturns said:
52classic said:
Nice thread and a job well done Robert.
Just a thought that you're missing some useful space in the garage loft. I hadn't spotted the pitched roof until the most recent photographs.
I scrounged some 6x2's which I bolted to the existing 4x then used some loft decking to make a mezzanine. An extra light on the upper level means I don't loose too much stuff and painting the underneath white gives some useful reflected light to the bench area.
My thinking is that with some decent storage bins I can switch the workshop between configurations for woodworking, mechanical work, body repairing, valeting etc. However, in practice I have never managed to be quite so tidy!
Thanks Just a thought that you're missing some useful space in the garage loft. I hadn't spotted the pitched roof until the most recent photographs.
I scrounged some 6x2's which I bolted to the existing 4x then used some loft decking to make a mezzanine. An extra light on the upper level means I don't loose too much stuff and painting the underneath white gives some useful reflected light to the bench area.
My thinking is that with some decent storage bins I can switch the workshop between configurations for woodworking, mechanical work, body repairing, valeting etc. However, in practice I have never managed to be quite so tidy!
Yup, there is a lot of space up there which I intend to use. Thing is, I want it accessible and don't want to get the ladder our everytime I need something...
I like your idea about painting the underside though, and switching configurations *goes to hatch plan*
matts4 said:
Great job, looks a load better/more practical.
Thanks! It is definately more practical having tools to hand rather than hunting through a huge box!Breeze blocks are a breeze (excuse the pun). I've had to drill into reinforced concrete (a la Marley style garages) with an SDS drill to put up racking and shelves, and melted/killed numerous pricey drill bits in the process.
It's a matter of using the space wisely. I've put up racking with bins, shelves and even a bike rack. I've also constructed a narrow workbench at the back.
My best advice however is to pad everything that could be clipped. I've glued underlay to the walls to take the brunt of knocking the door on the wall, scraping the mirror and bumping the bench. I've also put markers on the walls at mirror height so I know when I am in.
Look on this forum:
http://www.garagejournal.com/forum/forumdisplay.ph...
That should give you a lot of inspiration! (and jealousy at the Americans with loads of space!).
http://www.garagejournal.com/forum/forumdisplay.ph...
That should give you a lot of inspiration! (and jealousy at the Americans with loads of space!).
Matt.. said:
Look on this forum:
http://www.garagejournal.com/forum/forumdisplay.ph...
That should give you a lot of inspiration! (and jealousy at the Americans with loads of space!).
Yeah, its a good forum - I think someone mentioned it a couple of pages back.http://www.garagejournal.com/forum/forumdisplay.ph...
That should give you a lot of inspiration! (and jealousy at the Americans with loads of space!).
Theres a few Brits on there!
But how do you keep it that way????????
Did my last one (and the one before and the one before that), but after a few years of grinding, cutting, sanding, woodworking, welding, engine building, gearbox removal, spraying etc etc they all look like the inside of an old scrapyard with sawdust, spiders and undescribable gunge.
Then you try to build an engine and look for a clean space......
Chap round the corner seems to have partitioned his into two halves, (tandem garage), front half has the project car back half has the racking and presumably the clean area.
Trouble is the scooby and new wifes car sit outside all day.
Now once I get my new place livable, I need to get a car transporter, a mini, wifes car, a project car, a ton of spares tools stuff kept just in case, 3 sets of wheels, compressor, engine crane, trailer, 4 bikes, jacks, woodworking gear, tumble drier, dog food, gardening gear, into the tandem double garage....that leaves my car outside on the drive and the spare volvo scrapper, and another collection of stuff kept in case left in scotland....
Skyedriver said:
But how do you keep it that way????????
Well, I have taken measures to help me. For example, sealing brick work with paint/PVA, organising tools so they all have a place and most importantly... banning SWMBO from putting anything in there. Will it work...? Time will tell.BliarOut said:
Paint the end wall too, you'll get lots of light bouncing back 
Nah, I like the original brick work JFReturns said:
Skyedriver said:
But how do you keep it that way????????
Well, I have taken measures to help me. For example, sealing brick work with paint/PVA, organising tools so they all have a place and most importantly... banning SWMBO from putting anything in there. Will it work...? Time will tell.BliarOut said:
Paint the end wall too, you'll get lots of light bouncing back
Nah, I like the original brick work I built a Caterham once, what a revelation to use all new parts instead of cleaning up 20 years of gunge and rust from every part.
Skyedriver said:
JFReturns said:
Skyedriver said:
But how do you keep it that way????????
Well, I have taken measures to help me. For example, sealing brick work with paint/PVA, organising tools so they all have a place and most importantly... banning SWMBO from putting anything in there. Will it work...? Time will tell.BliarOut said:
Paint the end wall too, you'll get lots of light bouncing back
Nah, I like the original brick work Yes but the dust from paint spraying and grinding out rust just seems to get everywhere including into the pores of the concrete blocks, shelves etc
When you've got a 4 year long project, that cannot be moved the crud that builds up underneath and around, even with regular sweeping is horifying. Plus when you've most of the rest of the car lying around in every corner waiting to be cleaned, repaired or slung, ......
Must find a better project, as I said building a Caterham with all new parts was a great revelation compared to trying to resurect an old mini or BMW
JFReturns said:
Update time, floor now painted using hammerite floor paint. Few more prints up and I'm starting to fill the garage with my stuff. I wanted a chest of drawers from the spare room, painted black but SWMBO wouldn't let me.. women.. pfft
Anyway, pics:
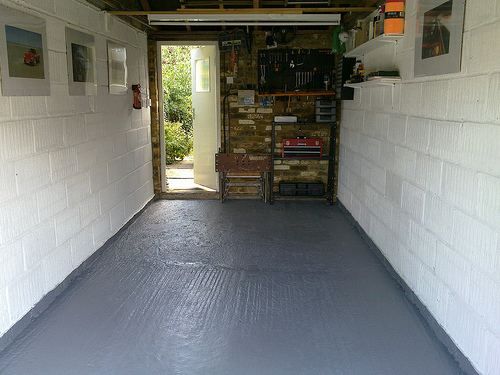
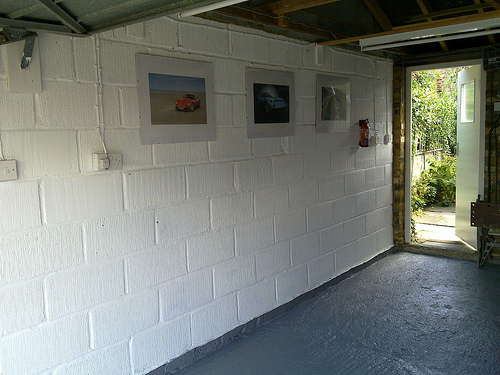
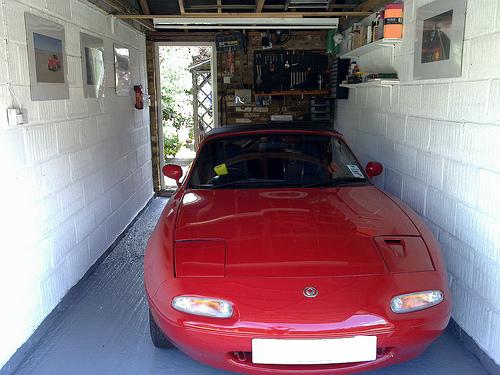
Plans now are to figure out clever ways of storing the rest of my tools and bits. I'm thinking along the lines of pulleys, runners and... well, cool stuff.
So far, I'm happy with it. I know it's tiny, and yeah, I admit a tinge of envy over the other garages posted in this thread, but hey, its mine.
Comments and suggestions welcome.
Very nice Anyway, pics:
Plans now are to figure out clever ways of storing the rest of my tools and bits. I'm thinking along the lines of pulleys, runners and... well, cool stuff.
So far, I'm happy with it. I know it's tiny, and yeah, I admit a tinge of envy over the other garages posted in this thread, but hey, its mine.
Comments and suggestions welcome.
What did you do in the way of prepping the floor for the paint?
I've a two year old garage and even although I've swept it numerous times and ever powerwashed it the dust keeps on coming back?
I fancy going red on my floor
Thanks raf
I love the idea of a red floor, but thought it would look naff with my current car.
To prep the floor I thoroughly sweeped with a stiff bristled broom, wire brushed, filled then sanded any crumbly bits then finally vacuumed the whole lot. The finish is tough and perfect apart from one small area that is flaking as I didn't spot the crumbly concrete.
JFReturns said:
Thanks raf
I love the idea of a red floor, but thought it would look naff with my current car.
To prep the floor I thoroughly sweeped with a stiff bristled broom, wire brushed, filled then sanded any crumbly bits then finally vacuumed the whole lot. The finish is tough and perfect apart from one small area that is flaking as I didn't spot the crumbly concrete.
How many coats of the paint did you need? I've read various different ways of using floor paint.I love the idea of a red floor, but thought it would look naff with my current car.
To prep the floor I thoroughly sweeped with a stiff bristled broom, wire brushed, filled then sanded any crumbly bits then finally vacuumed the whole lot. The finish is tough and perfect apart from one small area that is flaking as I didn't spot the crumbly concrete.
raf_gti said:
JFReturns said:
Thanks raf
I love the idea of a red floor, but thought it would look naff with my current car.
To prep the floor I thoroughly sweeped with a stiff bristled broom, wire brushed, filled then sanded any crumbly bits then finally vacuumed the whole lot. The finish is tough and perfect apart from one small area that is flaking as I didn't spot the crumbly concrete.
How many coats of the paint did you need? I've read various different ways of using floor paint.I love the idea of a red floor, but thought it would look naff with my current car.
To prep the floor I thoroughly sweeped with a stiff bristled broom, wire brushed, filled then sanded any crumbly bits then finally vacuumed the whole lot. The finish is tough and perfect apart from one small area that is flaking as I didn't spot the crumbly concrete.
Edited by JFReturns on Saturday 7th August 20:28
raf_gti said:
JFReturns said:
Thanks raf
I love the idea of a red floor, but thought it would look naff with my current car.
To prep the floor I thoroughly sweeped with a stiff bristled broom, wire brushed, filled then sanded any crumbly bits then finally vacuumed the whole lot. The finish is tough and perfect apart from one small area that is flaking as I didn't spot the crumbly concrete.
How many coats of the paint did you need? I've read various different ways of using floor paint.I love the idea of a red floor, but thought it would look naff with my current car.
To prep the floor I thoroughly sweeped with a stiff bristled broom, wire brushed, filled then sanded any crumbly bits then finally vacuumed the whole lot. The finish is tough and perfect apart from one small area that is flaking as I didn't spot the crumbly concrete.
Targarama said:
raf_gti said:
JFReturns said:
Thanks raf
I love the idea of a red floor, but thought it would look naff with my current car.
To prep the floor I thoroughly sweeped with a stiff bristled broom, wire brushed, filled then sanded any crumbly bits then finally vacuumed the whole lot. The finish is tough and perfect apart from one small area that is flaking as I didn't spot the crumbly concrete.
How many coats of the paint did you need? I've read various different ways of using floor paint.I love the idea of a red floor, but thought it would look naff with my current car.
To prep the floor I thoroughly sweeped with a stiff bristled broom, wire brushed, filled then sanded any crumbly bits then finally vacuumed the whole lot. The finish is tough and perfect apart from one small area that is flaking as I didn't spot the crumbly concrete.
odyssey2200 said:
Targarama said:
raf_gti said:
JFReturns said:
Thanks raf
I love the idea of a red floor, but thought it would look naff with my current car.
To prep the floor I thoroughly sweeped with a stiff bristled broom, wire brushed, filled then sanded any crumbly bits then finally vacuumed the whole lot. The finish is tough and perfect apart from one small area that is flaking as I didn't spot the crumbly concrete.
How many coats of the paint did you need? I've read various different ways of using floor paint.I love the idea of a red floor, but thought it would look naff with my current car.
To prep the floor I thoroughly sweeped with a stiff bristled broom, wire brushed, filled then sanded any crumbly bits then finally vacuumed the whole lot. The finish is tough and perfect apart from one small area that is flaking as I didn't spot the crumbly concrete.
Gassing Station | Homes, Gardens and DIY | Top of Page | What's New | My Stuff