New restoration project - what have I done!
Discussion


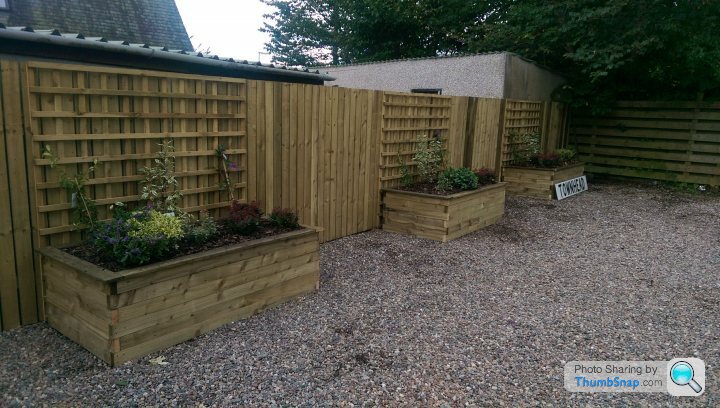
Also, I forgot to add that I've added some new fencing and planters to some of the boundary lines. It's been on my list for ages, and I was getting royally nagged about it as it wasn't looking the best.... so ended up building about 25m of fencing, along with 6 x wooden planters, 3 @ 6ft x 3ft and 3 @ 4ft x 2ft. Does make a much nicer view!
Dr_Rick said:
Come on, you were about to tell us the size of the small nuclear reactor you were needing to replace the vintage boilers. We've established north of 60 rads, but as someone about to replace two dinky boilers in my house, I'd like to hear the comedy size of what you're after.
Lol, I forgot about this! Sorry! Running total was 64 radiators, with a combined output of 142kw plus 2 x 300litre hot water tanks, guessing about 8kw per tank, so approx 158kw required.......ish....
IanA2 said:
I've been following this thread and admiring all the work done.
I have had absolutely no reason to make any criticism of any aspect of the project.
Until today.
There is no fruit pudding advertised in the breakfast menu.
That's it, I'm off, it's too much....

It does say we cater for any special dietary requirements, no matter how revolting they may be! I have had absolutely no reason to make any criticism of any aspect of the project.
Until today.
There is no fruit pudding advertised in the breakfast menu.
That's it, I'm off, it's too much....
monthefish said:
Was there any point in the project where the scale of it gave you the heebie-jeebies?
Weirdly, I wou,d say that the most heebie jeebies (great word btw!) are always after I've done the work. It's when I sit here, and look back at the pictures, or someone comes round who hasn't seen the house and asks to see the album, it's then that I tend to think holy crap! Were we really stupid enough to take this place on? When we were doing it, it was just a huge project, and was easy to compartmentalise the work and just look at it section by section. Stupidly you tend to get complacent with living in the place until someone visits and can't believe the scale, that's when it hits home! Had a good couple of days this week. First job was to try to get the water supplies connected now that I'd got all the radiators (bar one!) installed, and the bathrooms final fixed. This section if the house was done dry, as the 5 pipes put in months ago were capped under the floor ready to extend the ground floor system into the new section. This made it a lot easier to work on everything, but a bit butt clenching when it came to connecting! I had pressure tested the pipe work in order to check as much as possible that there were no obvious leaks, but nothing beats a live water test!
Fortunately when we first fitted the central heating we fitted lever isolation valves for every floor, and as our system is an open vented system, it's was technically easy to connect into.... but I'm not a plumber!
Anyway, apart from one slight internal water feature where some idiot (me) had accidentally left a radiator valve open on the ends with the missing radiator..... oops.... fortunately in a bathroom tiled floor to ceiling, so no damage done. Although after a moment of paniic down to my wife's struggle to plug a spurting water pipe whilst using a walkie talkie simultaneously (hey, I was always told women can multi task!) it all went well, and without a hitch! The walkie talkies are invaluable, as where the vales to the heating are situation there's no way you could shout to the other person, absolutely no chance of being able to hear each other, so they are the only way to keep in contact! I've even used the, to find her sometimes!
So, long and short, is the new section now has hot and cold water, and working central heating. Everything all leak tested and checked, so it's was a go ahead to get the floors down and finished! I've set a date of 22nd December to try to have everything finished as this is the date my kids finish school for Christmas, and to be honest I quite fancy spending some family time, and not having to work every day!
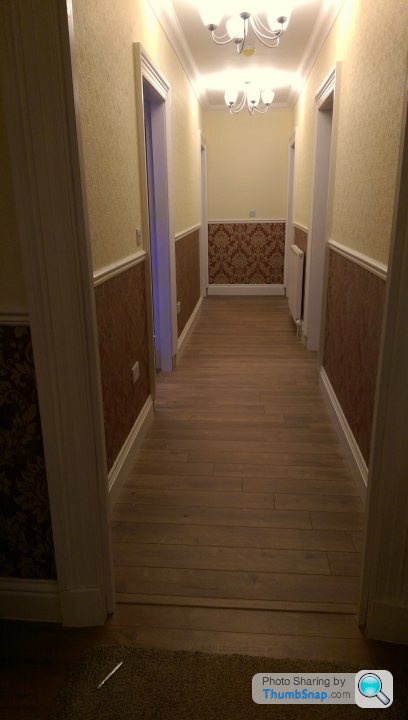
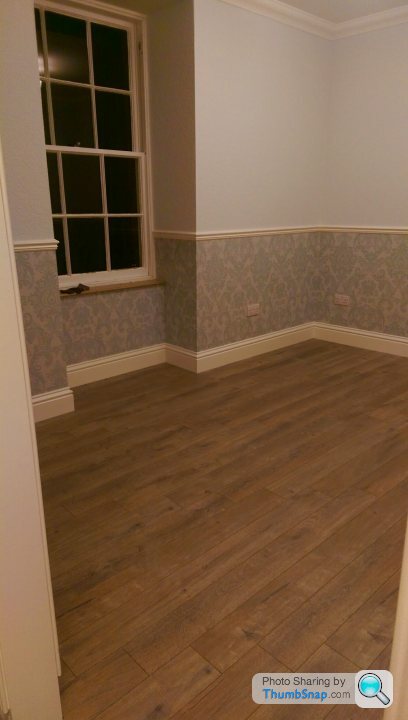
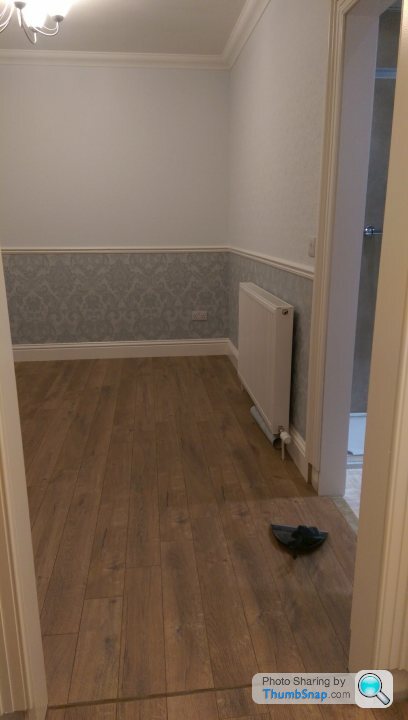
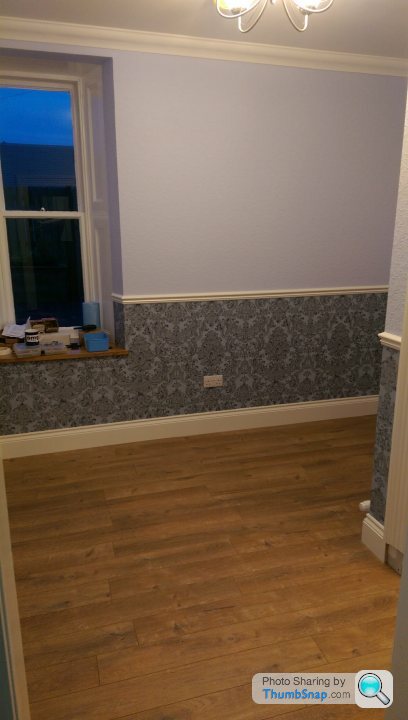
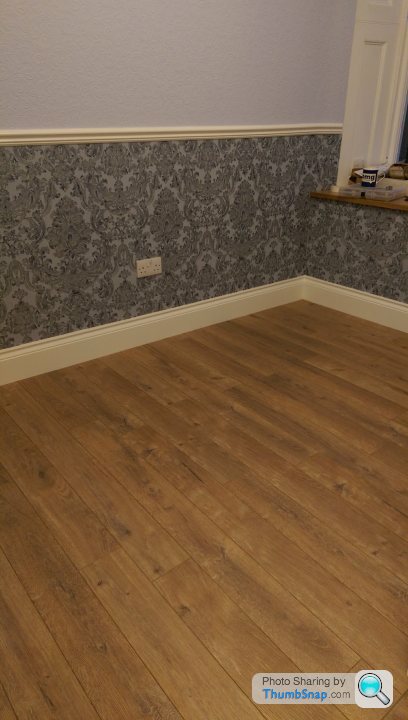
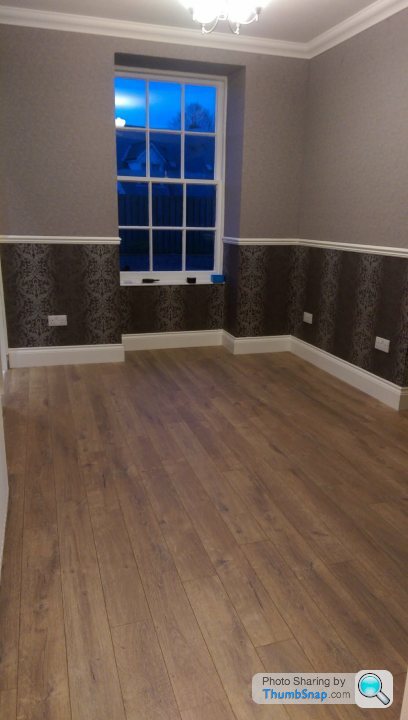
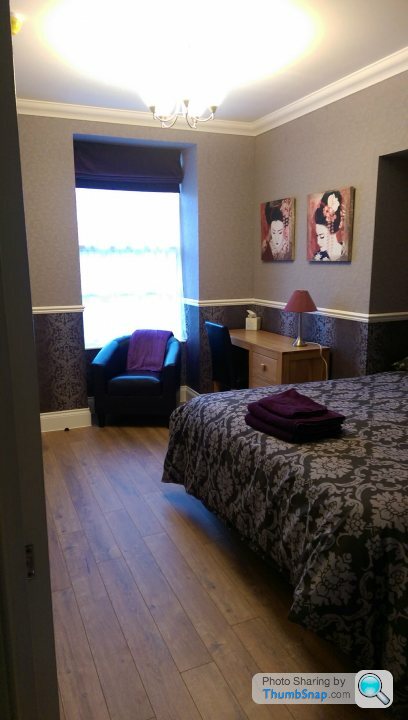
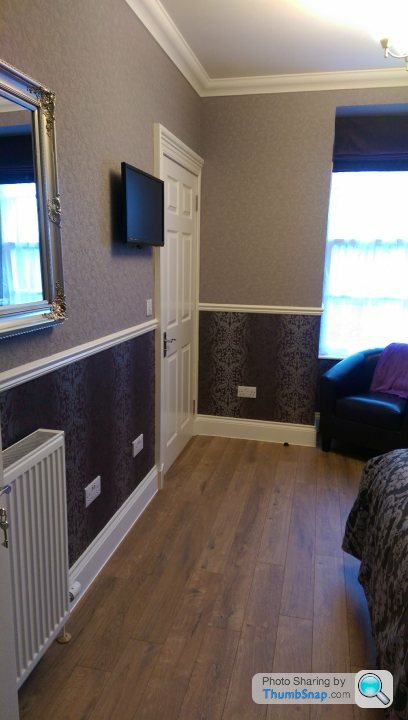
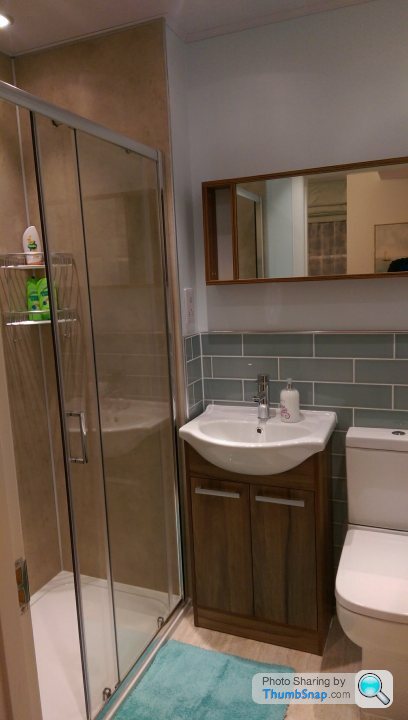
So, here's a couple of pictures of the rooms done so far, one bedroom and the hallway. Another day should see the other two rooms finished, and then it's into doors, plinth blocks etc etc.
Fortunately when we first fitted the central heating we fitted lever isolation valves for every floor, and as our system is an open vented system, it's was technically easy to connect into.... but I'm not a plumber!
Anyway, apart from one slight internal water feature where some idiot (me) had accidentally left a radiator valve open on the ends with the missing radiator..... oops.... fortunately in a bathroom tiled floor to ceiling, so no damage done. Although after a moment of paniic down to my wife's struggle to plug a spurting water pipe whilst using a walkie talkie simultaneously (hey, I was always told women can multi task!) it all went well, and without a hitch! The walkie talkies are invaluable, as where the vales to the heating are situation there's no way you could shout to the other person, absolutely no chance of being able to hear each other, so they are the only way to keep in contact! I've even used the, to find her sometimes!
So, long and short, is the new section now has hot and cold water, and working central heating. Everything all leak tested and checked, so it's was a go ahead to get the floors down and finished! I've set a date of 22nd December to try to have everything finished as this is the date my kids finish school for Christmas, and to be honest I quite fancy spending some family time, and not having to work every day!
So, here's a couple of pictures of the rooms done so far, one bedroom and the hallway. Another day should see the other two rooms finished, and then it's into doors, plinth blocks etc etc.
NickCW said:
I have just spent the past few afternoons reading this thread from start to finish (cannot believe I missed this!) and I must say it is absolutely fabulous, by far the best and most inspirational thread I have ever read.
It looks amazing, and I tip my virtual hat to you for accomplishing so much in a relatively short (considering the size) timescale!
Definitely tempted to visit the B&B in the summer, the Morgan needs a good run.
Either way, have a beer on me - and keep posting the updates.
Wow Nick, many thanks fo the lovely comments! Sometimes it's great to get a little perspective from comments like this, as when your always stuck working on it, spending days on end on your knees laying flooring or such, trust me when I say you really don't feel "fabulous"! Both myself and SWMBO still get a buzz from these kind of comments, and definitely it helps keep moral up, so thank you for that! It looks amazing, and I tip my virtual hat to you for accomplishing so much in a relatively short (considering the size) timescale!
Definitely tempted to visit the B&B in the summer, the Morgan needs a good run.
Either way, have a beer on me - and keep posting the updates.
Your always more than welcome to come see the place, especially with a chance of a ride in a Morgan! Lol
aspender said:
Have been consigned to spending most of my day in our bedroom whilst a man completes the restoration of the ground floor floorboards in our Victorian Semi. Thankfully I've used the time to read this entire thread. Astounding effort, craftsmanship and vision!
However, I now feel quite inadequate.
You should have been downstairs helping him! Lol. I'm only jealous as I don't have a "man" on hand to do the work for me! However, I now feel quite inadequate.
Don't get me wrong, I love the sense of achievement when it's done, but sometimes the idea of getting someone else to do it sounds bloody enticing!
Got the last 6 doors routered for locks and fitted today, 3 fire doors and 3 bathrooms doors, just keepers and stops to do now! SWMBO worked out today, that so far we have painted, sanded or stripped a total of 44 old and new doors in this house! Assuming each door had two coats of undercoat and primer, and two coats of top coats, that's 176 times we have painted a door in the last 2 1/2 years! Definitely don't want to do anymore!
dirty_dog said:
Still can't believe this place. The bnb thing is a great idea as most of us on here want a look around anyway!
How much Karndean has gone down do you know?
Lol, cheers mate.How much Karndean has gone down do you know?
Karndean was used in 8 bathrooms only, so something approx 25m2 I think? 3 other bathrooms are tiled, and the last one has Karndean looselay fitted.
Well, that's the final set of rooms, on the final floor finally finished! I do believe that all the internal rooms and work is now completed! Woo bloody hoo!
Still got to take a couple of pictures of the final room, but here's a couple of quick snaps of the rooms as they stand today.

Still got to take a couple of pictures of the final room, but here's a couple of quick snaps of the rooms as they stand today.
Thanks everyone, all comments are much appreciated, especially the good ones! Lol
Updated floor plans? Yep, I'm sure I can do this. The new rooms are the final rooms for the b&b, bringing the total to 6 bedrooms, all ensuite rooms.
Now I've had a few days off for Xmas it's time to get back to things.....
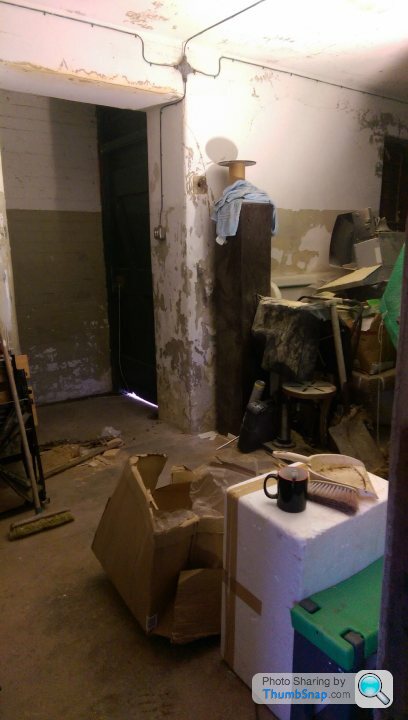
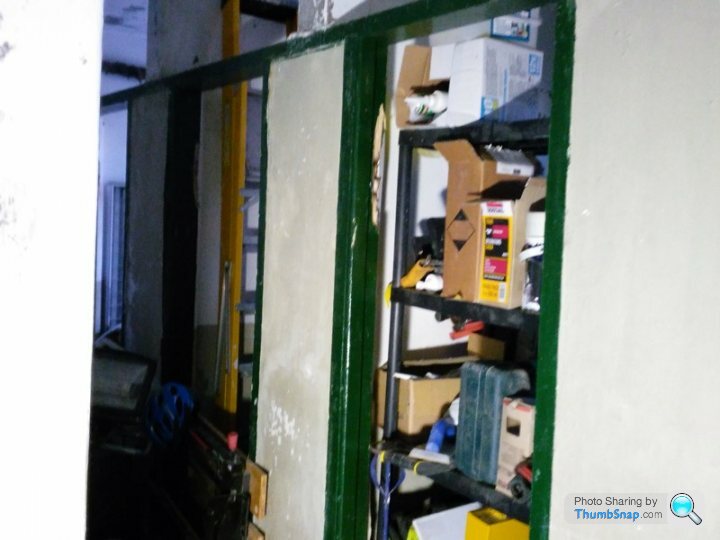
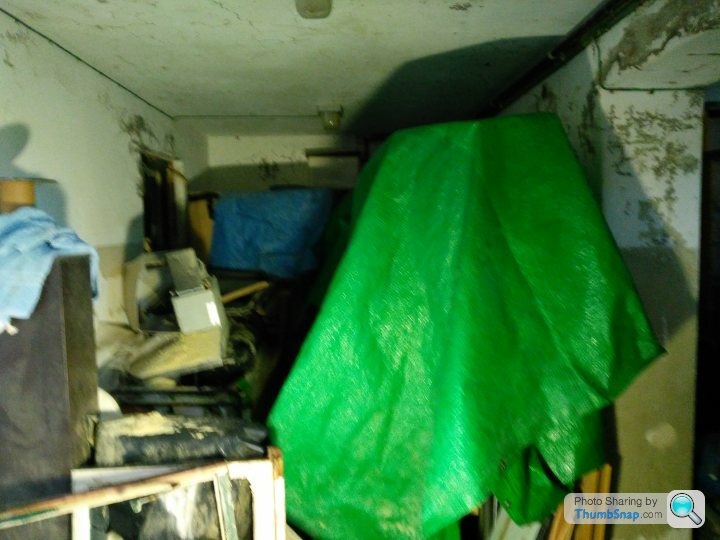
New stage of the project is to start on the outside toilet block, which I have been using as a storage / through it in room which has gradually accumulated a variety of tools, excess bits, rubbish, wood and god knows what! So before any real work can be done, it needs a clear out.
To give you an idea it's built around the corner of the old extension of the house, but goes up to the boundary line, so currently gave no access from one side of the house to the other, which means a walk right round the place to get through, sounds petty, but takes ages and is a real pain in the butt, so I wanted to open up an existing doorway to create a through route. The building is a mix of old and newish, as it's made from local stone, then rendered inside. All internal divides are brick and rendered in an impenetrable concrete render! Seriously, this is the same mix as used on nuclear bunkers!
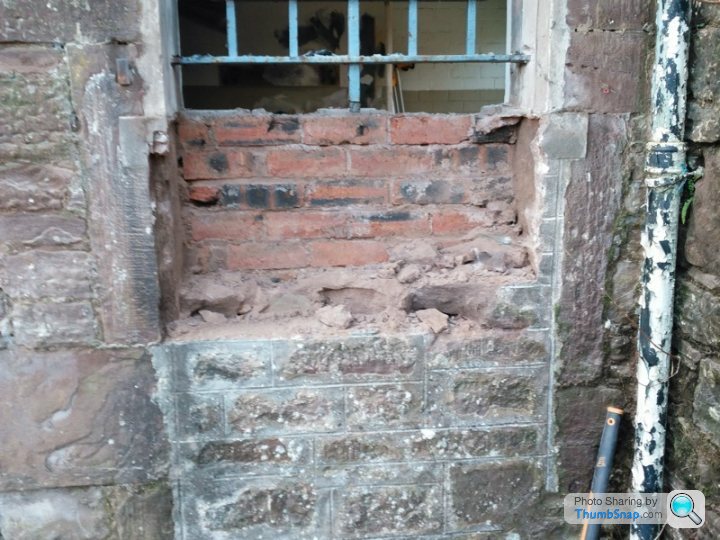
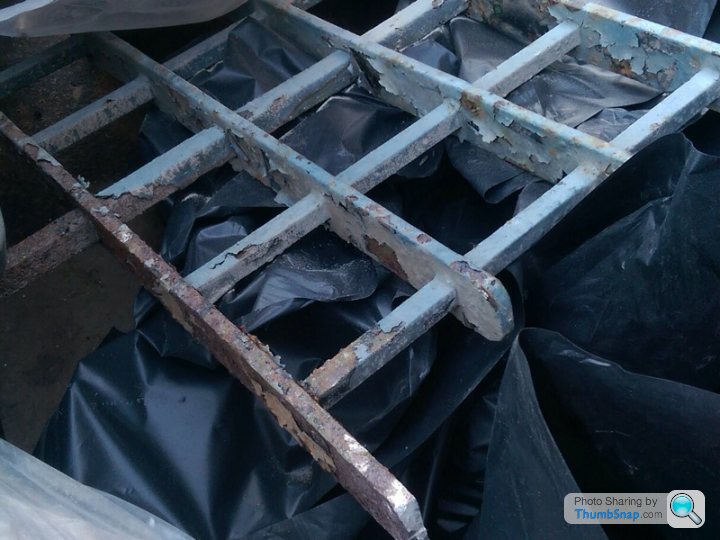
The old doorway had been built up in about 30cm of stone work, then a course of bricks inside. It had a window above it, with the thickest, most solid metal bar system in the planet. It was made of solid 15mm thick steel and set 50mm into solid stone, god knows why they fitted them to a toilet block, unless they sourced them from Alcatraz!
So, first job, cut out the steel bars....ha ha ha
The remove the stone work......ha ha ha
The the impenetrable brick course ........ ha bloody ha sledgehammer ha
Pics to follow...
Updated floor plans? Yep, I'm sure I can do this. The new rooms are the final rooms for the b&b, bringing the total to 6 bedrooms, all ensuite rooms.
Now I've had a few days off for Xmas it's time to get back to things.....
New stage of the project is to start on the outside toilet block, which I have been using as a storage / through it in room which has gradually accumulated a variety of tools, excess bits, rubbish, wood and god knows what! So before any real work can be done, it needs a clear out.
To give you an idea it's built around the corner of the old extension of the house, but goes up to the boundary line, so currently gave no access from one side of the house to the other, which means a walk right round the place to get through, sounds petty, but takes ages and is a real pain in the butt, so I wanted to open up an existing doorway to create a through route. The building is a mix of old and newish, as it's made from local stone, then rendered inside. All internal divides are brick and rendered in an impenetrable concrete render! Seriously, this is the same mix as used on nuclear bunkers!
The old doorway had been built up in about 30cm of stone work, then a course of bricks inside. It had a window above it, with the thickest, most solid metal bar system in the planet. It was made of solid 15mm thick steel and set 50mm into solid stone, god knows why they fitted them to a toilet block, unless they sourced them from Alcatraz!
So, first job, cut out the steel bars....ha ha ha
The remove the stone work......ha ha ha
The the impenetrable brick course ........ ha bloody ha sledgehammer ha
Pics to follow...
Finally got a chance to get some pictures uploaded!
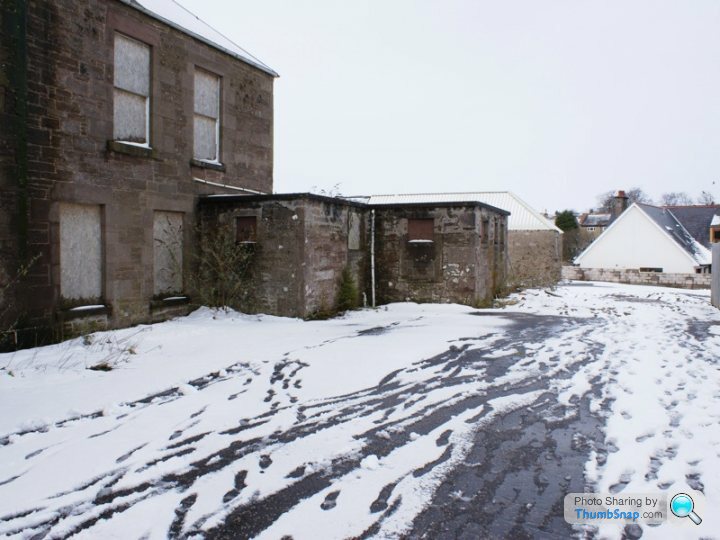
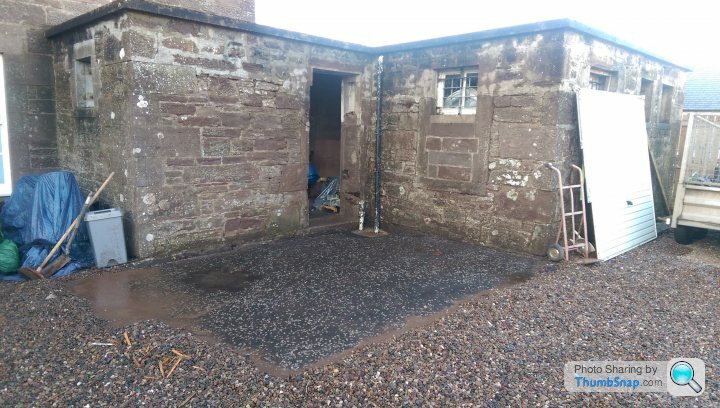
This is the outbuilding, which was a toilet block to the old school, not sure how many years it's been since it has been used, but going to guess about 50....
It wraps around the corner of the building, and one side goes up to my boundary, hence the need to get through it.
Here's a couple of old pictures from when I bought the place

And the proposed doorway, complete with steel security
Starting to knock out, as I've said, it's a layer of thick stone, backed up with nuclear strength bricks and then rendered!
Woohoo! We are through and have an original doorway! Just need to make a door now....
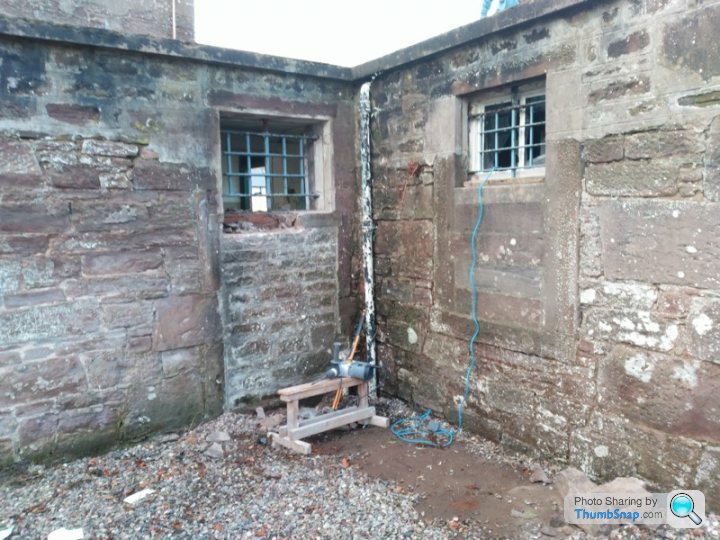
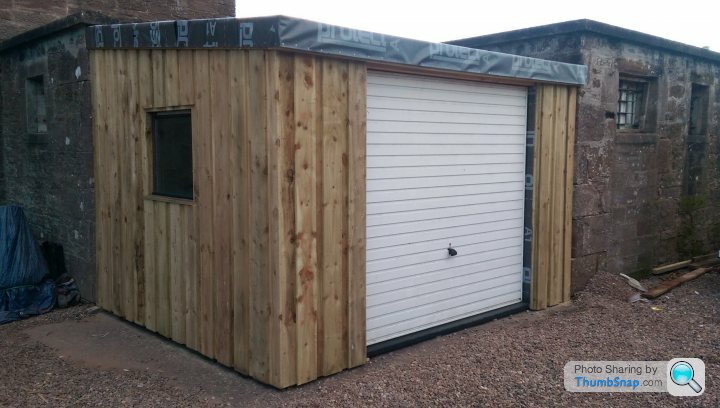
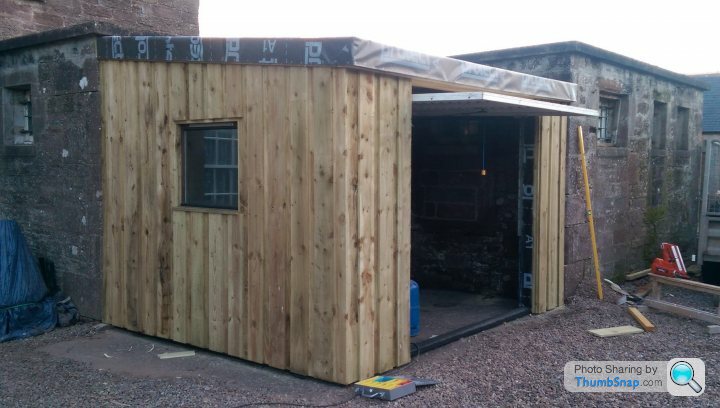
This leaves the perfect space for a new store to be built by yours truly in the space between the buildings. The idea is that it's going to be for storage of the ride on mower and a workshop for any mechanical / engineering work. It'll work out to be approx 3.5m x 2.8m, so not huge, but more than enough for a 2.5m work bench, some storage and loads of space for working on bikes, mowers etc. I've obtained a second hand garage door to make access easier for the mower etc, bargain at £50, especially as it's a couple of year old Garador that cost £685! Started this build on Monday, so more pictures to come.
The plan internally is to remove the WC stall walls, on one side to make a store area and then to open up the main area into a joinery workshop. Will need completely stripping inside, repainting, rewiring and the roof resealed before I can use it fully. I'm planning on keeping at least one we in there working, but stripping everything else out. I'll put up some interior shots soon, and also a quick plan if the space.
This is the outbuilding, which was a toilet block to the old school, not sure how many years it's been since it has been used, but going to guess about 50....
It wraps around the corner of the building, and one side goes up to my boundary, hence the need to get through it.
Here's a couple of old pictures from when I bought the place
And the proposed doorway, complete with steel security
Starting to knock out, as I've said, it's a layer of thick stone, backed up with nuclear strength bricks and then rendered!
Woohoo! We are through and have an original doorway! Just need to make a door now....
This leaves the perfect space for a new store to be built by yours truly in the space between the buildings. The idea is that it's going to be for storage of the ride on mower and a workshop for any mechanical / engineering work. It'll work out to be approx 3.5m x 2.8m, so not huge, but more than enough for a 2.5m work bench, some storage and loads of space for working on bikes, mowers etc. I've obtained a second hand garage door to make access easier for the mower etc, bargain at £50, especially as it's a couple of year old Garador that cost £685! Started this build on Monday, so more pictures to come.
The plan internally is to remove the WC stall walls, on one side to make a store area and then to open up the main area into a joinery workshop. Will need completely stripping inside, repainting, rewiring and the roof resealed before I can use it fully. I'm planning on keeping at least one we in there working, but stripping everything else out. I'll put up some interior shots soon, and also a quick plan if the space.
Dr_Rick said:
Can't believe no one else has commented; 158kw!!
My modest 5bed is getting a 40kw and a 250l Megaflow. I can't imagine what 3 of those boilers would be like to run, and heating 2 tanks!!
You're not on oil are you? Our last place out in the sticks south of Livingston was on oil. That was a bugger to keep on top of. That's got to be a pair of commercial boilers, surely.
Yeah, I know. Scary isn't it! My modest 5bed is getting a 40kw and a 250l Megaflow. I can't imagine what 3 of those boilers would be like to run, and heating 2 tanks!!
You're not on oil are you? Our last place out in the sticks south of Livingston was on oil. That was a bugger to keep on top of. That's got to be a pair of commercial boilers, surely.
Mains gas fortunately, but even so it's equivalent to sacrificing a small child every month!
As far as I understand it, up to 70Kw is not commercial, andything above this is rated as commercial, however the size of the gas meter and pipes also have a bearing on the situation. Generally speaking, it's considered a commercial syste, unfortunately....
So, started work last Monday on the additional store space. The idea was to build a simple structure nestled into the shape of the existing building. Going to be timber construction with a sloped, felted roof and incorporating my bargain garage door. No timber floor, as this area isn tarmac underneath already, and in good condition with an existing floor drain in place. As bearing in mind it was for lawn mowers, bikes etc etc it didn't seem much point in adding to the cost and work to install a floor as well, it is more of a garage than a shed I guess, although not big enough for a car.
Treated timber frame, clad in 12mm OSB, waterproof membrane, 2x1" batons then overlapping 150mm treated timber boards. A simple 6" roof truss system, notched into a wall plate and tied by notches to the end wall for strength, covered in sparking boards, membranes and then felted roof. Like I said, fairly simple and quick to build, until the cold snap stopped play a bit when my cup of tea froze mid way through drinking it!

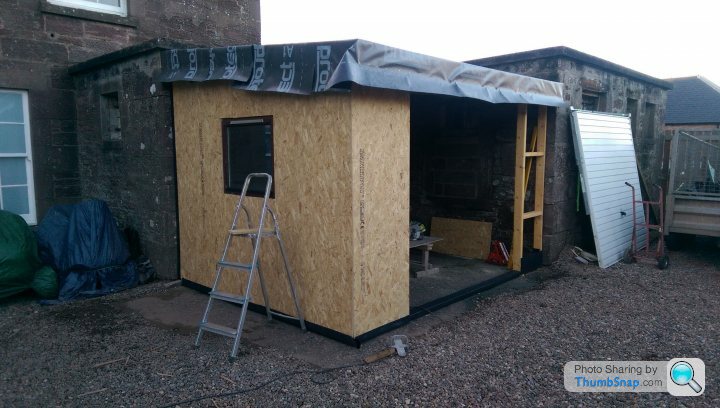
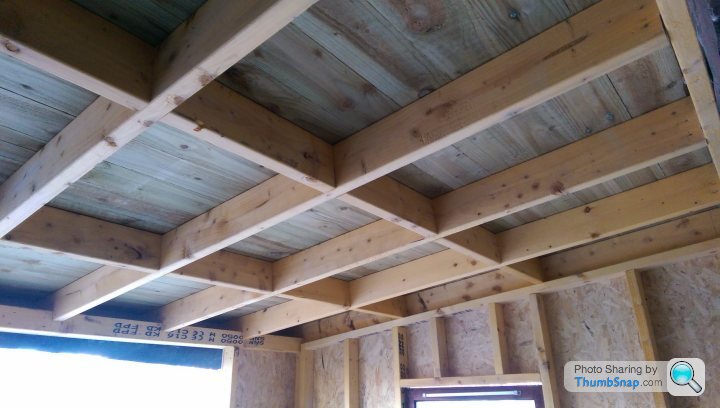
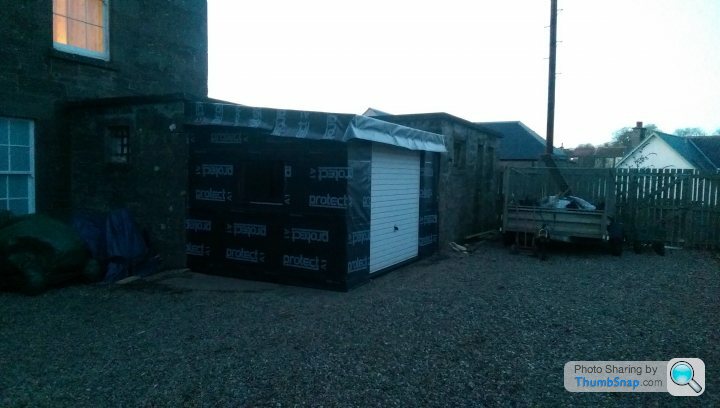
Took about 4 days to complete to this stage. Still to fit the roof felt and flashing, as it's been so cold and windy it wasn't safe to up on the roof, and the membrane is 99% waterproof anyway, so just waiting for a clear day!
Got some lights to go in, then adding power to it and the workshop end of the month with a seperate consumer unit run in SWA from the main lower fusebioard. Going to build a bench for under the window wall, make a door frame and fit an internal door in the new door way and it'll become my little engineering / mechanical workshop
Treated timber frame, clad in 12mm OSB, waterproof membrane, 2x1" batons then overlapping 150mm treated timber boards. A simple 6" roof truss system, notched into a wall plate and tied by notches to the end wall for strength, covered in sparking boards, membranes and then felted roof. Like I said, fairly simple and quick to build, until the cold snap stopped play a bit when my cup of tea froze mid way through drinking it!
Took about 4 days to complete to this stage. Still to fit the roof felt and flashing, as it's been so cold and windy it wasn't safe to up on the roof, and the membrane is 99% waterproof anyway, so just waiting for a clear day!
Got some lights to go in, then adding power to it and the workshop end of the month with a seperate consumer unit run in SWA from the main lower fusebioard. Going to build a bench for under the window wall, make a door frame and fit an internal door in the new door way and it'll become my little engineering / mechanical workshop
Edited by Griff Boy on Sunday 15th January 09:34
Now that the outside store is wind and water tight, I could empty the "stuff" (read crap!) store in the old WC stalls, to make space to start removing the old walls.
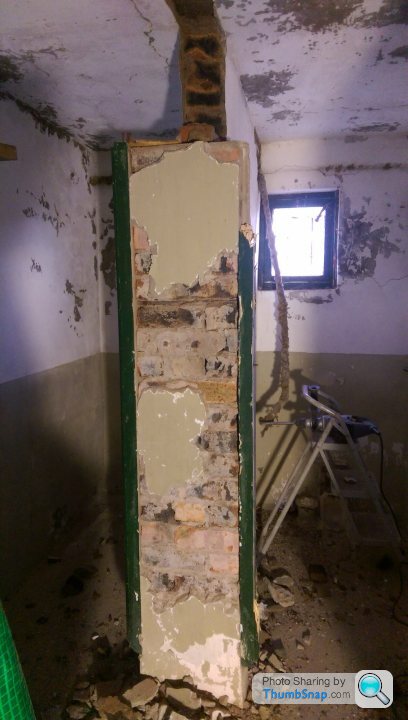
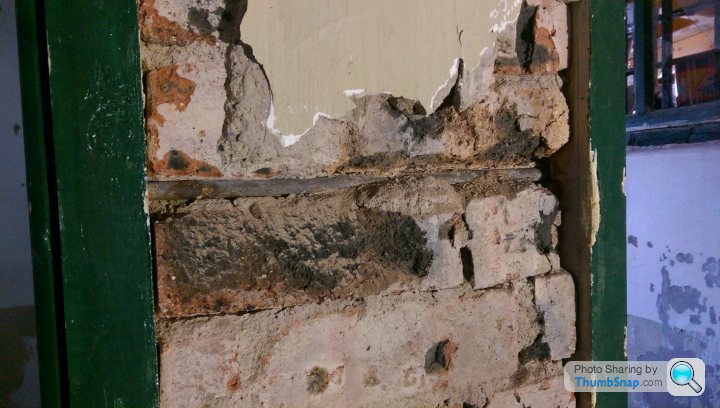
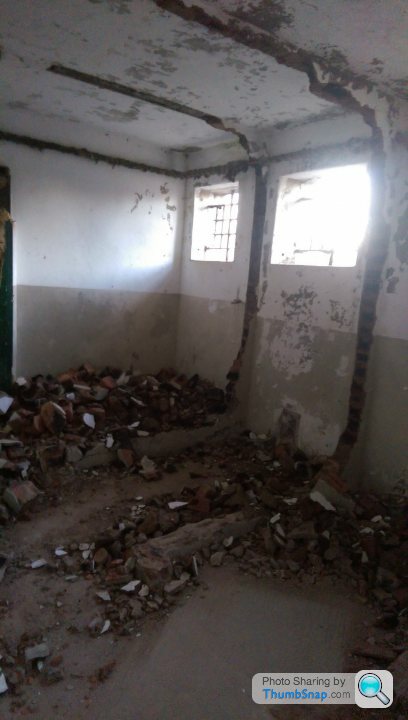
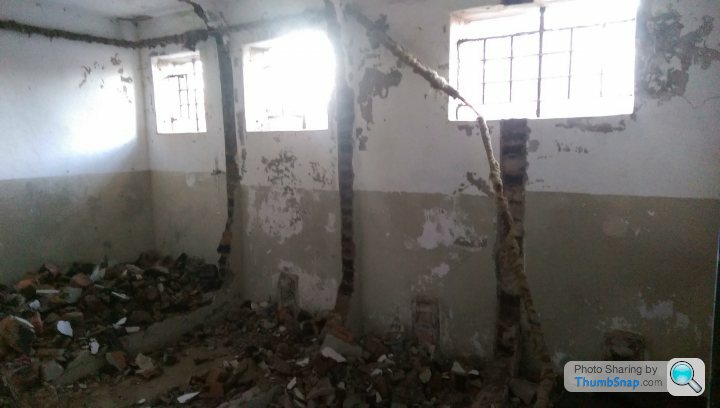
Been doing this for the last two days straight, and bloody hell is it hard work! Each wall between the wcs was solid brick, rendered in about 30mm of concrete render on both sides, reinforced with a T section at the end with 1/2" thick solid steel bar set into the brick work! This coupled with the space being restricted on the first stall, meant it was a seriously hard slog! God only knows what the original builders thought the kids would be doing in there, but steel gates over the windows, solid brick reinforced walls between stalls!
Stalls emptied and cleared ready
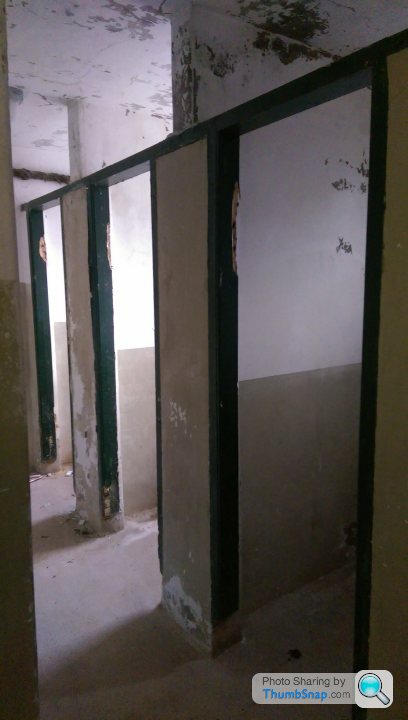
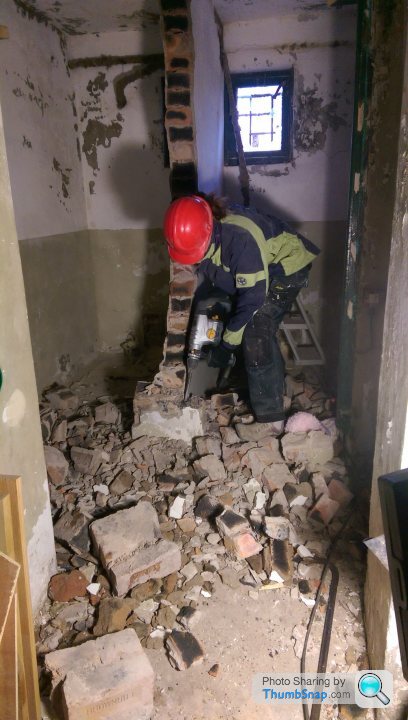
First one coming down
Reinforcing bars and later we found flat steel plates too.
More walls coming down! I'm extremely lucky to have an amazing wife who mucks in with anything thrown at her!
Unbelievably the only moans and complaints were when I made her take off her pink fluffy bobble hat to wear a hard hat instead! Apparently it's more important to have a warm head, than a working brain...... (note said pink bobble hat thrown on the grown in disgust!)
More walls down!
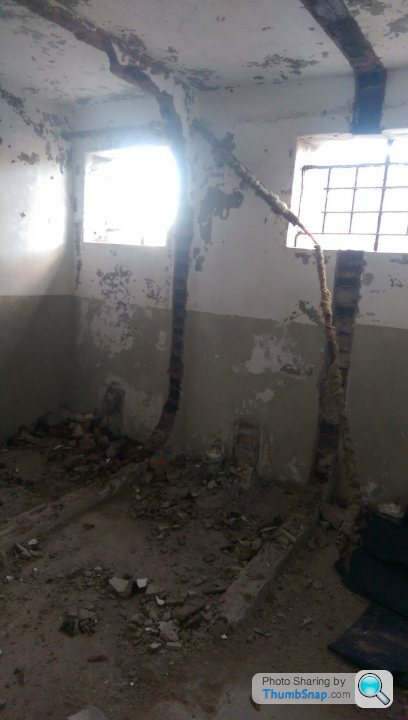
And finally all 3 down!
Still loads of clearing to do, and as every base line of bricks was then concreted into the floor, there's still a fair bit of breaker work to do...
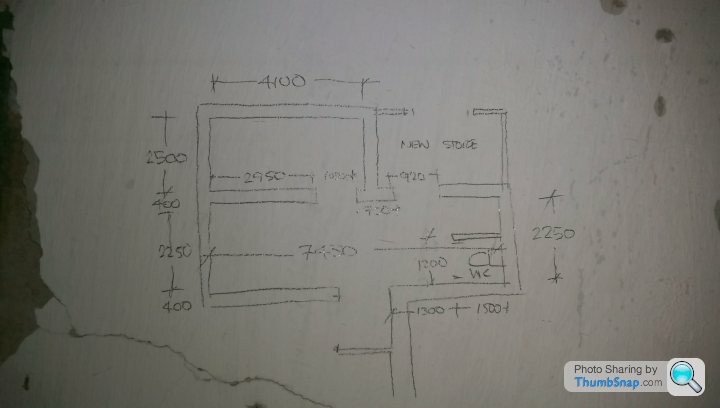
Did a few rough measurements to see what space I'll have when it's all cleared, so I can start designing some layout ideas.
All dims are internal
Been doing this for the last two days straight, and bloody hell is it hard work! Each wall between the wcs was solid brick, rendered in about 30mm of concrete render on both sides, reinforced with a T section at the end with 1/2" thick solid steel bar set into the brick work! This coupled with the space being restricted on the first stall, meant it was a seriously hard slog! God only knows what the original builders thought the kids would be doing in there, but steel gates over the windows, solid brick reinforced walls between stalls!
Stalls emptied and cleared ready
First one coming down
Reinforcing bars and later we found flat steel plates too.
More walls coming down! I'm extremely lucky to have an amazing wife who mucks in with anything thrown at her!
Unbelievably the only moans and complaints were when I made her take off her pink fluffy bobble hat to wear a hard hat instead! Apparently it's more important to have a warm head, than a working brain...... (note said pink bobble hat thrown on the grown in disgust!)
More walls down!
And finally all 3 down!
Still loads of clearing to do, and as every base line of bricks was then concreted into the floor, there's still a fair bit of breaker work to do...
Did a few rough measurements to see what space I'll have when it's all cleared, so I can start designing some layout ideas.
All dims are internal
Edited by Griff Boy on Sunday 15th January 09:54
Edited by Griff Boy on Sunday 15th January 09:56
Edited by Griff Boy on Sunday 15th January 10:00
minivanman said:
Fantastic space for a workshop! I'd have the smaller space to the left of the new store as a metalwork area and the larger one for woodwork.
Still undecided to be honest, I'm more into my woodwork than metal work, hence planning to use the new store as a mini lawnmower, bike, petrol powered tool service area type place and devote the entire interior space to making a joinery workshop. The area to the left of the new store is much brighter and wider, but no where as long as the other section..Plan is to include space for the following tools
Chop saw and stand
Table saw
Router table
Bandsaw
Pillar drill / morticer
And
General work bench
Wood store rack
Lots of storage
Looking at fitting multiple 4 or 5ft twin weatherproof lights across all 3 ceiling areas plus a ring of approx 20 sockets, and sink with water heater above. Heating will be via calor gas heater or electric storage heaters.
First jobs though are to seal the roof above fully, as still some water ingress and make some windows for the currently open holes in the walls!
So far I've spent another day chiselling out the last course of bricks, which were set into the concrete screeded floor and walls, absolute nightmare to get out! And the old toilets have had to be removed with the big breaker as they are also concreted and bricked in place! Each one take about 30mins with the breaker to remove and I've got 5 to do....
3 skip runs done as well, even though it's a big trailer, it's the weight that's the issue, must be getting on for 3 tonnes of rubble / brick out so far.
Will carry on with the rip out and get some more pictures up tomorrow.
Gassing Station | Homes, Gardens and DIY | Top of Page | What's New | My Stuff