Georgian House Renovation Up North - 5 Years and Counting
Discussion


elanfan said:
Whilst you there are you tempted to grind/chase out the cement in the bricks above and fill with black mortar..
Btw - has there been a slight change in your username? Could have sworn it used to be
StewStJohn or is my memory playing up?
Username is the same although have been toying with changing it for no particular reason.Btw - has there been a slight change in your username? Could have sworn it used to be
StewStJohn or is my memory playing up?
As for the mortar, it’s not grey and it’s n black, it’s a very specific shade and texture created by using what looks like coal dust in the mix and then exposing it to 100 years of heavy industrial staining...suffice to say we've tried to match as best we can and now have a sort of ‘recipe’ that is more or less right but it still varies by mix.
Although I trust the new builder completely, time, money (and me having a new found determination to fix s t once and for or all after a massive and understandable pissed off/will this ever end phase), I decided to do the arch form myself.
Unlike the door where we had one in situ to simply trace out and move down, I had to transfer from the drawing to the life size scale. I’d worked out to get the arch curvature right I’d need a pair of compasses with a radius of about six metres and the space to use them.
I could have used a bit of trigonometry and marked a load of points along the arch and then freehanded them up but didn’t fancy that either.
Then, doing something else with thin ply, I had an idea.
I figured that I could use the materials to help me so popped to B&Q and got some very thin ply and got it cut into a strip.
I then cut it to a specific length and on the wider ply that would be the formwork, I marked out the baseline of the arch, the centre point and the peak of the arch.
I then screwed a few long screws either side of the points I’d made and slid the thin ply in so it was under pressure at the apex and the ends and in theory, the natural properties of the wood would give a natural curve I could trace...I wasn’t sure it would work.


Success! Sadly, the wife and kids were away so I had to be smug at my own ingenuity on my own, since it was lost on the dog.
t once and for or all after a massive and understandable pissed off/will this ever end phase), I decided to do the arch form myself.Unlike the door where we had one in situ to simply trace out and move down, I had to transfer from the drawing to the life size scale. I’d worked out to get the arch curvature right I’d need a pair of compasses with a radius of about six metres and the space to use them.
I could have used a bit of trigonometry and marked a load of points along the arch and then freehanded them up but didn’t fancy that either.
Then, doing something else with thin ply, I had an idea.
I figured that I could use the materials to help me so popped to B&Q and got some very thin ply and got it cut into a strip.
I then cut it to a specific length and on the wider ply that would be the formwork, I marked out the baseline of the arch, the centre point and the peak of the arch.
I then screwed a few long screws either side of the points I’d made and slid the thin ply in so it was under pressure at the apex and the ends and in theory, the natural properties of the wood would give a natural curve I could trace...I wasn’t sure it would work.
Success! Sadly, the wife and kids were away so I had to be smug at my own ingenuity on my own, since it was lost on the dog.
I forgot to mention, before the first time the window went in, there was another fine mess.
I got home to find the left side of the reveal looking wonky as a bd.
A form hadn’t been used and because there was only a single brick between the doorway and window opening, rather than stop to think for a minute, they just bricked up the window and left an in our edge for the window that looked like a Tetris level.
I don’t have a pic of it before I started to fix it, because I saw it and knew I needed to get wriggle on to sort it so it would go off to fit the window.
I basically needed to get my arse to the hire shop before 4:30, get a prop and strong boy, knock out the wall, mix some mortar and spend my evening rebuilding the edge of the wall in the fading light that I’d paid the builder to do right in the first place. (This was the last time the old builder ever came to site).
I was able to fix it because all of my old bricks are mixed widths with a tolerance of about 10mm in places, I simply sorted through my piles of recovered bricks with a measuring tape to find ones that would end up square with the door reveal and with the window reveal, which meant different lengths for different courses, then laid them out in order and fitted them.
Pity the builder couldn’t have followed this logic but there you go...
Notice how far out from each other the window facing courses are

Removal

Using my level as a straight and square edge to finish to, weirdly a perfect fit.

Laid out in order

Beer time

The above was sent to the builder along with a shorty text about how a job should look and to not come back, etc.
Slightly awkward as technically a family member but such is life.
I got home to find the left side of the reveal looking wonky as a b
d.A form hadn’t been used and because there was only a single brick between the doorway and window opening, rather than stop to think for a minute, they just bricked up the window and left an in our edge for the window that looked like a Tetris level.
I don’t have a pic of it before I started to fix it, because I saw it and knew I needed to get wriggle on to sort it so it would go off to fit the window.
I basically needed to get my arse to the hire shop before 4:30, get a prop and strong boy, knock out the wall, mix some mortar and spend my evening rebuilding the edge of the wall in the fading light that I’d paid the builder to do right in the first place. (This was the last time the old builder ever came to site).
I was able to fix it because all of my old bricks are mixed widths with a tolerance of about 10mm in places, I simply sorted through my piles of recovered bricks with a measuring tape to find ones that would end up square with the door reveal and with the window reveal, which meant different lengths for different courses, then laid them out in order and fitted them.
Pity the builder couldn’t have followed this logic but there you go...
Notice how far out from each other the window facing courses are
Removal
Using my level as a straight and square edge to finish to, weirdly a perfect fit.
Laid out in order
Beer time
The above was sent to the builder along with a shorty text about how a job should look and to not come back, etc.
Slightly awkward as technically a family member but such is life.
Taking the window out for the second attempt was stressful...the bead was so tight I had to cut through the whole thing with a hacksaw blade pushed through the silicone held on to with mole grips as I had sod all clearance to try and avoid nicking the frame.

Took me bloody ages to cut around it, not to mention the time and slivers of skin lost cleaning the frame back with bare Stanley blades, plus two further weeks of stting it, with the window left under a tarp with nothing but a couple of sheets of Celotex for protection of it toppled over. (We didn’t want to lay it flat in case the size and weight of the window bowed the frame).

Lowering the arch meant we needed to infill the courses above so the soldier course was put back in amongst other jobs.

Took me bloody ages to cut around it, not to mention the time and slivers of skin lost cleaning the frame back with bare Stanley blades, plus two further weeks of s
tting it, with the window left under a tarp with nothing but a couple of sheets of Celotex for protection of it toppled over. (We didn’t want to lay it flat in case the size and weight of the window bowed the frame).Lowering the arch meant we needed to infill the courses above so the soldier course was put back in amongst other jobs.
Edited by stewjohnst on Tuesday 31st December 10:54


Frustratingly, we couldn’t get the level transition to outside due to the interior finished floor level ending up higher than outside and I wasn’t about to raise the external floor by lifting all the slabs and adding more hardcore but tbh, the step is no biggie and reduces a lot of splash back (which is why the bottom panel of door is wood and not a full French door, we’re muddy buggers and would forever cleaning it!).
Edited by stewjohnst on Tuesday 31st December 11:08
Edited by stewjohnst on Wednesday 1st January 09:04


Thanks.
In parallel to restoring the exterior windows, we’ve also been undoing some of the ‘modern’ touches a previous owner installed...

I’d long suspected there we’re going to be niches in the alcove as there were obvious hollows when you knocked on the wall in places. As we were in for a penny, etc. I decided to rip off the plaster board (that turned out to be mdf/hardboard?)

Have the fireplace to a friend who loaded it in his Model S, apparently it was unconnected but once it was loaded up in the boot, the Tesla crashed and required a reboot He said it wasn’t uncommon!

and so to the fireplace itself, it would have had a much bigger Georgian fireplace and the traces of it were visible on the older plaster. Instructions were duly given to me to take it to original size (hoping the original lintel was present).


There’s some time gaps across the photos as I the last pic you can see the fireplace the other half had spent weeks trying to find something that matched size and period.
She’d settled on a bicep busting Welsh slate fireplace that was painted to look like wood with an arts and craft style decoration. £750 seemed a bit steep but as i was assured it was ‘the perfect match’ it was bought and delivered, ready for me to assemble and fit.
I’d also say, if anyone has anything heavy they need to stick together like they’ve welded it, get some CT-1.

In parallel to restoring the exterior windows, we’ve also been undoing some of the ‘modern’ touches a previous owner installed...
I’d long suspected there we’re going to be niches in the alcove as there were obvious hollows when you knocked on the wall in places. As we were in for a penny, etc. I decided to rip off the plaster board (that turned out to be mdf/hardboard?)
Have the fireplace to a friend who loaded it in his Model S, apparently it was unconnected but once it was loaded up in the boot, the Tesla crashed and required a reboot
He said it wasn’t uncommon!and so to the fireplace itself, it would have had a much bigger Georgian fireplace and the traces of it were visible on the older plaster. Instructions were duly given to me to take it to original size (hoping the original lintel was present).
There’s some time gaps across the photos as I the last pic you can see the fireplace the other half had spent weeks trying to find something that matched size and period.
She’d settled on a bicep busting Welsh slate fireplace that was painted to look like wood with an arts and craft style decoration. £750 seemed a bit steep but as i was assured it was ‘the perfect match’ it was bought and delivered, ready for me to assemble and fit.
I’d also say, if anyone has anything heavy they need to stick together like they’ve welded it, get some CT-1.
Edited by stewjohnst on Wednesday 1st January 11:15
I’m a lot lighter than I used to be because of all the exercise this place generates and luckily I don’t sleep much but there is still the permanent brain fog that comes with having kids waking you up at all hours.
At times it’s been very trying, especially with the mayhem the last builder caused - The idea of getting someone in was that although I was confident I was capable of learning and doing things myself, I wanted to spend time with the wife and kids and not have the house vacuum up all my time when the kids are the priority at this age.
We therefore we spent money on getting someone to do it but they were fking useless...so what was knackering/stressful was going to work/having to work from home as much as I could, affecting my work and then having to come home and fix whatever cock up had been executed that day...we were stuck in as much as I couldn’t fire him with everything in the air as there was too much so we had to get to some kind of point I could handle, except that every week longer created another new issue.
I try not to moan about it but it did cause serious marital strife and stress and discussions of selling up and ‘you love this house more than us’ type arguments (untrue, obviously).
My motto in general is to try not to waste time’ so if I’m sat there in front of the TV and there’s a job, however small to do, then I try (not always successfully) to get off my bum and do it.
I hope my posts paint an honest picture of renovation misadventures, there are ups and downs and some are worse than others but I’ve yet to find something we haven’t been able to overcome.
At times it’s been very trying, especially with the mayhem the last builder caused - The idea of getting someone in was that although I was confident I was capable of learning and doing things myself, I wanted to spend time with the wife and kids and not have the house vacuum up all my time when the kids are the priority at this age.
We therefore we spent money on getting someone to do it but they were f
king useless...so what was knackering/stressful was going to work/having to work from home as much as I could, affecting my work and then having to come home and fix whatever cock up had been executed that day...we were stuck in as much as I couldn’t fire him with everything in the air as there was too much so we had to get to some kind of point I could handle, except that every week longer created another new issue. I try not to moan about it but it did cause serious marital strife and stress and discussions of selling up and ‘you love this house more than us’ type arguments (untrue, obviously).
My motto in general is to try not to waste time’ so if I’m sat there in front of the TV and there’s a job, however small to do, then I try (not always successfully) to get off my bum and do it.
I hope my posts paint an honest picture of renovation misadventures, there are ups and downs and some are worse than others but I’ve yet to find something we haven’t been able to overcome.
On move in, the front room looked like this, complete with a disconnected gas fire.


Prior to the kids, it was a cinema room, by virtue of having a spare side and TV in it but when the kids came along, it was turned into a playroom so we could keep their bedrooms and rest of the house tidy and just shut the door on the carnage if we needed to.
It worked well for a couple of years until they got old enough to open the doors and got a hell of a lot noisier...


When the noise was too much, we moved their playroom to my old office, which was upstairs and far enough away from the living room so we wouldn’t hear them bounding about it screaming unless they’d actually injured each other and this meant the dining room was destined to become my third new office in the time I’d had the house.
Prior to the kids, it was a cinema room, by virtue of having a spare side and TV in it but when the kids came along, it was turned into a playroom so we could keep their bedrooms and rest of the house tidy and just shut the door on the carnage if we needed to.
It worked well for a couple of years
until they got old enough to open the doors and got a hell of a lot noisier...When the noise was too much, we moved their playroom to my old office, which was upstairs and far enough away from the living room so we wouldn’t hear them bounding about it screaming unless they’d actually injured each other and this meant the dining room was destined to become my third new office in the time I’d had the house.
Edited by stewjohnst on Wednesday 1st January 22:21
The reason I bring up the moving of my office is because when it came to the critical moment of fitting the fireplace to the wall, the other half decided that it wouldn’t look right and suggested I put it in ‘Your new office’.
So the dining room (which was going to move to the kitchen when that was finished) was emptied and more work was started. It pained me a little as an 80:20 sort of person to have to undo the work below, but it was either that or no office


So the dining room (which was going to move to the kitchen when that was finished) was emptied and more work was started. It pained me a little as an 80:20 sort of person to have to undo the work below, but it was either that or no office
I’m not one for vlogs over blogs but I’m not sure a post can adequately describe the sheer exhaustion involved in fitting a big ass slate fireplace on your own but just imagine a lot of swearing and heavy grunting accompanying the photos and you won’t be far off.
First things first, grind back previous areas of cement to get a flat base to work from.


Next, drill wall and put some substantial battens on to help take the weight.

Then, realise the floor isn’t level so a bit of head scratching and adjustment is needed to ensure the top ends up level so do it all again and then use expanding foam adhesive to start to hold it in place.

Let that go off and set for two days (because I was paranoid about it falling off) and the stick the mantle on with CT-1 and apply weighty tomes to hold in place for another few days until it’s all set.

Finally, I also wanted to move the radiator to a less intrusive spot and get a more modern and higher btu unit.


First things first, grind back previous areas of cement to get a flat base to work from.
Next, drill wall and put some substantial battens on to help take the weight.
Then, realise the floor isn’t level so a bit of head scratching and adjustment is needed to ensure the top ends up level so do it all again and then use expanding foam adhesive to start to hold it in place.
Let that go off and set for two days (because I was paranoid about it falling off) and the stick the mantle on with CT-1 and apply weighty tomes to hold in place for another few days until it’s all set.
Finally, I also wanted to move the radiator to a less intrusive spot and get a more modern and higher btu unit.
Although I say it’s an office, the wife and I do read quite a lot and so we were after an office/library vibe but with space for me to have a computer and a separate area for using my laptop when working from home.
So for the first time in ages, shopping commenced for my benefit instead of the kids or the building.
Ever the bargain hunter/tightarse...I rummaged around on Schpock and the bay and found a few bargain bits of furniture and although I wanted to make my own fitted bookcases, time, money and the wife forbade it so I jogged on to Ikea.
It turns out that owning a Sharan is quite handy when sniffing around Ikea’s Bargain Corner...with all the seats out, you can fit three fully assembled and massively discounted Billy bookcases in the back
Add on a discount voucher scheme through my employer and I think the corner unit cost me £250 tops for the lot.

Found this chair on Schpock to add a bit of colour. A total fluke that it just fit under the desk, measuring is for wimps

Saw a chair I liked on Dwell and bought it via the missus to get a £40 new customer discount, delivery was going to be £48 but they’ve a branch in Leeds so got it delivered there free and chucked it in the Sharan.

Also picked up a bureau so I could fold it away when I wasn’t working from home and dug out the old victorian bathchair to sit in whilst working...she did say I could do the room how I wanted


Theres also a wine fridge next to the desk (because I haven’t done the cellar yet) that was another £30 ebay bargain although it’s power hungry and a dangerous thing to have when working from home on Fridays

So for the first time in ages, shopping commenced for my benefit instead of the kids or the building.
Ever the bargain hunter/tightarse...I rummaged around on Schpock and the bay and found a few bargain bits of furniture and although I wanted to make my own fitted bookcases, time, money and the wife forbade it so I jogged on to Ikea.
It turns out that owning a Sharan is quite handy when sniffing around Ikea’s Bargain Corner...with all the seats out, you can fit three fully assembled and massively discounted Billy bookcases in the back
Add on a discount voucher scheme through my employer and I think the corner unit cost me £250 tops for the lot.
Found this chair on Schpock to add a bit of colour. A total fluke that it just fit under the desk, measuring is for wimps
Saw a chair I liked on Dwell and bought it via the missus to get a £40 new customer discount, delivery was going to be £48 but they’ve a branch in Leeds so got it delivered there free and chucked it in the Sharan.
Also picked up a bureau so I could fold it away when I wasn’t working from home and dug out the old victorian bathchair to sit in whilst working...she did say I could do the room how I wanted
Theres also a wine fridge next to the desk (because I haven’t done the cellar yet) that was another £30 ebay bargain although it’s power hungry and a dangerous thing to have when working from home on Fridays
God knows how far back I posted it but a few years back you may recall I mentioned hearing a metallic and then silence as I dropped my wedding ring taking it off at the top of the cellar because it had bounced on the stone and then under the floorboards.
It was a running joke that she would accuse me to friends of having ‘lost’ my wedding ring that I would counter by pointing out that I knew exactly where it was.
As things had been getting fraught, I thought it would be a nice gesture to finally dig it out so I planned to lever up a board carefully and see if it really was where I thought it was...
Floorboard has other ideas about careful persuasion but I fixed it properly afterwards with much glue and bonding.


It was indeed where I suspected, albeit under three years of dust and crap, oddly still awaiting an apology from the missus
and then silence as I dropped my wedding ring taking it off at the top of the cellar because it had bounced on the stone and then under the floorboards.It was a running joke that she would accuse me to friends of having ‘lost’ my wedding ring that I would counter by pointing out that I knew exactly where it was.
As things had been getting fraught, I thought it would be a nice gesture to finally dig it out so I planned to lever up a board carefully and see if it really was where I thought it was...
Floorboard has other ideas about careful persuasion but I fixed it properly afterwards with much glue and bonding.
It was indeed where I suspected, albeit under three years of dust and crap, oddly still awaiting an apology from the missus
The garden is very much a working garden and as a result, this...
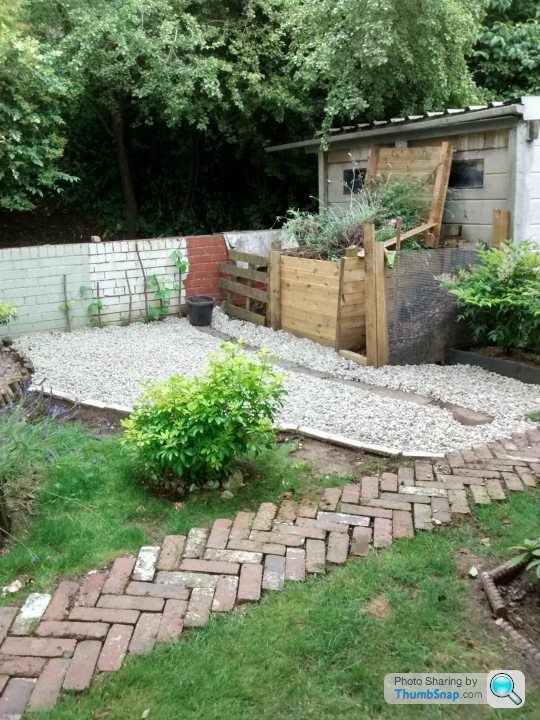
Now looked like this as of a couple of mornings ago.

In truth, this is partly because the wife wants a potting shed at the end of the garage and as I’ve had a few hours spare the last couple of morngings, I thought I’d make a start, using whatever I had lying around.
There’s a handy bit of metal angle bolted to the garage so I drilled a few holes through and used some stripped out shield anchor bolts and nylock nuts to secure it. It means it’s rock solid and I have some eyelets to run tools or wires on when finished.


I’ve obviously got loads of sand and cement, etc. laying around as the building work goes on so I nicked a load of sand to get a rough level and put some weed fabric down, and set about sinking a couple of uprights and cementing them in.


I ran a loose length from the garage to the post and pinned it one handed, with a couple of levels to get it level ready to put the cement as there was no spare pair of hands to help.

About then, the kids arrived home and I left the cement to set, by now the wife trusts me and didn’t judge it on its current appearance

Now looked like this as of a couple of mornings ago.
In truth, this is partly because the wife wants a potting shed at the end of the garage and as I’ve had a few hours spare the last couple of morngings, I thought I’d make a start, using whatever I had lying around.
There’s a handy bit of metal angle bolted to the garage so I drilled a few holes through and used some stripped out shield anchor bolts and nylock nuts to secure it. It means it’s rock solid and I have some eyelets to run tools or wires on when finished.
I’ve obviously got loads of sand and cement, etc. laying around as the building work goes on so I nicked a load of sand to get a rough level and put some weed fabric down, and set about sinking a couple of uprights and cementing them in.
I ran a loose length from the garage to the post and pinned it one handed, with a couple of levels to get it level ready to put the cement as there was no spare pair of hands to help.
About then, the kids arrived home and I left the cement to set, by now the wife trusts me and didn’t judge it on its current appearance
Edited by stewjohnst on Thursday 2nd January 19:36
Milder weather today meant we were back outside and more work on the potting shed.
First, I consulted my extensive and well stacked wood pile for bits.

The dug out, cut and concreted in another post, I just made the mix from and months old open bag of cement, a load of rough grains and and a few shovel loads of the pea shingle from around the compost beds. It’s not an exact science, but it’s only a posting shed so hardly a major foundation.

I’ve had a coloured window in the garage the wife bought off eBay years ago and decided to make use of it for the potting shed to let a bit of light in and save me using so much wood. It doesn’t need to open and the hinges are long past coming off/out so I notched the middle bar and set it in with some screws and fixing straps.


I had a helper today at least

A couple of small brackets were enough to push the bottom of a rain/drip deflector for the window.


Wife thinks it looks cute, I think it will need paint to look a little less like Ed Gein’s cabin...

Aim is to have it finished before I go back to work, so far have managed with just off cuts but I’ll have to spend money for a roof as I want a couple of sheets of ply and roof felt to weatherproof it, plush she wants skylights.
First, I consulted my extensive and well stacked
wood pile for bits.The dug out, cut and concreted in another post, I just made the mix from and months old open bag of cement, a load of rough grains and and a few shovel loads of the pea shingle from around the compost beds. It’s not an exact science, but it’s only a posting shed so hardly a major foundation.
I’ve had a coloured window in the garage the wife bought off eBay years ago and decided to make use of it for the potting shed to let a bit of light in and save me using so much wood. It doesn’t need to open and the hinges are long past coming off/out so I notched the middle bar and set it in with some screws and fixing straps.
I had a helper today at least
A couple of small brackets were enough to push the bottom of a rain/drip deflector for the window.
Wife thinks it looks cute, I think it will need paint to look a little less like Ed Gein’s cabin...
Aim is to have it finished before I go back to work, so far have managed with just off cuts but I’ll have to spend money for a roof as I want a couple of sheets of ply and roof felt to weatherproof it, plush she wants skylights.
stewjohnst said:
Yep, not only had custard been poured on the floor, the levels were wrong so when the missus sat on a chair at what the finished floor level would be (including mortar bed and stone) all she could see at eye level were bricks.
This was the moment.
We were at least 85mm out on the floor and it needed to go higher. This brought a whole load of headaches...
I phoned my original builder (not the one responsible for this fine mess) from many moons ago asking for help and he came over the next evening to try and figure out a solution to get us out of the st and ideally in to the kitchen.
This was the
moment.We were at least 85mm out on the floor and it needed to go higher. This brought a whole load of headaches...
I phoned my original builder (not the one responsible for this fine mess) from many moons ago asking for help and he came over the next evening to try and figure out a solution to get us out of the s
t and ideally in to the kitchen.stewjohnst said:
I forgot to mention, before the first time the window went in, there was another fine mess.
The above was sent to the builder along with a shorty text about how a job should look and to not come back, etc.
Ahhh, the joys of tradesmen....The above was sent to the builder along with a shorty text about how a job should look and to not come back, etc.
....as always epic amounts of great work!
Daniel
Gassing Station | Homes, Gardens and DIY | Top of Page | What's New | My Stuff