The ebay generator restoration thread
Discussion


KTF said:
What stops the generators from cooking themselves as some dont seem to have radiators, thermostatic fans, etc. or any form of airflow to cool them down - compared to water or air cooled engine in a car or bike for example?
As tr7v8 said they are air cooled with fins on the cylinder like petrol lawnmowers etc, there is fan attached to the flywheel which draws air in, normally through the pull start and blows it across the engine like the VW beetle engine.Latest progress
After lots of time wasters and stupid offers, the massive yellow Stephill was sold a couple of weeks ago and is now providing joy and excitement to young and old as it has gone to a bouncy castle hire outfit.
This left room for a new project:
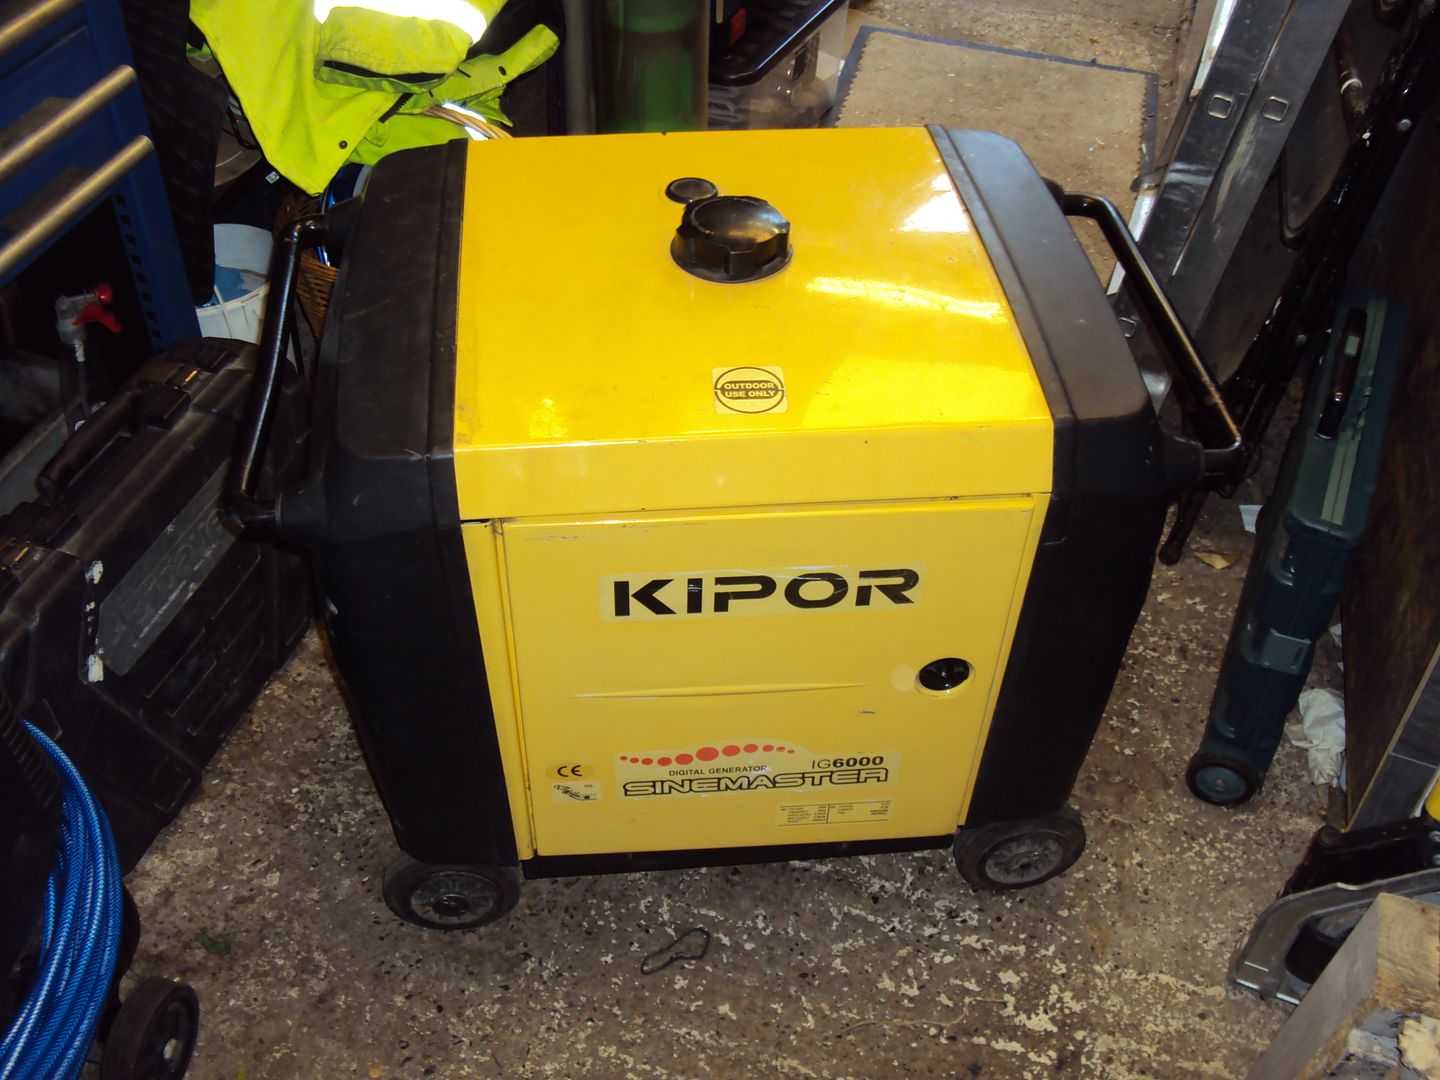
It’s a 5.5KW inverter, I had been watching this one for a couple of months as the seller kept listing it and not selling, so I made an offer and go it.
The fault was with the inverter pack
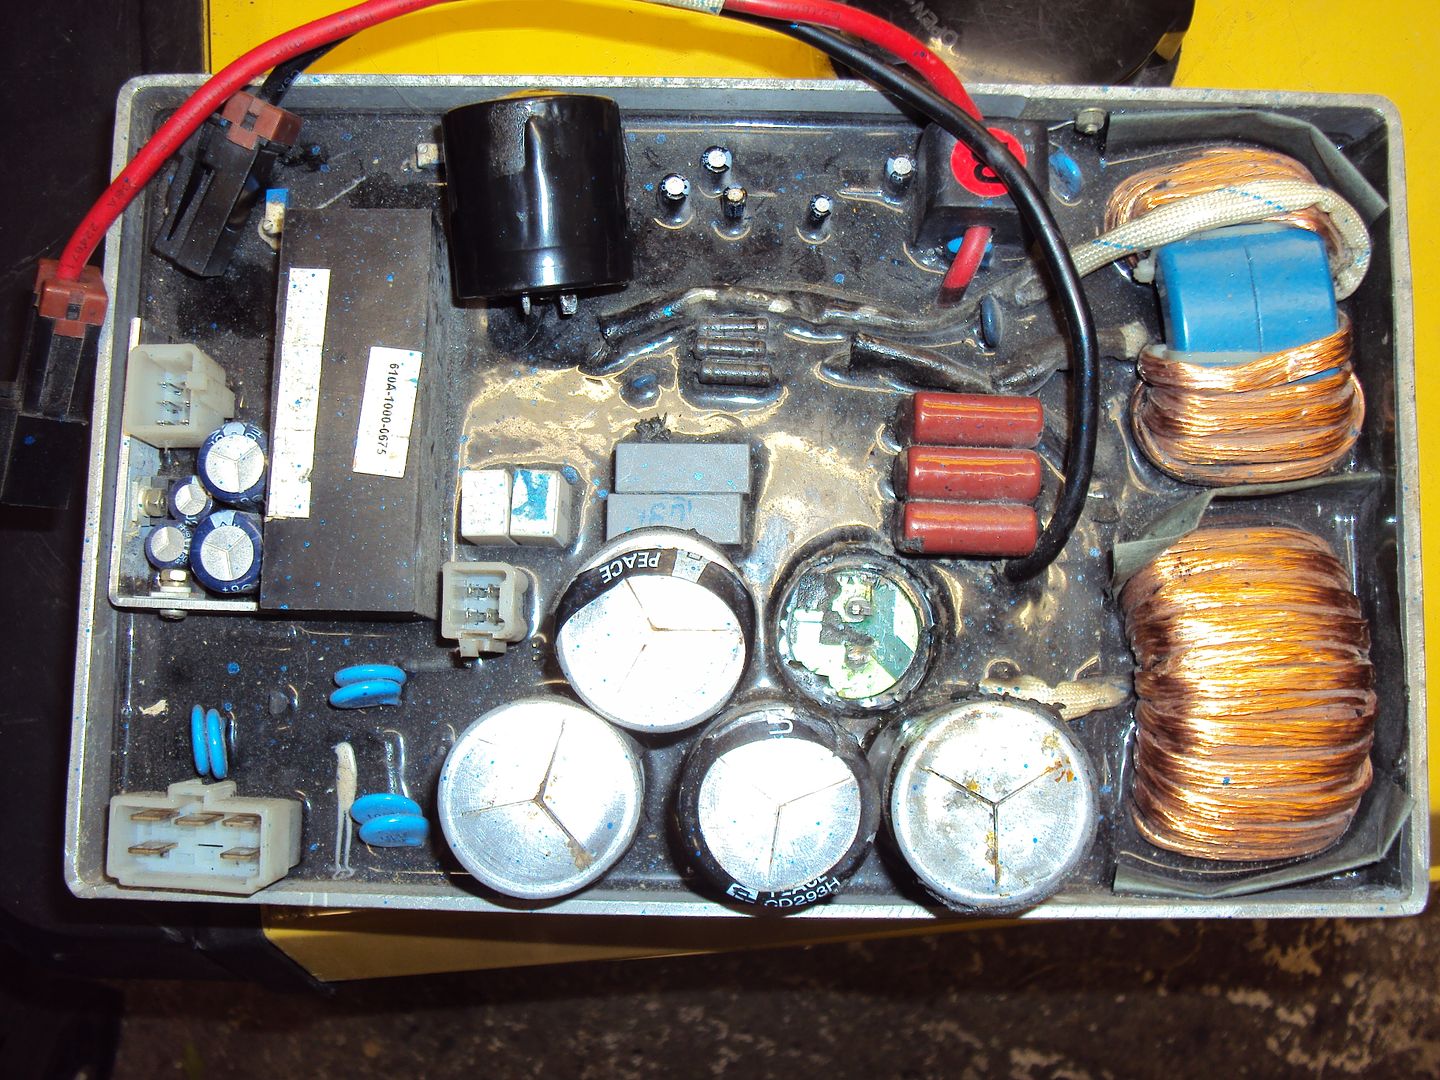
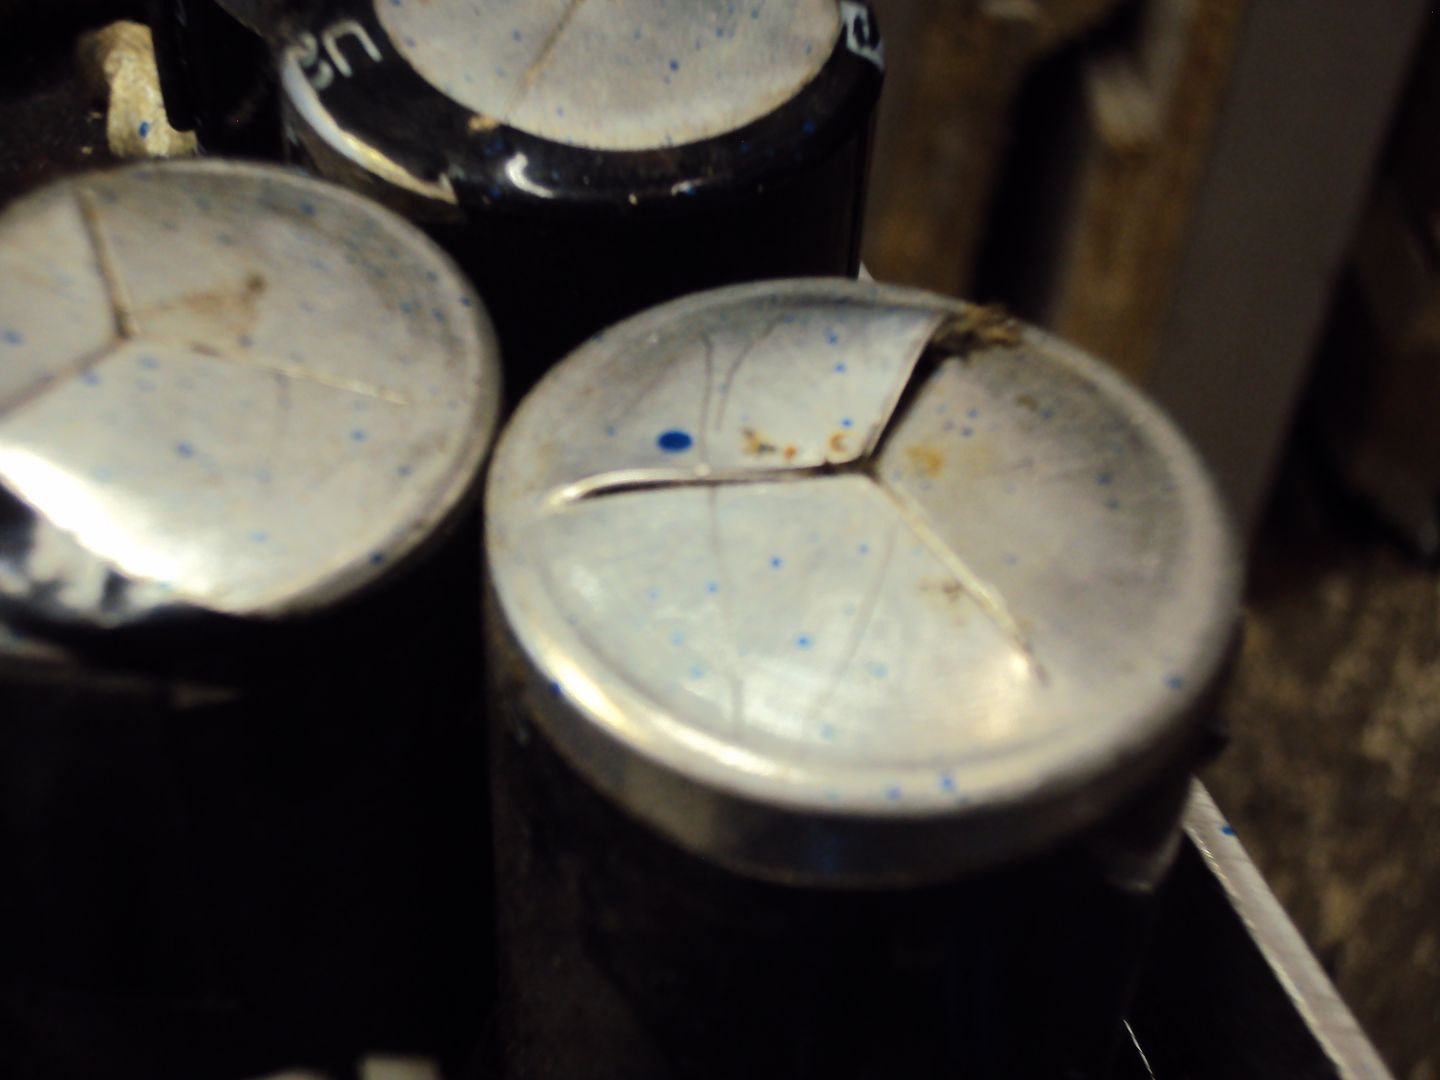
The capacitors shouldn’t look like that! The tops should be flat and not split. The plan is to try and remove the black coating and replace them.
It also had a starting issue, which I tracked down to the choke appeard so be missing
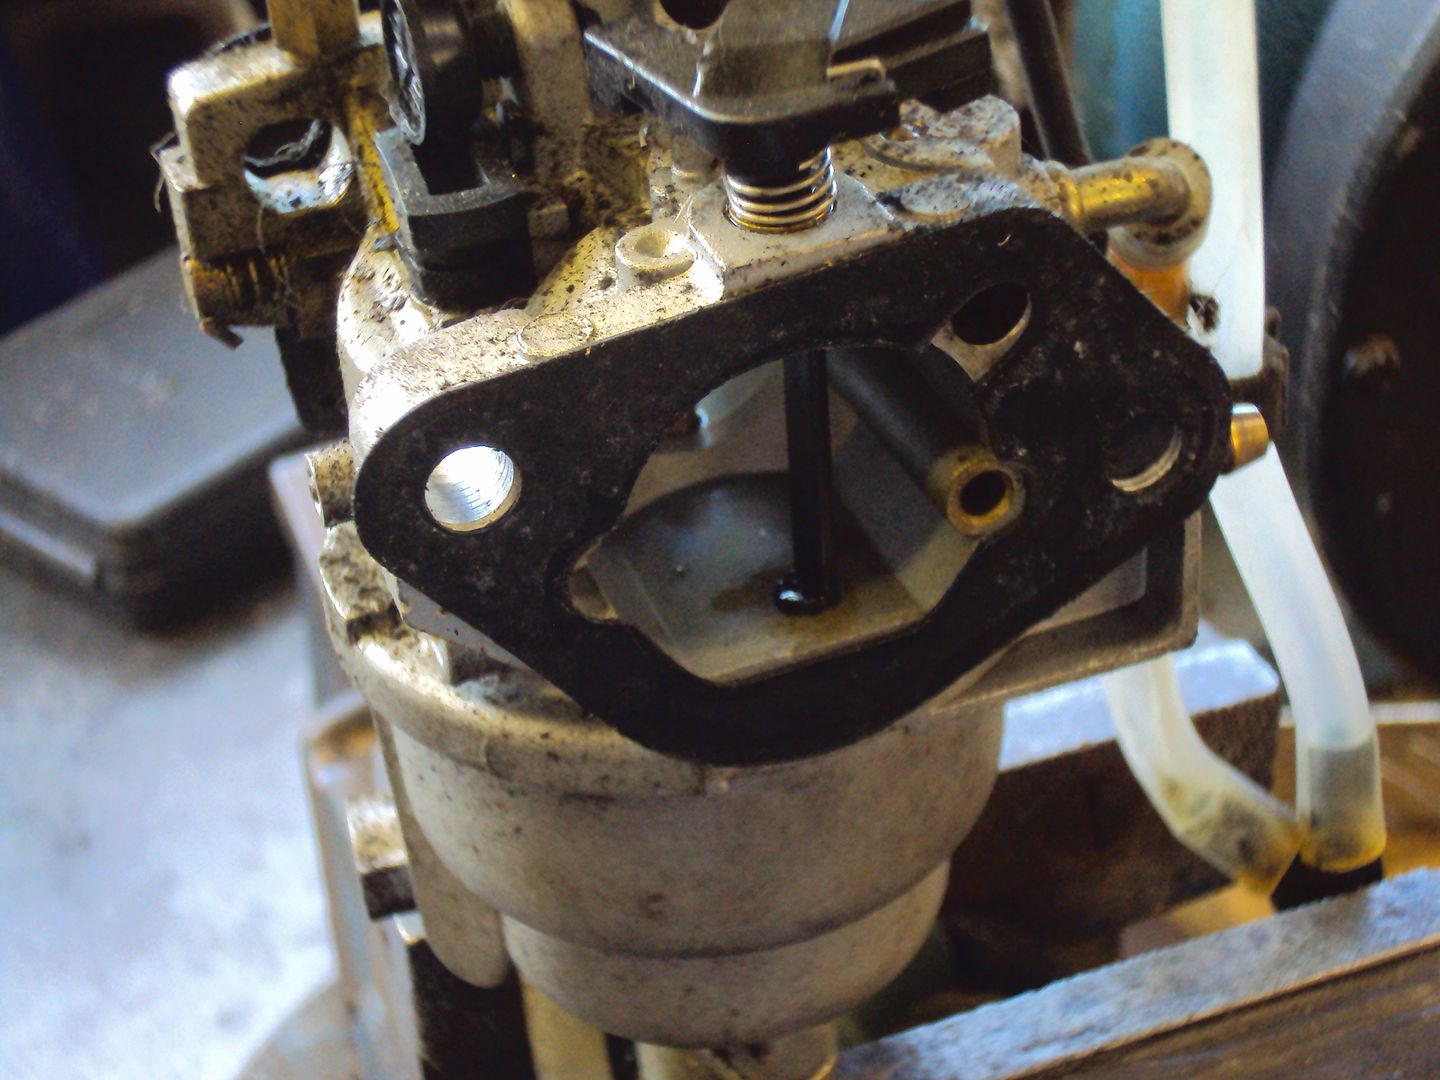
Found the missing choke plate in the bottom of the case under the engine
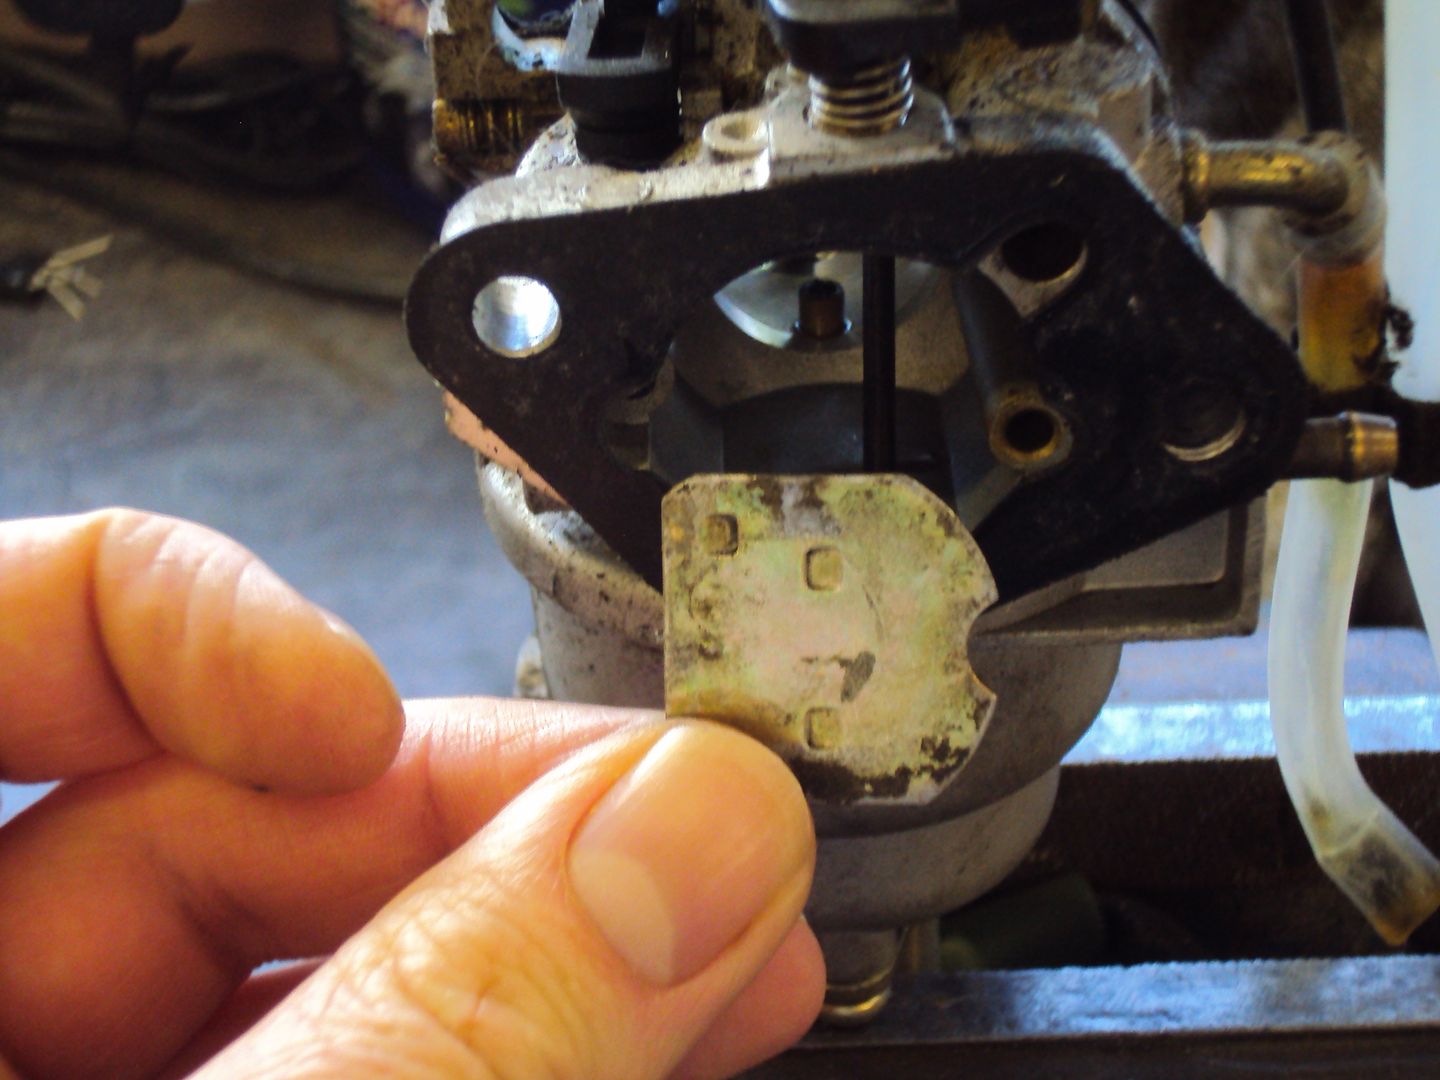
The plate should slip into a slot in the choke shaft, however one side was missing
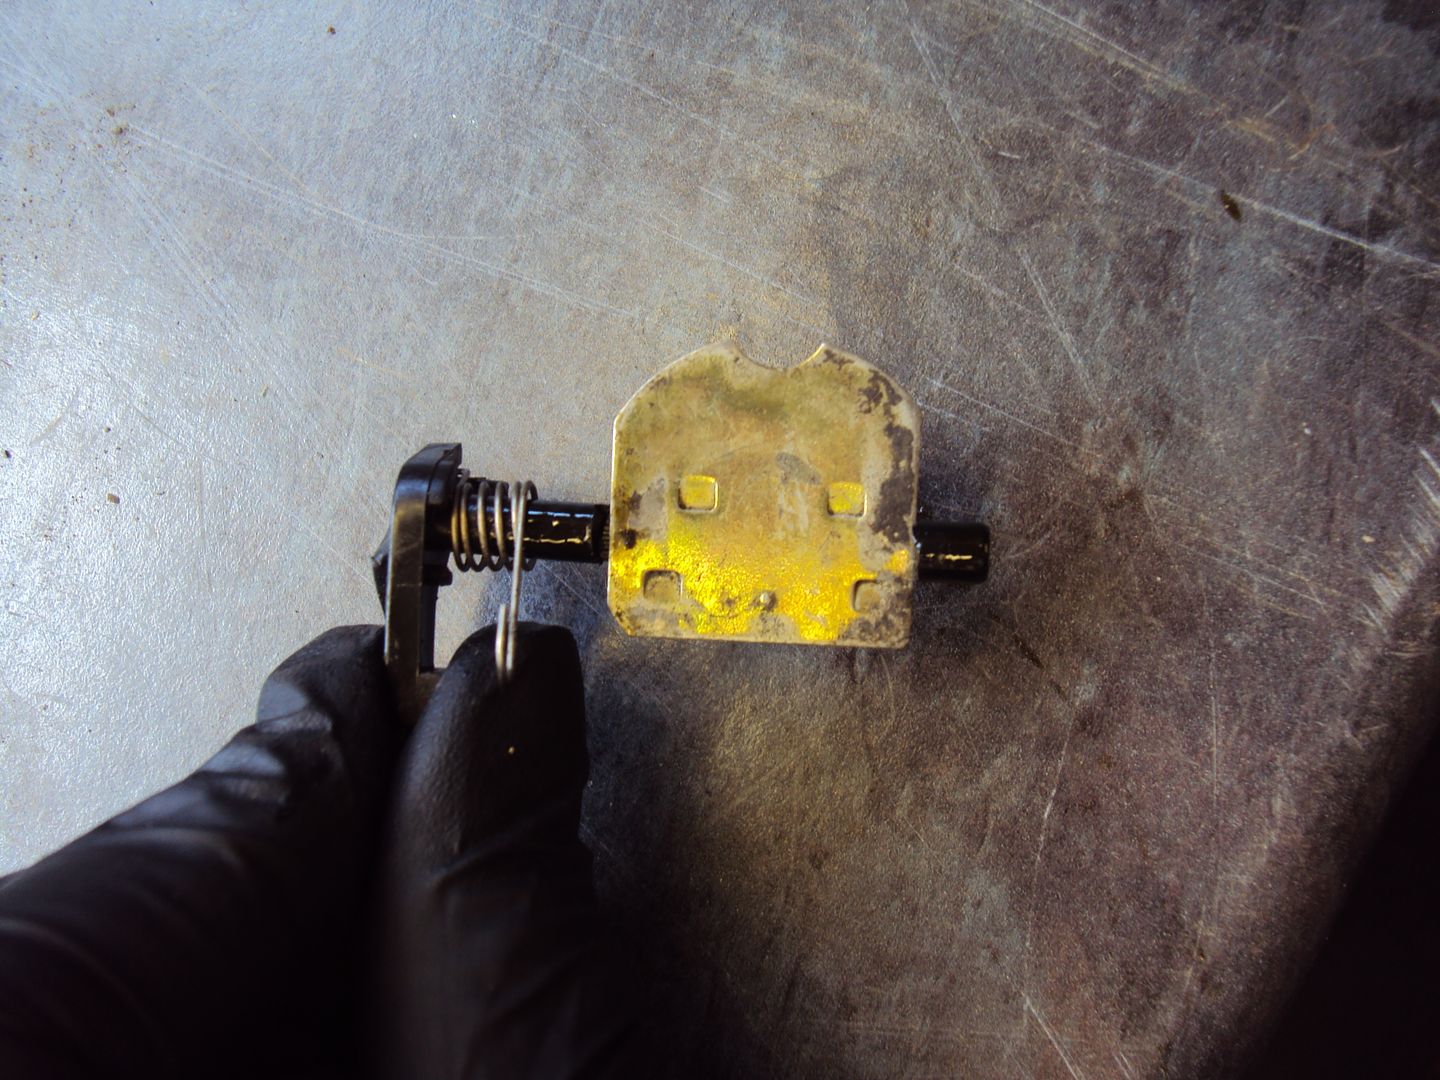
To fix it I drilled a couple of holes in the shaft and plate so a M2 bolt could be used to hold it together.
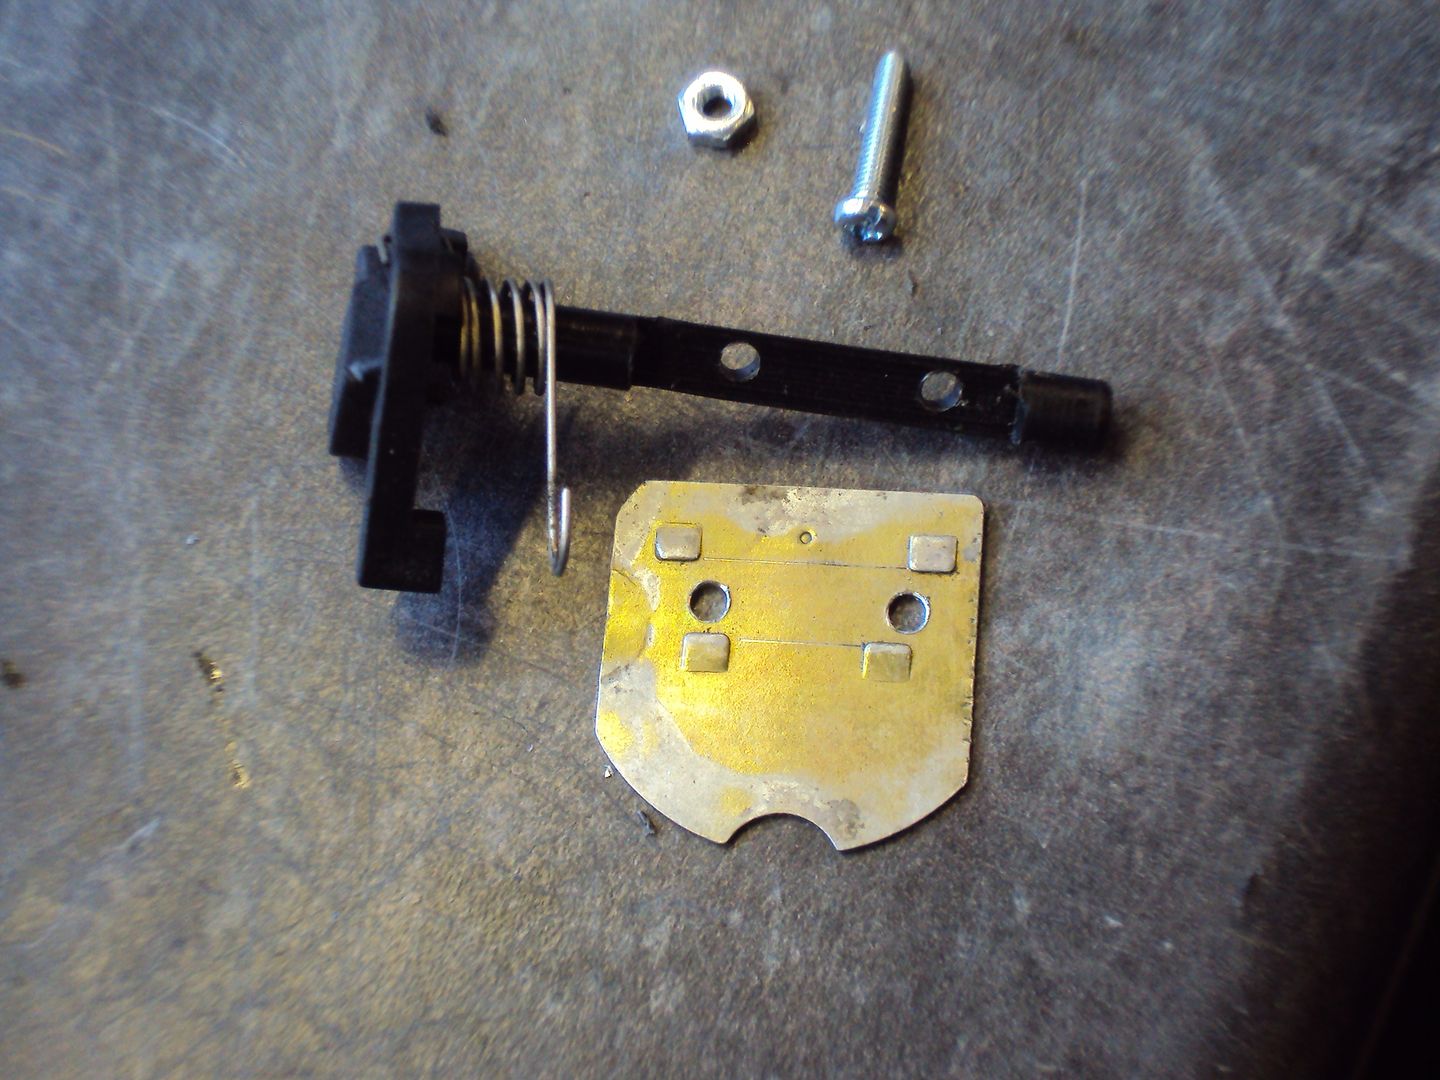
All bolted together
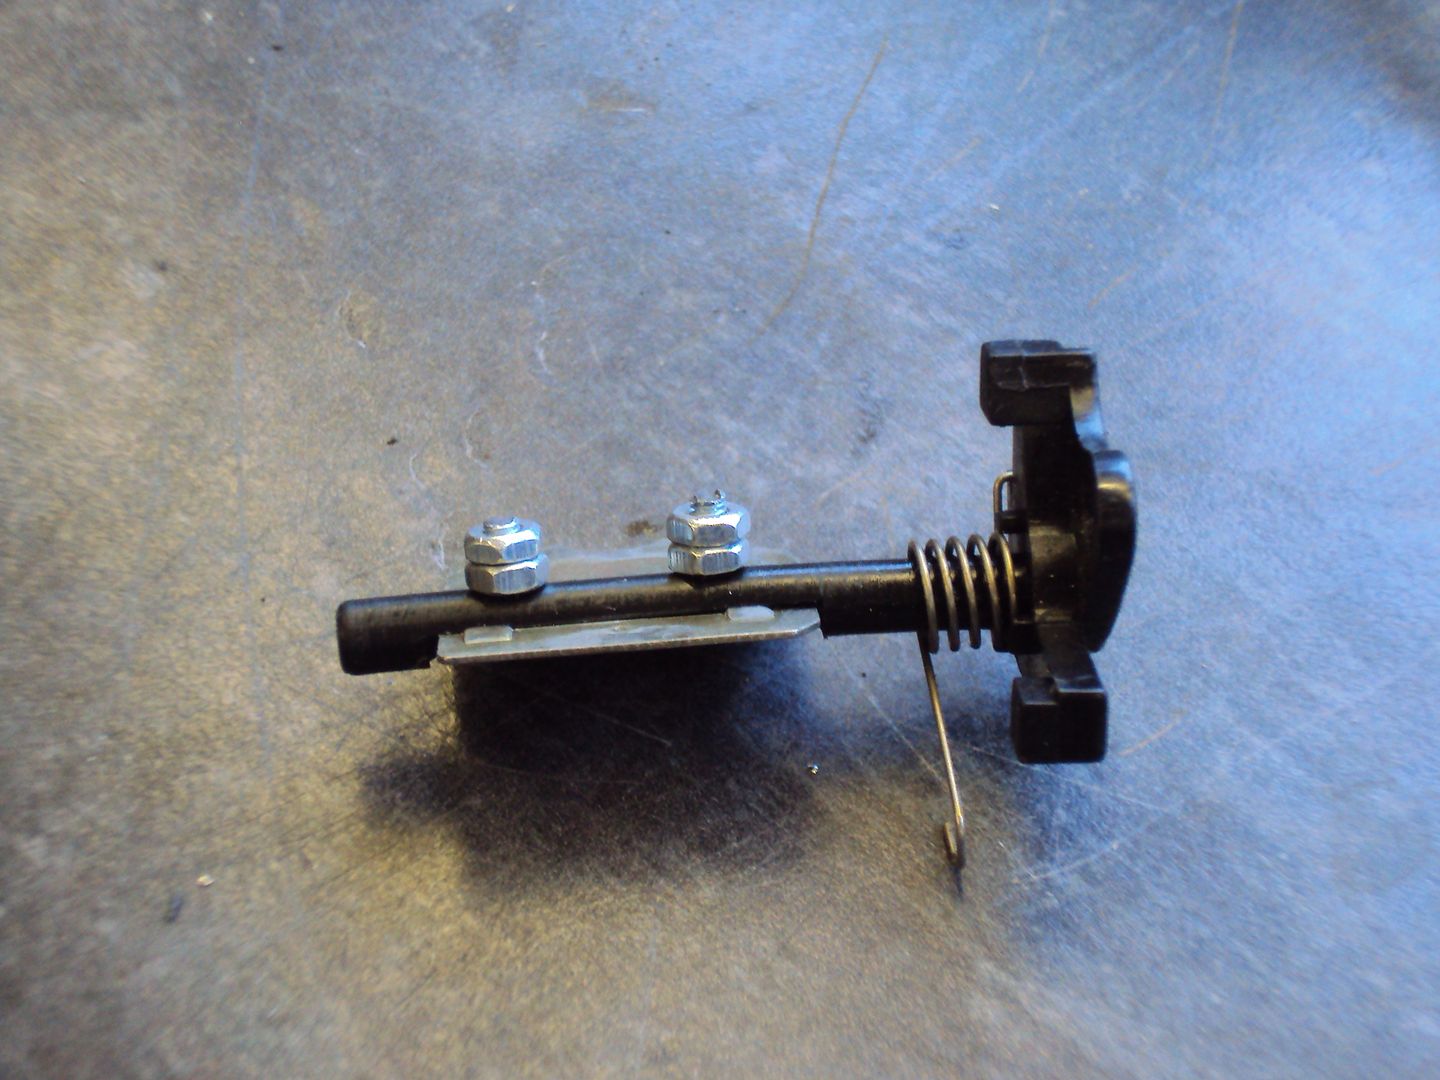
Just need to put it back in the carburettor, the nits will be fixed with thread lock to prevent them working loose and getting into the engine.
The carb also got the usual strip down an clean as it was really gummed up.
More to follow….
eliot said:
Was that the oxfordwheelshop one?
I offered £150 for it, but said he had someone who was willing to pay much more -(i assume you) yet still kept listing it.
Yep,I offered £150 for it, but said he had someone who was willing to pay much more -(i assume you) yet still kept listing it.
I offered £180 as I figured that’s what he would get after fees, ended up paying £200 as he said he had another offer of £200 and the first to get there can have it, which at the time seemed like a good deal. However after looking a bit deeper into it today I’m not so sure

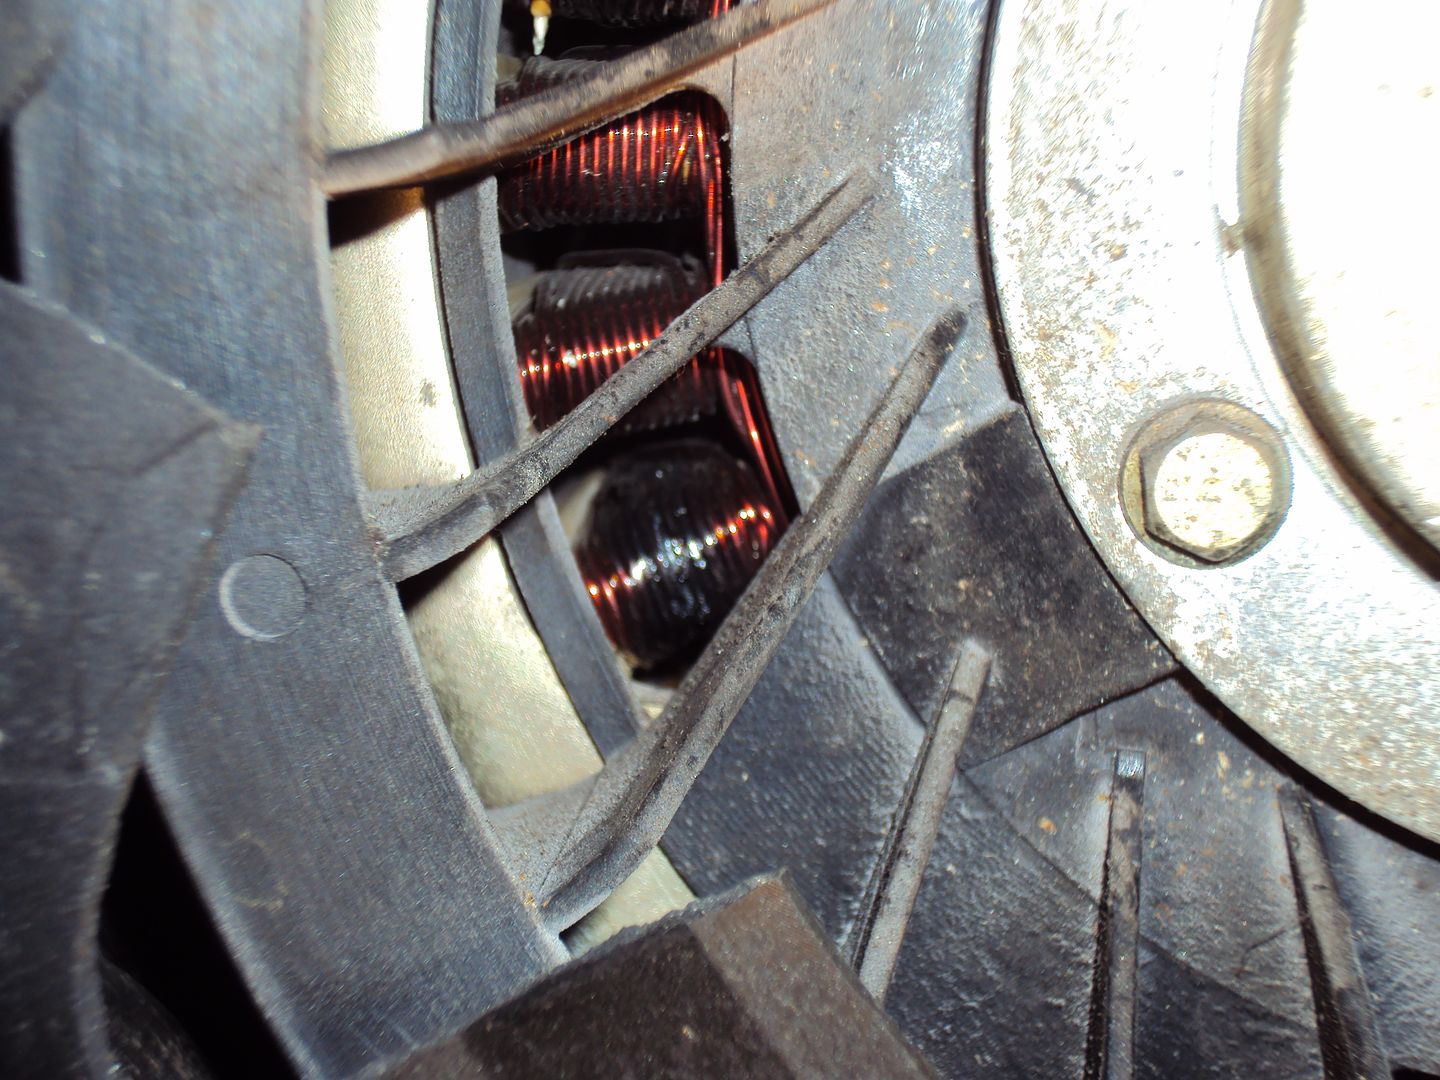
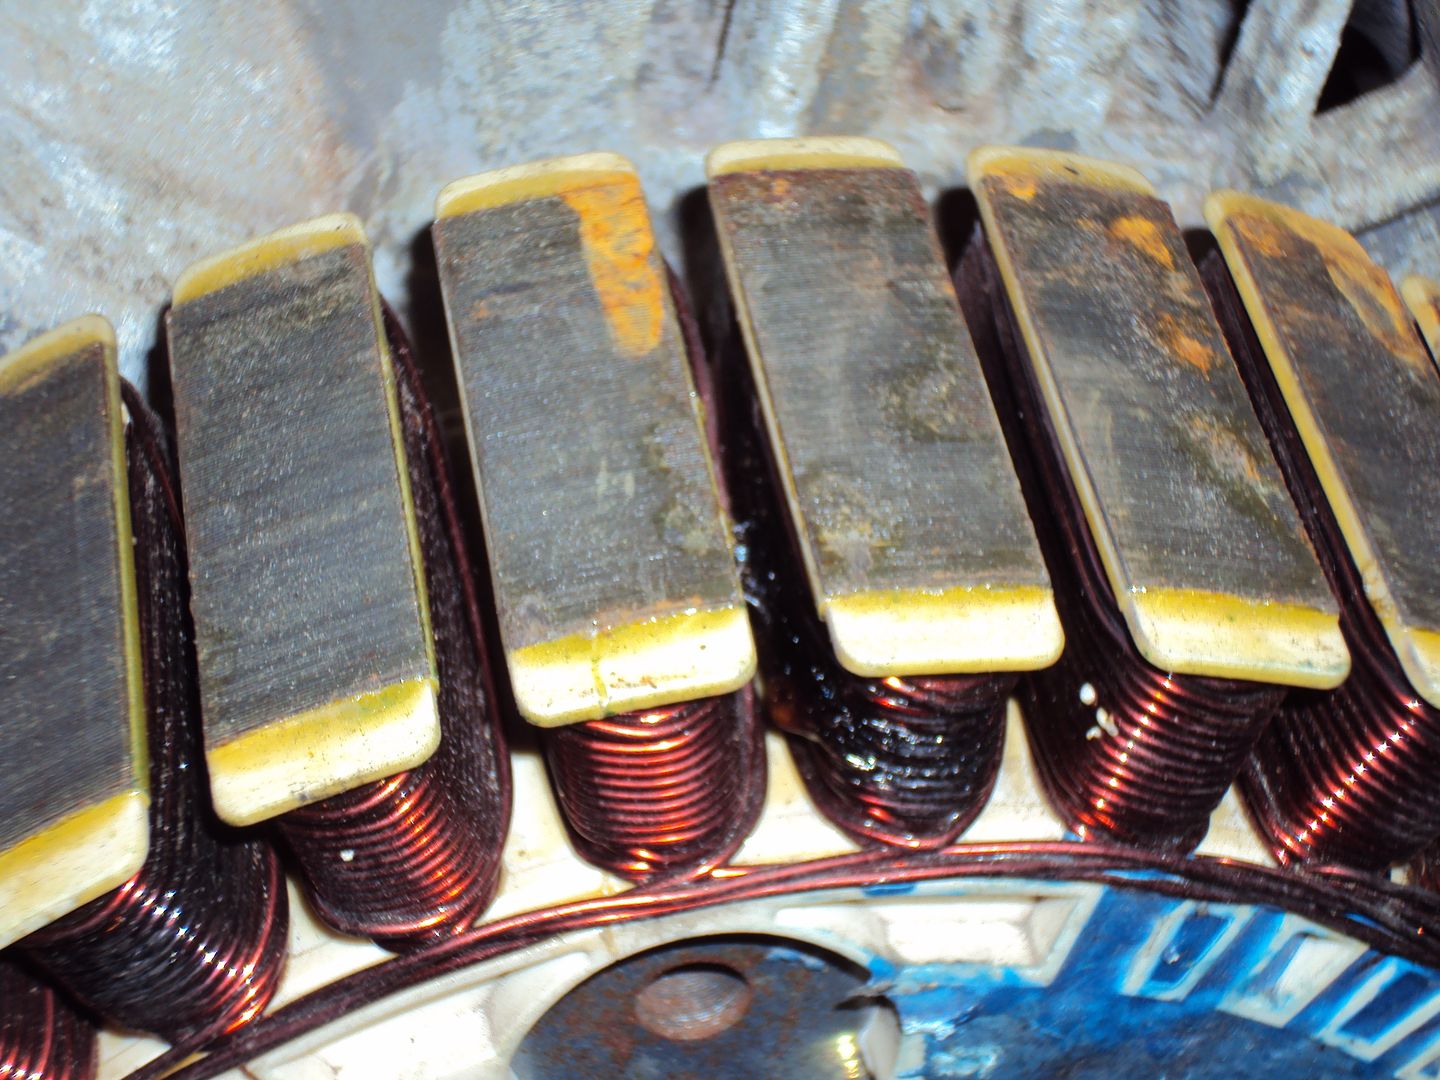
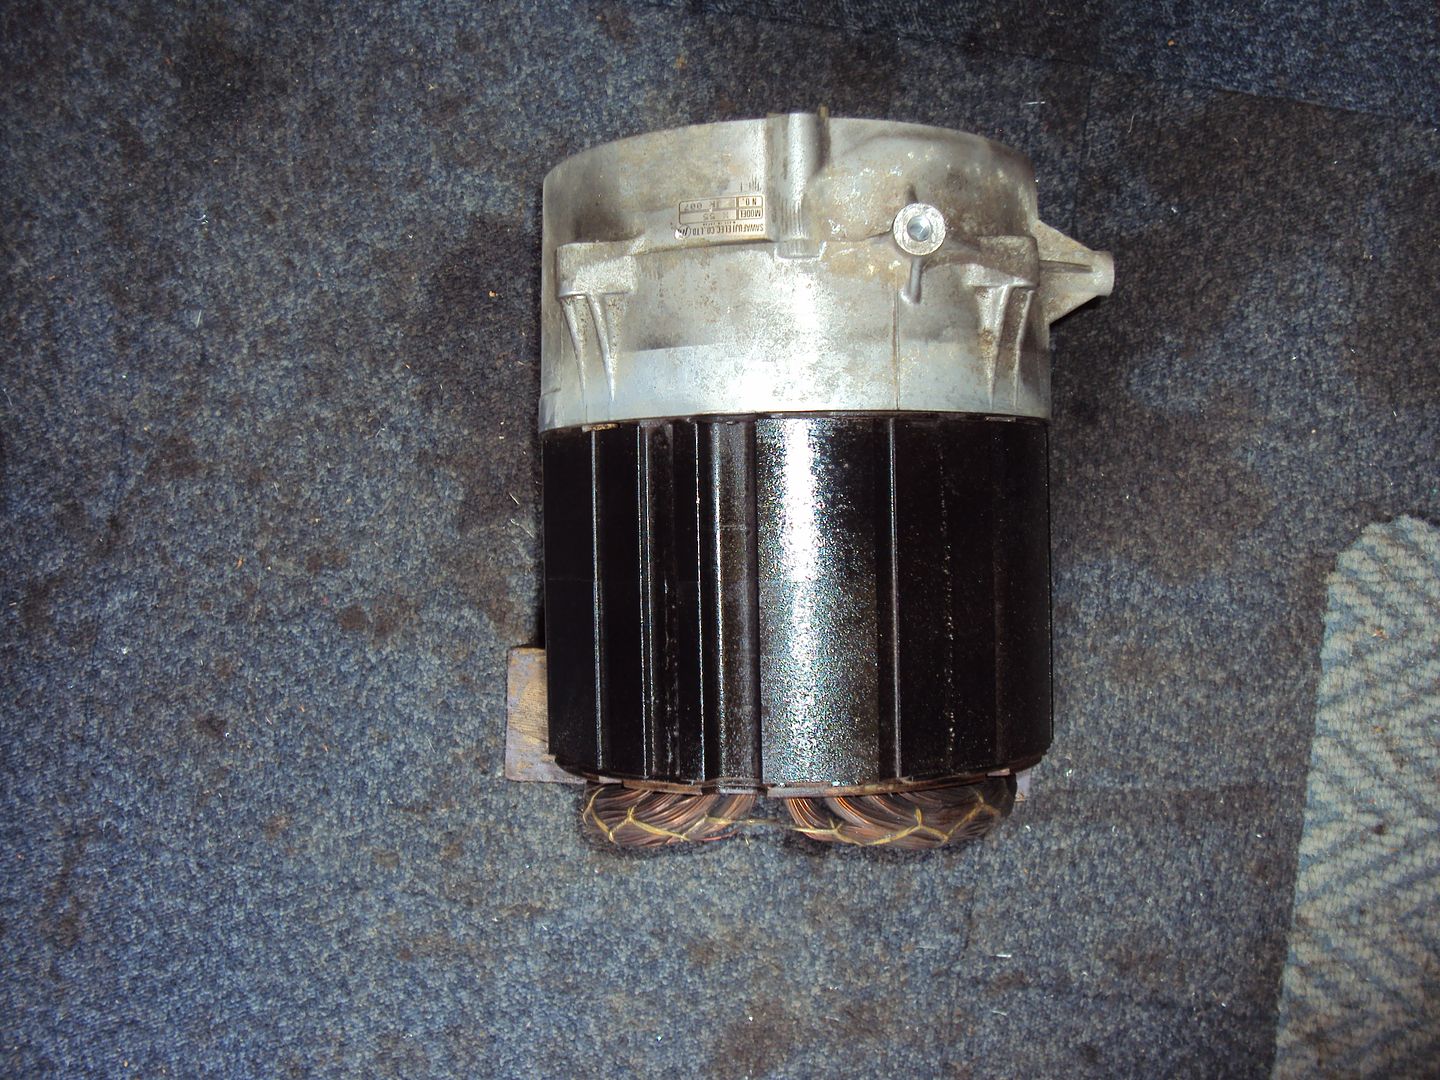
Looks like the stator windings have got a bit warm…..
eliot said:
He was pretty abrupt with me. I said it wasn't worth what he was asking for it and it was a bit of a punt that it's just the inverter that had gone.
His words were:
"I know how much an inverter is and i also know the rest of it is in perfect working order and also know the reason it has blown
I dont care how many times its failed to sell i have a buyer who deals in these things that will give me £225 if and when ever i wish to sell it
So if he deals in them its worth more than that so your opinion dosnt count thanks"
Clearly the rest of the thing isn't in perfect working order.
I've picked up a working IG3000 for the house, going to start work on a changeover panel as there are some cheap misprinted changeover switches on the bay at the moment.
Hope you get it fixed though.
He was the same with me when I contacted him when it was first listed, I decided to give him another try as he gradually lowered the price. His words were:
"I know how much an inverter is and i also know the rest of it is in perfect working order and also know the reason it has blown
I dont care how many times its failed to sell i have a buyer who deals in these things that will give me £225 if and when ever i wish to sell it
So if he deals in them its worth more than that so your opinion dosnt count thanks"
Clearly the rest of the thing isn't in perfect working order.
I've picked up a working IG3000 for the house, going to start work on a changeover panel as there are some cheap misprinted changeover switches on the bay at the moment.
Hope you get it fixed though.
Edited by eliot on Monday 16th May 18:57
I suspect he new more about what was wrong with it than he was letting on. As during disassembly some bolts were not as tight as I would have expected.
After attacking the inverter pack with paint stripper I managed to remove some of the epoxy.
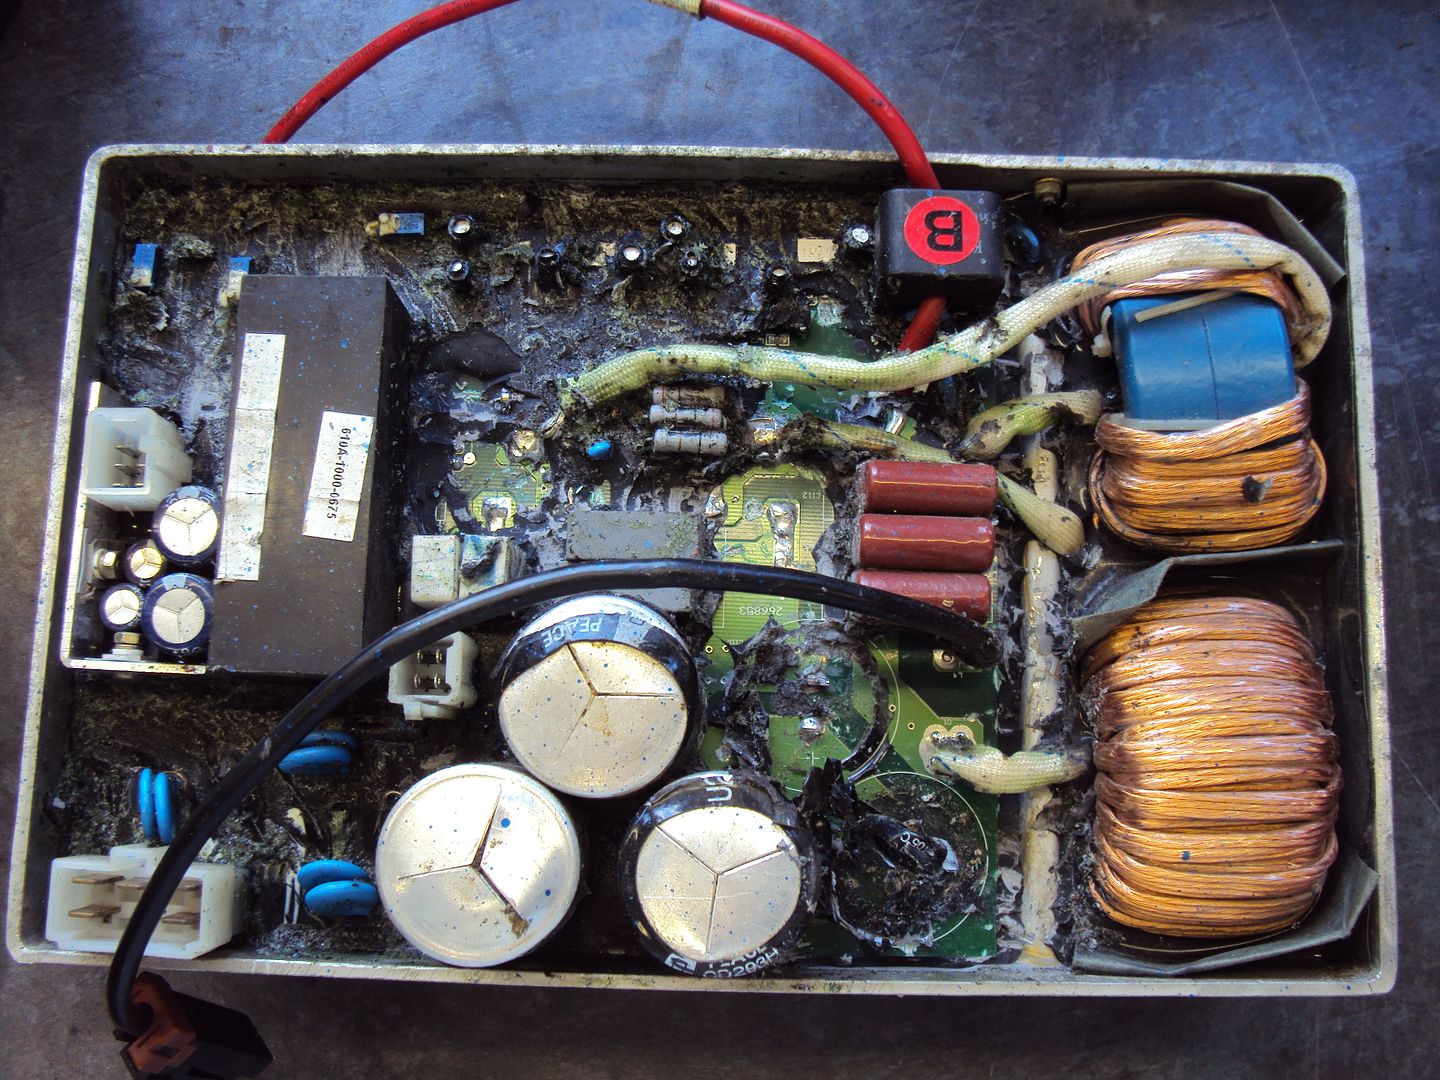
I had to give up, as the epoxy was under the circuit board, so there way now way of getting to it.
I moved on to trying to get the flywheel off using a hub puller so I could get access to the stator.
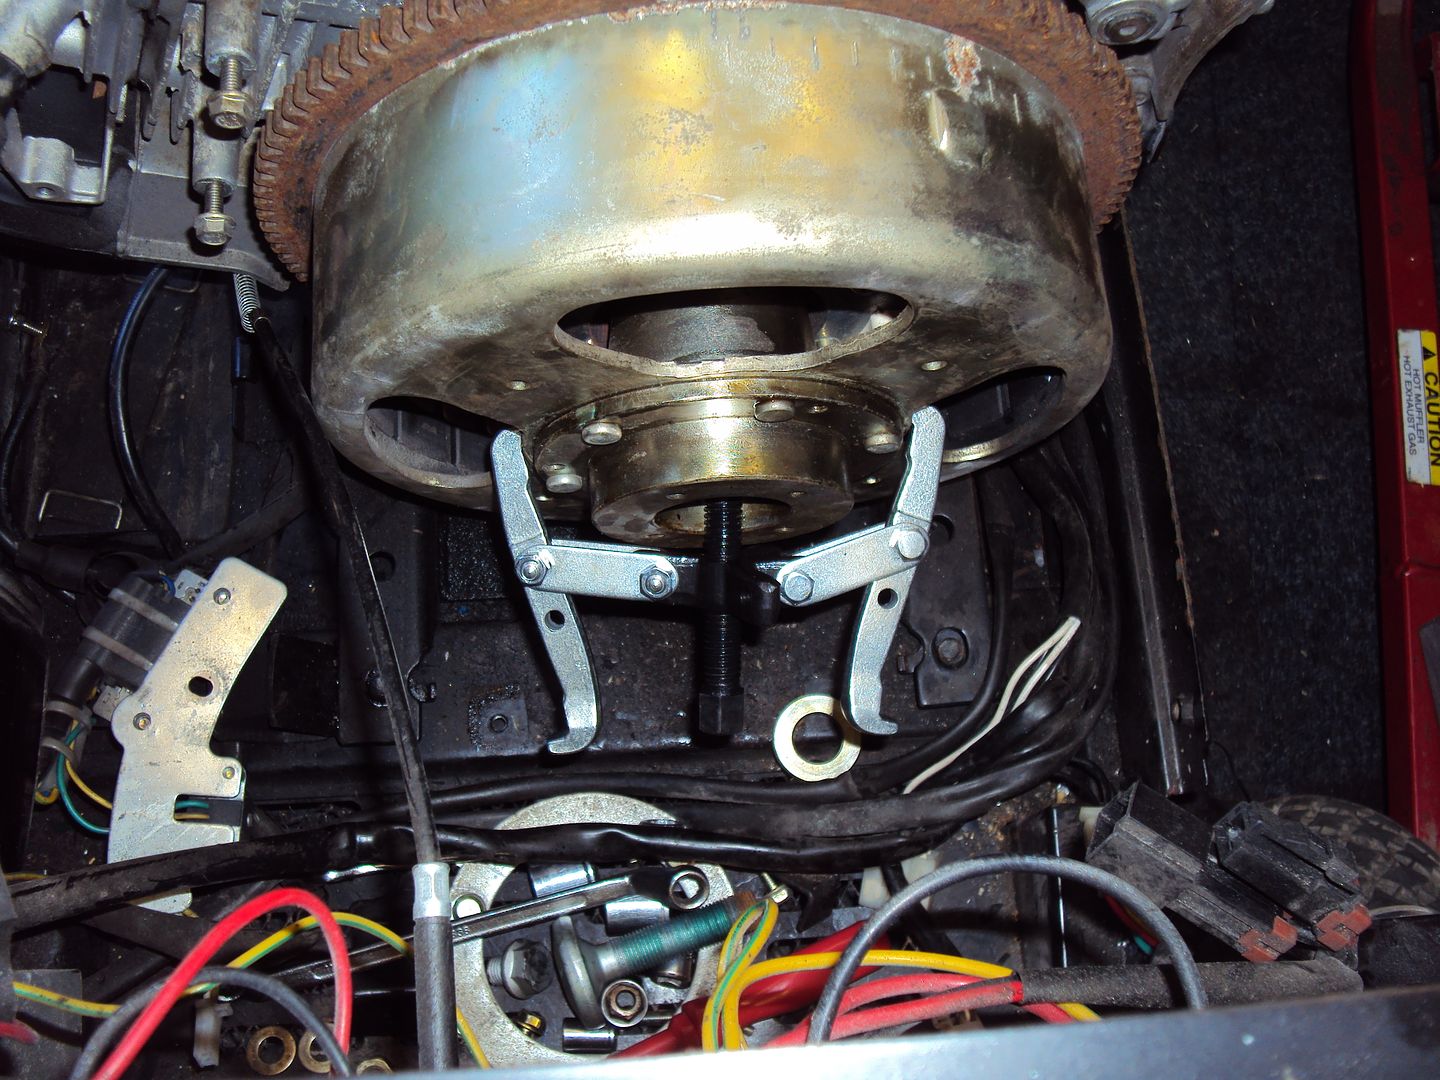
After applying lots of heat WD40 and leaving it under tension for a week it wouldn’t budge, so I gave up with the baby puller and managed to borrow a man size puller
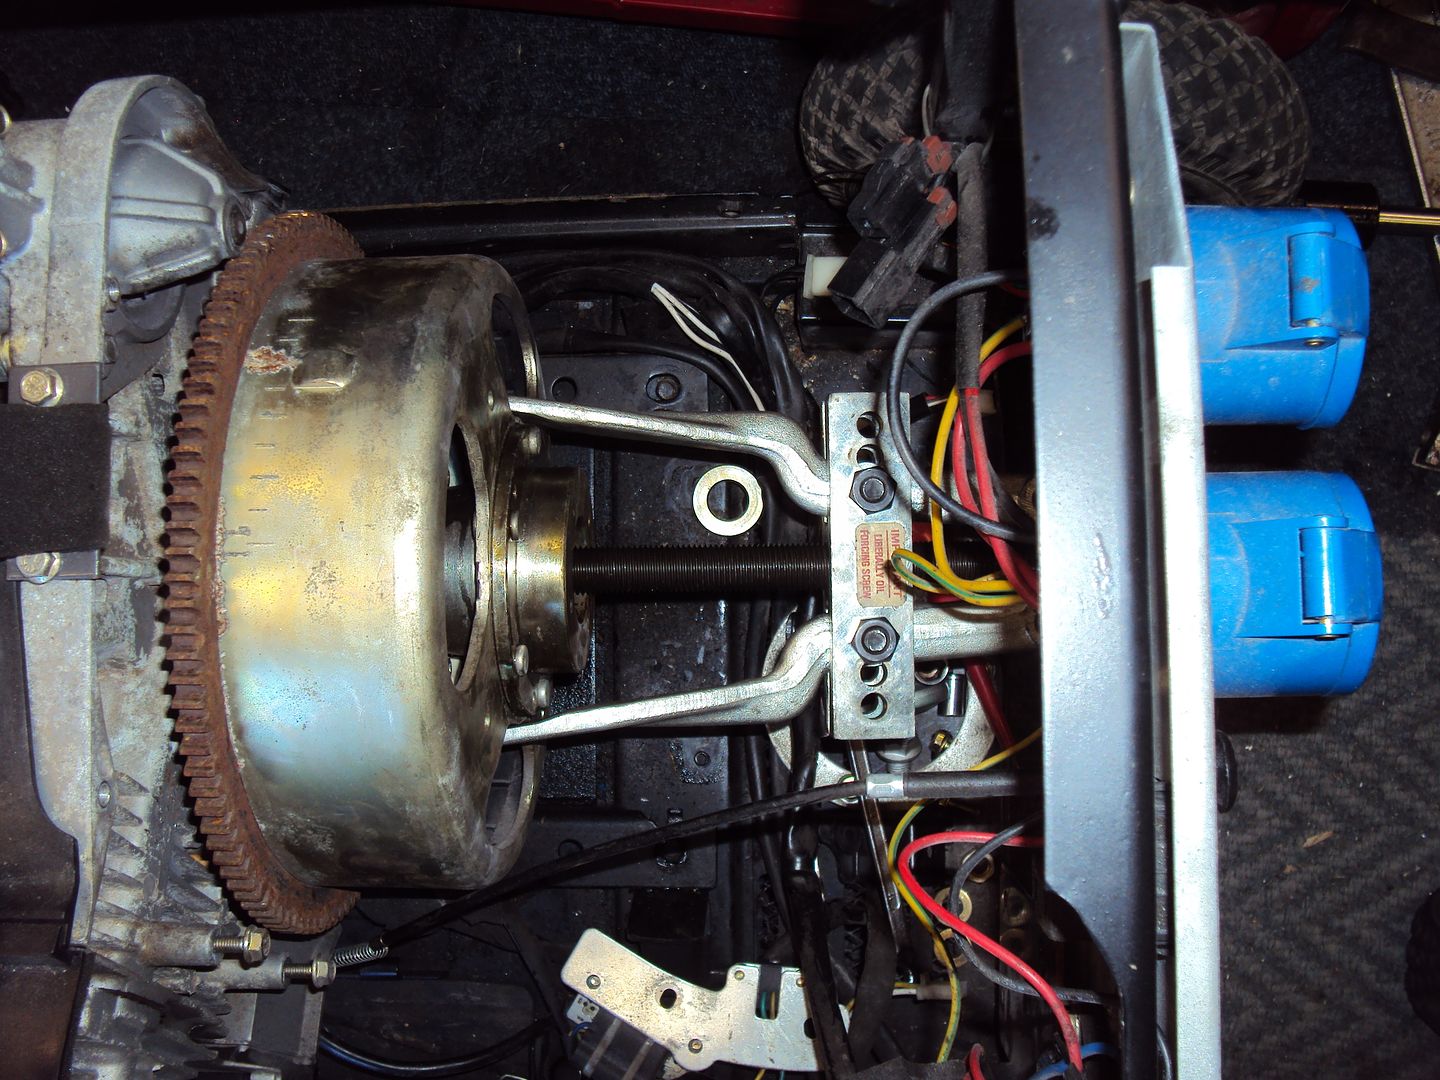
After a couple of turns on the puller the flywheel was free.
As expected the stator windings were toast.
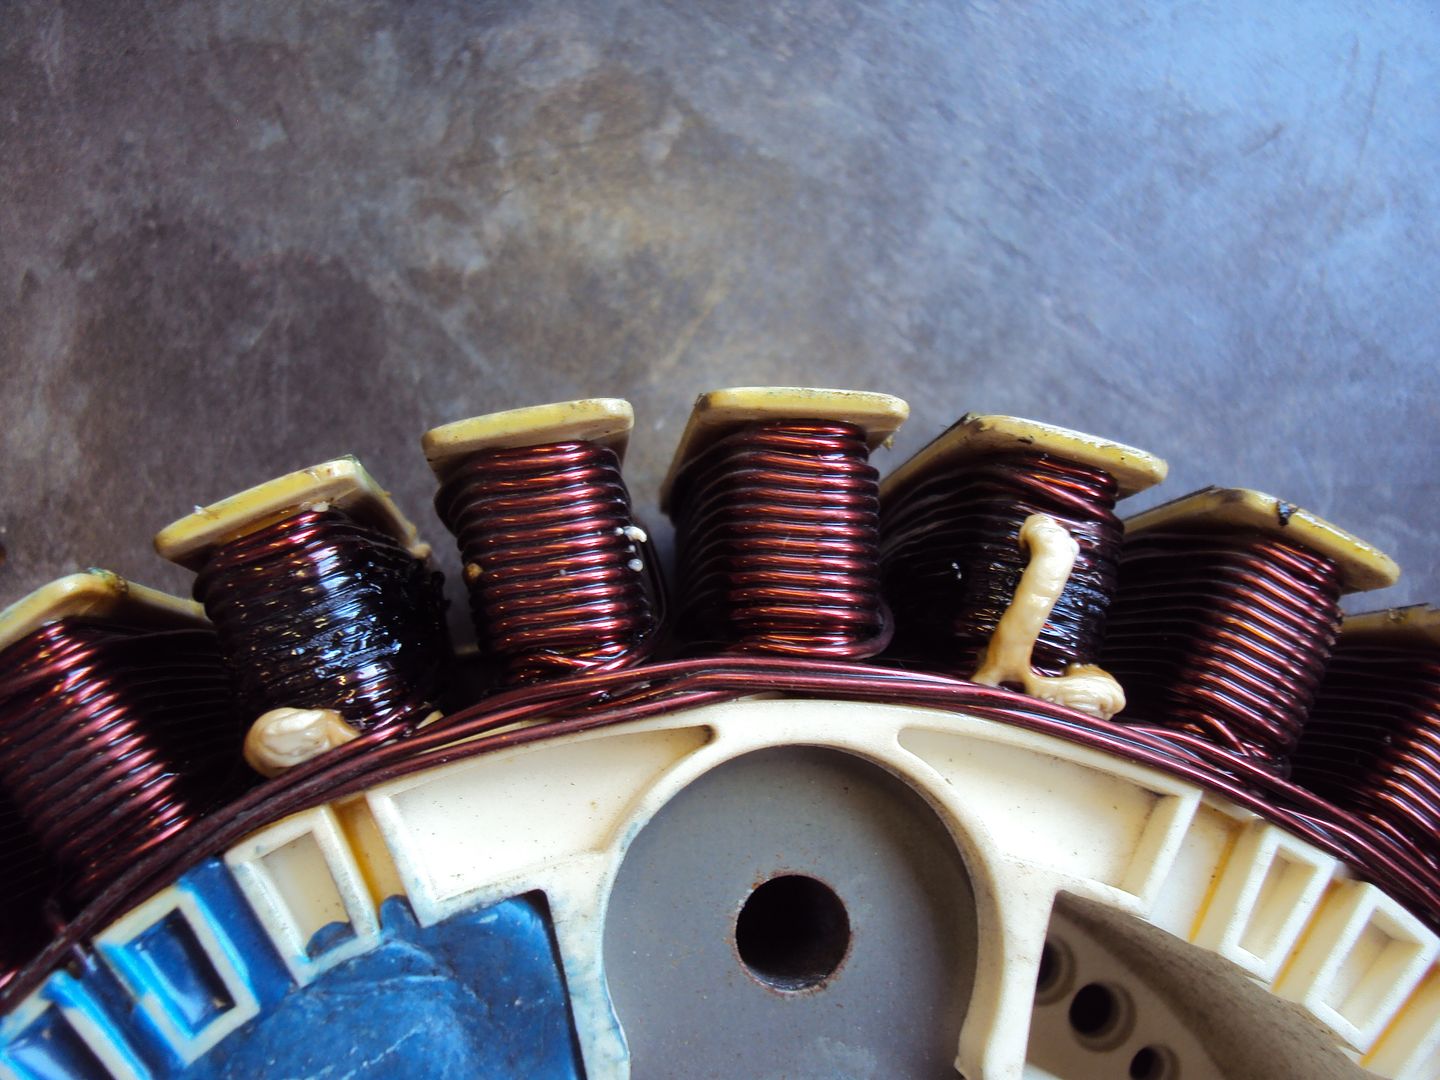
Even though the stator winding resistances matched the values in the service manual I decided it couldn’t be trusted.
I managed to source a second hand stator
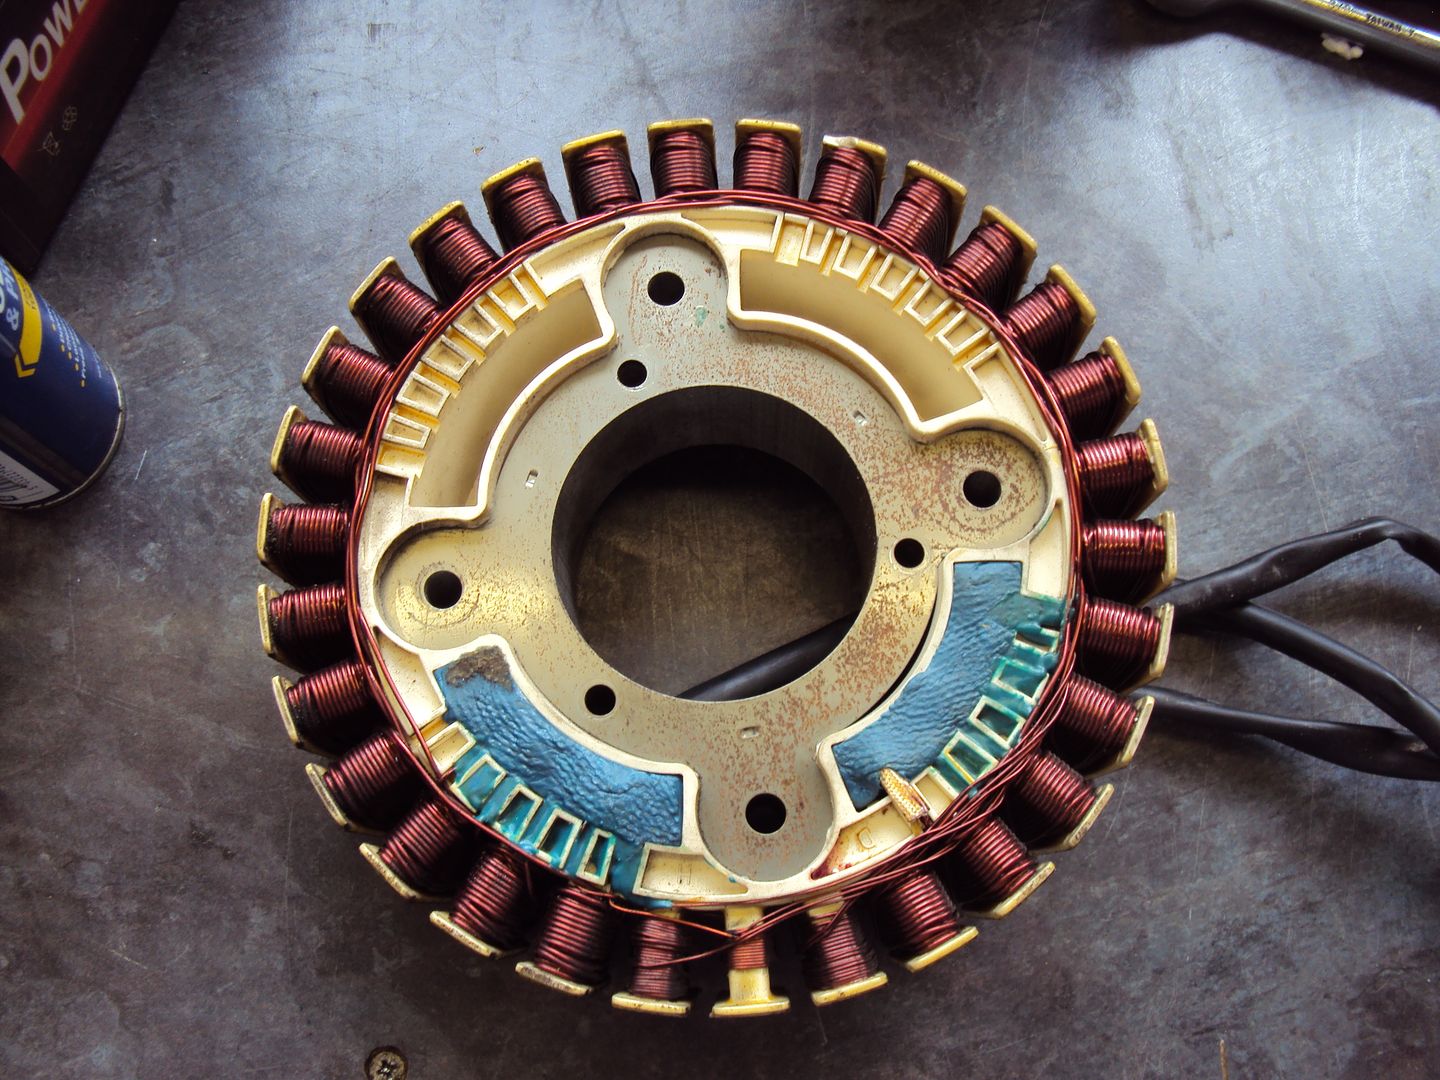
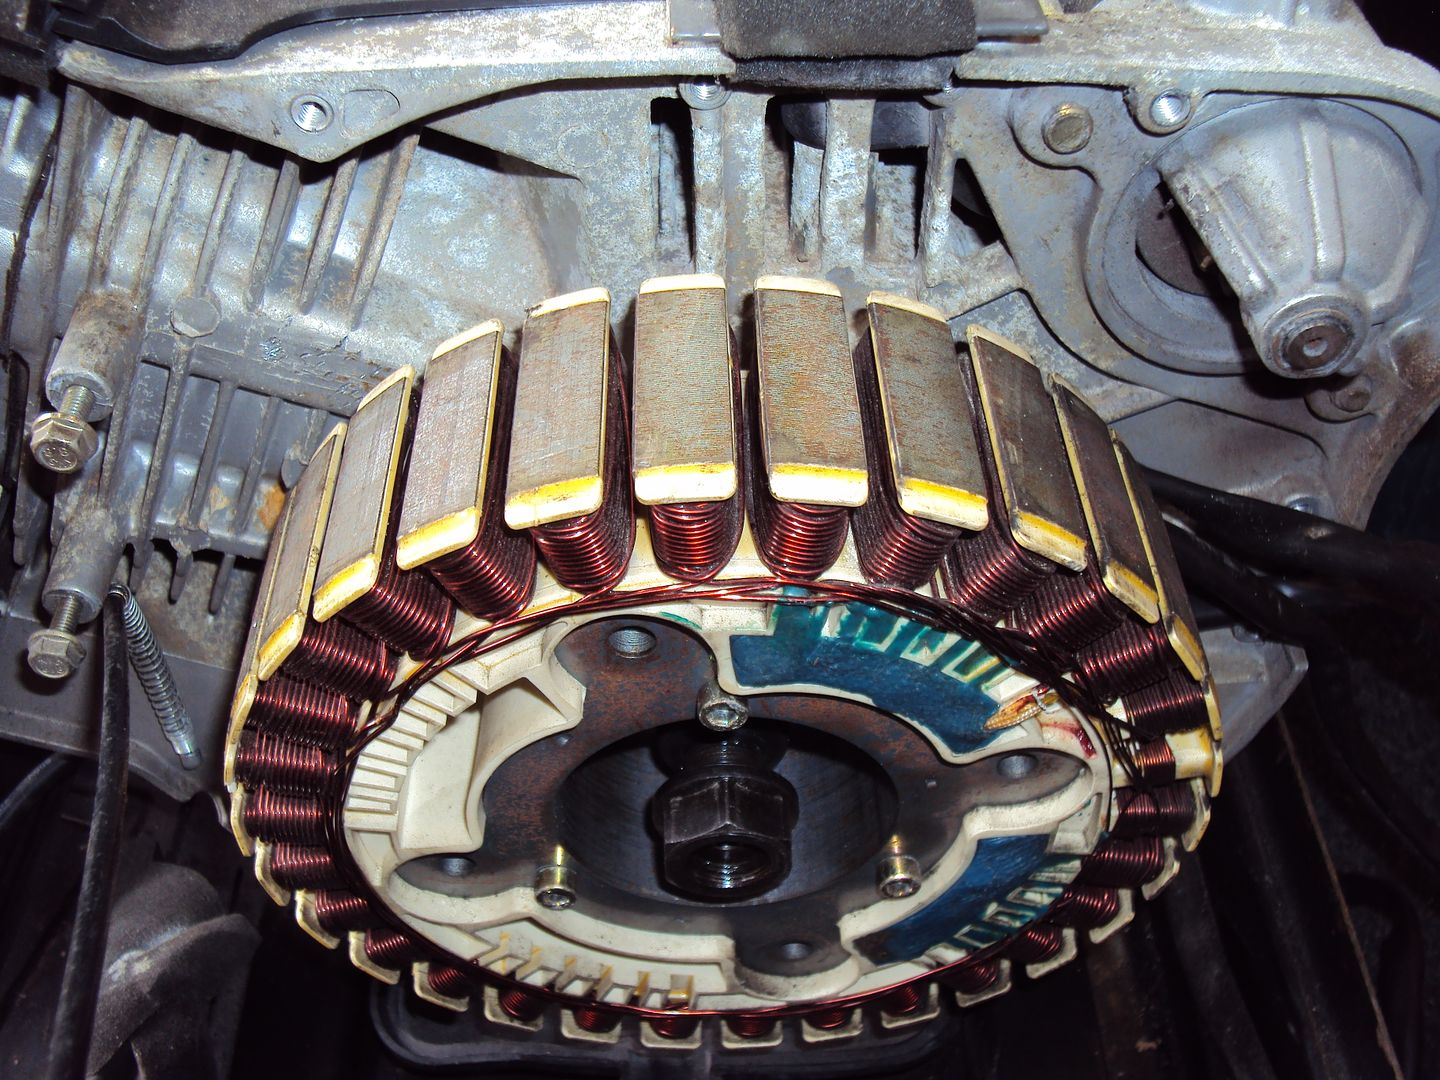
Stator fitted to engine
New inverter pack
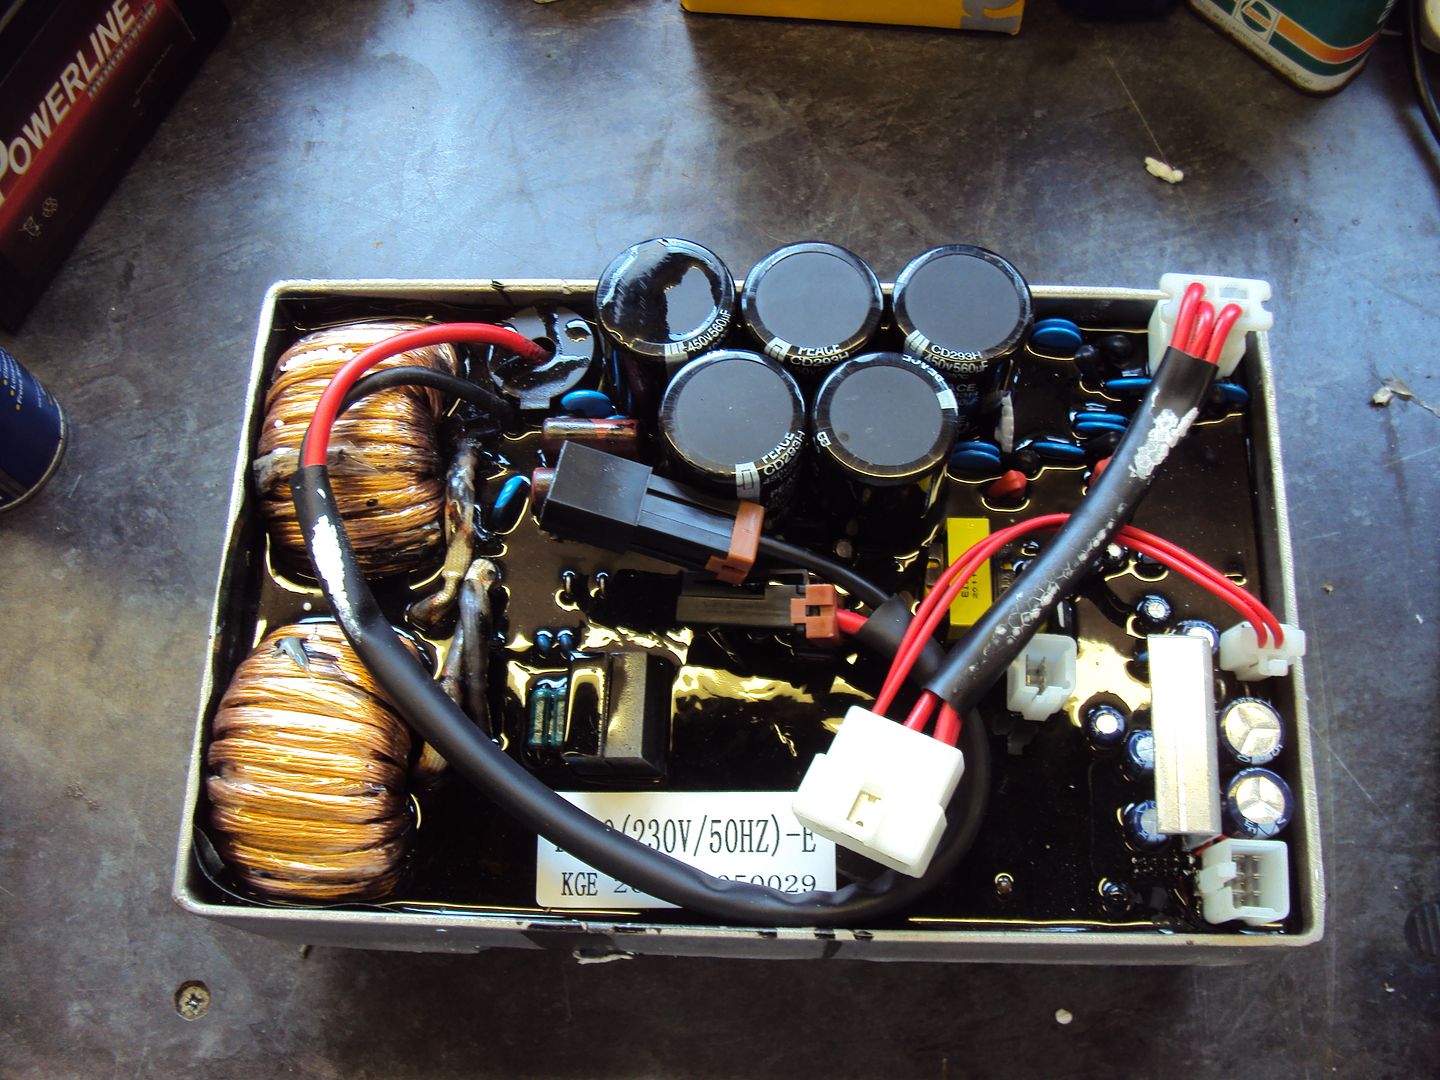
Inverter pack fitted
Once re-assembled it fired up straight away and worked, the carburettor needs some adjustment as the engine wasn’t running smoothly.
Condi said:
Right, generator people, after turning over a few petrol engine'd things Ive ended up with a genny.
This one, to be precise: http://www.ebay.co.uk/itm/182140081260?_trksid=p20...
Now, its nothing special, but will do me to either turn and sell or keep myself. Had it back tonight and it wont start, so stripped down, ordered new spark plug, spark plug cap and fuel tap. Already have some new oil so thats fine, and the carb looks in incredibly good condition, much better than I was expecting.
So, assuming I can get the engine running fine - which I should be able to - what do I then need to test on the generator part of it. How do I test it is putting out the correct power in the right way?
As eliot said, take the cover off the end and check the windings also check the capacitor, normally a white cylinder with 2 connections (can be ½ moon shape as well) to see if it’s bulging. There are a few videos on youtube which show how to test a brushless alternator.This one, to be precise: http://www.ebay.co.uk/itm/182140081260?_trksid=p20...
Now, its nothing special, but will do me to either turn and sell or keep myself. Had it back tonight and it wont start, so stripped down, ordered new spark plug, spark plug cap and fuel tap. Already have some new oil so thats fine, and the carb looks in incredibly good condition, much better than I was expecting.
So, assuming I can get the engine running fine - which I should be able to - what do I then need to test on the generator part of it. How do I test it is putting out the correct power in the right way?
If it works it will be fine to power lights and power tools, but is wouldn’t use it on anything electronic as the regulation isn’t that good.
Might be with sticking a post on https://www.smokstak.com/forum/forumdisplay.php?f=... they are pretty knowledgeable over there on these machines (being US made).
Thought it was about time I revive this.
Since the last update I have worked on a few more generators, they all have been relatively easy fixes ranging from clogged carbs to the wrong spark plug being fitted so nothing exciting.
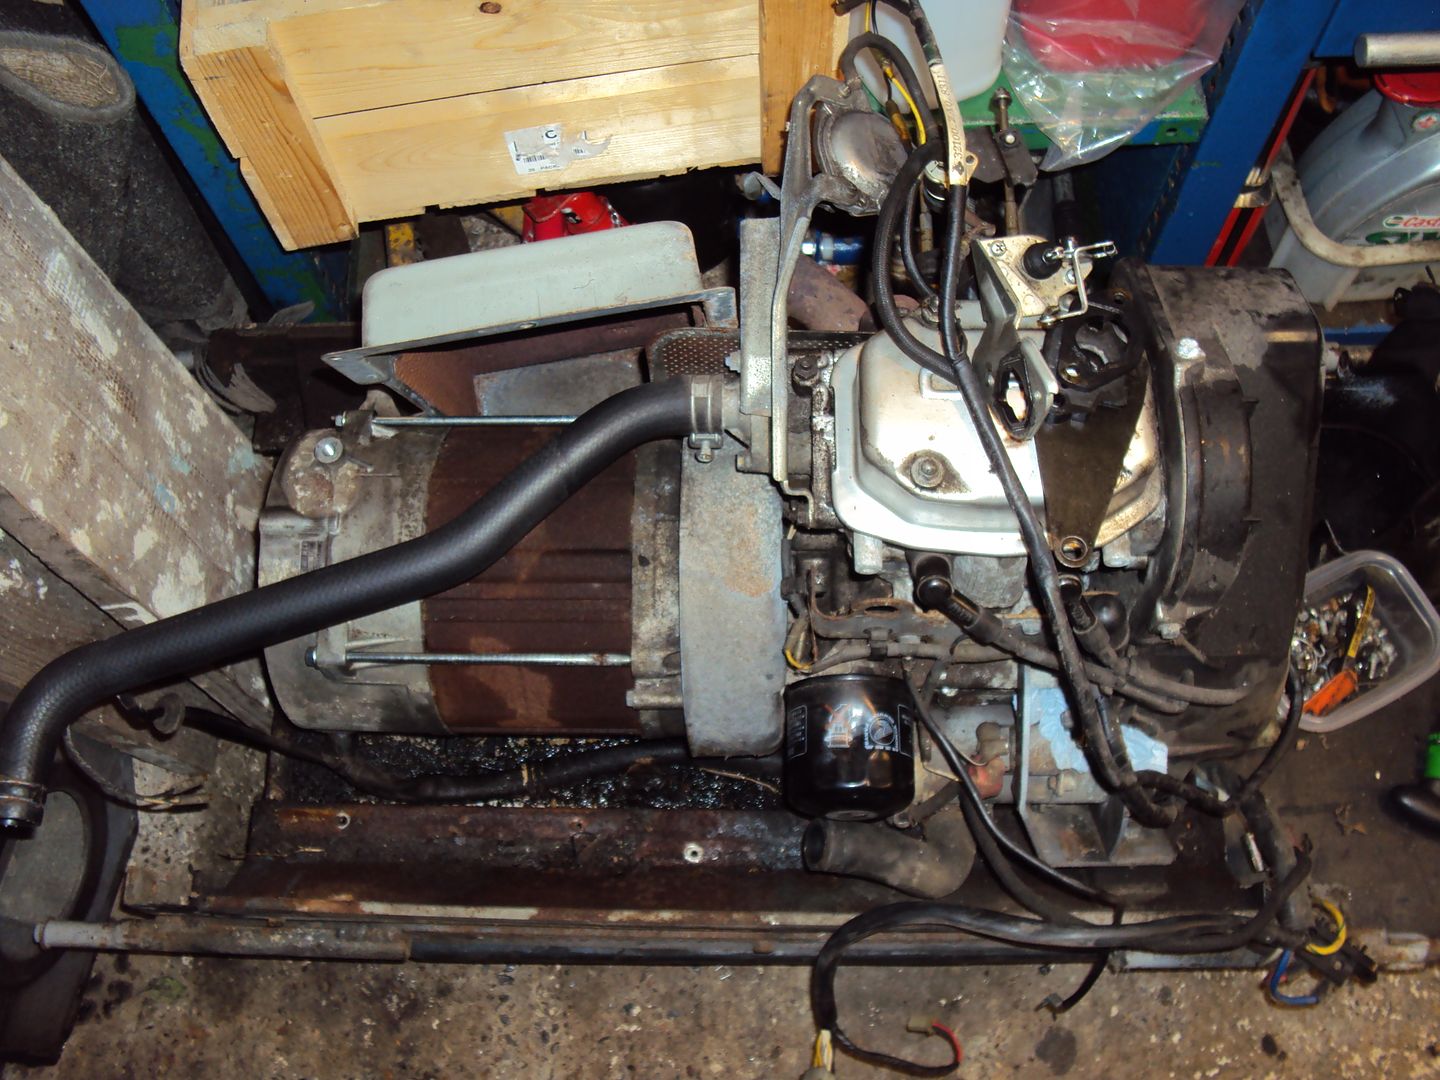
The latest project is another of the big HondaEX5500’s (pic from ebay listing).
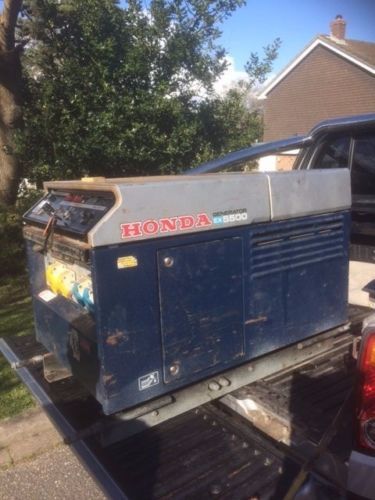
It was described as running, but after an exchange of messages with the seller found it had no oil pressure as the oil pressure warning light was permanently on. I guessed it would be the same problem as before where the plastic gear that drives the oil pump had lost its teeth. The other problem was that it had no wheels so was difficult to move.
Strip down started
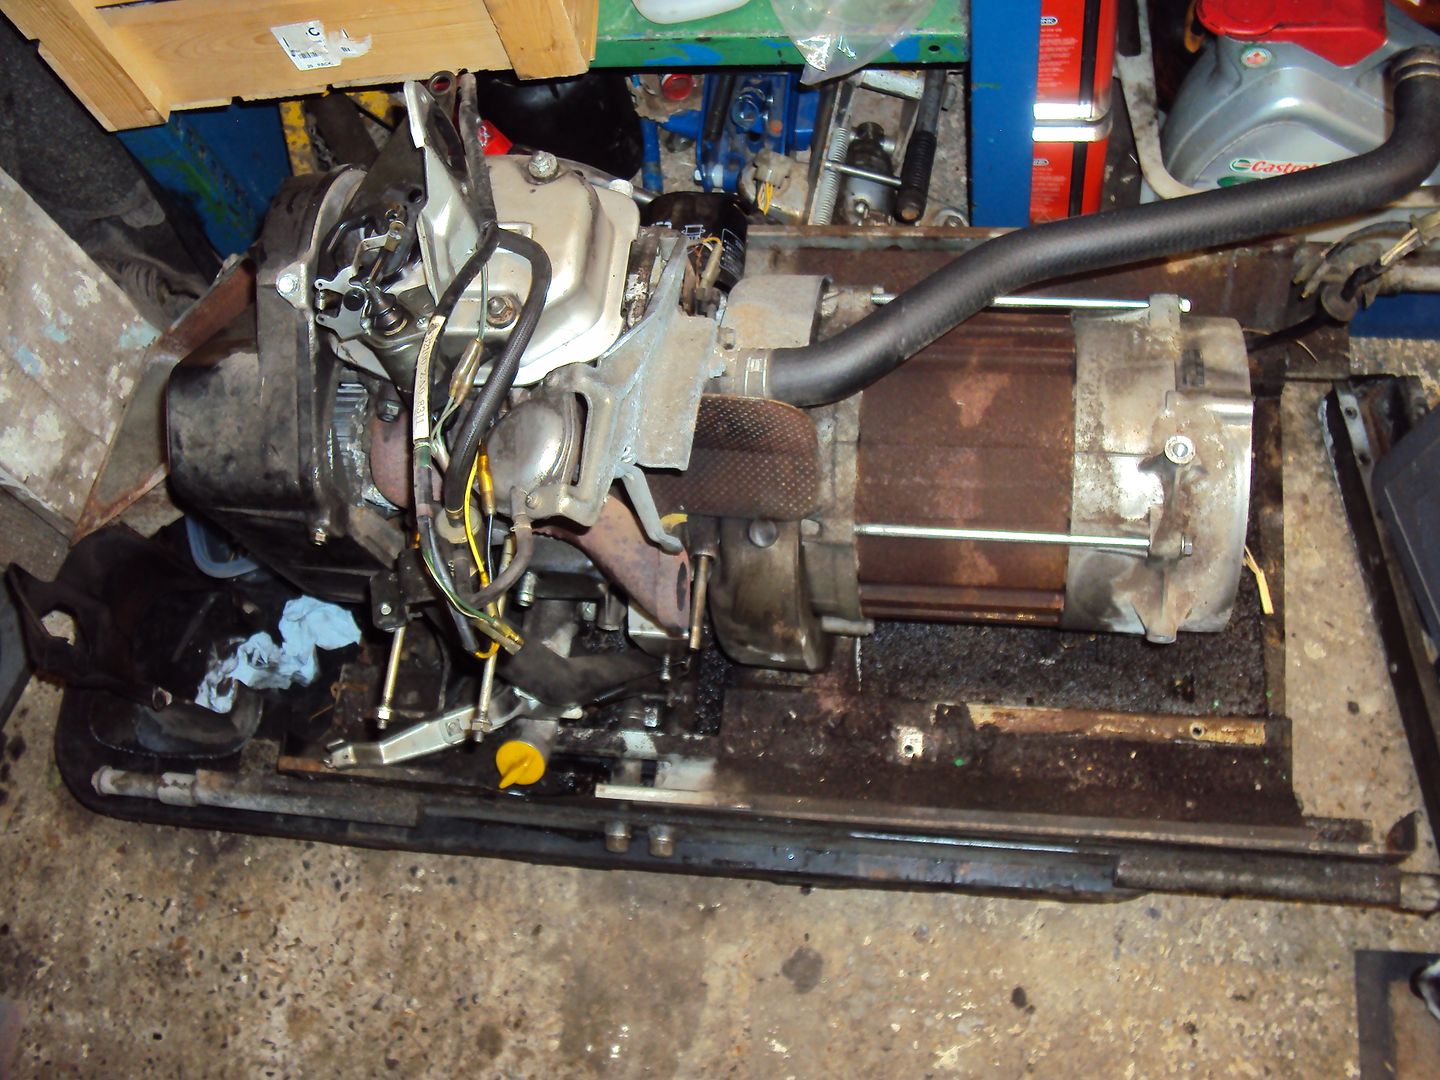
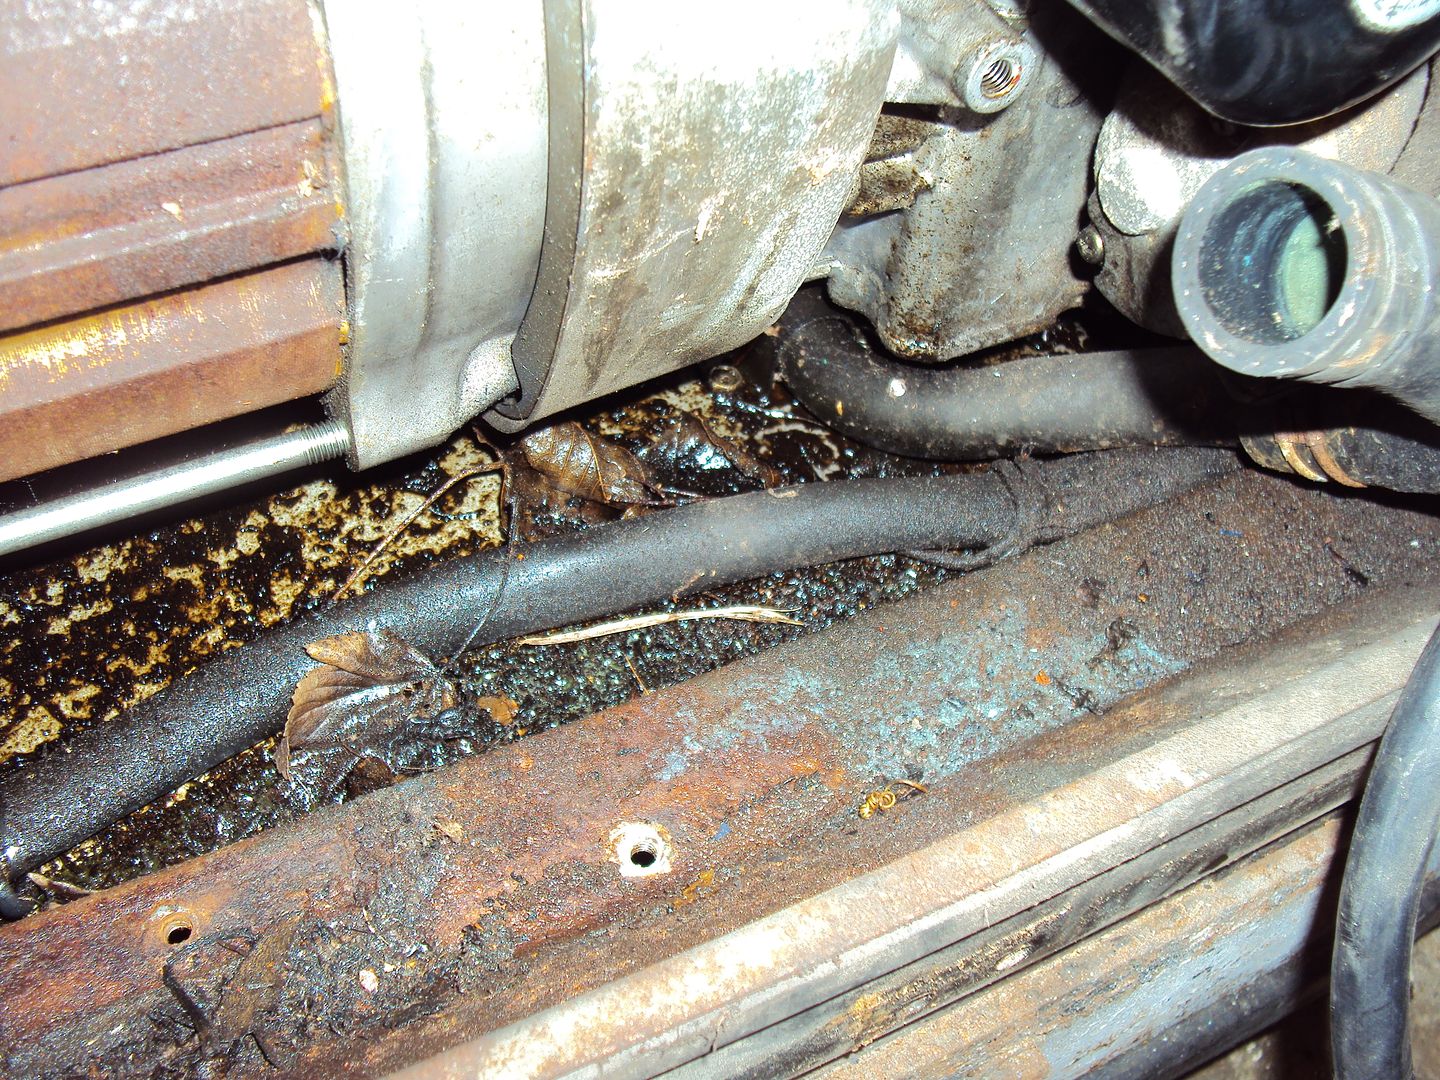
The bottom of the case was covered in oil, mud and leaves, think I scooped a good 2kg of congealed gunk out of it.
As before I had to completely dismantle it to get to the oil pump, once I got the cover off the pump it was as expected.
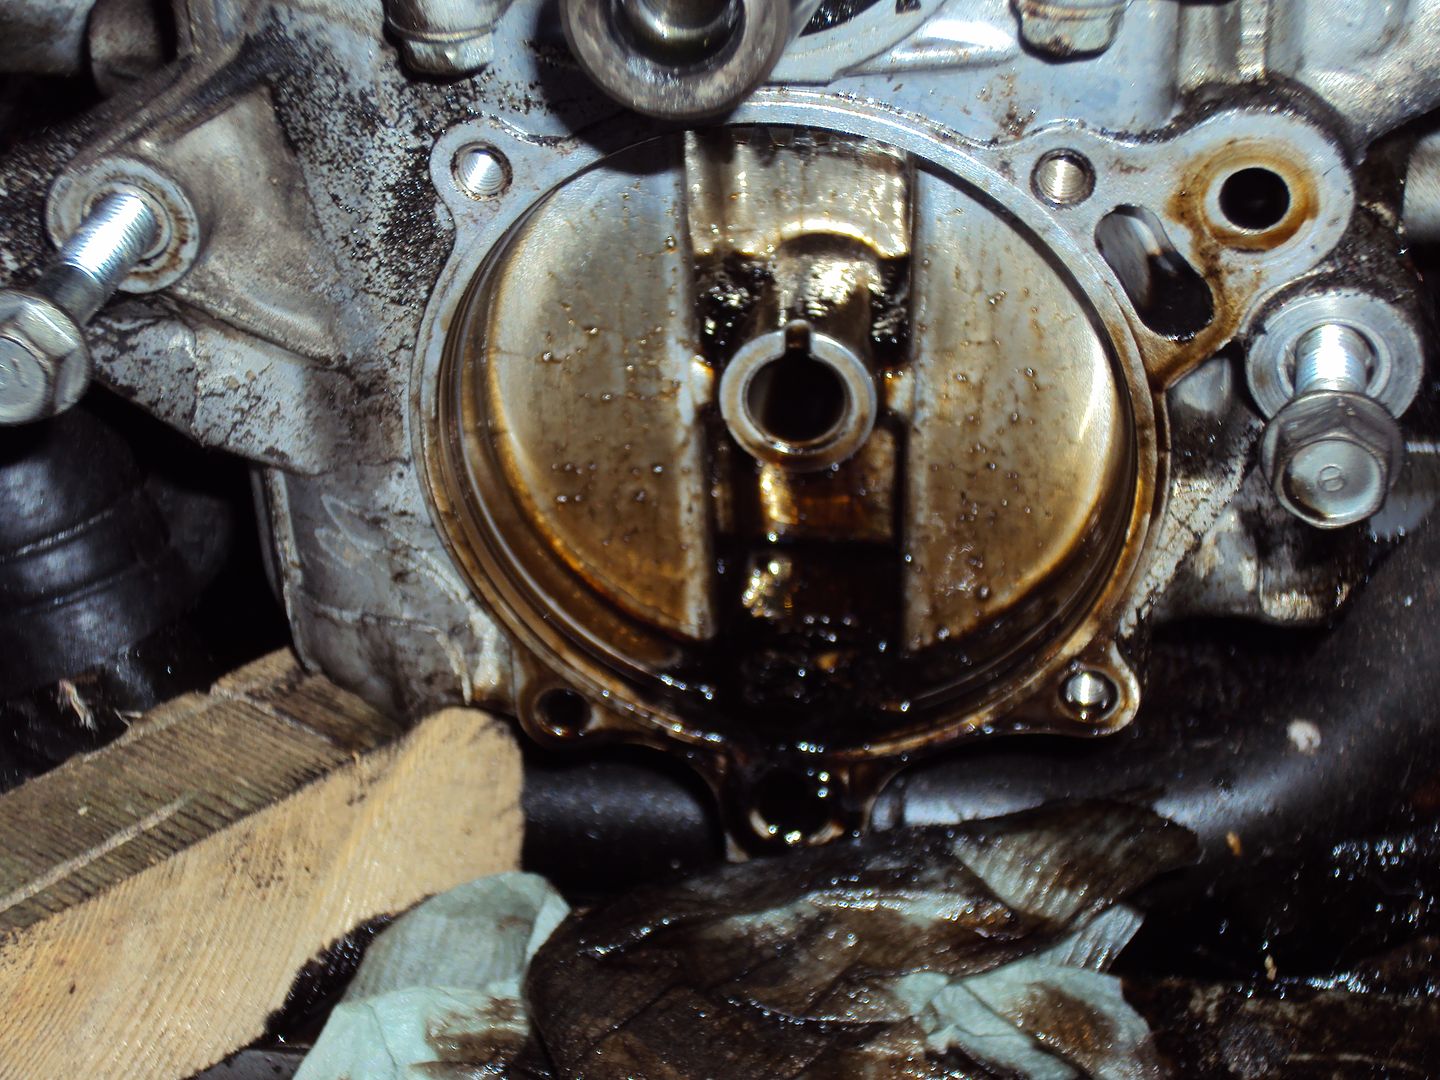
Unfortunately the replacement drive gear is on back order from the factory and won’t be available until the end of July.
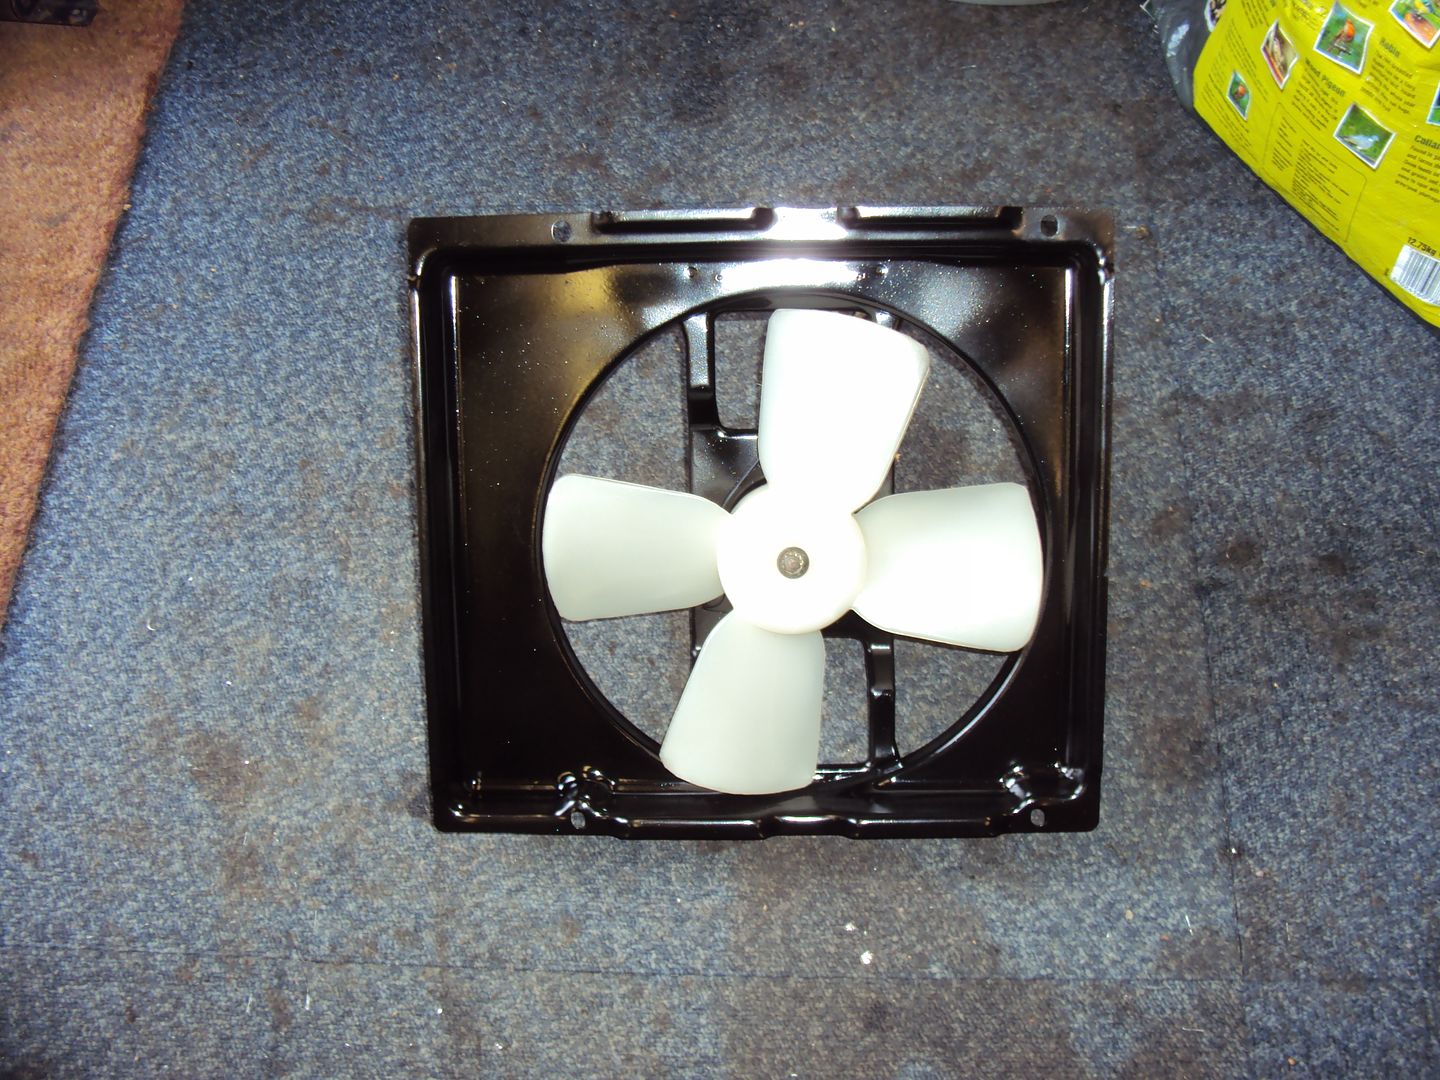
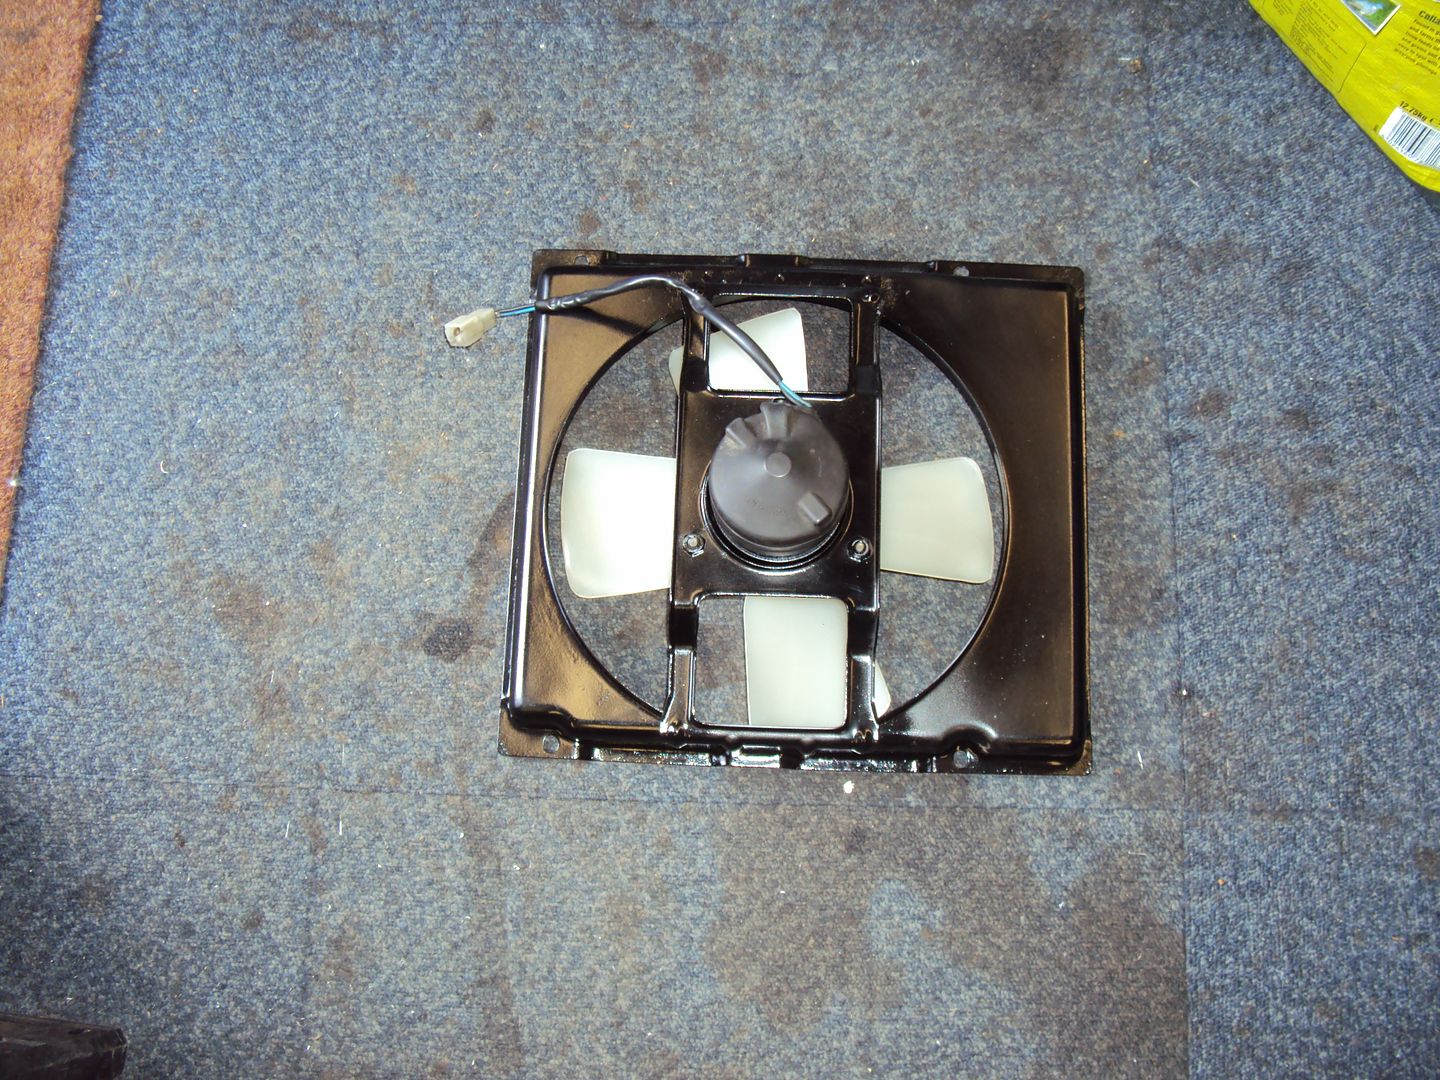
While waiting for the parts I decided to clean and repaint some of bits I removed. Started with the end cover for the alternator.
Cooling fan

Cam cover (didn’t get a before)

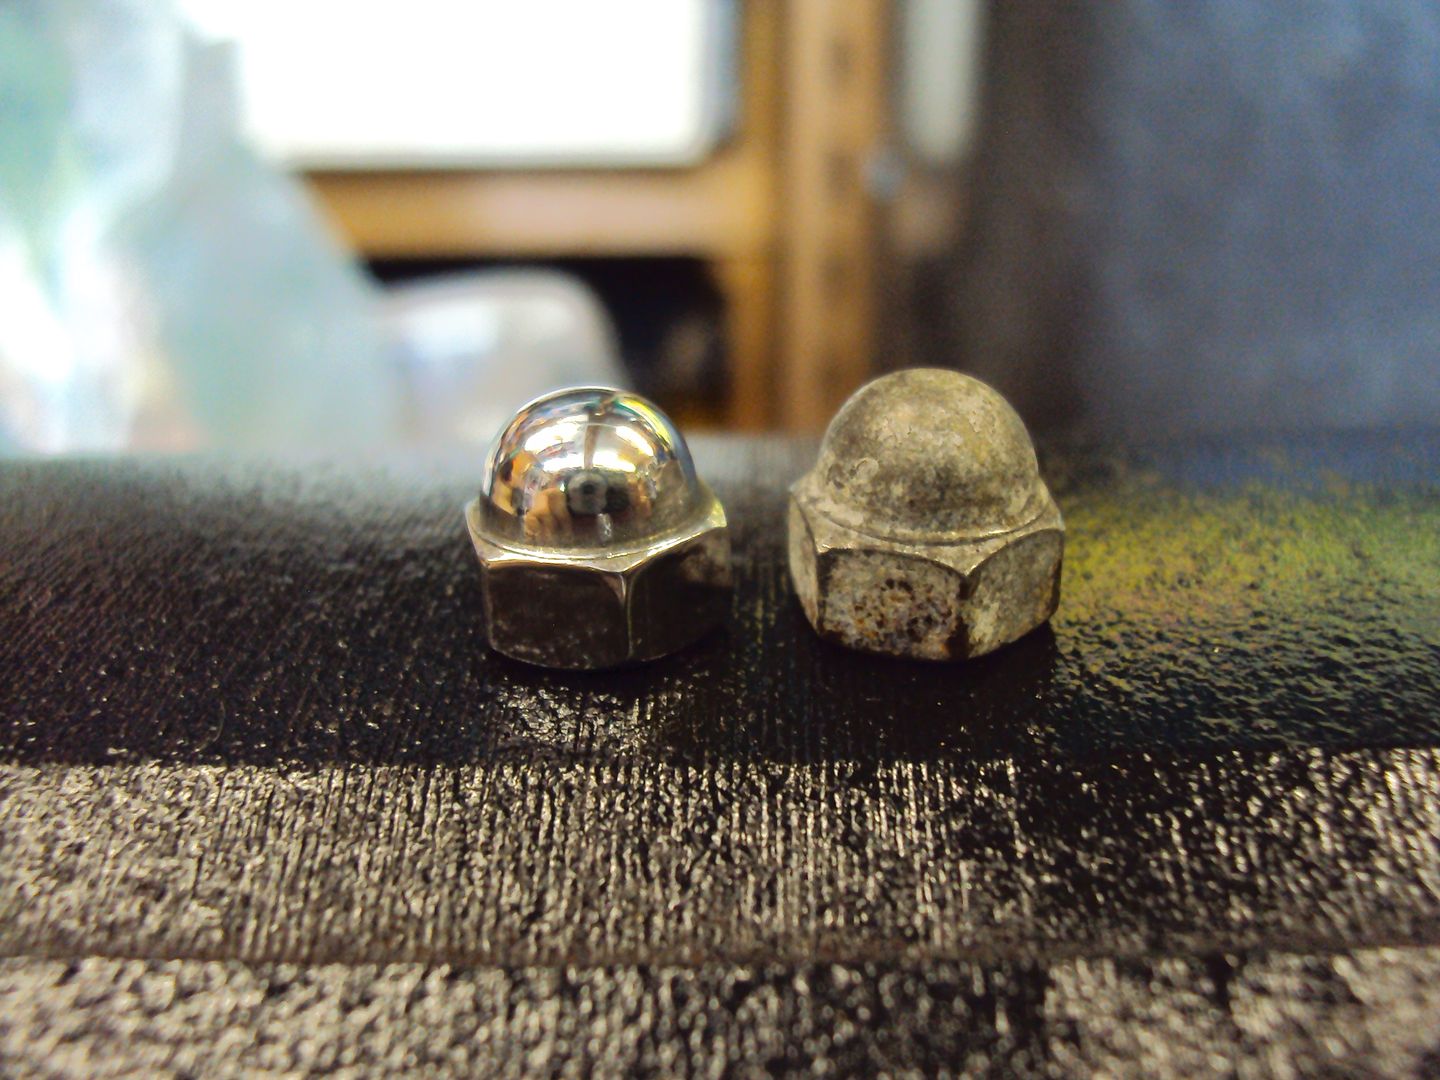
Polished the domed nuts that hold the cam cover down
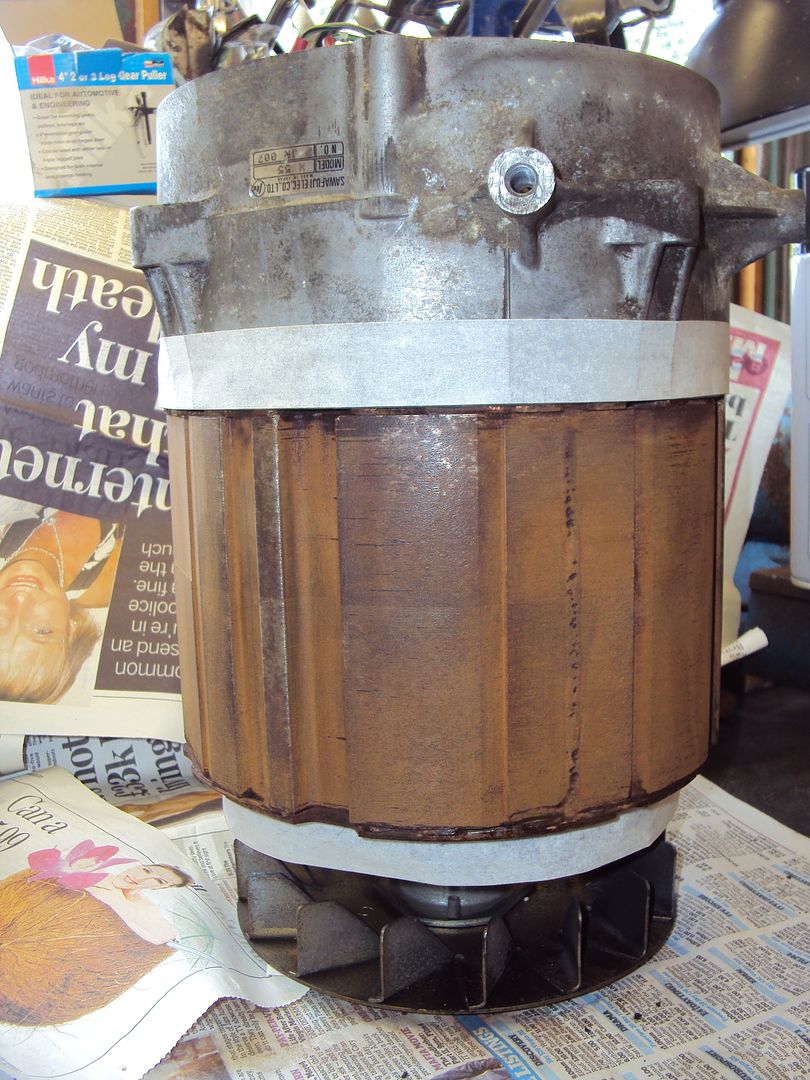
Also gave the alternator a coat of paint
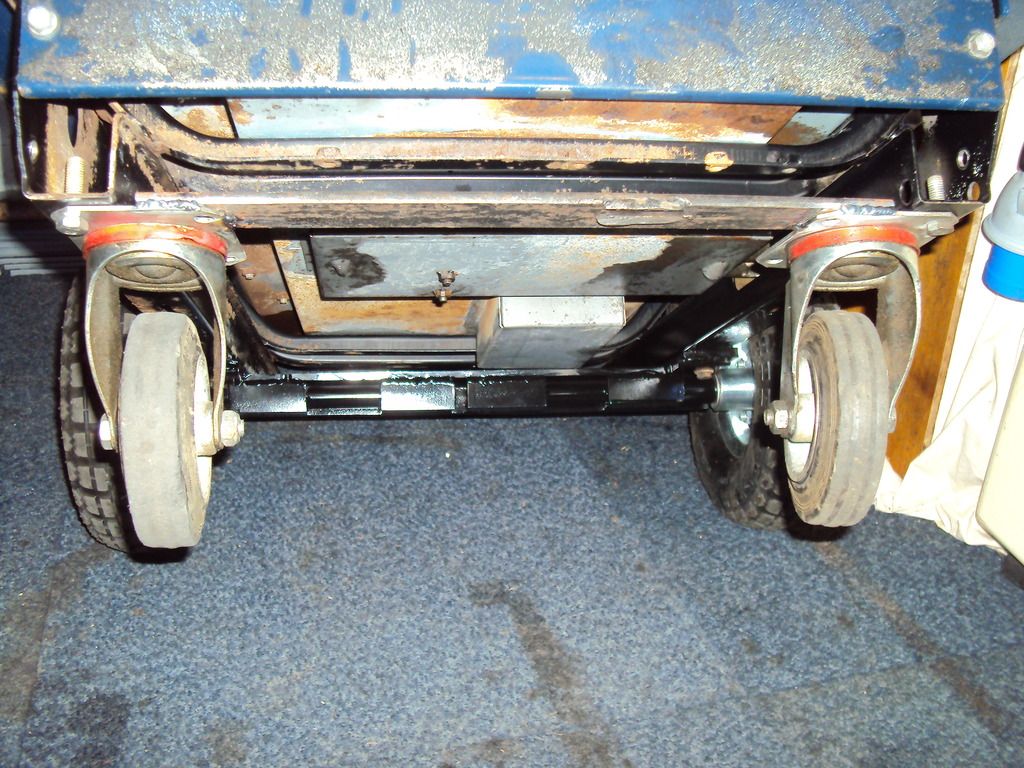
The next part of the project is to sort some wheels, I started by assembling the case so I could check the wheels I got wouldn’t catch anywhere. As I was getting setup our pet tortoise decided it wanted to get involved.
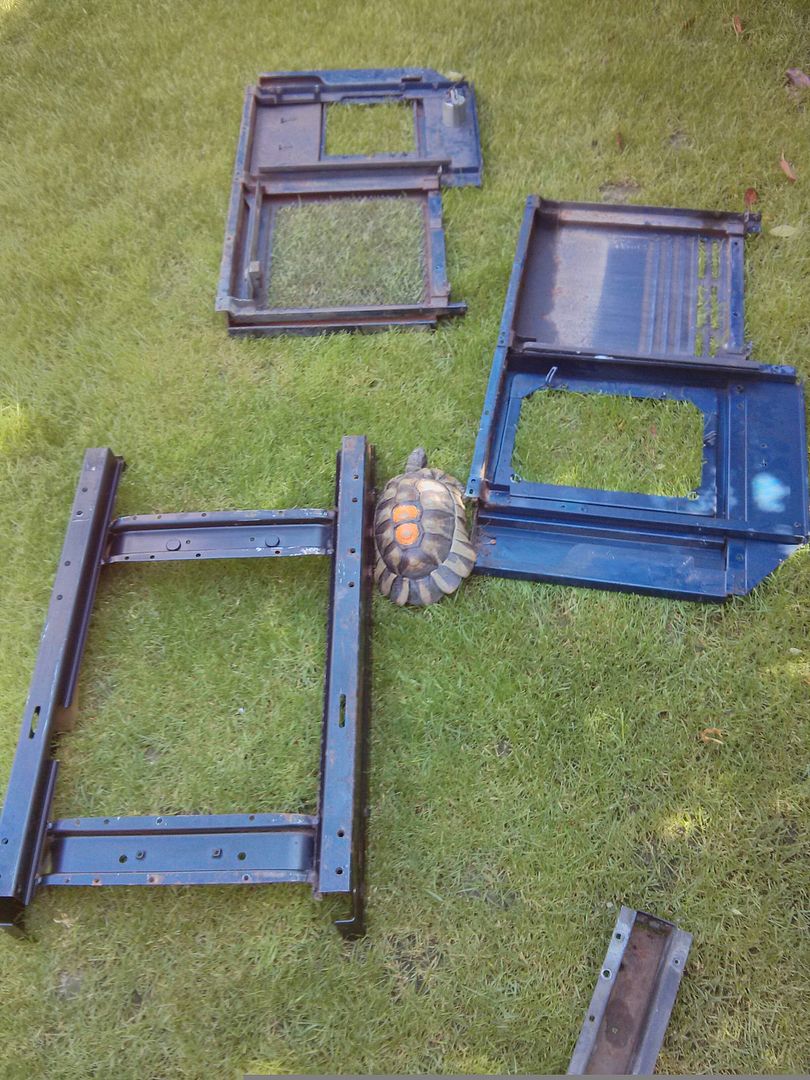
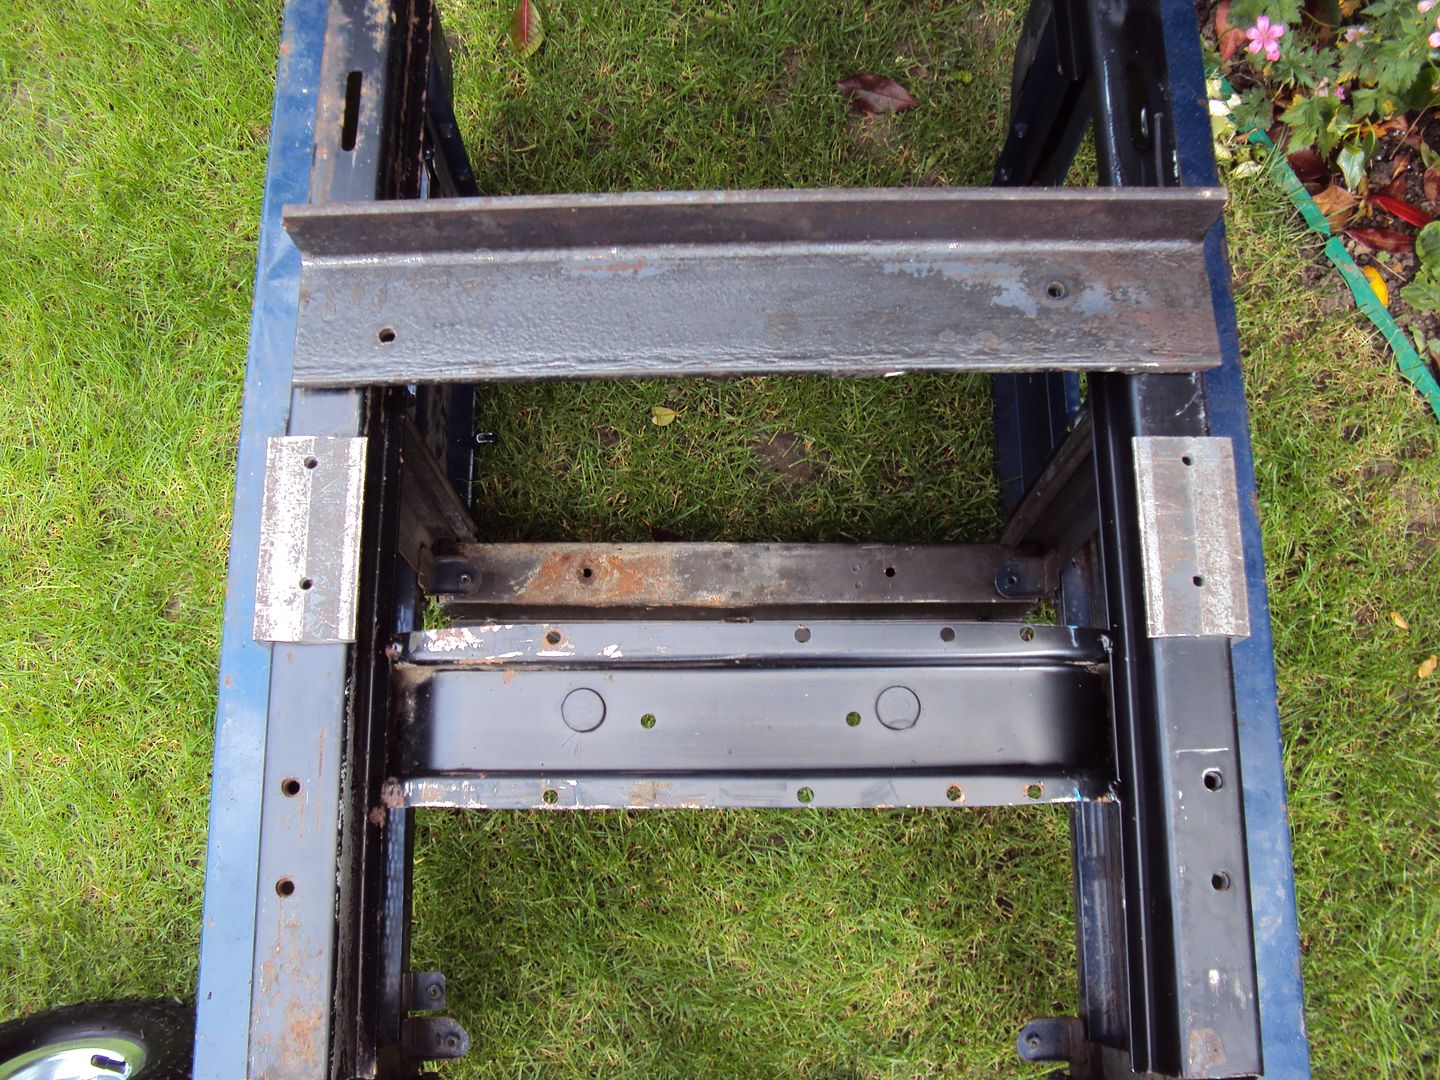
The original axles from the generator had been cut and welded to angle section which ran from front to back.

The plan was to cut the axles from the angle section, shorten and reassemble with a wheel either side.
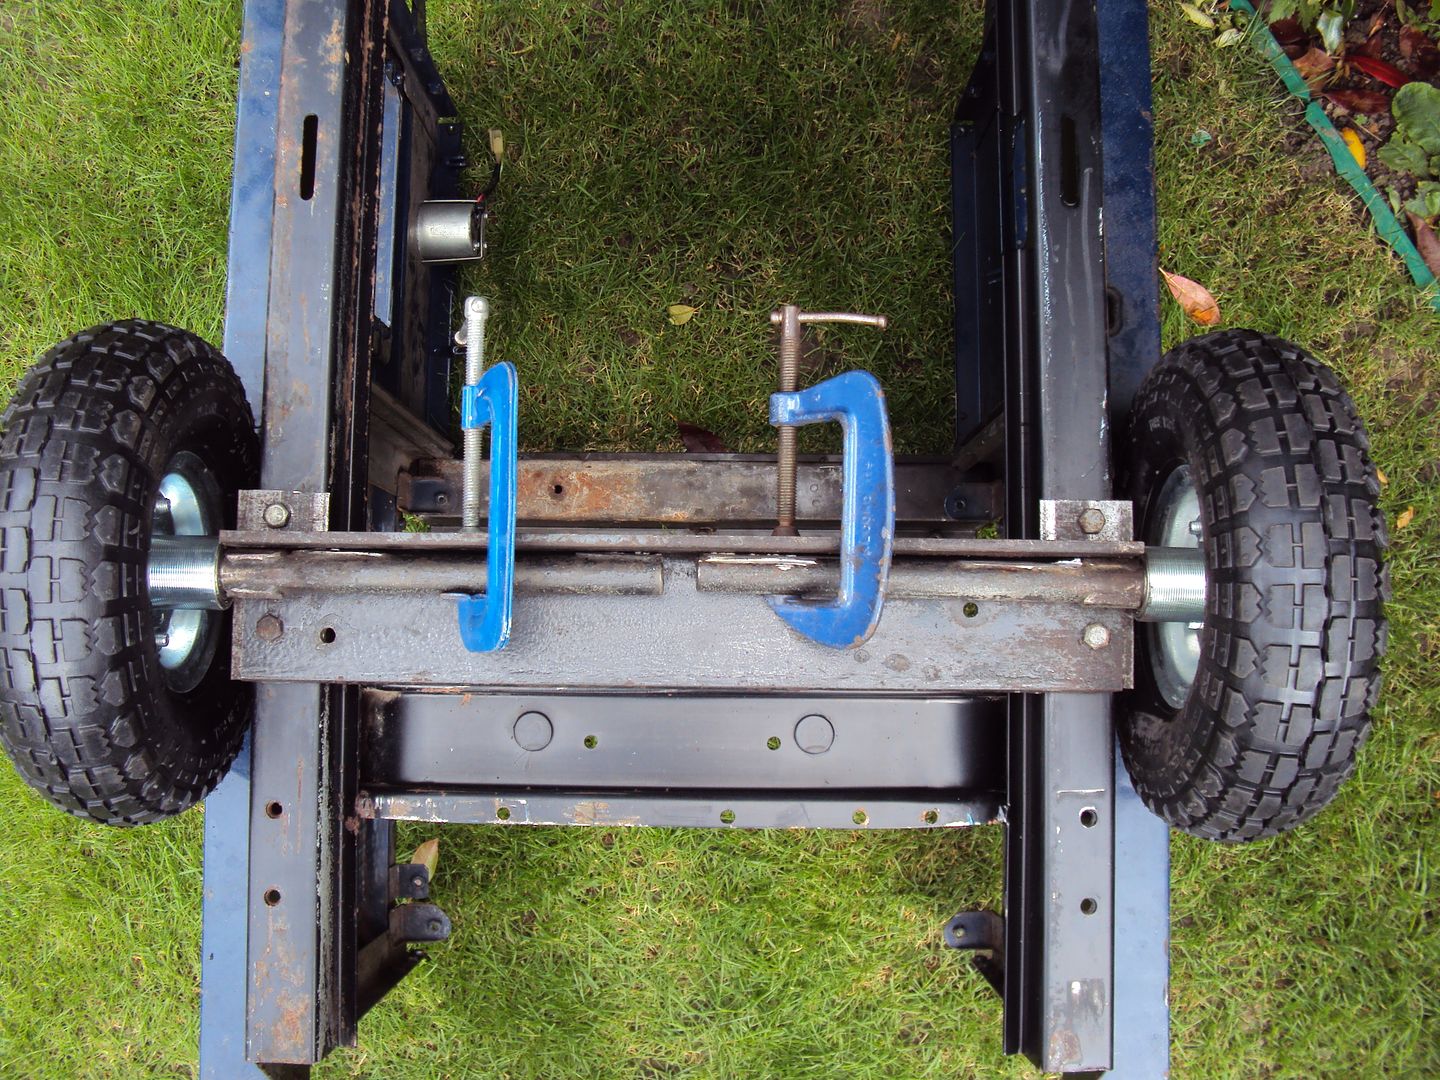
Section cut down and plates made to attach to generator frame
Trial fit
Next step is to get a welder, learn how to weld so I can get it all welded together.
Since the last update I have worked on a few more generators, they all have been relatively easy fixes ranging from clogged carbs to the wrong spark plug being fitted so nothing exciting.
The latest project is another of the big HondaEX5500’s (pic from ebay listing).
It was described as running, but after an exchange of messages with the seller found it had no oil pressure as the oil pressure warning light was permanently on. I guessed it would be the same problem as before where the plastic gear that drives the oil pump had lost its teeth. The other problem was that it had no wheels so was difficult to move.
Strip down started
The bottom of the case was covered in oil, mud and leaves, think I scooped a good 2kg of congealed gunk out of it.
As before I had to completely dismantle it to get to the oil pump, once I got the cover off the pump it was as expected.
Unfortunately the replacement drive gear is on back order from the factory and won’t be available until the end of July.
While waiting for the parts I decided to clean and repaint some of bits I removed. Started with the end cover for the alternator.
Cooling fan
Cam cover (didn’t get a before)
Polished the domed nuts that hold the cam cover down
Also gave the alternator a coat of paint
The next part of the project is to sort some wheels, I started by assembling the case so I could check the wheels I got wouldn’t catch anywhere. As I was getting setup our pet tortoise decided it wanted to get involved.
The original axles from the generator had been cut and welded to angle section which ran from front to back.
The plan was to cut the axles from the angle section, shorten and reassemble with a wheel either side.
Section cut down and plates made to attach to generator frame
Trial fit
Next step is to get a welder, learn how to weld so I can get it all welded together.
Muncher said:
Is this worth saving?
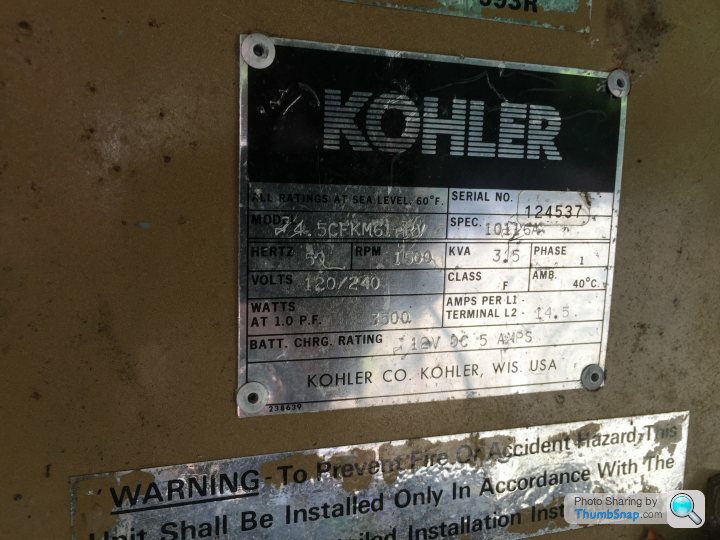
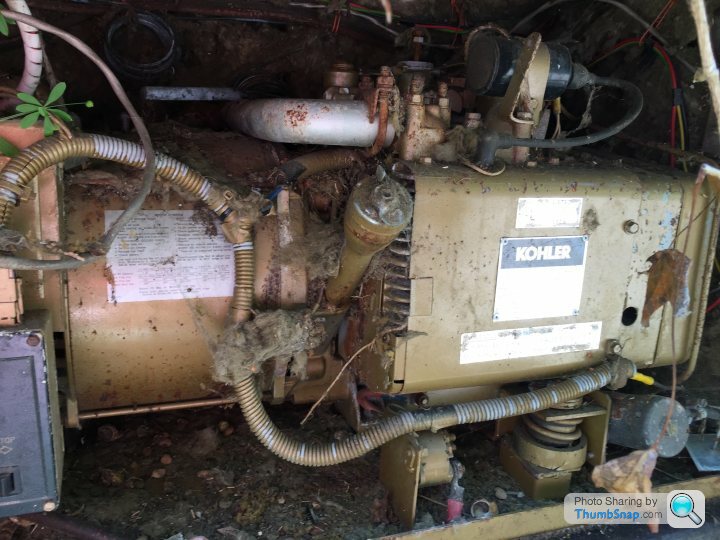
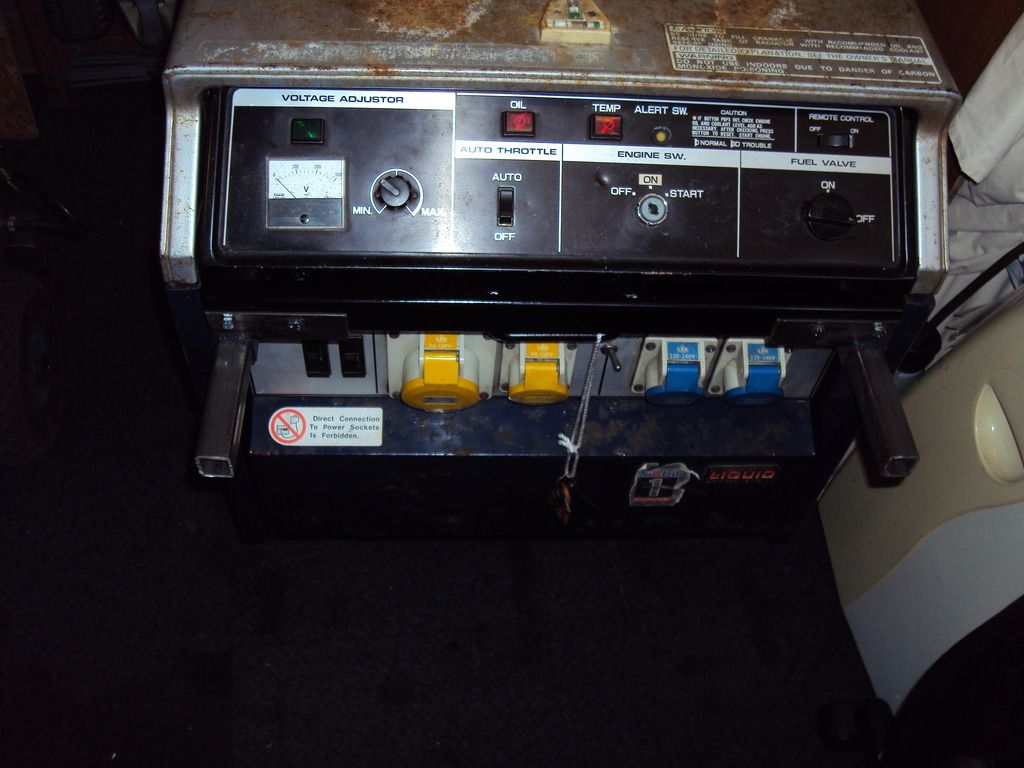
From your previous description it sounds like someone put some effort into installing it, so would be worth getting up and running. Once running it looks like should be reasonably quiet/economical to run as looking at the data plate it runs a 1500 rpm where most generators run at 3000rpm
Is there a changeover switch near your fuse board?
Does it have a fuel tank or run from LPG?
I guess the first thing to do is to see if it works, as it looks like electric start there should be a starter battery, if not you could try jump starting it from your car (assuming you can get the car close enough).
If it’s been sitting for a while the carburettor is probably gummed up, but you can cheat by pouring a bit of petrol (1-2tsp) down the carb to see if it fires.
What I would do:
Step 1:
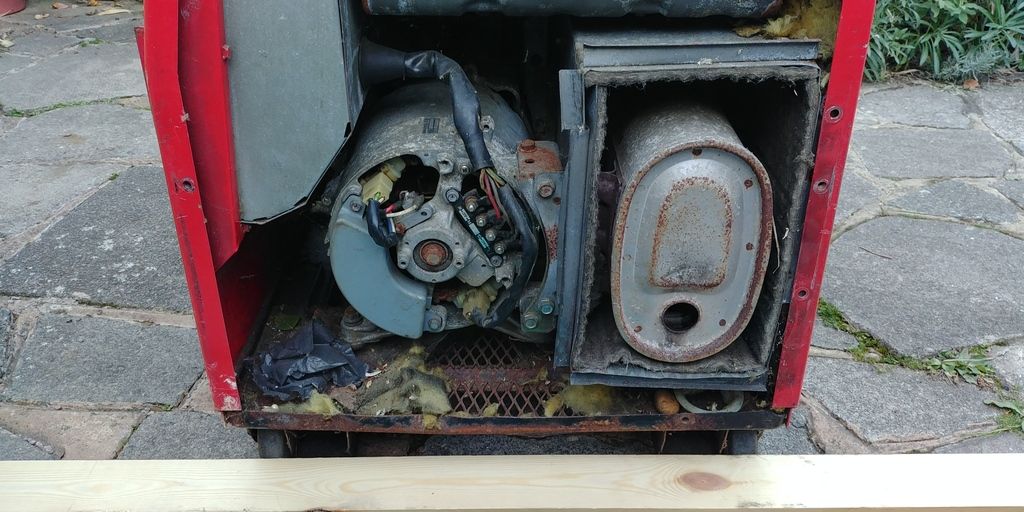
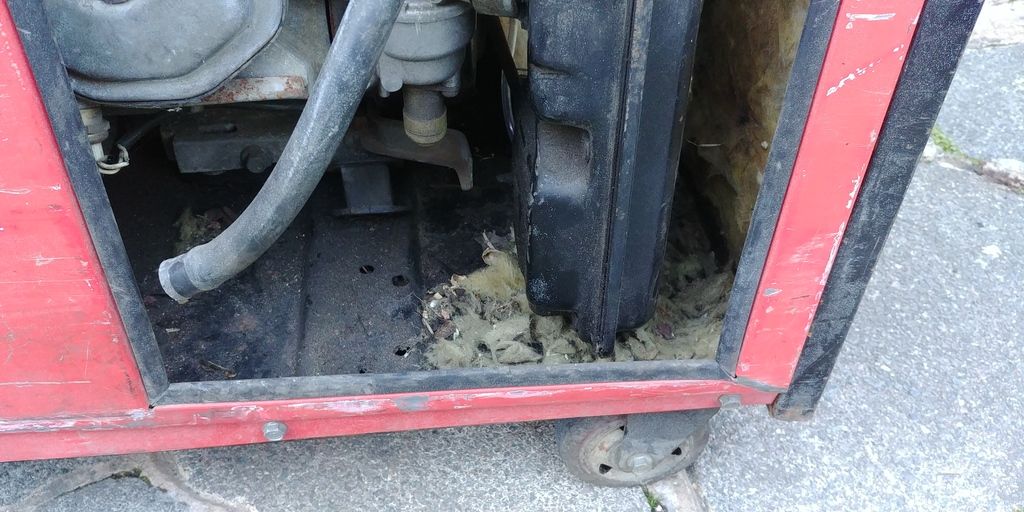
Clear all the rubbish from around the engine, looks like you have disintegrated insulation/rock wool all over it.
If you can pull it out of the enclosure its worth checking inside the alternator to make sure it hasn’t been destroyed by mice or packed with insulation as looking at the photo, the ventilation grills by the oil filler look like they might be blocked from the inside.
Step 2
Check for spark, unscrew the sparkplug put the HT cable (thick black lead) back on the spark plug. Using INSULATED pliers hold the spark plug against a metal part of the engine and try spinning itover with the starter. If the engine is a twin cylinder don’t forget to disconnect the second spark plug.
If you see a spark go to step 3 if not you will need to start digging in to it more in which case you will need to get hold of a manual/wiring diagrams.
Step 3
If spark was OK, screw sparkplug back in and reconnect HT cables, try pouring a bit of petrol down the carb and see if it fires/tries to run.
It’s probably wort adding before trying step 2, find the output leads from the alternator and disconnect (not forgetting where the wires go!) just in case it’s sending power somewhere you are not expecting.
Step 4
If there is a fuel tank, try looking inside to see if it’s clean. If yes check the condition of the fuel pipe between the tank and carburetor as it is likely to have perished. If the fuel pipe is ok try putting a small amount of petrol in the tank and see if it runs. If not it is likely you will need to take the carburetor apart, clean and reassemble.
The above should get you to a point (with minimal expenditure) where you can see if it’s worth pursuing.
The next steps (if it runs) will be electrical testing to see if the output is ok.
Edited by Blue32 on Tuesday 20th June 21:32
Muncher said:
Thanks for the detailed reply!
It's located at a development site I own, the original house it was connected to has since been sold, but this remains on our retained land at the bottom of the garden. It's very well installed, in a very solid brick structure with concrete roof. It's possible it was fed by the main oil tank at the house, albeit that is about 60 yards away, I can't see any other visible tank near it.
I probably have no need for it going forward and have far too many other projects that are much higher priorities so I would rather remove it from the site and sell it if it has some value. Is it something you fancy?
No problemIt's located at a development site I own, the original house it was connected to has since been sold, but this remains on our retained land at the bottom of the garden. It's very well installed, in a very solid brick structure with concrete roof. It's possible it was fed by the main oil tank at the house, albeit that is about 60 yards away, I can't see any other visible tank near it.
I probably have no need for it going forward and have far too many other projects that are much higher priorities so I would rather remove it from the site and sell it if it has some value. Is it something you fancy?

As much as I’d like to say yes, I’d fancy it to tinker with, I don’t really have space for another project
. If you don’t want/need it best thing to do is remove it, take some good photos (all sides) and stick it on ebay as spares repairs with buyer to collect. Also worth including dimensions in the description (to stop silly questions).
Worst case you make 99p best case you could make over £100, someone will buy it.
I’m now the proud owner of a CEMOUNT TX150 TIG welder for errr welding Tigs.
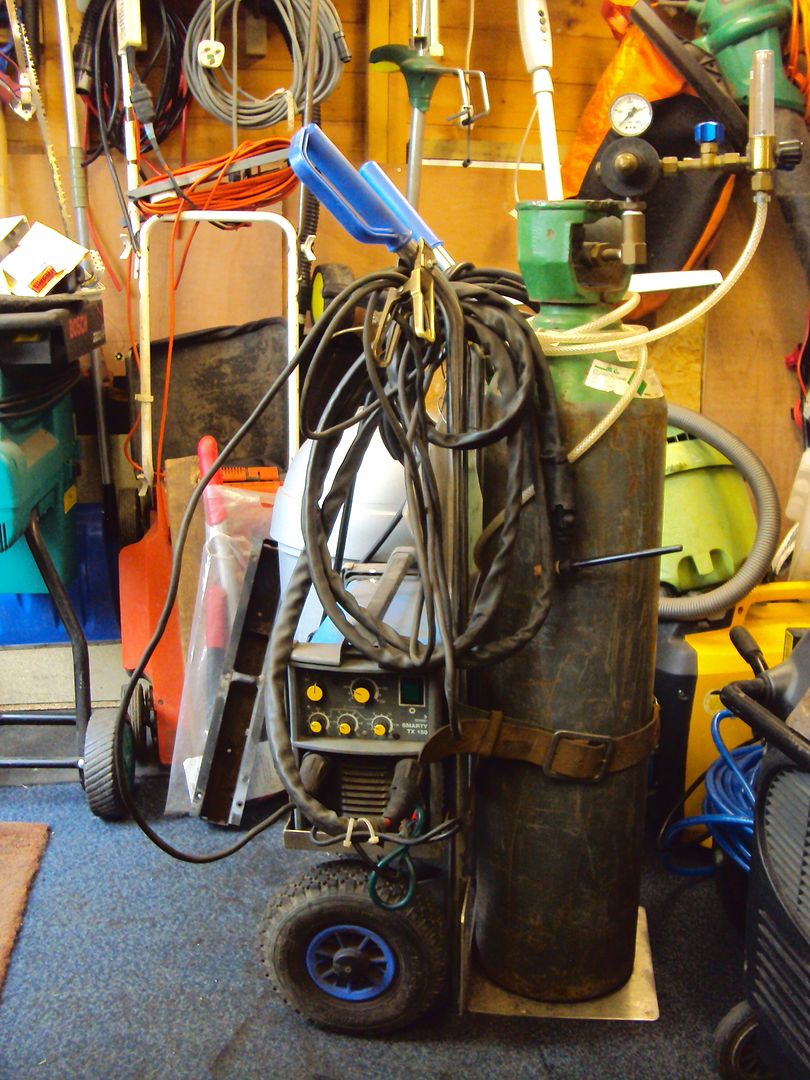
It needs bit of remedial work on the mains lead as the outer insulation has started to split, but apart from that it seems pretty good. The gas cylinder (Argon) is almost full too, still has over 180bar of pressure (230bar when full).
It’s probably not the best thing to start learning with considering I have never welded before, a MIG probably would have been better. However, I want to be able to weld stainless steel in the future (want to make stuff for the R32).
After watching a few how to weld videos and reading some guides I started with a scrap piece of metal to practice on.
First weld with no filler rod, managed to melt a hole (front)
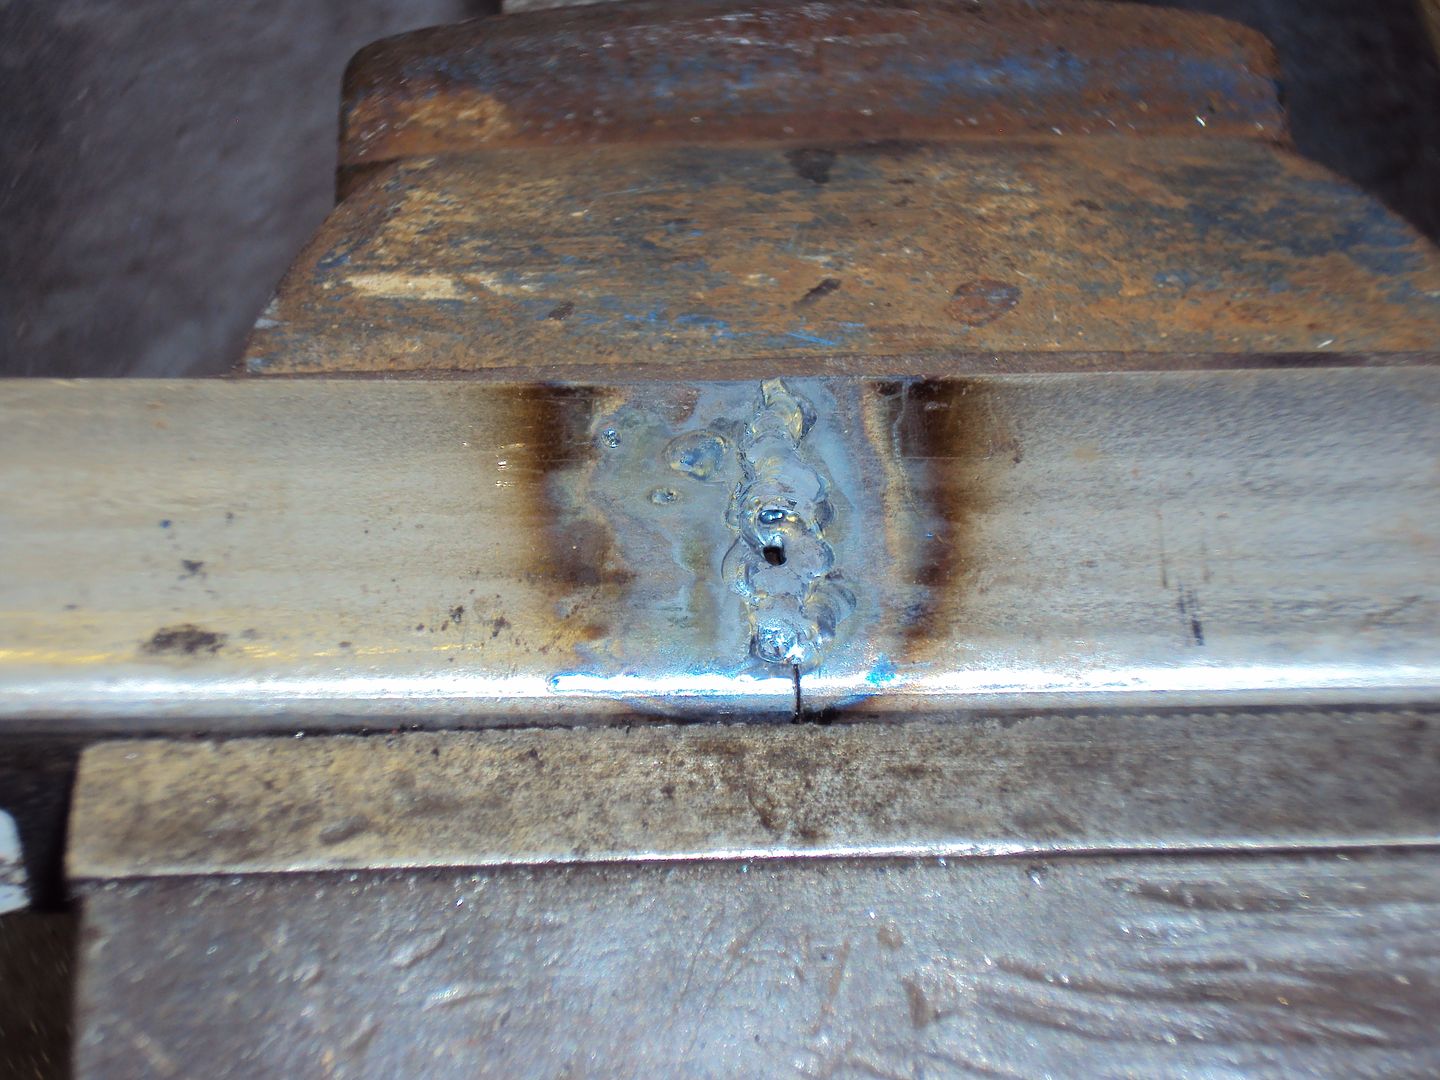
Back
Current turned up a bit (70A I think) with some filler (front)
Back
I’m pleased with the first attempts, but more practice is needed as after a while I was just melting holes everywhere so gave up for the day.
Just need to get some more bits of metal and spend some time practicing. Also learnt gloves are a must as left hand feels a bit sunburnt
It needs bit of remedial work on the mains lead as the outer insulation has started to split, but apart from that it seems pretty good. The gas cylinder (Argon) is almost full too, still has over 180bar of pressure (230bar when full).
It’s probably not the best thing to start learning with considering I have never welded before, a MIG probably would have been better. However, I want to be able to weld stainless steel in the future (want to make stuff for the R32).
After watching a few how to weld videos and reading some guides I started with a scrap piece of metal to practice on.
First weld with no filler rod, managed to melt a hole (front)
Back
Current turned up a bit (70A I think) with some filler (front)
Back
I’m pleased with the first attempts, but more practice is needed as after a while I was just melting holes everywhere so gave up for the day.
Just need to get some more bits of metal and spend some time practicing. Also learnt gloves are a must as left hand feels a bit sunburnt
eliot said:
Just keep practicing. TIG is quite easy and forgiving - you can slow down or go over work without piling on more metal like you get with mig.
Read up on which tungstens to use (red's for steels and white for ally) and learn how to grind them.
DC for steel with HF start and AC with HF continuous for ally.
Main thing is to make sure everything is 'clean' - you cant be welding rusty, oily or corroded metals and if your tip touches the weld, then you need to stop and clean it. Best bet is to have a few tungstens ready to swap out rather than letting your job go cold whilst you regrind your tungsten.
Thanks, I’m not sure what the tungsten is as there is no colour code on it, although I’m guessing it was setup for welding stainless as it originally came from a food processing factory.Read up on which tungstens to use (red's for steels and white for ally) and learn how to grind them.
DC for steel with HF start and AC with HF continuous for ally.
Main thing is to make sure everything is 'clean' - you cant be welding rusty, oily or corroded metals and if your tip touches the weld, then you need to stop and clean it. Best bet is to have a few tungstens ready to swap out rather than letting your job go cold whilst you regrind your tungsten.
Discovered one mistake I made was how I ground he tip, I did it radially instead of in line with the electrode. So first job for tomorrow is to re-grind the tip properly.
I’m going to order up some new electrodes as there isn’t much left on the one that’s in the torch.
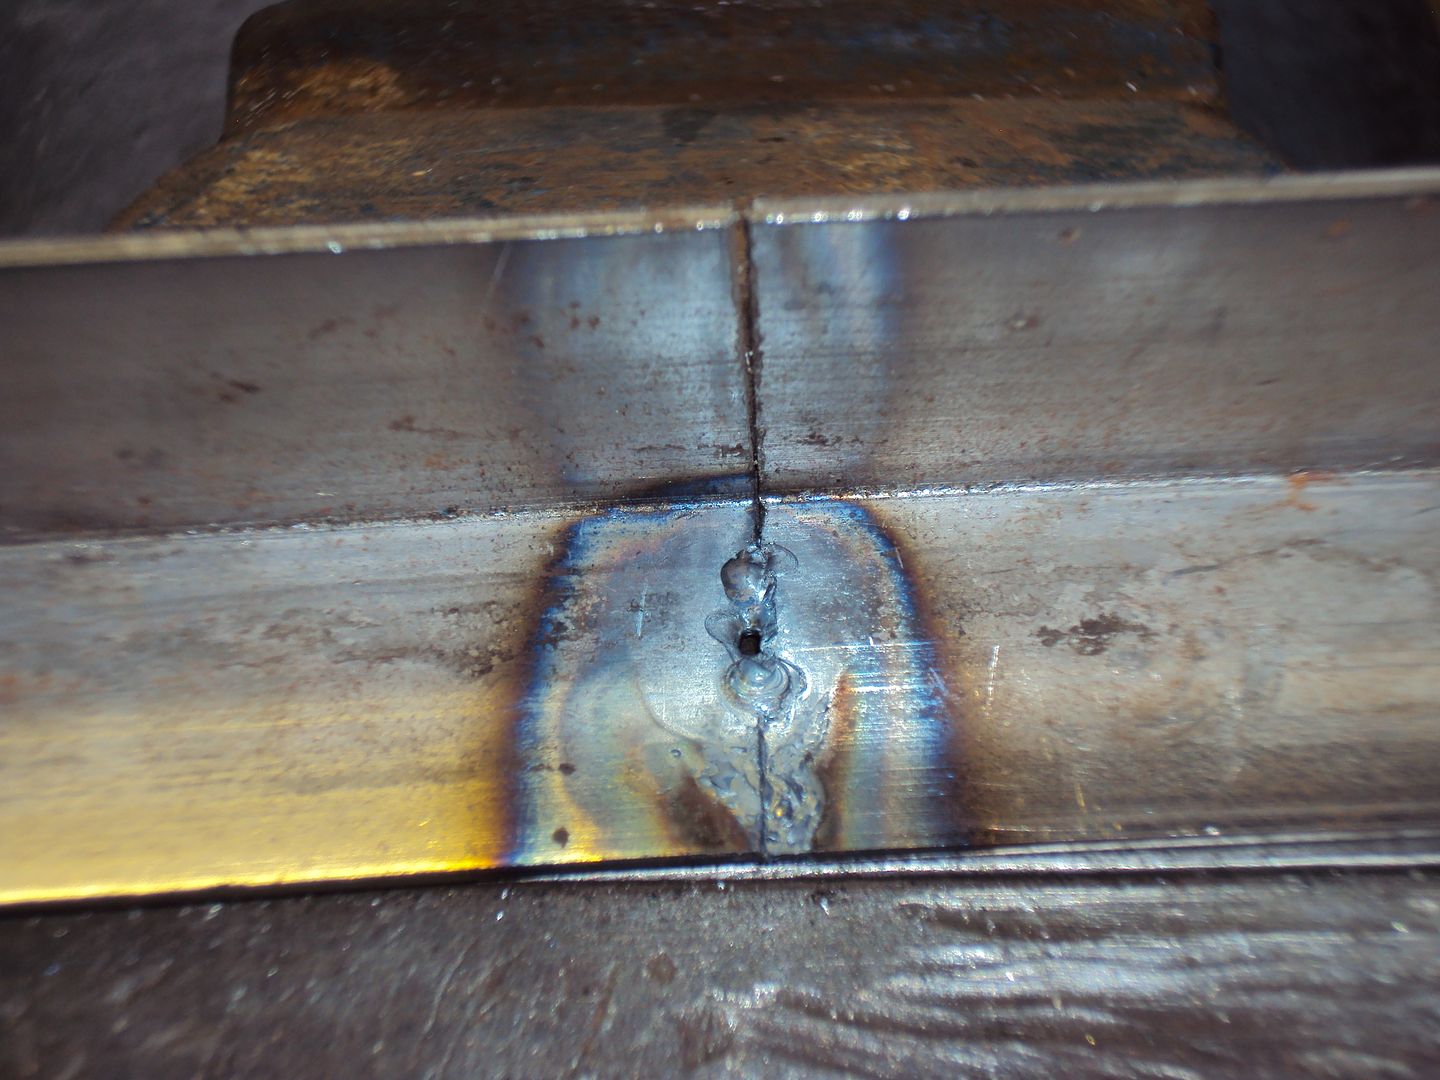
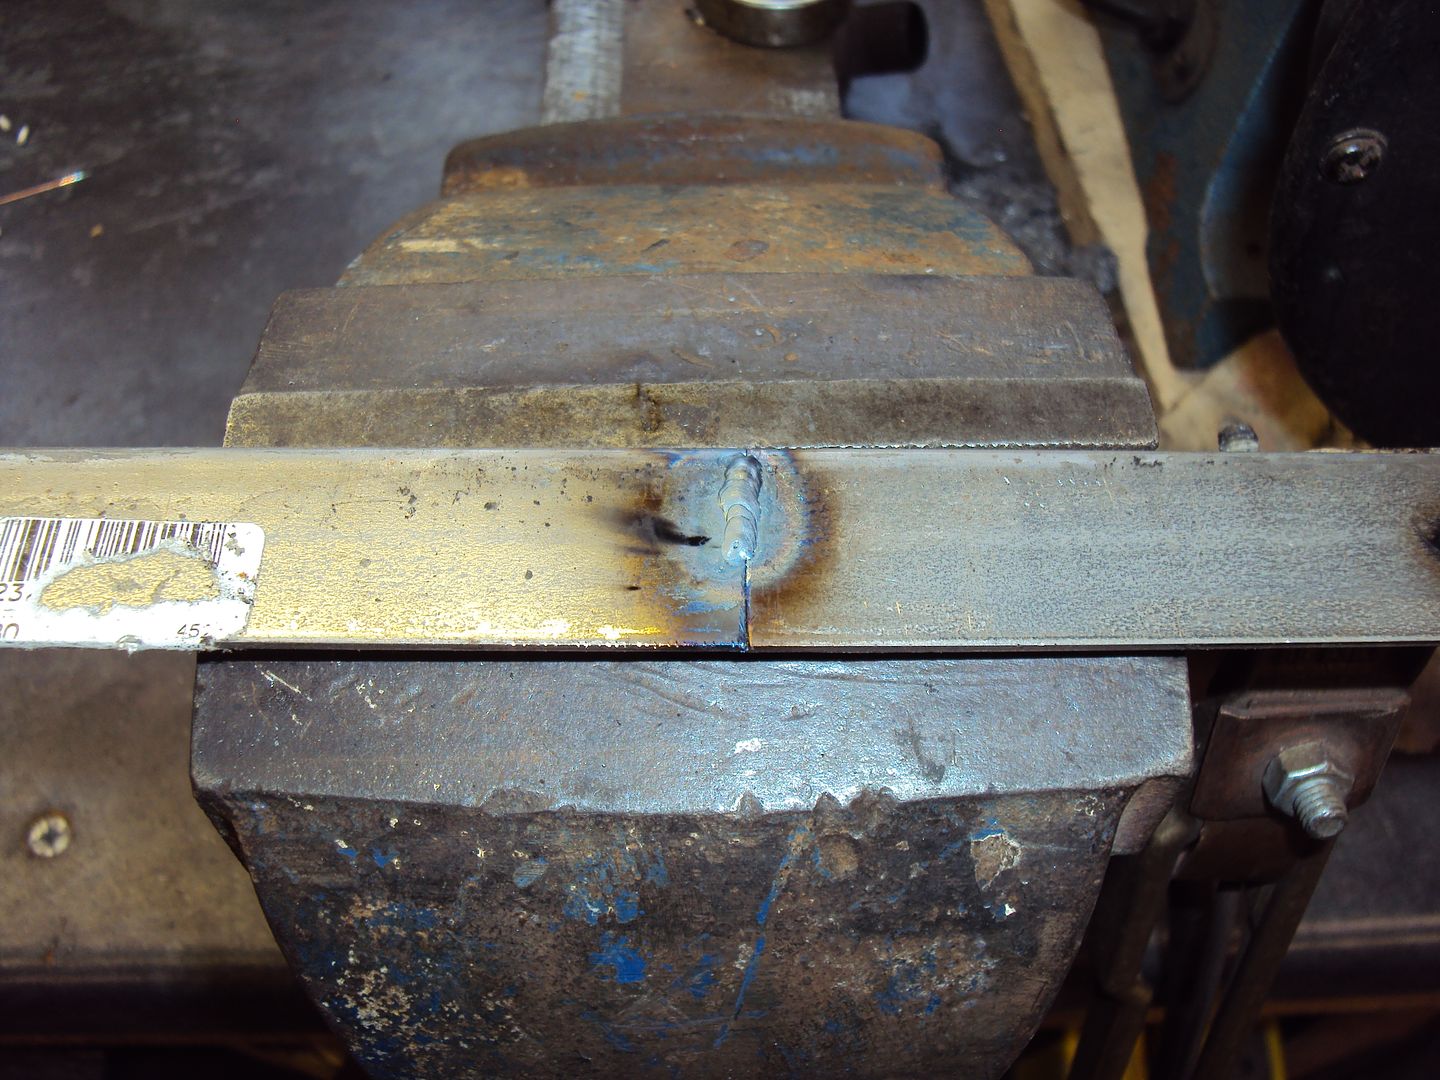
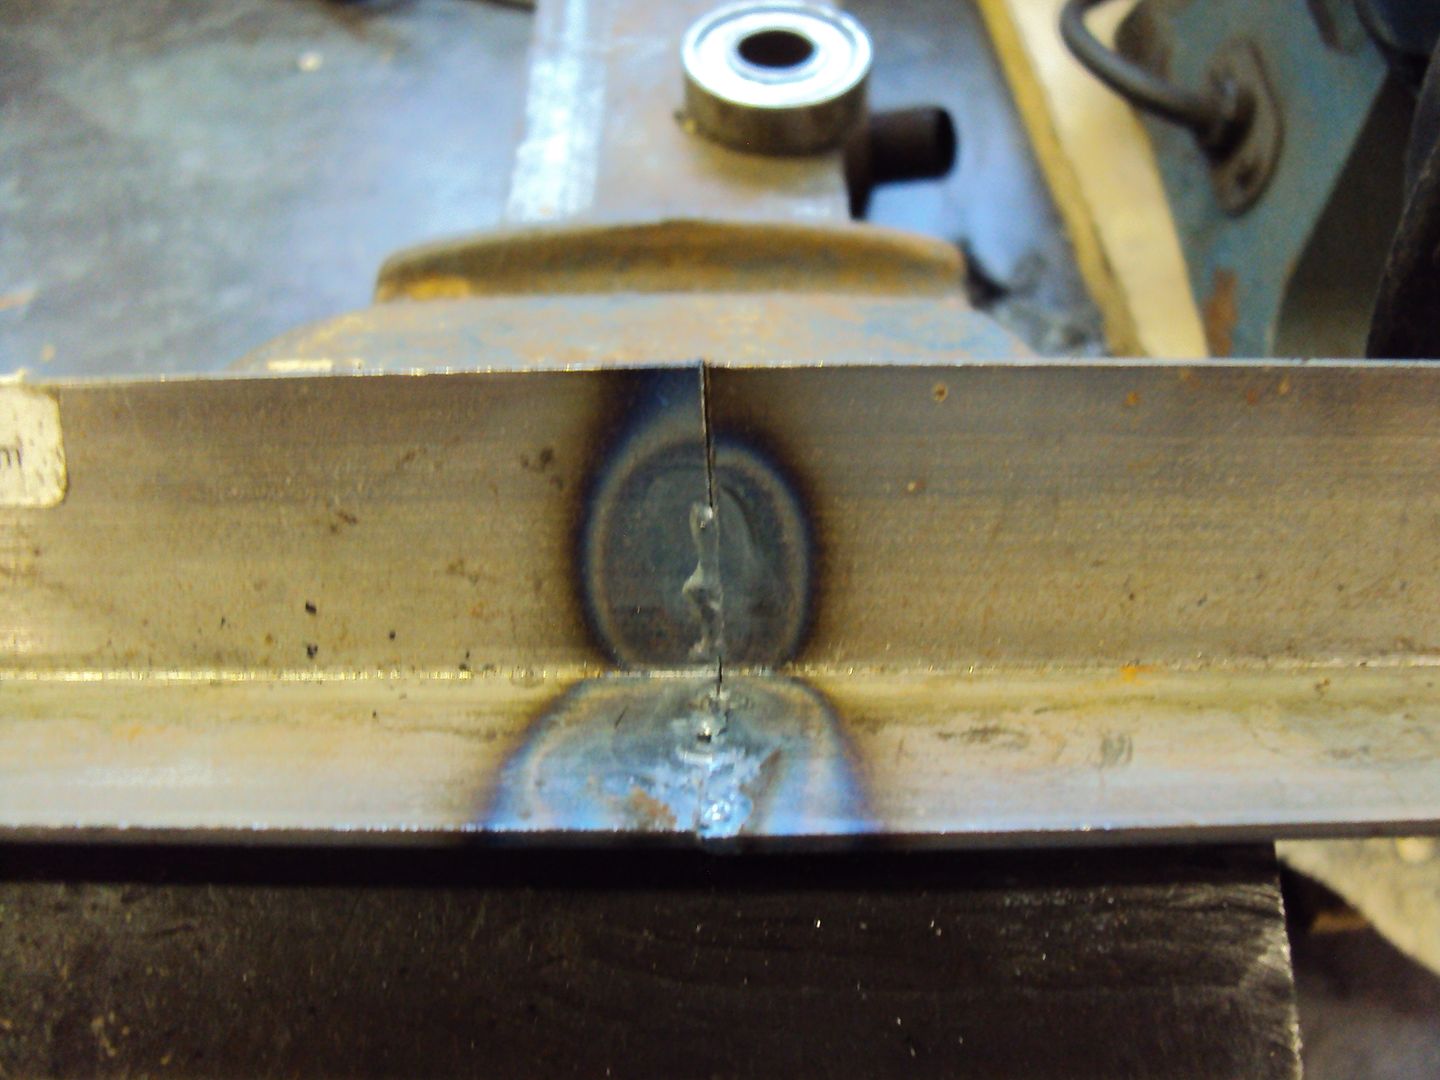
Had a productive day building the frame for the wheels yesterday. During the week a set of replacement parts for the torch on the welder turned up, so I now have some new tungsten tips.
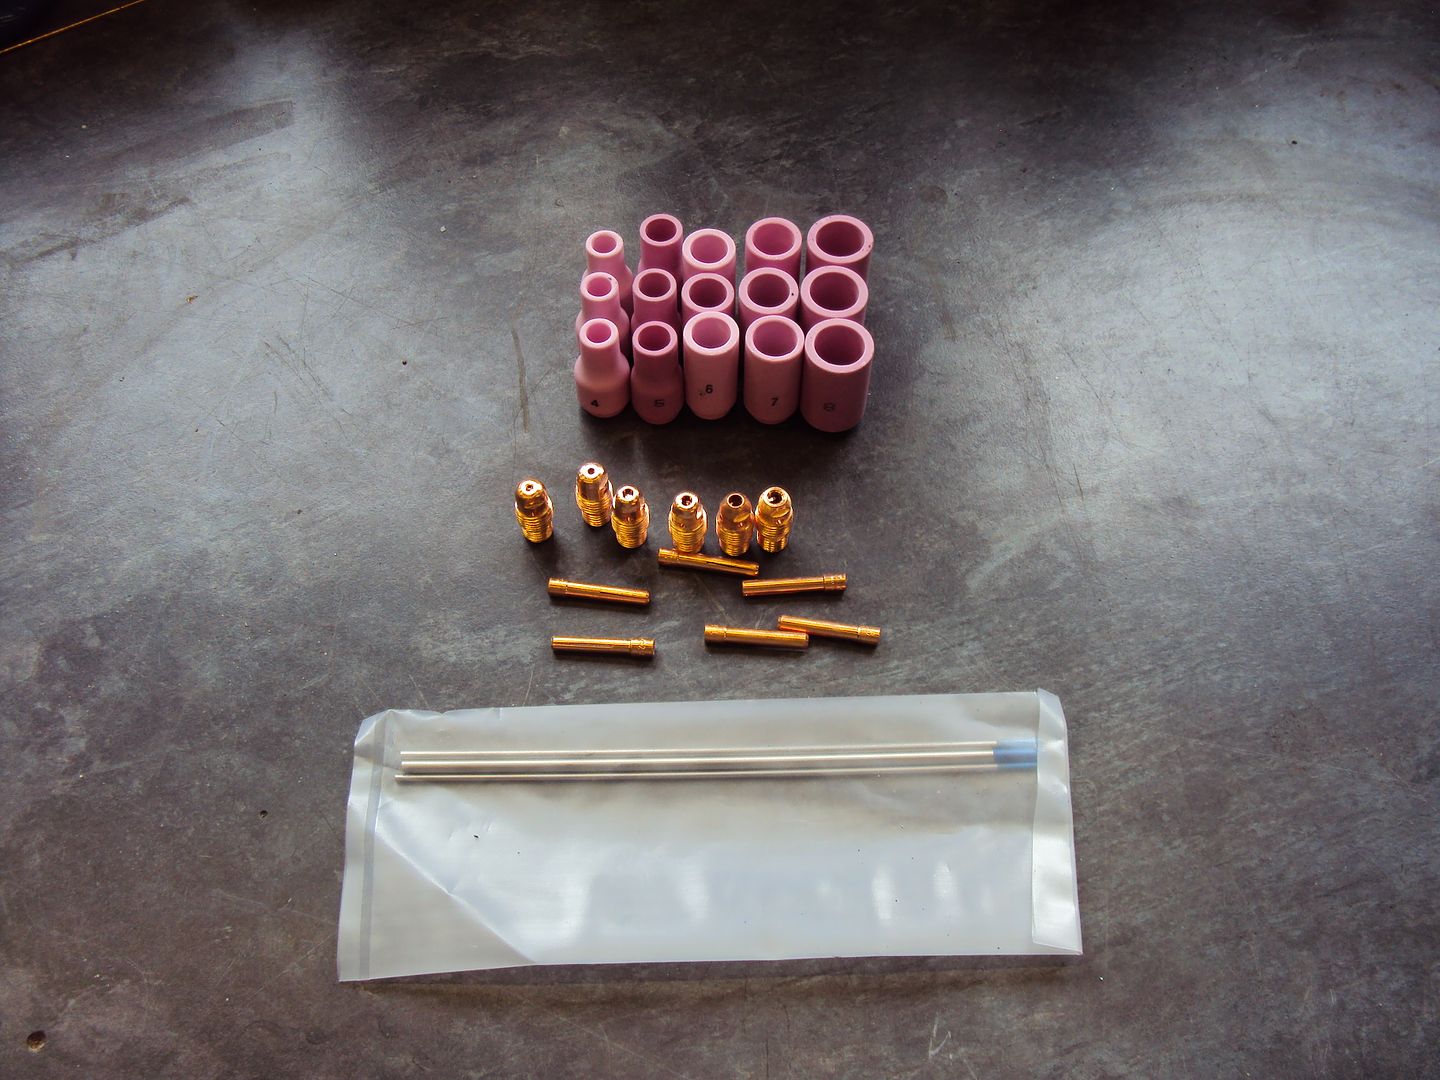
I decided to go with blue Lanthanated tungsten as it good for most metals.
As I was going to be using quite a high current I went with a 2.4mm tip
I’m still working on the best way to grid the point on the tip, so far the best way I have found is to use a drill to spin the tip while holding it against the bench grinder.
Frame pieces all cleaned up and ready for welding.
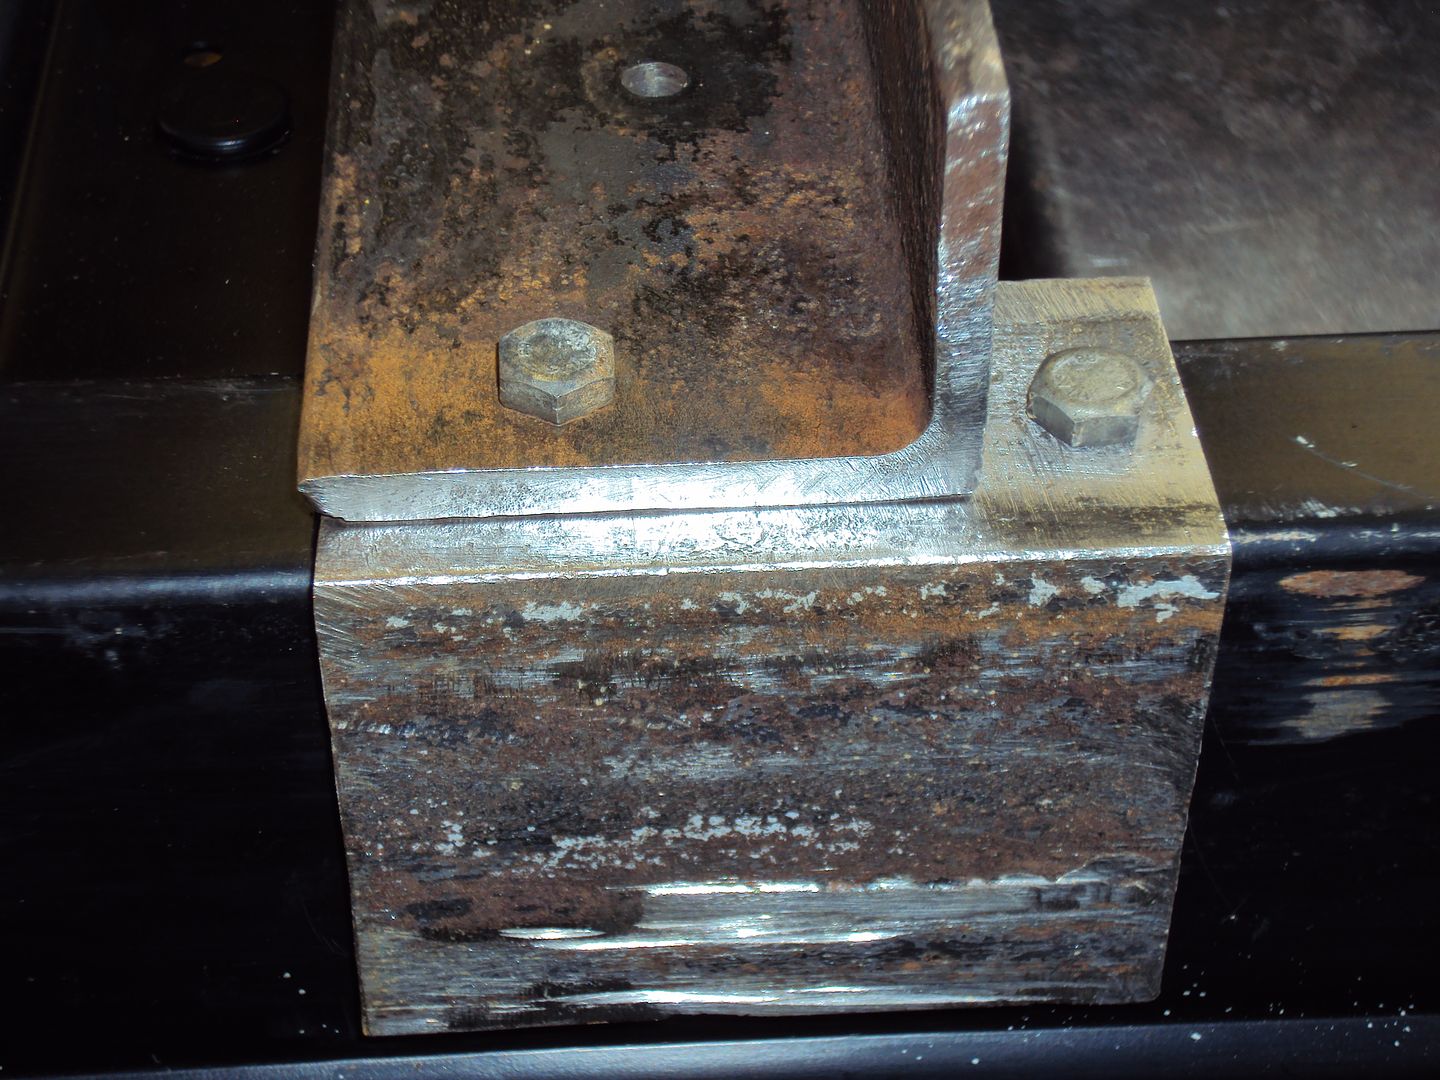
Tacked
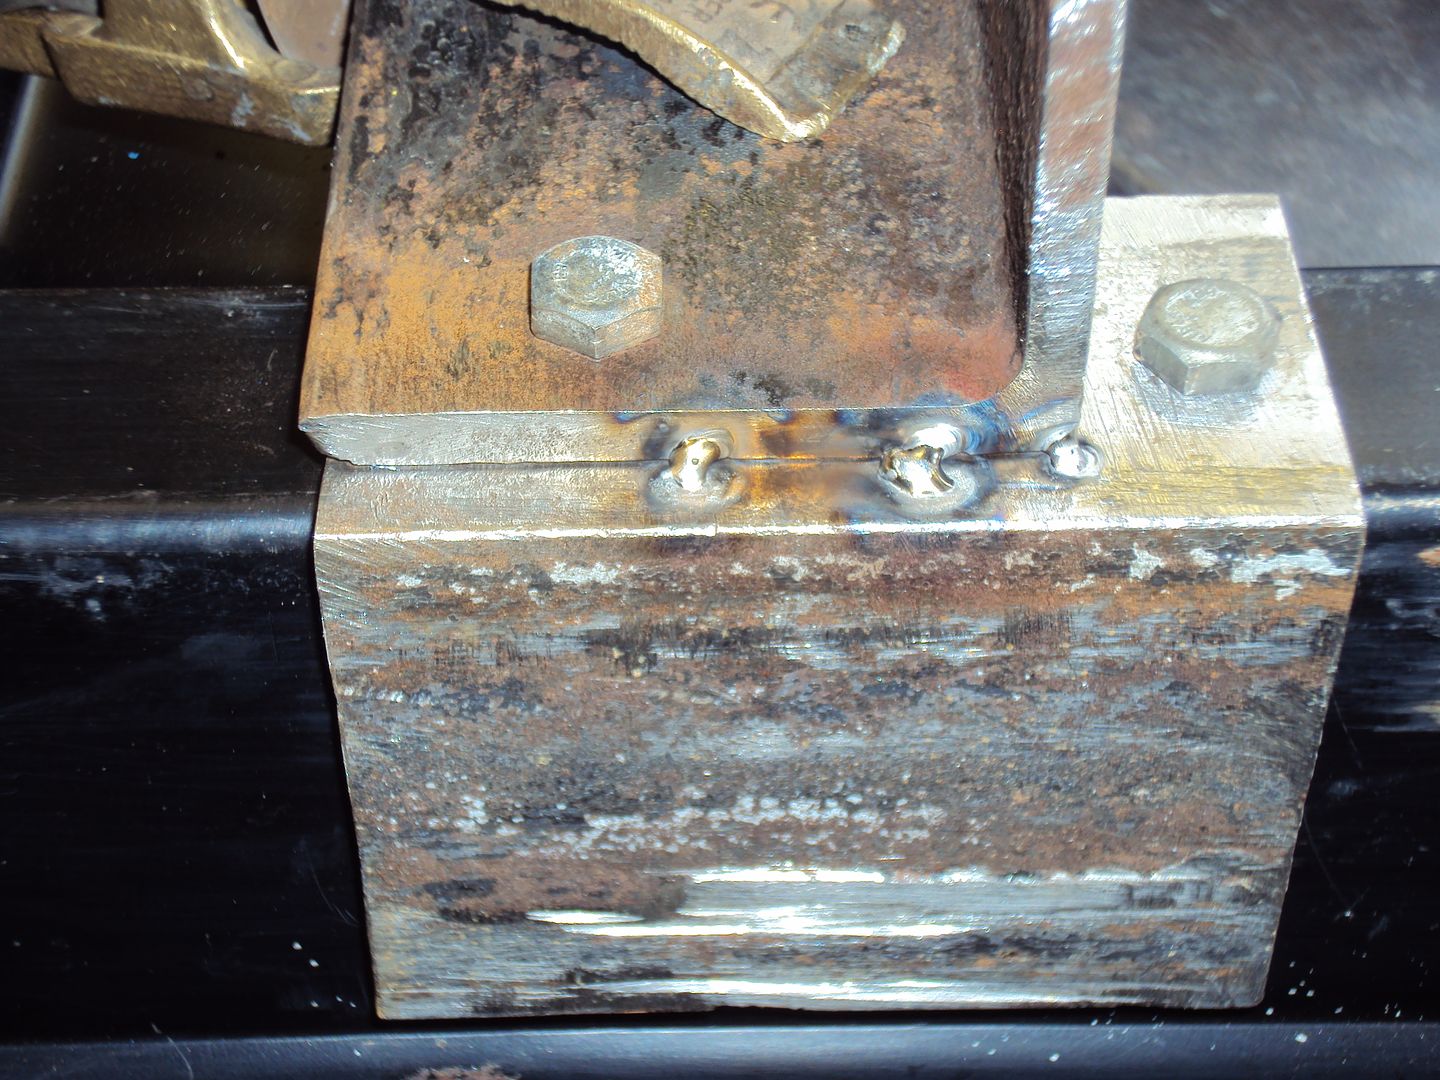
First proper weld

Finished
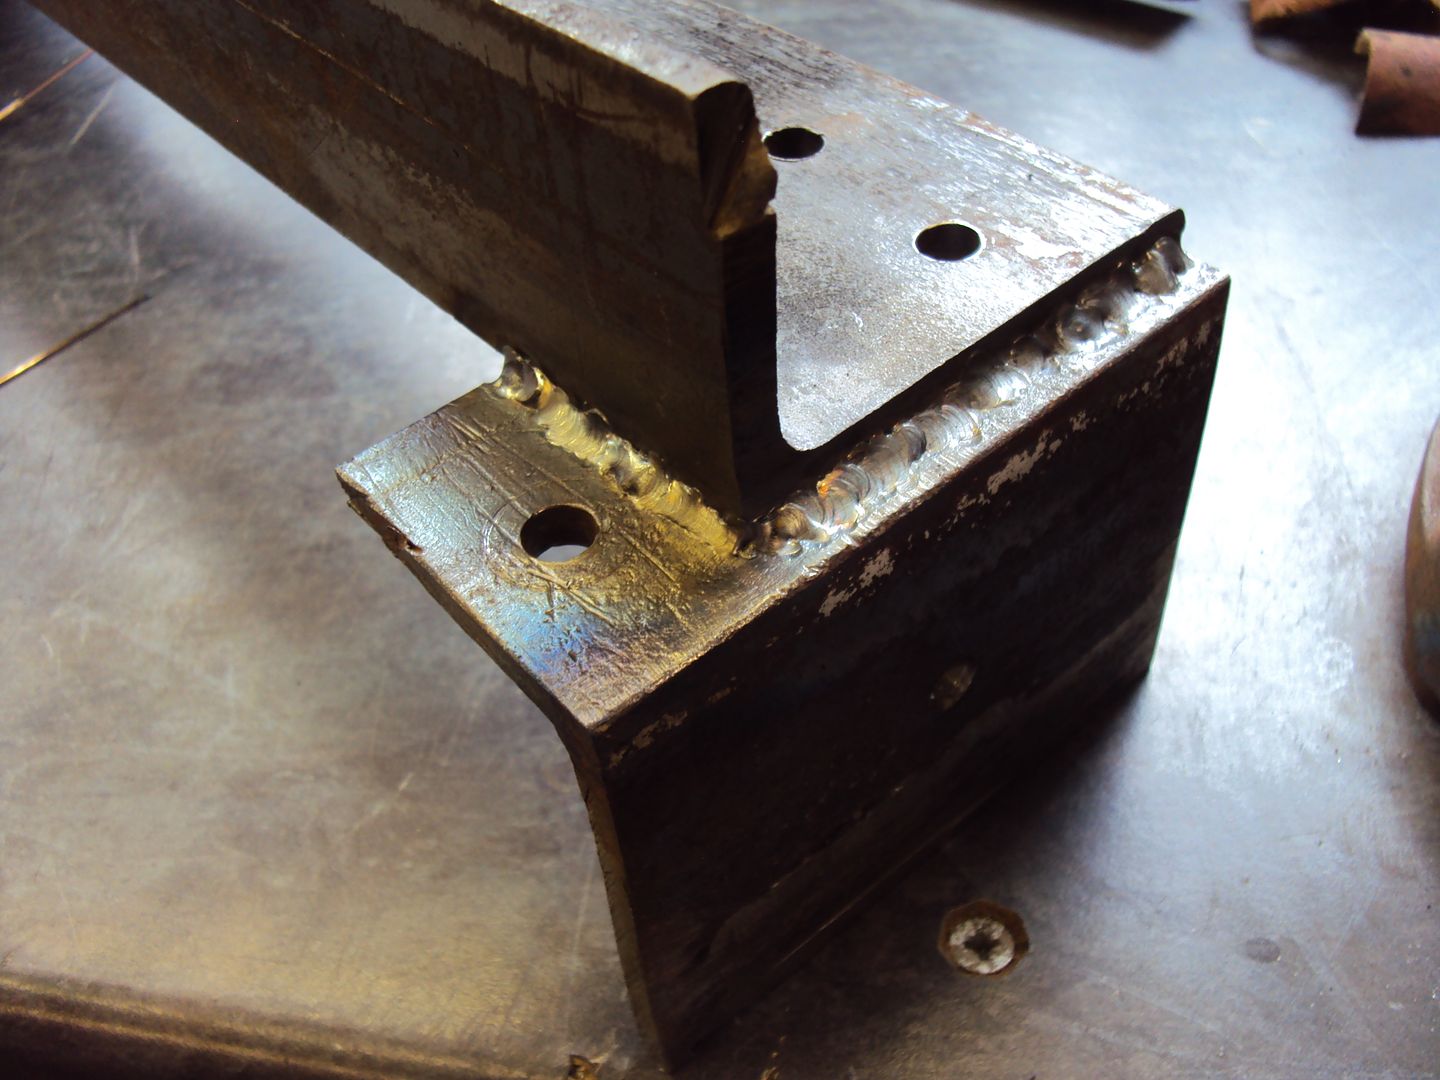
The welds aren��t pretty but they should be strong
Next step is to clean up the axles and get them mounted.
I decided to go with blue Lanthanated tungsten as it good for most metals.
As I was going to be using quite a high current I went with a 2.4mm tip
I’m still working on the best way to grid the point on the tip, so far the best way I have found is to use a drill to spin the tip while holding it against the bench grinder.
Frame pieces all cleaned up and ready for welding.
Tacked
First proper weld
Finished
The welds aren��t pretty but they should be strong
Next step is to clean up the axles and get them mounted.
Haven’t updated for a while as there hasn’t been any interesting gennys to work on. However, I have (mostly) finished the EX5500
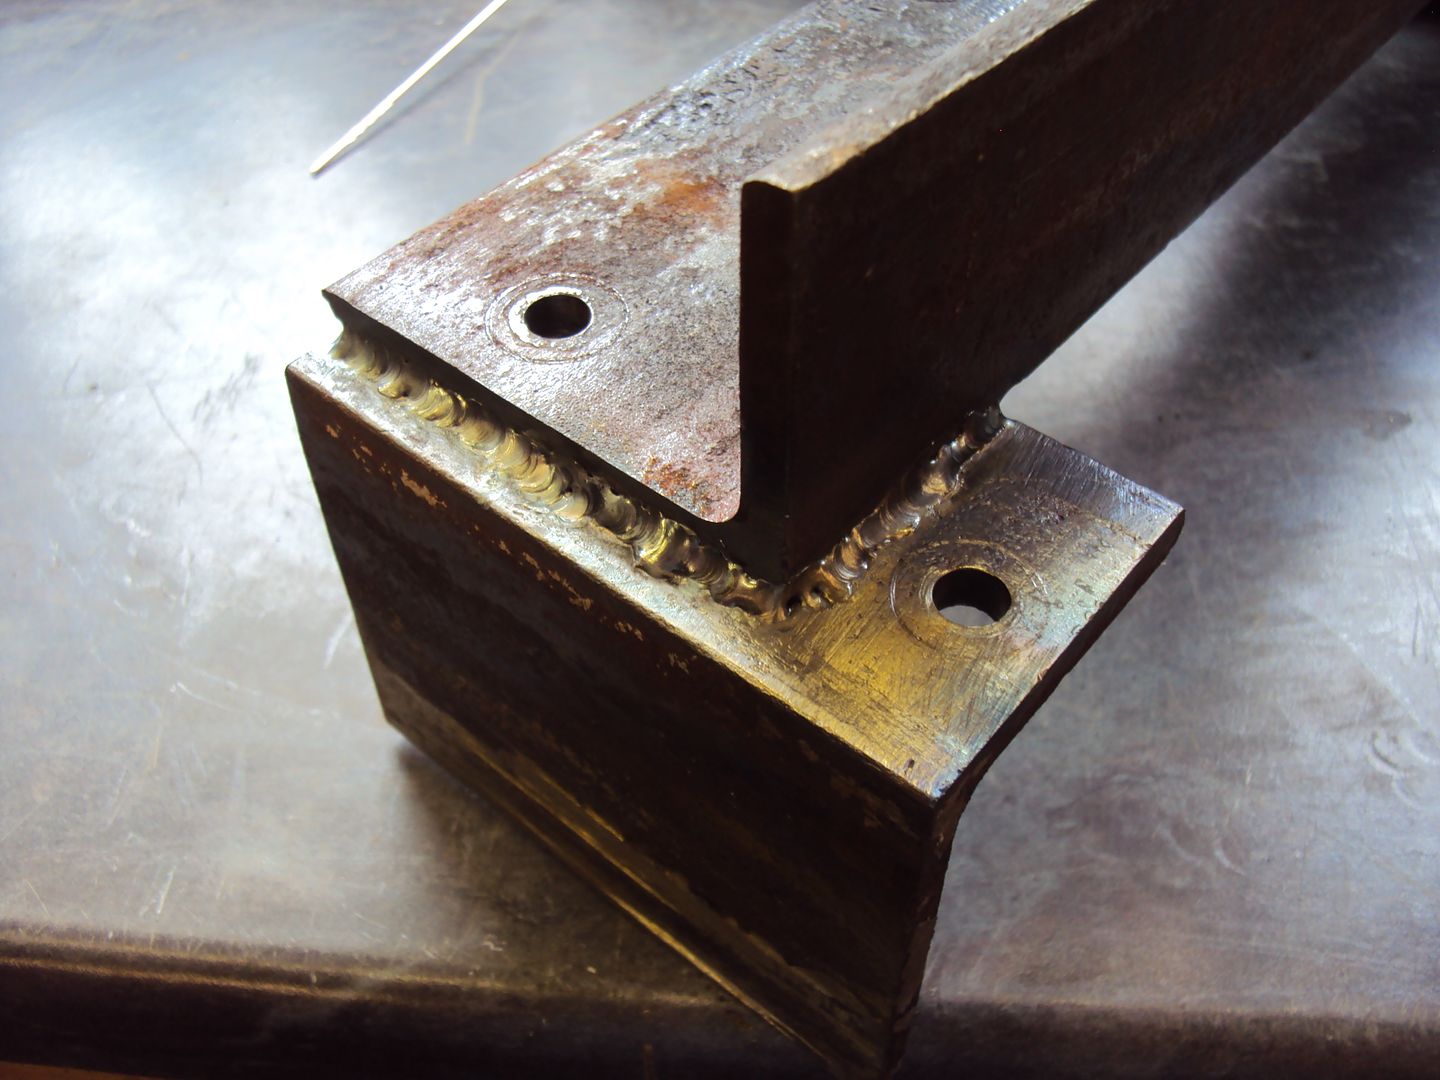
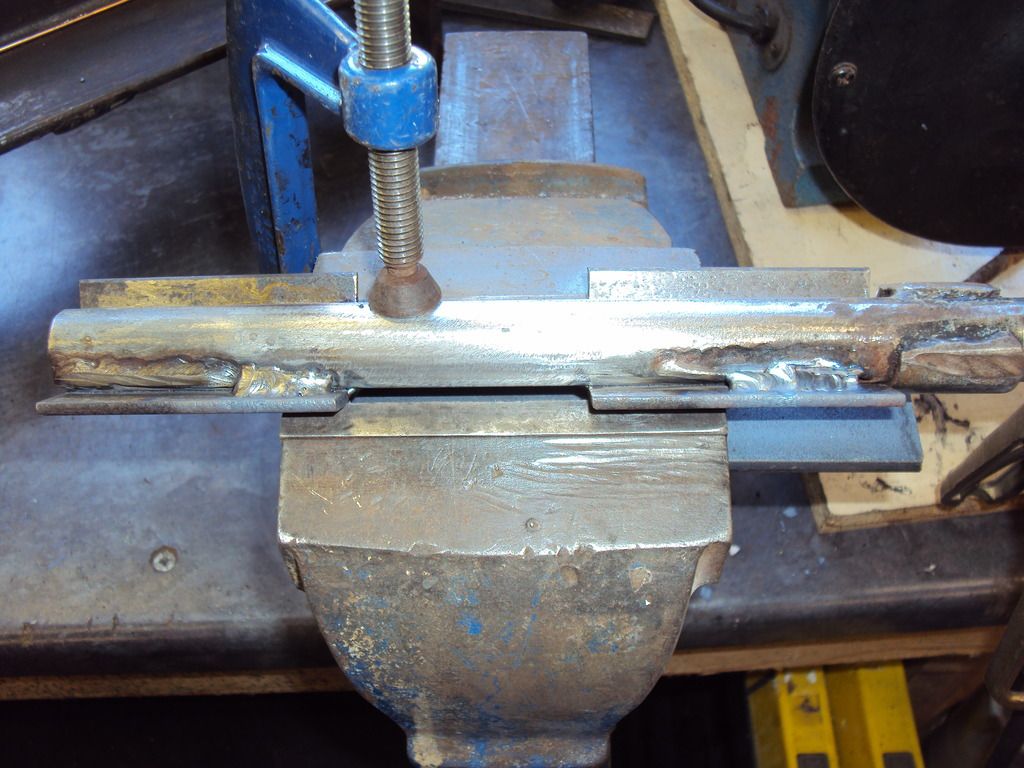
To pick up from where I left off, I have finished the axles. To make the axles I welded the axel shaft to pieces of angle iron so they could be mounted to the frame I made.
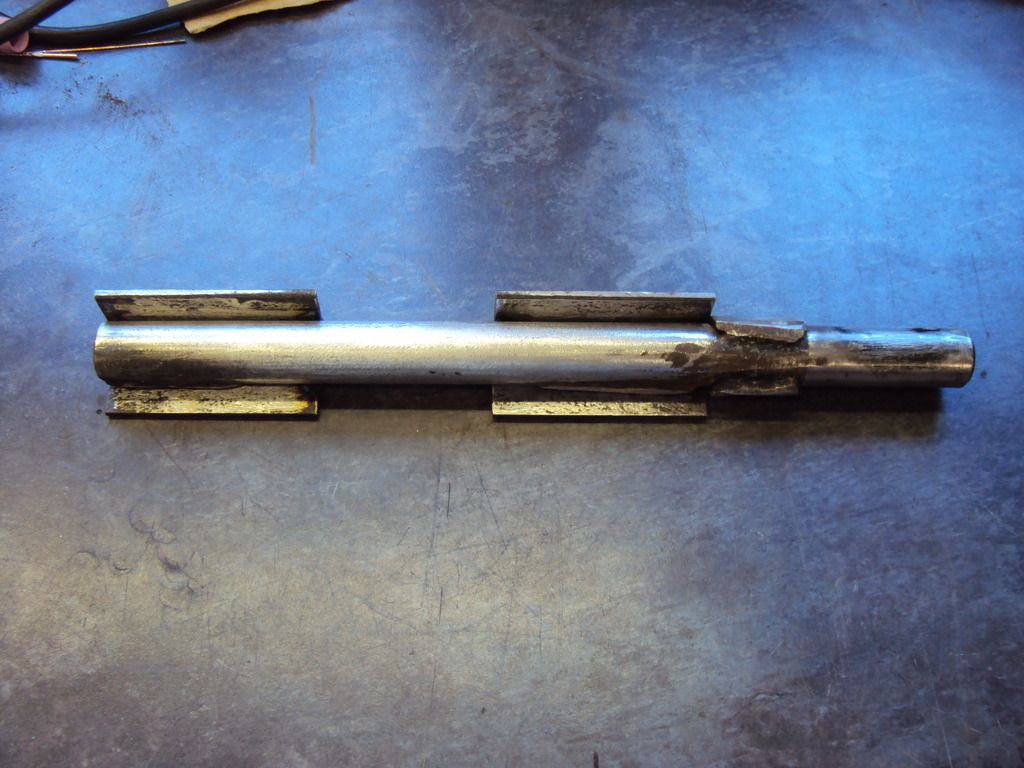
Tacked to hold together
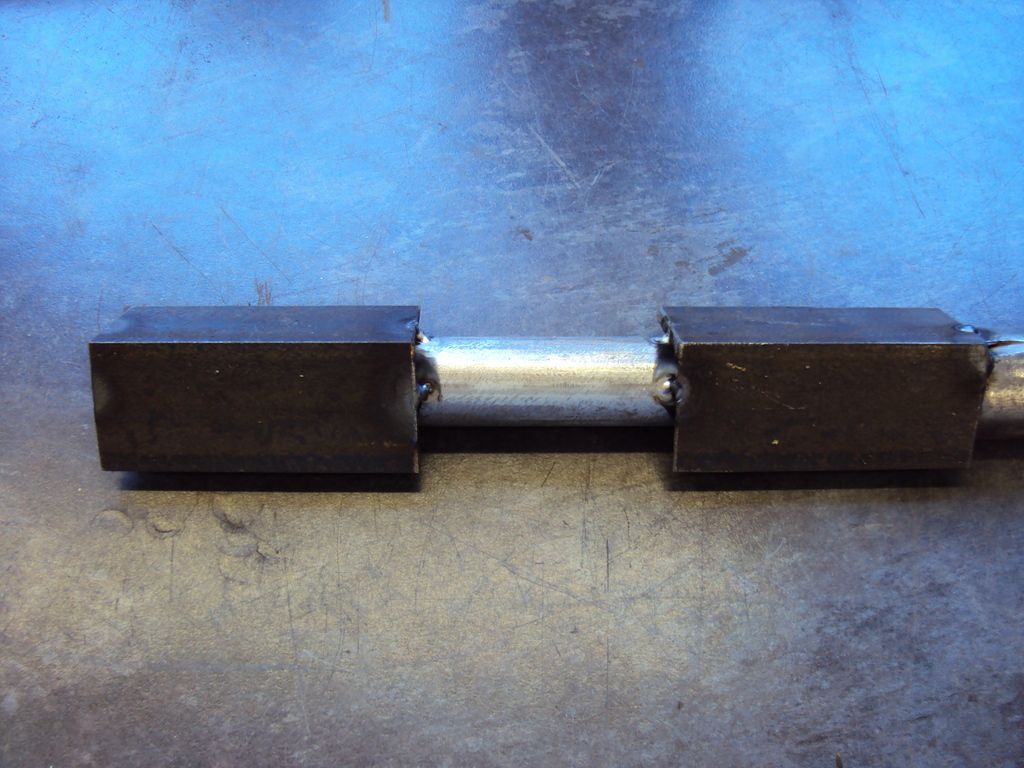
The axles will be welded to the frame like this
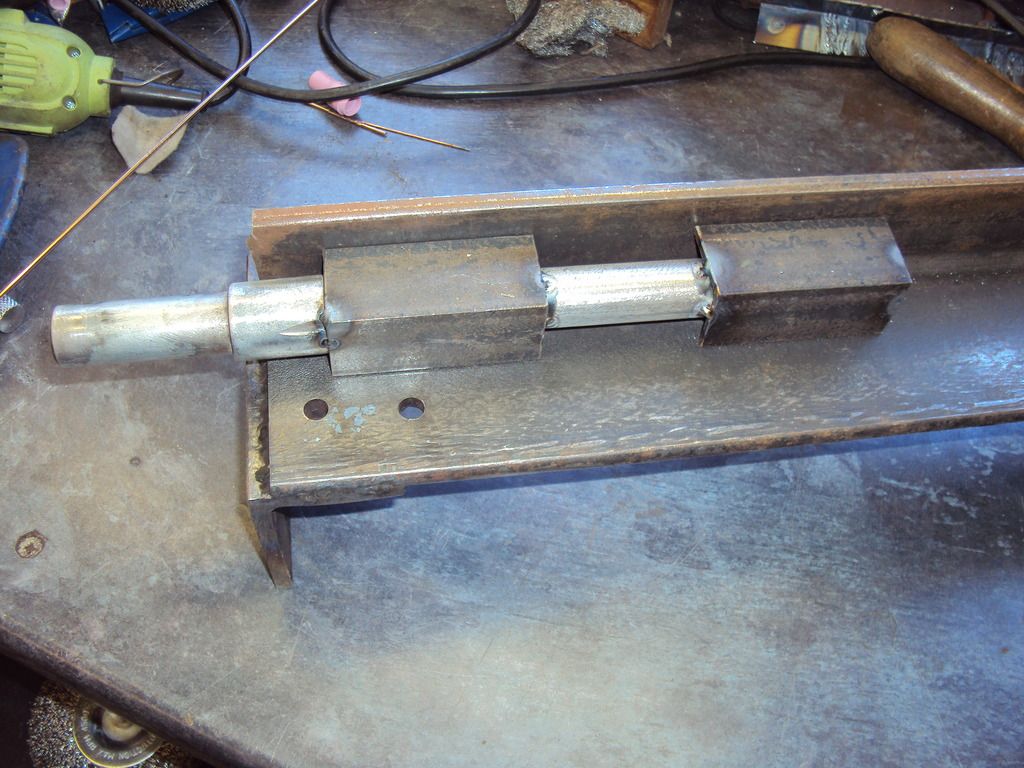
Axle welded to angle iron
A few photos have gone missing so I only have a photo of the completed axle frame after it had been painted
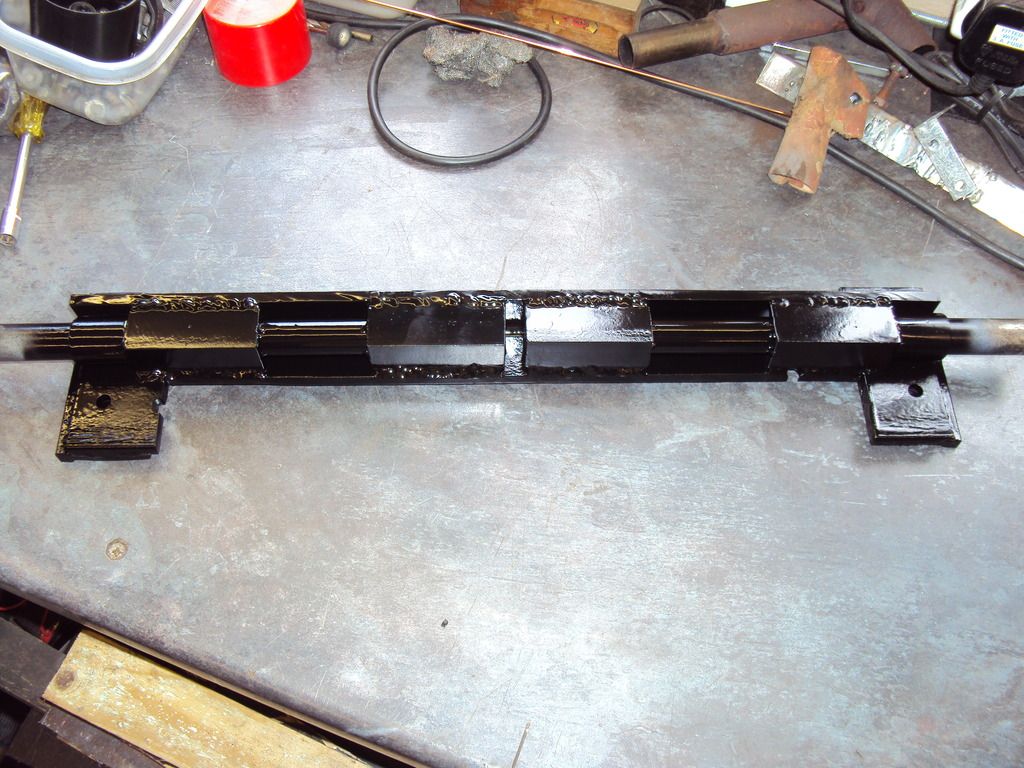
I also cut away a lot of the excess metal to lighten it up a bit.
Axle frame bolted to generator chassis
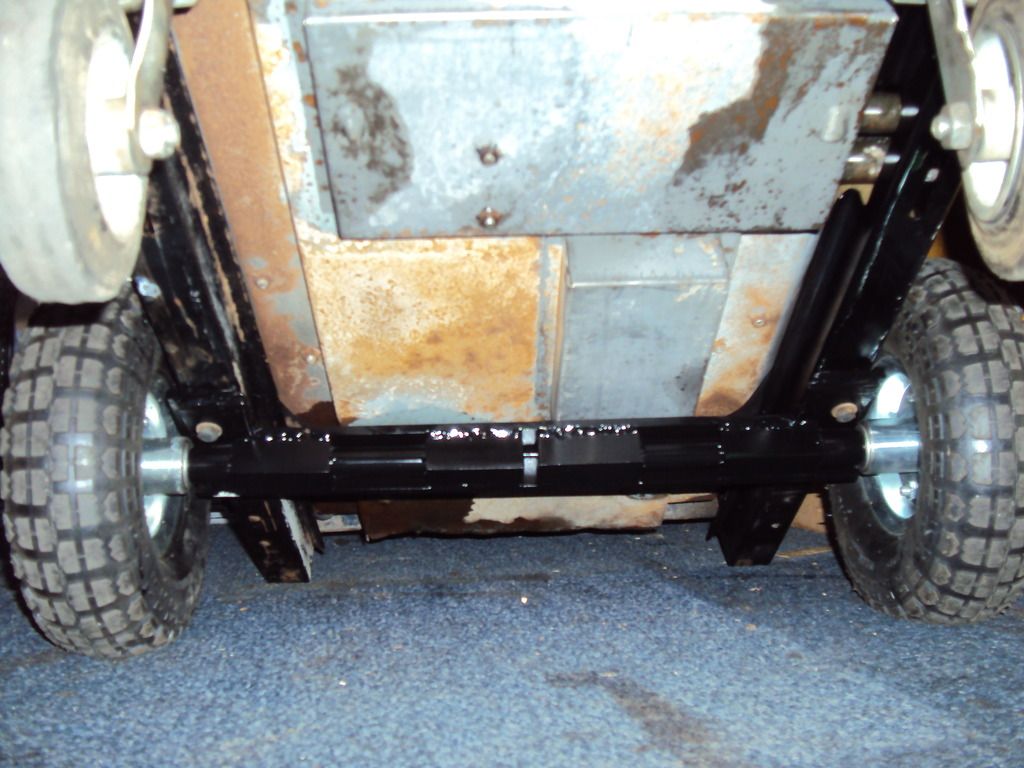
Generator reassembled and sitting on wheels
To support the front of the generator I used a pair of castors and braced them with an offcut from the axle frame.
I made a start on lifting handles so the generator can be easily moved around, the handles will be made so they can fold down when not in use.
Once the generator was all back together I ran it up for a couple of hours and found it has an oil leak from the cylinder head.

The leak looks like it is from the head gasket where the oil feed from the pump passes through up to the cam bearings. I managed to reduce the leak by re torqueing the cylinder head bolts while the engine was hot. It is likely I’ll have to change the cylinder head gasket at some point.
As a test I started the gennny this morning to see how it copes with the cold as it is -1 today, after about 8-10 seconds of cranking it burst into life and settled down to a nice constant rpm. Can’t beat a Honda for reliability!
To pick up from where I left off, I have finished the axles. To make the axles I welded the axel shaft to pieces of angle iron so they could be mounted to the frame I made.
Tacked to hold together
The axles will be welded to the frame like this
Axle welded to angle iron
A few photos have gone missing so I only have a photo of the completed axle frame after it had been painted
I also cut away a lot of the excess metal to lighten it up a bit.
Axle frame bolted to generator chassis
Generator reassembled and sitting on wheels
To support the front of the generator I used a pair of castors and braced them with an offcut from the axle frame.
I made a start on lifting handles so the generator can be easily moved around, the handles will be made so they can fold down when not in use.
Once the generator was all back together I ran it up for a couple of hours and found it has an oil leak from the cylinder head.
The leak looks like it is from the head gasket where the oil feed from the pump passes through up to the cam bearings. I managed to reduce the leak by re torqueing the cylinder head bolts while the engine was hot. It is likely I’ll have to change the cylinder head gasket at some point.
As a test I started the gennny this morning to see how it copes with the cold as it is -1 today, after about 8-10 seconds of cranking it burst into life and settled down to a nice constant rpm. Can’t beat a Honda for reliability!
I'm Back
Latest project:
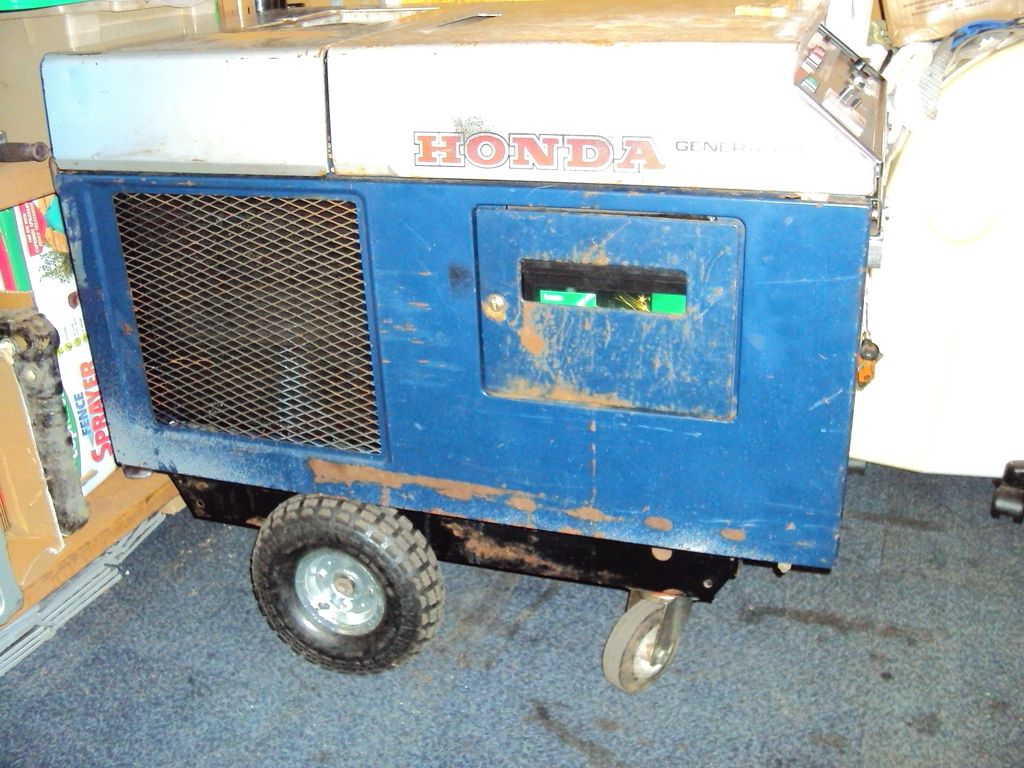
Honda EX4000
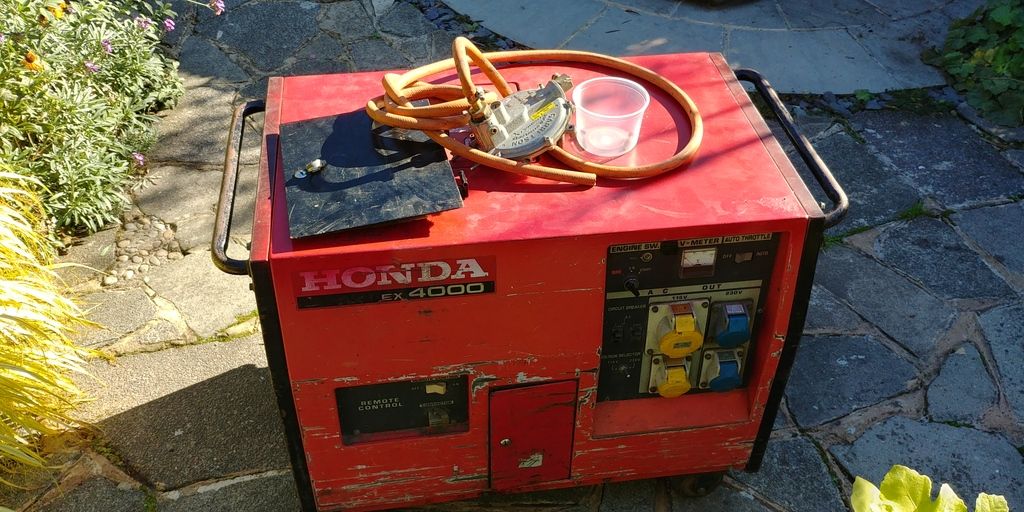
It runs but has no output.... I got this one due to it having a LPG conversion, won it for less than a new LPG kit costs!
I have been after a LPG kit to put on on the EX550 for a while so I don't have to worry about petrol going off and ruining the carburetor.
Plan is to get it working (obviously !) and strip the LPG kit off.
Had a quick poke around and it looks like mice have been having a party so maybe the lack of output is due to chewed wiring
To be continued.......
Latest project:
Honda EX4000
It runs but has no output.... I got this one due to it having a LPG conversion, won it for less than a new LPG kit costs!
I have been after a LPG kit to put on on the EX550 for a while so I don't have to worry about petrol going off and ruining the carburetor.
Plan is to get it working (obviously !) and strip the LPG kit off.
Had a quick poke around and it looks like mice have been having a party so maybe the lack of output is due to chewed wiring
To be continued.......
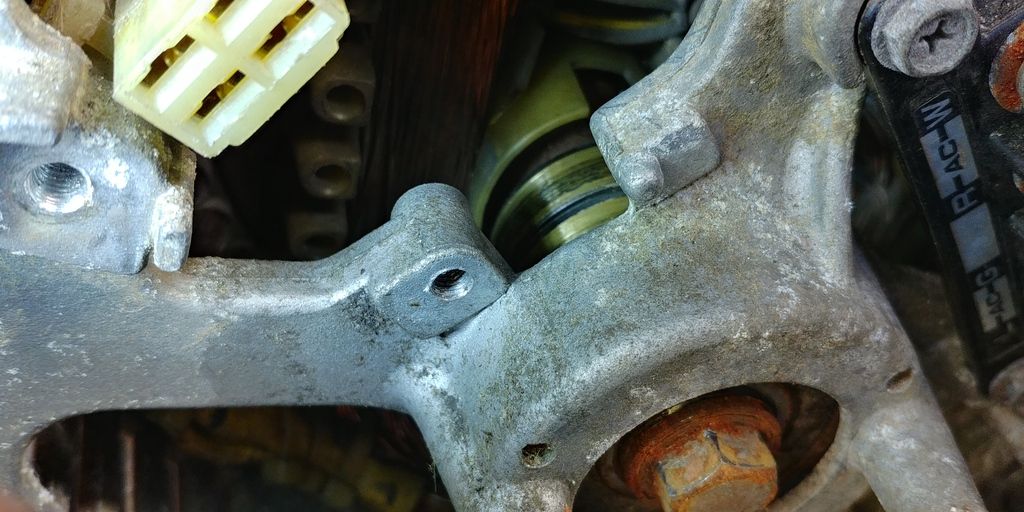
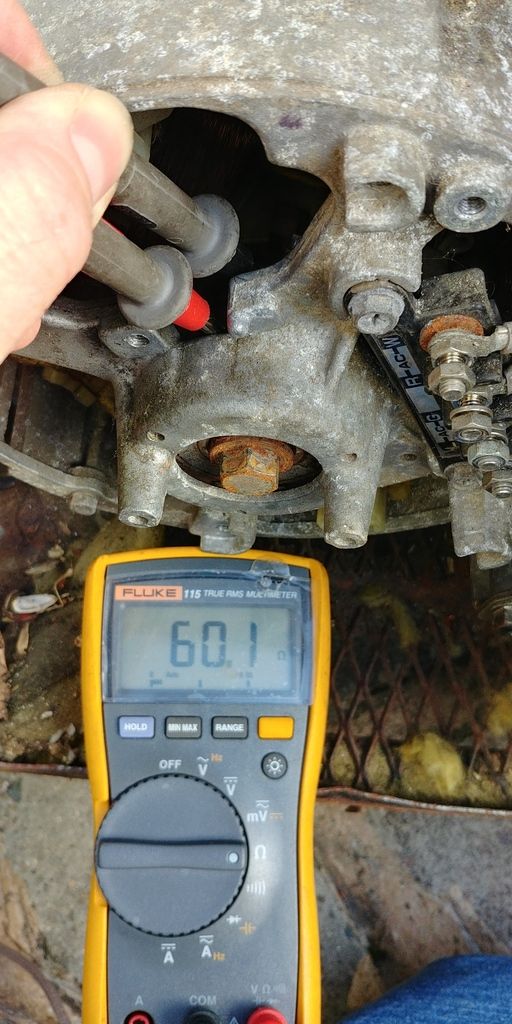
Made a start on the fault finding tody, first thing to check was the sliprings and brushes for the rotor. A test with the multimeter showed the resistance was too high.
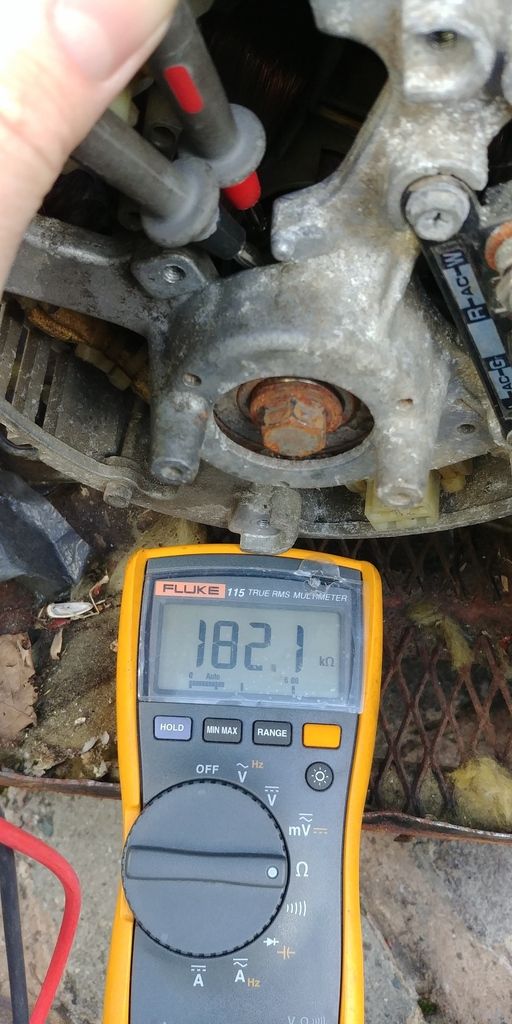
Based on past experience, the resistance should be 60-70 ohms.
I cleaned the sliprings with some scotchbright

Looking better
That’s more like it
Refitted the brushes and fired it up and it worked
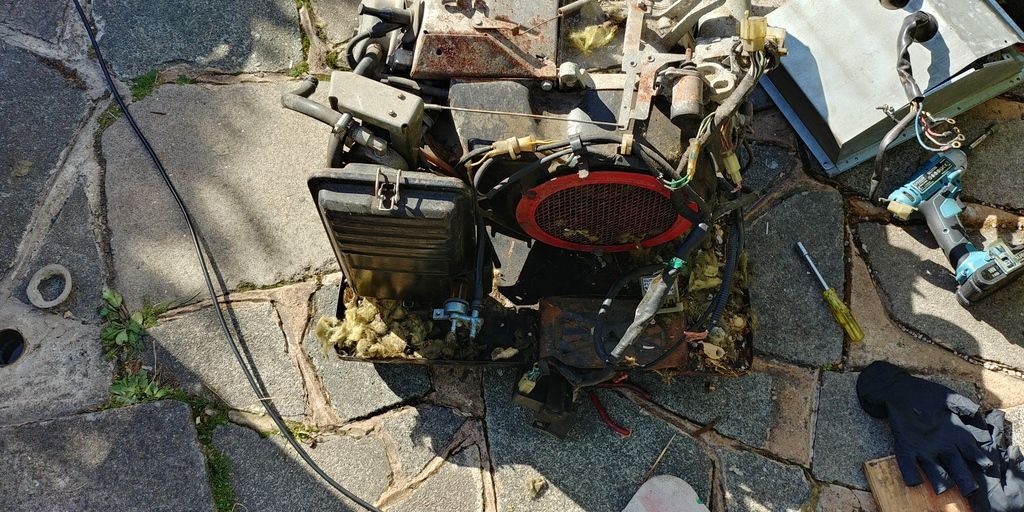
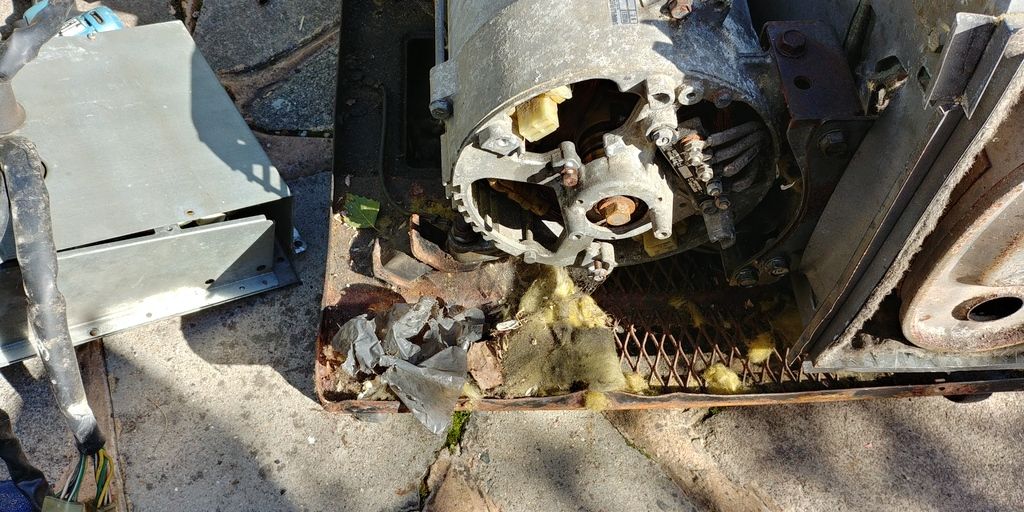
However it sounded very rattley so decided to strip it down so I could check the engine over. During the disassembly found lots of the sound insulation had been chewed up and there were loads of seeds and leaves. Obviously the generator had been a home to a few mice
Once I had cleared all the chewed-up insulation, I removed the rocker cover to check the valve clearance with a feeler gauge. To correctly set the valve clearance the engine needs to be set to top dead centre (TDC). To find TDC I removed the spark plug and rested a screw driver on the piston and slowly rotated the engine.
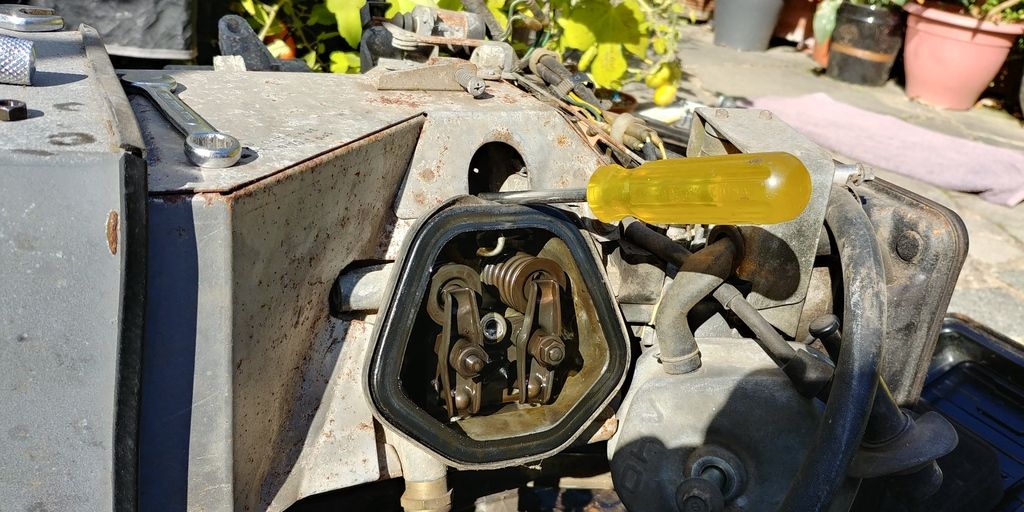
TDC is the highest point the piston reaches, at this point the engine should be on the compression stroke with both valves closed.
Once it is at this point I used the feeler gauge to check the clearance between the valve stem and the rocker.
The spec is 0.15mm in the intake and 0.20mm on the exhaust, the measured values were 0.30 on the intake and 0.25mm on the exhaust.
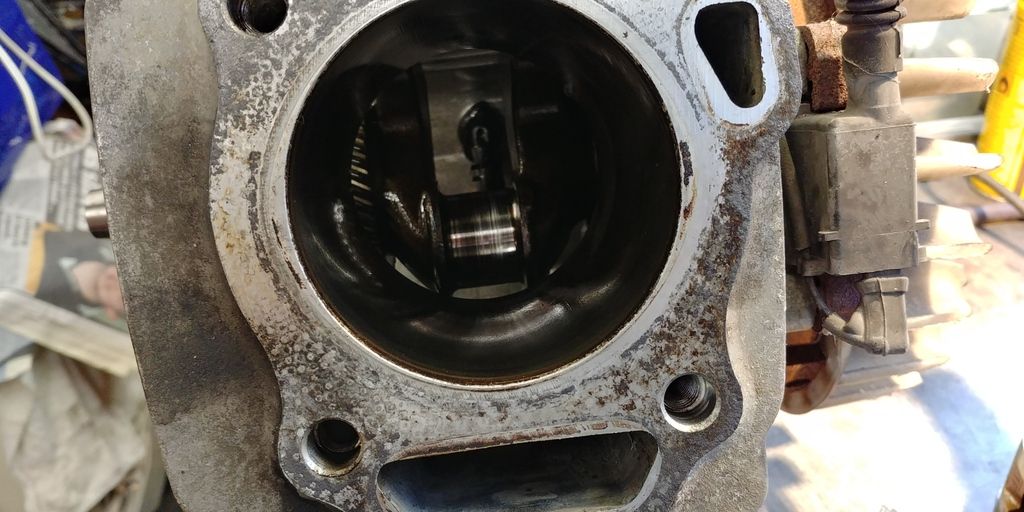
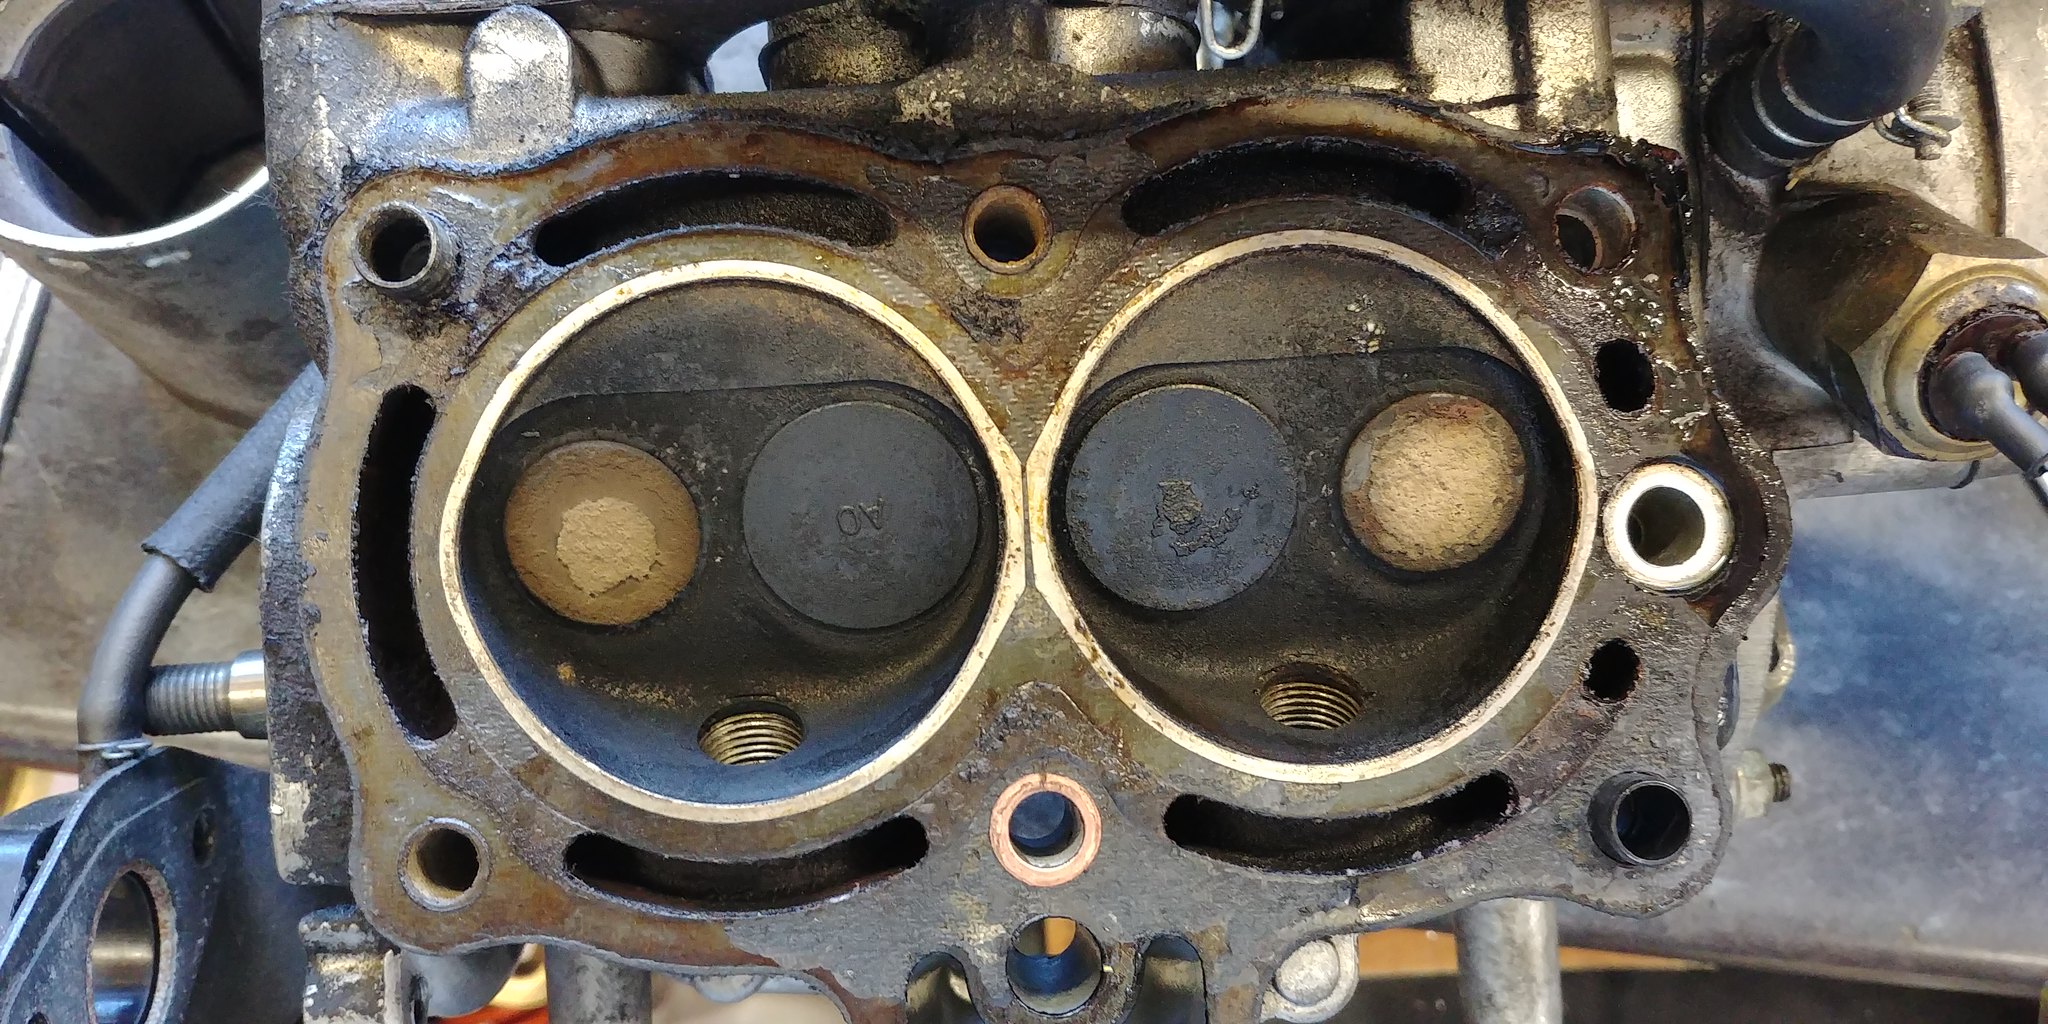
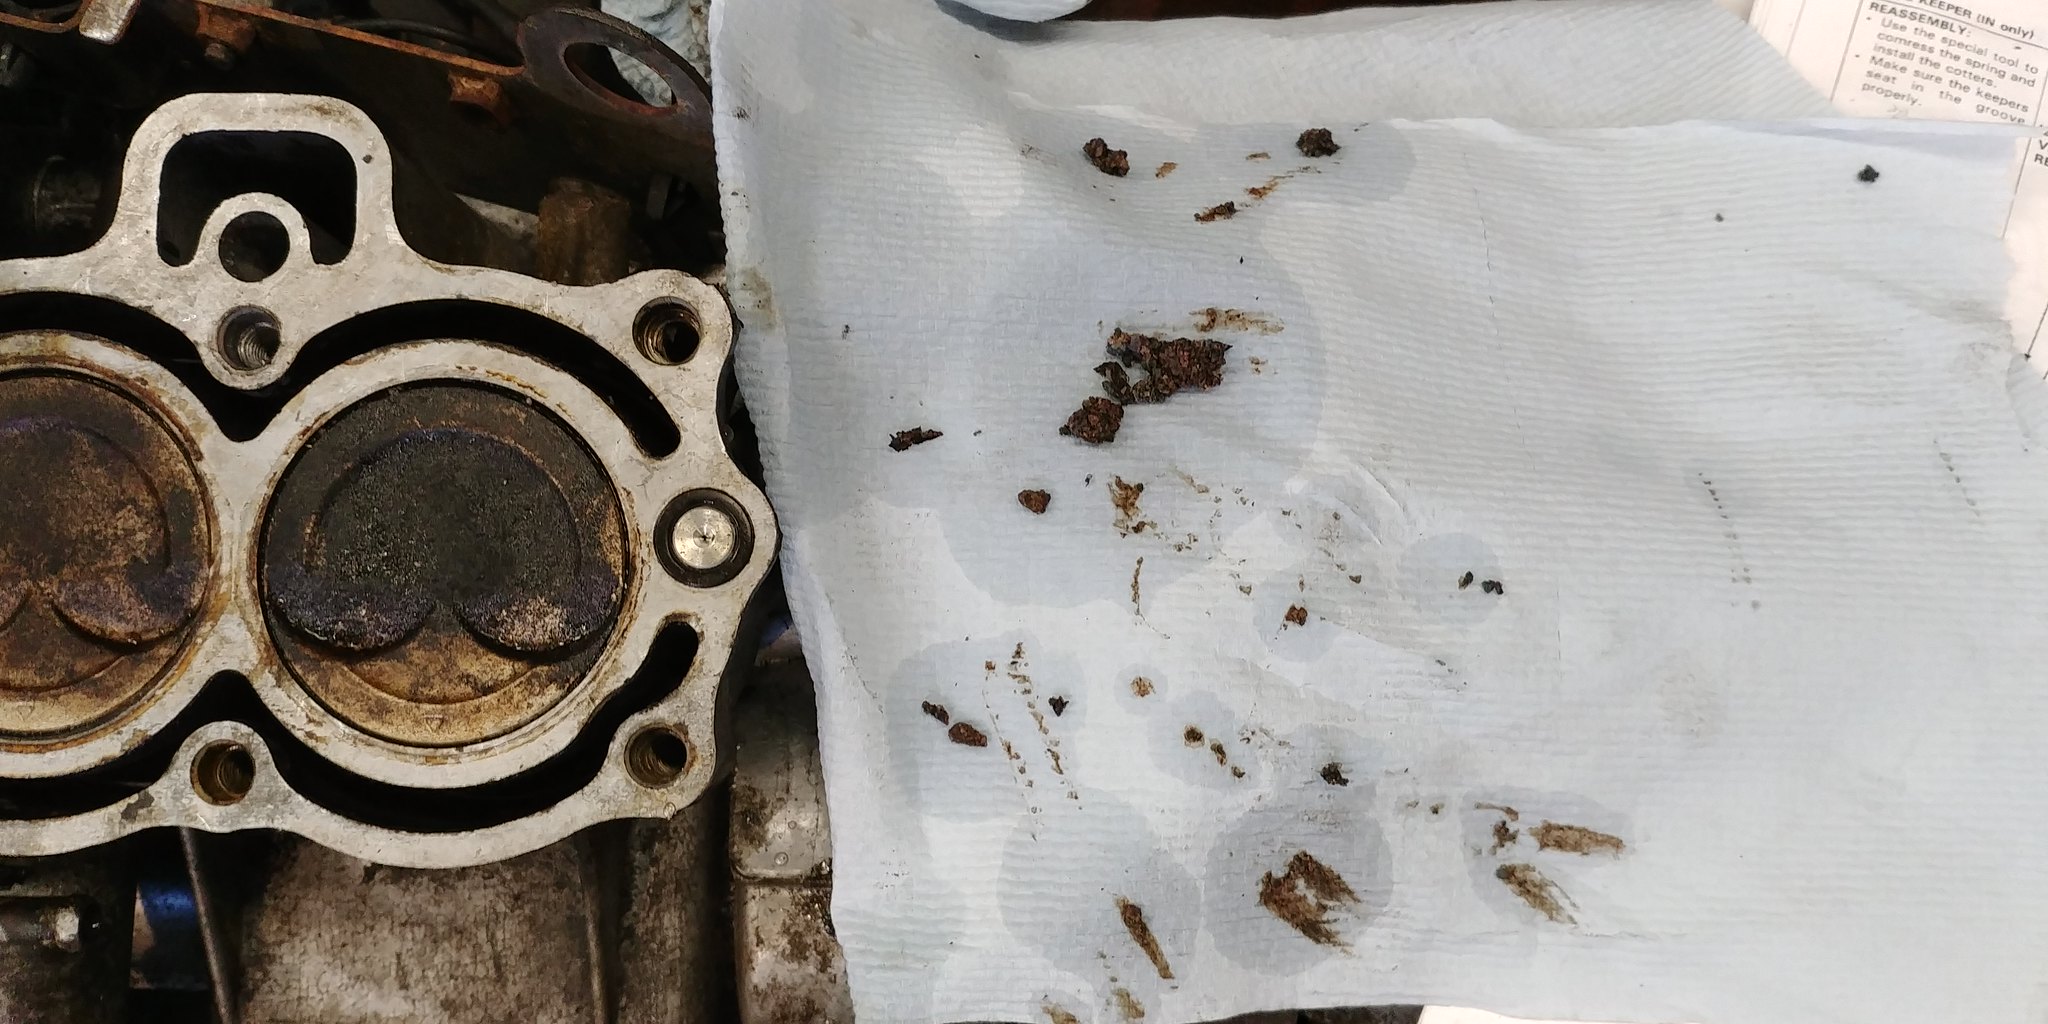
While adjusting the valve clearance I looked into the cylinder and noticed there was lots of carbon on the piston, so decide to remove the cylinder head.
A previous engine I worked (shown earlier in this thread) on had so much carbon it prevented the piston form reaching TDC so the engine wouldn’t turn over. Didn’t want to risk carbon dropping off and jamming the engine while it was running
In the end it wasn’t as bad as I expected. don't think it has spent much time running on LPG as the LPG should be a cleaner burn with no carbon.
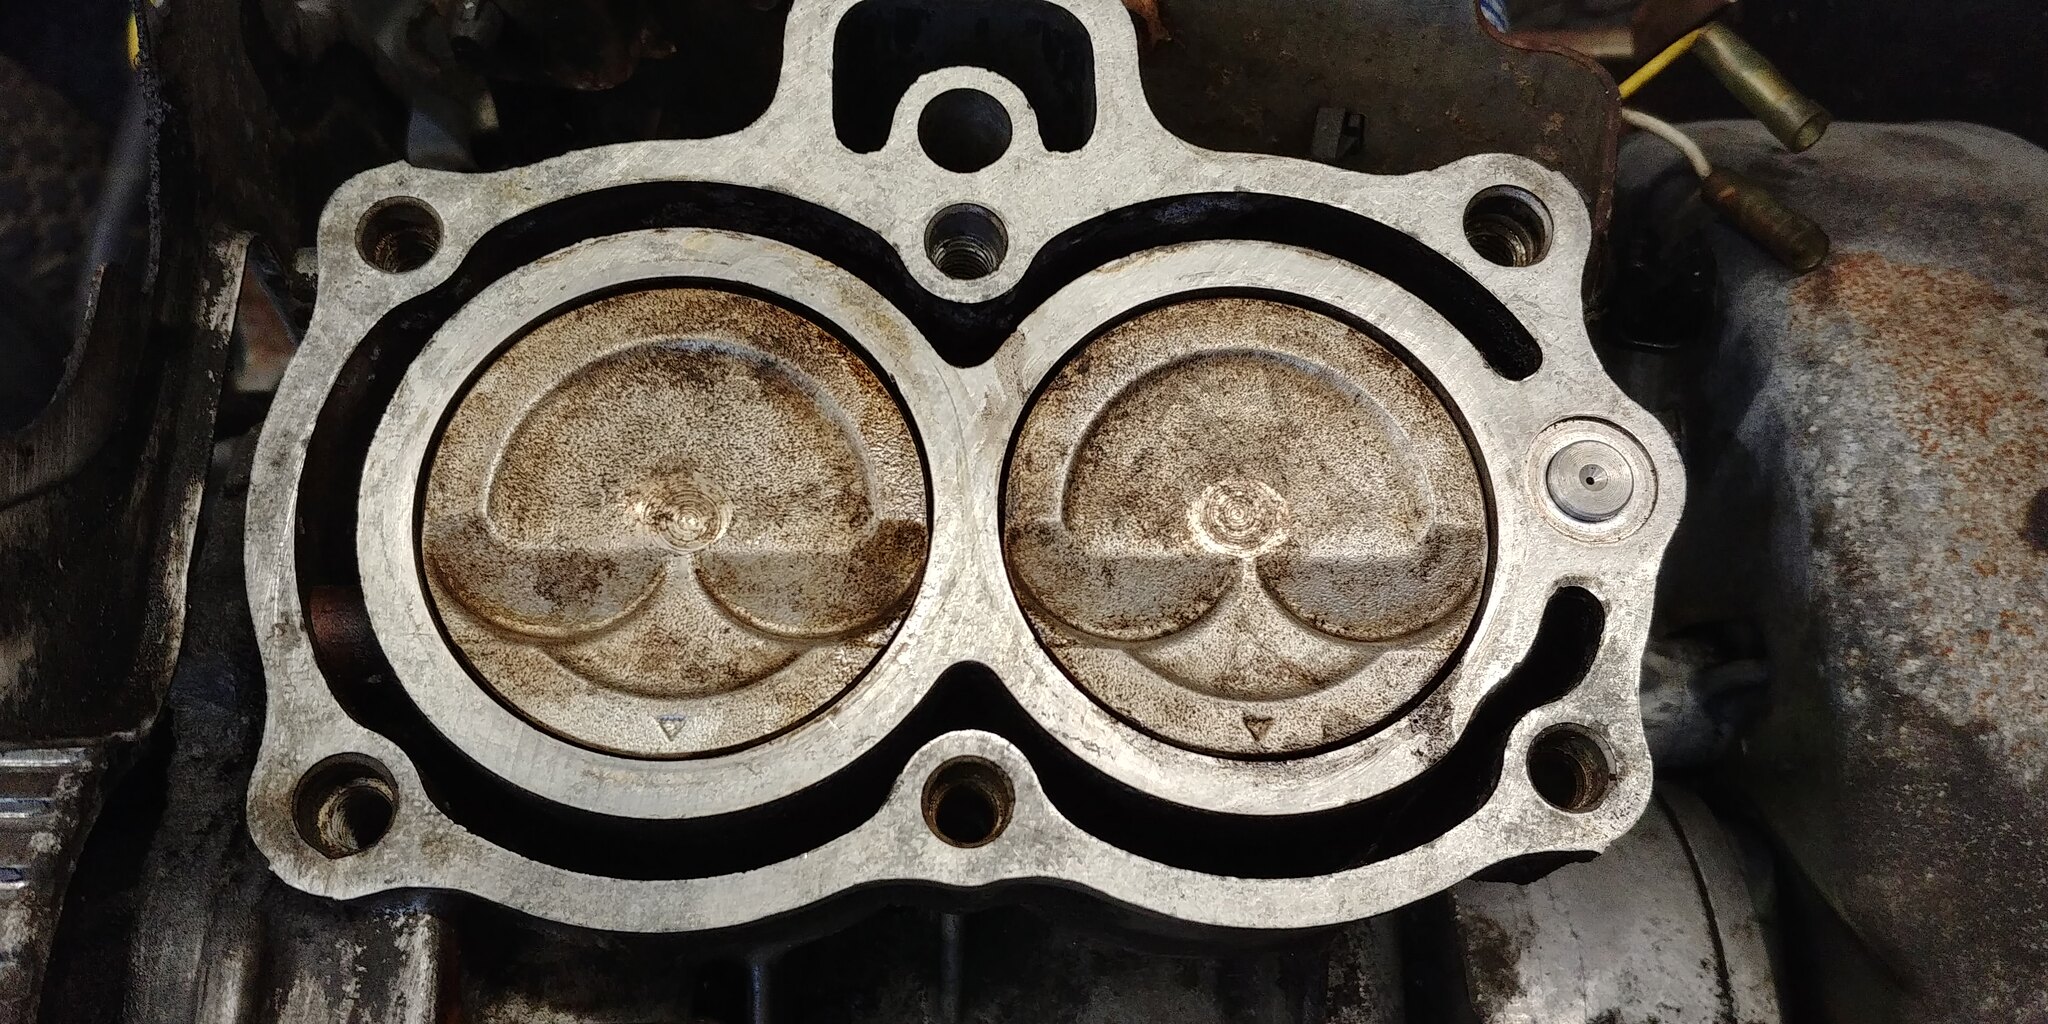
Cylinder
Cylinder head
I’ll clean it all up and reassemble to see if the rattle has gone.
Based on past experience, the resistance should be 60-70 ohms.
I cleaned the sliprings with some scotchbright
Looking better
That’s more like it
Refitted the brushes and fired it up and it worked
However it sounded very rattley so decided to strip it down so I could check the engine over. During the disassembly found lots of the sound insulation had been chewed up and there were loads of seeds and leaves. Obviously the generator had been a home to a few mice
Once I had cleared all the chewed-up insulation, I removed the rocker cover to check the valve clearance with a feeler gauge. To correctly set the valve clearance the engine needs to be set to top dead centre (TDC). To find TDC I removed the spark plug and rested a screw driver on the piston and slowly rotated the engine.
TDC is the highest point the piston reaches, at this point the engine should be on the compression stroke with both valves closed.
Once it is at this point I used the feeler gauge to check the clearance between the valve stem and the rocker.
The spec is 0.15mm in the intake and 0.20mm on the exhaust, the measured values were 0.30 on the intake and 0.25mm on the exhaust.
While adjusting the valve clearance I looked into the cylinder and noticed there was lots of carbon on the piston, so decide to remove the cylinder head.
A previous engine I worked (shown earlier in this thread) on had so much carbon it prevented the piston form reaching TDC so the engine wouldn’t turn over. Didn’t want to risk carbon dropping off and jamming the engine while it was running
In the end it wasn’t as bad as I expected. don't think it has spent much time running on LPG as the LPG should be a cleaner burn with no carbon.
Cylinder
Cylinder head
I’ll clean it all up and reassemble to see if the rattle has gone.
guindilias said:
If there is no output it might just need flashed - only takes a minute to do, one of my gennys needs flashed after about 6 months of not being used, without fail!
Cleaning the brushes worked, the output voltage was a bit high as it had been set to run at 60Hz for some reason.Got the cylinder head and piston cleaned up.
Re assembled the generator and ran it up, and I sounded like a bag of nails were rattling around inside so ended up stripping the engine down.
The bottom of the engine was full of sludge.
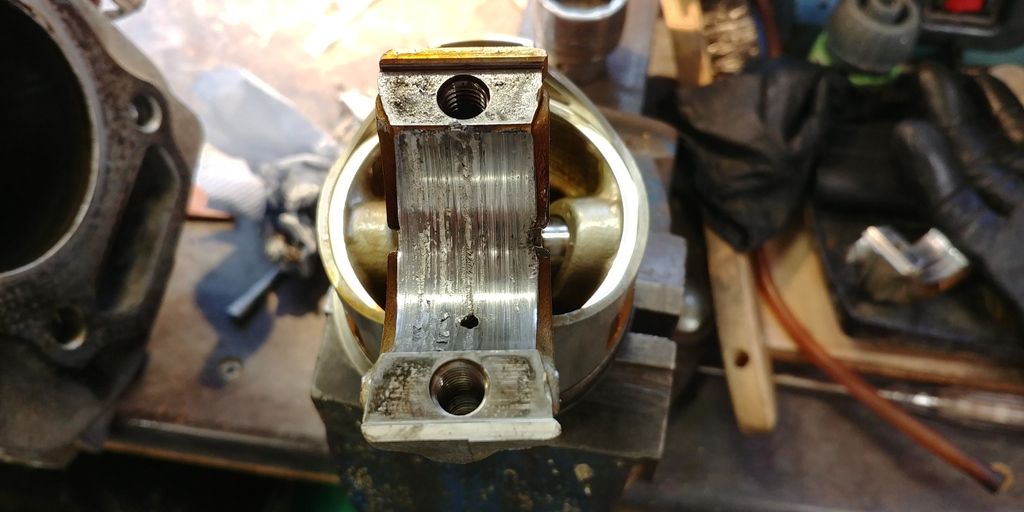
Found the oil splasher hiding in the sludge, it’s supposed to be part of the con rod.
Decided to remove the con rod to see if there was any other damage and there was…
Big end bearing
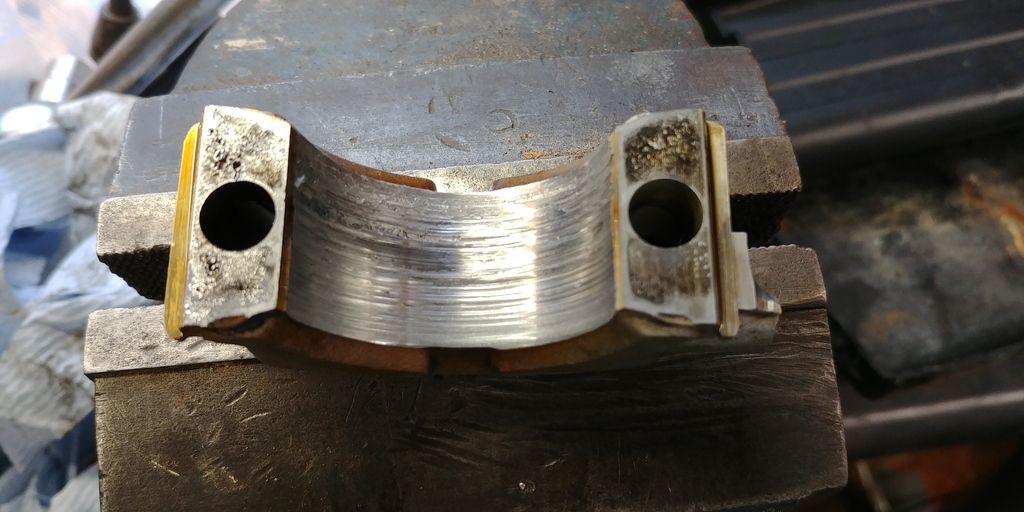
The con rod wasn’t much better
Fortunately the crankshaft is ok, just a minor mark and no nasty ridges.
Based on the state of the oil that drained out before the strip down the damage was probably caused by lack of servicing.
I have ordered a gasket set and a new con rod so will be able to get it fixed and running like a Honda engine should.
Brother D said:
@Blue32 - Don't want to detract from this awesome thread - but I did come across this guy on youtube, who does exactly what you do
https://www.youtube.com/channel/UCcSeeATlWJJbXpOZR...
Has 195K subscribers! - Just a thought if you wanted to do video updates as well
Thanks,https://www.youtube.com/channel/UCcSeeATlWJJbXpOZR...
Has 195K subscribers! - Just a thought if you wanted to do video updates as well
Edited by Brother D on Friday 19th October 19:06
Funnily enough that channel popped up as a suggestion for me on Youtube a few days ago. So far have watched the lawn tractor video where he reset the timing after the belt slipped. The tractor uses the same engine as the EX550 I rebuilt earlier in the thread.
New connecting rod arrived last week along with a gasket set so was able to start the rebuild.
Old rod top, new bottom
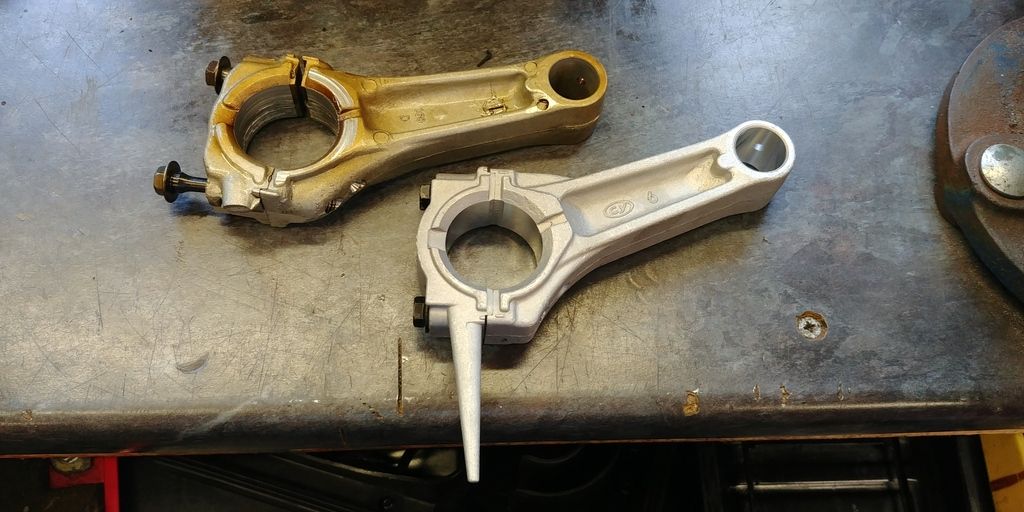
Comparison of rod bearing (new left old right)

New head gasket, bit strange that it’s not completely circular, but is a genuine Honda part so must be right!
Re-assembly nearly complete
Finished off the repairs to the EX4000, last job was to replace the insulation which had been damaged by the mice.
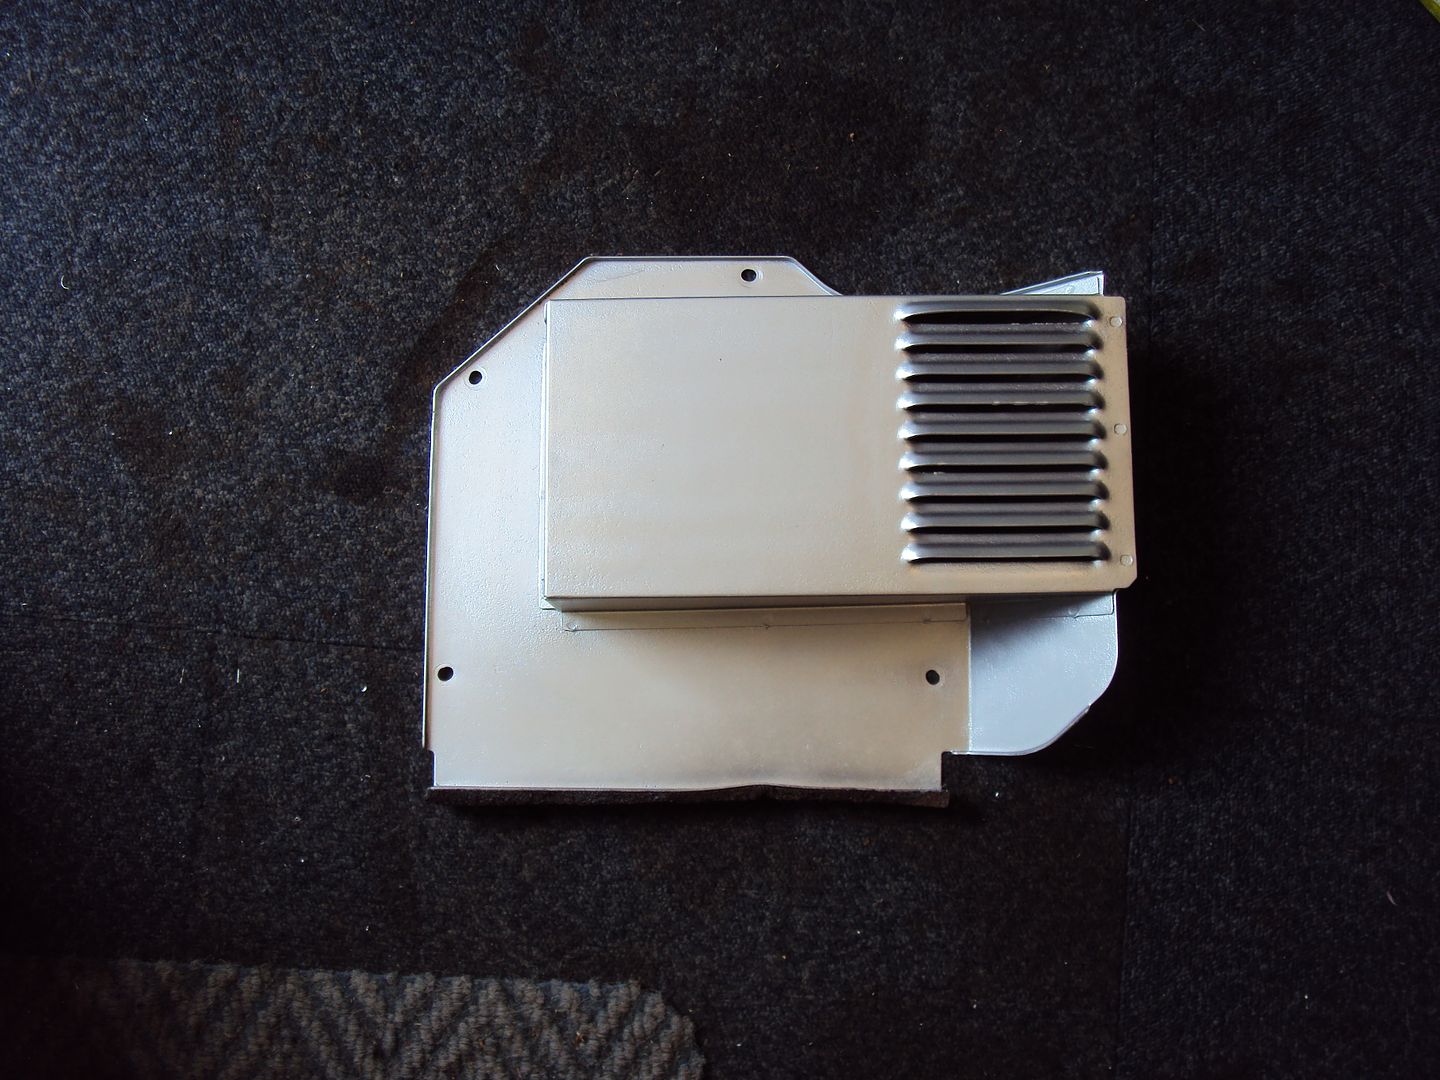
I got hold of insulation used on industrial boilers, its rockwool like the original, but has a heat reflective foil layer.
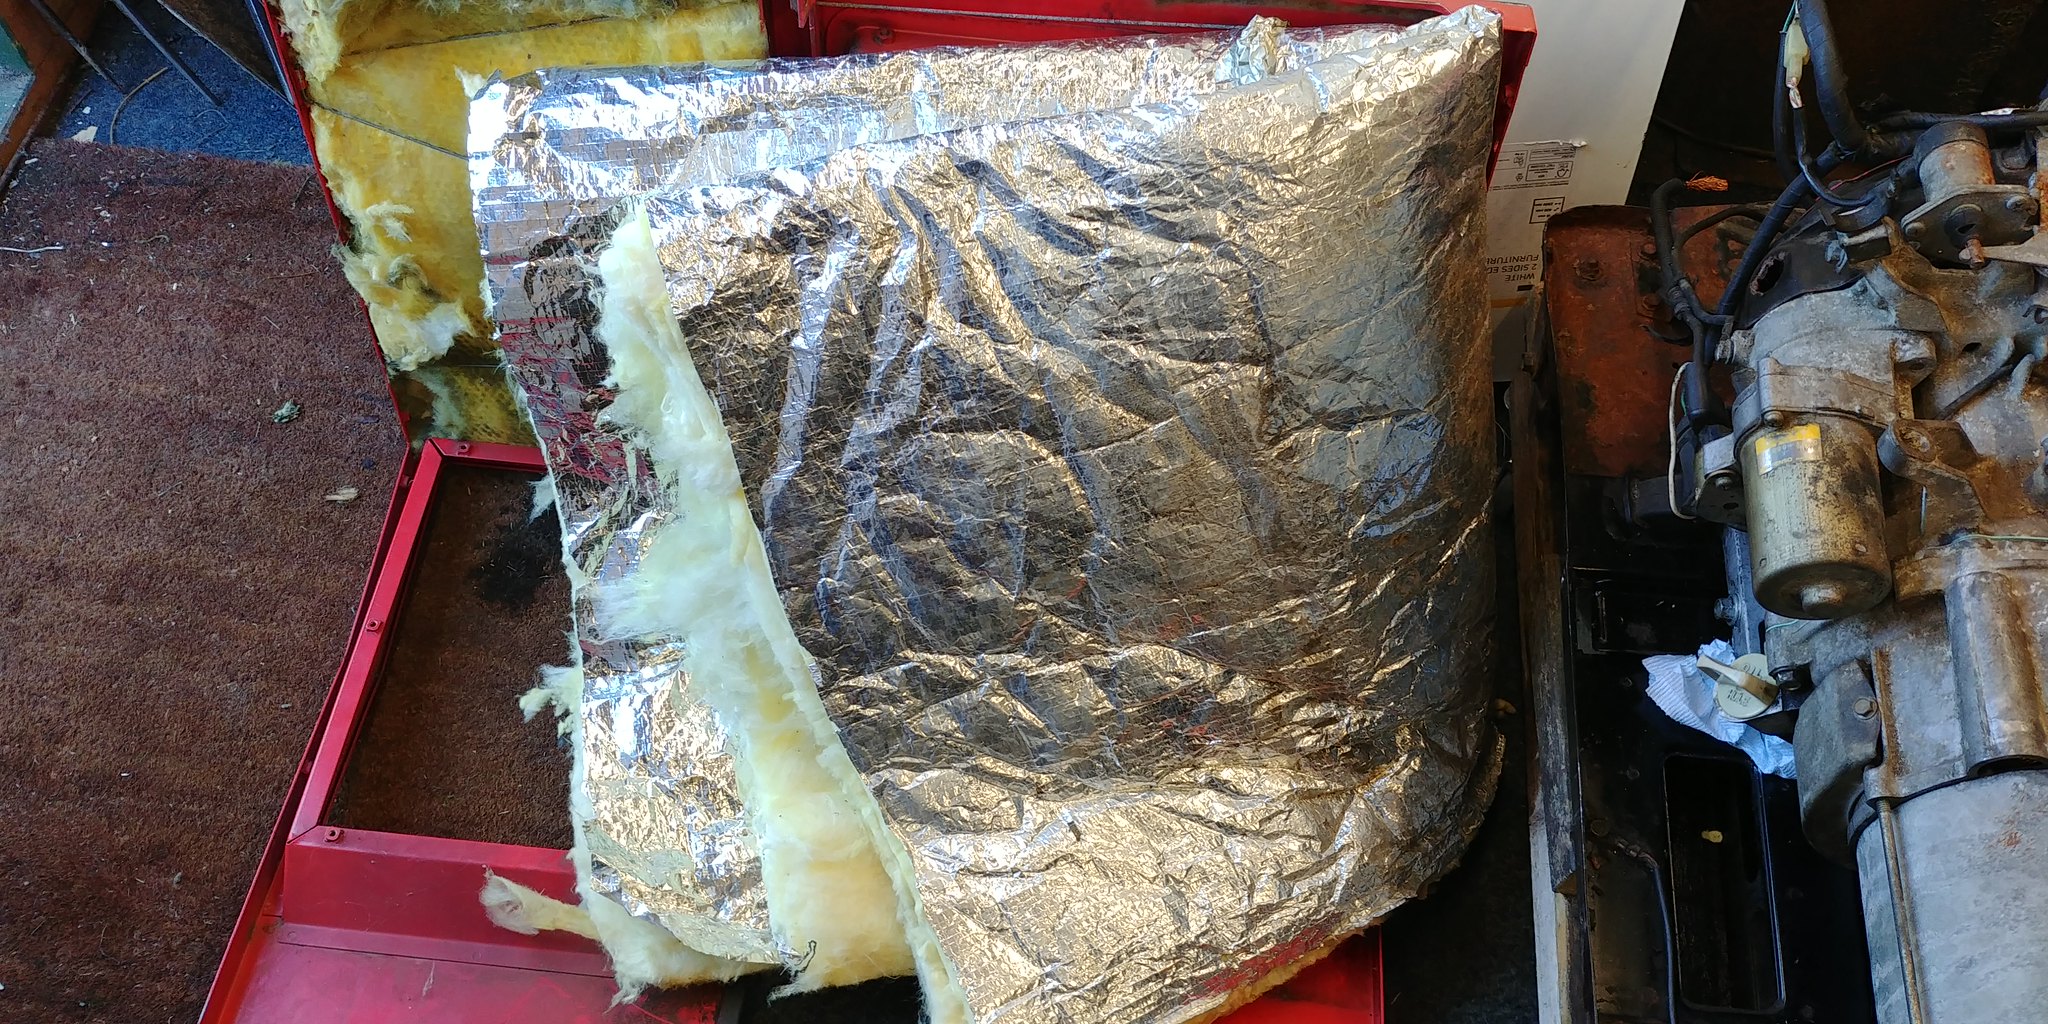
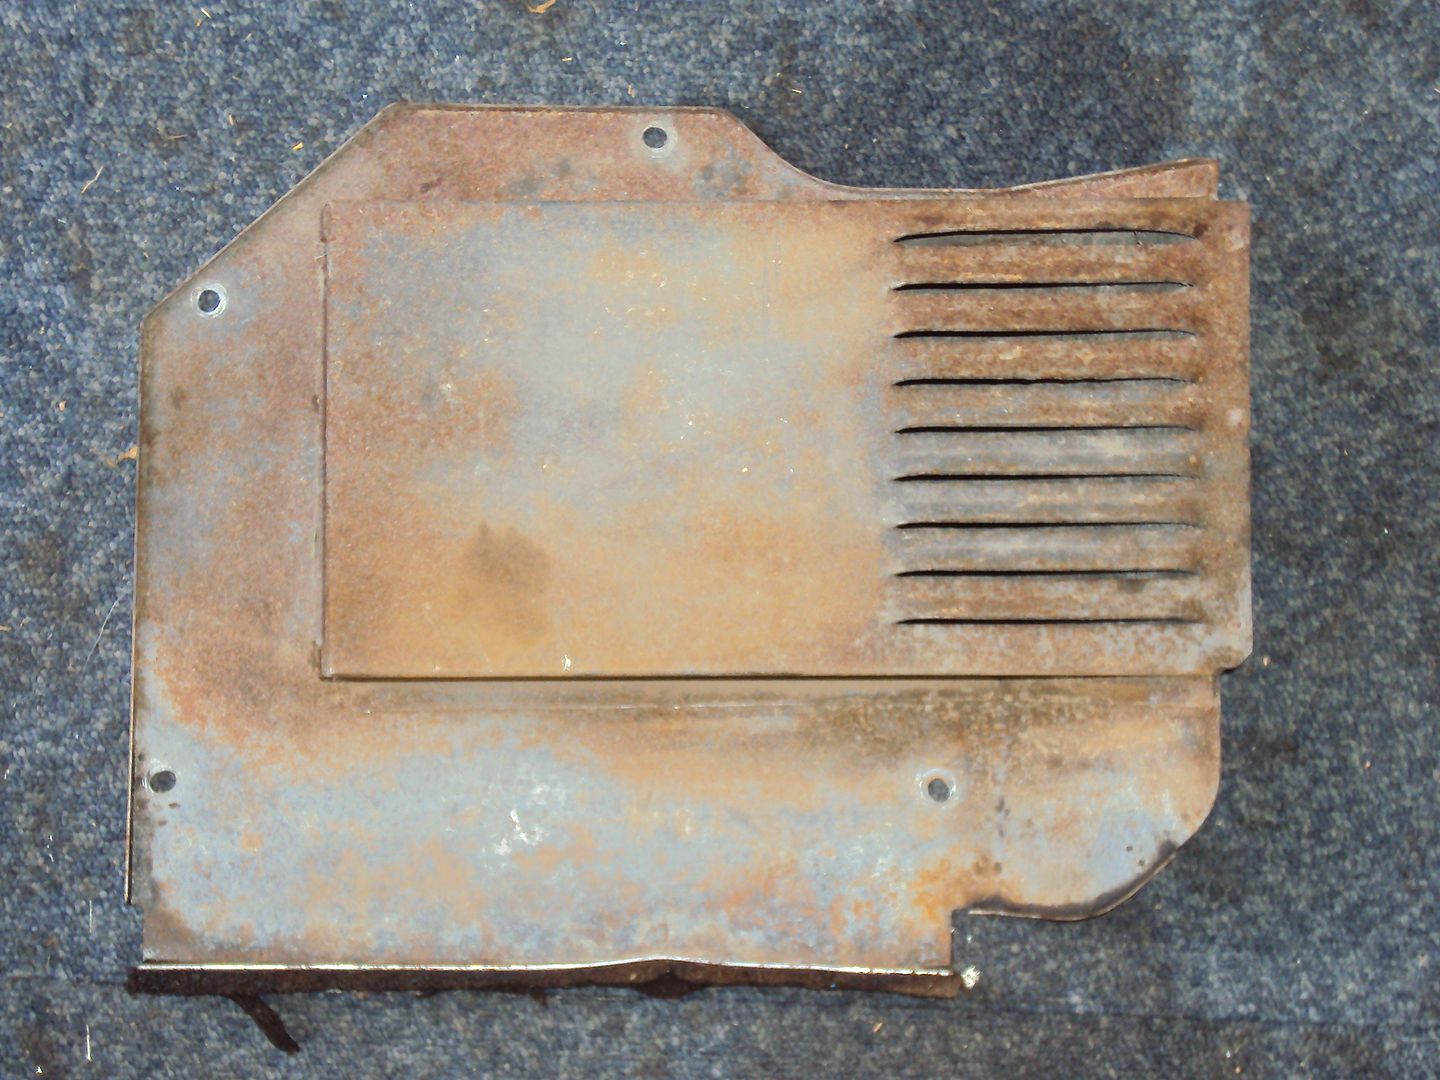
The top cover had the most damage to the insulation.

Looking better.
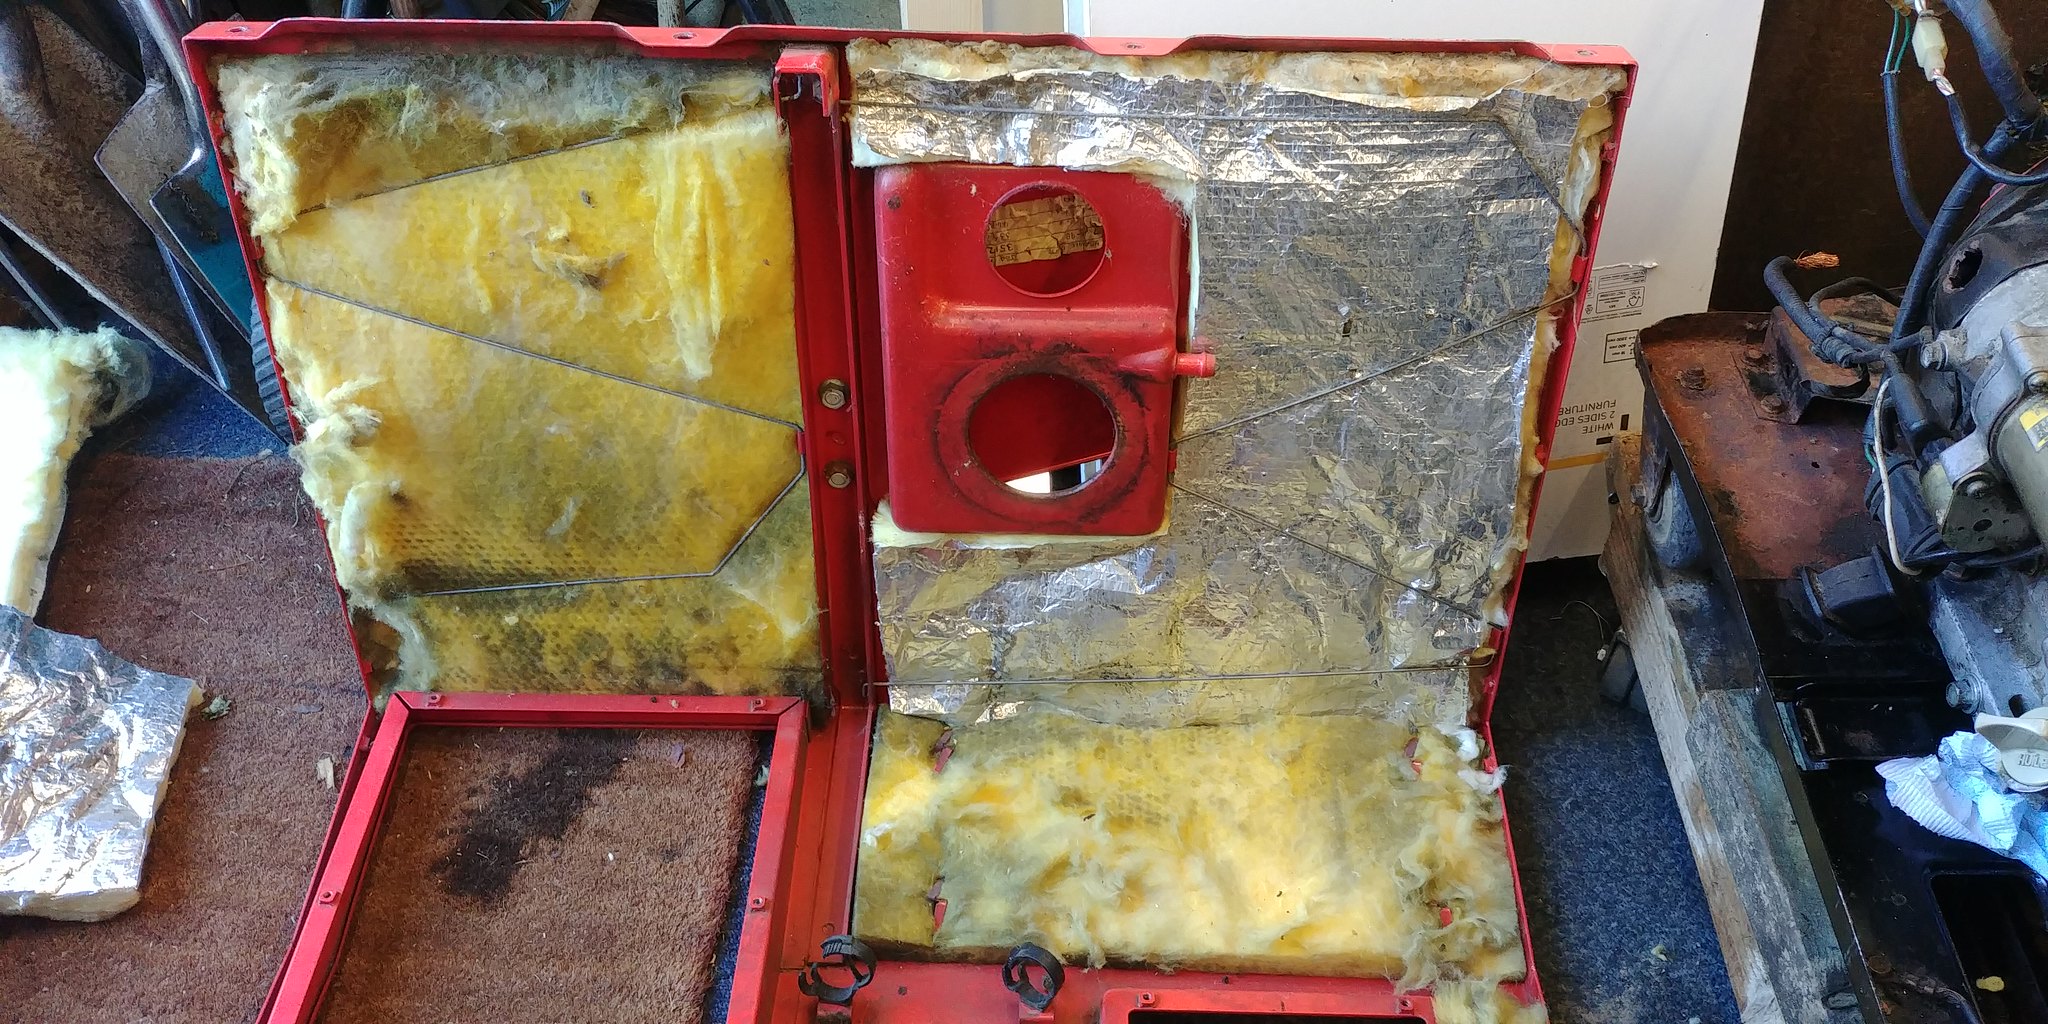
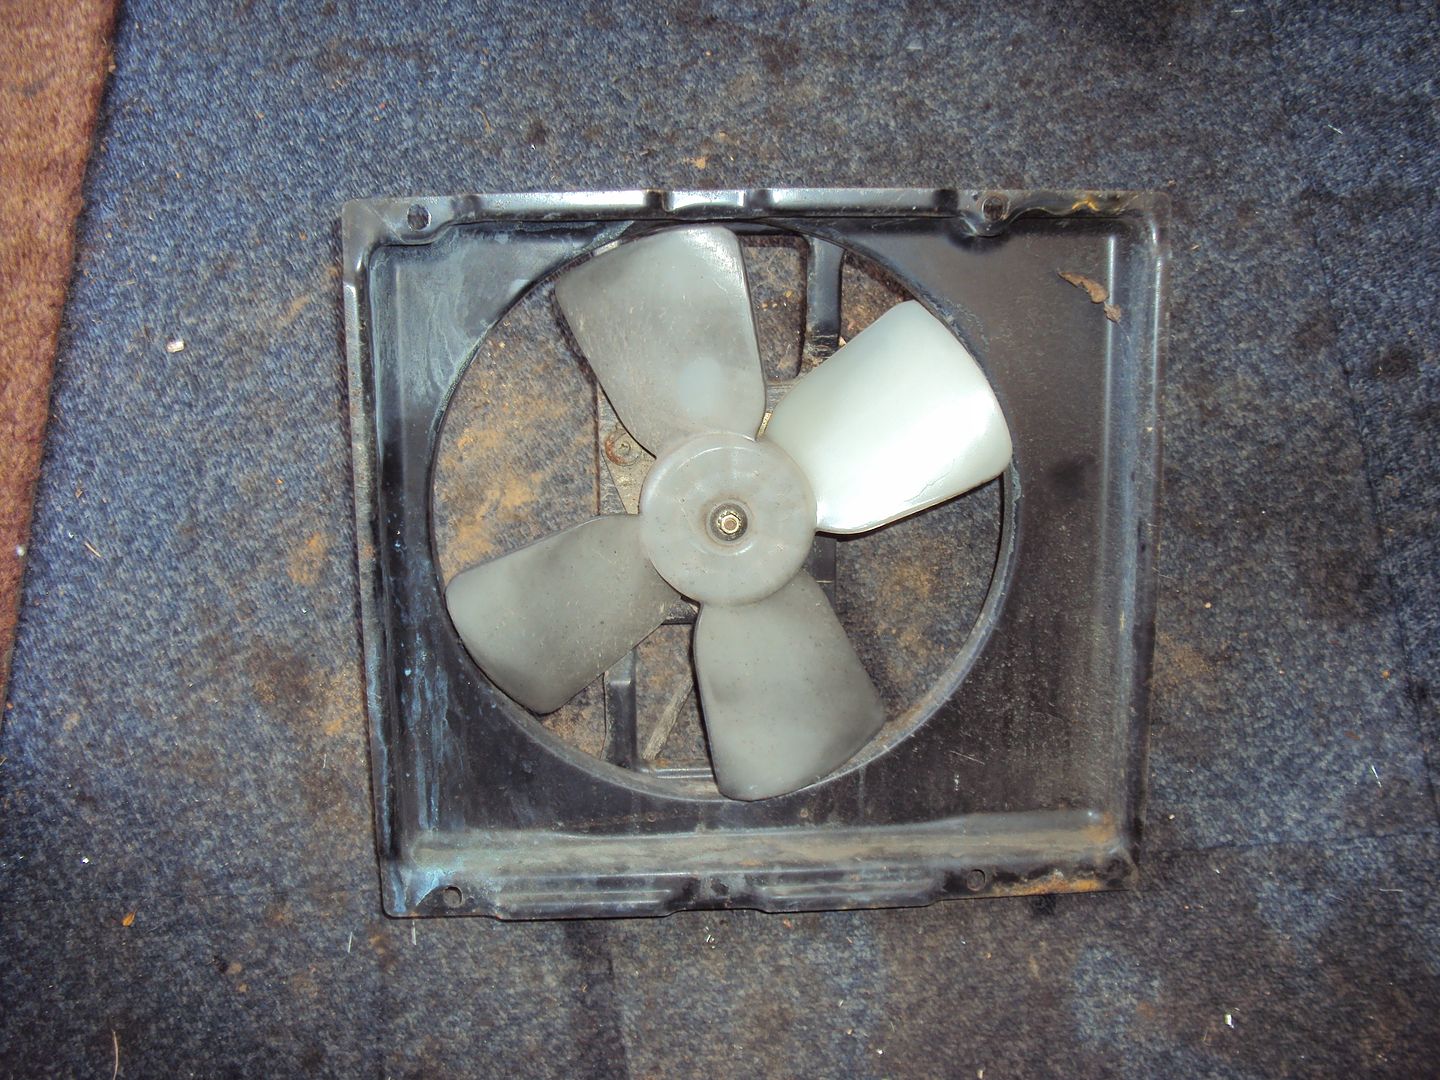
Rear panel repaired.
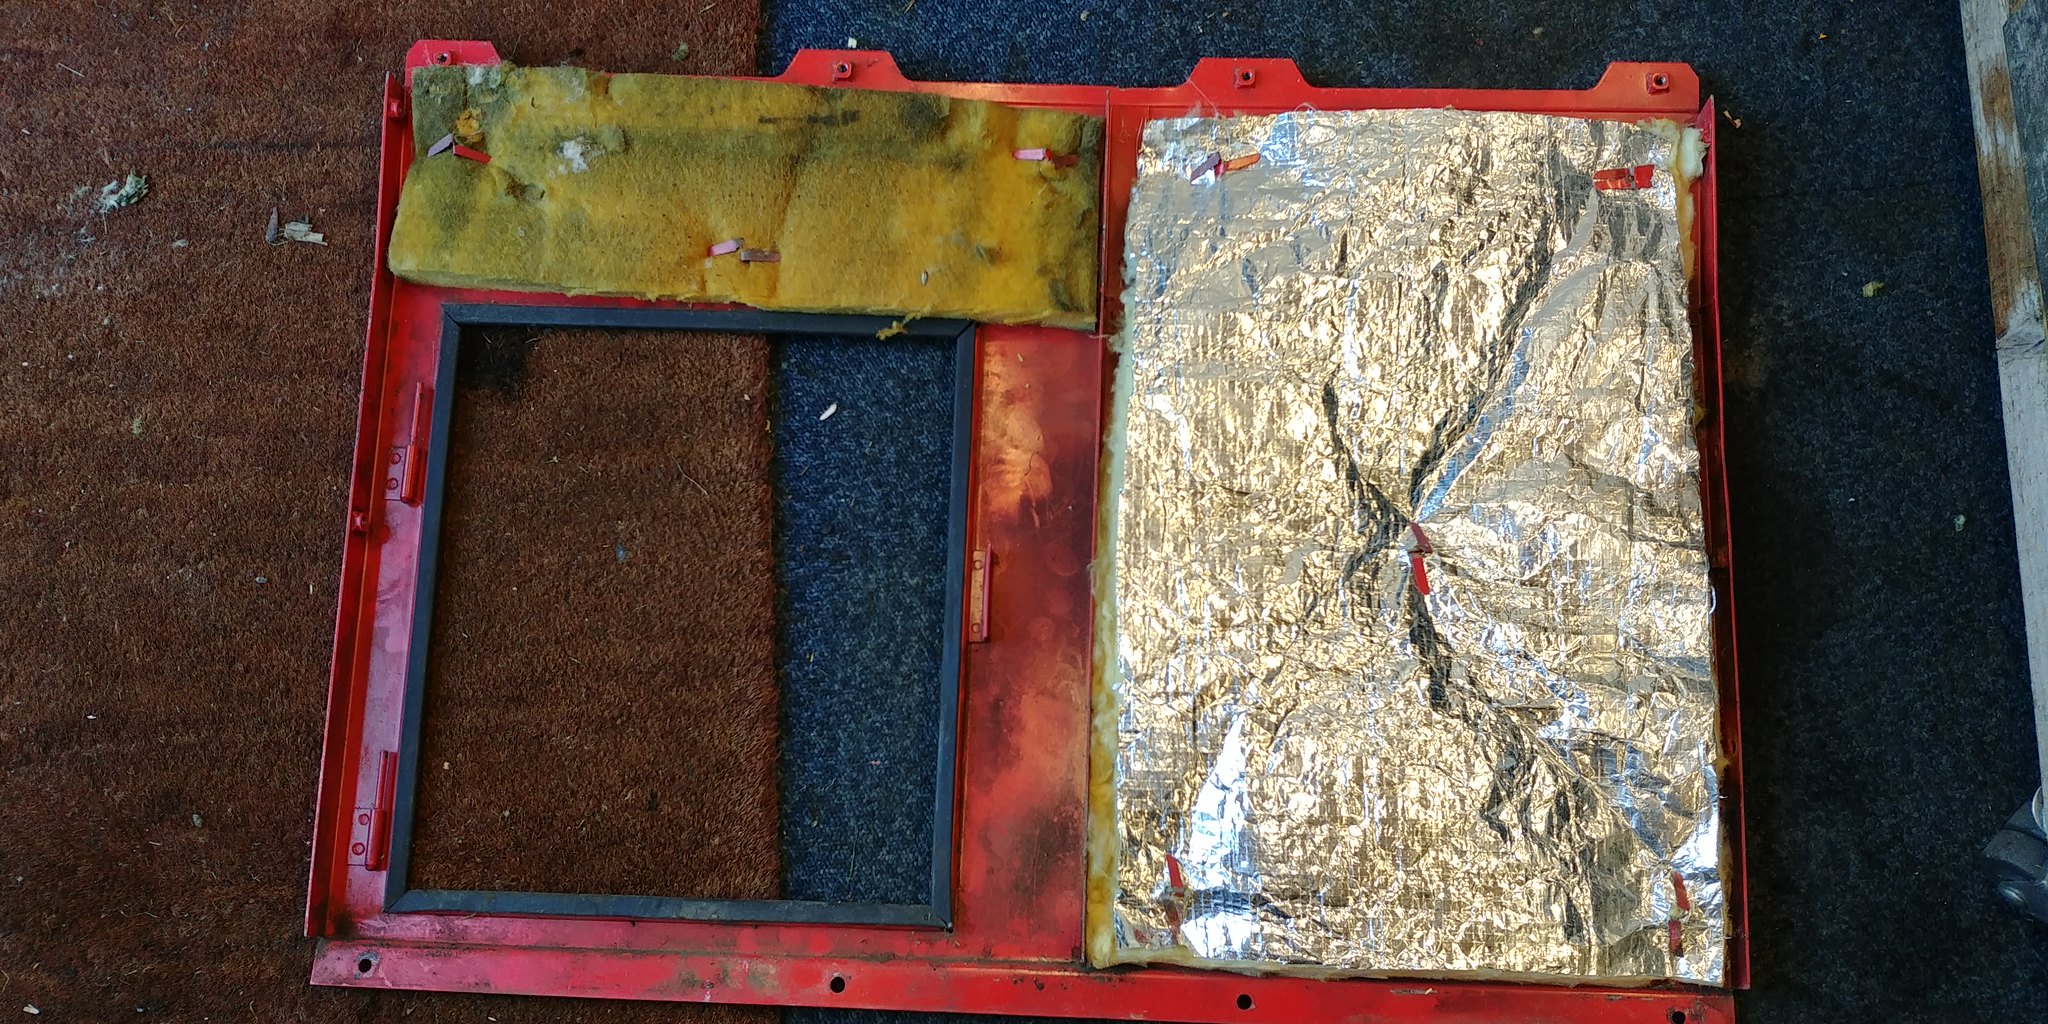
All back together.

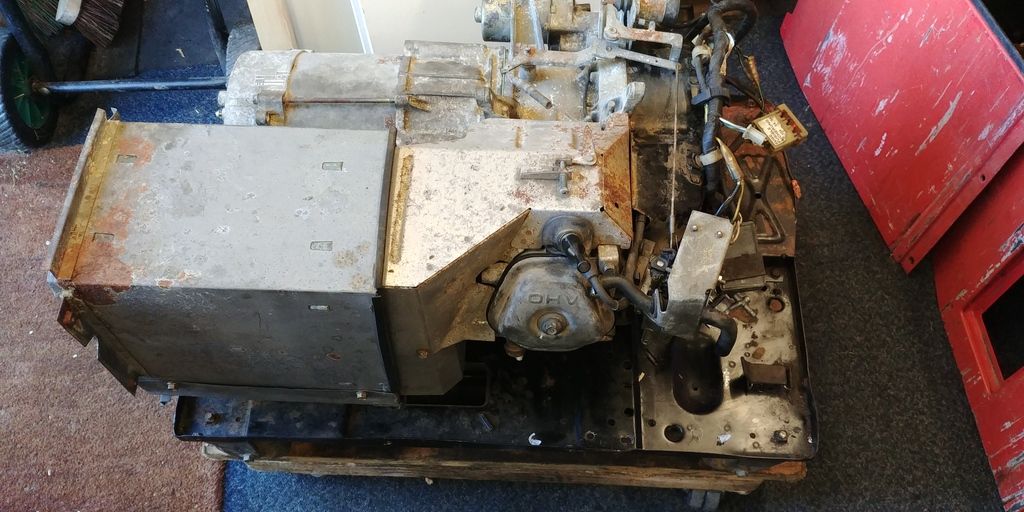
Had to revisit the EX5500 that I rebuilt last year, I wanted to try fitting LPG kit on it. Before I could install the kit, I wanted to make sure it was running properly, however I couldn’t get it to start. Initially it seemed like the battery had gone flat, as it was turning over very slowly. After some testing it turned out there was a problem with the starter motor.
To get to the starter motor I had to completely dismantle the generator, so after a couple of hours it looked like this.
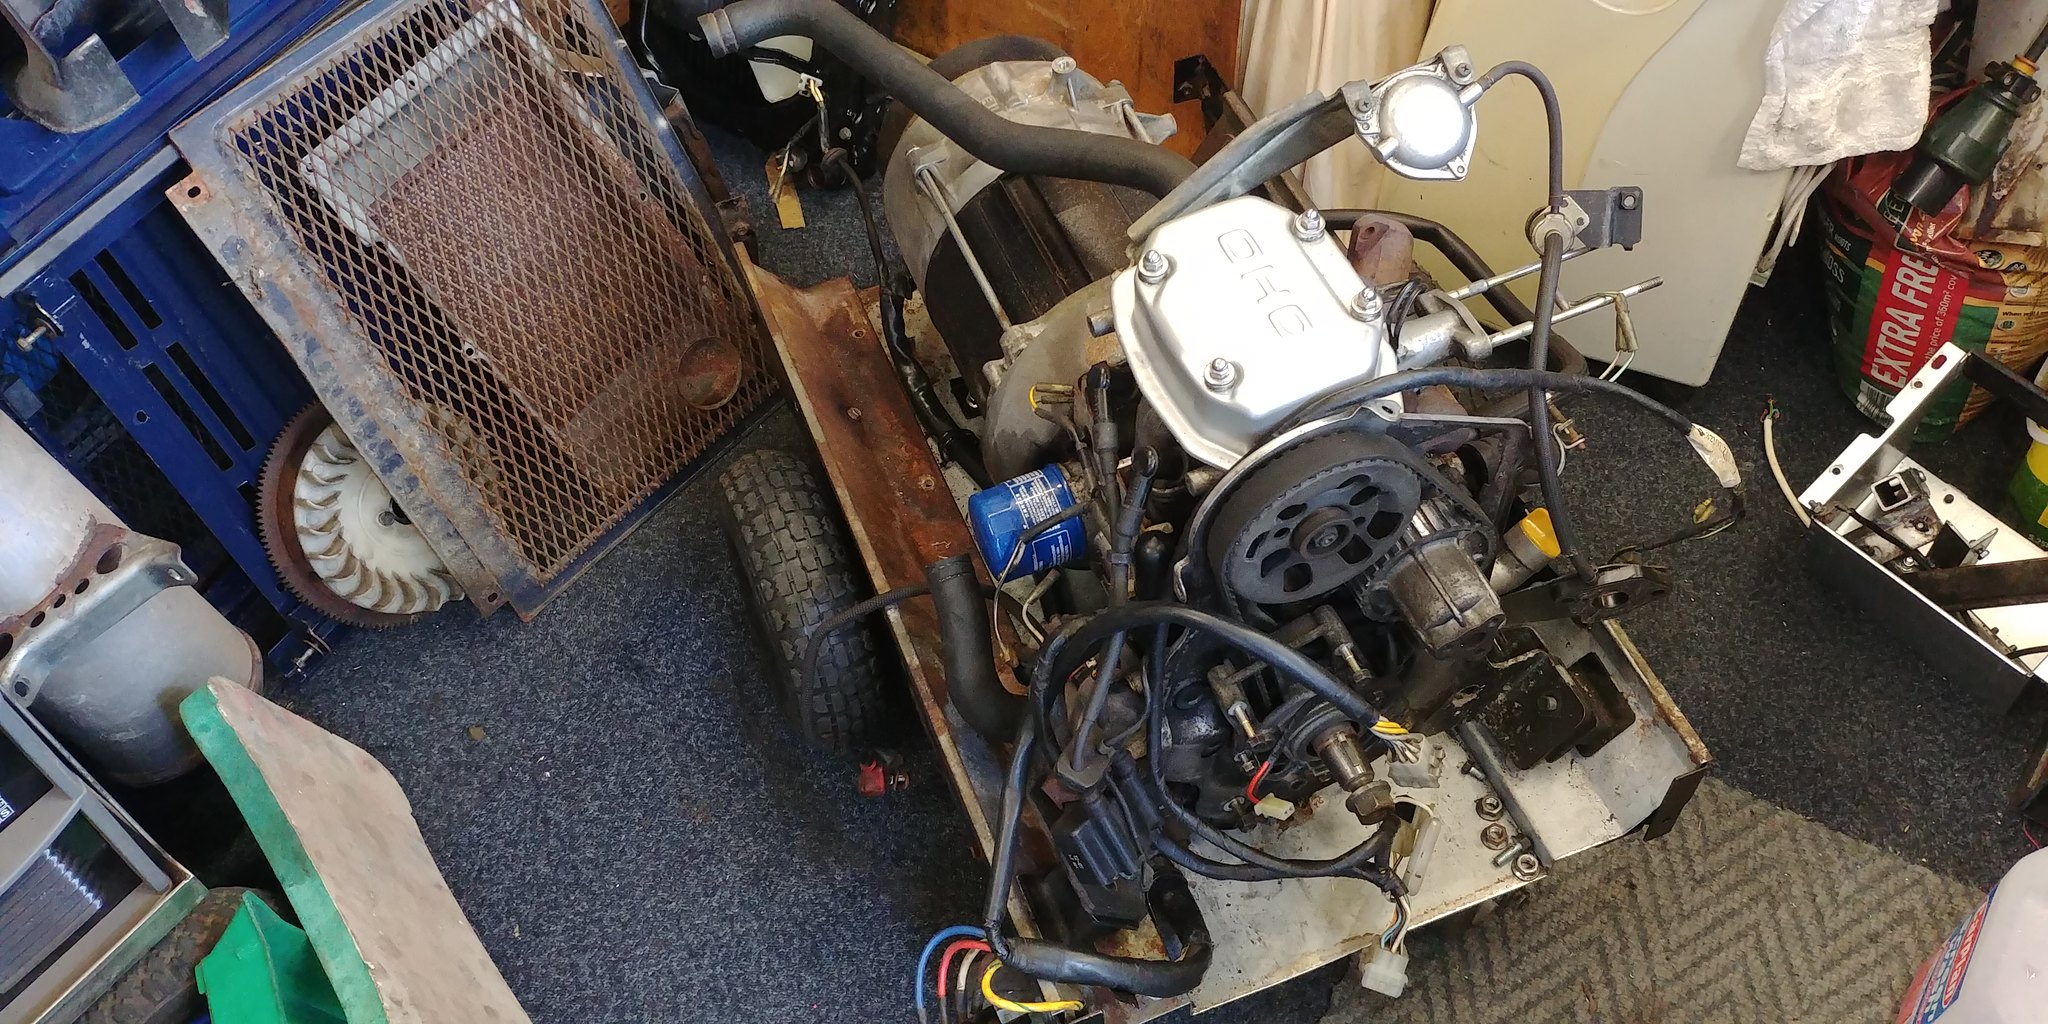
The starter motor is tucked down at the bottom of the engine and is trapped by an engine mount.
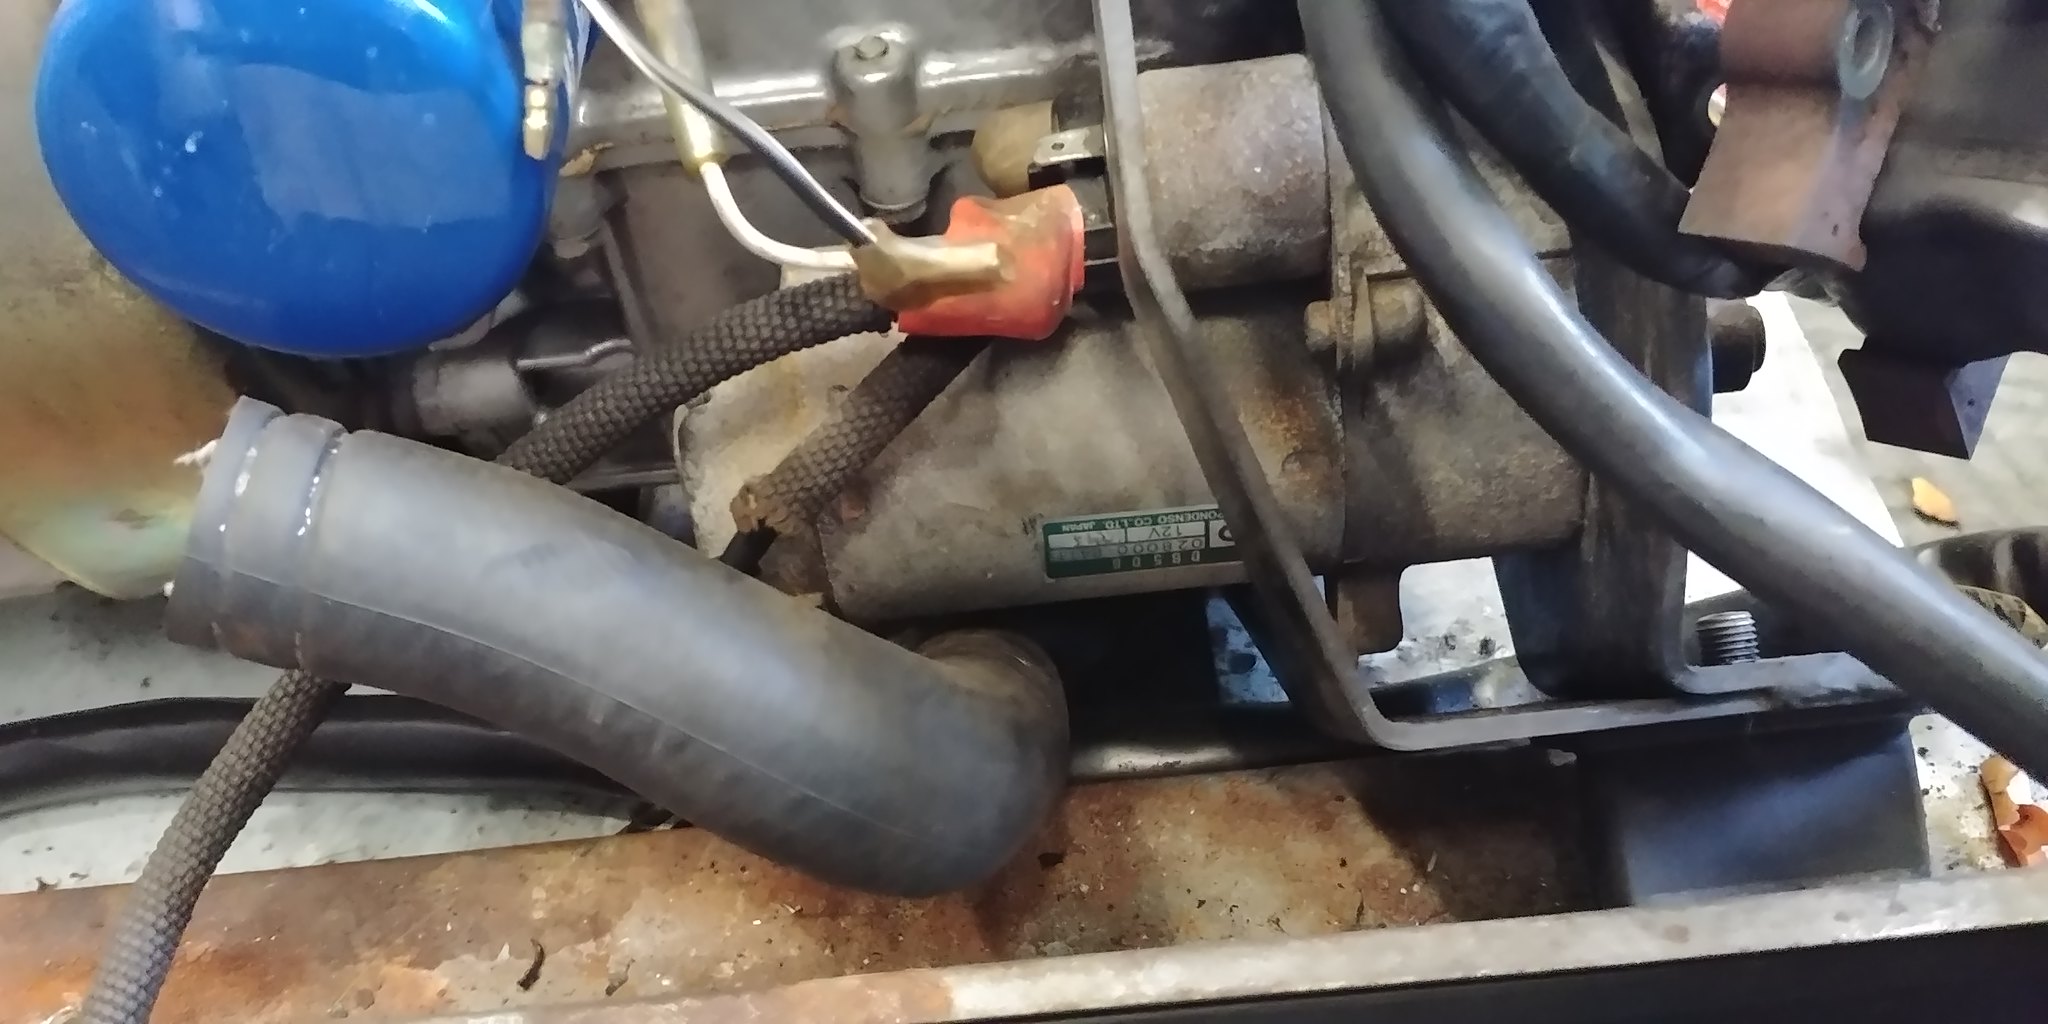
Starter motor removed
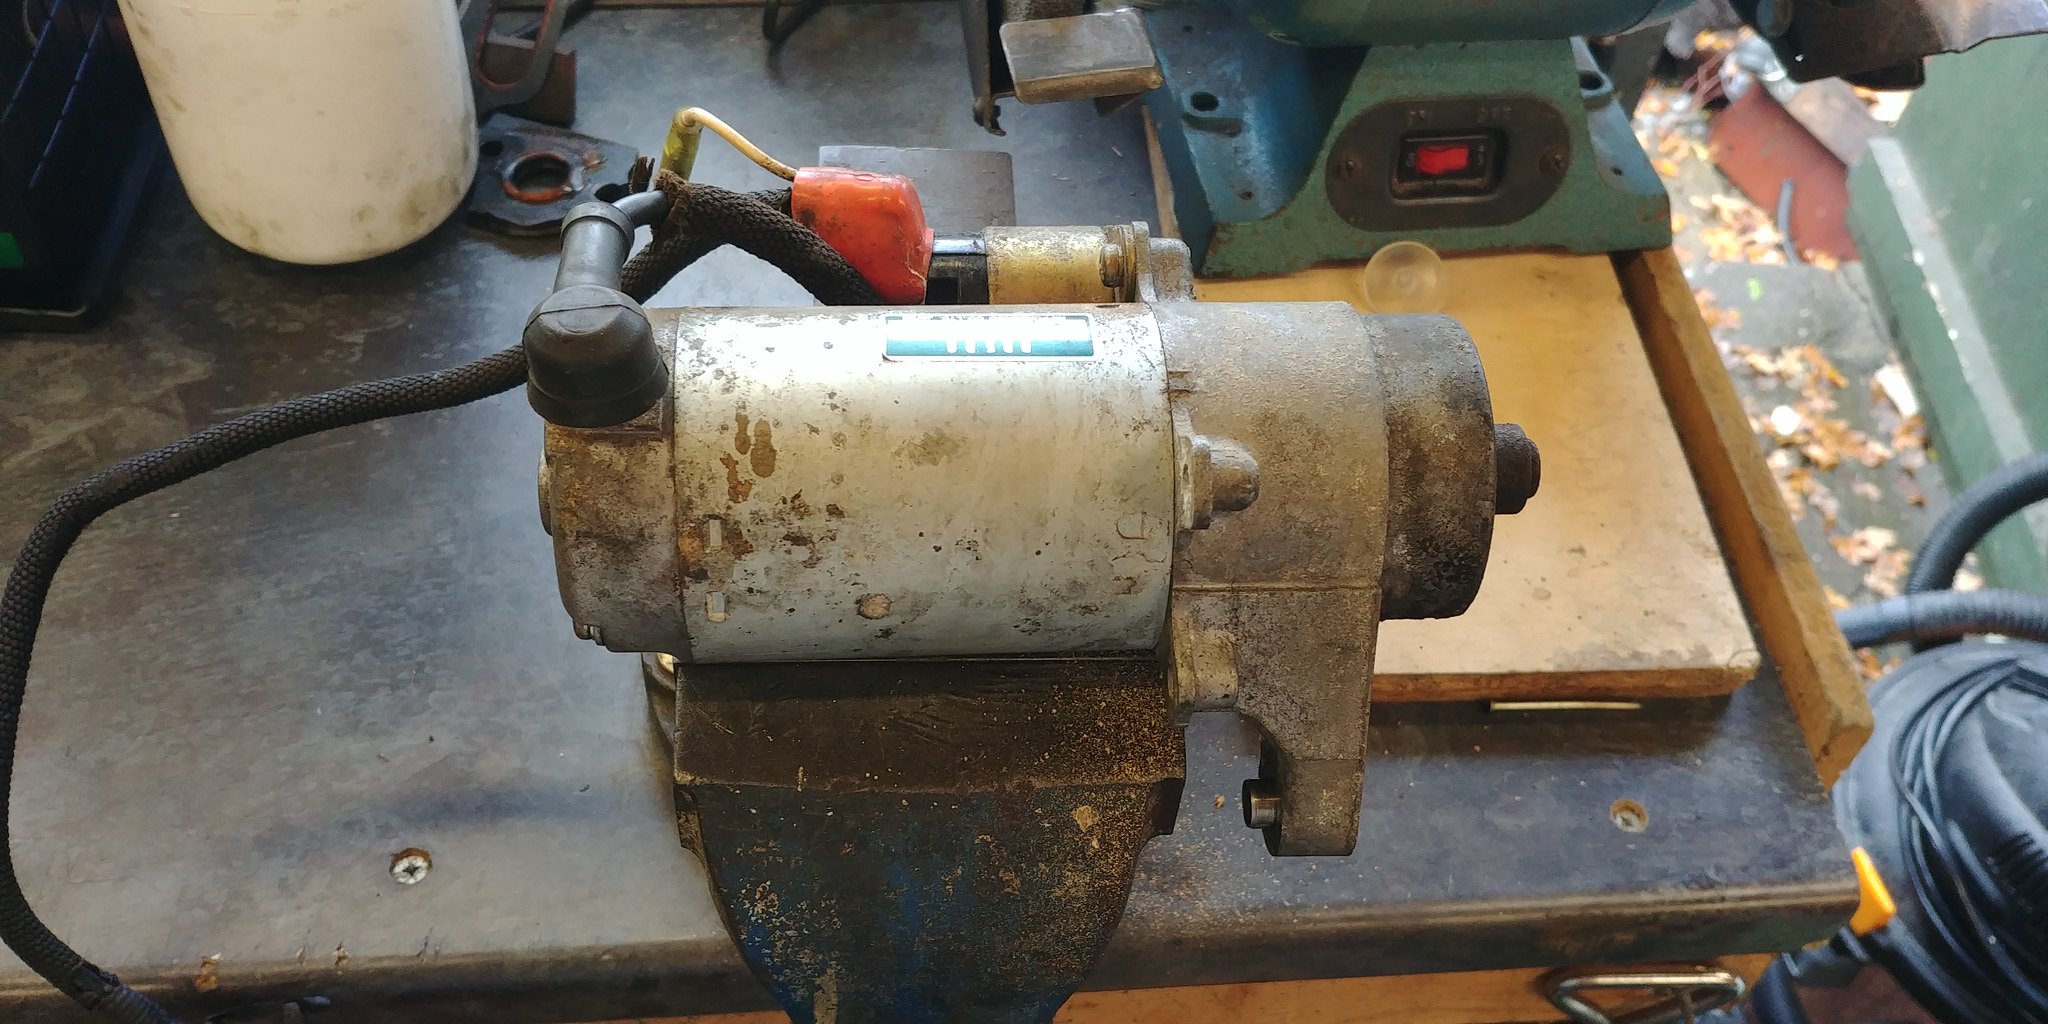
The problem with the starter motor was due to the brushes having been completely worn down so they weren’t making proper contact.
The positive brush was so worn the wire supplying it was against the housing so I couldn’t move any further
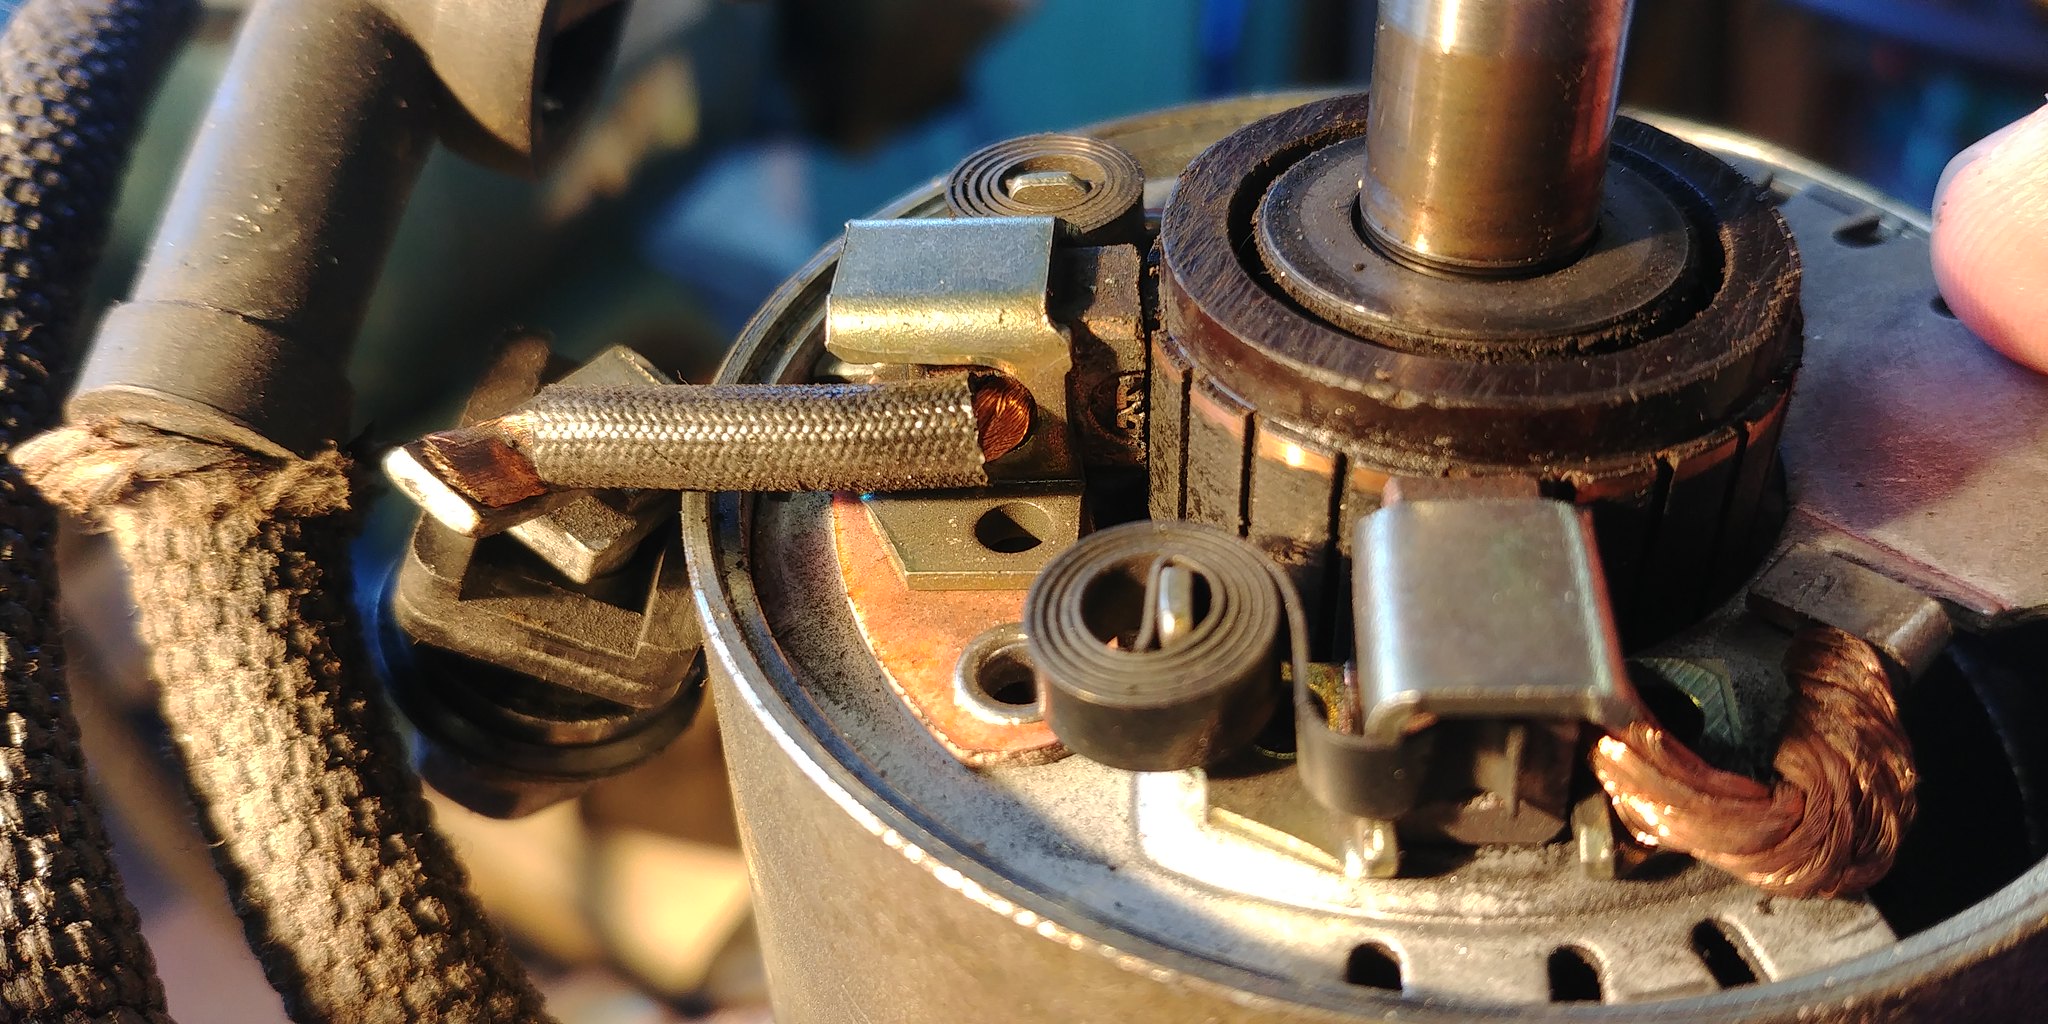
The negative brush wasn’t as bad, still has a couple of mm to go
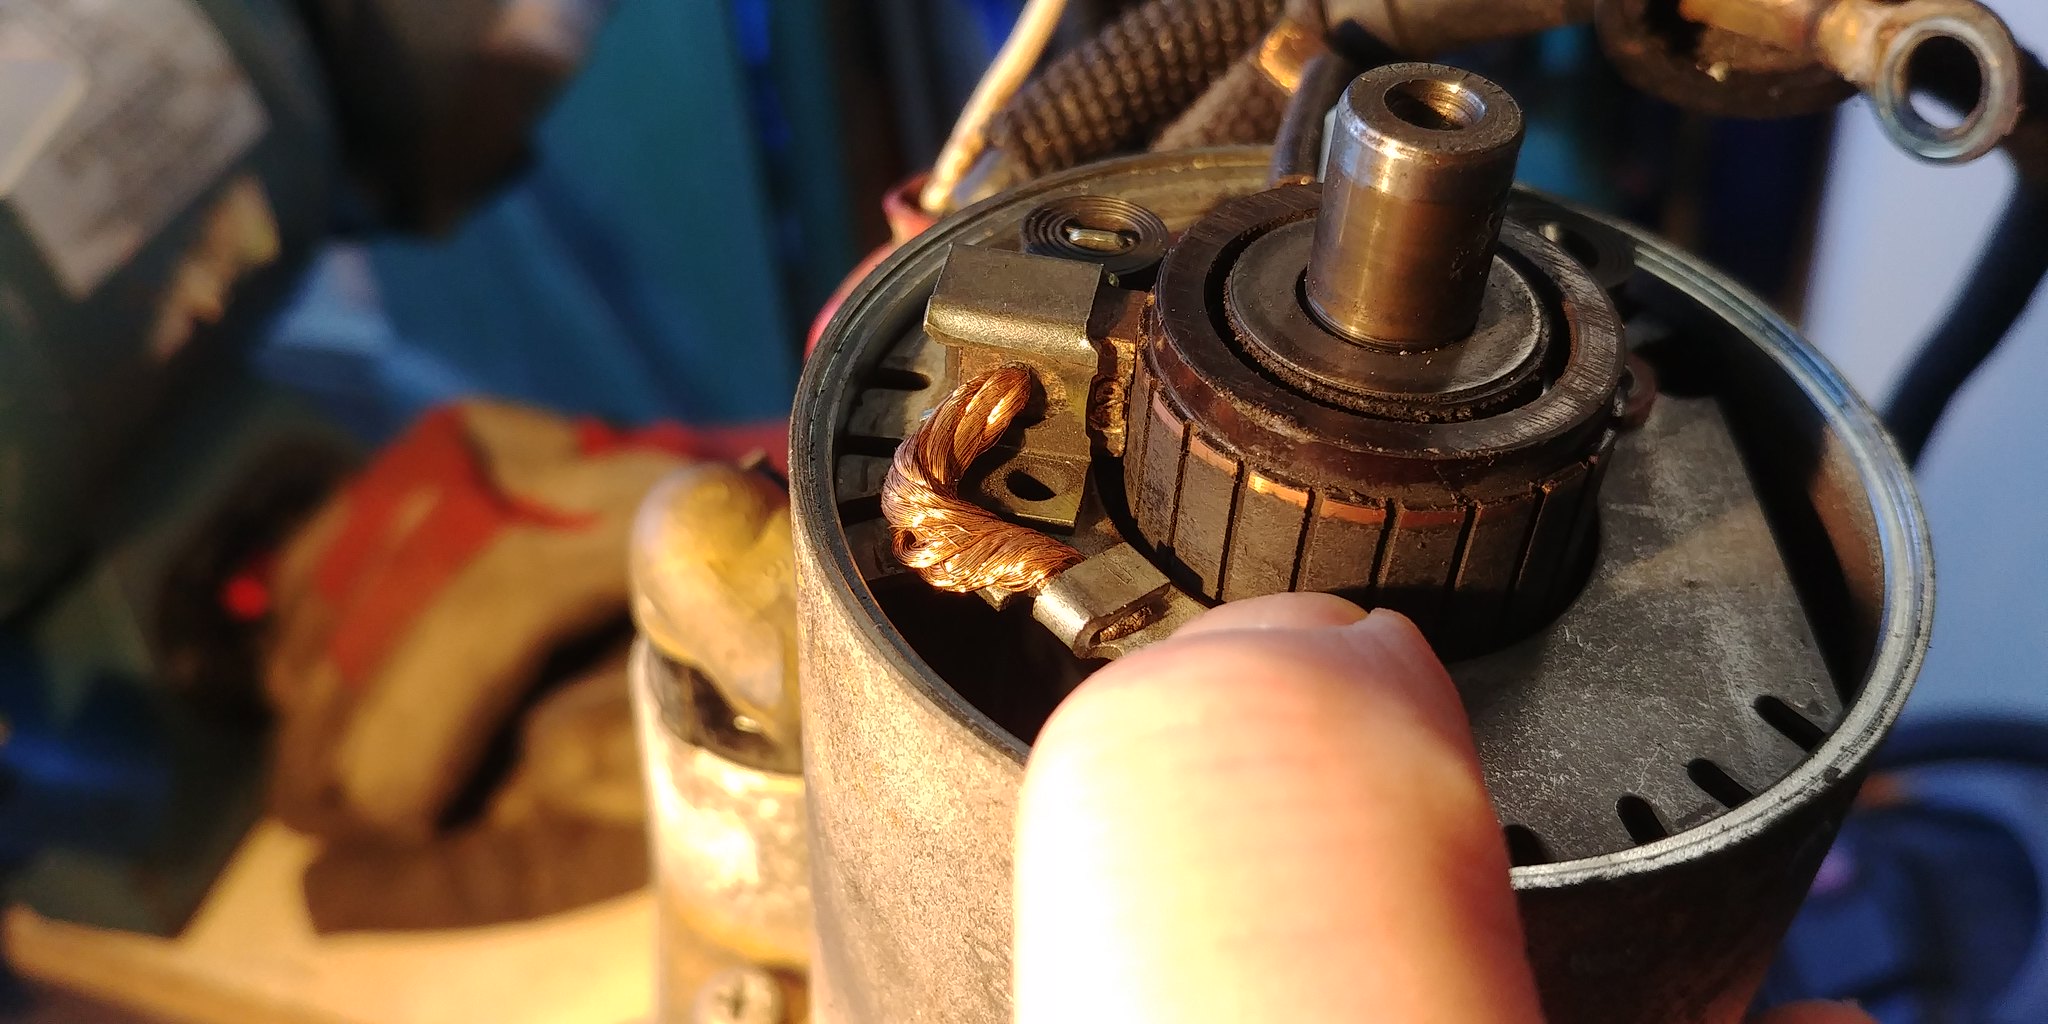
Unfortunately, the brushes have been discontinued by Honda, however I found some new old stock brushes in the USA, just waiting for them to turn up.
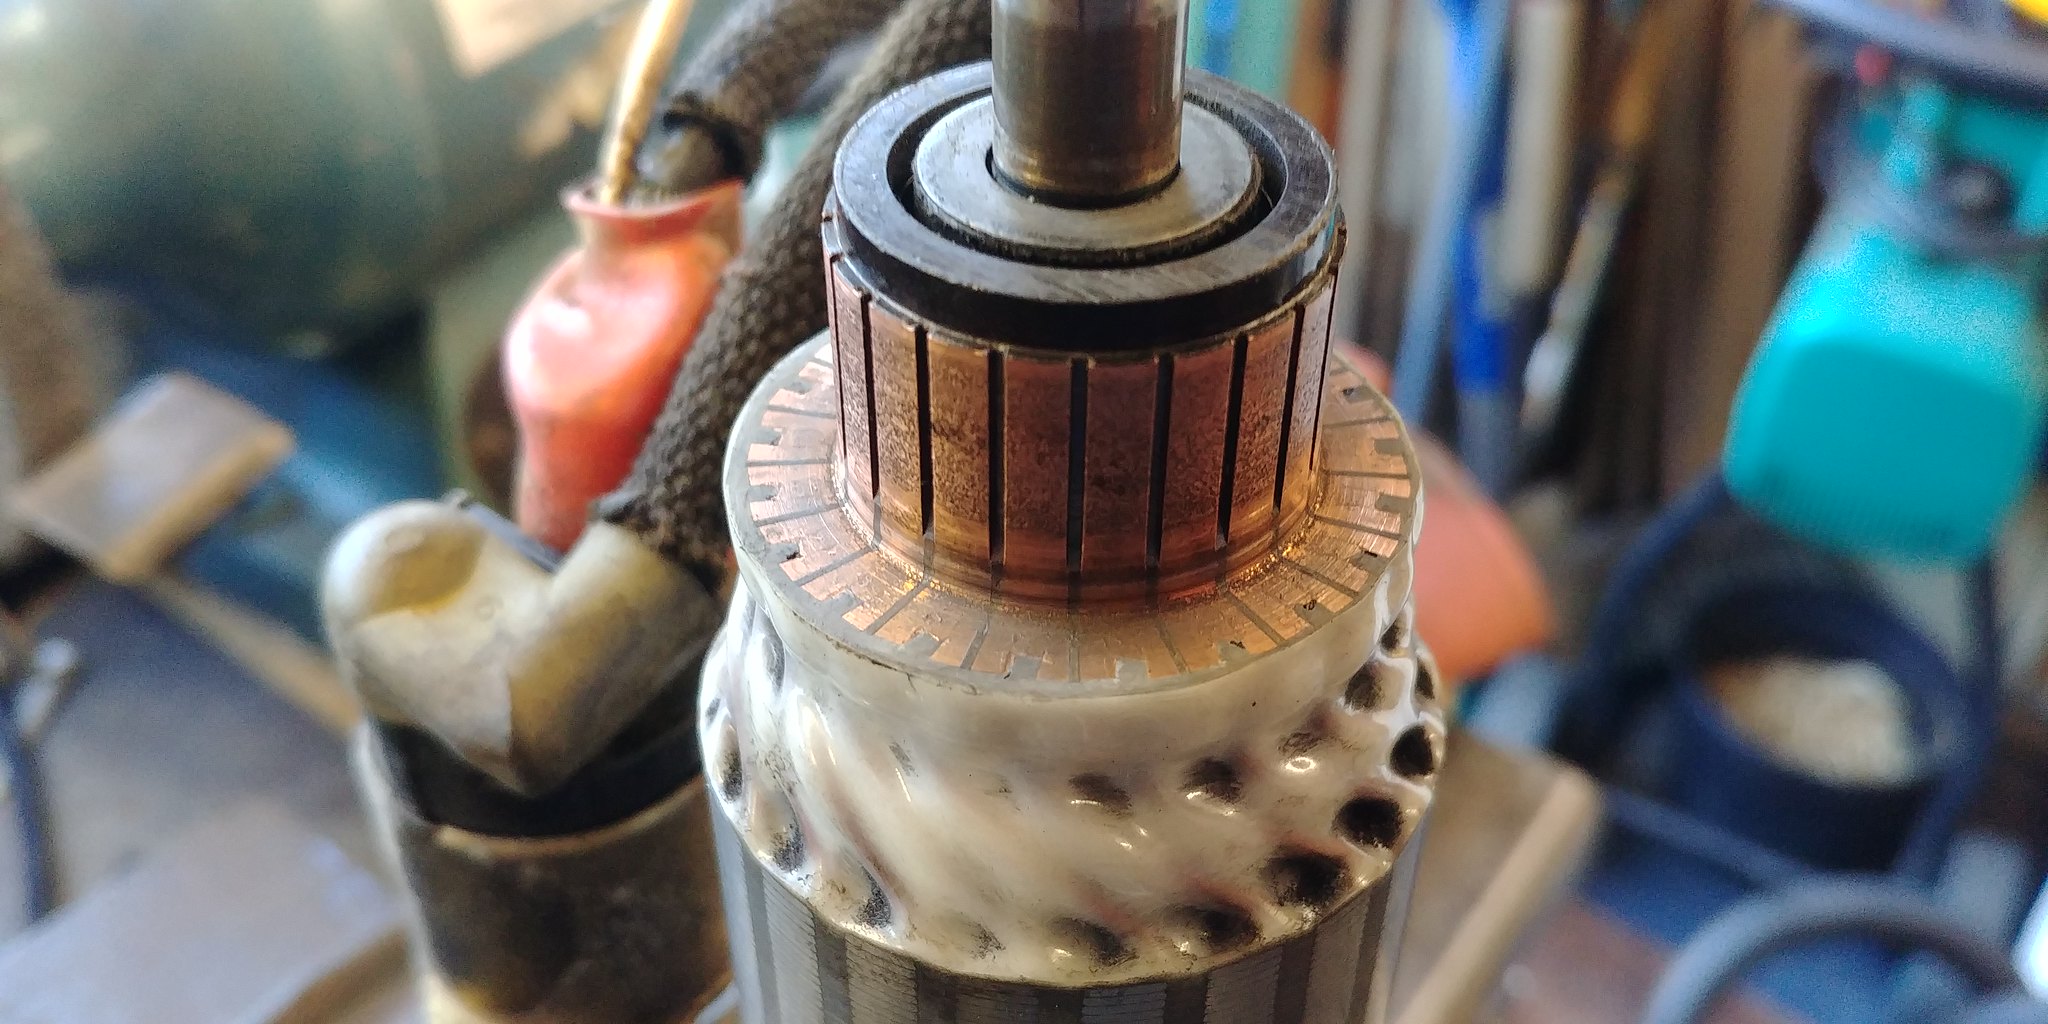
while waiting for the new brushes I thought it would be a good idea to give the commutator a clean.
Before
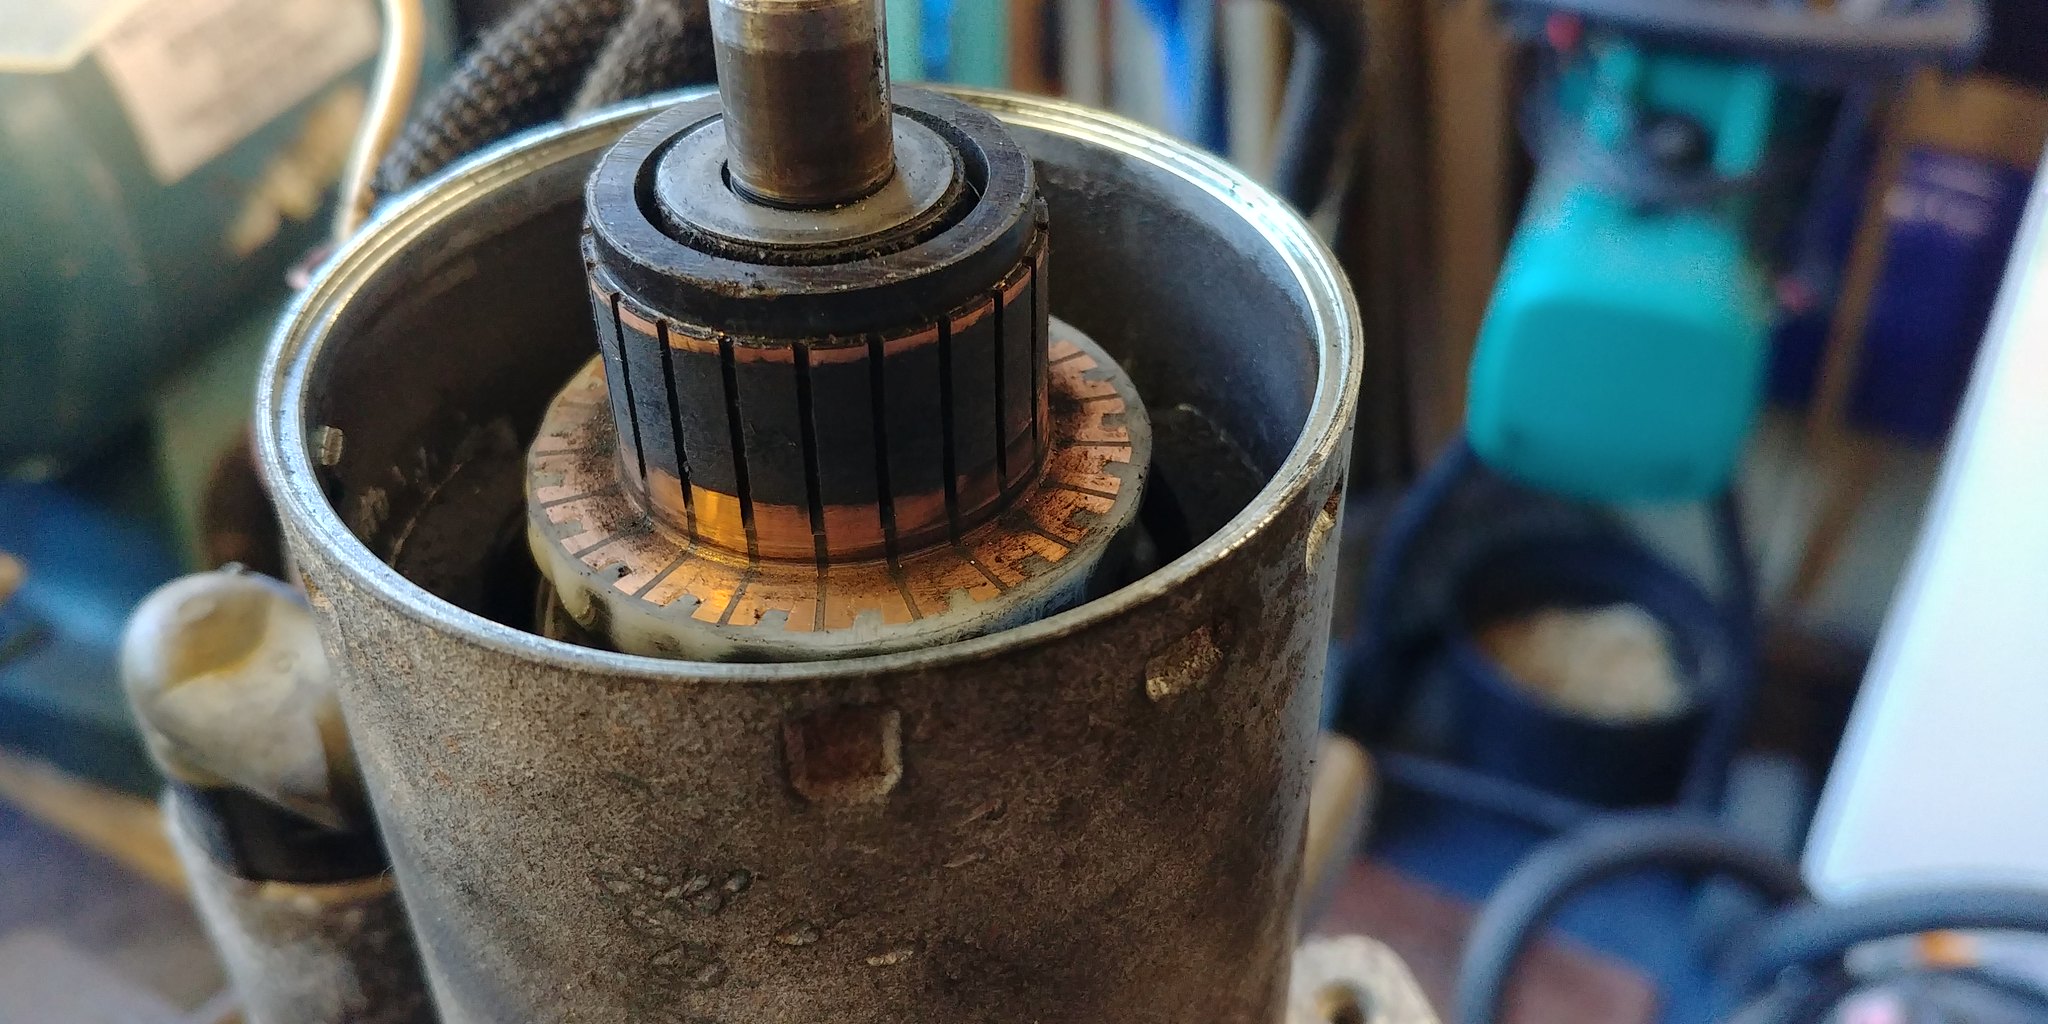
After cleaning.
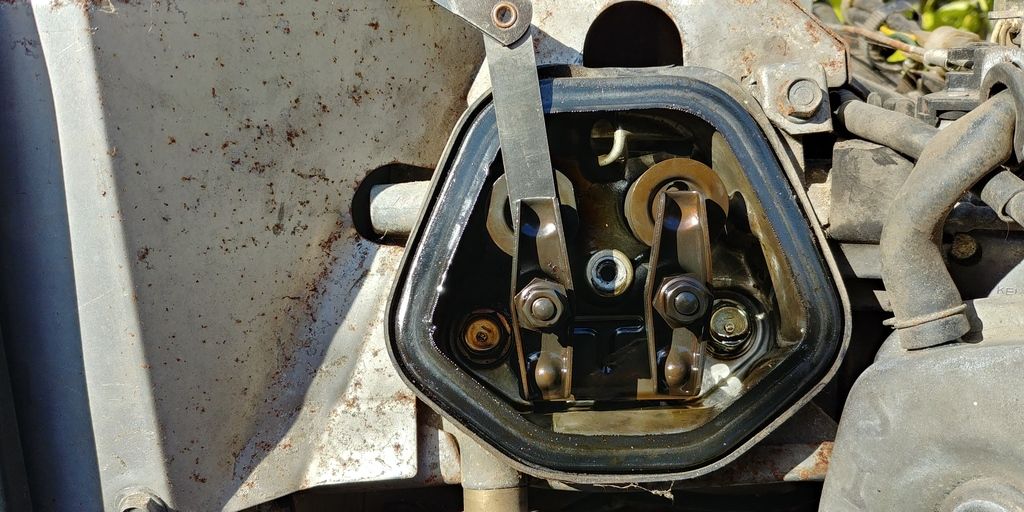
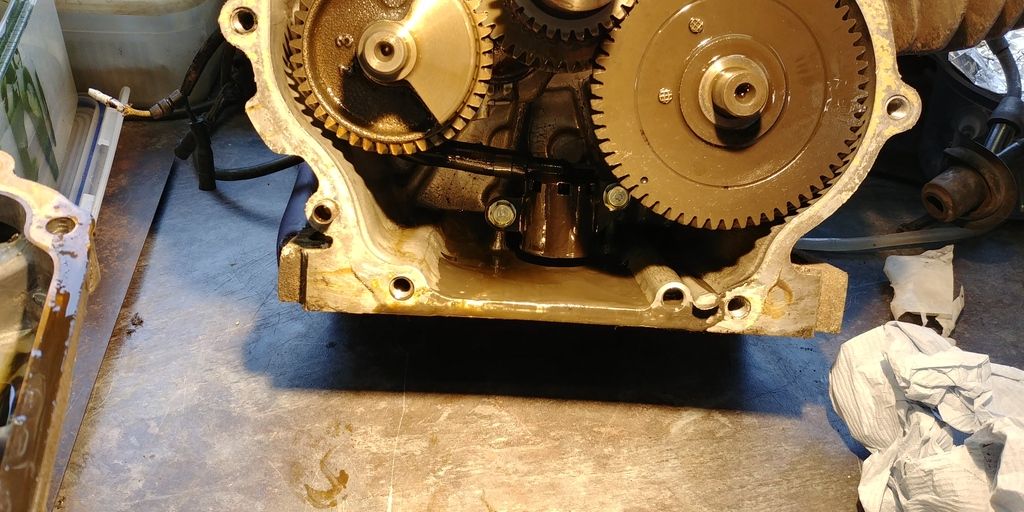
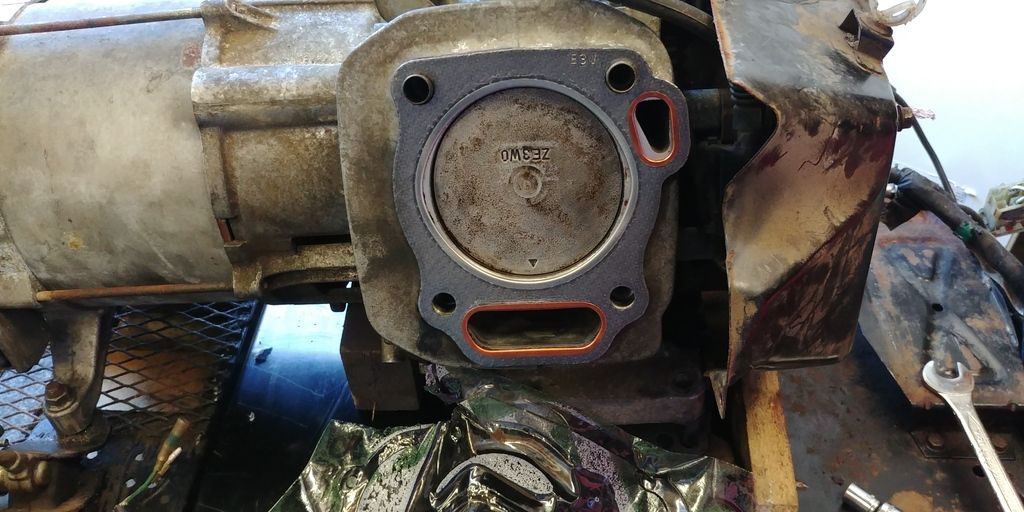
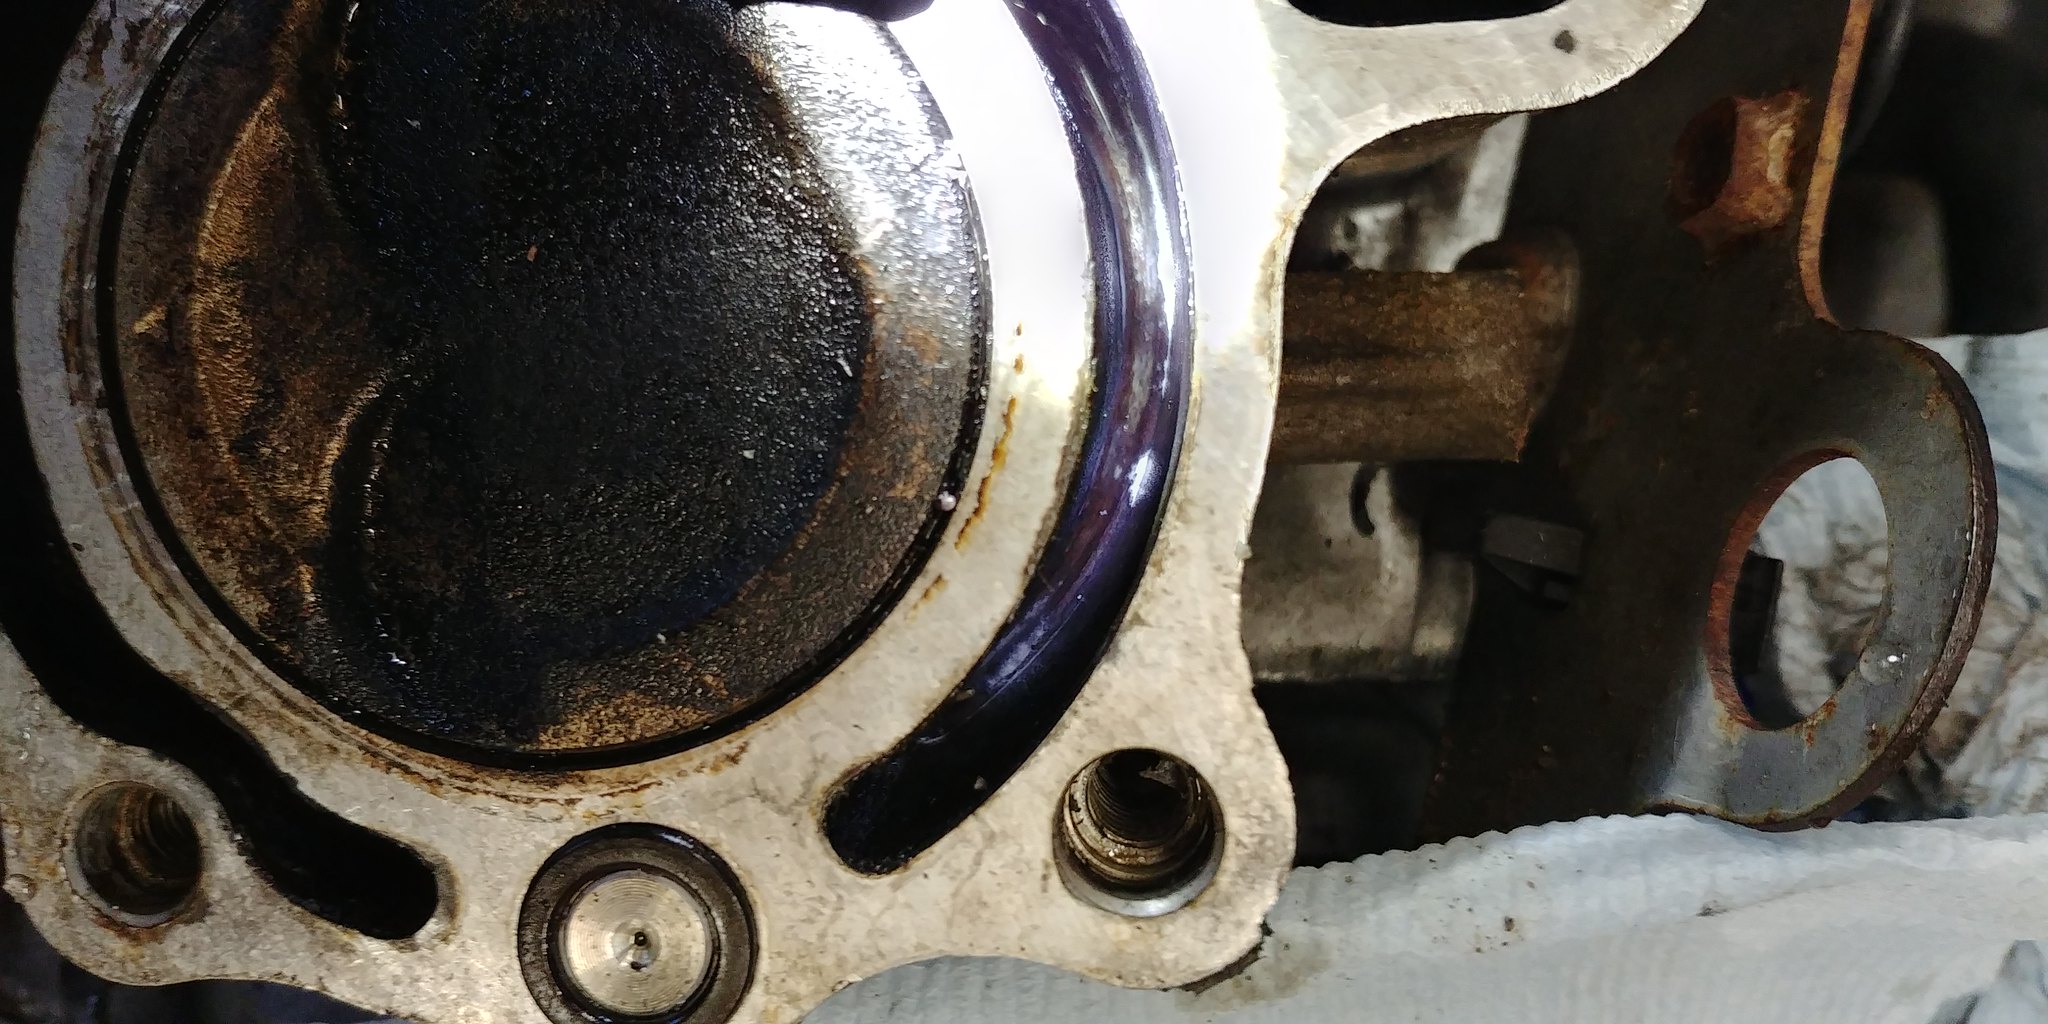
While the generator is in bits I wanted to fix an oil leak. The leak is from the oil feed up to cam shaft in the cylinder head. I had tried previously to fix it with some sealant but it didn’t fix the leak so the head needs to come off.
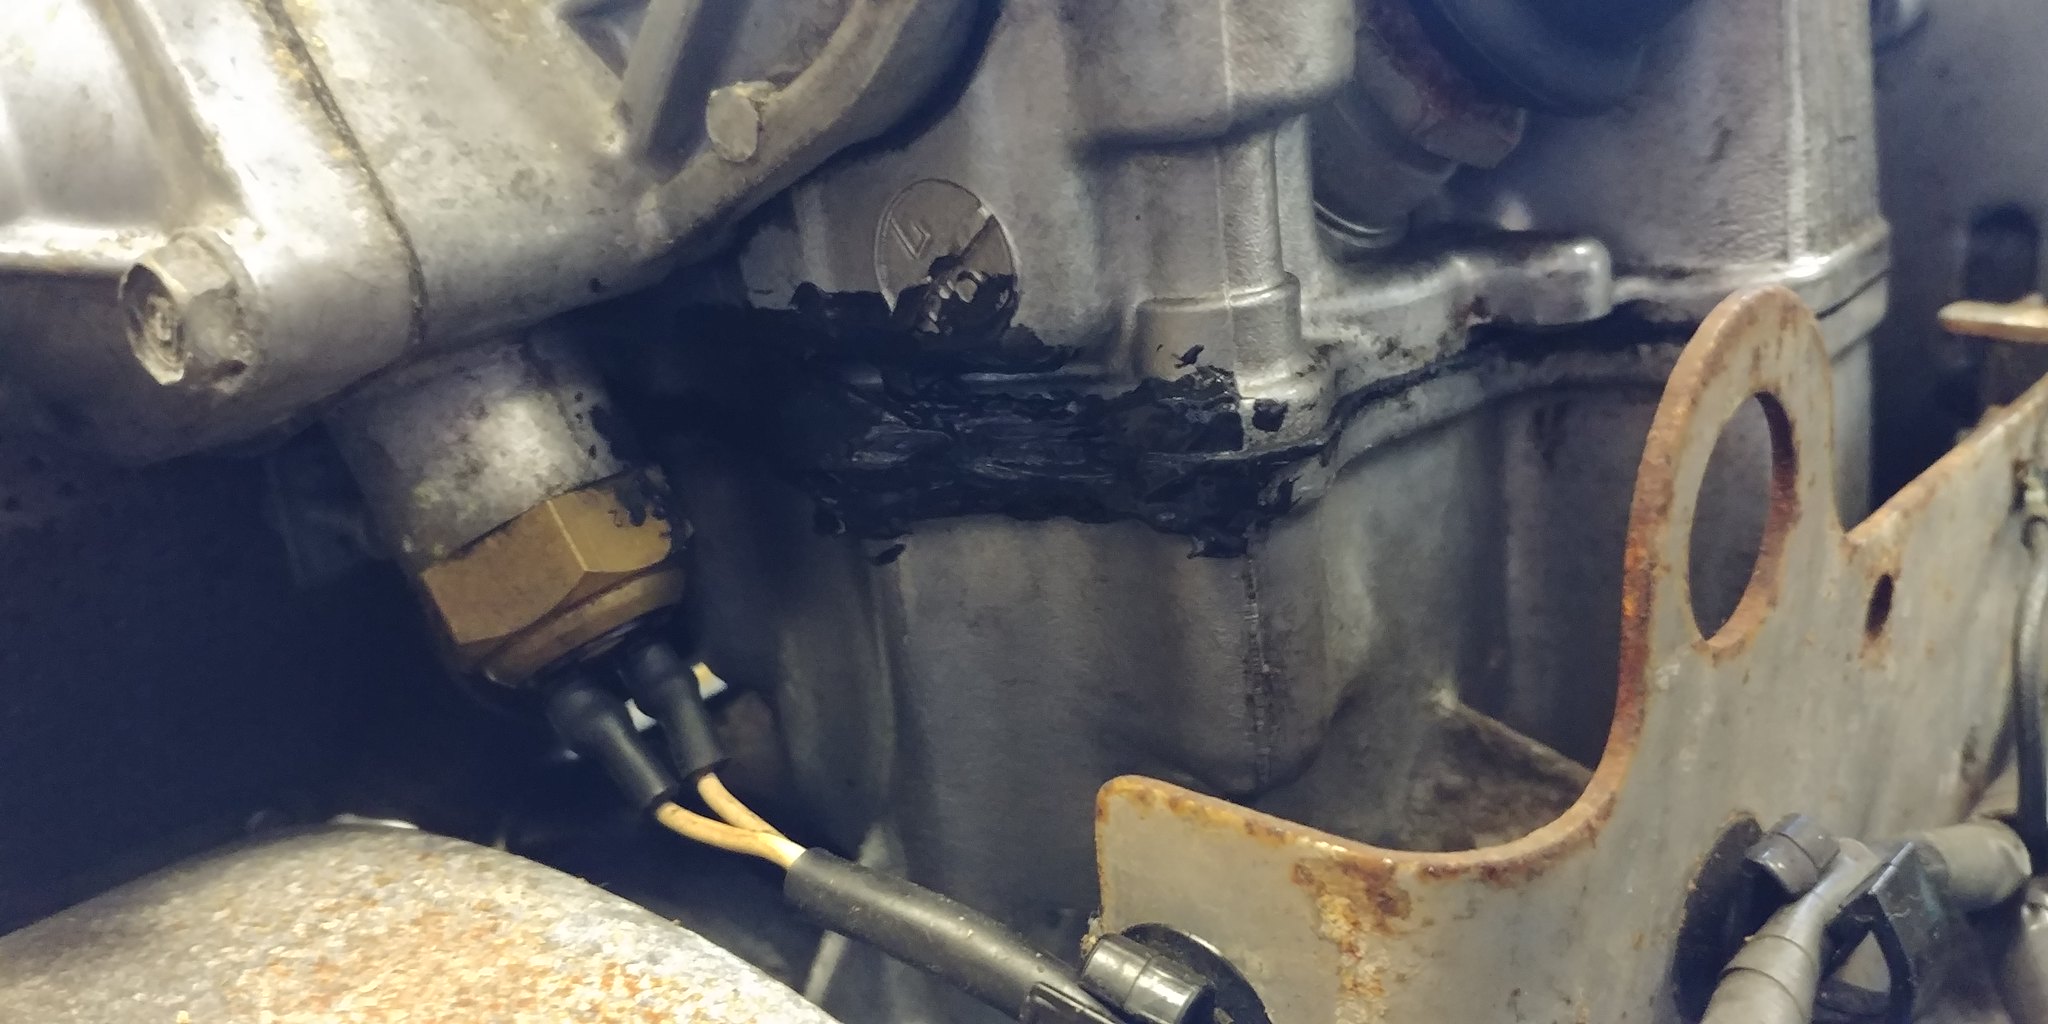
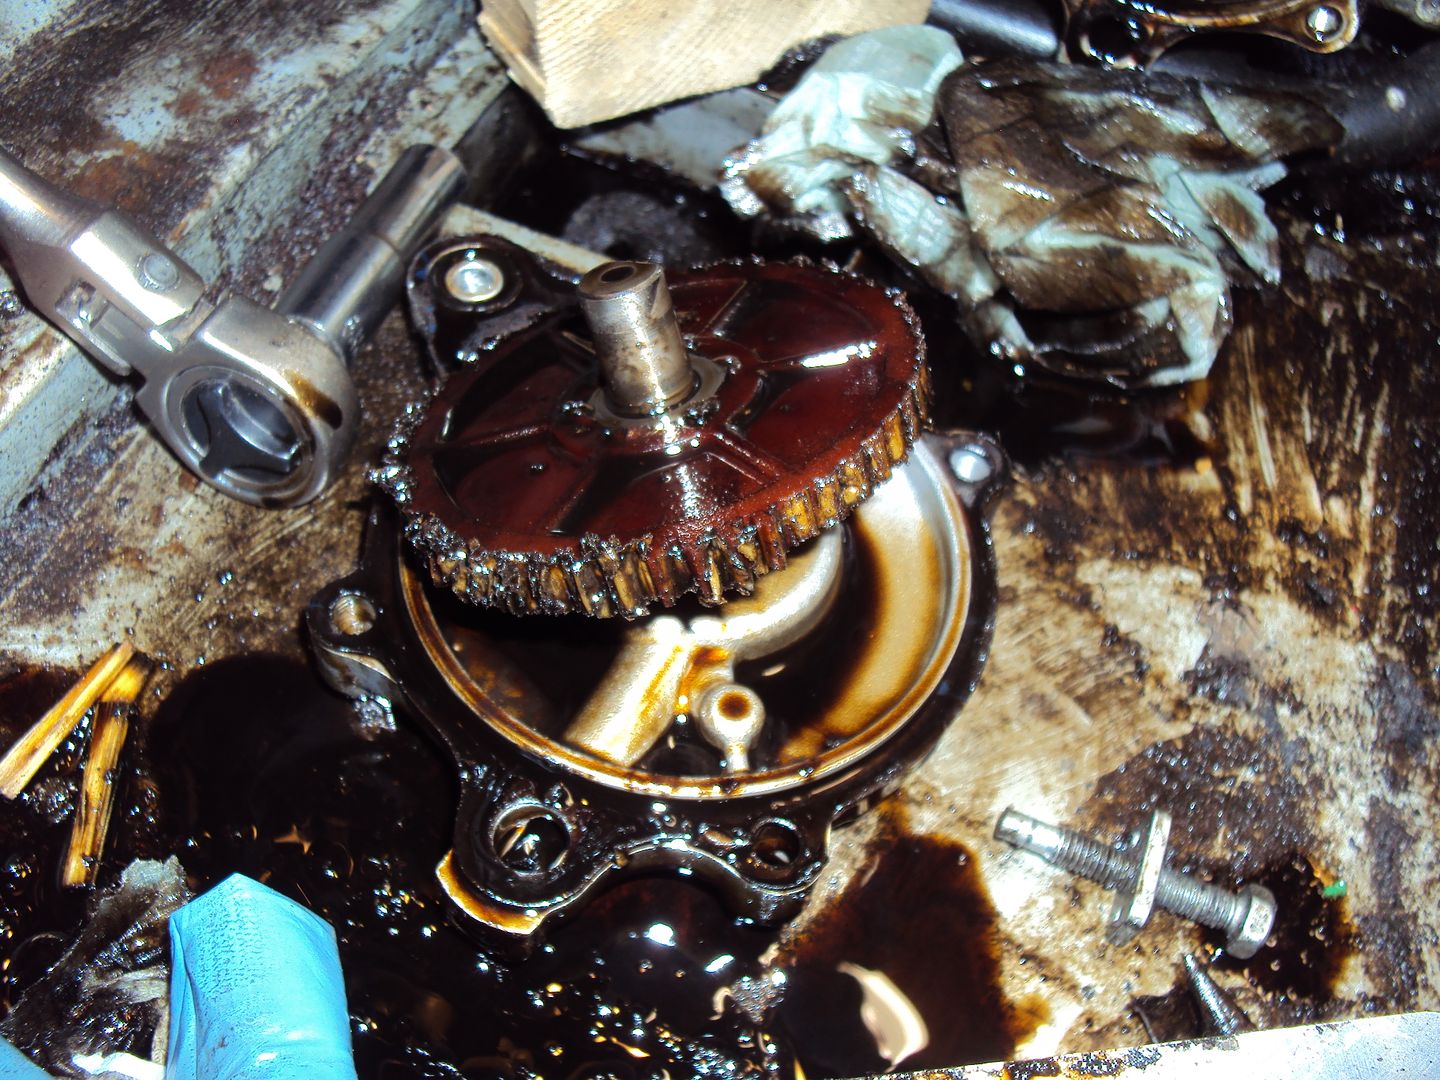
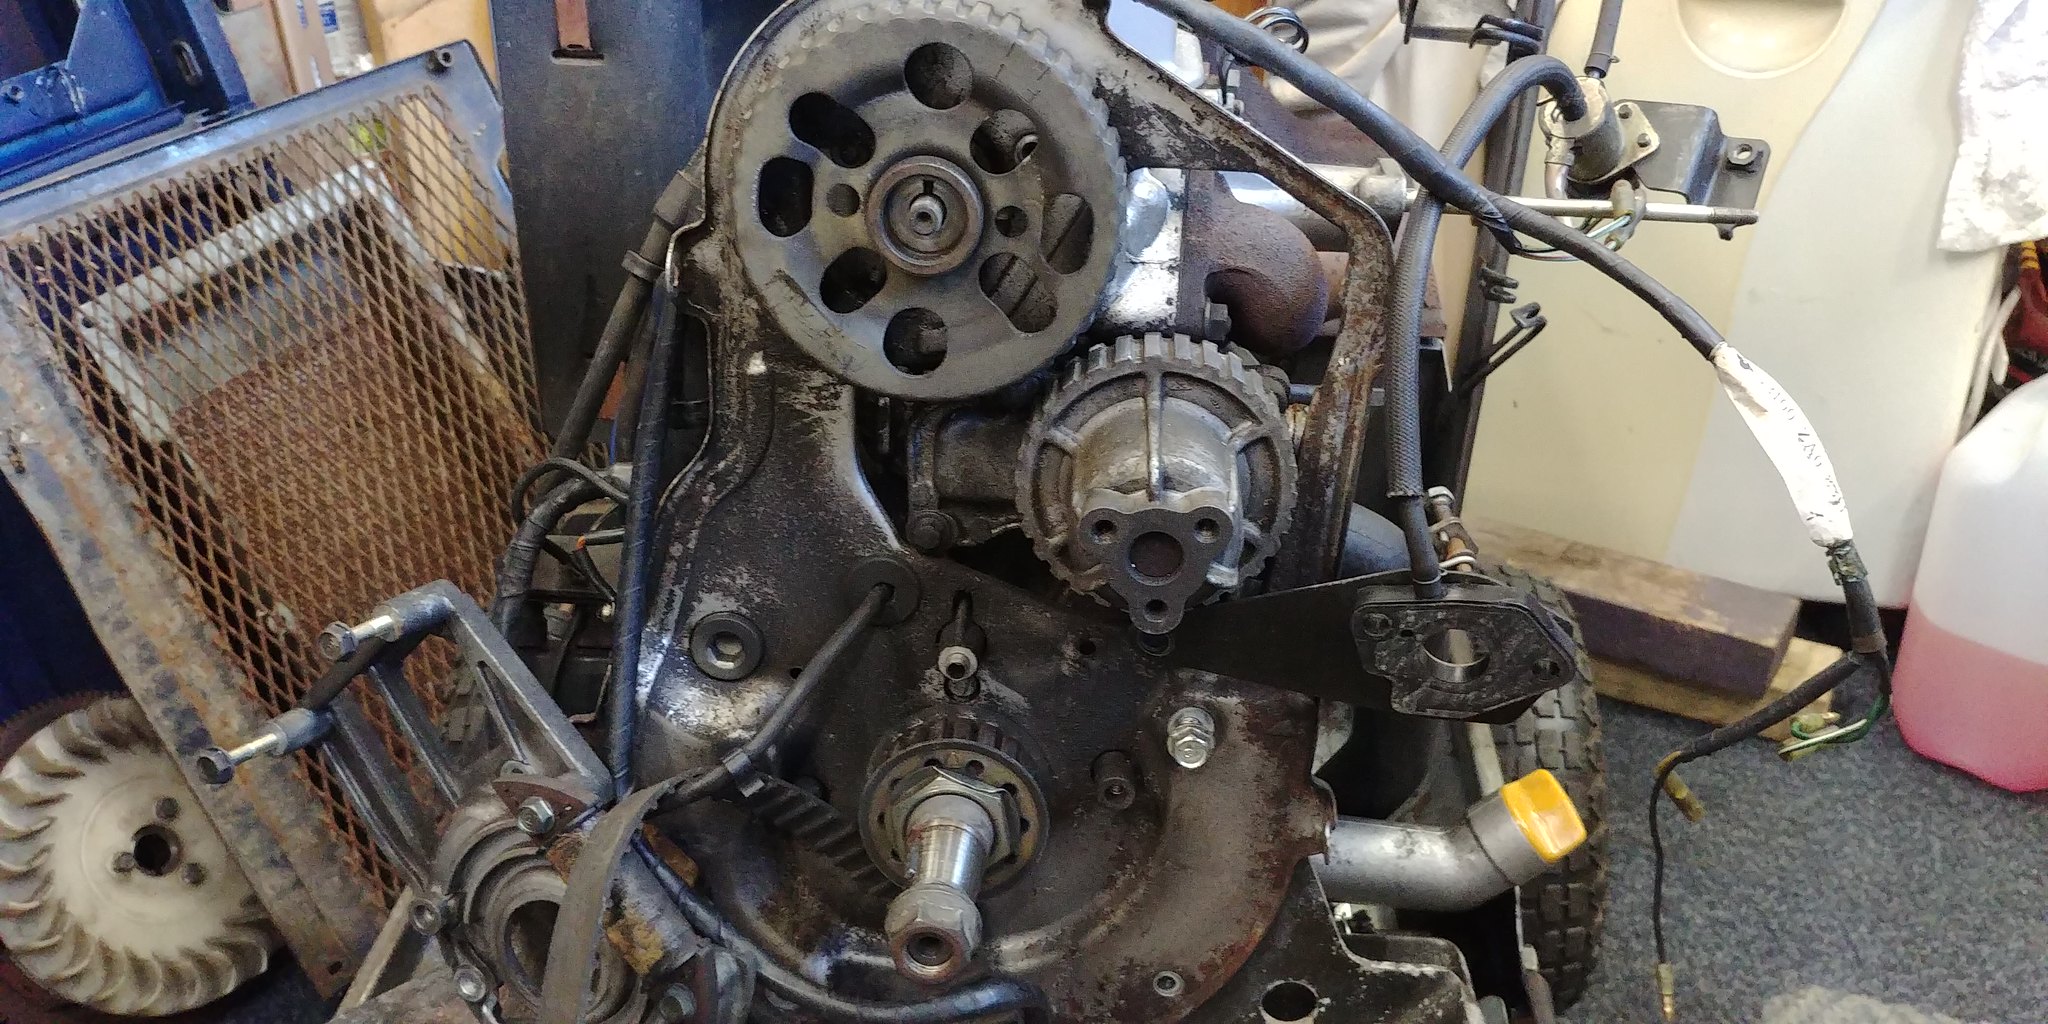
To remove the head the cam belt and cam pulley have to be removed.
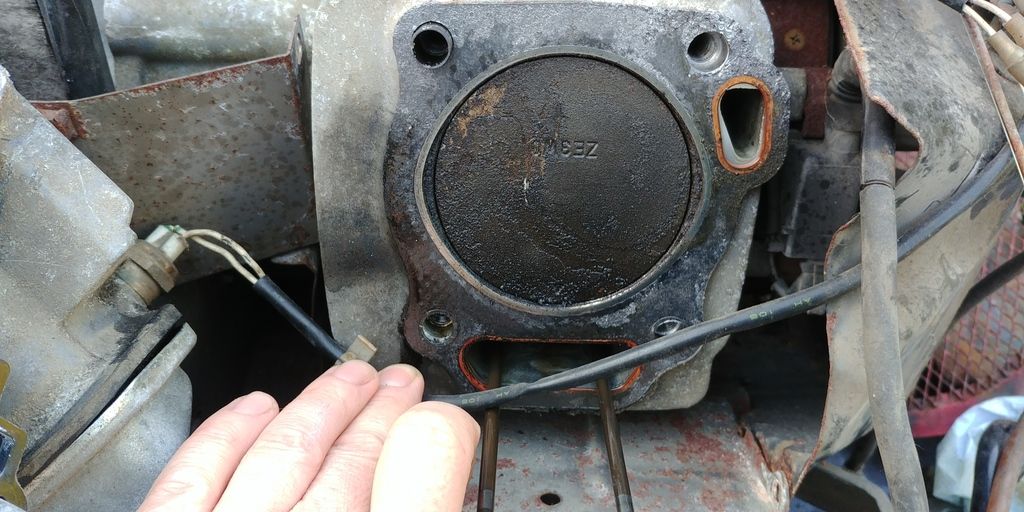
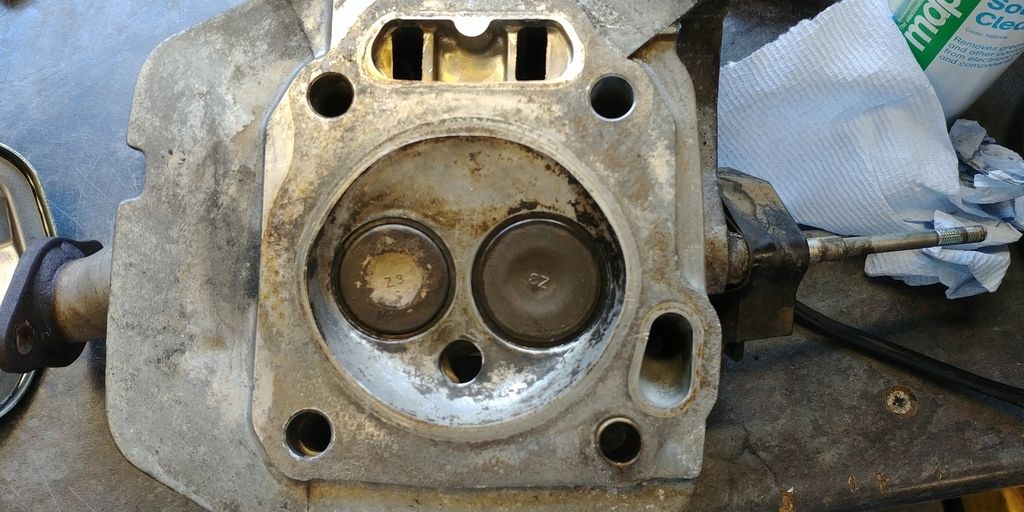
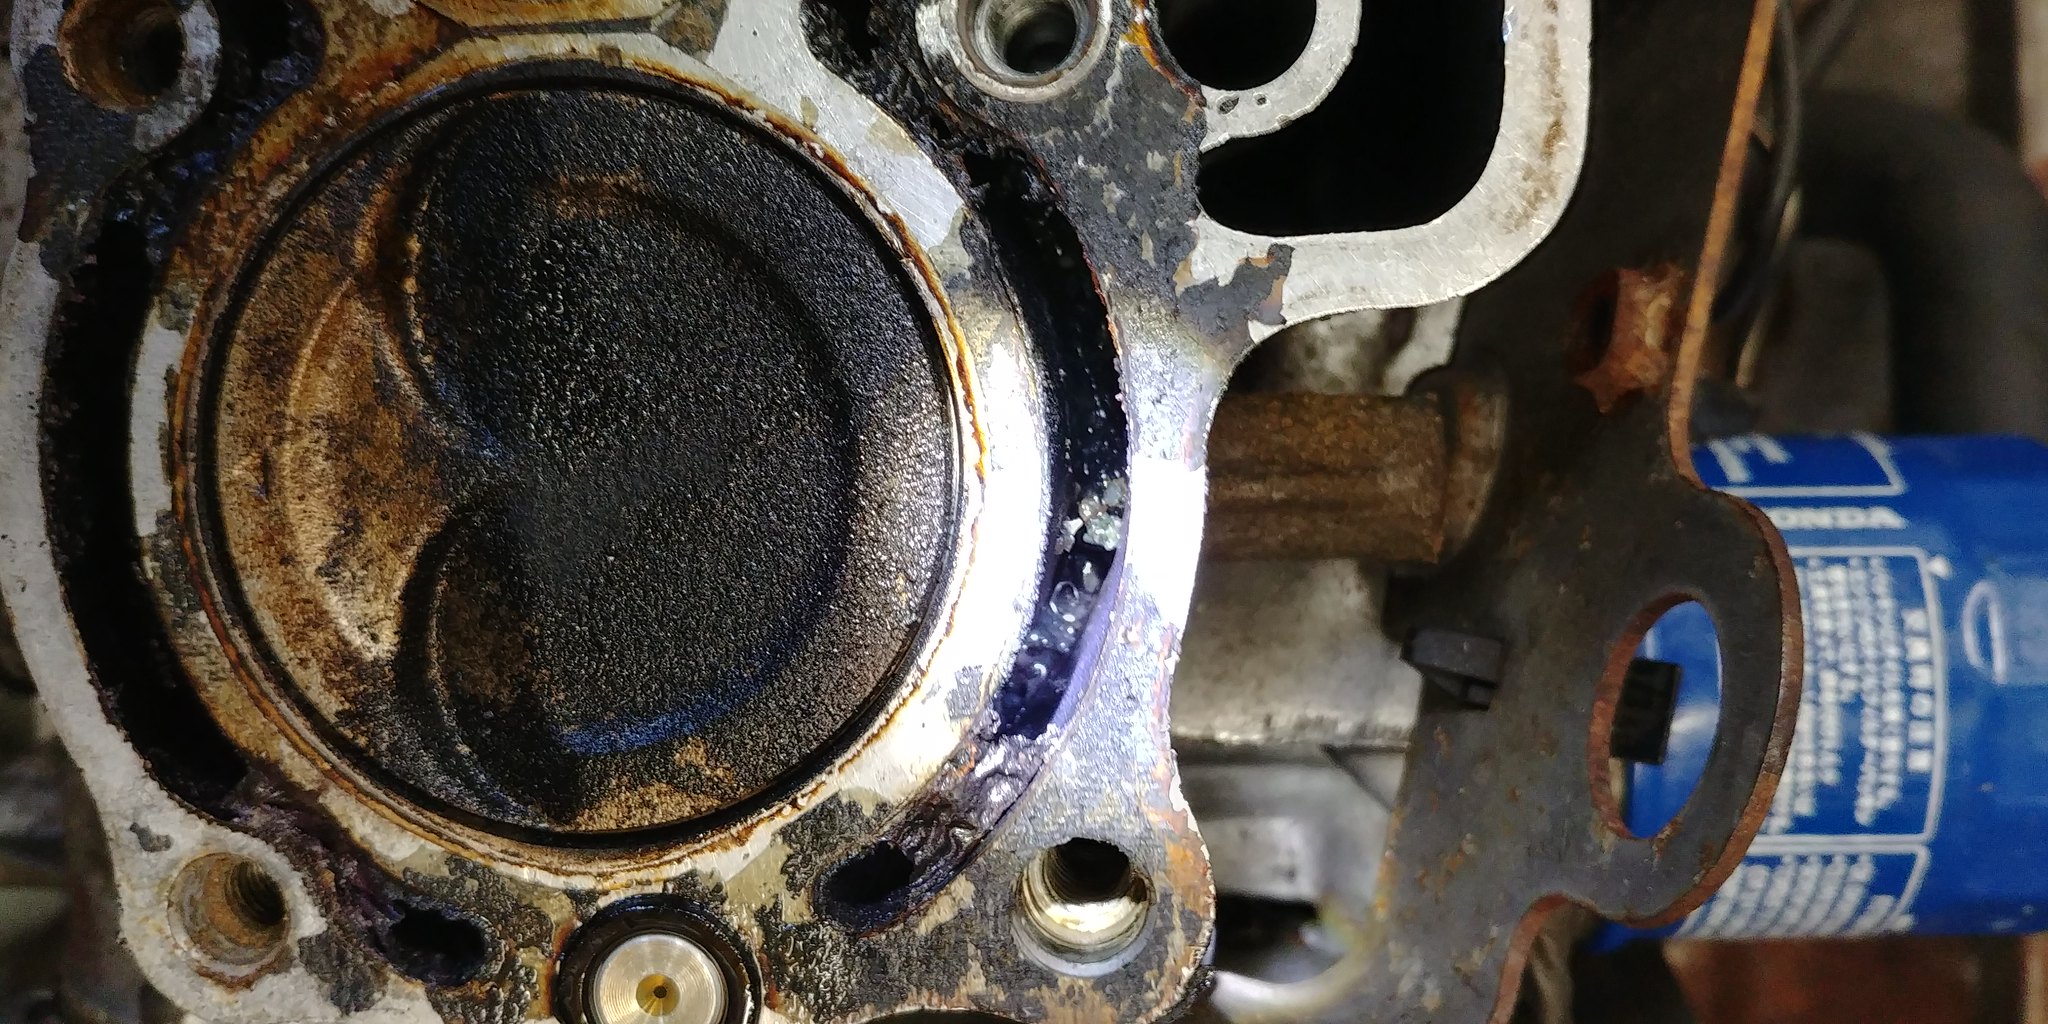
Cylinder head removed, the oil is leaking from the oring around the oil feed restrictor (next to right cylinder, in line with alternator), looks like some oil was getting into the cylinder as well.

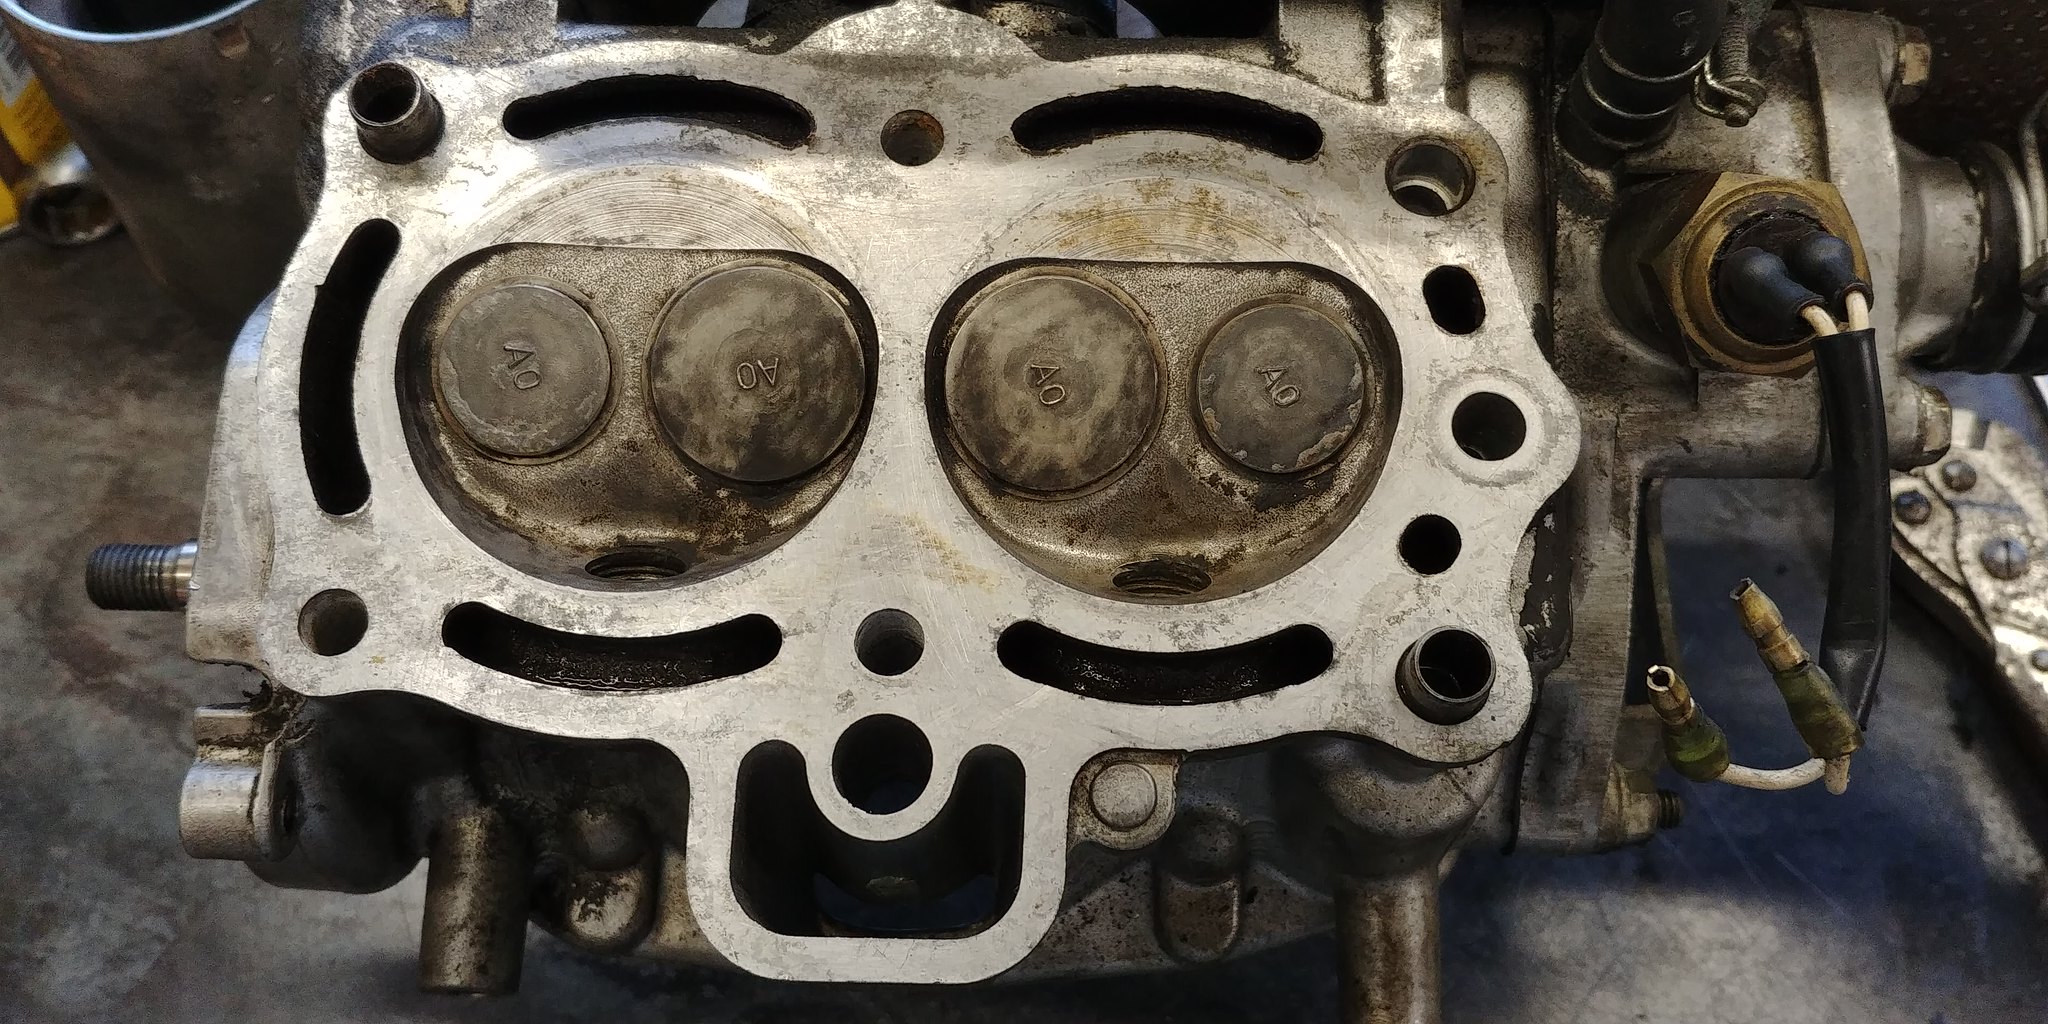
The head looks in good condition with a small amount of carbon, you can see where the oil was leaking (right side of head) as the gasket is wet with oil.
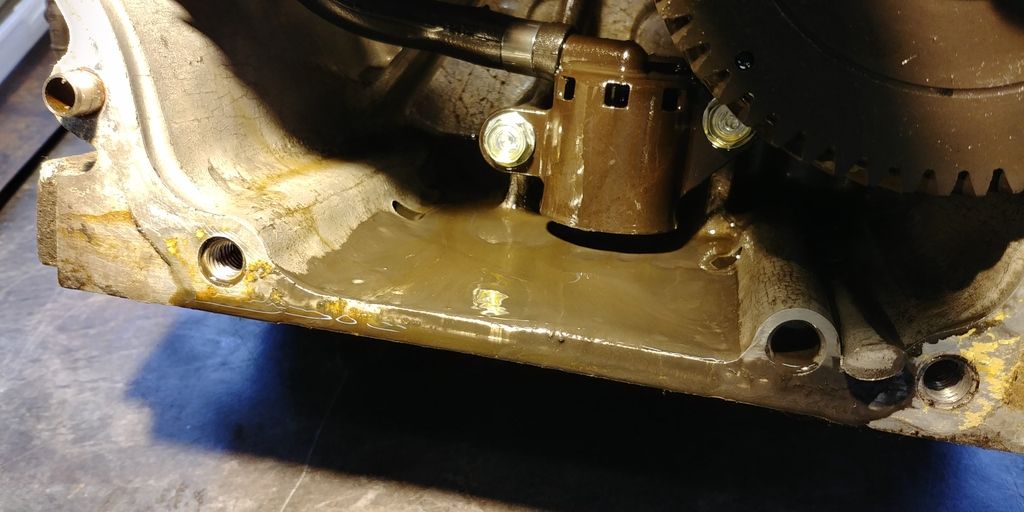
There was allot of sludge in the water passages in the cylinder block
I dug out some of the sludge with a screwdriver, looks like it was filled with mud at some point!
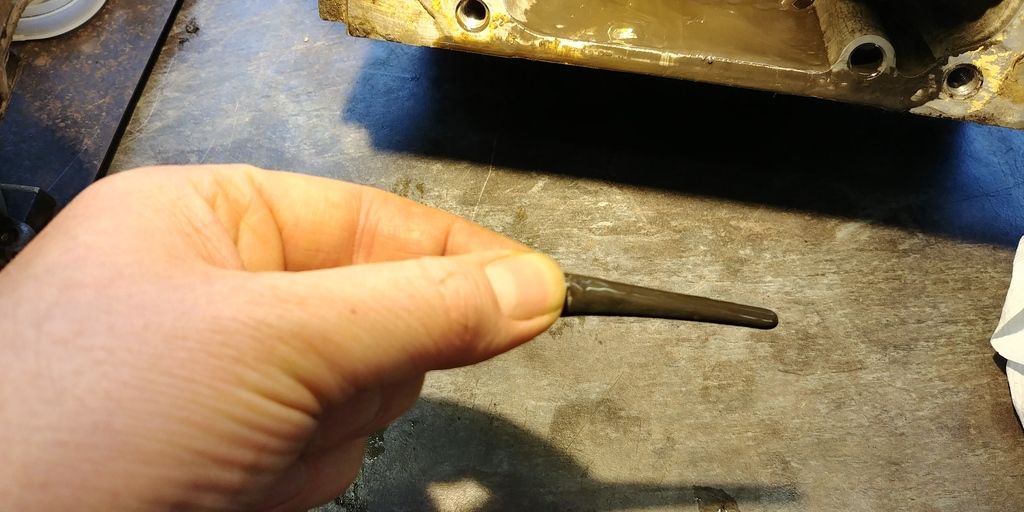
I managed to get all the sludge out of the water jacket, the leaky oring can be seen at the bottom of the image. The oring has gone hard and is starting to crack so no wonder it leaked.
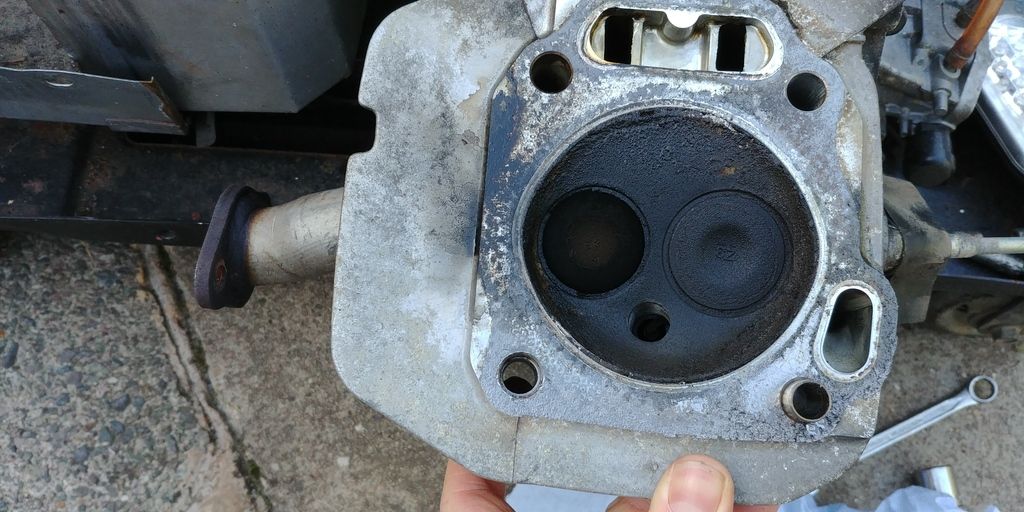
Cylinder head after cleaning
Block cleaned up ready for new head gasket
Just waitin for the replacement oring to arrive so I can get it all back together.
I got hold of insulation used on industrial boilers, its rockwool like the original, but has a heat reflective foil layer.
The top cover had the most damage to the insulation.
Looking better.
Rear panel repaired.
All back together.
Had to revisit the EX5500 that I rebuilt last year, I wanted to try fitting LPG kit on it. Before I could install the kit, I wanted to make sure it was running properly, however I couldn’t get it to start. Initially it seemed like the battery had gone flat, as it was turning over very slowly. After some testing it turned out there was a problem with the starter motor.
To get to the starter motor I had to completely dismantle the generator, so after a couple of hours it looked like this.
The starter motor is tucked down at the bottom of the engine and is trapped by an engine mount.
Starter motor removed
The problem with the starter motor was due to the brushes having been completely worn down so they weren’t making proper contact.
The positive brush was so worn the wire supplying it was against the housing so I couldn’t move any further
The negative brush wasn’t as bad, still has a couple of mm to go
Unfortunately, the brushes have been discontinued by Honda, however I found some new old stock brushes in the USA, just waiting for them to turn up.
while waiting for the new brushes I thought it would be a good idea to give the commutator a clean.
Before
After cleaning.
While the generator is in bits I wanted to fix an oil leak. The leak is from the oil feed up to cam shaft in the cylinder head. I had tried previously to fix it with some sealant but it didn’t fix the leak so the head needs to come off.
To remove the head the cam belt and cam pulley have to be removed.
Cylinder head removed, the oil is leaking from the oring around the oil feed restrictor (next to right cylinder, in line with alternator), looks like some oil was getting into the cylinder as well.
The head looks in good condition with a small amount of carbon, you can see where the oil was leaking (right side of head) as the gasket is wet with oil.
There was allot of sludge in the water passages in the cylinder block
I dug out some of the sludge with a screwdriver, looks like it was filled with mud at some point!
I managed to get all the sludge out of the water jacket, the leaky oring can be seen at the bottom of the image. The oring has gone hard and is starting to crack so no wonder it leaked.
Cylinder head after cleaning
Block cleaned up ready for new head gasket
Just waitin for the replacement oring to arrive so I can get it all back together.
guindilias said:
I'd love to see a Listeroid torn down and rebuilt with genuine parts.
Happy to chip in if it needs a bit of cash!
A lister would be interesting to tinker with, but they tend to be big and heavy so not easy to get up to the “workshop”Happy to chip in if it needs a bit of cash!
Latest progress, the new brushes for the starter motor turned up.

New brushes are about twice the length of the old brushes (old right new left)

Got the starter motor reassembled and tested.
Next was the new head gasket and oil feed o-ring.

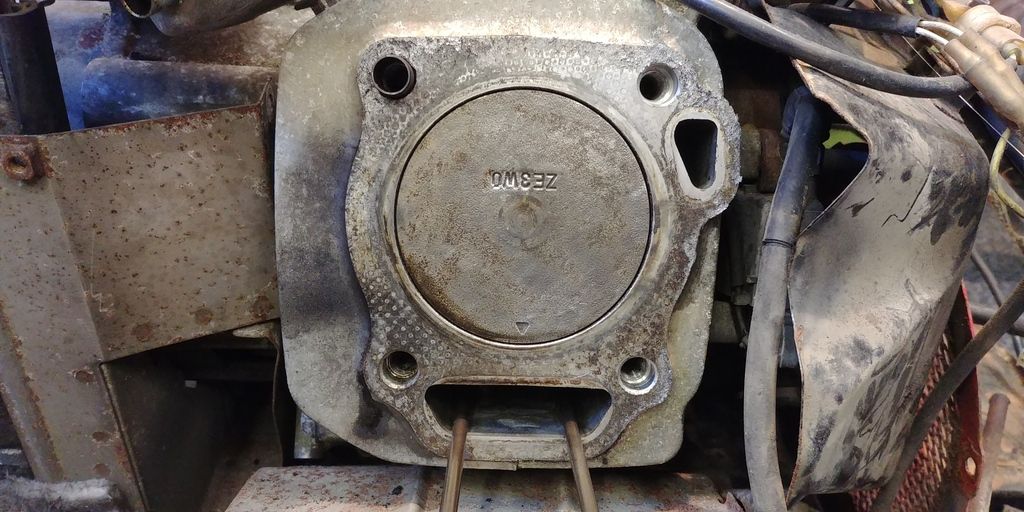
Cylinder head and cambelt refitted


Reassembly started, didn’t take many photos as it’s all been seen before earlier in the thread.
Starter motor back in place and reconnected.

Nearly finished, engine refilled with oil and coolant, just got to refit the fuel tank and front panel.

Gassing Station | Homes, Gardens and DIY | Top of Page | What's New | My Stuff