Raised deck project
Discussion


This is a bit of an ongoing project, so updates might be a bit slow!
As a bit of a back story, our house sits on top of a hill, the neighbour at the bottom of our garden is probably ten metres below us, with their roofline being below the top of our garden, we have almost unrestricted views into the rear rooms of their house and back garden.
Our plan was to build our deck out 6 metres, replacing the current patio and making the use of the dead space that is just a slope.
We let our neighbours know what we had planned as we didn't want to upset them, we took a load of recommendations from local people and found someone that a) turned up b) didn't mind working on a steep slope to do the work.
We hoped to have the whole thing done by November last year but ran into a couple of problems, the first being that what our neighbours said to our face and what they then did bore no relation and the recommended contractor appeared to have a great work ethic but no comprehension of engineering.
When I started doing this I read through the permitted development guidelines to check if I needed planning permission. Building a deck on a slope appears to be a grey area with the common guidelines of anything above 300mm needs planning permission, but reading through the PD guidelines it clearly states that when building on a slope then all measurements are taken from the top of the slope.
That led me to believe that I didn't need planning as the deck was actually below the top of the slope and I could carry on. Our planning office disagreed as they argued that a deck isn't a structure so that guideline doesn't apply and measurements should be taken from the bottom of the slope and I needed planning so they issued me with an enforcement notice.
That led me to second guessing myself and talking to a planning consultant (Paul Scott at Scottplan). He agreed with me and we applied for a Certifiate of Lawful development. A quick dabble with sketchup and visio and I had the plans together and an appeal in to the LA.
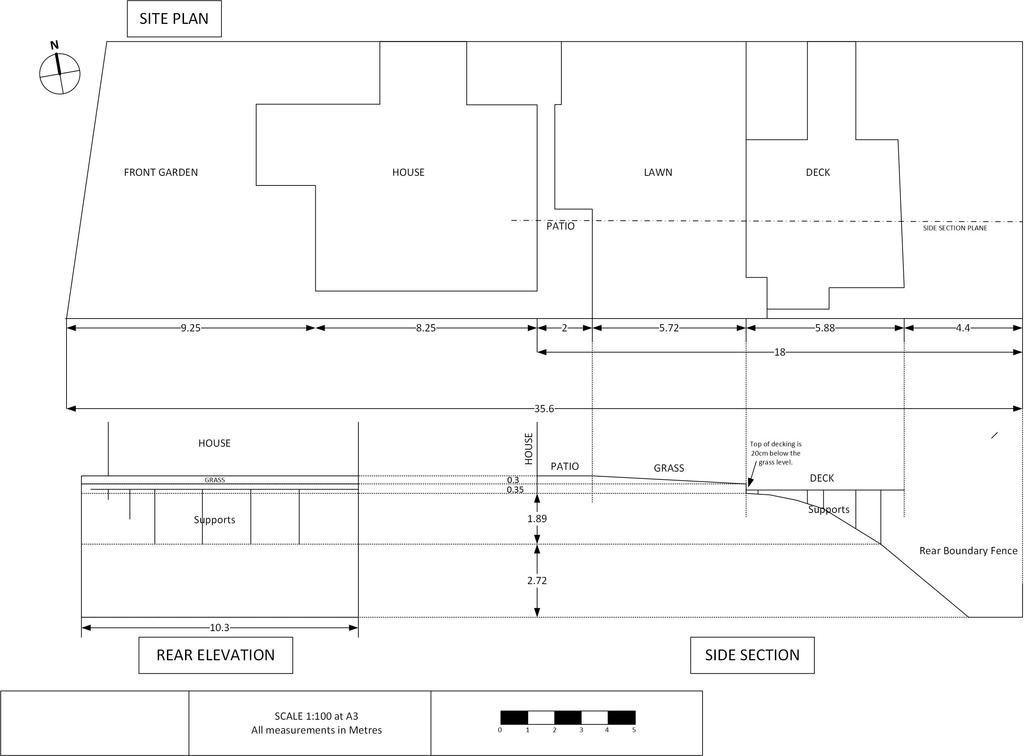
This is basically what we're doing:
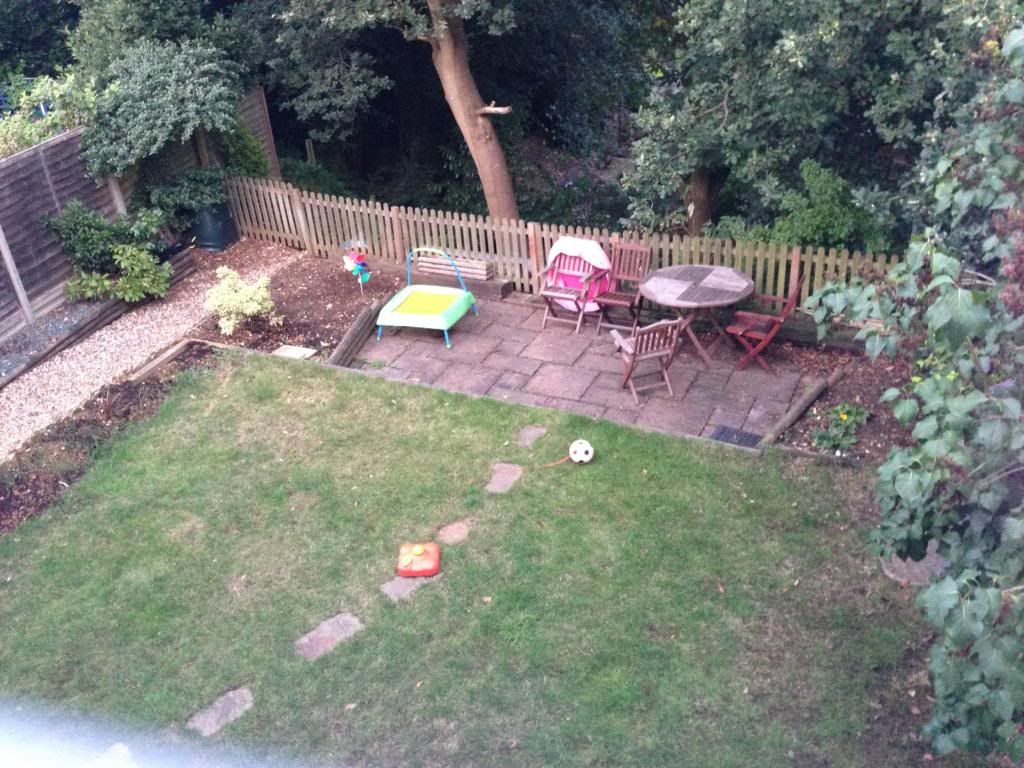
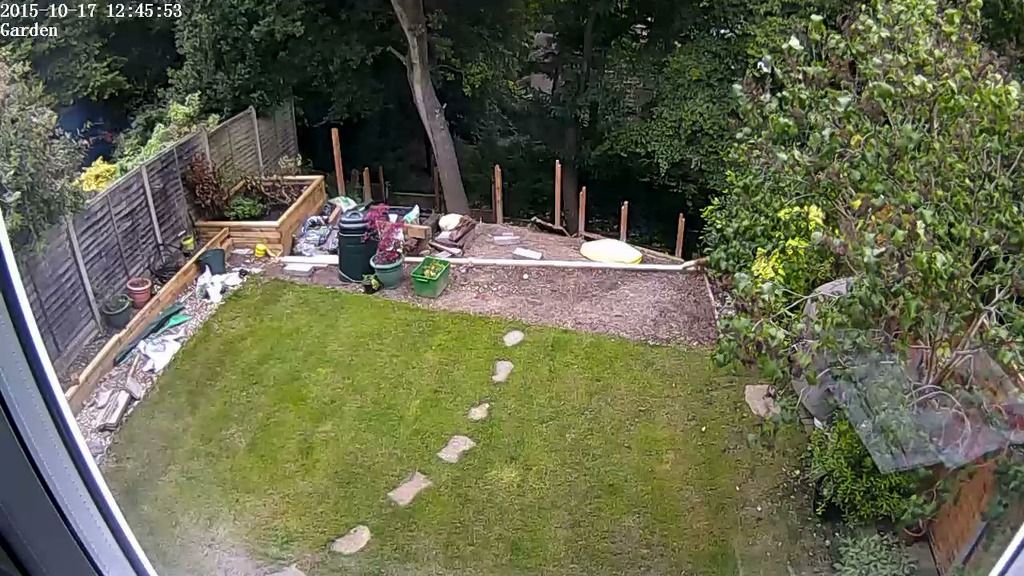
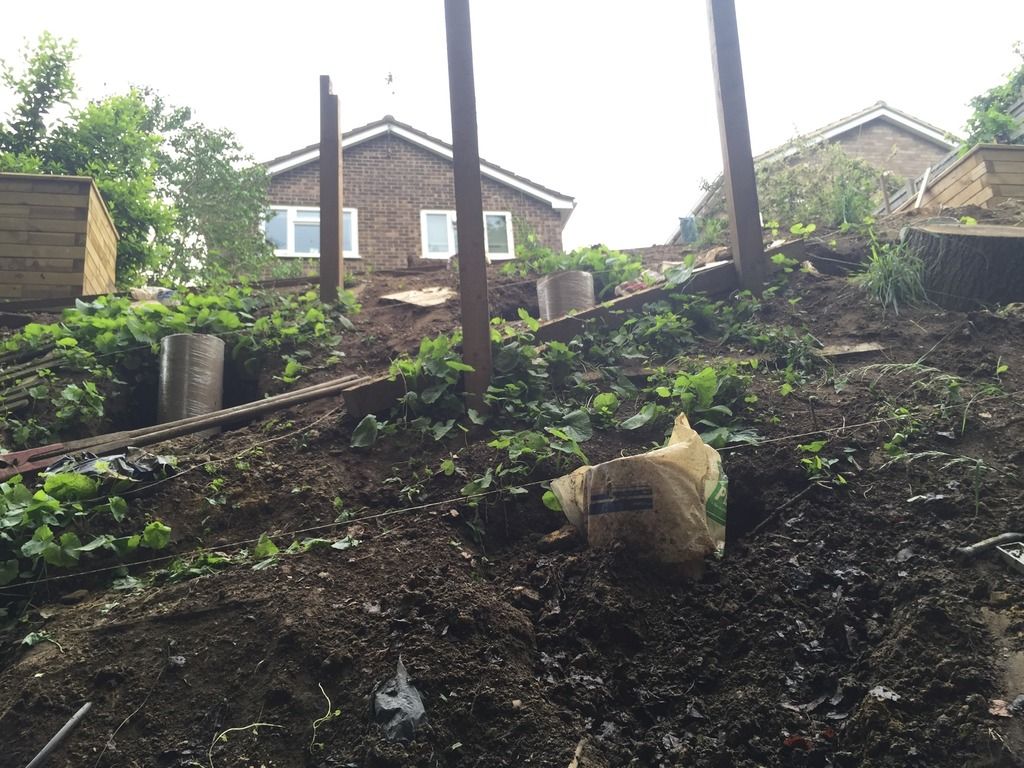
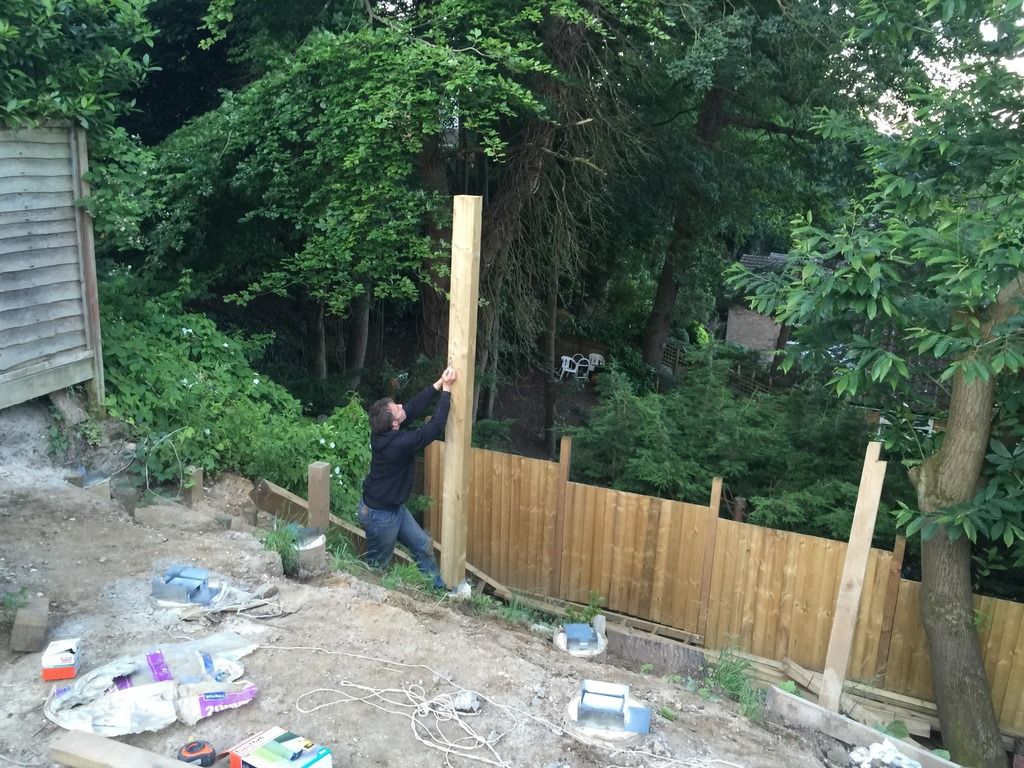
Our garden
The slope
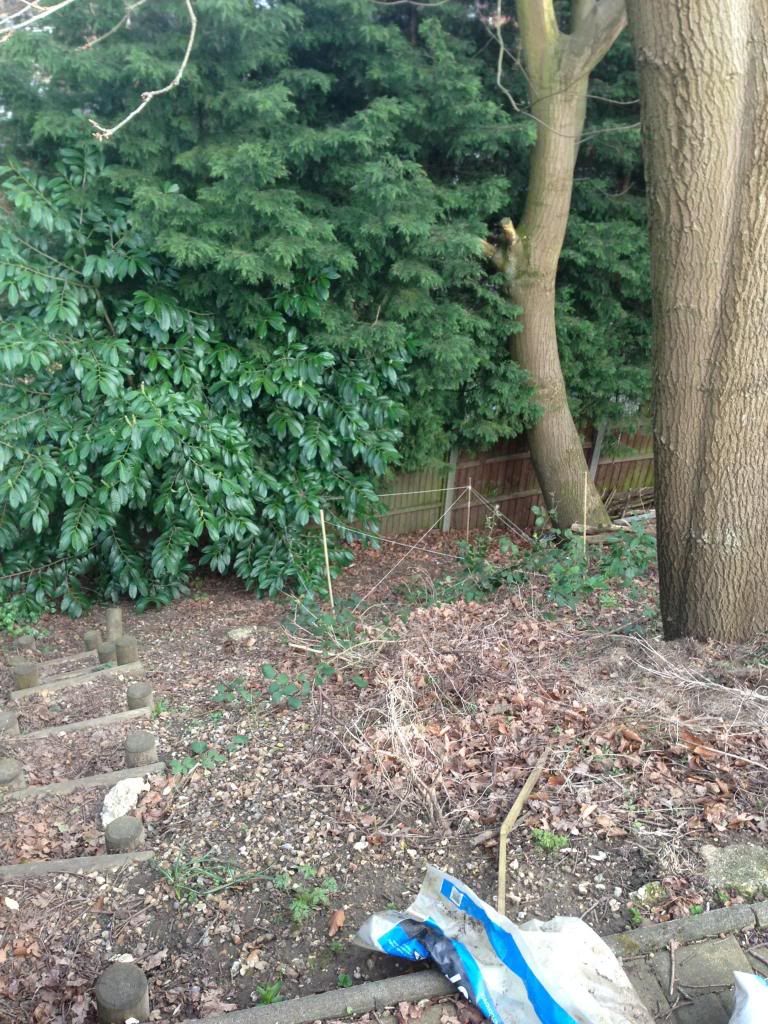
This was taken before our they chopped down their conifers and about a year before we even spoke to them about the work.
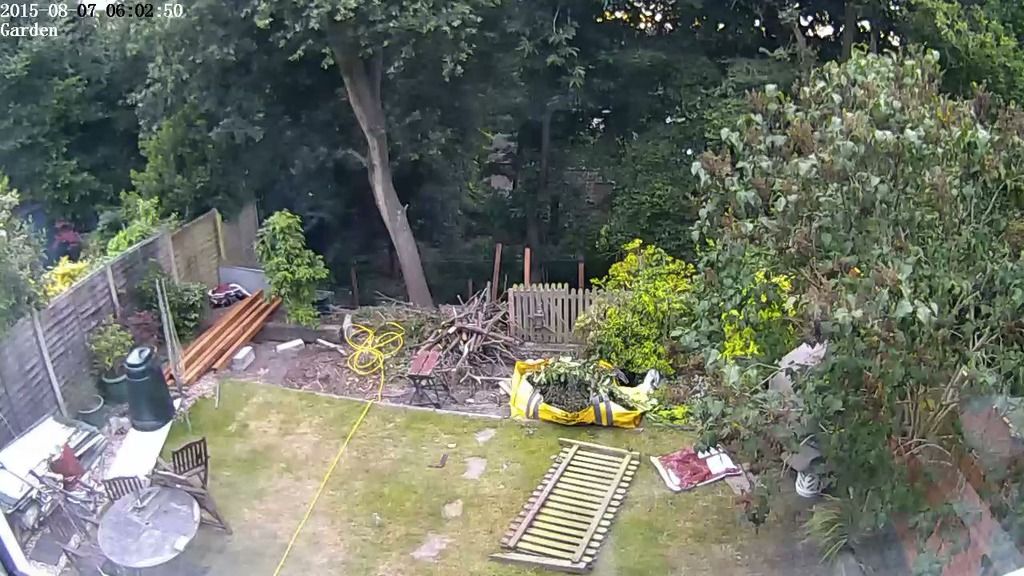
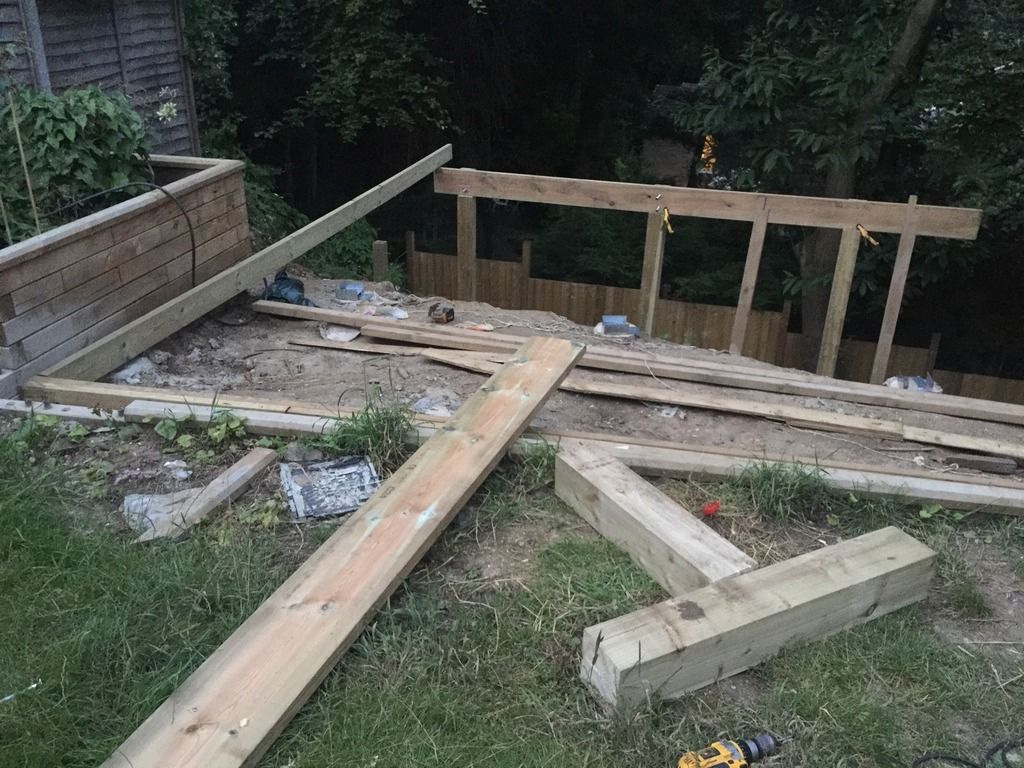
Work underway
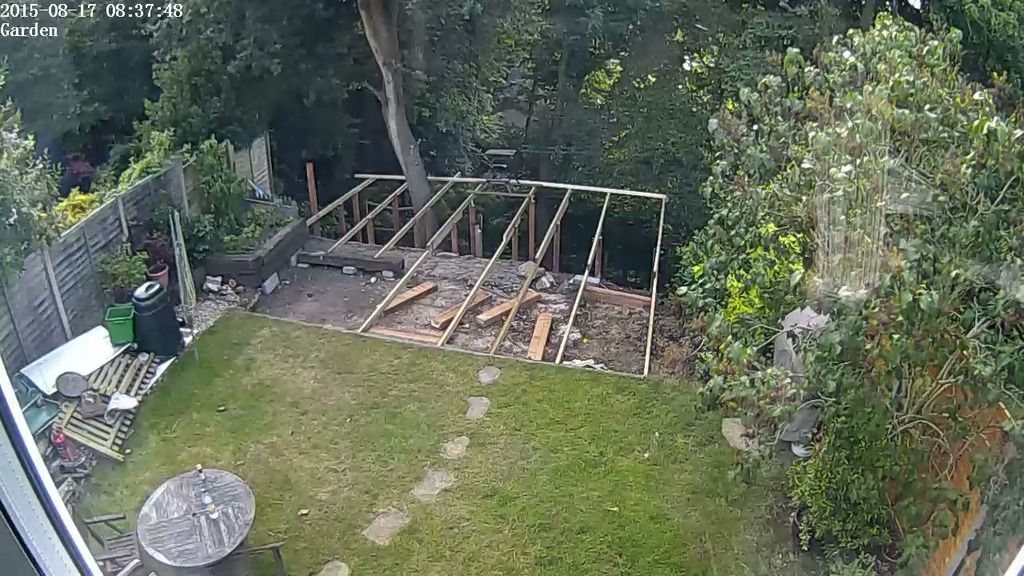
So with the appeal in we stopped work. Which was a blessing in disguise as I got a chance to look at what our contractor was doing and it scared the life out of me!
None of the installed posts were really secure, they wobbled if you lent on them. He'd used 4x4 posts and sunk them in concrete, which he then explained to save us some money he'd managed to use one bag of postcrete per 3 holes!
He hadn't looked at using bearers and the distance between the posts was a seeming random distance.
The first phase of the work was supposed to have been a decked platform at the bottom of the slope which when I looked at the construction I found he'd used drywall screws to hold the lot together! So not only was I fighting the council I no longer had anyone to do the work for me and needed to do everything he'd already done again.
Our application for our certificate landed with our neighbours and we received their objections which if I was reading them as an outsider would have had me in hysterics! Our application was based around the premise that our deck was not a raised platform as at no point was it above 300mm in height when measured from the top of the slope. We provided appeal details that had gone in front of the planning inspectorate and also let the council know that we'd appeal and apply for costs. The objections were based around disrupting wild life, loss of privacy, loss of light, increased risk of flooding and inaccuracy of our site plans, apparently our garden wasn't as I'd drawn it, it was completely different.
The only concern of the planning officer was the last point, which was factually incorrect and thankfully she ruled in our favour and provided us our certificate.
So come March of this year I started again.
We decided to chop down the oak, it was slightly diseased and one of the large limbs was looking a bit sick.
I dug out the existing posts
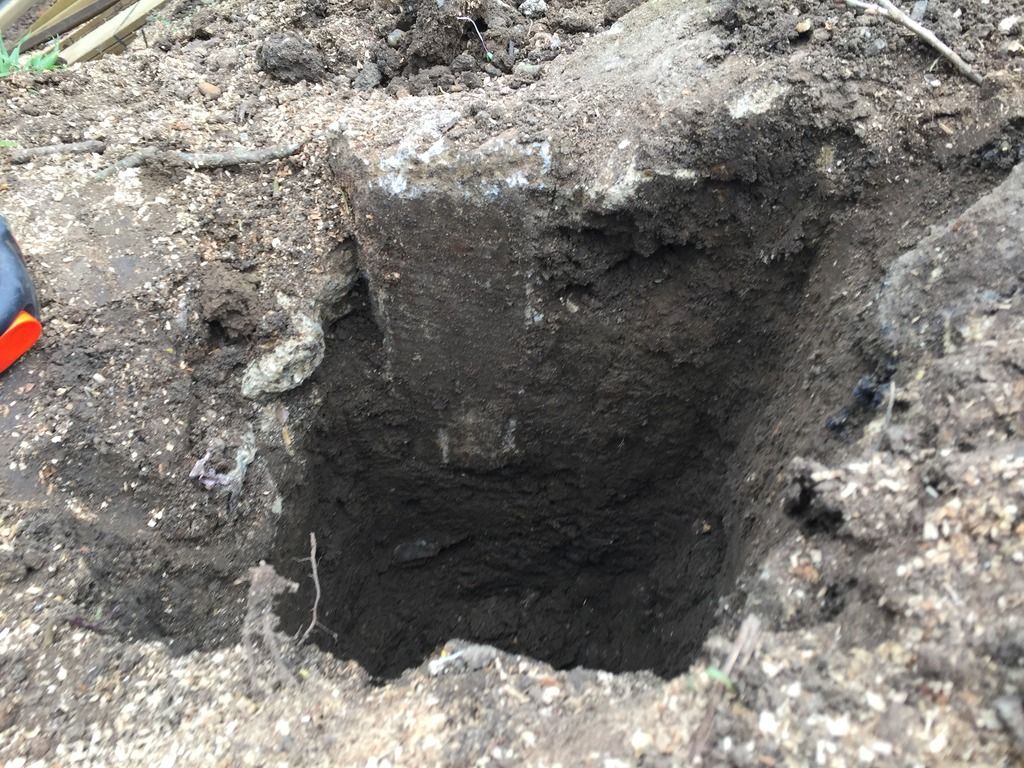
The deepest one I found was 32cm deep.
My design is 4 bearer joists attached to 6x6 posts. The bearers are two bits of 2x10 in a cantilever layout. I'll then attach 2x6 joists at 400 centres and lots of noggins for the deck board to screw to.
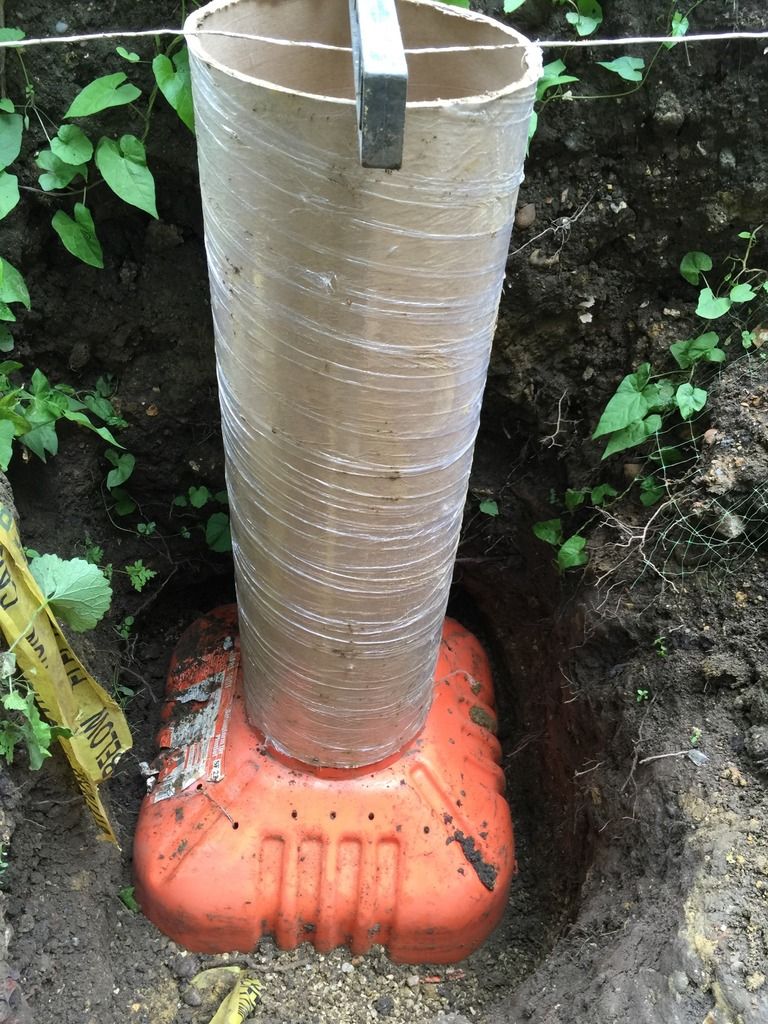
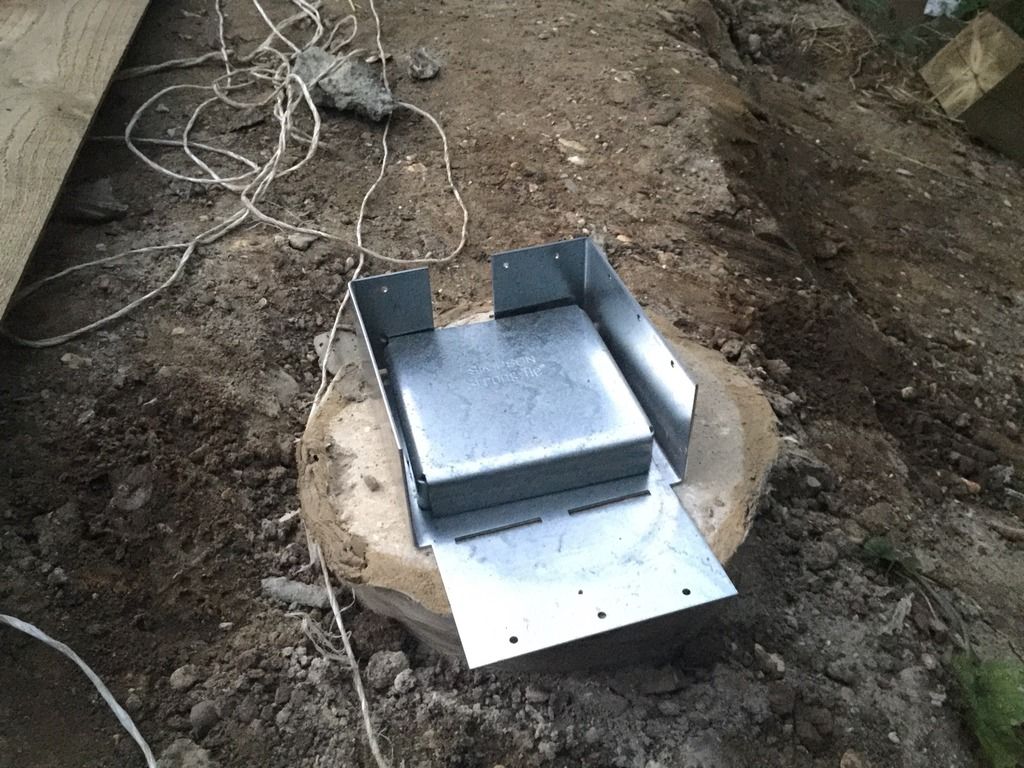
The 6x6 posts are going to be mounted into 6x6 postbases on top of 10" diameter concrete columns. Each column will vary in height but is at least 2 foot tall and has a Squarefoot SF22 post base. These are 2 foot square and 16 inches tall. I'm adding two bits of rebar per column too.
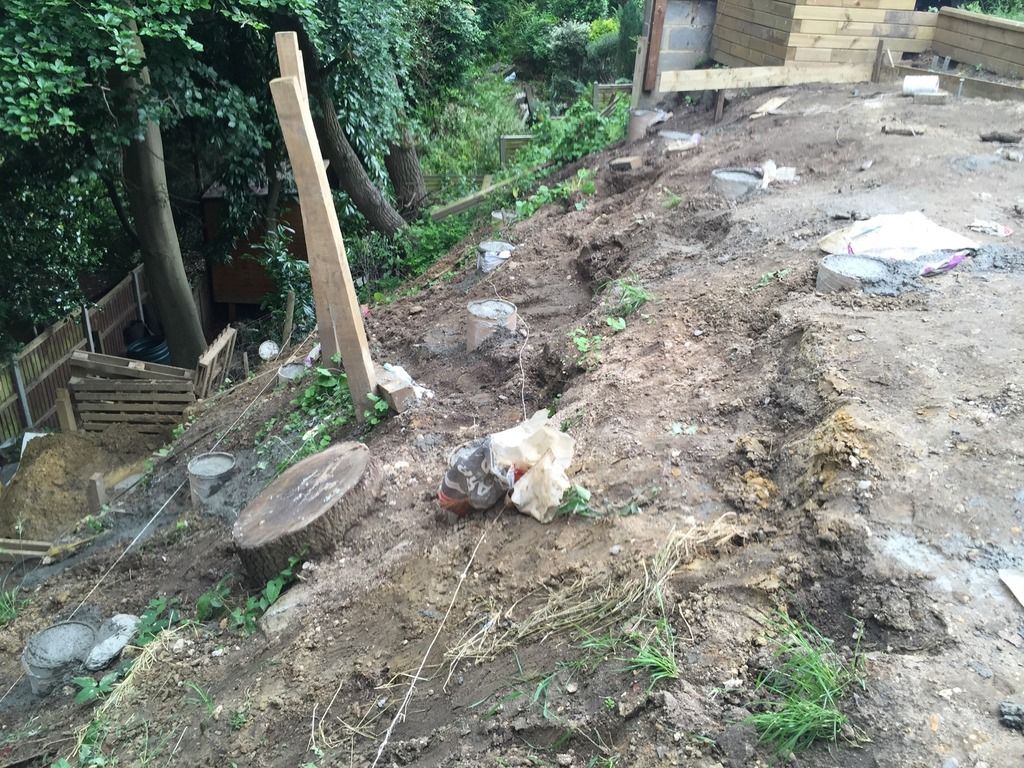
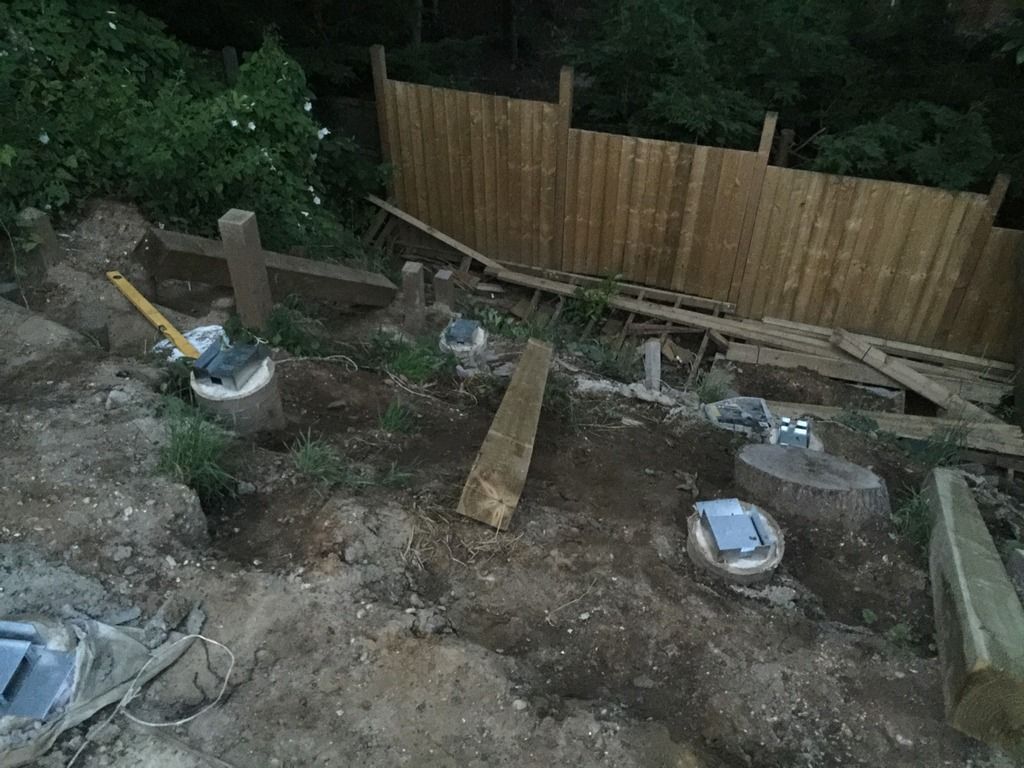
Digging the post holes has been interesting, there are 17 holes and the slope meant it was all done by hand tools.
Every hole was a pig as it would appear that the whole garden has been filled with building waste. I've found 7 of these
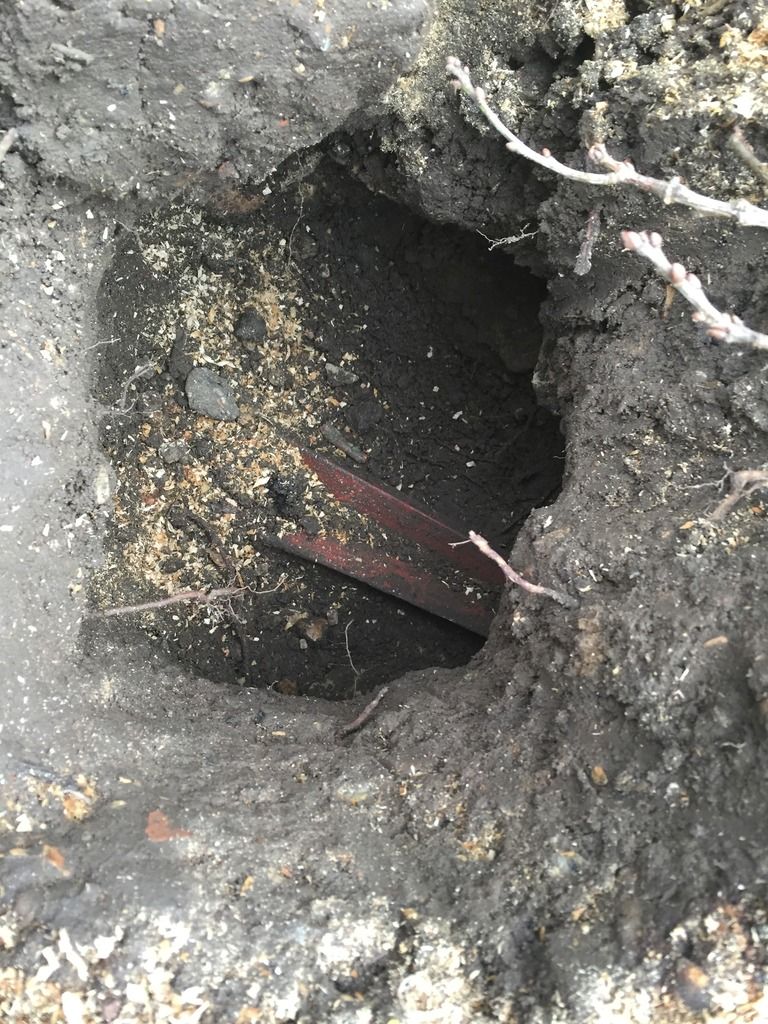
A waste pipe that runs from who knows where to who knows where but was smack bang through the middle of the last two holes in a row!
That meant a bit of a shuffle of holes!
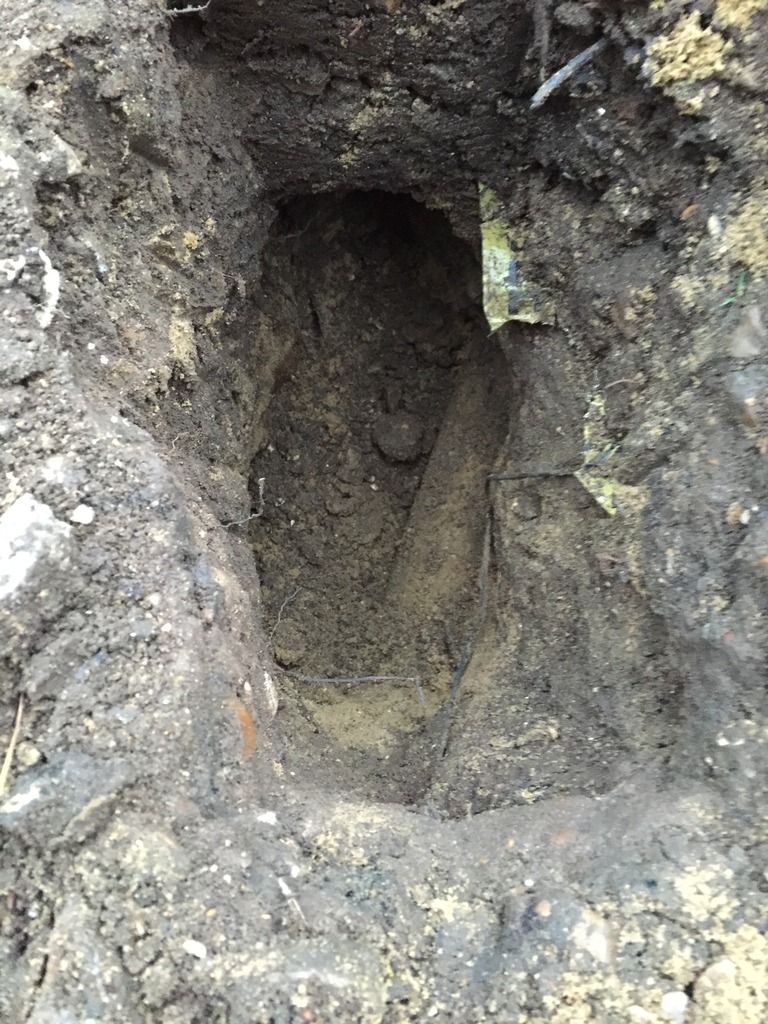
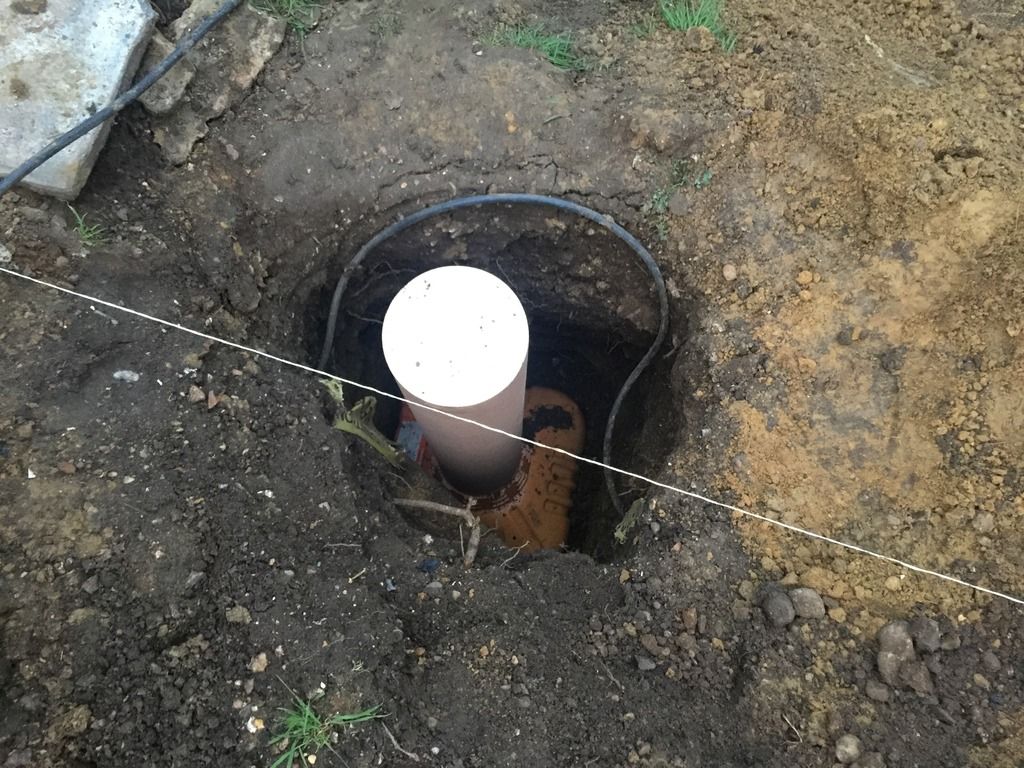
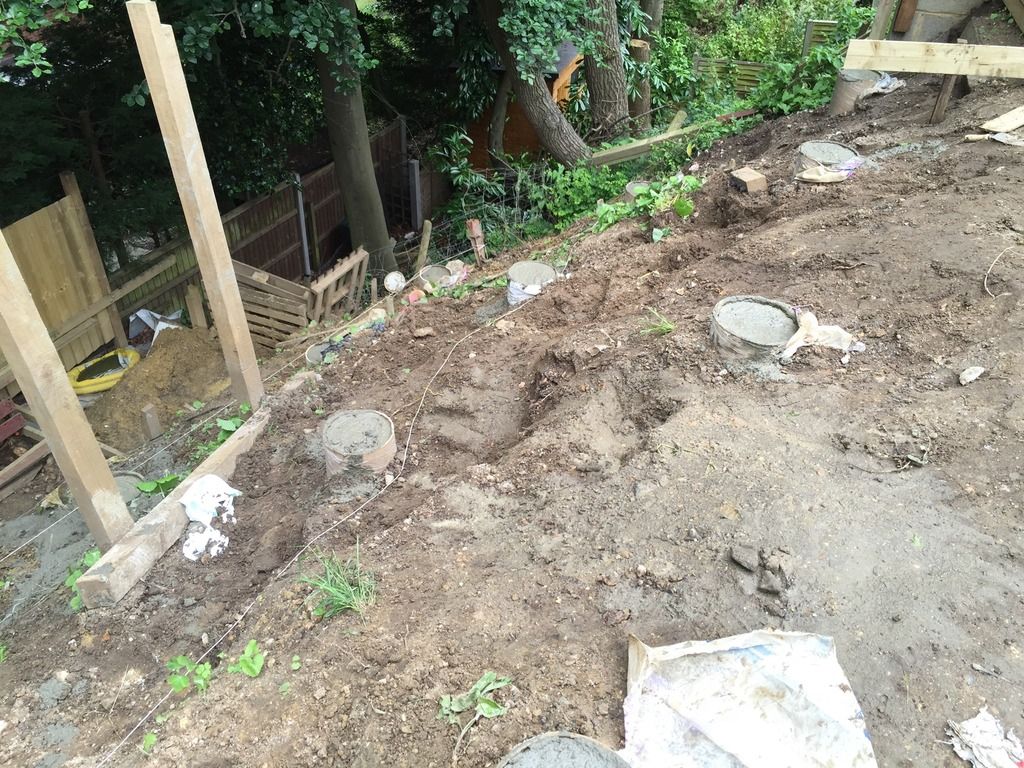
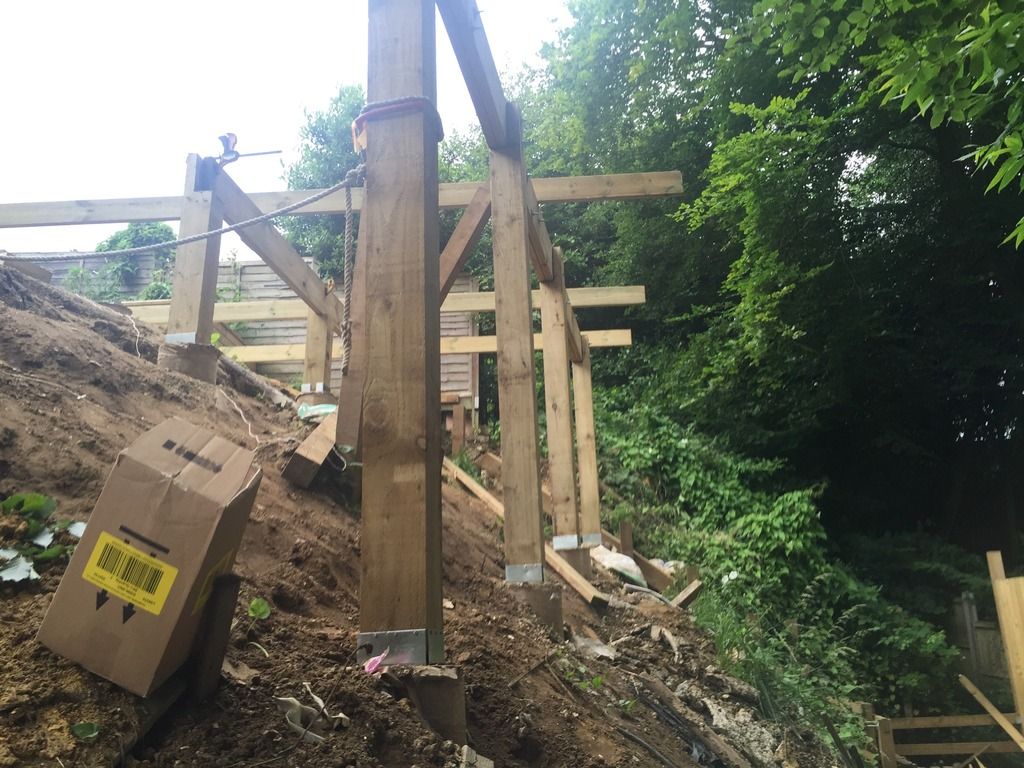
I'm now in the position that all of the holes are dug, I've put between 4 and 6 inches of gravel at the bottom of each hole as a bed and all of the rebar has been cut to fit in the post forms.
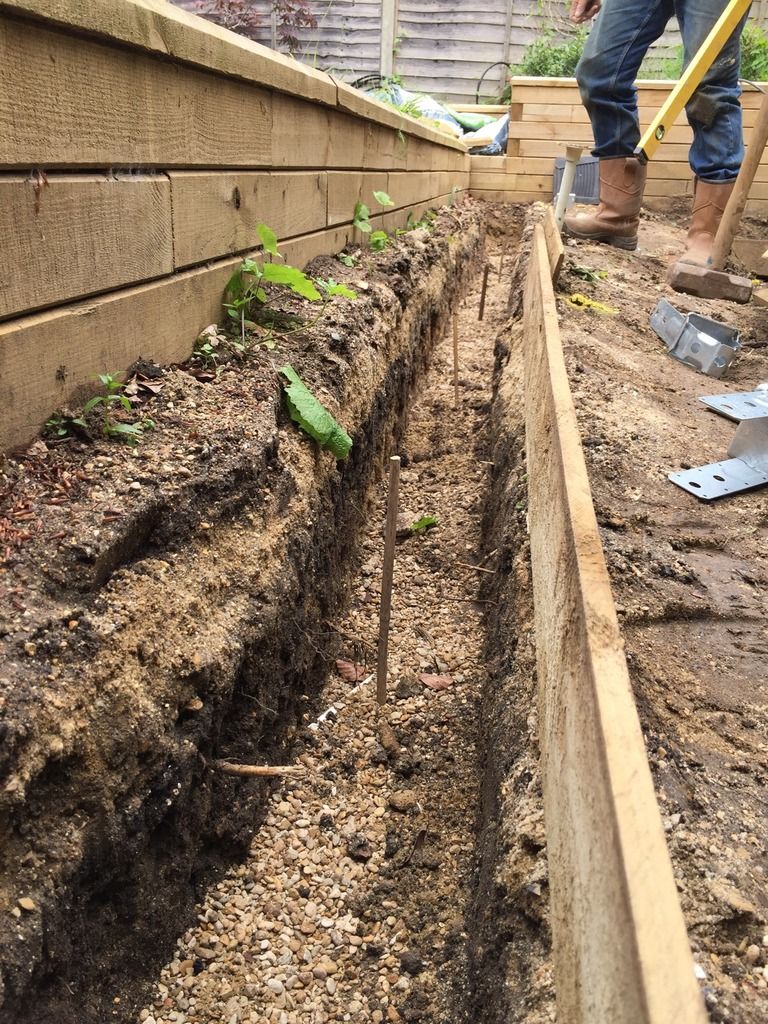
Footers

Finished holes with cardboard form in place
Rebar to be cut.

I'm hoping to get all of the rebar in place this weekend so that the holes are ready to be backfilled once the concrete pour has been booked.
For what I'm doing I need 1.75m3 of concrete which is about 180 bags of concrete to do myself which costs more than getting it pumped!
As a bit of a back story, our house sits on top of a hill, the neighbour at the bottom of our garden is probably ten metres below us, with their roofline being below the top of our garden, we have almost unrestricted views into the rear rooms of their house and back garden.
Our plan was to build our deck out 6 metres, replacing the current patio and making the use of the dead space that is just a slope.
We let our neighbours know what we had planned as we didn't want to upset them, we took a load of recommendations from local people and found someone that a) turned up b) didn't mind working on a steep slope to do the work.
We hoped to have the whole thing done by November last year but ran into a couple of problems, the first being that what our neighbours said to our face and what they then did bore no relation and the recommended contractor appeared to have a great work ethic but no comprehension of engineering.
When I started doing this I read through the permitted development guidelines to check if I needed planning permission. Building a deck on a slope appears to be a grey area with the common guidelines of anything above 300mm needs planning permission, but reading through the PD guidelines it clearly states that when building on a slope then all measurements are taken from the top of the slope.
That led me to believe that I didn't need planning as the deck was actually below the top of the slope and I could carry on. Our planning office disagreed as they argued that a deck isn't a structure so that guideline doesn't apply and measurements should be taken from the bottom of the slope and I needed planning so they issued me with an enforcement notice.
That led me to second guessing myself and talking to a planning consultant (Paul Scott at Scottplan). He agreed with me and we applied for a Certifiate of Lawful development. A quick dabble with sketchup and visio and I had the plans together and an appeal in to the LA.
This is basically what we're doing:
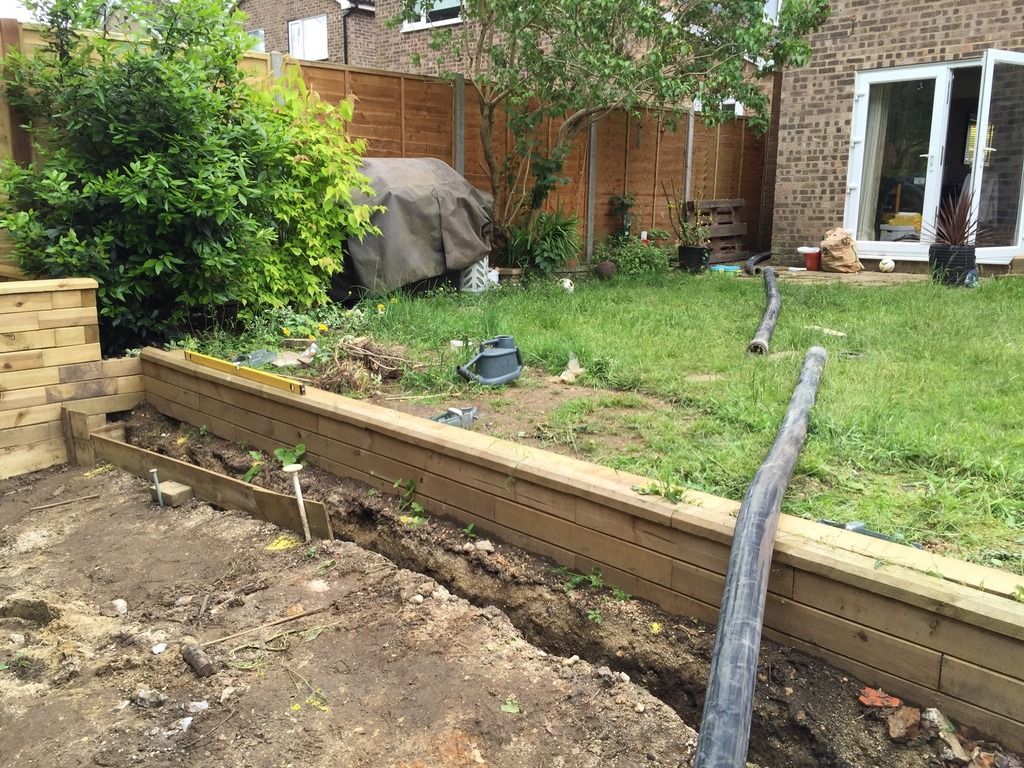
Our garden
The slope
This was taken before our they chopped down their conifers and about a year before we even spoke to them about the work.
Work underway
So with the appeal in we stopped work. Which was a blessing in disguise as I got a chance to look at what our contractor was doing and it scared the life out of me!
None of the installed posts were really secure, they wobbled if you lent on them. He'd used 4x4 posts and sunk them in concrete, which he then explained to save us some money he'd managed to use one bag of postcrete per 3 holes!
He hadn't looked at using bearers and the distance between the posts was a seeming random distance.
The first phase of the work was supposed to have been a decked platform at the bottom of the slope which when I looked at the construction I found he'd used drywall screws to hold the lot together! So not only was I fighting the council I no longer had anyone to do the work for me and needed to do everything he'd already done again.
Our application for our certificate landed with our neighbours and we received their objections which if I was reading them as an outsider would have had me in hysterics! Our application was based around the premise that our deck was not a raised platform as at no point was it above 300mm in height when measured from the top of the slope. We provided appeal details that had gone in front of the planning inspectorate and also let the council know that we'd appeal and apply for costs. The objections were based around disrupting wild life, loss of privacy, loss of light, increased risk of flooding and inaccuracy of our site plans, apparently our garden wasn't as I'd drawn it, it was completely different.
The only concern of the planning officer was the last point, which was factually incorrect and thankfully she ruled in our favour and provided us our certificate.
So come March of this year I started again.
We decided to chop down the oak, it was slightly diseased and one of the large limbs was looking a bit sick.
I dug out the existing posts
The deepest one I found was 32cm deep.
My design is 4 bearer joists attached to 6x6 posts. The bearers are two bits of 2x10 in a cantilever layout. I'll then attach 2x6 joists at 400 centres and lots of noggins for the deck board to screw to.
The 6x6 posts are going to be mounted into 6x6 postbases on top of 10" diameter concrete columns. Each column will vary in height but is at least 2 foot tall and has a Squarefoot SF22 post base. These are 2 foot square and 16 inches tall. I'm adding two bits of rebar per column too.
Digging the post holes has been interesting, there are 17 holes and the slope meant it was all done by hand tools.
Every hole was a pig as it would appear that the whole garden has been filled with building waste. I've found 7 of these
A waste pipe that runs from who knows where to who knows where but was smack bang through the middle of the last two holes in a row!
That meant a bit of a shuffle of holes!
I'm now in the position that all of the holes are dug, I've put between 4 and 6 inches of gravel at the bottom of each hole as a bed and all of the rebar has been cut to fit in the post forms.
Footers
Finished holes with cardboard form in place
Rebar to be cut.
I'm hoping to get all of the rebar in place this weekend so that the holes are ready to be backfilled once the concrete pour has been booked.
For what I'm doing I need 1.75m3 of concrete which is about 180 bags of concrete to do myself which costs more than getting it pumped!

5potTurbo said:
Ditto!
I was shocked to see the lack of support in the initial deck construction!
Also, change the thread title, in case your neighbours see it; it's a "supported" deck, not raised (above main garden level)
It's not a raised deck if you measure it from the top I was shocked to see the lack of support in the initial deck construction!
Also, change the thread title, in case your neighbours see it; it's a "supported" deck, not raised
(above main garden level)
Besides, now I Have my certificate there's no recourse for them, the only person that can appeal it is me.
The hilarious (to me) thing is, the biggest bone of contention they had was a loss of privacy, so, they've cut down the conifers that screened their garden, and then complained that the fence I'd put up at the bottom of the garden was too tall.
If they'd have complained to me directly I would have explained it was temporary until we'd sorted the lower deck area height and we'd be reducing it to about chest height, I just didn't know where that was going to be yet!
But they didn't. They went straight to the council. Who told me that the fence was 8 cm too high on one section, so that's been adjusted and it's now 2 metres tall and staying that way.
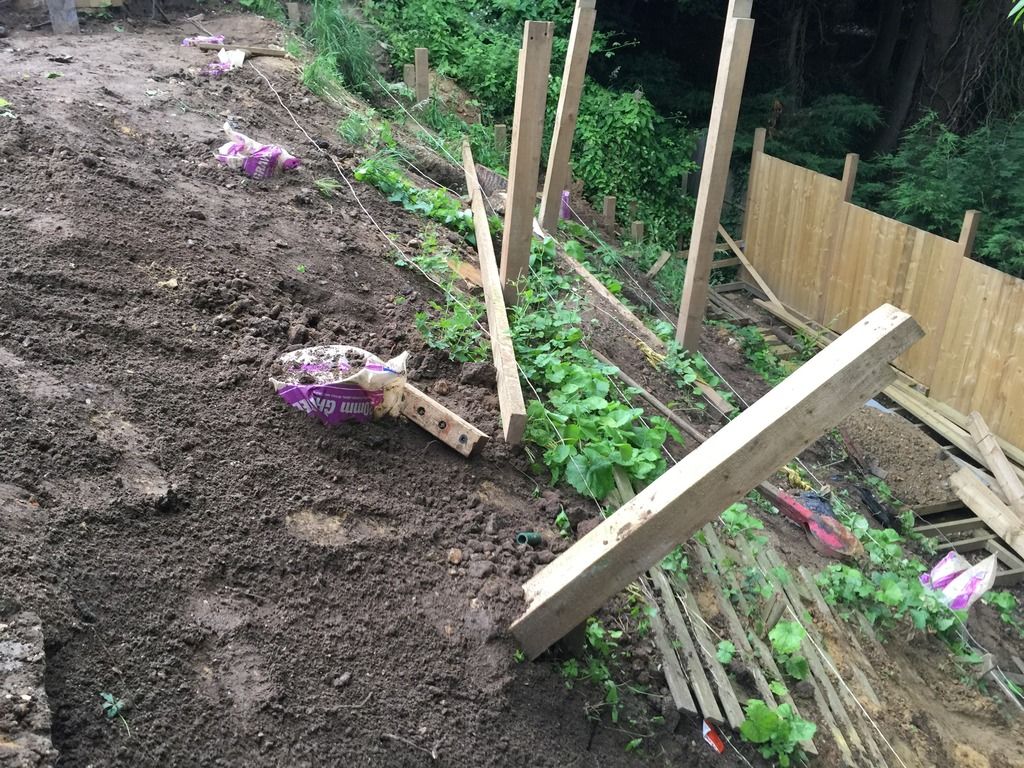
As for the support of the old structure, the posts all did this!

That's one of the few posts left, I'll remove them once the new holes are filled
Hitch said:
What's the general consensus on informing the neighbours pre-application? I know its the right thing to do but is it of any benefit in the process?
Love the scene OP, reminds me of a lot of houses in Sydney.
I knocked and talked to them. Explained what I wanted to do, asked if they had any objections and if they did later just come around and knock. But they've been passive aggressive about every issue. Either straight to the council or a letter through they door that mentions "by law" and their rights and how they want to resolve it amicably. Love the scene OP, reminds me of a lot of houses in Sydney.
Edited by Hitch on Wednesday 1st June 17:53
I understand that they were upset, but I don't understand the unwillingness to talk things through.
All of the other neighbours were fine with it.
As for does it help the process, in a planning application I'd say yes. Our neighbours did before they applied to extend. It made us aware, but from a council perspective I'm not sure.
We were asked if we'd spoken to them, which we confirmed and also mentioned that they hadn't raised objections or concerns with us.
The same happened again over the fence height. No contact from the neighbours until the man from the council knocked on the door. Which he seemed to take a dim view of and gave me loads of advice on where the shed could go and how high it could be, he even suggested starting it on the slope to give me a bigger workbench and a higher roof as the 2.5 metres would start from there!

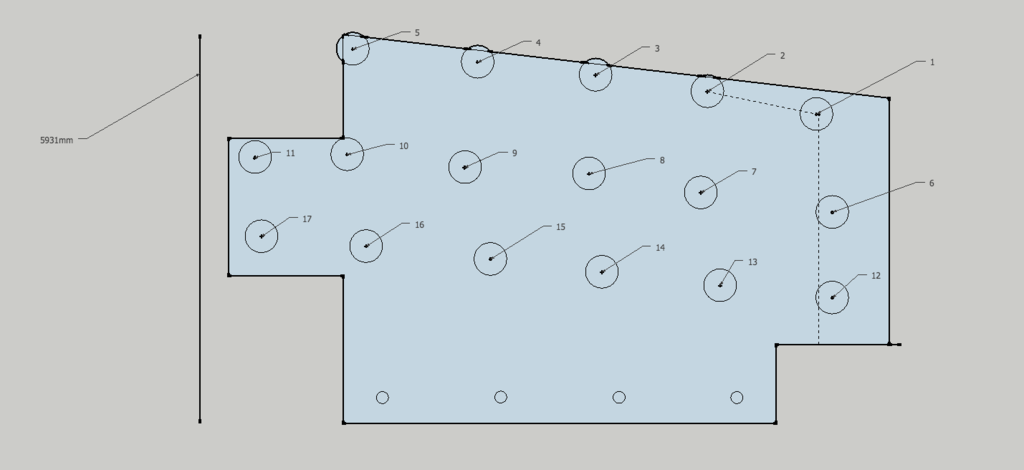
These are the "plans" I'm working to.
I tried to map out the terrain in sketchup but roots, pipes, services etc always get in the way so things have had to be adjusted a bit, including the addition of an extra post.
My plan for the top row is a concrete trench with the post bases on/in
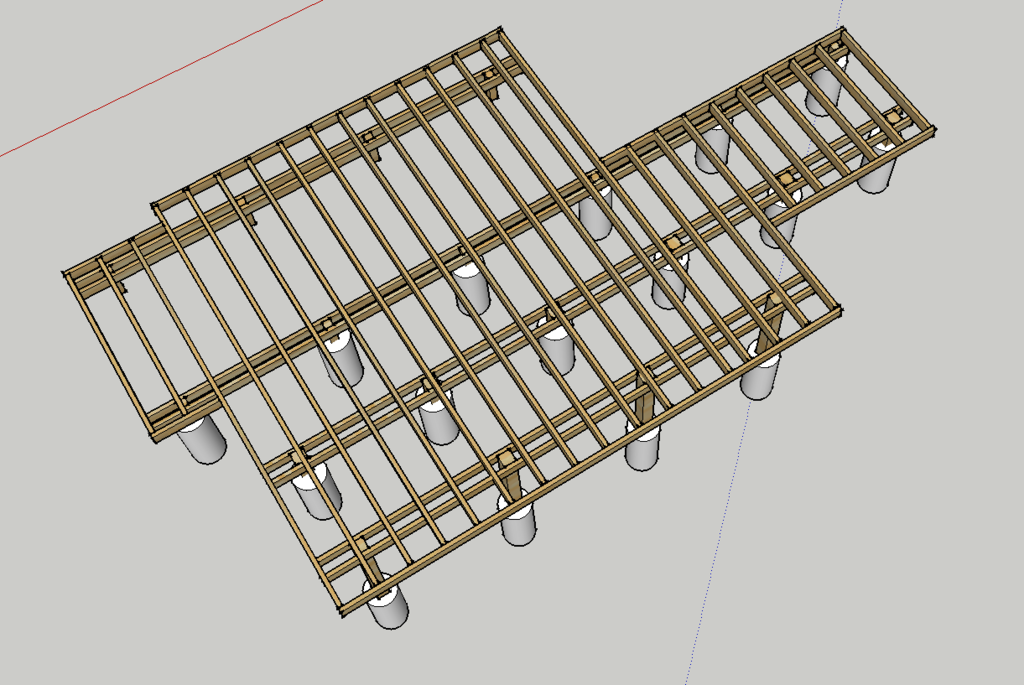
Bearers
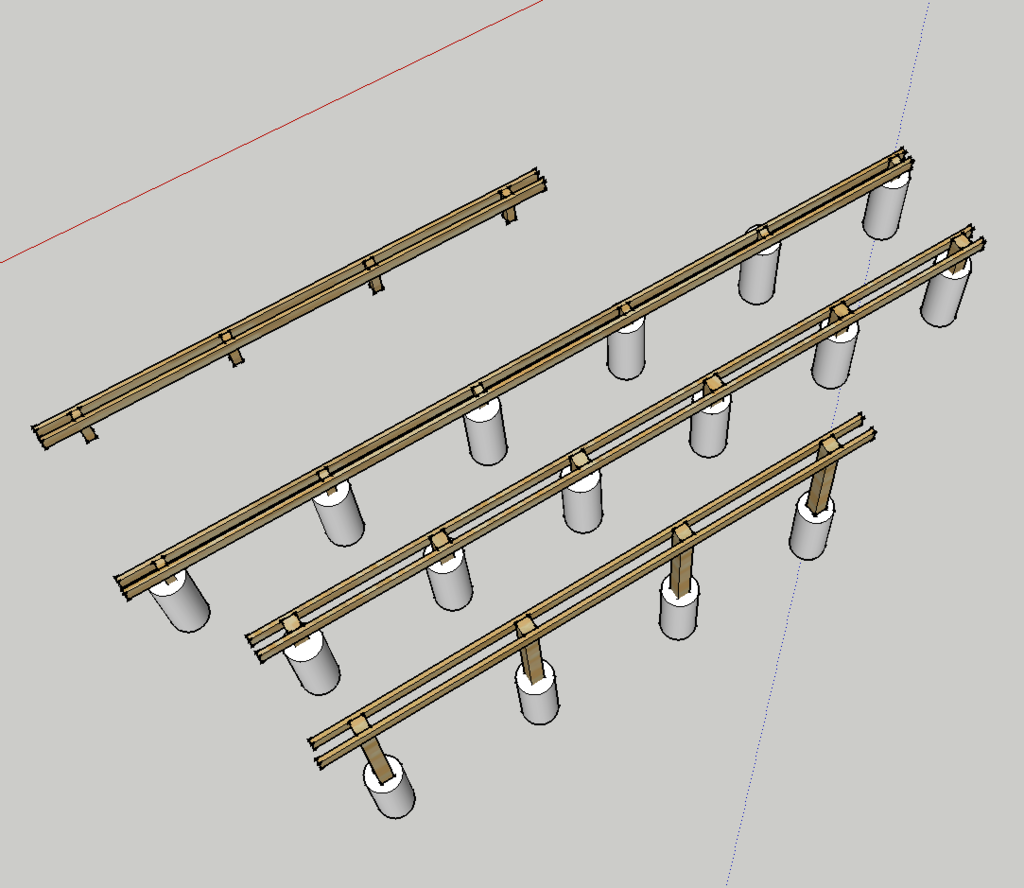
Joists
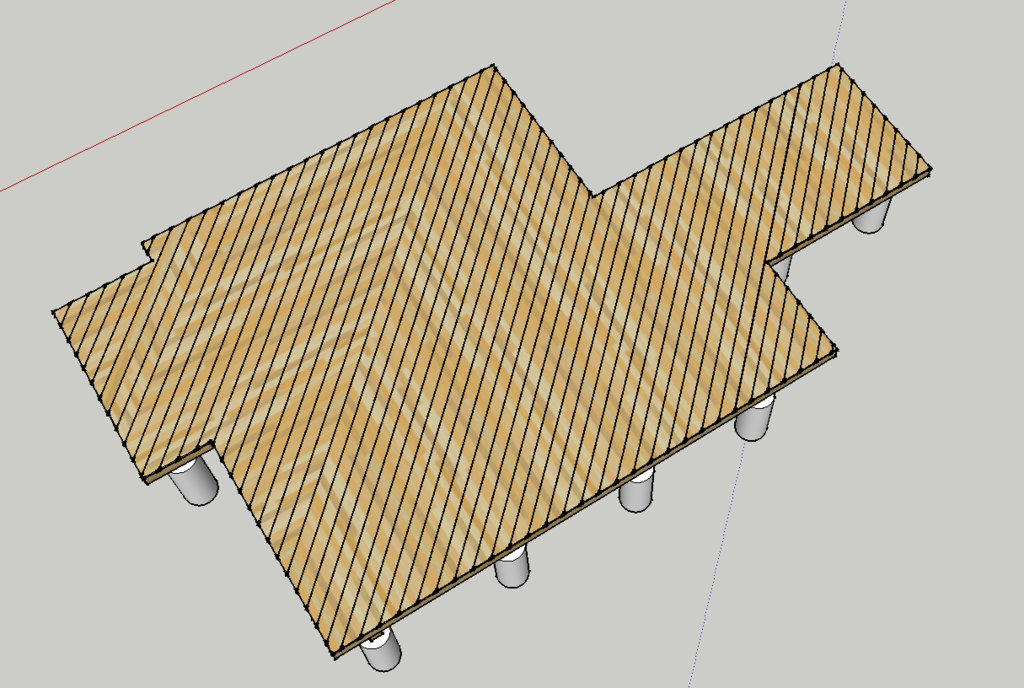
Top layer
All of my research on spans has been based on TRADA span tables, I've worked to commercial loadings as I just don't want to get this wrong.
I struggled to find much information from building raised platforms/supported decks, especially on a slope so a lot of the information and building hints I've taken have come from the US where this kind of thing is done a lot.
That's caused fun trying to find the fittings, what's a simple walk into a HomeDepot is a hunt for a UK equivalent. Simpson have amount of information for building decks, the show which fitting to use where but the majority of the fittings can't be bought in the UK.
LUS26z joist hangers aren't available in the UK, post caps that are $10 are closer to £60 from a uk supplier, 6x6 post bases have limited choices. That kind of thing just adds to the cost and time spent trying to find equivalents!
I tried to map out the terrain in sketchup but roots, pipes, services etc always get in the way so things have had to be adjusted a bit, including the addition of an extra post.
My plan for the top row is a concrete trench with the post bases on/in
Bearers
Joists
Top layer
All of my research on spans has been based on TRADA span tables, I've worked to commercial loadings as I just don't want to get this wrong.
I struggled to find much information from building raised platforms/supported decks, especially on a slope so a lot of the information and building hints I've taken have come from the US where this kind of thing is done a lot.
That's caused fun trying to find the fittings, what's a simple walk into a HomeDepot is a hunt for a UK equivalent. Simpson have amount of information for building decks, the show which fitting to use where but the majority of the fittings can't be bought in the UK.
LUS26z joist hangers aren't available in the UK, post caps that are $10 are closer to £60 from a uk supplier, 6x6 post bases have limited choices. That kind of thing just adds to the cost and time spent trying to find equivalents!
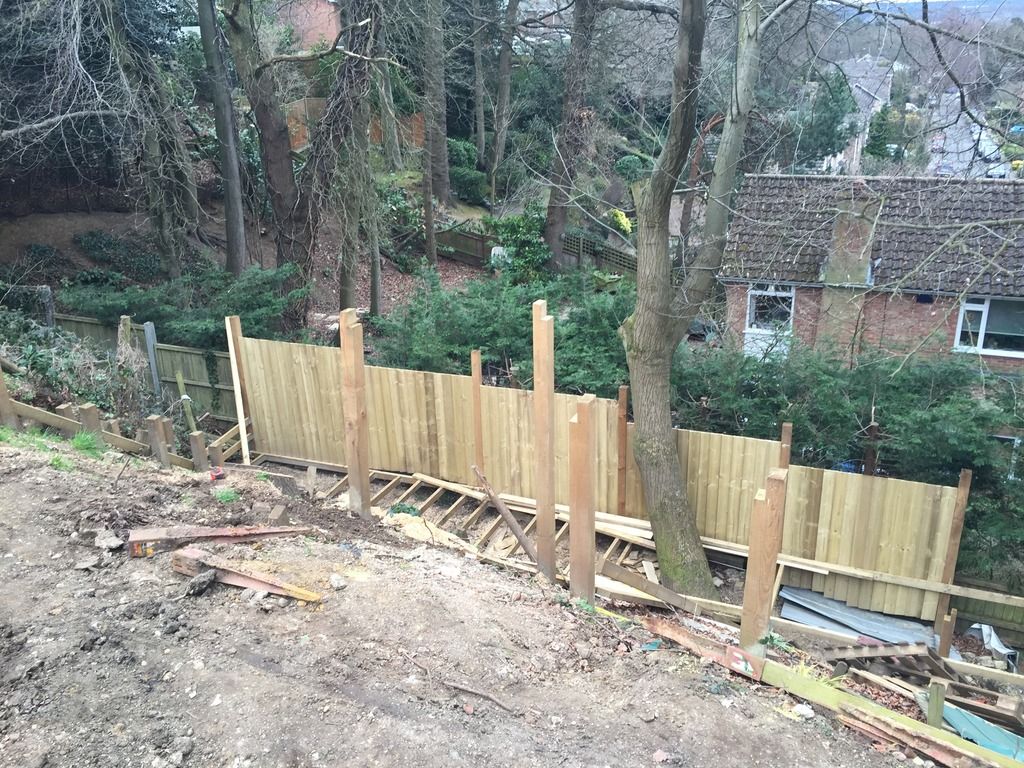
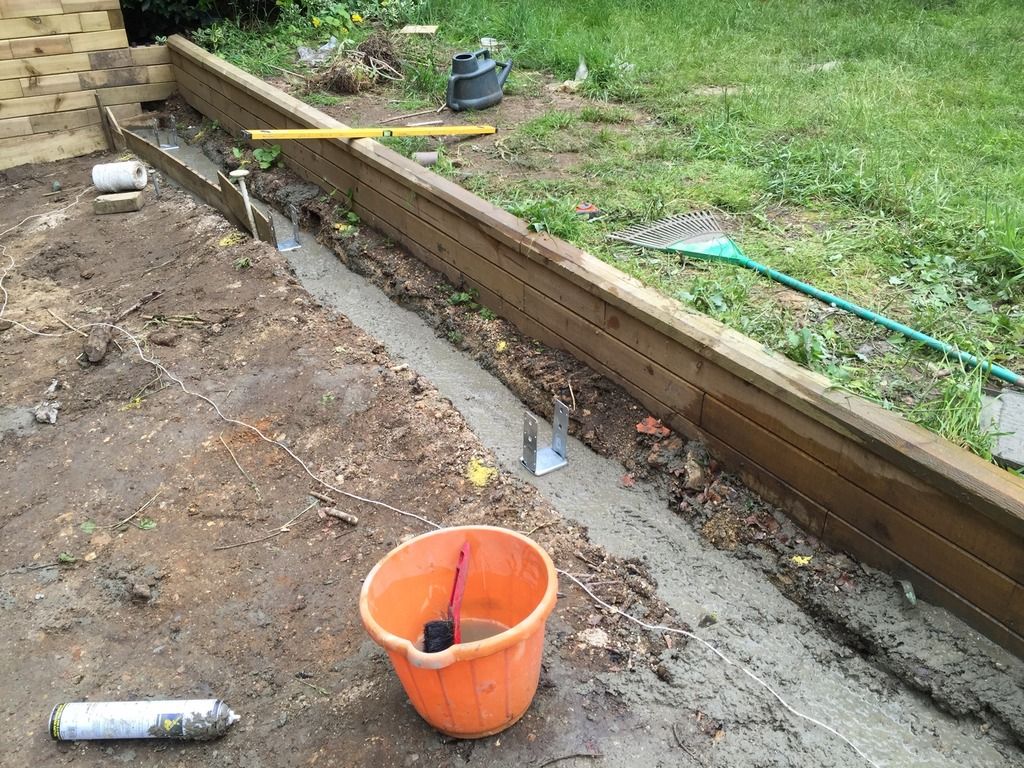
There's been some progress!
All of the holes are now backfilled and the concrete is due to be pumped in tomorrow. Most of the old posts are out, not one of them had more than half a bag of postcrete and they were all about 45cm deep!
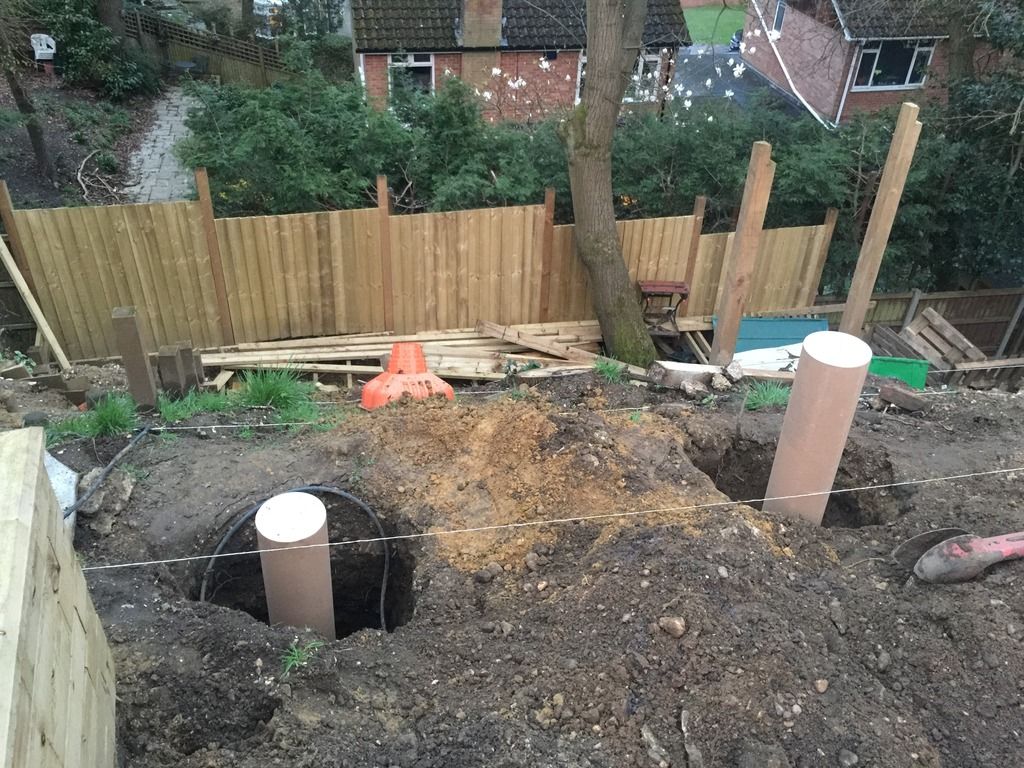
Tubes in place
Looking up from the bottom of the slope
From the top looking down
All of the holes are now backfilled and the concrete is due to be pumped in tomorrow. Most of the old posts are out, not one of them had more than half a bag of postcrete and they were all about 45cm deep!
Tubes in place
Looking up from the bottom of the slope
From the top looking down
Well for a change the British weather actually helped me, it didn't rain.
This morning was spent setting the level on the trench at the top of the slope and setting the position of the supports for it.
I had a window of 12-2 for the concrete and was ready to go well before the call telling me he was on his way.
He checked over what I was doing, laughed a lot at the slope and mentioned that the hose will get heavy!

Mixamate were great, they did their best to make sure I actually needed the pump and didn't just want a toy to play with, they give me a guide price based on 2 cubic metres, which was my estimate with the trench.
It took 30 minutes to get the hoses out and the mixture ready to go.
Then the fun began, I would have loved to have got some pictures but the pump, even on it's lowest flow, was doing an average pier in less than a minute.
It was all I could do to stay upright and not pour concrete down the slope more than once! Calling when to turn the pump off was a dark art, gravity lower down the slope helped as I could shut it off earlier and let the flow of the mix in the pipe fill out the tubes. The flow came in waves and I tended to call the shut off when the level was one wave below the top. By the time my Dad had run to the front of the house and called the shut ,I'd topped the tube as close to the top and then moved the hose to a bucket.
We tried using the house phones as intercoms (mobile signal is just too patchy for call drops) but that failed on the first tube, they couldn't hear my screams for STOP which lead to me having to aim a flipping heavy tube and trying to arc the concrete into the neighbouring tube when I couldn't get it any closer! My aim sucks so we switched to the relay and slowed it down. It only took 20 minutes to do all of the tubes and the trench.
If I hadn't had the little slip I would have been bang on with the mixture level, as it was I was about a barrow load short so wasn't able to top off some of the tubes as I wanted.
You can see my spillage at the bottom!
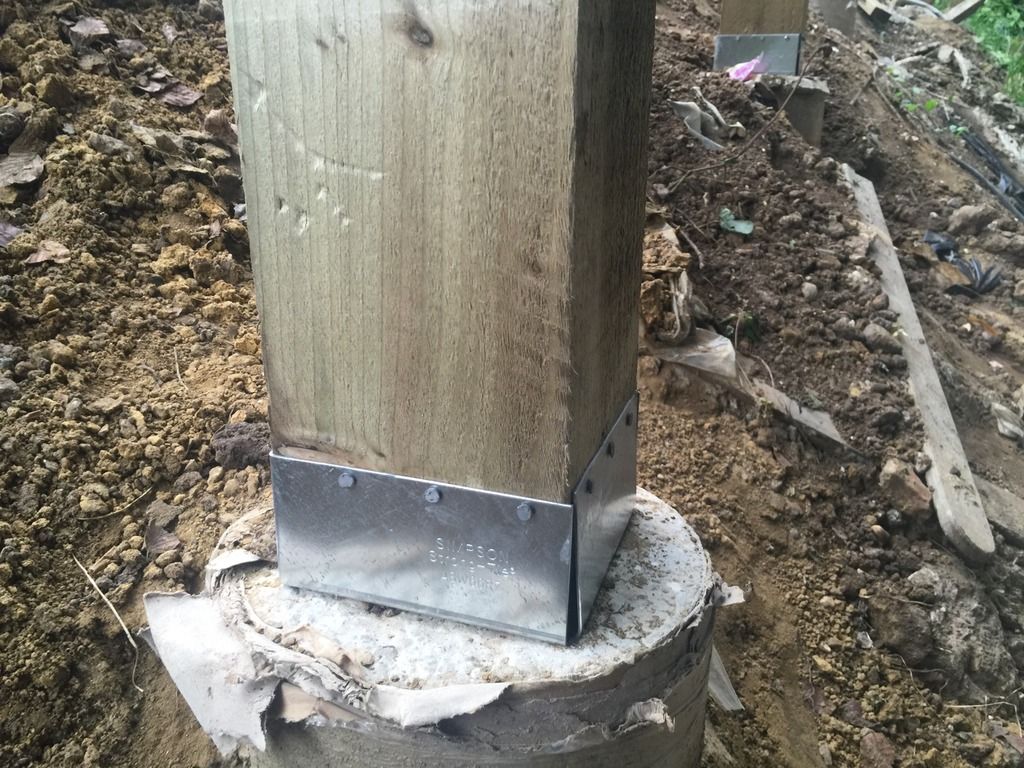
It didn't take long to get the post bases in the trench and get them lined up, this is my ledger board, unlike the other bases this one will have two 2x10s bolted/screwed together and placed straight onto the footings. I'll then use joist hangers to take the deck frame joists out to the 3 bearer joists.
Now I just need to wait for it cure completely and I can get the anchors drilled and chemically bonded into the bases and then work out how much timber I need to order! The bases that didn't quite brim will get the top of the tubes trimmed down so there's nowhere for water to pool.
The costs of the foundations are quite shocking when you consider it won't be seen once the deck is up!
This morning was spent setting the level on the trench at the top of the slope and setting the position of the supports for it.
I had a window of 12-2 for the concrete and was ready to go well before the call telling me he was on his way.
He checked over what I was doing, laughed a lot at the slope and mentioned that the hose will get heavy!
Mixamate were great, they did their best to make sure I actually needed the pump and didn't just want a toy to play with, they give me a guide price based on 2 cubic metres, which was my estimate with the trench.
It took 30 minutes to get the hoses out and the mixture ready to go.
Then the fun began, I would have loved to have got some pictures but the pump, even on it's lowest flow, was doing an average pier in less than a minute.
It was all I could do to stay upright and not pour concrete down the slope more than once! Calling when to turn the pump off was a dark art, gravity lower down the slope helped as I could shut it off earlier and let the flow of the mix in the pipe fill out the tubes. The flow came in waves and I tended to call the shut off when the level was one wave below the top. By the time my Dad had run to the front of the house and called the shut ,I'd topped the tube as close to the top and then moved the hose to a bucket.
We tried using the house phones as intercoms (mobile signal is just too patchy for call drops) but that failed on the first tube, they couldn't hear my screams for STOP which lead to me having to aim a flipping heavy tube and trying to arc the concrete into the neighbouring tube when I couldn't get it any closer! My aim sucks so we switched to the relay and slowed it down. It only took 20 minutes to do all of the tubes and the trench.
If I hadn't had the little slip I would have been bang on with the mixture level, as it was I was about a barrow load short so wasn't able to top off some of the tubes as I wanted.
You can see my spillage at the bottom!
It didn't take long to get the post bases in the trench and get them lined up, this is my ledger board, unlike the other bases this one will have two 2x10s bolted/screwed together and placed straight onto the footings. I'll then use joist hangers to take the deck frame joists out to the 3 bearer joists.
Now I just need to wait for it cure completely and I can get the anchors drilled and chemically bonded into the bases and then work out how much timber I need to order! The bases that didn't quite brim will get the top of the tubes trimmed down so there's nowhere for water to pool.
The costs of the foundations are quite shocking when you consider it won't be seen once the deck is up!
Great thread chockymonster
I'm considering a raised deck but not on the scale of this.
I may also consider the Mixamate pumping truck for the slab I'd like to put at the bottom of the garden for a summerhouse/shed/mancave. Was it any more expensive to have the pump?
We have no rear access to the garden and don't fancy barrowing it down or lugging all the materials to mix it at the point of laying so mix and pump would be ideal.
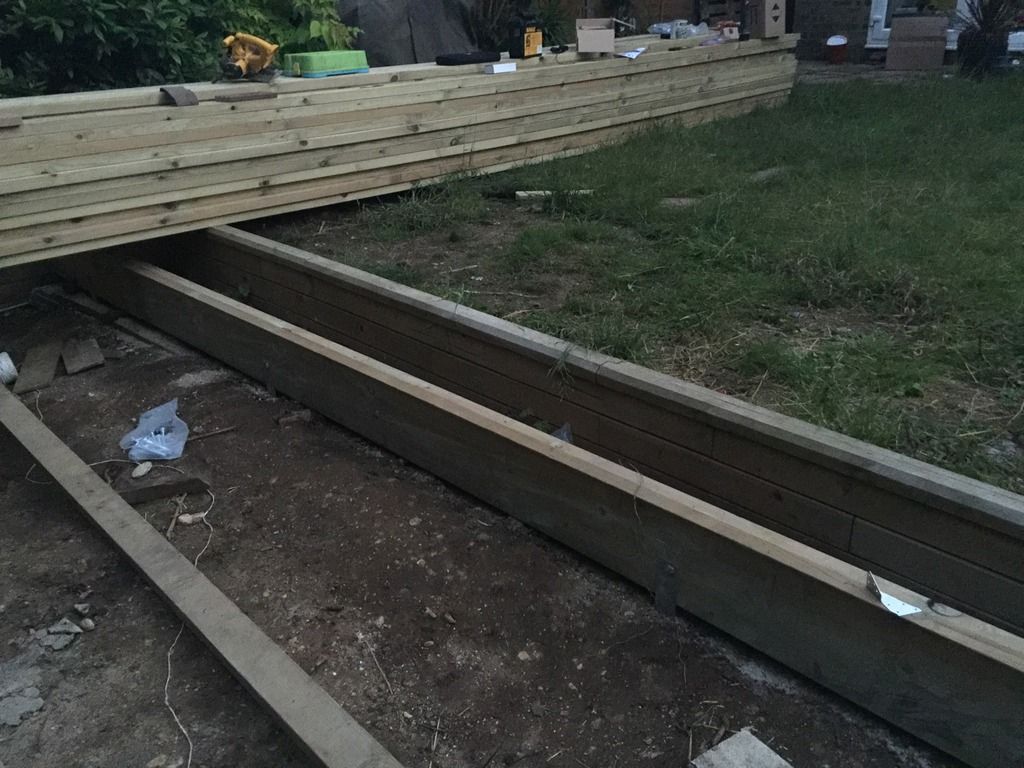
All the way through designing this I knew that it was going to be fairly large, but it was only the timber arriving that I realised how big!
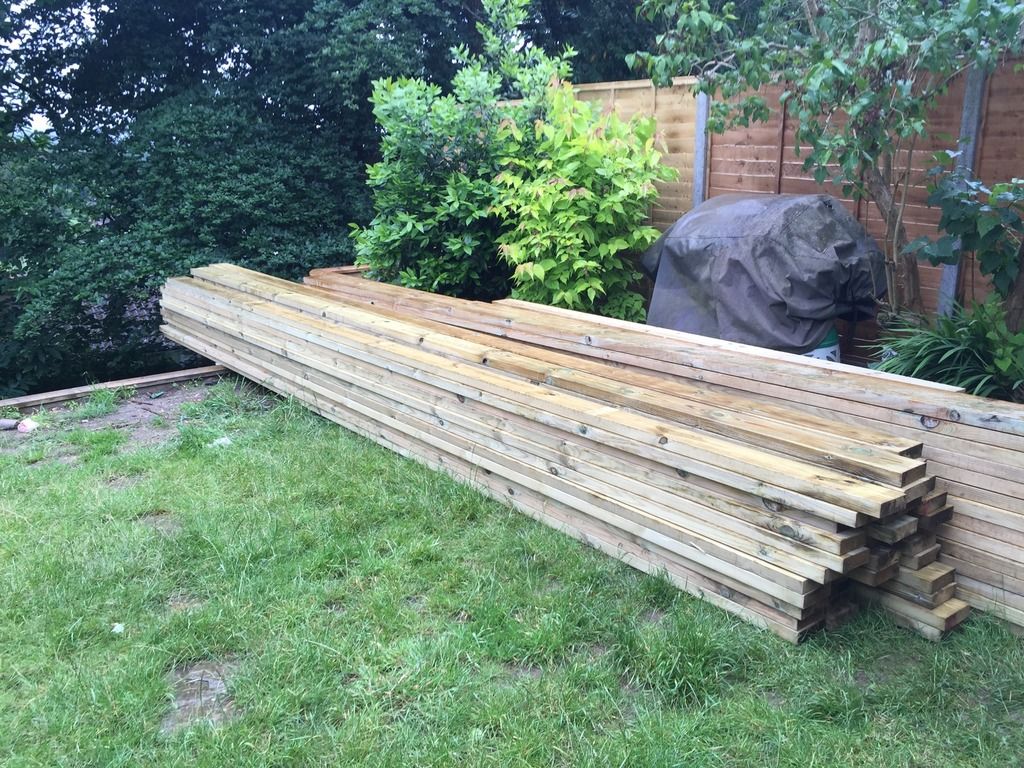
I have 8 150mm 3 metre posts, 14 250x47mm 5.4 metre bearer boards and 35 150x47 joists.
My wife wants the wood moved off the grass this weekend, I can't see that happening somehow!
I have 8 150mm 3 metre posts, 14 250x47mm 5.4 metre bearer boards and 35 150x47 joists.
My wife wants the wood moved off the grass this weekend, I can't see that happening somehow!

Another day working on this with my Dad and we got a fair bit done but not a lot to look at!
I started the day with the angle grinder and a diamond grinding cup to level and smooth the top of the concrete piers so the postbases would sit level. Having never worked with concrete before it would have been so much easier to smooth it out when wet but it got sorted in the end, albeit with a lot of dust!
All of the concrete piers have been drilled and I've bonded M12 A4 stainless studs using Fischer FIP 300SF resin. This didn't have a long work time and I got caught out with one of the holes as it had got too hard to put the rod in when I got to it, so it need drilling out and rebonding.
With the temperature today the resin was fully set after 60 minutes so all of the post bases were installed.
Whilst I was sorting the postbases, my Dad was sorting the top ledger board, 2 bits of 2x10 and some offcuts had it all sorted.
I've used 130mm M12 coach bolts and evil looking timber connectors to make everything hang together, I'll do the same with each bearer board.
Lots of postbases
With all of the postbases in place I needed to work out the exact heights for the post bases.
I'd bought a Dewalt self leveling laser level that was supposed to be super bright and ok for outdoor use. Well that was obviously an OK for outdoor use because it's rugged, not because you can actually see where the damn line is. I had to wait until 8pm to actually see it which makes it useless for what I need.
I used the ledger board, attached the level at the height of the bottom of where the 6x2 will sit. The joists will be approximately 20ft long so I'm allowing a 4 inch drop at the end bearer joist for water run off.
I used a couple of bits of feather edge screwed together as a big measurey stick and marked each joist bottom, I'll work out the run off as I go when cutting the posts.
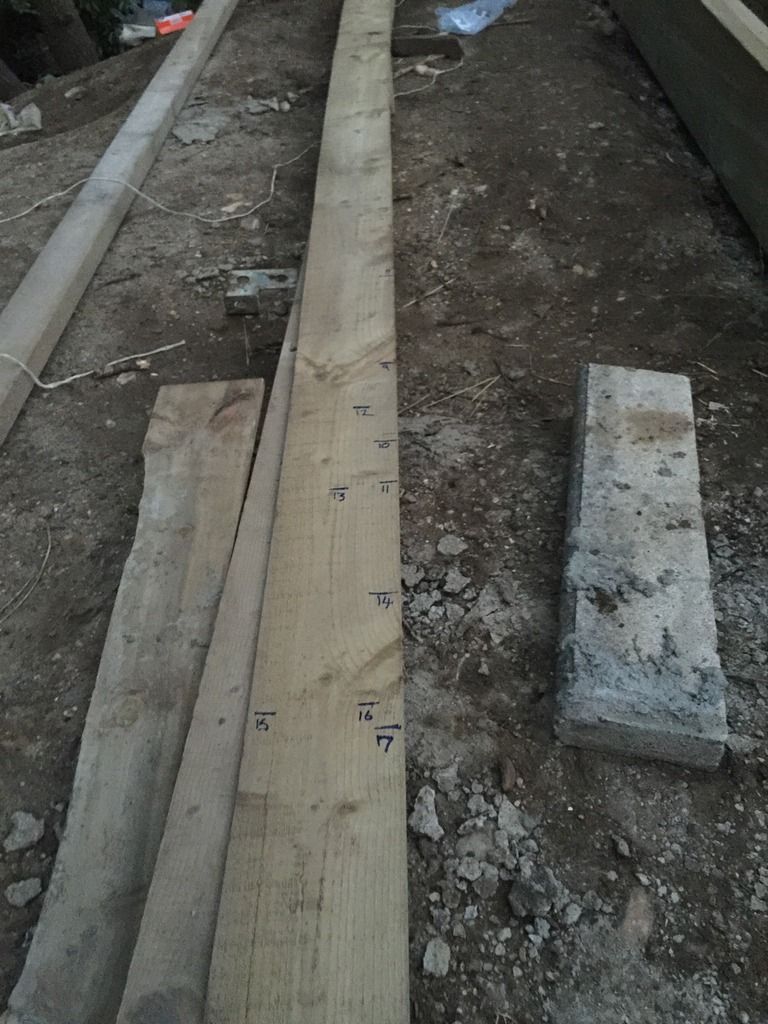
Because of the slope I'm wokring on getting the last bearer joists and the tall posts cut first. If I get all that bearer board sorted I can pust a couple of joists out to hold it in place and then mark the other posts against them.
I've got a plan of each post base numbered, it also gives a rough size of the deck area, but the final line for the far end will be set to the kitchen wall so that it looks square from there. I just can't figure that out on the plan. Every post has a number so I can mark wood/measurements etc
The piers look a bit higgledy piggledy, they're not that bad out in the ground, they're not as straight as I'd like but it's not going to cause an issue.
I could have used the big measurey stick but figured that if I can mark the big posts on the posts then I have a smaller chance of cocking up the transfer of marks!
The only problem was lifting 3m tall 6x6 posts into the post bases, keeping the posts upright and then marking them.
I picked post 5 as it's the shortest of the tall posts at just over 2 metres, with the water run off it'll be just under.
Post 1 is 2.78 metres tall as the slope falls off in two directions. I've got it marked but it wasn't fun balancing on a slippy slope whilst trying to stop a 3m 6x6 disappearing into next door's garden!
I'm going to try notching some of the posts over the week, if I can get that end bearer in then I can put some joists up to crack on.
I started the day with the angle grinder and a diamond grinding cup to level and smooth the top of the concrete piers so the postbases would sit level. Having never worked with concrete before it would have been so much easier to smooth it out when wet but it got sorted in the end, albeit with a lot of dust!
All of the concrete piers have been drilled and I've bonded M12 A4 stainless studs using Fischer FIP 300SF resin. This didn't have a long work time and I got caught out with one of the holes as it had got too hard to put the rod in when I got to it, so it need drilling out and rebonding.
With the temperature today the resin was fully set after 60 minutes so all of the post bases were installed.
Whilst I was sorting the postbases, my Dad was sorting the top ledger board, 2 bits of 2x10 and some offcuts had it all sorted.
I've used 130mm M12 coach bolts and evil looking timber connectors to make everything hang together, I'll do the same with each bearer board.
Lots of postbases
With all of the postbases in place I needed to work out the exact heights for the post bases.
I'd bought a Dewalt self leveling laser level that was supposed to be super bright and ok for outdoor use. Well that was obviously an OK for outdoor use because it's rugged, not because you can actually see where the damn line is. I had to wait until 8pm to actually see it which makes it useless for what I need.
I used the ledger board, attached the level at the height of the bottom of where the 6x2 will sit. The joists will be approximately 20ft long so I'm allowing a 4 inch drop at the end bearer joist for water run off.
I used a couple of bits of feather edge screwed together as a big measurey stick and marked each joist bottom, I'll work out the run off as I go when cutting the posts.
Because of the slope I'm wokring on getting the last bearer joists and the tall posts cut first. If I get all that bearer board sorted I can pust a couple of joists out to hold it in place and then mark the other posts against them.
I've got a plan of each post base numbered, it also gives a rough size of the deck area, but the final line for the far end will be set to the kitchen wall so that it looks square from there. I just can't figure that out on the plan. Every post has a number so I can mark wood/measurements etc
The piers look a bit higgledy piggledy, they're not that bad out in the ground, they're not as straight as I'd like but it's not going to cause an issue.
I could have used the big measurey stick but figured that if I can mark the big posts on the posts then I have a smaller chance of cocking up the transfer of marks!
The only problem was lifting 3m tall 6x6 posts into the post bases, keeping the posts upright and then marking them.
I picked post 5 as it's the shortest of the tall posts at just over 2 metres, with the water run off it'll be just under.
Post 1 is 2.78 metres tall as the slope falls off in two directions. I've got it marked but it wasn't fun balancing on a slippy slope whilst trying to stop a 3m 6x6 disappearing into next door's garden!
I'm going to try notching some of the posts over the week, if I can get that end bearer in then I can put some joists up to crack on.
Marking, measuring and cutting, that's all I seem to do!
The good weather in the evenings has meant I can sneak another couple of hours after work in the garden.
By the end of Wednesday I'd got 3 posts up and part of a bearer joist in place
Working past the 3rd post on my own was just impossible, the weight of the bearer joists (5.4m 2 x 10 planks) are too heavy to lift and manoeuvre when the posts they sit on are 2m plus in height. I was also finding it difficult to get the holes drilled for the coach bolts whist supporting the beam and balancing.
I had some help on the weekend to finish the furthest row, I'd also had some time to look at options for the coach bolts.
I came across a product by Fastenmaster , called a thrubolt, which replaces the bolt and is fitted with an impact driver. I guess it was taking me 15 minutes or so per post to drill, fit and ratchet up the bolts. These bolts are taking less than a minute each and make it so much easier to fit and support.
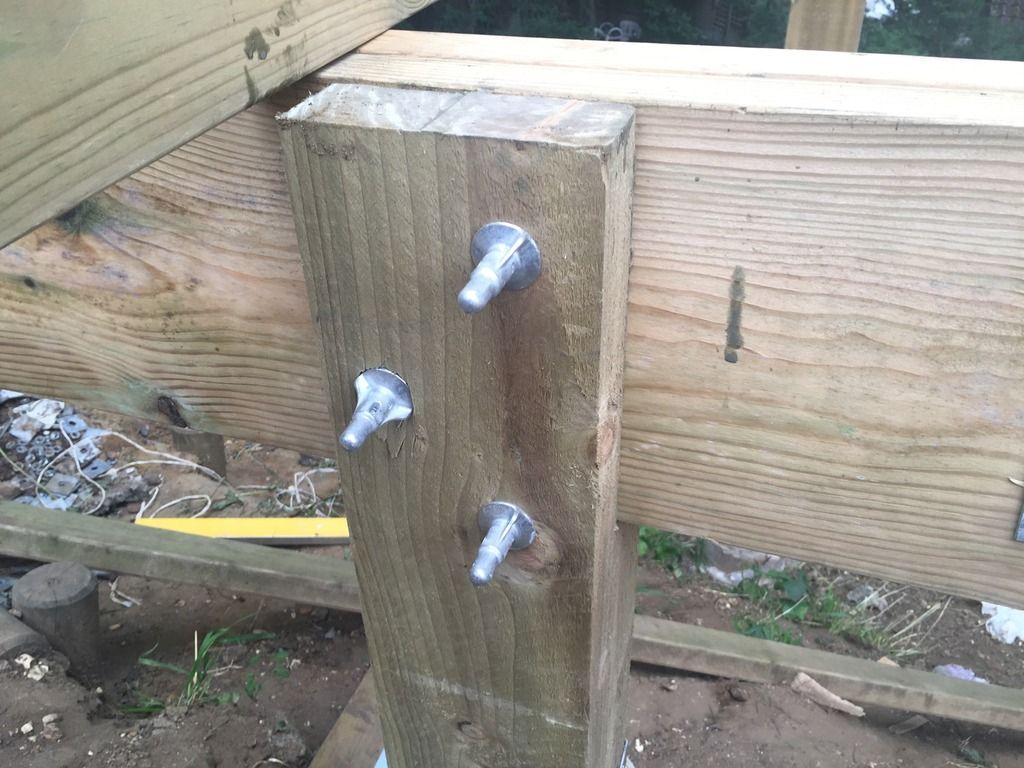
The bolts were expensive and I needed to buy an impact driver but it's made such a difference to fitting the posts that I don't mind so much.
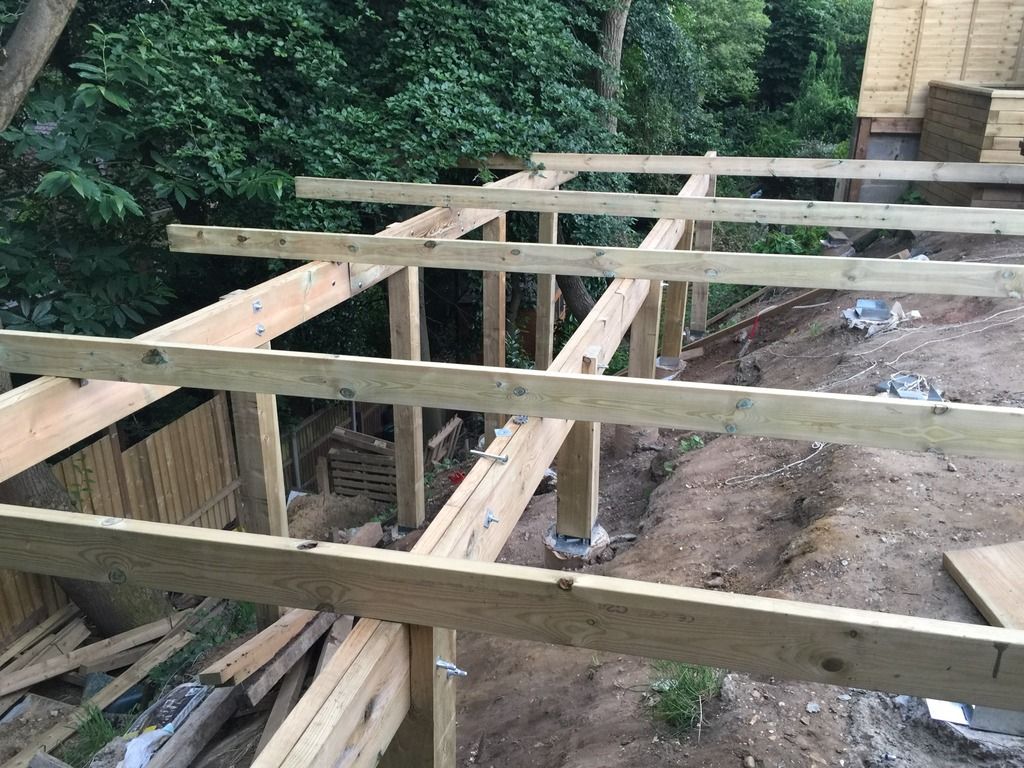
By the end of Saturday I was here
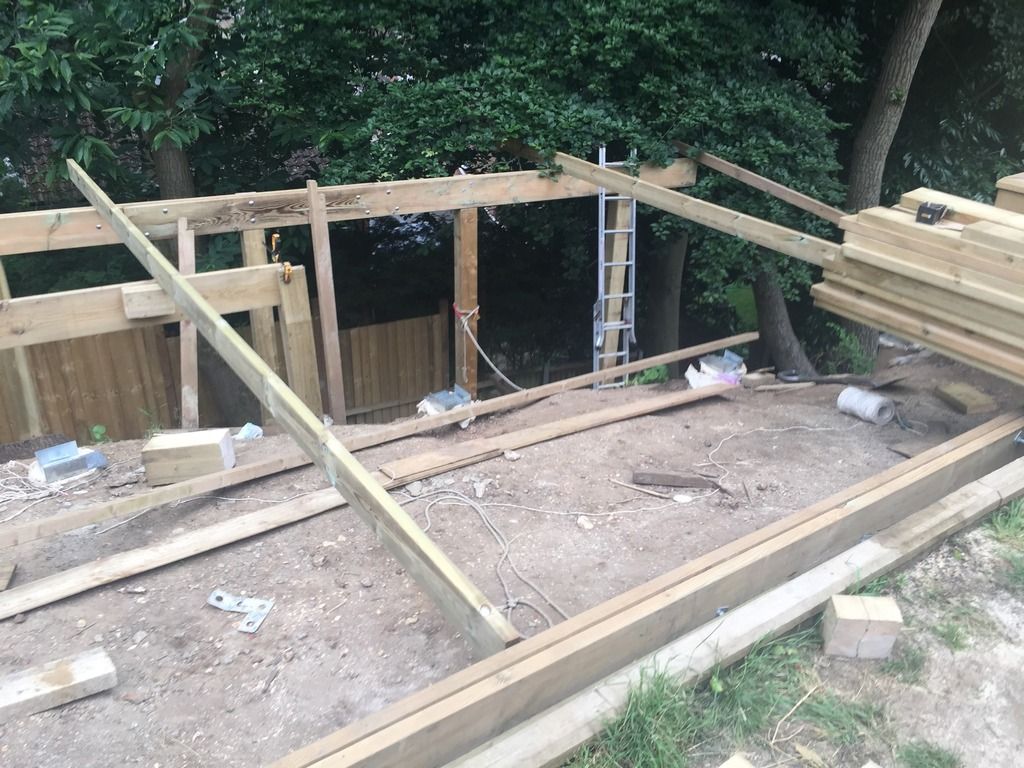
Sunday was a bit slower in progress, I was on my own for the majority of it and it's just not as easy measuring and supporting the large joists, but having only fallen down the slope twice holding a joist, I'm not doing too badly for bruises!
Which brings the end of the weekend to here and two installed bearer joists.
I need to add some more coachbolts into the newer joist but it's in place and is solid.
The one thing I'm realising is that drawing it out on paper is one thing, but when you see it coming together it looks so much bigger!

The good weather in the evenings has meant I can sneak another couple of hours after work in the garden.
By the end of Wednesday I'd got 3 posts up and part of a bearer joist in place
Working past the 3rd post on my own was just impossible, the weight of the bearer joists (5.4m 2 x 10 planks) are too heavy to lift and manoeuvre when the posts they sit on are 2m plus in height. I was also finding it difficult to get the holes drilled for the coach bolts whist supporting the beam and balancing.
I had some help on the weekend to finish the furthest row, I'd also had some time to look at options for the coach bolts.
I came across a product by Fastenmaster , called a thrubolt, which replaces the bolt and is fitted with an impact driver. I guess it was taking me 15 minutes or so per post to drill, fit and ratchet up the bolts. These bolts are taking less than a minute each and make it so much easier to fit and support.
The bolts were expensive and I needed to buy an impact driver but it's made such a difference to fitting the posts that I don't mind so much.
By the end of Saturday I was here
Sunday was a bit slower in progress, I was on my own for the majority of it and it's just not as easy measuring and supporting the large joists, but having only fallen down the slope twice holding a joist, I'm not doing too badly for bruises!
Which brings the end of the weekend to here and two installed bearer joists.
I need to add some more coachbolts into the newer joist but it's in place and is solid.
The one thing I'm realising is that drawing it out on paper is one thing, but when you see it coming together it looks so much bigger!
Progress has been made, it's just slow going and a bit mind numbing!
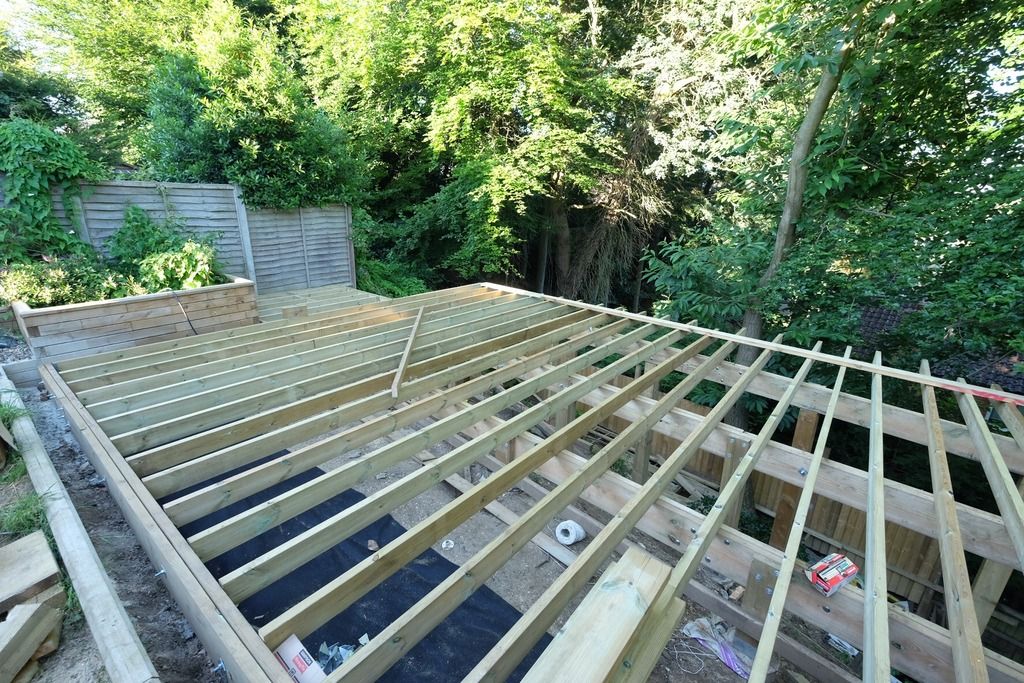
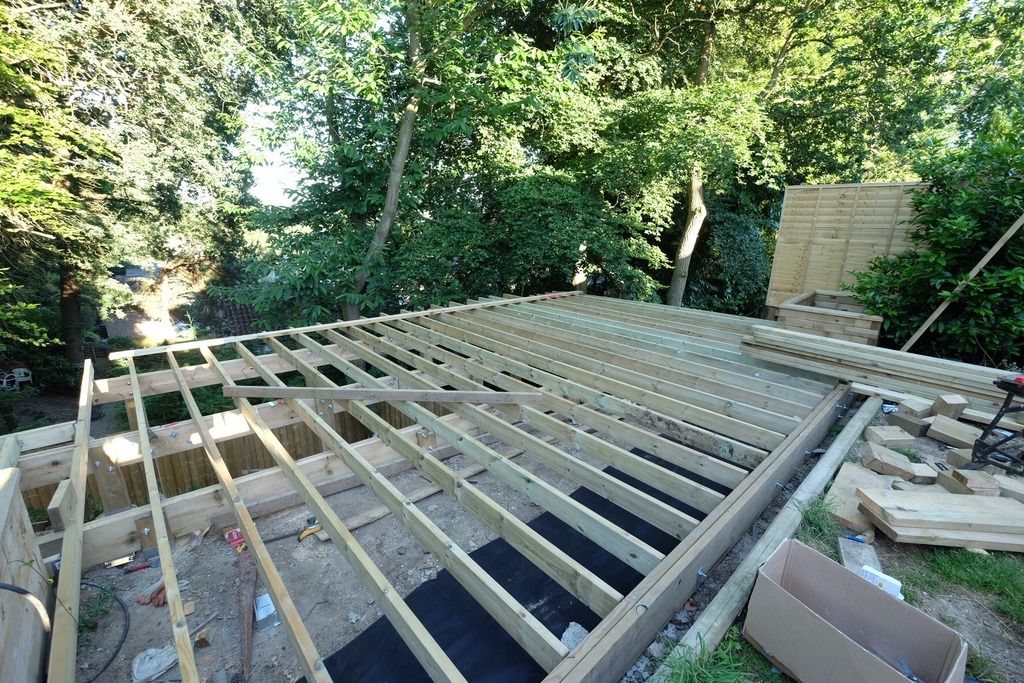
The deck structure is pretty much complete, I didn't take pictures of the noggins, I didn't find them interesting so I can't see how anyone would want to look at pictures of them! They're positioned halfway between the bearer rows to stop any twist, the only fun part was using a nail gun, but that gets boring after a while!
With the deck structure in place we then needed to decide on what to use for the top layer. Shortlists at the beginning was always softwood and staining, but reading threads on this and knowing that I'm inherently lazy, I only managed to treat one of my garden chairs and the rest has rotted away, I started to look at other options.
I got some samples in,
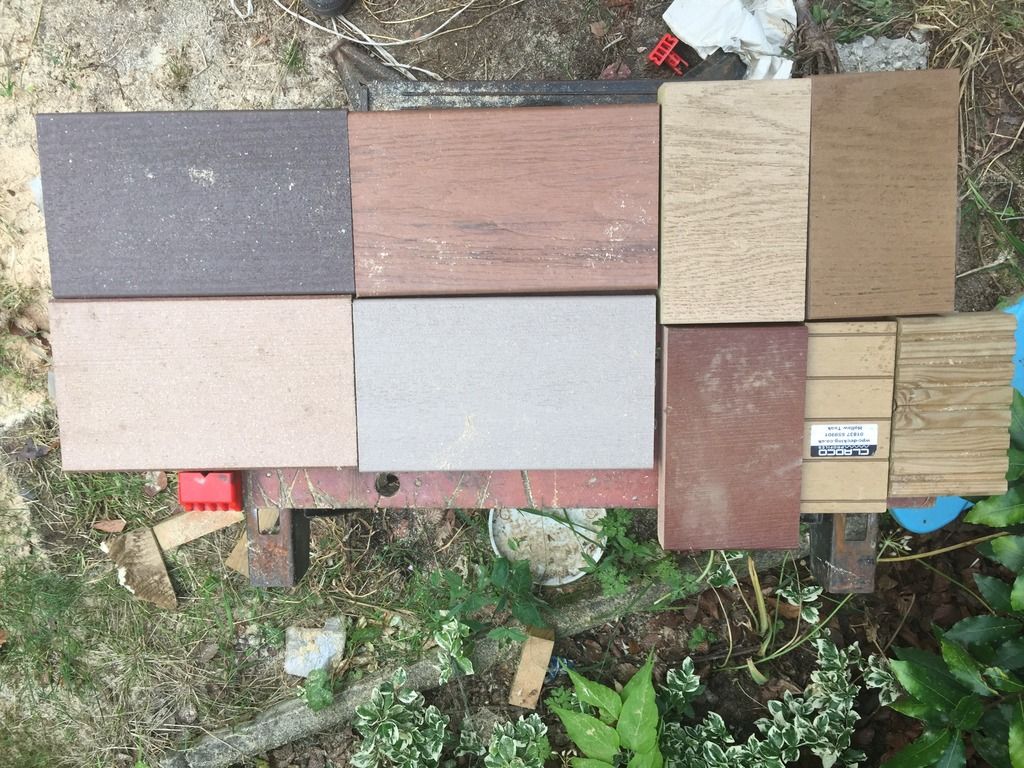
Going clockwise from top left
Timbertech Easyclean Elm, Timbertech Easyclean Tropical Teak, Millboard Golden Oak, Millboard Coppered Oak
Qdeck Softwood (wrong way up) Cladco teak, Millboard Jarrah, Timbertech Easyclean Birch, Timbertech eDeck Cedar.
Timbertech was our first choice, I liked what I'd seen on their website and brochure, the problem was that the colours of the product bear no resemblance to the brochures and they look plastic, none of the colours worked with the existing softwood planters in the garden and they didn't contrast enough either. The Qdeck stuff was ruled out because I was lazy and the cladco stuff because it looked cheap even though it wasn't. That left the Millboard which I really liked, the boards are plastic but moulded from planks of Oak so they're not identical, but looked expensive in comparison to the others, also there's currently a long lead time because they've had an issue with the machines that make the boards.
Quotes for both the timbertech and the millboard were requested, the millboard was actually cheaper, which was a surprise, I just needed to overcome the 10 week lead time. The company I'd got the fixings from (www.exteriordecking.co.uk) and had been very helpful in the past didn't hold stock, so as much as I wanted to use them I couldn't put the project on hold until November out of loyalty, laziness plus cold weather would make things drag out! I found that a company called London Stone (www.londonstone.co.uk) held stock and could deliver next day. So decision made.
78 Boards (50 square metres), a load of stainless steel screws, some edging and touch up paint were delivered and the top layer could start to go down. There were some damaged boards but these were replaced next day.
Installation of the top layer started, this is when I realised how much easier it would have been if I'd known what boards were being used prior to laying the joists because I could have ensured that I didn't need to cut the boards to length. Unfortunately I didn't so trimming and touching up the ends of the boards is a necessity. I'd also have made sure that the edges were square to the deck boards so funny cuts weren't required!
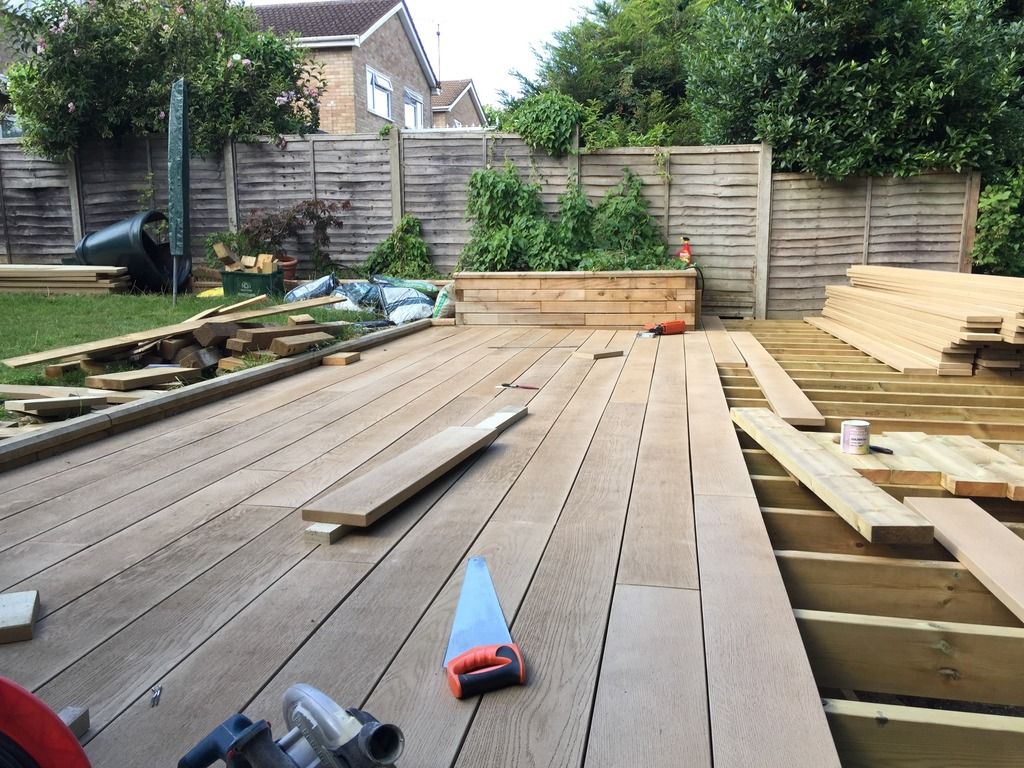
As of last night this is where I am
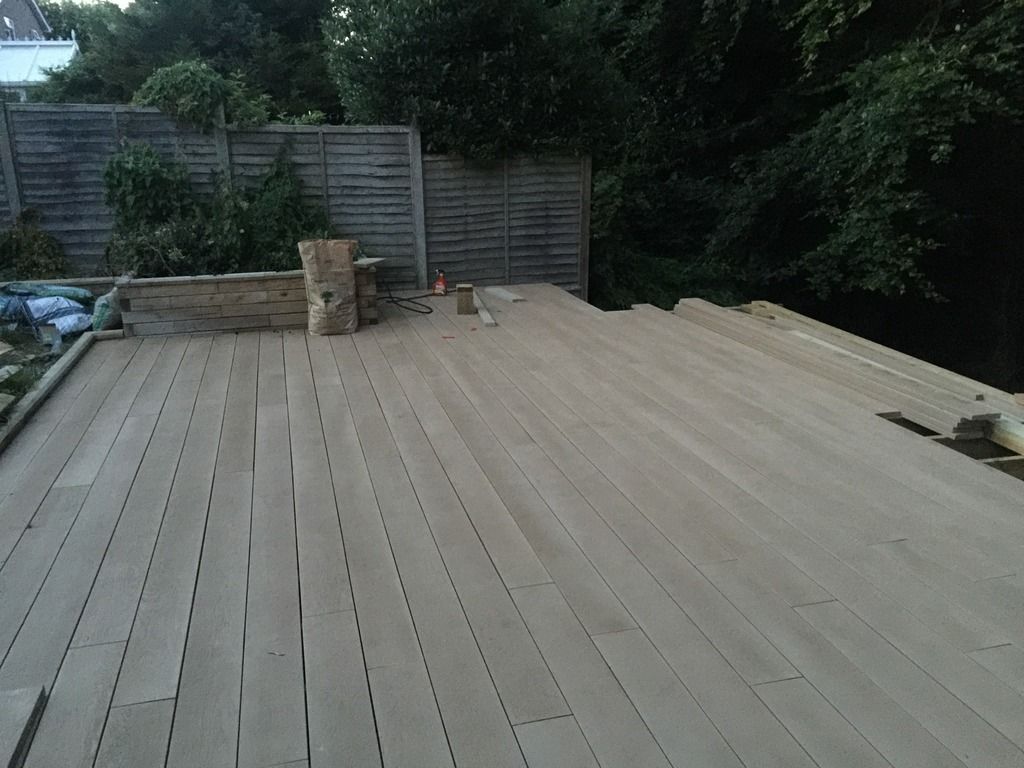
I guess there are 10 boards left to put down and then I need to sort out a railing.
The deck structure is pretty much complete, I didn't take pictures of the noggins, I didn't find them interesting so I can't see how anyone would want to look at pictures of them! They're positioned halfway between the bearer rows to stop any twist, the only fun part was using a nail gun, but that gets boring after a while!
With the deck structure in place we then needed to decide on what to use for the top layer. Shortlists at the beginning was always softwood and staining, but reading threads on this and knowing that I'm inherently lazy, I only managed to treat one of my garden chairs and the rest has rotted away, I started to look at other options.
I got some samples in,
Going clockwise from top left
Timbertech Easyclean Elm, Timbertech Easyclean Tropical Teak, Millboard Golden Oak, Millboard Coppered Oak
Qdeck Softwood (wrong way up) Cladco teak, Millboard Jarrah, Timbertech Easyclean Birch, Timbertech eDeck Cedar.
Timbertech was our first choice, I liked what I'd seen on their website and brochure, the problem was that the colours of the product bear no resemblance to the brochures and they look plastic, none of the colours worked with the existing softwood planters in the garden and they didn't contrast enough either. The Qdeck stuff was ruled out because I was lazy and the cladco stuff because it looked cheap even though it wasn't. That left the Millboard which I really liked, the boards are plastic but moulded from planks of Oak so they're not identical, but looked expensive in comparison to the others, also there's currently a long lead time because they've had an issue with the machines that make the boards.
Quotes for both the timbertech and the millboard were requested, the millboard was actually cheaper, which was a surprise, I just needed to overcome the 10 week lead time. The company I'd got the fixings from (www.exteriordecking.co.uk) and had been very helpful in the past didn't hold stock, so as much as I wanted to use them I couldn't put the project on hold until November out of loyalty, laziness plus cold weather would make things drag out! I found that a company called London Stone (www.londonstone.co.uk) held stock and could deliver next day. So decision made.
78 Boards (50 square metres), a load of stainless steel screws, some edging and touch up paint were delivered and the top layer could start to go down. There were some damaged boards but these were replaced next day.
Installation of the top layer started, this is when I realised how much easier it would have been if I'd known what boards were being used prior to laying the joists because I could have ensured that I didn't need to cut the boards to length. Unfortunately I didn't so trimming and touching up the ends of the boards is a necessity. I'd also have made sure that the edges were square to the deck boards so funny cuts weren't required!
As of last night this is where I am
I guess there are 10 boards left to put down and then I need to sort out a railing.
Gassing Station | Homes, Gardens and DIY | Top of Page | What's New | My Stuff