My garage - tips, ideas and recommendations please
Discussion


Hi PH'ers,
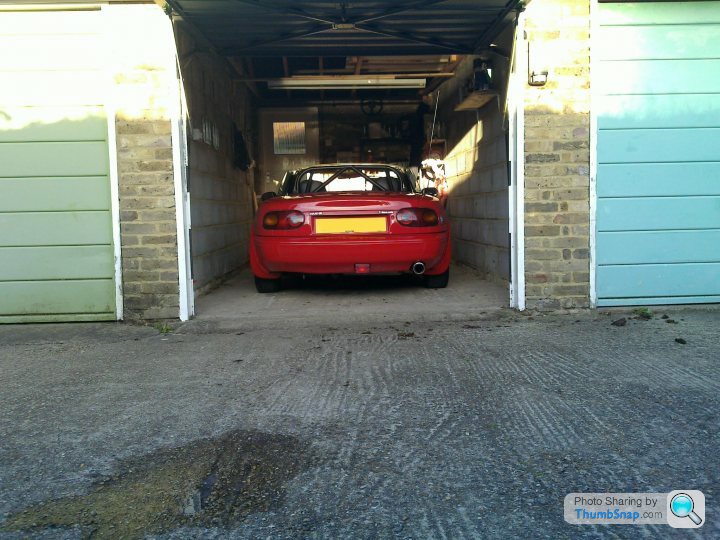
I have recently brought my first house which came with a small garage. My '5 just fits, but as you can see, space is at a premium:
I've brought a few tools and have a large collection of old wood working tools from my Grandad, and I want to store them all in the garage in a tidy and accessible way. However, after neary seven years of studying IT my DIY skills are pretty much non-existant so your help is required.
I want to paint the walls white, and put up a couple of EVO prints. Maybe put a strip of carpet on the wall to save the doors... but otherwise, has anyone got any suggestions on how best to store the tools? Any cool ideas to make the most of the wall space?
Also, the side walls are breeze block - will I have to treat these before painting? They seem quite porous and I'm worried the paint will be soaked up like a sponge.
Thanks,
J
P.S. SWMBO has been banned from putting her stuff in the garage, so no worries there. She gets the house for that
GingerWizard said:
No idea with the shelves.
Regarding the walls, get a big 15litre tub of white paint and get a litre of pva glue, mix into the paint with a little water and bobs your uncle, should cost no more then 30 with rollers.
Gwiz
Done, cost £25 all in (joys of working near Wilkos..) but the PVA tub instructions state I should mix one part PVA with three or four parts water and apply this before the paint. Is it better to do this or mix straight into the paint?Regarding the walls, get a big 15litre tub of white paint and get a litre of pva glue, mix into the paint with a little water and bobs your uncle, should cost no more then 30 with rollers.
Gwiz
pmanson said:
I would put some ex display kitchen cupboards along the rear wall
Above that either some adjustable shelves or that tool board stuff where you hang your tools from little hooks.
Yup, like this. I'm on a limited budget and have brought some plastic wall mounted draws and tool rack from EBay already, but will keep an eye out on freecycle in case anyone is getting rid of kitchen cupboads...Above that either some adjustable shelves or that tool board stuff where you hang your tools from little hooks.
Steve_W said:
Do you have any room in the roof?
Yes, there are chipboards laid across the rafters which I will remove and replace with some decent timber. I'm hatching a plan where I get some kind of folding board that hoists back to the rafters when not in use.....Paddy_N_Murphy said:
I have a combination of the above. (and same car )
Narrow shelves on the Left hand side with Paint tins, and crap.
Lots of nails and hooks on the left for Garden Tools etc.
Oh and a Golfball on a string to stop me in 'just' the right place.
You have good taste in cars )Narrow shelves on the Left hand side with Paint tins, and crap.
Lots of nails and hooks on the left for Garden Tools etc.
Oh and a Golfball on a string to stop me in 'just' the right place.
- plus Loaded Calender type thing.
 Some good advice too, I like the golfball idea but I might replace with a tennis ball so as not to damage my paint work
Paddy_N_Murphy said:
If I remember I will post some pics if interested.
Pictures speak a thousand words 
dirty boy said:
Out of curiosity, what's the width of that garage?
Cheers
dirt
It is 2.5 metres inside the garage and 2.24 at the door. 5 Metres long.Cheers
dirt
I have cleared it out now and started clearing the huge amounts of dust out. Hate spiders, so went and got Henry and vacuumed the buggers up
Here are a couple of pics to get a better idea of what we are working with (all shelving and tat since been removed):
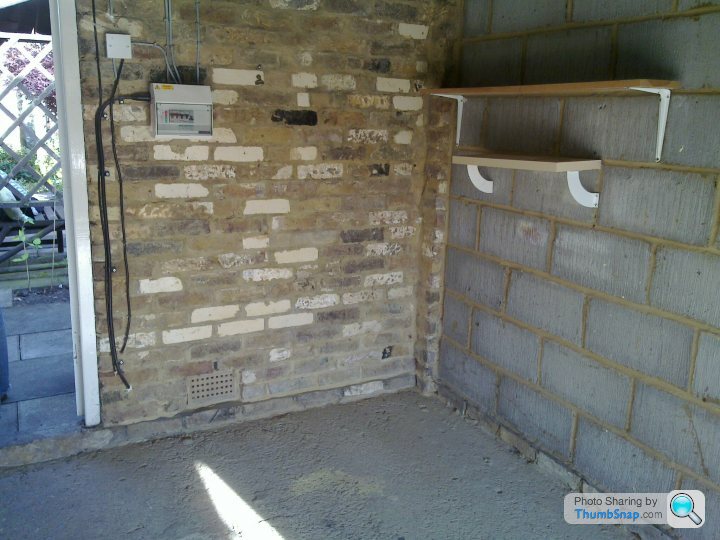

This week I am preparing the walls by brushing them down with a stiff bristled broom, a quick sandpaper, another brush then maybe a vacuum. Any other prep required for breeze block before I slap on the PVA/paint?
Edited by JFReturns on Tuesday 29th June 08:09
GingerWizard said:
- some paint advice
Gwiz
Paddy_N_Murphy said:
- some pics*
Streetrod said:
That thread was making me feel bad about how small my garage was until I saw this: 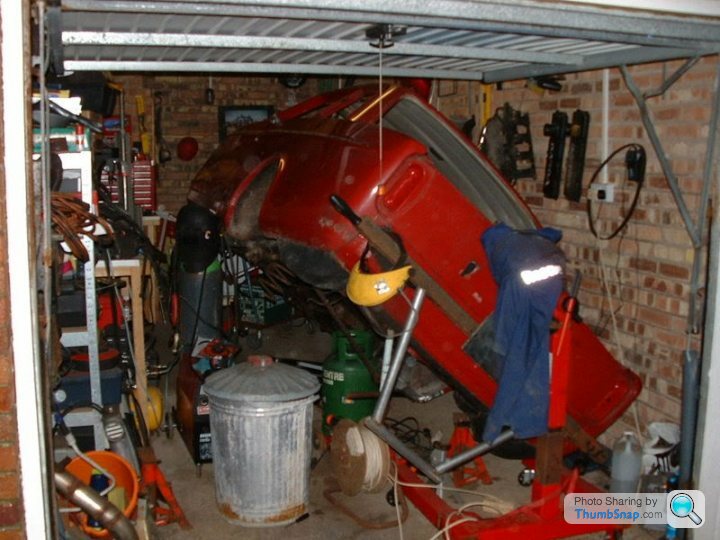
Last night I got rid of the final bits of dust and spiders webs ready for the paint stage (I got a weird look from my neighbour who saw me vacuuming the walls though...). Next step is to mask up the wires and lights. Also having a Sketchup done to play around with space, and woke up in the middle of the night with some genius space saving ideas... watch this ..erm.. space
Thanks for the tip, but Im not planning on keeping kitchen knives in the garage 
So, the garage is pretty much prepped and ready for painting this weekend. Need to rip out the 'orrible chalk board currently laid across the rafters (found a nice pool cue up there - bonus!)which I'll do tonight, and give a final sweep/vacuum.
Here are a couple of ideas on what it could look like:
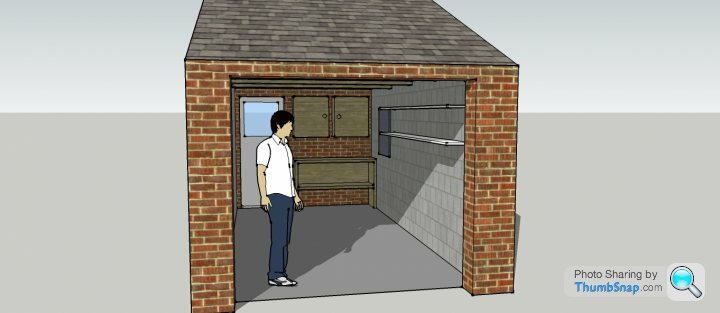
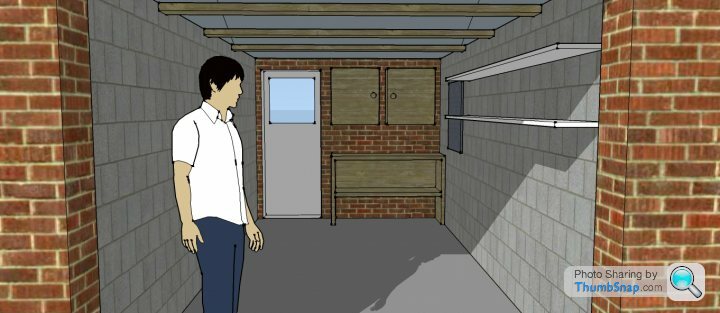

Just noticed the cupboard and workbench look like a cross eyed monster!
So, the garage is pretty much prepped and ready for painting this weekend. Need to rip out the 'orrible chalk board currently laid across the rafters (found a nice pool cue up there - bonus!)which I'll do tonight, and give a final sweep/vacuum.
Here are a couple of ideas on what it could look like:
Just noticed the cupboard and workbench look like a cross eyed monster!
Tumbler said:
This any good http://www.machinemart.co.uk/shop/product/details/...
Already got one very similar, thats what the grey bit is in the sketch up DocJock said:
Do you really want those shelves on the drivers side of the car?
Could make getting in and out a bit painful if you forget they're there.
No, I normally reverse in, hard to that wall so I have plenty of room to get out. The only problem with that is I will have to move the car to get to the shelves.... not sure about their position yet.Could make getting in and out a bit painful if you forget they're there.
Tumbler said:
You legend! Perfect for hanging my fishing rods Thanks! Edited by JFReturns on Friday 2nd July 08:23
Update after a weekend of graft! I've never done so much screwing 
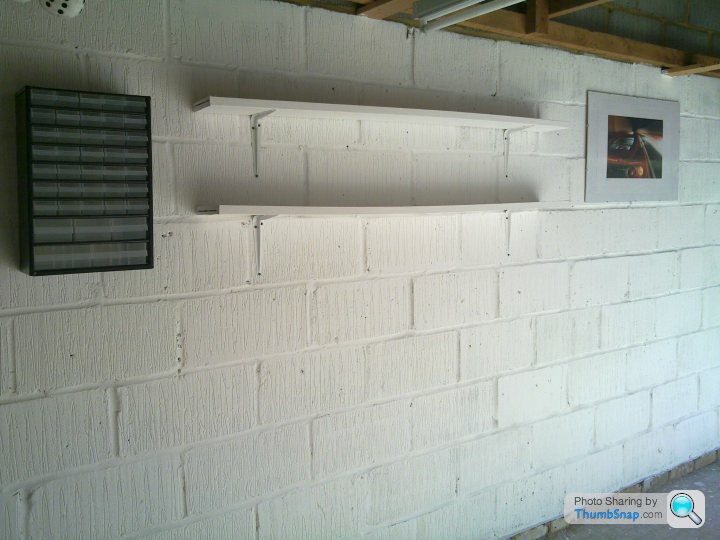
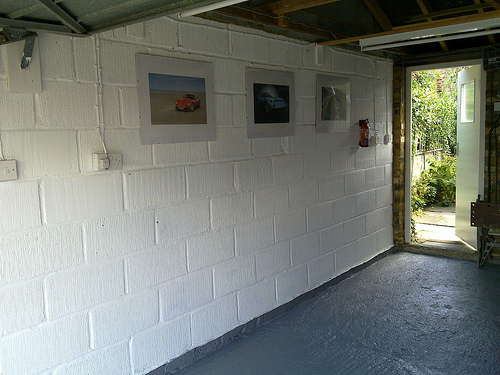
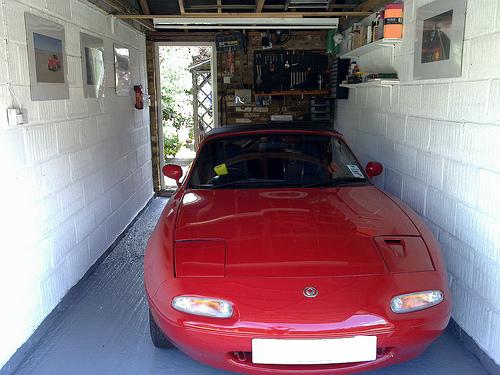
Walls now painted white, could possibly do with another coat but I am happy with it. Brick work sealed with watered down PVA to prevent dust, shelves painted and fitted (I know they are bowed, I recycled them... hoping they will level out with stuff on). Pics:

Shelves, bits n bobs draws and EVO print
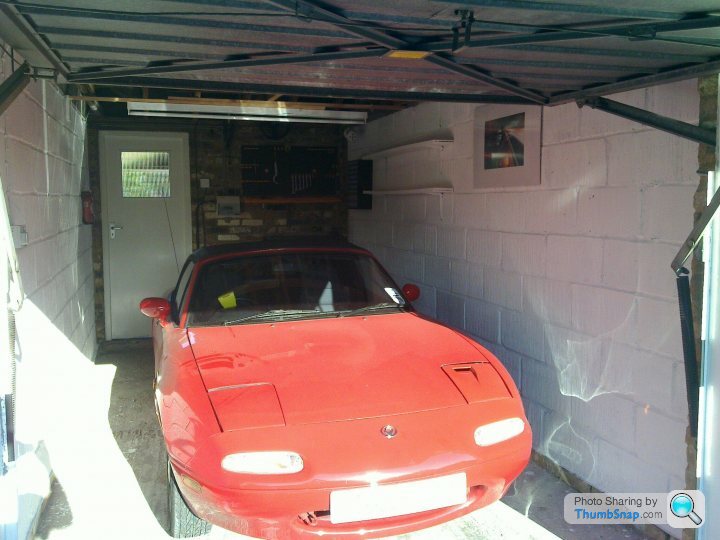
Steering wheel from my first car And something to hang my most used tools up for easy access (bit empty at the mo!).

Plenty of room

Car put away, fits nicely! Very dusty though, I am hoping now its all sealed and painted it won't be as bad...
Next plans:
- Paint floor light grey
- Get more EVO prints and various die cast models up
- Figure out ingenius ways of storing stuff out of the way...
P.S. Bit of a rant here.... I went to my local tip to get rid of some plaster board, and they had the most perfect work bench and set of drawers that someone wanted to chuck, and they wouldn't let me take it away! Local council rules apparently! ggrrrrr
Walls now painted white, could possibly do with another coat but I am happy with it. Brick work sealed with watered down PVA to prevent dust, shelves painted and fitted (I know they are bowed, I recycled them... hoping they will level out with stuff on). Pics:
Shelves, bits n bobs draws and EVO print
Steering wheel from my first car
And something to hang my most used tools up for easy access (bit empty at the mo!).Plenty of room
Car put away, fits nicely! Very dusty though, I am hoping now its all sealed and painted it won't be as bad...
Next plans:
- Paint floor light grey
- Get more EVO prints and various die cast models up
- Figure out ingenius ways of storing stuff out of the way...
P.S. Bit of a rant here.... I went to my local tip to get rid of some plaster board, and they had the most perfect work bench and set of drawers that someone wanted to chuck, and they wouldn't let me take it away! Local council rules apparently! ggrrrrr
sdmurray said:
Very interested in how you found the wall painting . . . How many coats did it take and did you do a PVA/water coat first or PVA/water/paint each time? I saw the advice but would like to know what you actually did and how well it went on. Did you use a roller or brush?
I did exactly this:- Brushed down walls with stiff bristled broom and vacuumed the entire garage thoroughly
- Made a 50/50 water to paint mix, and slapped it on using a roller
- Once dry, rollered on a 20/80 water to paint mix
- The brick wall was sealed with 50/50 water to PVA mix
I used a small roller and a brush to fill the gaps. Note that my mortar was quite old and so soaked up the mix, so neat paint was applied to most of these trouble spots. I doubt you will have trouble with yours as it is newer and probably less porous.
And that is pretty much it! Didn't take much time, maybe four hours. Note that the advice given was to add PVA to the paint mix but I found there was no need - I was quite surprised by how good the first wash took.
If I had a garage as new and nice as yours, I would take my time and maybe do it over three weekends, giving it a third coat or using undiluted paint for the second.
It's very relaxing!
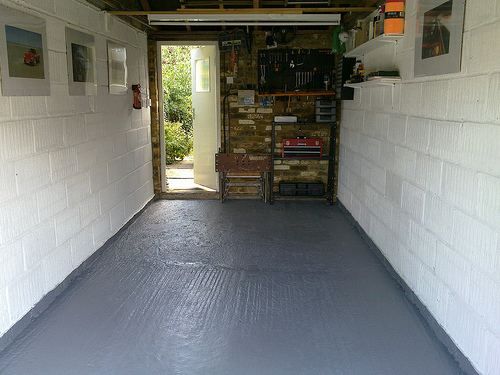
Update time, floor now painted using hammerite floor paint. Few more prints up and I'm starting to fill the garage with my stuff. I wanted a chest of drawers from the spare room, painted black but SWMBO wouldn't let me.. women.. pfft
Anyway, pics:
Plans now are to figure out clever ways of storing the rest of my tools and bits. I'm thinking along the lines of pulleys, runners and... well, cool stuff.
So far, I'm happy with it. I know it's tiny, and yeah, I admit a tinge of envy over the other garages posted in this thread, but hey, its mine.
Comments and suggestions welcome.
Fatboy said:
That looks really good - you've done a very nice job there 
Where did you get the tool board, and how much was it?
I've almost finished my lockup, doing something similar - once it's done I'll have no excuse for not getting on with my Mini :-)
It's amazing how much brighter and cleaner the garage is with the walls and floors painted, isn't it?
Thanks Where did you get the tool board, and how much was it?
I've almost finished my lockup, doing something similar - once it's done I'll have no excuse for not getting on with my Mini :-)
It's amazing how much brighter and cleaner the garage is with the walls and floors painted, isn't it?
I got the tool board and drawers from Ebay. I can't access it at work so can't give you a link, but search 'tool rack' or similar and there is loads of choice. And yes, the garage feels bigger and lighter since painting! A lot less dusty too....
52classic said:
Nice thread and a job well done Robert.
Just a thought that you're missing some useful space in the garage loft. I hadn't spotted the pitched roof until the most recent photographs.
I scrounged some 6x2's which I bolted to the existing 4x then used some loft decking to make a mezzanine. An extra light on the upper level means I don't loose too much stuff and painting the underneath white gives some useful reflected light to the bench area.
My thinking is that with some decent storage bins I can switch the workshop between configurations for woodworking, mechanical work, body repairing, valeting etc. However, in practice I have never managed to be quite so tidy!
Thanks Just a thought that you're missing some useful space in the garage loft. I hadn't spotted the pitched roof until the most recent photographs.
I scrounged some 6x2's which I bolted to the existing 4x then used some loft decking to make a mezzanine. An extra light on the upper level means I don't loose too much stuff and painting the underneath white gives some useful reflected light to the bench area.
My thinking is that with some decent storage bins I can switch the workshop between configurations for woodworking, mechanical work, body repairing, valeting etc. However, in practice I have never managed to be quite so tidy!
Yup, there is a lot of space up there which I intend to use. Thing is, I want it accessible and don't want to get the ladder our everytime I need something...
I like your idea about painting the underside though, and switching configurations *goes to hatch plan*
matts4 said:
Great job, looks a load better/more practical.
Thanks! It is definately more practical having tools to hand rather than hunting through a huge box!Matt.. said:
Look on this forum:
http://www.garagejournal.com/forum/forumdisplay.ph...
That should give you a lot of inspiration! (and jealousy at the Americans with loads of space!).
Yeah, its a good forum - I think someone mentioned it a couple of pages back.http://www.garagejournal.com/forum/forumdisplay.ph...
That should give you a lot of inspiration! (and jealousy at the Americans with loads of space!).
Theres a few Brits on there!
Skyedriver said:
But how do you keep it that way????????
Well, I have taken measures to help me. For example, sealing brick work with paint/PVA, organising tools so they all have a place and most importantly... banning SWMBO from putting anything in there. Will it work...? Time will tell.BliarOut said:
Paint the end wall too, you'll get lots of light bouncing back
Nah, I like the original brick work Skyedriver said:
JFReturns said:
Skyedriver said:
But how do you keep it that way????????
Well, I have taken measures to help me. For example, sealing brick work with paint/PVA, organising tools so they all have a place and most importantly... banning SWMBO from putting anything in there. Will it work...? Time will tell.BliarOut said:
Paint the end wall too, you'll get lots of light bouncing back
Nah, I like the original brick work Thanks raf
I love the idea of a red floor, but thought it would look naff with my current car.
To prep the floor I thoroughly sweeped with a stiff bristled broom, wire brushed, filled then sanded any crumbly bits then finally vacuumed the whole lot. The finish is tough and perfect apart from one small area that is flaking as I didn't spot the crumbly concrete.
raf_gti said:
JFReturns said:
Thanks raf
I love the idea of a red floor, but thought it would look naff with my current car.
To prep the floor I thoroughly sweeped with a stiff bristled broom, wire brushed, filled then sanded any crumbly bits then finally vacuumed the whole lot. The finish is tough and perfect apart from one small area that is flaking as I didn't spot the crumbly concrete.
How many coats of the paint did you need? I've read various different ways of using floor paint.I love the idea of a red floor, but thought it would look naff with my current car.
To prep the floor I thoroughly sweeped with a stiff bristled broom, wire brushed, filled then sanded any crumbly bits then finally vacuumed the whole lot. The finish is tough and perfect apart from one small area that is flaking as I didn't spot the crumbly concrete.
Edited by JFReturns on Saturday 7th August 20:28
odyssey2200 said:
Targarama said:
raf_gti said:
JFReturns said:
Thanks raf
I love the idea of a red floor, but thought it would look naff with my current car.
To prep the floor I thoroughly sweeped with a stiff bristled broom, wire brushed, filled then sanded any crumbly bits then finally vacuumed the whole lot. The finish is tough and perfect apart from one small area that is flaking as I didn't spot the crumbly concrete.
How many coats of the paint did you need? I've read various different ways of using floor paint.I love the idea of a red floor, but thought it would look naff with my current car.
To prep the floor I thoroughly sweeped with a stiff bristled broom, wire brushed, filled then sanded any crumbly bits then finally vacuumed the whole lot. The finish is tough and perfect apart from one small area that is flaking as I didn't spot the crumbly concrete.
Gassing Station | Homes, Gardens and DIY | Top of Page | What's New | My Stuff