Tuscan Challenge Road Car (at the moment) build project
Discussion


G1ABB said:
Graham,Thanks Graham good to talk Sunday night long overdue that one!
yep...your right I colour matched the wishbones that came with my initial purchase...in day light they are...bit like the O.Z.'s I painted...
Anyway things have moved on with some help from a couple of Pete, Howard and Karl one of neighbours karl...the chassis now about ready for the show this weekend

Roll cage painted being painted as I type...collecting it late this PM then fixing to the chassis tonight...looks like Tim Hood will be popping round to collect his stuff for the show...might give a spanner and get him to give me an hand

Be interesting to get your feed back on here for those that see "the pile of scrap" at the NEC Classic... just for starters though...
I know there are no brake pads fitted to the calpiers (not had chance to get any...not sure which ones i need for the fronts...or where to get them not had chance really)
I know there are some stainless fixings in places where there should be high tensile... but most parts came without bolts so have had to make do for now..
I know that the wheels might have a bit of positive camber...or negative...I will need it set up...Johnny the kettle is on!
The shocks are two way adjustables ...designed for road use I have spoken with a few folk that "know" and they should be ideal for what I need in this application...
It's all rose jointed ...thanks to graham walden for the loan of steering arms...thanks to Ivor to for the offer of his, thanks to Andy Holden for looking for steering arms for me ......he has the same side as me...v.few steering arms for the pass side about...bit like BTR diff mounts....finally got a set....
 ...hence diff and driveshafts on too...
marsdalebear said:
Hi Steve, how are the new neighbours coping with all of those kit cars at your place? Is Sam still driving Harvey? Be in touch soon, got some news for you.
Hi mate,No one will ever come close as you folk as neighbours ...You were perfect mate!
Kit cars indeed....you havn't changed then, thank god!
Unfortunately Harvey passed away on the M6 in snow when Sam was forced into lane three by an HGV ...lane three was covered in snow she spun hit the trailer tyre it burst ...spun her again leaving her in lane three facing on coming cars....thankfully she wasn't hurt ...Harvey saved her....at the other side of b'ham one of our lot Dave Hothersall...did the same thing in his griff 500.....hitting the armco....they ended up sitting opposite each other last night when 30odd of us had a curry in Shirly Solihull following the show at the nec classic car show....this is where I am heading back now!
The rolling chassis is on display there....no chance to post pics yet tho!
Love to Ben, Jeanette and you mate ....you are missed!
I will try and post some images re progress need to load up on photobucket first...just been busy Newcastle last week London this week..
I went straight from work last night to take all the spectra flake paint off the cage....
Didn't achieve the desired effect and looked good in the sun, but like something that had been shot blasted and galvernised in dull conditions....and lft a "sandy" type surface....
So back to square one!
Guess it would have been a different story if I went for spectra flare but at circa £400 per litre I can't justify it...especially as spraying a cage most of it would just go into fresh air!
I managed to rub the whole cage down last night will be staright back there tonight and finish off...then it will be painted in the "high coarse" silver...and lacquered...this evening so going to be another late one
We prepped a door last night Rich primed it in white ready for the top coat this evening...again see how the paint works and see what effect is has...
Got my rear gearbox mount off Tim Hood and his mechanic Terry Saturday...just missing the part that attaches the bracket to the T5 box...this appears to have a bush similar to the large rear diff mount bush on a griff of chimaera or challenge chassis....
So if anyone has one...
Scheduled to collect the cage Friday, then drop the bonnet off for the three "vents" at Graham Waldens...then gonna try fitting the body Saturday..hands needed...although Ginny, Blaine, Karl and myself did it last time more hands will make it much easier ...as the parts welded to the chassis will fowl the bodywork....this will be the first of a few times it will be fitted as I need to cut holes in the sill sections for the extra seatbelt and four point harness mounts....
...although Malcolm (one of the directors from TVR) advised me to go for 6 point harnesses on a raod car to stop submarining...didn't get his contact details as he offrered to give me some input around this area...doh!
So moving on...
marsdalebear said:
Did you get my e-mail Steve?
HYes I did mate.....that's brilliant news , Ginny is so pleased.....
.....iWeb are much likely to come and visit you when you take up residence in Barbados than Syston!Seriously pleased for you both fantastic....just replied to email too......
Chuggaboom said:
Mine doesn't use the mounts on sills like Chims/Griffs if that's what you mean...instead a pair of eylets through the floor into the corner chassis support plates behind the seat(s) to which the side and extra straps (for 6 point) are attached. 
Hi Grant,I have gone for FIA approved fixings throughout....for the three point harnesses I have tried to replicate the set up like chimaera and cerebral ....I will use cerbera "shoulder" seatbelt extensions on the rear cage struts....the fixings are in both sides now....the seatbelt real will sit vertically behind the seats....
Have you still got those three way adjustables?
Keithyboy said:
Don't forget the harness should have EEC approval for road use too 
Thanks for the heads up....will usne Securon 3 point ...still not sure which way to go yet over harnesses....like G says can be a pain for road use....hence the three points....just need to make sure cage is padded well too.....I cut the centre bar out too....Steve Howard's advice that ...passengers have been hurt on these in the past....retained the bar to re-fit if needed...Chuggaboom said:
I agree with Andy and Graham....yes the multi points involve a bit of phaffing about when you get in, but its all part of the event of driving one of these toys.
I wouldn't imagine you're having road car style seats, so a 3 point just aint gonna look right IMHO.
As G suggests, both my strap sets (different makes) have the buckle on the LH lap strap, so you can use as many straps or not as you like to go a few yards, or the full set on a track day - I wouldn't fancy a track day in one of these cars with just a 3 point !
Appreciate where you are coming from here...perhaps. I havn't been very clear in what I have posted ....I wouldn't imagine you're having road car style seats, so a 3 point just aint gonna look right IMHO.
As G suggests, both my strap sets (different makes) have the buckle on the LH lap strap, so you can use as many straps or not as you like to go a few yards, or the full set on a track day - I wouldn't fancy a track day in one of these cars with just a 3 point !
Ideally I want to have the convenience of normal belts.....so that when I drive her on the road I can lean forward at junctions etc to see on coming traffic ...advised by a fellow challenge road builder who is retaining his dignity...
So thinking of fitting both....hence the multiple harness, seatbelt, seatbelt reel mounting point I have welded to the chassis and cage.....thing is once the "lid" is on the chassis it will become a pain to start putting more fixing points in...so in effect trying to think ahead....with no prior knowledge of this..... i.e. the seatbelt reel needs to be located vertically so I have tried to establish "vertical" for the plate that has been welded in between the roll bar "v" sections behind the seats and will use cerbera seatbelt shoulder extensions.......
Straightforward....not!
But more importantly thanks for posting, fully appreciate input....thank you
Chuggaboom said:
f you mean the 2 way Ohlins....yes haven't tried to sell them TBH.
So if anyone would like them, they're still available.
That's good then, not for me but I have someone who might be wanting to chat with you....not looking to benefit from this in anyway ....just thought it would be nice to put you both in contact....So if anyone would like them, they're still available.
I have lost you mobile number ...otherwise I would have contacted you instead of this....
See where you are coming from John this project stalled for a while as I was laid up following an operation, thankfully my fiend Karl who lives just over the road kept it moving on and trailered stuff about for me...top bloke images here we go...
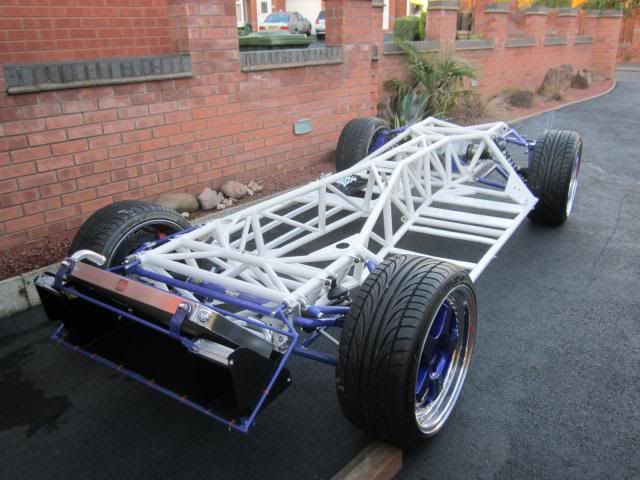
The cage
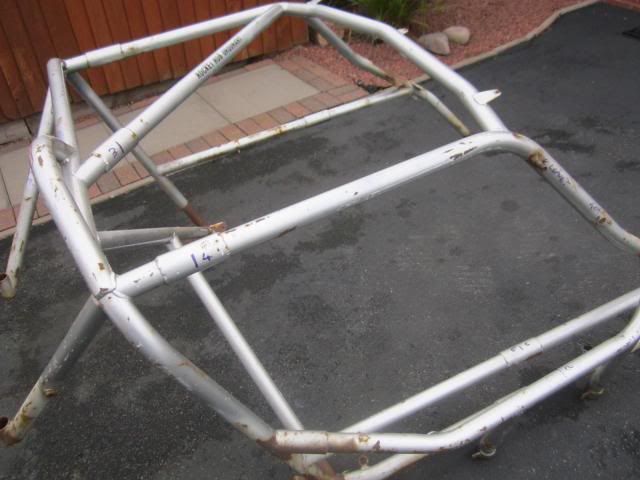
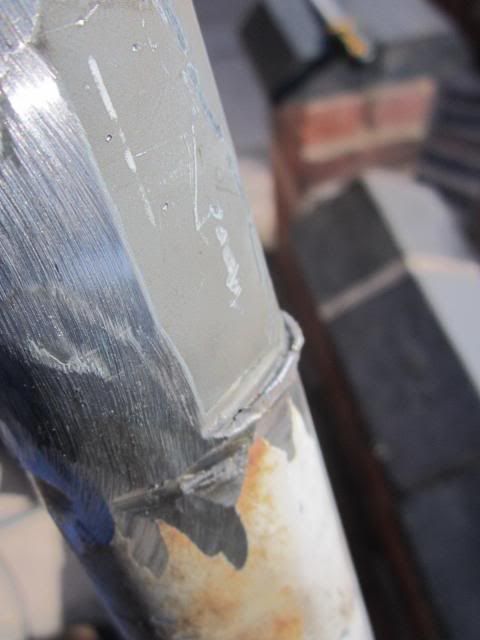
We had to cut it in two...this meant cutting each of the seven joins in the middle...i.e. in the middle of the sleeve...
Luckily I managed to hit the space on most cuts...there were seven sleeves on my cage...
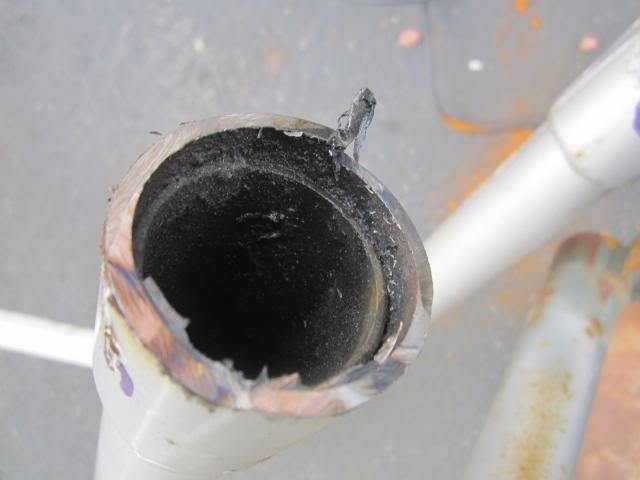
Then angle grind off each of the 14 welds...JR gave me sound advice on how to do this...each of the areas hit with the grinder have been filled and prepped for paint...
The cage and chassis were then sent for shot blasting and hot zinc spray and primer....
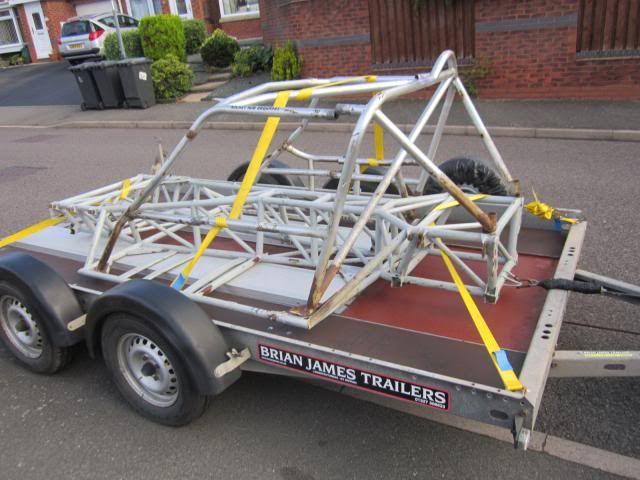
then back in the garage...
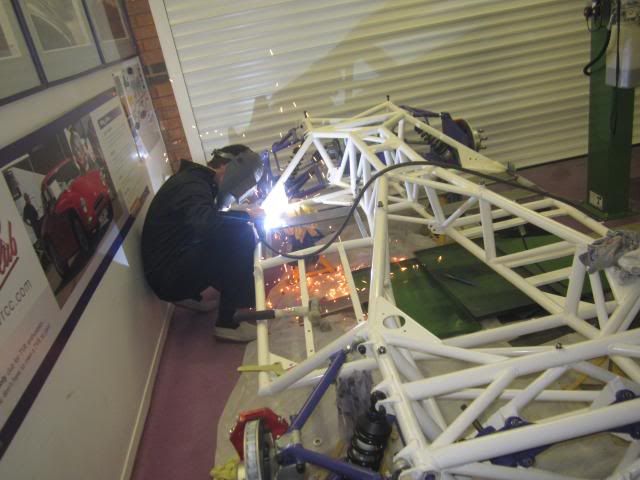
The roll cage was dropped at the bodyshop for paint...and further modification...
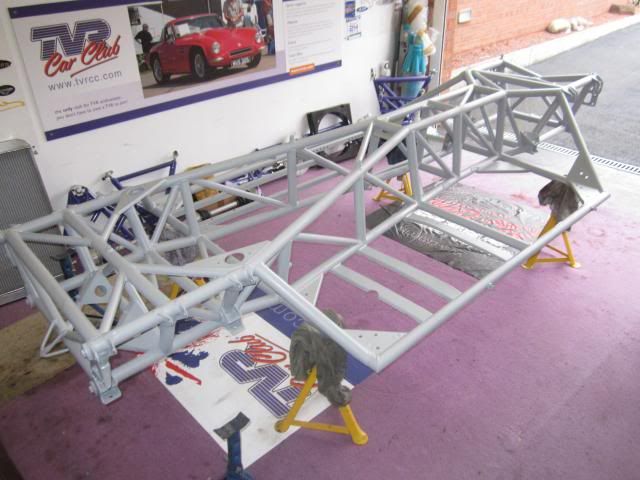
Ginny was s super star painting the zinc coated chassis with silver POR15....two coats of...more in some areas...
Then three coats of smooth white hammerite...brush painted...then flatted back and sprayed with cans...
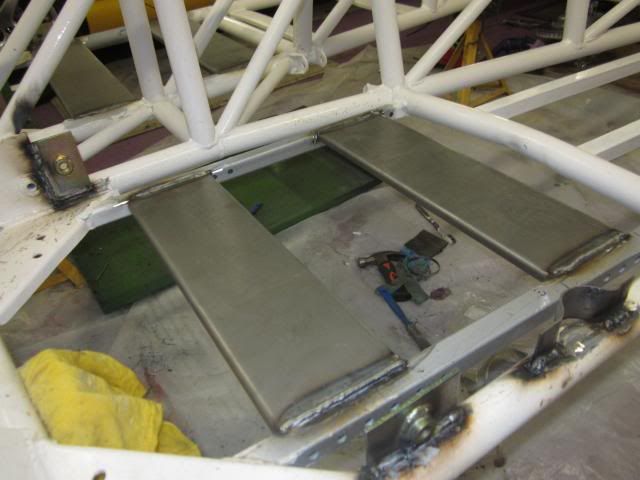
No seat fixing brackets or seat belt mounts on the chassis at this point...

The cage

We had to cut it in two...this meant cutting each of the seven joins in the middle...i.e. in the middle of the sleeve...

Luckily I managed to hit the space on most cuts...there were seven sleeves on my cage...

Then angle grind off each of the 14 welds...JR gave me sound advice on how to do this...each of the areas hit with the grinder have been filled and prepped for paint...

The cage and chassis were then sent for shot blasting and hot zinc spray and primer....

then back in the garage...

The roll cage was dropped at the bodyshop for paint...and further modification...
Ginny was s super star painting the zinc coated chassis with silver POR15....two coats of...more in some areas...

Then three coats of smooth white hammerite...brush painted...then flatted back and sprayed with cans...

No seat fixing brackets or seat belt mounts on the chassis at this point...

Edited by schimg on Friday 29th November 00:00
Edited by schimg on Friday 29th November 07:34
So I ordered a load of FIA approved fixings...
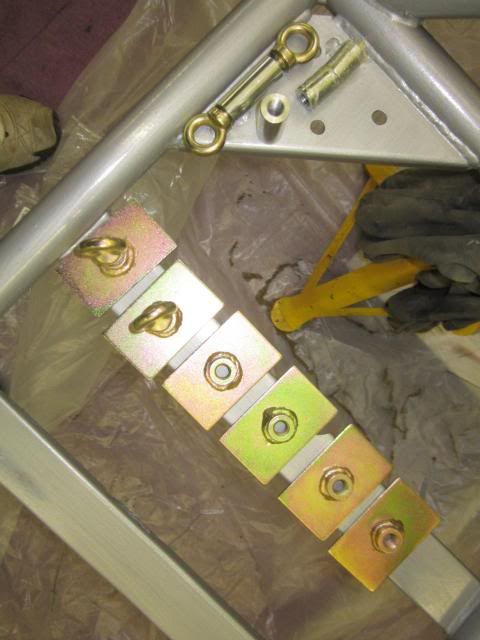
Got some metal 3mm sheet this is wide because I do not know for sure where the seat will line up..I want to bolt the seat through the floor...had a fold put in the edge of each sheet for strength and got Rich to weld them in..this was on a Saturday night at 19:00...he had to go to a wedding evening do and did this on the way home from the bodyshop!
Sourced the correct sleeve tubing, had bolt holes drilled and finished correctly for 7 sleeves (plus a spare)...these are sat on the plates for the seats in the picture...

Will probably have to cut the floor to accommodate the seat fixing plates....not a problem I will just re-glass them in..
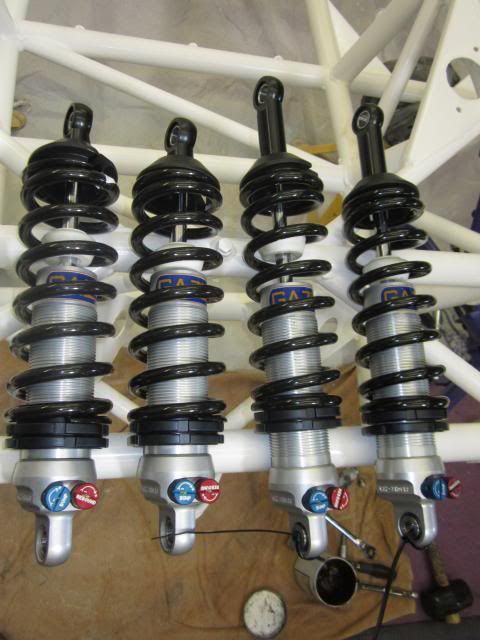
As a road car I have been advised against 3-way adjustable shocks etc and have gone with a set of two-way adjustable bespoke GAZ units
Wayne (ex Steve Guigiami)has had sight of these new shocks and suggested spring rates that will suit this application...
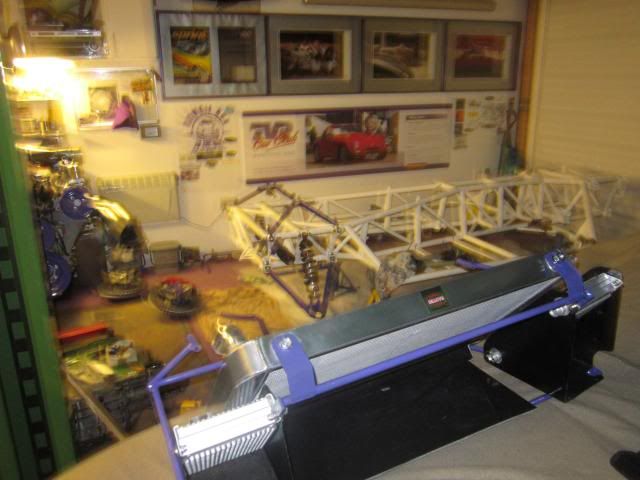
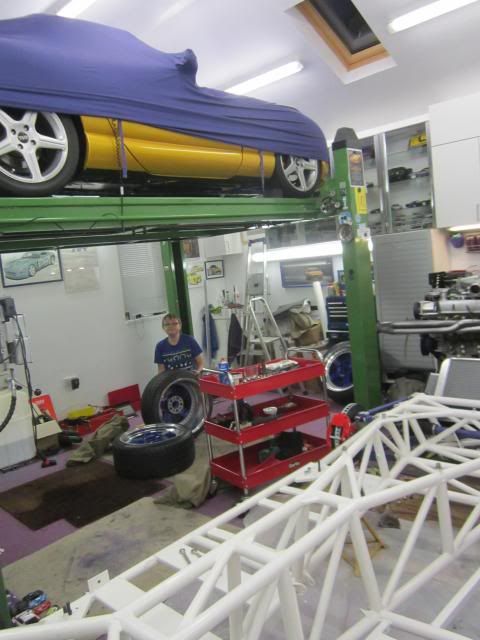
Darren Dowling had a spare bonnet frame and oil coolers and carbon casings plus top rad bar.......again JR was helpful here in putting me in contact with Darren
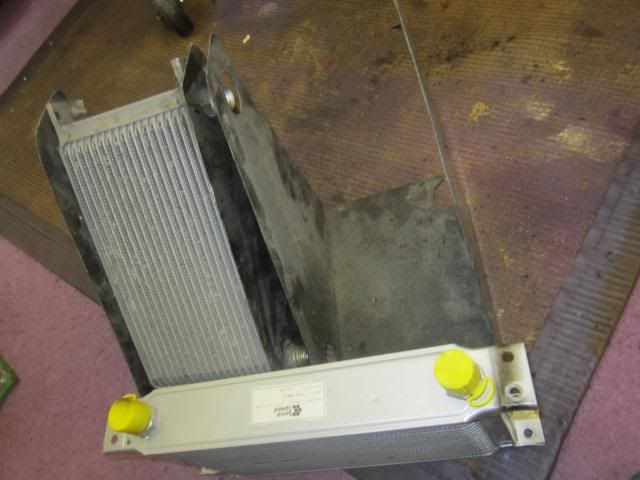
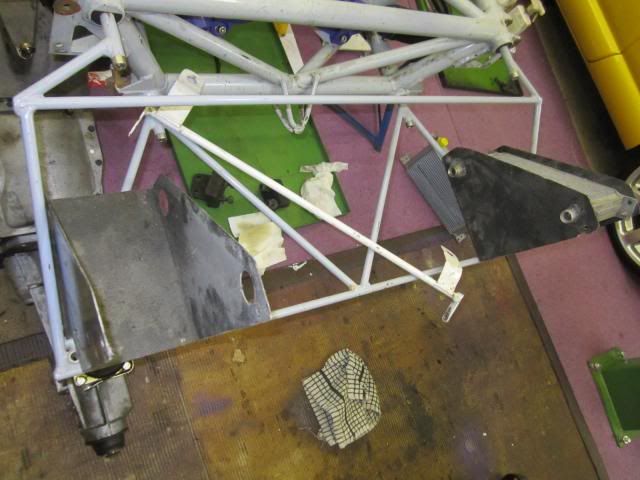
After flatting them back and lacquering them they oil cooler casing came up well...a new radiator from Radtec...and some spray paint on the bonnet frame improved looks nicely...still no bonnet brackets yet though....
JR made me a bottom radiator mount fiberglass casing...and proper front ARB brackets with offset hole ....things you's never be aware of..
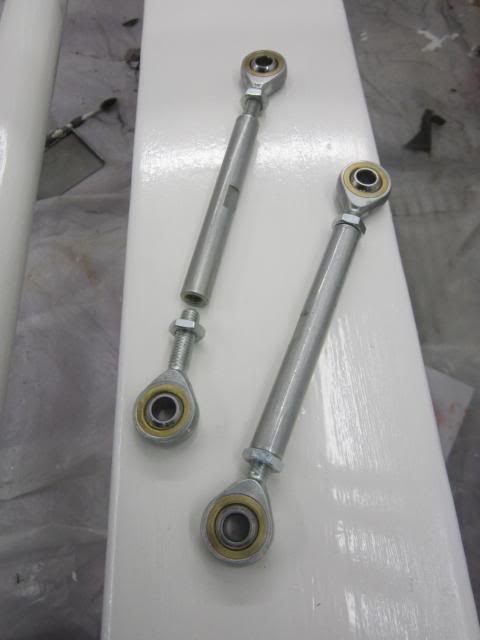
Used McGils again for a fully adjustable pair of turnbuckle drop-links..painted with POR15 and stirling silver
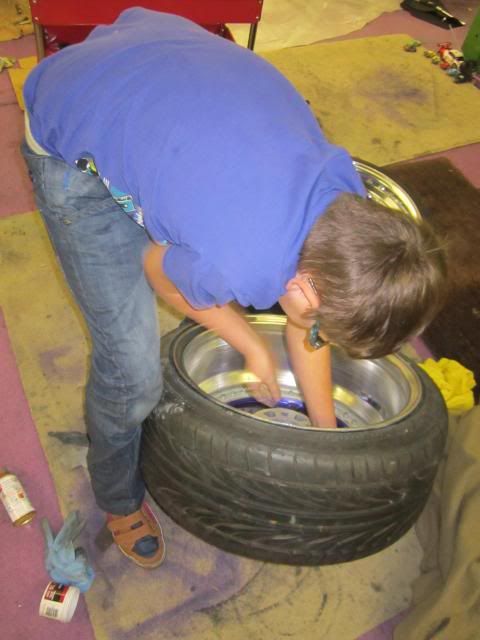
My ten year old son George helped with the rear suspension..
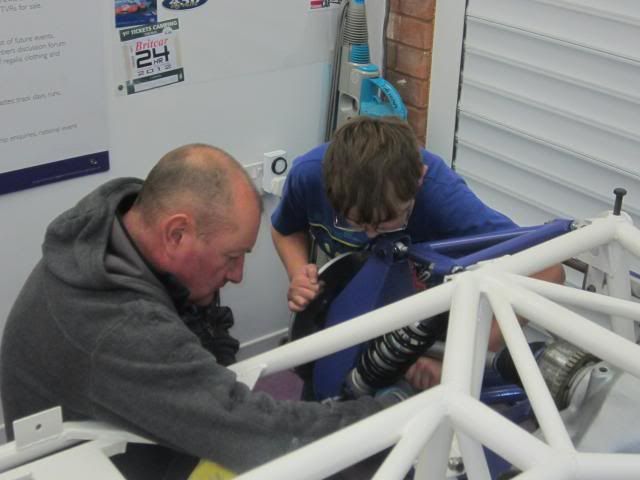
Plus the three of us worked until midnight one Saturday night trying to get the chassis ready for the NEC...
He even polished the inside rims of the O.Z's..
Ginny and me fitted the diff one Sunday morning whilst listening to Vettel win another gp..AND I managed to get some diff mounts...all cleaned up and painted....
Howard and John came round one night and tightened up the rear hubs...
Then Karl who lives across the road came round....stood back identified the fact that I had the arb upside down...that the front bottom wishbones needed swapping....then we put the wheels on and rolled the chassis out..
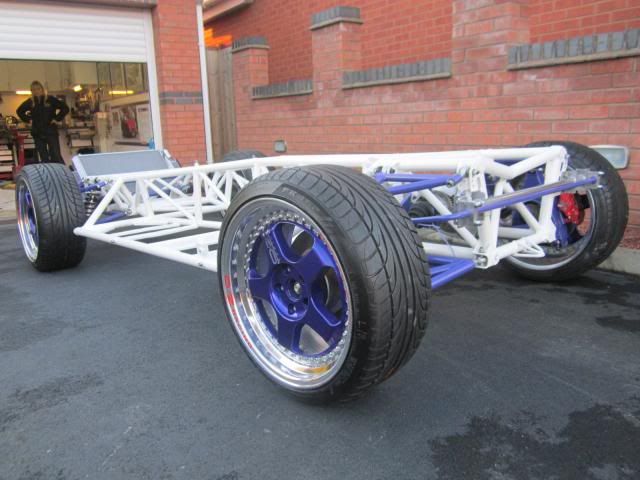
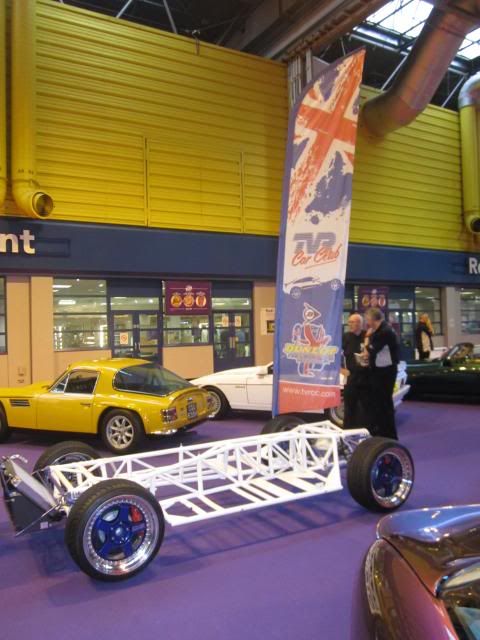
And we got her to the NEC Classic Car Show...and flew the DTEC flag...Les Edgar and the new directors of TVR (spent nearly three hours with us) had a good look over it, one of them a chap called Malcolm had some sound advice regarding belt fixings...missed grabbing his email address though doh!
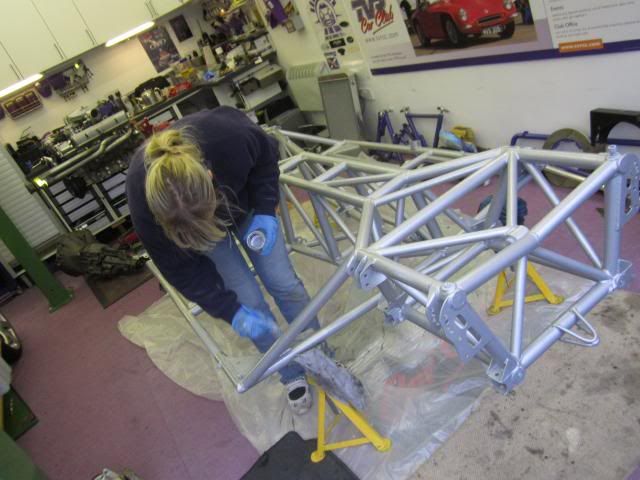
Been at the bodyshop tonight flatting back the passenger door ...thiss was painted last night and will be go through three stages of cutting back the lacquer tomorrow...If we are happy with the colour...we will look at prepping the body...the roll cage will be painted in the morning...this will be the second time it has been painted...the first time was in "spectra-flake" which left a "gritty" touch...spent two nights this week taking off the lacquer coating...oh joy!
This turned into war and peace!

Got some metal 3mm sheet this is wide because I do not know for sure where the seat will line up..I want to bolt the seat through the floor...had a fold put in the edge of each sheet for strength and got Rich to weld them in..this was on a Saturday night at 19:00...he had to go to a wedding evening do and did this on the way home from the bodyshop!

Sourced the correct sleeve tubing, had bolt holes drilled and finished correctly for 7 sleeves (plus a spare)...these are sat on the plates for the seats in the picture...


Will probably have to cut the floor to accommodate the seat fixing plates....not a problem I will just re-glass them in..
As a road car I have been advised against 3-way adjustable shocks etc and have gone with a set of two-way adjustable bespoke GAZ units
Wayne (ex Steve Guigiami)has had sight of these new shocks and suggested spring rates that will suit this application...

Darren Dowling had a spare bonnet frame and oil coolers and carbon casings plus top rad bar.......again JR was helpful here in putting me in contact with Darren


After flatting them back and lacquering them they oil cooler casing came up well...a new radiator from Radtec...and some spray paint on the bonnet frame improved looks nicely...still no bonnet brackets yet though....

JR made me a bottom radiator mount fiberglass casing...and proper front ARB brackets with offset hole ....things you's never be aware of..
Used McGils again for a fully adjustable pair of turnbuckle drop-links..painted with POR15 and stirling silver

My ten year old son George helped with the rear suspension..

Plus the three of us worked until midnight one Saturday night trying to get the chassis ready for the NEC...
He even polished the inside rims of the O.Z's..


Ginny and me fitted the diff one Sunday morning whilst listening to Vettel win another gp..AND I managed to get some diff mounts...all cleaned up and painted....
Howard and John came round one night and tightened up the rear hubs...
Then Karl who lives across the road came round....stood back identified the fact that I had the arb upside down...that the front bottom wishbones needed swapping....then we put the wheels on and rolled the chassis out..


And we got her to the NEC Classic Car Show...and flew the DTEC flag...Les Edgar and the new directors of TVR (spent nearly three hours with us) had a good look over it, one of them a chap called Malcolm had some sound advice regarding belt fixings...missed grabbing his email address though doh!

Been at the bodyshop tonight flatting back the passenger door ...thiss was painted last night and will be go through three stages of cutting back the lacquer tomorrow...If we are happy with the colour...we will look at prepping the body...the roll cage will be painted in the morning...this will be the second time it has been painted...the first time was in "spectra-flake" which left a "gritty" touch...spent two nights this week taking off the lacquer coating...oh joy!
This turned into war and peace!
Edited by schimg on Thursday 28th November 23:55
Edited by schimg on Friday 29th November 00:02
Edited by schimg on Friday 29th November 19:42
Edited by schimg on Saturday 30th November 08:30
Chuggaboom said:
Really ? Because ???
This reminds me of so many old stories of fitting what type of cam to the A series mini engine.....so much twaddle spoken when they were really just trying to create a market for what was an average product !
I have 2 way Ohlins on the "road going" Cerb and they're excellent....as you'd expect !
I guess you are right over two way adjustables.....cos thats what I have fitted Grant!This reminds me of so many old stories of fitting what type of cam to the A series mini engine.....so much twaddle spoken when they were really just trying to create a market for what was an average product !
I have 2 way Ohlins on the "road going" Cerb and they're excellent....as you'd expect !
And perhaps my post regarding shocks isn't that clear ...what I meant was when I was talking of three way adjustables for the road I was advised that they would take more setting up and be ott for a road app....
Not knocking ohlins or nitrons we all know they are good units .....I will keep moving forward with this and see how it drives when it gets to the road.....there will be things that will need tweaking etc...
Thanks for posting hopefully your ohlins will find a new home...all good
450Nick said:
Looking great Steve! Yet another fantastic looking car on your drive - you are absolutely mad. Did Les offer any insight as to what he and the new directors are doing, particularly regarding racing..?
Cheers Nick,Going picked the cage up from the bodshop last night....looking sweet!
A few of my mates are coming round at 14:00 we are going to drop the body on the chassis...bonnet with Graham Walden now....evan that is a bit wierd ...not like others it has a metal frame/hoop inside the nose section...looks like it possibly had vents and they were glassed in!
Les, Rob and Malcolm spent about 3 hours with us.....they could have just spent a few minutes and moved on but they didn't.....had a few cuppas some biccies and were really interested in the cars on the stand...
..Tim Hoods Sagaris created some interest, the fact the Terry was there on the stand with us also afforded a proper explanation of how they have developed the car....(in fact they are still doing just that....I will probably go over to thier unit later with my. Mate Karl who's 16 year son Ben has asked to help work on the sagaris....Terry and Tim have welcomed him....just brilliant that!, Ben is my son George mate...think George would love to help but he is too young....at the moment)
All three of TVR's directors are obviously real petrolheads and enthusiasts of proper sports cars....we asked loads of the "obvious" questions....and to be honest they answered them v.positively,
Obviously there's a certain etiquette thing that I need to be mindful of, I know they are talking to Tony C chairman of the club so thats good enough from where I am sat......last thing we want to do is compromise stuff that would not be good
But like a few os us that are followers of the brand all I can say is think back 12 months.....who would have thought TVR was back on home soil, talking to us....even responding to requests for shirts sponsorship (never happened before) and take the time to visit our stand....just brill....
Perhaps a stretegy of keeping "your powder dry" not making promises that although well intentioned are not met by conflicting unforeseen issues is probably sound methodolgy...could even start the ball off with a race series......only kidding!
Eitherway positive stuff....
Edited by schimg on Saturday 30th November 09:14
Been a little while since I have updated this thread...still been working away since my last post back in November...I had pretty much committed to the colour when I sprayed up the OZ Split tims (at 44 bolts each...I wouldn't want to take them apart for a colour change!
But still needed to see if my paint man was happy with the quality of paint and needed to see what the colour sat like on a panel...and get some input from mates to see if I was heading the right direction colourwise...this paint is a solid with lots of movement i.e something that can be easily colour matched...a necessity on a project like this where things will need to be adapted as I go...here is the "test" half door...warning flash makes it look blue it is purple!
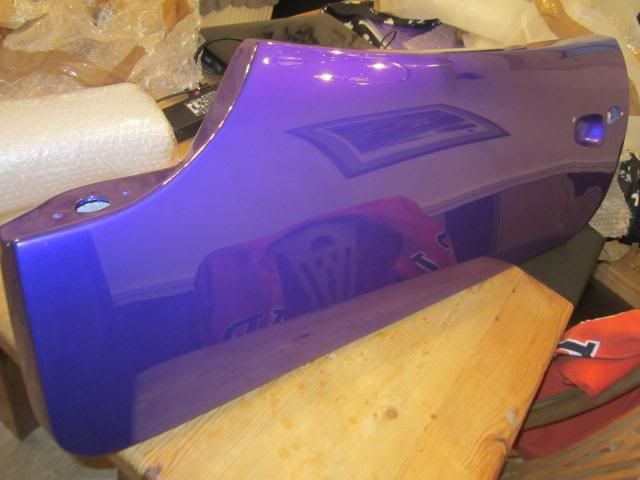
I prepped the door under the close supervision!.....there are no ripples the finish is like glass....I have not polished this in any way it is "off the gun" I have filled all of the tonneu cover holes in the top of the door...so I have a blank canvas ..
wadsapple said:
looks a good colour to my eyes, get on with it
Funny you should say that Perry, early December we tried fitting the body...the floor and sill section needed cutting away in passenger and driver seat areas..the extra seatbelt points and harness points and seat reinforcement sections were the main problem here...
[URL=http://s188.photobucket.com/user/schimg/media/IMG_4371_zps4d888bdd.jpg.html]
it only took a few pairs of hands...

But we ran out of light and time....so the car sat on a couple of fence posts until I could get hands around again...at least the body was inside the garage now..even if it looked like the only off road Tuscan!

With the body inside the garage I had chance to have a proper look at the carpet that had been fitted


Had a chat with Ginny (my wife) and we have decided to change all of the carpet and re-trim it ourselves using the discarded carpet as a template...

The rear wiring loom was just hanging there and had damage to the wires (it still has the rear plastic sections for the hamburger lights) I took the whole lot out...

I don't think the set up for the steering column is standard....it has this bracer bar that runs accross the bottom of the dash board - I reckon the dash support sits in the roll cage....I don't have this bar...anyone got a spare?
And the cage I have has the brackets...(I reckon the persons who were going to use this body were going to do so without any sort of cage....)

The wiring was attached to it and the steering wheel and column purchased with the car sort of sits in there...I try fitted it

The steering column and wiring loom and ignition key all go together...it is out of a 1.4 metro kensington or knightsbridge!
Many wires have labels attached to them...
I am tempted to retain this though has it has lots of useful stuff on the couple of column stalks...wiper - indicators - dip - main beam - horn - mostly things not normal on a challenge car!.....
I have been spending a fair bit of time going through this loom soldering joints - heat shrinking them before wrapping the loom in self amalgamating tape...then it will go in conduit sleeve...also discovered that there are standard colours for wires functioning different things, using a circuit tester to id feeds etc...
I took the dash out too...

The dashboard support came out next ..


The shell is now bare...

I have also taken off the drivers door

I do not have hinges for the passenger side...they are quite basic...is this normal?

So a couple of questions
1. What is that dashboard bar all about?

2. Does anyone have a couple of those passenger door hinges?
3. Has anyone got a spare dashboard cross bar?
(still need to confirm what the set up is).
4. How do you fir roll cages!
5. Anybody got a rear gearbox mount that attaches to the cross member.. Tim Hood (top bloke!) let me have the bracket bar but we do not have the fixing that goes on the back f the gearbox....bar
6. That flippin steering arm anyone got one!
Thanks for looking
Edited by schimg on Wednesday 12th February 17:28
TiffsTuzzy said:
Steve,
My steering column is held in place by a bar as shown in the photo. There's a similar bar on the other side (without the steering column mounting. I don't know if this is the standard setup.
.....Rich
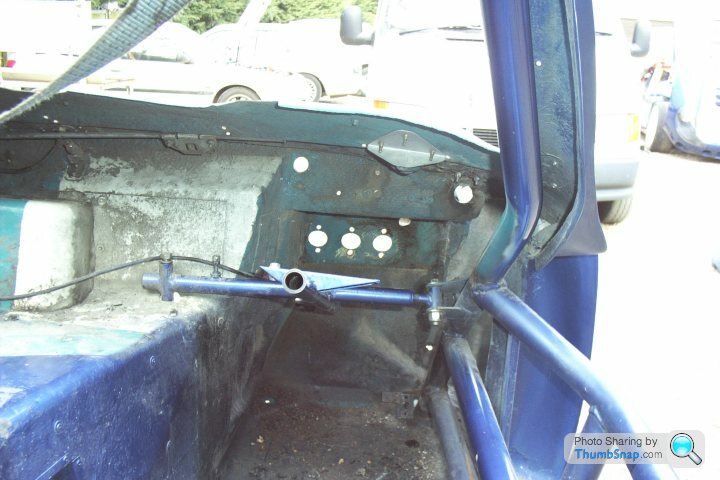
Hi Rich,My steering column is held in place by a bar as shown in the photo. There's a similar bar on the other side (without the steering column mounting. I don't know if this is the standard setup.
.....Rich
That makes sense now thank you...
Could do with those bars....still might be able to chop and weld my frame....
Mins has another set of Brackets ....above those for the column....perhaps these are for the "brace" bar that You are talking about Perry?
How long has your car been on the road?
Looks cool mate well done
wadsapple said:
crash bar does what it says helps in a crash roll over type thing. More stiffening and I used mine to hang the steering Colum off it.I have a set of hinges but you have to make a nylon bush for the centre mount hole that goes into the body socket depending on size bolt you are going to use.450 quid special price  can't say I blame you with replacing the carpets preety cheap but a really good pattern
I guess as far as c.car carpets go they were cool....edged well enough good trimming in all fairness....don't think I will replace the sound deadening sponge will retain water ....they will make a broil template we will get some half decent black carpet...got a brill trimmer...get them edged in either purple or red......will fit the cage then cut the doors to fit the cage...then make interior door panels ...to wrap the drivers side protection ....then quilt in leather ....prob red or purple thread to match carpet .....can't say I blame you with replacing the carpets preety cheap but a really good patternGot a set of white dials to replace odd non tvr ones...

wadsapple said:
trust me you won't have time to look at the clock with rose joints.
Perry if the clocks anything like the one's in my chimaera (early one's) the hands wave at you as you drive it!Hopefully they will work OK when I am sat in traffic....anyway just thinking...all this suggests that I am going to finish it lol!
TiffsTuzzy said:
Steve,
I ended up dodging (unsuccessfully) the rain over the Christmas period, driving to my friendly garage to get an MOT on it. The DVLA were as good as gold and assigned it an age related plate in the middle of January. Since then, it hasn't stopped raining. I've still got plenty of jobs to do on the car, but it's legal and driveable.
Yours is looking fantastic..... keep up the good work!
...Rich
Well done mate, great that the DVLA played ball, and dropping an age related plate on it is brilliant, as for rain...I imagine you got drenched...they are quite open to the elements aren't they? I ended up dodging (unsuccessfully) the rain over the Christmas period, driving to my friendly garage to get an MOT on it. The DVLA were as good as gold and assigned it an age related plate in the middle of January. Since then, it hasn't stopped raining. I've still got plenty of jobs to do on the car, but it's legal and driveable.
Yours is looking fantastic..... keep up the good work!
...Rich
Yes this weather is rubbish, been out in the Cerbera a few times when the sun breaks through...you just forget how rapid these cars are..one of my neighbors Karl from across the road (who trailer-ed my chassis to the NEC and has a Malek race cara) came along for a blat ...certainly put a smile on his face...let him drive it a short(ish) distance...whats nice is that he is joining the club and will be getting a TVR in the future...his dad used to have a Grantura....now that is one to aspire to!
Anyway Rich must be nice to be in a position to actually drive the car, thanks for sending me images of work on your motor, I decided to just go for one cage hoop in the end...not got the rear impact tank protection bar sorted yet...
Thanks for posting
Edited by schimg on Friday 14th February 17:17
Chuggaboom said:
Steve
Are you going to glue these carpets in place ?
Reason I ask is even when you wash thes cars carefully, well mine at least, water gets in through places that you wouldn't immediately think of...like the pedal box cover for instance which obviously isn't sealed up for maintenance.
G.
Hi Grant,Are you going to glue these carpets in place ?
Reason I ask is even when you wash thes cars carefully, well mine at least, water gets in through places that you wouldn't immediately think of...like the pedal box cover for instance which obviously isn't sealed up for maintenance.
G.
Thats the intention...the set I took out had sound deadening behind the carpet I will loose this as it will retain water and smell after a period of time.
Thinking of relatively thin pile...the footwells and rear deck areas will be removable.
I will seal the bulkhead and floor, the glass windscreen is already sealed...
I am removing all of the tonneu cover fixings, as at this stage will be going for a removable roof with a bulge for the drivers hoop and perspex glass for the back screen, also intend to create some way of closing off the the are above the door and roof...still early days there!
I do not intend to cut a boot into the back end (at this stage) this will prevent water ingress and add security as the only access to the boot will be via the parcel shelf area, there will be a secured panel in front of this...again dependent on how much space I am left after the rear cage goes in...plus save time by fabricating a channel and drainage for water , could work out to be a pain if I went that way
I am under no illusions this will be a challenge...I think you also told me that you get cold hands as a result of how the wind flows over and around the windscreen..oh joy!
TiffsTuzzy said:
Thanks everyone for the photos and advice. I need to sort out a tonneau cover for the summer, so Perry's photos will help here and then start modifying the roof so it fits around the second rollover hoop I've got on my car. I only hope I don't hit a problem with the side of the rollcage fouling the roof, otherwise it'll have more lumps and bumps on it than someone with carbuncles.
Thanks for everyone's help..... Rich
Echo what you say here Rich....thanks to everyone for posting....appreciatedThanks for everyone's help..... Rich
We spent yesterday afternoon getting the roll cage to fit....ended up cutting some floor away....but we got it to fit!
The front section's "feet" need pushing out by about 1/2 ins so the cage comes back out at 14:00 we will jack it apart that should make the body/chassis/cage all line up ....we are then off to see Tim Hood and Terry to take clutches and think about bolting the engine to the box....then borrow an engine hoist.....still need to see how we can mod sump....
Gassing Station | General Motorsport | Top of Page | What's New | My Stuff