2003 Porsche Boxster S
Discussion


shalmaneser said:
If that's a track rod end then with the wheel off (and the other wheels on the car) jack it up by putting the jack directly under the ball joint. this will press the taper into the hub with the weight of the car and will normally stop it spinning. you should then be able to undo the nut.
The next problem will be getting the taper out. This time support the hub with the jack and wind the nut upside down onto the thread so the top of the thread is just below the surface of the nut, and give it a big hit with a hammer. the nut will protect the threads and stop it peening over.
One big hit is better than lots of little ones.
Also hit the hub casting next to the taper if it's really stuck.
Now just wind off the nut - or cut it off if necessary.
I've tried the jack under the ball joint, literally didn't do anything - I'm not sure if my arm is a little different? It's an aftermarket part (hence how it's rounded so easily, lesson learnt), but it didn't stop it turning in the slightest.The next problem will be getting the taper out. This time support the hub with the jack and wind the nut upside down onto the thread so the top of the thread is just below the surface of the nut, and give it a big hit with a hammer. the nut will protect the threads and stop it peening over.
One big hit is better than lots of little ones.
Also hit the hub casting next to the taper if it's really stuck.
Now just wind off the nut - or cut it off if necessary.
The nut isn't frozen to the bolt so as soon as I can get a few turns it'll be absolutely fine - the arm will drop out easily as it's not that old.
I'll give it another go with the jack though, thanks!
Heaveho said:
I know how much aggro you've had with this, so you'll probably have tried it, but if not, a battery impact wrench might shock it off instead of just trying to turn it?
Not actually tried it yet mainly due to lack of access... but you might be right though, could well give it a go. The nut isn't seized in any way, so this could work. Just need to find someone with an impact wrench!Can't take it to a garage either - it's uninsured and taxed, so needs to be done on the drive really. I'll ask about, see who's got an impact gun. Cheers!
Heaveho said:
I know how much aggro you've had with this, so you'll probably have tried it, but if not, a battery impact wrench might shock it off instead of just trying to turn it?
Would love to try one but I'm not sure if there's room? If there is, I haven't got one! Need to see if I can borrow one...Mark-t said:
I have one and happy to visit with it. I live near Talbot green so can't be far from you (saw you driving through a few months ago actually).
That would be fantastic! When would you want to meet up?M4CK 1 said:
Have you tried driving in a ball joint separator , ( Draper 14159 19 mm Ball Joint Separator https://www.amazon.co.uk/dp/B0001K9Q2C/ref=cm_sw_r... {/URL} This will pull ball joint down retightening the nut and then try slackening the nut. This will work better with the old rattle gun. Without the separator I'm guessing it will spin.
I'm a little confused to where it would fit into? Looking at my photo, it seems the little walls on the hub would stop it?Hi all,
Looks like I haven't been on here for a while now. I've got plenty of updates but I'm not sure what the image limit is on the posts!
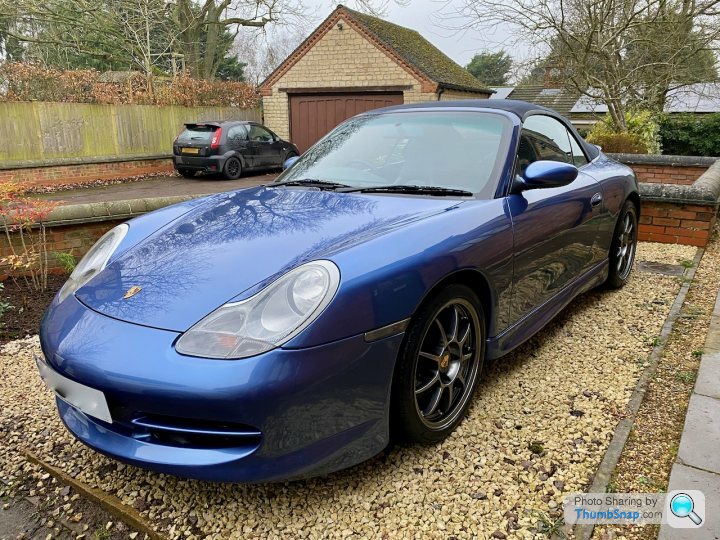
I've still got the car, and it's now better than ever. I've fixed the subframe issue (turned into a nightmare, the more parts I removed the more I found I needed to replace), but it's back on the road and after a full-on tear down and detail (as in, bumpers, wheel arches, wheels, lights, all taken off the car), it's fantastic. Even areas you can't see have been polished up. Some parts have been resprayed, too.
This is the condition it's in now:


I'll give you all a full write-up soon! What's the image limit per post?
Looks like I haven't been on here for a while now. I've got plenty of updates but I'm not sure what the image limit is on the posts!
I've still got the car, and it's now better than ever. I've fixed the subframe issue (turned into a nightmare, the more parts I removed the more I found I needed to replace), but it's back on the road and after a full-on tear down and detail (as in, bumpers, wheel arches, wheels, lights, all taken off the car), it's fantastic. Even areas you can't see have been polished up. Some parts have been resprayed, too.
This is the condition it's in now:
I'll give you all a full write-up soon! What's the image limit per post?
THIS IS A LONG POST.
Where do I start…
So the car was in a bad state for a year or so. A lot of things happened in that time in my personal life (good and bad) so the car was no longer a priority and wasn’t in such a financial place that I could go “Ah let’s just give it to a garage to fix”. I’d either sell it broken, or fix it slowly. Instead, I bought a £500 fiesta run about (1.4 TDCI that does 75mpg) that I still have as a daily, and the Porsche went under wraps for the foreseeable future.

I thought about selling it as is, as there was so much that went wrong on it that I lost any sort of feeling for it. Take a big loss and sell it for a few grand, then get something more sensible.
Instead I stuck at it with the notion of selling it, but fixing it up first and selling it. I got the nut off with a helping hand (either a person from this forum or Boxa.net, who was kind enough to bring a torque gun round). The nut came off with a fight, and revealed something alarming.
This is what the underside should look like (on my newer hub that I had to buy):

And this is what it actually looked like:

The insert was missing, which explains all of the other times that the arm’s bolt had sheered off. Quite worrying.
Nevertheless, I finally put the new subframe in, and went to Canada for a holiday.
Whilst I was there I constantly thought out the plan of what I was going to tackle when I got back, and it was to remove the hub from the shock absorber (as I needed a new one due to it being damaged by having no insert), along with the hand brake cable, brake caliper, etc.
After a few days of being jet lagged, I got to work. First thing was to remove the drop link. I cut off the end to get a breaker bar onto it and… slipped the socket off, which rounded the nut. Game over, need a new shock absorber, spring and hub as now it’s impossible to separate.

Arse. More seems to be going wrong here.
So I bought a second hand shock with a spring (was fantastic condition), and another hub, and also a brand new wheel bearing which a garage fit for me.
Fit the new hub with its shock absorber, but found that the speed sensor that came with it was different.

No bother. Except I couldn’t get it out and it was seized. Tried to take it out and it sheered off in the hub. Lovely, another new hub was needed and I’ve wasted the wheel bearing.
Ordered a second one, and the guy sent the wrong one. Sent that back. Ordered a third and before I confirmed the order, I phoned the guy up and said “I’ll buy it, for as long as you remove your speed sensor first.” to which he replied “in that case, no, it’s seized”.
Ordered a fourth one without a speed sensor in it, everything was fine after a second wheel bearing was purchased and fitted. The shock assembly went in with the hub, and all was fine. Eventually. There were some hiccups along the way, such as fitting the coffin arm to the hub with the wrong speed sensor and not being able to remove the arm, etc. But eventually, the suspension job was fixed and the car was, for the first tine in a long time, sitting on its own four wheels again.

The alignment (as you can probably see from the photo) was way out, so that needed doing asap.
But the main thing was that the car was fixed! I serviced it, put fresh tyres on, and booked it in for an MOT. I hadn’t drove the car in over a year, and it felt amazing driving it to the MOT garage. Even though the alloys and the paint looked like s t (bird poo etched paint, cracked paint on the alloys, etc), it felt good to be back in it. Felt special.
The car passed the MOT first time, with only a drop link as an advisory - something I knew about since the last one but never got round to fitting it. It passed! That same day I got some insurance sorted and took it to get an alignment sorted. The alignment was off the chart, but £90 later and the camber, toe and caster sorted, it felt outstanding to drive.
At this point, I thought about doing it up and keeping it, rather than selling it, but I thought I’d see how I go.
With the mechanics done, cosmetics was the next thing on my list.
Over the next few months, the following was done:
- Rebuilt headlights with new projectors
- Sprayed radio surround gloss black
- Wrapped ashtray gloss black
- Powder coated alloys back to silver
- Full tear-down detail of the car, including:
- All metals beneath bumpers and lights cleaned and polished
- Wheel arches cleaned thoroughly
- Wheels sealed and waxed
- Exhaust re-sprayed to gloss black (and silver bypass pipes)
- Paint work two-stage machine polished
- New number plates
- New number plate mount for the front
- Rewired DRL’s as DRL’s and not sidelights (on with ignition, off with headlights)
And here’s the photo bombardment!
Bought projectors with squared-off halo rings, and sprayed the 4 sides to only reveal the corners. I wanted to give them the newer Porsche look with the 4-LED’s on the corners, and they looked fantastic:


This was before the car was machine polished.
Some photos of the rest of the cosmetic overhaul:


Rear before clean:

Rear after clean:

Exhaust & rear before:

Exhaust & rear after:


Arches cleaned

Engine bay too

All metals cleaned and polished

Alloys detailed


Bumpers cleaned and machine polished


Back ‘PORSCHE’ lettering sprayed gloss black


Number plate mount

Headlights polished


And here’s the car as of this morning!


And there we have it.
If you’ve stayed with me this far, you deserve a pint.
Here’s a few photos took recently.


I’m keeping the car. Here’s to many happy miles
Thanks for reading!
Where do I start…
So the car was in a bad state for a year or so. A lot of things happened in that time in my personal life (good and bad) so the car was no longer a priority and wasn’t in such a financial place that I could go “Ah let’s just give it to a garage to fix”. I’d either sell it broken, or fix it slowly. Instead, I bought a £500 fiesta run about (1.4 TDCI that does 75mpg) that I still have as a daily, and the Porsche went under wraps for the foreseeable future.
I thought about selling it as is, as there was so much that went wrong on it that I lost any sort of feeling for it. Take a big loss and sell it for a few grand, then get something more sensible.
Instead I stuck at it with the notion of selling it, but fixing it up first and selling it. I got the nut off with a helping hand (either a person from this forum or Boxa.net, who was kind enough to bring a torque gun round). The nut came off with a fight, and revealed something alarming.
This is what the underside should look like (on my newer hub that I had to buy):
And this is what it actually looked like:
The insert was missing, which explains all of the other times that the arm’s bolt had sheered off. Quite worrying.
Nevertheless, I finally put the new subframe in, and went to Canada for a holiday.
Whilst I was there I constantly thought out the plan of what I was going to tackle when I got back, and it was to remove the hub from the shock absorber (as I needed a new one due to it being damaged by having no insert), along with the hand brake cable, brake caliper, etc.
After a few days of being jet lagged, I got to work. First thing was to remove the drop link. I cut off the end to get a breaker bar onto it and… slipped the socket off, which rounded the nut. Game over, need a new shock absorber, spring and hub as now it’s impossible to separate.
Arse. More seems to be going wrong here.
So I bought a second hand shock with a spring (was fantastic condition), and another hub, and also a brand new wheel bearing which a garage fit for me.
Fit the new hub with its shock absorber, but found that the speed sensor that came with it was different.
No bother. Except I couldn’t get it out and it was seized. Tried to take it out and it sheered off in the hub. Lovely, another new hub was needed and I’ve wasted the wheel bearing.
Ordered a second one, and the guy sent the wrong one. Sent that back. Ordered a third and before I confirmed the order, I phoned the guy up and said “I’ll buy it, for as long as you remove your speed sensor first.” to which he replied “in that case, no, it’s seized”.
Ordered a fourth one without a speed sensor in it, everything was fine after a second wheel bearing was purchased and fitted. The shock assembly went in with the hub, and all was fine. Eventually. There were some hiccups along the way, such as fitting the coffin arm to the hub with the wrong speed sensor and not being able to remove the arm, etc. But eventually, the suspension job was fixed and the car was, for the first tine in a long time, sitting on its own four wheels again.
The alignment (as you can probably see from the photo) was way out, so that needed doing asap.
But the main thing was that the car was fixed! I serviced it, put fresh tyres on, and booked it in for an MOT. I hadn’t drove the car in over a year, and it felt amazing driving it to the MOT garage. Even though the alloys and the paint looked like s
t (bird poo etched paint, cracked paint on the alloys, etc), it felt good to be back in it. Felt special.The car passed the MOT first time, with only a drop link as an advisory - something I knew about since the last one but never got round to fitting it. It passed! That same day I got some insurance sorted and took it to get an alignment sorted. The alignment was off the chart, but £90 later and the camber, toe and caster sorted, it felt outstanding to drive.
At this point, I thought about doing it up and keeping it, rather than selling it, but I thought I’d see how I go.
With the mechanics done, cosmetics was the next thing on my list.
Over the next few months, the following was done:
- Rebuilt headlights with new projectors
- Sprayed radio surround gloss black
- Wrapped ashtray gloss black
- Powder coated alloys back to silver
- Full tear-down detail of the car, including:
- All metals beneath bumpers and lights cleaned and polished
- Wheel arches cleaned thoroughly
- Wheels sealed and waxed
- Exhaust re-sprayed to gloss black (and silver bypass pipes)
- Paint work two-stage machine polished
- New number plates
- New number plate mount for the front
- Rewired DRL’s as DRL’s and not sidelights (on with ignition, off with headlights)
And here’s the photo bombardment!
Bought projectors with squared-off halo rings, and sprayed the 4 sides to only reveal the corners. I wanted to give them the newer Porsche look with the 4-LED’s on the corners, and they looked fantastic:
This was before the car was machine polished.
Some photos of the rest of the cosmetic overhaul:
Rear before clean:
Rear after clean:
Exhaust & rear before:
Exhaust & rear after:
Arches cleaned
Engine bay too
All metals cleaned and polished
Alloys detailed
Bumpers cleaned and machine polished
Back ‘PORSCHE’ lettering sprayed gloss black
Number plate mount
Headlights polished
And here’s the car as of this morning!
And there we have it.
If you’ve stayed with me this far, you deserve a pint.
Here’s a few photos took recently.
I’m keeping the car. Here’s to many happy miles
Thanks for reading!
rufusgti said:
Good god. That's a clean car. Well done, where do you find the time!?!
Self-isolation, and being a lecturer means I'm working from home, and the times when I'm not lecturing, well... this happened.It's been planned since August last year, so I was waiting for the right time. Two weeks of lovely weather, cloudy in between, made perfect weather for detailing (cloudy for machine polishing and waxing, etc). Maddie (other half) was an absolute gem through it all - she knew it was in the works, but to put up with me being like "Right off to work on the car for hours bye!" was lovely. She's in her last year of University so has a lot of studying and working to do herself, so we were both busy. Don't worry, she's a student at another University, not mine... that would be weird.
shalmaneser said:
Very impressive work - the car looks great and I'm glad to see you've got it back on the road!
I have a question WRT the headlights and the dreaded MOT.
I'm working on fitting a set of projectors from a BMW X3 to my 996 - see here:
Fitting these means the 'flash to pass' functionality (ie. flashing your high beams when your lights are turned off) is now lost as you obviously can't flash bi-xenons without having them on. It looks like you don't have that ability either - have you experienced any issues with this come MOT time or have you got around it another way?
Thanks!
My god that's genius! How? How did you mount the projector?!I have a question WRT the headlights and the dreaded MOT.
I'm working on fitting a set of projectors from a BMW X3 to my 996 - see here:
Fitting these means the 'flash to pass' functionality (ie. flashing your high beams when your lights are turned off) is now lost as you obviously can't flash bi-xenons without having them on. It looks like you don't have that ability either - have you experienced any issues with this come MOT time or have you got around it another way?
Thanks!
Well I have a very bright Cree LED bulb that has a front projector on it, so it's fine for the day time as you can see them flashing. In the night when the low-beams are on, the bi-xenons flick those up, so the full beams in the day time are only ever used to flash people. MOT didn't even question it.
I do have a wiring diagram that turns on your low-beam when you flash your high-beam though, if you're interested? Someone did it for be on 986forum, but never got round to wiring it up. If you implement that, your low beams would always flash. There's a lot of talk of never flashing a HID bulb, but modern cars do it, so I don't see the issue. For as long as it has the hot reignite feature (think that's what it's called?) then it's fine.
Here's the diagram: http://986forum.com/forums/uploads02/gt1574565997.... (the 'solenoid' being the bi-xenon positive wire)
Let me know if you do it! Would want to do it myself.
CornedBeef said:
Good effort, that looks really really good. I've got a few cosmetic bits and general tidying I want to do to the 996 this week - nothing being open and the other half still working this weekend means I've got a clear run. I still want a 986!
They're beautiful cars. My brother in law had a 996 and I must say I did want one for a while, but having already own a 986, I couldn't justify the double-price difference given the fact it wasn't, in my eyes, double the car. But on saying that, if I had one I'd love it. Would love to see yours!ATM said:
I still want a 986 but I have a 981. What's your excuse?
Swap?___
Some final touches to the exterior included some tyre gel:

The new number plates with a nice little 'Porsche Classic' added:

The rear 'Porsche' lettering was added back


Then the interior was finished!

The steering wheel was re-dyed as it was wearing quite substantially

And I also re-dyed the gearstick and handbrake

All interior panels were washed and dressed

Which led to a fresh interior

And there we have it. Detail finished.
Only took me a solid week to do (two weeks but stretched over half days).
Here's a walk-around video showing the car as a whole. Shows off the paint much better!
https://www.youtube.com/watch?v=zVZzGSfBTJ0
...but my number plate fell off this morning

Damn. The number plate tape is perfect for paint, so the rear plate is stuck properly. The front doesn't stick to that plastic very well, so I may need screws. Except how the hell do I mount a plate to the mount? There's 4 rectangular holes, any ideas?
Edited by geraintthomas on Friday 3rd April 09:42
alpha channel said:
Glue a washer and nut on the backside of the plastic mount and attach to that? Nice work on the car.
Not a bad idea that...shalmaneser said:
Thanks for your kind words - I work in design so I've got lots of tools to help me do this sort of stuff!
The mount is 3D printed and then the projector has been screwed to that. I had some not so good results using £30 ebay projectors on my old e36 M3 but it's easy to find second hand projectors from BMW/Jag/Audi on Ebay and they're much better quality than the Chinese Ebay specials.
Only problem is they're designed for fitting into a specific housing and that's where the 3D printer comes in.
Currently looks like this:
I need to find a way to hide the gubbins on the inside - probably just another 3D printed part TBH. Then re-attach the lens and we're away.
Progress has stalled slightly however as I managed to pick up a bargain pair of OE projector headlights and while the output is a million times better than the crappy halogens it's not great and having had the projector unit out the silvering is starting to fade. It would be great to have bi-xenons too as the standard ones are main beam xenon only so the work isn't done yet...
That's outstanding! How would the light be adjustable? Is the 3D printed mount mounted to the original adjusters? If so, you could just print off another shroud and that would be that. If you manage to do it I'd be interested as the halo rings I have can be disconnected so that they're separate.The mount is 3D printed and then the projector has been screwed to that. I had some not so good results using £30 ebay projectors on my old e36 M3 but it's easy to find second hand projectors from BMW/Jag/Audi on Ebay and they're much better quality than the Chinese Ebay specials.
Only problem is they're designed for fitting into a specific housing and that's where the 3D printer comes in.
Currently looks like this:
I need to find a way to hide the gubbins on the inside - probably just another 3D printed part TBH. Then re-attach the lens and we're away.
Progress has stalled slightly however as I managed to pick up a bargain pair of OE projector headlights and while the output is a million times better than the crappy halogens it's not great and having had the projector unit out the silvering is starting to fade. It would be great to have bi-xenons too as the standard ones are main beam xenon only so the work isn't done yet...
Edited by shalmaneser on Friday 3rd April 10:57
Beautiful work though.
paddy27 said:
Awesome thread. Tha ks for keeping it updated.
Just read the whole thread with a bottle of wine.
Am impressed with everything you've done.
Thank you so much, means a lot. Certainly been a labour of love. Well, a love hate relationship with it! Lots more to come though, will update with a list tomorrow.Just read the whole thread with a bottle of wine.
Am impressed with everything you've done.
Podie said:
Car looks fantastic - glad you’ve stuck with it
Many thanks bud, appreciate it. Glad I've stuck with it as well.Roboticarm said:
Wow, blast from the past Ger, just read the whole thread. I know you from Celica club (i'm ScottChester on there) great to see you still enjoying cars. I see you are also still amazing at detailing too !
Glad you decided to keep the car, boxster is on my list of cars to own one day. Infact I narrowly missed out on a cat n from copart a few months back... Outbid by £50
Ah Scott! How's things? Long time no speak. Thanks for the kind words, really appreciate it.Glad you decided to keep the car, boxster is on my list of cars to own one day. Infact I narrowly missed out on a cat n from copart a few months back... Outbid by £50
Oh damn that sucks! All I'd say is if you're handy with mechanics, go for it. If not, avoid. They will go wrong and if you can't fix them yourself they're too expensive! But if you can, they're fantastic. Don't get a low milage example (for IMS reasons) and enjoy it.
Updates on the car:
Managed to bend the plate overnight

And it helped, until it started to come off a little. I think I need some stronger tape as it's not the best!
Started the car in the night and realised my headlights were WAY too high, after fitting the lenses. This is either because the projectors are tilted up slightly in the housing, or the housing adjustments have shifted on them both. I could adjust these, but the left lens cut-off is curved, and that needs an adjustment to the cut-off plate inside the projector, which means I have to split the headlight again. Damn! Ah well, that'll teach me to not align them before fitting the lenses.
Anyway. Went out this morning to catch some nice beading:


Right! The next plan on the cards is to re-build the footwell lights. At the moment, there are untidy wires coming from the fusebox in the footwell and going to some SMD's cable tied and double sided taped to under the footwells. It's a mess, and it looks horrible if you were to look at them. The lighting looks lovely, but I need to re-do them.
So I've ordered two of these standard Porsche boot light holders:

Two of these T5 bulb holders:

Some braided wire wrap:

As well as two festoon bulbs for the boot lights, two T5 bulbs for the T5 holders and some spade connectors for the boot bulb lamps.
The plan is to cut a hole in the passenger side foam, and the drivers side heater pipe, perfect size enough for the boot light can clip into it. I'll make a template from the front boot hole to give a perfect template. I'll run wires above the foam (passenger side) and within the heater pipe (drivers side) that all run to the fuse box. The wires will have the braided wrap so they look nice and neat, and because they're connected to the boot lights which are clipped into tailored sized holes, it should look totally factory. Those light are for the courtesy lights when you open the door, however I want a subtle footwell glow for when you're driving at night. That's where the T5 bulbs come in. They're tiny and give off a small amount of light. The plan is to glue the T5 holders inside of the original boot holders so that both the subtle illumination and courtesy light are coming from one lamp, whilst giving me (and any future owners) the opportunity to swap the bulbs over if they wish.
I have two questions though:
- Can I fit in an inline fuse on the positive cable in case any future owner fits a halogen bulbs in the footwell, to save it damaging any wiring or other components? It happened on my last car when I put a normal 501 bulb in the footwell as opposed to an LED, and it blew the courtesy light module. If so, same amp as the fuse for the lights I'm jumping from?
- Will the heat from the heater pipe in the footwell be a problem for the wiring/bulbs? I can't imagine they'd get that hot. I've put an LED light in my oven before and that's been fine (though probably not recommended).
Cheers!
Edited by geraintthomas on Monday 6th April 10:13
Just went to check my passenger side headlight, the one that has a massively curved cut-off pattern. I thought I'd need to go and open the unit again to re-bend the cut-off shield, but turns out I just installed the bulb a little on an angle. Re-sat the bulb and it's perfectly straight. Still need to aim the headlights but jesus christ the light output is phenominal. A beautiful blue hue on the cut-off line, incredible light output beneath it, whilst pitch black above the cut-off. Literally like a lazer. Really reminds me of a modern Mercedes Xenon unit, properly floods the road whilst leaving no glare.
I live right next to a Harvester that's currently being renovated. No literally, my garden fence wall is their outer kitchen wall. There's no one there, so I'll pop in the car park tomorrow to show you a beam photo.
At least I'm still self isolating!
Wish we could go for drives. They say no essential travel, but all I want to do is to step into the car, drive for an hour, and return home without meeting or seeing anyone else. Just a shame we can't. Newly refurbished car and can't drive it anywhere.
Still, it's giving me the time to sort all of the odds and ends, such as:
- Fixed the drop on the drivers window, as it never dropped much when opening the door (used to catch on close)
- Went to replace the cabin blower fan, but looks a challenge to get to. Instead I've WD-40'd it whilst I had it partly visible, and seems to have stopped the squeeling
- Fixed a bad wire for my radio's ACC power. Now and again, going over a bump would put the radio into shut down, as if you've taken out the key. All sorted
All that's left to do on my maintenance list is:
- Re-locate the 12v auxillery plug. I've replaced the current one with a permanent USB port for Apple CarPlay
- Fix roof handle rattle. There's a metal rattle now and again which stops if I push the 'PUSH' part and close it agian. No idea...
- Repair rear demister lines as 3 don't work. Already got the repair kit
- Fix cup holder. The slide mechanism is broken; probably a bad spring
- Replace radio microphone. I broke mine by accident
- Fit my newly purchased short shifter kit with new linkage end socket things
- Replace O/S droplink
- Replace front bonnet struts
But next up is the footwell light build. I'll let you know how I get on as I have a good feeling about this.
While I wait for the courtesy lighting kit to arrive, I thought I'd change over my shifter to the short shifter.
Removal of the center console was a doddle. The whole job took under an hour.

Here's a side by side.

Machined black metal always looks lovely.
I had to take out the stalk, spin it 180 degrees, and put it back in the correct way as it was angling the wrong side. I've seen posts that this is how they get away with copying the more expensive kits.
And installed:

I also installed new shifter cable ends, just in case, although the ones I took out seemed absolutely fine in all honesty.
The difference is astonishing. Firsty, as you'd expect the throw is a lot shorter, and feels a lot more precise. The main thing however is the feel of the shift. It feels snickety and almost like a bolt-action rifle, with no marshmallow feel to the gear change. Feels very much like a Japanese performance car's shift. The throw is noteably shorter, too. Because of the precision and the lack of slop, changing gears is an absolute pleasure. Left and back into second, 'click-click', seemingly barely moving my fist on the gearstick. Slipping it out of second gear and punching it forward into third year feels like a small one-inch punch forward clicking it into gear. It's beautifully mechanical. I drove a Formula Ford not too long ago, and had a lovely resemblance to it.
If you want the same one (black, unlike the other blue Ebay ones), here's the link.
For £50, it's a no brainer. If you want to spend a little something to improve the feel of the car, then do this. How I haven't done this before now is beyond me.
I'll let you know how the footwell lights get on.
Removal of the center console was a doddle. The whole job took under an hour.
Here's a side by side.
Machined black metal always looks lovely.
I had to take out the stalk, spin it 180 degrees, and put it back in the correct way as it was angling the wrong side. I've seen posts that this is how they get away with copying the more expensive kits.
And installed:
I also installed new shifter cable ends, just in case, although the ones I took out seemed absolutely fine in all honesty.
The difference is astonishing. Firsty, as you'd expect the throw is a lot shorter, and feels a lot more precise. The main thing however is the feel of the shift. It feels snickety and almost like a bolt-action rifle, with no marshmallow feel to the gear change. Feels very much like a Japanese performance car's shift. The throw is noteably shorter, too. Because of the precision and the lack of slop, changing gears is an absolute pleasure. Left and back into second, 'click-click', seemingly barely moving my fist on the gearstick. Slipping it out of second gear and punching it forward into third year feels like a small one-inch punch forward clicking it into gear. It's beautifully mechanical. I drove a Formula Ford not too long ago, and had a lovely resemblance to it.
If you want the same one (black, unlike the other blue Ebay ones), here's the link.
For £50, it's a no brainer. If you want to spend a little something to improve the feel of the car, then do this. How I haven't done this before now is beyond me.
I'll let you know how the footwell lights get on.
CornedBeef said:
That shifters straight into my watch list, to buy at a weaker time (after a beer). I didn't like the bright blue on the other ones, I hadn't found this one in black!
You won't regret it. I've got an itch to just go and drive it now purely because of that shift.shalmaneser said:
I fitted one of those shifters immediately after I bought my 996 - a blue one though.
Makes a huge difference to the gearshift! Make sure that the circlips are properly seated though, mine were a bit of a fight at first.
I love a cheeky bit if blue anodising, but it can't be seen when fitted so what difference does it make?!
I did consider it, but then when I saw the black I just need it it in my life... hah!Makes a huge difference to the gearshift! Make sure that the circlips are properly seated though, mine were a bit of a fight at first.
I love a cheeky bit if blue anodising, but it can't be seen when fitted so what difference does it make?!
ATM said:
I'm not sure I'm sold on the shorter throw. I did buy a 9x7 shifter for my 996 which has been fettled with roller bearings and generally tightened up. The 9x7 shifter is a little bit shorter in throw. I have not fitted it yet.
I've since found this video which I think is good.
https://www.youtube.com/watch?v=iJv0wI72aRg
Ah really? That's a shame. Have you tried one? I did consider the 9x7 shifters but for the price I gave this a go first.I've since found this video which I think is good.
https://www.youtube.com/watch?v=iJv0wI72aRg
GR_TVR said:
I've read this thread from start to finish over the last week and thoroughly enjoyed it.
I purchased a 996 at the start of the year which has been keeping me busy - love what you've been doing with your 986!
Mine has an aftermarket double din Kenwood in, which is OK, but getting on a bit now.
Really liking the look of that xtrons unit...especially with your custom templates etc...!
That's beautiful! How are you finding it? I love the GT3 parts, eventually want to get them for mine. The Xtrons radio is nice but by god does it need work to set up right. The wiring is a pain, the harness is almost impossible to fit unless you have the patience of a saint, you need to cut a bit of wood to fill the gap beneath the radio (I wrapped wood in gloss black), then when all that's done you need to wipe the radio, do not sign into google as the account sync will slow it down, and just side-load all APK packages onto it. That's just to get it working normally, without my tweaks! I had to tweak the firmware to patch the start up screens, then design custom icons. But, it's done and it's worth it if you have got the time!I purchased a 996 at the start of the year which has been keeping me busy - love what you've been doing with your 986!
Mine has an aftermarket double din Kenwood in, which is OK, but getting on a bit now.
Really liking the look of that xtrons unit...especially with your custom templates etc...!
Edited by GR_TVR on Thursday 9th April 14:54
Mark-t said:
It's great to see you've regained the love for this car and the updates are superb! That paint finish is amazing too, top work and attention to detail.
It was me that popped down in my Honda with the impact gun btw
Ahhhhh! Ladies and gentlemen, the saviour. Thanks again for that - when all this COVID-19 business is done, give me a shout - we'll go for a drive and I'll buy you a beer.It was me that popped down in my Honda with the impact gun btw
Smitters said:
I've found heavy duty velcro works well with number plates. Hairdryer the glue sides and hold in place for a few mins. Held my Caterham plate on while on track just fine.
Ordered - thanks for the tip!Right.
Yesterday saw the installation of the footwell lights.
My previous lights were simply SMD boards stickied to the underside, with tape and cable ties holding them on. Real bodge job, but the effect was nice. Nevertheless I wanted a more OEM approach that allowed the change of bulbs should I (or any future owner) want to.
The previous courtesy light "loom" (if you could call it that) was this:

As well as this for the ambient lights:

Eww.
But I wanted to make a much tidier, bulb-swappable one.
Started by staring at my 'bits' for a good half hour

So this is what I've come up with:

The wires are held together by wire braid. There's 4 connectors for each bulb; two for the courtesy light + and -, and two for the ambient light + and -.
The courtesy lights are the original lamp connectors, connected by original Porsche connecting blocks. The ambient lights are just spade connectors which I had lying around.


Connected, it looks like this:

Wires aren't amazingly accurate when it comes to length, but it works. This allows the user to pull the lamp out of the footwell, disconnect it if they like, and change the bulb, like a normal courtesy lamp in the boot.
Next up was to tackle my old wiring

What a mess. I originally extended the wires in the fuse box used for the courtesy light, and also the side lights, so I could tap into them easier. I did this horrendously before, but have re-done it properly this time:

Made a paper template for the lamps:

Then cut holes in both the passenger side foam, and the drivers side heater pipe.
The result:


Courtesy lights:

Night driving ambient lights:

The installation is lovely. It's easy to change bulbs should I want a change of colour (before was permanent SMD boards, non-changable), and it looks lovely and neat under there. They're also the exact same bulbs used in the boot courtesy lamps, as well as the same bulbs used for the original interior ambient lighting (T5 bulbs), just so that it's consistent.
My only concern is the heat going through that pipe for the drivers lamp. As I've mentioned before, I can't imagine the air would get that hot to cause an issue with these bulbs.
The lights are all white LED bulbs, but the one I've fitted into the roof doesn't match too well. It's a little blue, and it's a pain in the ass to get right as I need a 501 W5W that's 5000k. not 6000k, except ebay just throw numbers around so it's impossible to get it right. I've ordered a few bulbs to see if one of them will match.
Managed to get a better 5000k courtesy light - now all of the interior is white, rather than cool white or warm white. It's lovely and modern.
Anyway, decided that in the future I'd like to take the centre console to the body shop and have it sprayed gloss black to match the car's exterior (as it was an optional extra). In the meantime, I thought I'd wrap it with what wrap I had left, to see what it would be like.
Stripped it to wrap the black plastic parts

Here we go

Forgot to take a half-way shot, so here it is finished


Doesn't look half bad like that to be honest. The wrap cost less than a tenner and I already had some left over, so was free for me to do.
There's the odd bubble here and there, but I didn't bother getting it perfect as I wasn't sure I was keeping it (was sold on spraying it), but as it looks half decent I may buy more wrap and do it perfectly. The finish isn't as smooth as paint and has more orange peel than a painted surface, but it's temporary.
Anyway, decided that in the future I'd like to take the centre console to the body shop and have it sprayed gloss black to match the car's exterior (as it was an optional extra). In the meantime, I thought I'd wrap it with what wrap I had left, to see what it would be like.
Stripped it to wrap the black plastic parts
Here we go
Forgot to take a half-way shot, so here it is finished
Doesn't look half bad like that to be honest. The wrap cost less than a tenner and I already had some left over, so was free for me to do.
There's the odd bubble here and there, but I didn't bother getting it perfect as I wasn't sure I was keeping it (was sold on spraying it), but as it looks half decent I may buy more wrap and do it perfectly. The finish isn't as smooth as paint and has more orange peel than a painted surface, but it's temporary.
KillerHERTZ said:
Nice project!
Looks loads better with the Porsche logo back on the bootlid.
Not feeling the centre console wrap myself, makes it look cheap IMO.
I would have tried Plastic bumper paint (available from Halfords) - I have done my faded numberplate plinth and wiper cover. its hardwearing and looks original.
I think you're right. I want it gloss black but wrap gloss just isn't cutting it. Taking it off tomorrow, and off to the body shop it goes soon!Looks loads better with the Porsche logo back on the bootlid.
Not feeling the centre console wrap myself, makes it look cheap IMO.
I would have tried Plastic bumper paint (available from Halfords) - I have done my faded numberplate plinth and wiper cover. its hardwearing and looks original.
HM-2 said:
I think the orange-peel is because of the texturing of the plastic under the wrap no?
If I were you I'd be tempted to get a spare of eBay, flatten and plastic prime it, then spray it body colour yourself. With a bit of care you can get a decent finish using good quality rattle cans; I certainly did on the wing mirror of my M140i.
Nah it's actually on the vinyl itself. It's quite cheap.If I were you I'd be tempted to get a spare of eBay, flatten and plastic prime it, then spray it body colour yourself. With a bit of care you can get a decent finish using good quality rattle cans; I certainly did on the wing mirror of my M140i.
To be honest, the price of more vinyl, primer, lacquer, spray and another centre console would be the same as getting it sprayed so may as well get it professionally done!
Roboticarm said:
All good here mate, been through a fair few cars since I was last on Celica club, currently running an abarth turismo picked up on a great deal as pre reg.
The boxster I was looking at was planned to be a toy for the weekend, a Porsche has always been a dream car of mine and my old boss had a Cayman and after traveling it that I have to own one at some point, they just feel like a special car to be in. His was an auto non S model Cayman and it still felt really special.
Yours looks great and the thread is a great read. Will be following the thread.
Oh lovely! Any photos of it?The boxster I was looking at was planned to be a toy for the weekend, a Porsche has always been a dream car of mine and my old boss had a Cayman and after traveling it that I have to own one at some point, they just feel like a special car to be in. His was an auto non S model Cayman and it still felt really special.
Yours looks great and the thread is a great read. Will be following the thread.
That's what I thought when I drove mine. I've driven a 986, 996, 997, 991, Macan, and a Cayenne, and the one consistency throughout all of them (17 years between them all as well) is the sense of something special. I can wholeheartedly recommend any of them!
MadRob6 said:
You need the little plastic inserts that go into the slots, part 22 in the diagram below
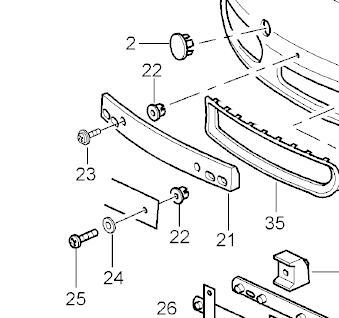
Part number is 999 507 040 40
They let you get a self tapping screw in there and the inserts can slide side to side so you can centre things up nicely. I did mine last year and it should look something like this.
That's a great help, thanks! I've opted for using sealant for the time being though.Part number is 999 507 040 40
They let you get a self tapping screw in there and the inserts can slide side to side so you can centre things up nicely. I did mine last year and it should look something like this.
ddom said:
This may fly in the face of things but I used standard silicone sealant when the self tapping screws in mine started messing about. If the plate ever needs to be removed it’s easy enough with some dental floss or similar.
Exactly what I've just done. Thanks for the tip.gregs656 said:
Velcro will do it.
Unfortunately it was the adhesive side of any pad onto the plate mount that was the issue. Even with velcro, it would still need adhesive.In the end I've opted for 6 small dabs of tiger seal in each corner and in the middle in conjunction with the pads. It's on there solid now!
Couple of small updates:
Removed the centre console black vinyl as it did indeed start to bubble, so it's now back to black. I've used AutoFinesse Dressle in the meantime which coats all interior/exterior plastics with a deep shine, that dries quite quickly and lasts. You can use it for interior as it doesn't dry sticky. It hides a lot of scratches, too.

You can see where I forgot to apply some when the armrest was down:

Lovely stuff.
I've also just found out that my car was supposed to have heated wing mirrors, which obviously don't work. I'll check the door wires but I suspect it's just the glass elements that have burnt out after 17 years of use. Cheap enough - £11 each on ebay, and that includes blue tinted ones too for night driving. Should be quite a nice upgrade.
Gassing Station | Readers' Cars | Top of Page | What's New | My Stuff