Porsche Boxster 986.2 2.7
Discussion


Has been a while since the last update as not much has happened with the boxster over the last few months. It's actually been slightly forlorn lately as with the house move the new garage hasn't been up to storing it, (update on the garage on my Rover thread if anyone's interested) so it's been outside which irks me but needs must. Can start going back in the garage soon.
This is more a pre update as I don't have a huge amount of info to go into however the Porsche has just failed the MOT. It failed on emissions, front pads (although these could have been an advisory I forget right now) and passenger side sidelights not working. The emissions (thankfully) stems from broken exhaust hangers from cats to u bend and u bends to silencer. I've ordered 4 replacement clamps which should seal the system up, that's a job I'll be doing on Saturday. I've ordered front Pagid pads and rear Pagid discs (rear discs were an advisory too but looking at them on the ramp they need replacing really so got them as a 'why not') so the Boxster will be getting a bit of a pampering this weekend ready for the re-test. The only worry are the sidelights. This issue could either be a 15p fuse oorrrr the lights switch in the cabin - £120 we'll know more in a few days. It needs a good clean inside and out and a service wouldn't go amiss either, all will be done in the next few weeks; potentially with a view to selling in the early summer
  not essential to sell but I'm going to see if I can be a 1 car man for a while ha
Pics to follow in a few days
This is more a pre update as I don't have a huge amount of info to go into however the Porsche has just failed the MOT. It failed on emissions, front pads (although these could have been an advisory I forget right now) and passenger side sidelights not working. The emissions (thankfully) stems from broken exhaust hangers from cats to u bend and u bends to silencer. I've ordered 4 replacement clamps which should seal the system up, that's a job I'll be doing on Saturday. I've ordered front Pagid pads and rear Pagid discs (rear discs were an advisory too but looking at them on the ramp they need replacing really so got them as a 'why not') so the Boxster will be getting a bit of a pampering this weekend ready for the re-test. The only worry are the sidelights. This issue could either be a 15p fuse oorrrr the lights switch in the cabin - £120
we'll know more in a few days. It needs a good clean inside and out and a service wouldn't go amiss either, all will be done in the next few weeks; potentially with a view to selling in the early summer not essential to sell but I'm going to see if I can be a 1 car man for a while ha Pics to follow in a few days
Edited by squareflops on Friday 29th December 07:45
On the subject of sorting the exhaust, a mixed bag today...
Ease and a straightforward job turned to frustration. A friend offered to help a few nights ago at one of the boys birthday dos and I was happy to take him up on the offer. Was helpful as he had a grinder which I don't have atm, I was hoping not to need a grinder but
 Untitled by Kaeser Devon, on Flickr
More of that in a minute. With the car on ramps I started on the the NS first, it couldn't have gone more straightforwardly
 Untitled by Kaeser Devon, on Flickr
 Untitled by Kaeser Devon, on Flickr
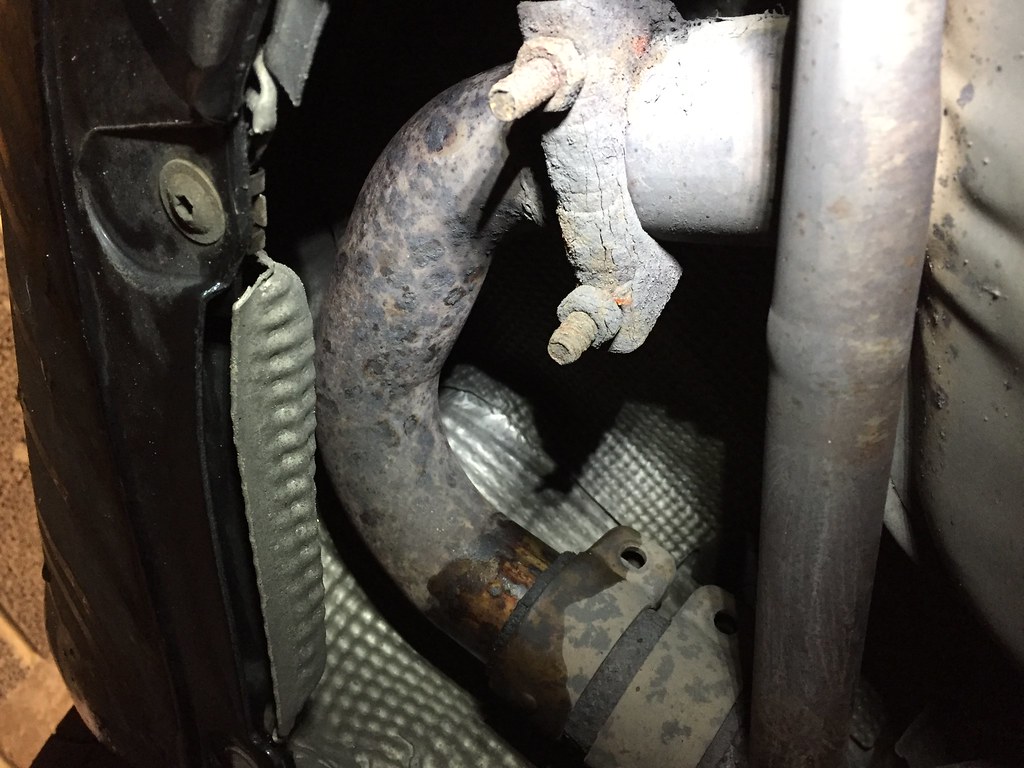
Having sprayed the joints in penetrating fluid things started to come (break) apart easily enough. You'll see the 'double' clamp on bend-to-silencer missing it's retaining bolts, that's how it's been for some time presumably and the cat-to-bend clamp being a cheap after market replacement, partly responsible for the emissions issue on the MOT. These were purchased to to do the job correctly
 Untitled by Kaeser Devon, on Flickr
This was the u bracket after some finagling
 Untitled by Kaeser Devon, on Flickr
And the double after some grinding with the u bend removed
 Untitled by Kaeser Devon, on Flickr
 Untitled by Kaeser Devon, on Flickr
Some exhaust putty applied and everything went together beautifully
 Untitled by Kaeser Devon, on Flickr
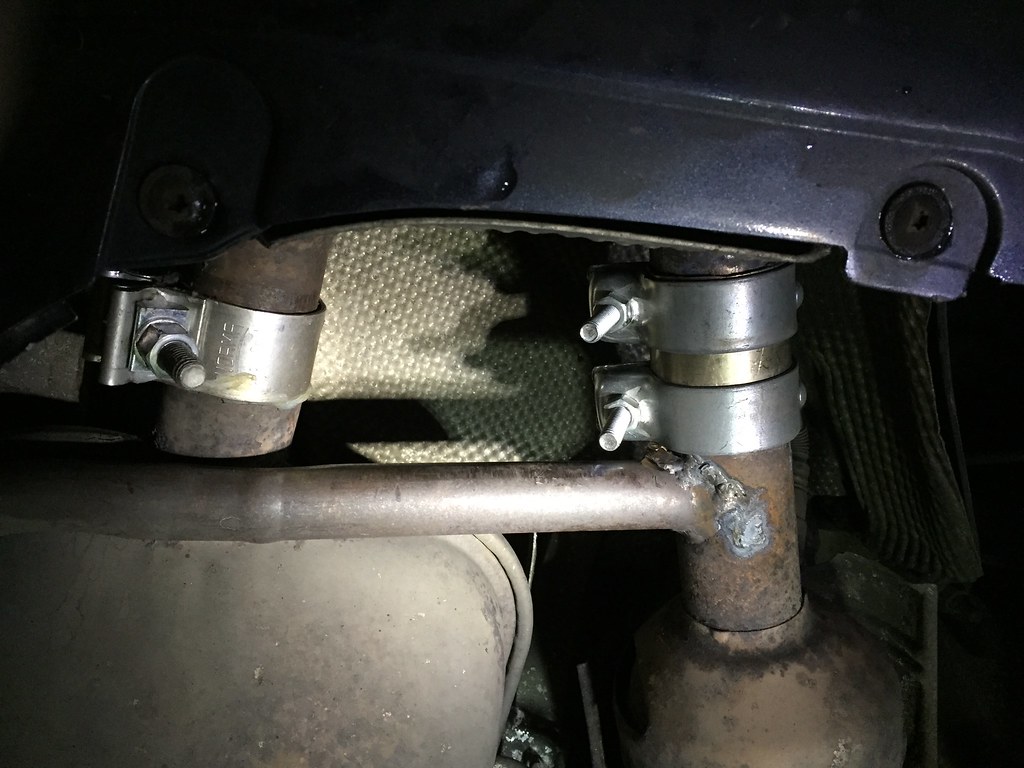
Note the position of the bypass pipe, this will become important in a moment. So onto the OS. Same process right? Wrong... The company that fitted the bypass pipes made 2 errors when doing so on the RHS of the car. Spot the first one
 Untitled by Kaeser Devon, on Flickr
Pretty obvious right? The bypass had been welded to the double clamp! Quite comprehensively too. Well, out came the grinder again to remove the excess weld. Now at this point I said to my mate "Jim, whatever you do, do not cut into the exhaust pipe" in my sternest tone. I would have been happier doing this part of the process as I'm very cautious however Jim was all "I got this" OK. unfortunately he did not "have this" and promptly cut a 1" slice clean through the cat pipe where it joined the u bend pipe Now this in itself isn't a big issue, it will need welding back up but 5 mins with any competent welder will have it sealed again as if it hand't happened. What is more frustrating is the second problem with the bypass pipe, it's much closer to the double clamp on this side than the other, so close that; given the way the u bend operates when being moved and the length of the double clamp the clamp won't slide down the pipe toward the cat enough to allow the u bend to be refitted. Essentially the exhaust fitter should have put another slight bend in the bypass pipe to move it closer to the cat. I'll be on the phone to them first thing Tuesday morning to book in and rectify the situation. So ended the day with one side complete and the other half put back together pending a fix.
Cars
Ease and a straightforward job turned to frustration. A friend offered to help a few nights ago at one of the boys birthday dos and I was happy to take him up on the offer. Was helpful as he had a grinder which I don't have atm, I was hoping not to need a grinder but
Untitled by Kaeser Devon, on FlickrMore of that in a minute. With the car on ramps I started on the the NS first, it couldn't have gone more straightforwardly
Untitled by Kaeser Devon, on FlickrUntitled by Kaeser Devon, on FlickrHaving sprayed the joints in penetrating fluid things started to come (break) apart easily enough. You'll see the 'double' clamp on bend-to-silencer missing it's retaining bolts, that's how it's been for some time presumably and the cat-to-bend clamp being a cheap after market replacement, partly responsible for the emissions issue on the MOT. These were purchased to to do the job correctly
Untitled by Kaeser Devon, on FlickrThis was the u bracket after some finagling
Untitled by Kaeser Devon, on FlickrAnd the double after some grinding with the u bend removed
Untitled by Kaeser Devon, on FlickrUntitled by Kaeser Devon, on FlickrSome exhaust putty applied and everything went together beautifully
Untitled by Kaeser Devon, on FlickrNote the position of the bypass pipe, this will become important in a moment. So onto the OS. Same process right? Wrong... The company that fitted the bypass pipes made 2 errors when doing so on the RHS of the car. Spot the first one
Untitled by Kaeser Devon, on FlickrPretty obvious right? The bypass had been welded to the double clamp! Quite comprehensively too. Well, out came the grinder again to remove the excess weld. Now at this point I said to my mate "Jim, whatever you do, do not cut into the exhaust pipe" in my sternest tone. I would have been happier doing this part of the process as I'm very cautious however Jim was all "I got this" OK. unfortunately he did not "have this" and promptly cut a 1" slice clean through the cat pipe where it joined the u bend pipe
Now this in itself isn't a big issue, it will need welding back up but 5 mins with any competent welder will have it sealed again as if it hand't happened. What is more frustrating is the second problem with the bypass pipe, it's much closer to the double clamp on this side than the other, so close that; given the way the u bend operates when being moved and the length of the double clamp the clamp won't slide down the pipe toward the cat enough to allow the u bend to be refitted. Essentially the exhaust fitter should have put another slight bend in the bypass pipe to move it closer to the cat. I'll be on the phone to them first thing Tuesday morning to book in and rectify the situation. So ended the day with one side complete and the other half put back together pending a fix. Cars
Edited by squareflops on Saturday 30th December 21:04
Well round 2 with the Boxster. The return to Prospeed didn't got exactly to plan. Was there for two days and when I returned the only difference was the small knick that the grinder caused had been welded up. Some discussion later and the double clamp was ground down on the ends slightly which allowed easier fitment. Unfortunately Prospeed didn't have any exhaust sealant other than silicone  so I had to strip the drivers side down today and seal it all up properly. Thankfully all done now properly, air tight and ready for the MOT. The sidelight issue has been solved also by replacing the 7.5amp fuse plus one side light bulb / number plate bulb.
 Untitled by Kaeser Devon, on Flickr
This was it as it came from Prospeed, looks kosher but still an ever so slight blow due to no sealant
 Untitled by Kaeser Devon, on Flickr
I took this opportunity to clean the u pipes up with some sandpaper to ensure the best fitment and sealing
 Untitled by Kaeser Devon, on Flickr
 Untitled by Kaeser Devon, on Flickr
So that's that all done. MOT Monday morning I'm slightly
  by some of the advisories on the MOT- stone chips in windscreen, where?! Show me a 14 yr old car (especially German) with a perfect windsreen, I certainly can't see any imperfections in it other than very minor marks from 14 years of normal driving .
Under trays fitted was another one, really
Tyre valves cracking - good lord! When did I sleep with the MOT testers wifeI pay quite a lot of attention to previous MOT history when looking to buy a new car and some of these are irrelevant/unwarranted IMO and may effect a potential buyers opinion of the car. Oh well..
To address the advisories that I do agree with
 Untitled by Kaeser Devon, on Flickr
new rear discs and front pads that I'll get around to fitting either tomorrow or next weekend. Will keep me busy
so I had to strip the drivers side down today and seal it all up properly. Thankfully all done now properly, air tight and ready for the MOT. The sidelight issue has been solved also by replacing the 7.5amp fuse plus one side light bulb / number plate bulb. Untitled by Kaeser Devon, on FlickrThis was it as it came from Prospeed, looks kosher but still an ever so slight blow due to no sealant
Untitled by Kaeser Devon, on FlickrI took this opportunity to clean the u pipes up with some sandpaper to ensure the best fitment and sealing
Untitled by Kaeser Devon, on FlickrUntitled by Kaeser Devon, on FlickrSo that's that all done. MOT Monday morning
I'm slightly by some of the advisories on the MOT- stone chips in windscreen, where?! Show me a 14 yr old car (especially German) with a perfect windsreen, I certainly can't see any imperfections in it other than very minor marks from 14 years of normal driving . Under trays fitted was another one, really
Tyre valves cracking - good lord! When did I sleep with the MOT testers wife
I pay quite a lot of attention to previous MOT history when looking to buy a new car and some of these are irrelevant/unwarranted IMO and may effect a potential buyers opinion of the car. Oh well.. To address the advisories that I do agree with
Untitled by Kaeser Devon, on Flickrnew rear discs and front pads that I'll get around to fitting either tomorrow or next weekend. Will keep me busy
Thanks TR4man ha. Indeed will not be returning, shame.
Advisories are not the end of the world and it can all be explained easily enough, I'll have to devote a paragraph in the for sale ad about it I guess!
Brompty - to be honest the exhaust is back as it should be now, everything is sealed and all easily disassembled if needs be in the future, was just a bit of a journey to get there urgh.
re-test tomorrow. I may take the garage to task re the over zealous advisory list, then again I may not
Well taken a few months but I finally got around to the brakes on Saturday. I really didn't fancy doing them in the wind/rain and the garage isn't really big enough to stretch out with it being a single. Couldn't have asked for better weather on Saturday morning so got cracking. I really find doing stuff like this therapeutic (quite necessary atm) and believe that if you can change you a wheel you can change discs and pads, It's really a joy to do.
The front discs were deemed (by me) to be absolutely fine regardless of what my friendly MOT tester man said, I concurred with him about the front pads and rear discs as we'll see momentarily. Rear pads are fine too.
Started with the front pads. The calipers are well designed 4 pots, the locating pin was a little tight on both sides due to a little surface rust build up but a drift soon saw then out and old pads removed.
My work station for the day, quite secluded with no through traffic, right next to my house
 Untitled by Kaeser Devon, on Flickr
Pad removal was very simple, no need to remove or rotate the caliper, simply slide the pin out and pull the pads
 Untitled by Kaeser Devon, on Flickr
Home made drift
 Untitled by Kaeser Devon, on Flickr
and pads out, both wear sensors were already broken but that's almost to be expected
 Untitled by Kaeser Devon, on Flickr
Cleaned the pins up, I don't have a bench grinder atm due to not having a bench so had to make do with hand held sand paper
 Untitled by Kaeser Devon, on Flickr
and cleaned; a bit, a world of difference!
 Untitled by Kaeser Devon, on Flickr
Old pads vs new pads
 Untitled by Kaeser Devon, on Flickr
 Untitled by Kaeser Devon, on Flickr
 Untitled by Kaeser Devon, on Flickr
Never seen new pads rust before!
 Untitled by Kaeser Devon, on Flickr
 Untitled by Kaeser Devon, on Flickr
 Untitled by Kaeser Devon, on Flickr
and all back together with the retaining pin copper slipped. All 4 pistons on both front calipers slid back smoothly so the calipers are working as they should. The fronts took no time at all. Turned my attention to the rears
 Untitled by Kaeser Devon, on Flickr
The rear discs particularly were knackered. The pads have worn quite strangely, leaving a high spot in the centre of the swept area of the disc, this will no doubt disappear in time as the new pads cut in
Outside face looks great
 Untitled by Kaeser Devon, on Flickr
Inside not so good
 Untitled by Kaeser Devon, on Flickr
 Untitled by Kaeser Devon, on Flickr
 Untitled by Kaeser Devon, on Flickr
and can see the step on the rear pads
 Untitled by Kaeser Devon, on Flickr
One thing I noticed on the rear was the hard line going to the caliper, great I thought, how do I remove the caliper to pull the disc without bending/snapping the line. I could see a union and then flexi so thought I may have to separate the two
 Untitled by Kaeser Devon, on Flickr
I thought, this may not be easy but then I noticed the bracket was holding the union was bolted to the strut rather then welded, awesome, undone and caliper could be removed, nice to have the air tools to hand again
 Untitled by Kaeser Devon, on Flickr
 Untitled by Kaeser Devon, on Flickr
 Untitled by Kaeser Devon, on Flickr
Thankfully the two retaining bolts were removed easily and the discs both sides pretty much popped off with no issues, super. I blew compressed air around the brake shoe mechanism and calipers which yielded a huge amount of dust but no doubt better for a de-dusting
Tiny shoes
 Untitled by Kaeser Devon, on Flickr
 by Kaeser Devon, on Flickr
I cleaned up both discs before fitting with brake and clutch cleaner, then all back together
 Untitled by Kaeser Devon, on Flickr
retaining bolts torqued to 7.5nm
 Untitled by Kaeser Devon, on Flickr
 Untitled by Kaeser Devon, on Flickr
Caliper bolts done back up to 63nm
 Untitled by Kaeser Devon, on Flickr
Before going for a spin
 Untitled by Kaeser Devon, on Flickr
Pulling the car off the drive I did what I always do and forget to pump the brakes to get the pedal back, queue panic when I couldn't stop and a quick pull of the hand brake stopped me rolling into anything
And after a few miles drive to check everything over, interesting wear on the still uneven rear pad
 Untitled by Kaeser Devon, on Flickr
That's gone now having done a few more miles.
So all in all a 100% success trip
All to do now is take a trip to France in it in May and then sell it when I get home
The front discs were deemed (by me) to be absolutely fine regardless of what my friendly MOT tester man said, I concurred with him about the front pads and rear discs as we'll see momentarily. Rear pads are fine too.
Started with the front pads. The calipers are well designed 4 pots, the locating pin was a little tight on both sides due to a little surface rust build up but a drift soon saw then out and old pads removed.
My work station for the day, quite secluded with no through traffic, right next to my house
Untitled by Kaeser Devon, on FlickrPad removal was very simple, no need to remove or rotate the caliper, simply slide the pin out and pull the pads
Untitled by Kaeser Devon, on FlickrHome made drift
Untitled by Kaeser Devon, on Flickrand pads out, both wear sensors were already broken but that's almost to be expected
Untitled by Kaeser Devon, on FlickrCleaned the pins up, I don't have a bench grinder atm due to not having a bench so had to make do with hand held sand paper
Untitled by Kaeser Devon, on Flickrand cleaned; a bit, a world of difference!
Untitled by Kaeser Devon, on FlickrOld pads vs new pads
Untitled by Kaeser Devon, on FlickrUntitled by Kaeser Devon, on FlickrUntitled by Kaeser Devon, on FlickrNever seen new pads rust before!
Untitled by Kaeser Devon, on FlickrUntitled by Kaeser Devon, on FlickrUntitled by Kaeser Devon, on Flickrand all back together with the retaining pin copper slipped. All 4 pistons on both front calipers slid back smoothly so the calipers are working as they should. The fronts took no time at all. Turned my attention to the rears
Untitled by Kaeser Devon, on FlickrThe rear discs particularly were knackered. The pads have worn quite strangely, leaving a high spot in the centre of the swept area of the disc, this will no doubt disappear in time as the new pads cut in
Outside face looks great
Untitled by Kaeser Devon, on FlickrInside not so good
Untitled by Kaeser Devon, on FlickrUntitled by Kaeser Devon, on FlickrUntitled by Kaeser Devon, on Flickrand can see the step on the rear pads
Untitled by Kaeser Devon, on FlickrOne thing I noticed on the rear was the hard line going to the caliper, great I thought, how do I remove the caliper to pull the disc without bending/snapping the line. I could see a union and then flexi so thought I may have to separate the two
Untitled by Kaeser Devon, on Flickr I thought, this may not be easy but then I noticed the bracket was holding the union was bolted to the strut rather then welded, awesome, undone and caliper could be removed, nice to have the air tools to hand againUntitled by Kaeser Devon, on FlickrUntitled by Kaeser Devon, on FlickrUntitled by Kaeser Devon, on FlickrThankfully the two retaining bolts were removed easily and the discs both sides pretty much popped off with no issues, super. I blew compressed air around the brake shoe mechanism and calipers which yielded a huge amount of dust but no doubt better for a de-dusting
Tiny shoes
Untitled by Kaeser Devon, on Flickr by Kaeser Devon, on FlickrI cleaned up both discs before fitting with brake and clutch cleaner, then all back together
Untitled by Kaeser Devon, on Flickrretaining bolts torqued to 7.5nm
Untitled by Kaeser Devon, on FlickrUntitled by Kaeser Devon, on FlickrCaliper bolts done back up to 63nm
Untitled by Kaeser Devon, on FlickrBefore going for a spin
Untitled by Kaeser Devon, on FlickrPulling the car off the drive I did what I always do and forget to pump the brakes to get the pedal back, queue panic when I couldn't stop and a quick pull of the hand brake stopped me rolling into anything
And after a few miles drive to check everything over, interesting wear on the still uneven rear pad
Untitled by Kaeser Devon, on FlickrThat's gone now having done a few more miles.
So all in all a 100% success trip
All to do now is take a trip to France in it in May and then sell it when I get home
Tuning fork arms.
I didn't know either but having had the service done by Chris Denning he pointed to these items as the culprits for the knocking at slow speeds. They attach from the lower wishbone on the hub going forward and bolt to the chassis to stop fore and aft movement of the rear wheel. The bushing on the LHS fork was the worst offender creating a knocking noise at slow speeds mainly when going over speed bumps etc but I opted to change both as they were on the same mileage of course (81k)
With no guides on how to do it the job took me a while but got there. 4 bolts - 6 hours I'm not the fastest worker and like taking my time but that's a long time to change 2 arms with a total of 4 bolts  well the job has been properly and I almost enjoyed it.
I managed to get 2 new identical to OEM arms at a very reasonable price, matching part numbers, same manufacturer, the only difference being a casting mark having to be ground off for some sort of TP seller reasons as Chris was telling me.
 Untitled by Kaeser Devon, on Flickr
 Untitled by Kaeser Devon, on Flickr
notice the ground off P emblem
 Untitled by Kaeser Devon, on Flickr
 Untitled by Kaeser Devon, on Flickr
and for comparison to the OEM item
 Untitled by Kaeser Devon, on Flickr
 Untitled by Kaeser Devon, on Flickr
 Untitled by Kaeser Devon, on Flickr
all very nice. The job although having taken ages was more fiddly than hard, undertrays had to be removed and the bolts at the chassis ends were a bit of a potch to get to
with the arch liner pulled off to reveal mud which was then cleaned off
 Untitled by Kaeser Devon, on Flickr
 Untitled by Kaeser Devon, on Flickr
and under tray removed
 Untitled by Kaeser Devon, on Flickr
the bolt (thank god the nut was captive) was a right pain to get to at the chassis end, this is the old one before removal
 Untitled by Kaeser Devon, on Flickr
I did have to jack up the hub to release the twisting pressure off the bolts when the hub was at full droop
 Untitled by Kaeser Devon, on Flickr
bit of a mess
 Untitled by Kaeser Devon, on Flickr
and fitted, not a lot to see at all
 Untitled by Kaeser Devon, on Flickr
The most interesting bit of the whole job was the comparison between old and new, even before fitting the wear was obvious in the old arm. I'm putting the same force into each bush here
 Untitled by Kaeser Devon, on Flickr
edit: if this hasn't worked as a video someone will have to tell me how to do it!
and what a difference it's made when on the car! I wasn't expecting to feel any obvious difference but blimey the back end of the car feels like a snare drum now. the difference is truly amazing. the back end is pin sharp with no tram lining or wandering over bumps, it almost feels like I've replaced the suspension for stiffer items. If you own a boxster - look into this!
If I was keeping the car () I'd be doing the fronts too and I imagine the difference with be similarly impressive. alas I am not. I got talking to someone from work about a week ago and mentioned it was going up for sale soon, she asked if she and her husband could take a look and after a look around and test drive he decided he'd have it. so not sold as yet as the money isn't in my bank but all being equal it will be gone the day after I come back from France in it. I will be very sad to see it go but - I need a kitchen and this will get me 80% of the way there (bloody expensive things kitchens)
so there we have it. lets hope it doesn't get taken out by a polish trucker on a french autoroute
I didn't know either but having had the service done by Chris Denning he pointed to these items as the culprits for the knocking at slow speeds. They attach from the lower wishbone on the hub going forward and bolt to the chassis to stop fore and aft movement of the rear wheel. The bushing on the LHS fork was the worst offender creating a knocking noise at slow speeds mainly when going over speed bumps etc but I opted to change both as they were on the same mileage of course (81k)
With no guides on how to do it the job took me a while but got there. 4 bolts - 6 hours
I'm not the fastest worker and like taking my time but that's a long time to change 2 arms with a total of 4 bolts well the job has been properly and I almost enjoyed it. I managed to get 2 new identical to OEM arms at a very reasonable price, matching part numbers, same manufacturer, the only difference being a casting mark having to be ground off for some sort of TP seller reasons as Chris was telling me.
Untitled by Kaeser Devon, on FlickrUntitled by Kaeser Devon, on Flickrnotice the ground off P emblem
Untitled by Kaeser Devon, on FlickrUntitled by Kaeser Devon, on Flickrand for comparison to the OEM item
Untitled by Kaeser Devon, on FlickrUntitled by Kaeser Devon, on FlickrUntitled by Kaeser Devon, on Flickrall very nice. The job although having taken ages was more fiddly than hard, undertrays had to be removed and the bolts at the chassis ends were a bit of a potch to get to
with the arch liner pulled off to reveal mud which was then cleaned off
Untitled by Kaeser Devon, on FlickrUntitled by Kaeser Devon, on Flickrand under tray removed
Untitled by Kaeser Devon, on Flickrthe bolt (thank god the nut was captive) was a right pain to get to at the chassis end, this is the old one before removal
Untitled by Kaeser Devon, on FlickrI did have to jack up the hub to release the twisting pressure off the bolts when the hub was at full droop
Untitled by Kaeser Devon, on Flickrbit of a mess
Untitled by Kaeser Devon, on Flickrand fitted, not a lot to see at all
Untitled by Kaeser Devon, on FlickrThe most interesting bit of the whole job was the comparison between old and new, even before fitting the wear was obvious in the old arm. I'm putting the same force into each bush here
Untitled by Kaeser Devon, on Flickredit: if this hasn't worked as a video someone will have to tell me how to do it!
and what a difference it's made when on the car!
I wasn't expecting to feel any obvious difference but blimey the back end of the car feels like a snare drum now. the difference is truly amazing. the back end is pin sharp with no tram lining or wandering over bumps, it almost feels like I've replaced the suspension for stiffer items. If you own a boxster - look into this! If I was keeping the car (
) I'd be doing the fronts too and I imagine the difference with be similarly impressive. alas I am not. I got talking to someone from work about a week ago and mentioned it was going up for sale soon, she asked if she and her husband could take a look and after a look around and test drive he decided he'd have it. so not sold as yet as the money isn't in my bank but all being equal it will be gone the day after I come back from France in it. I will be very sad to see it go but - I need a kitchen and this will get me 80% of the way there (bloody expensive things kitchens) so there we have it. lets hope it doesn't get taken out by a polish trucker on a french autoroute
Gassing Station | Readers' Cars | Top of Page | What's New | My Stuff