E46 M3 Project
Discussion


CSL balance rail and MAP sensor
My CSL balance rail and MAP sensor arrived yesterday. These along with a good map are essential parts to ensure good low-RPM driveability with the carbon airbox.

Fitted. I used an O clip to secure the brake vacuum hose. I've yet to order the electrical plug and contacts - it's on the list.

Additional strengthening of rear subframe mounts
I don't believe that reinforcement plates alone are the complete solution for RACP failure. I do think they help prevent localised cracking of the subframe mount areas, but they still leave the issue of the entire panel twisting under load, so I wanted to take an additional step to help make more secure the rear mounting points.
Using a long 5mm drill bit I drilled up from underneath the car inside the rear subrame mount holes, through into the boot area. Then from inside the boot I used a 20mm hole cuter to enlarge the holes drilled from underneath, and then a 13mm bit to bore out the 5mm hole inside the RACP cavity to match the subframe mount bolts. Finally I tapped through the entire floor from underneath using a M12 x 1.5 tap.

My plan is to use a stud that runs through the subframe, RACP into the boot, that will be tightened down to secure the upper floor to the lower subframe mount. The following photo helps illustrate how the stud will enter the boot area.

Next I fabricated some 2mm plates to reinforce the boot floor where the studs will protrude.

I lined the boot with old rags/towels, and then used a garden sprayer to moisten everything to prevent welding sparks causing embers or even fire. I have to say it is really unpleasant performing this kind of work on such a cherished car, but it should prevent failure leading to more drastic remedial work later down the line, and at least by doing it myself I know it's done to an acceptable standard.

Plates welded into place.

Etch primed and silver top coat blended into the rest of the boot area. Once fitted the studs will be secured here with thick washers and a nut.

Seam welding of boot floor/rear spring seat area
Some cars with heavily progressed RACP failure exhibit tearing of the floor panel from the bottom edge of the wheel well. There are actually four panel joins in this area so I wanted to take the precautionary measure of seam welding here. The photo below shows the area cleaned of underseal ready for welding.

Welded. Underseal and cavity wax in the seams makes it difficult to get a very neat weld, but I achieved plenty of penetration which is of primary importance. I etch primed the area ready for seam sealant - which will come later.

Driveshaft restoration
My driveshafts were looking tatty so I am in the process of restoring them. There's really little point stripping them at this mileage so the restoration is purely cosmetic.
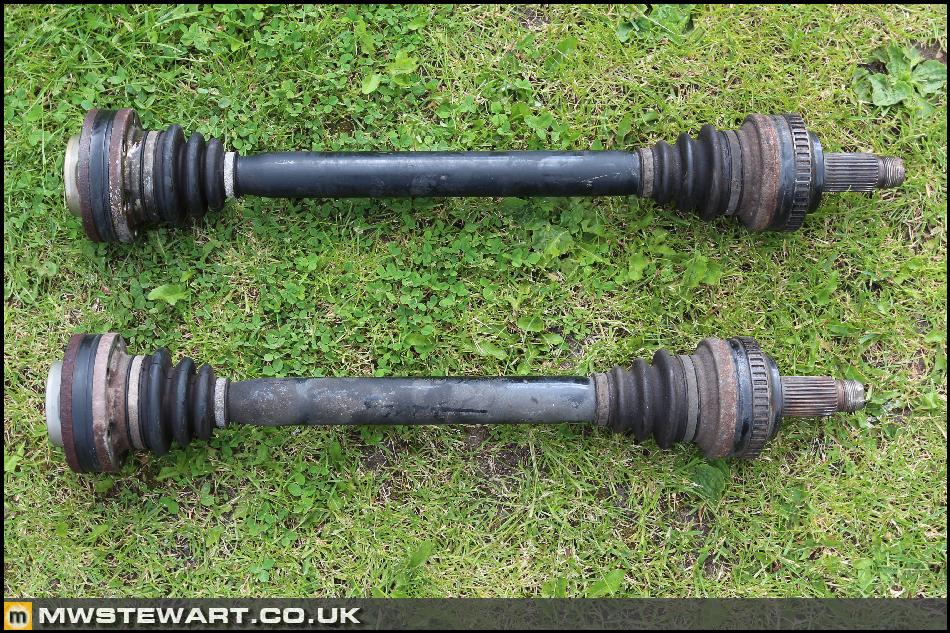
Keeping the shafts assembled I have left them submersed in brick cleaner, which is a diluted acid. The acid will dissolve the oxide over time.

Bubbles show the acid at work. I'll check on progress tomorrow morning.

My CSL balance rail and MAP sensor arrived yesterday. These along with a good map are essential parts to ensure good low-RPM driveability with the carbon airbox.
Fitted. I used an O clip to secure the brake vacuum hose. I've yet to order the electrical plug and contacts - it's on the list.
Additional strengthening of rear subframe mounts
I don't believe that reinforcement plates alone are the complete solution for RACP failure. I do think they help prevent localised cracking of the subframe mount areas, but they still leave the issue of the entire panel twisting under load, so I wanted to take an additional step to help make more secure the rear mounting points.
Using a long 5mm drill bit I drilled up from underneath the car inside the rear subrame mount holes, through into the boot area. Then from inside the boot I used a 20mm hole cuter to enlarge the holes drilled from underneath, and then a 13mm bit to bore out the 5mm hole inside the RACP cavity to match the subframe mount bolts. Finally I tapped through the entire floor from underneath using a M12 x 1.5 tap.
My plan is to use a stud that runs through the subframe, RACP into the boot, that will be tightened down to secure the upper floor to the lower subframe mount. The following photo helps illustrate how the stud will enter the boot area.
Next I fabricated some 2mm plates to reinforce the boot floor where the studs will protrude.
I lined the boot with old rags/towels, and then used a garden sprayer to moisten everything to prevent welding sparks causing embers or even fire. I have to say it is really unpleasant performing this kind of work on such a cherished car, but it should prevent failure leading to more drastic remedial work later down the line, and at least by doing it myself I know it's done to an acceptable standard.
Plates welded into place.
Etch primed and silver top coat blended into the rest of the boot area. Once fitted the studs will be secured here with thick washers and a nut.
Seam welding of boot floor/rear spring seat area
Some cars with heavily progressed RACP failure exhibit tearing of the floor panel from the bottom edge of the wheel well. There are actually four panel joins in this area so I wanted to take the precautionary measure of seam welding here. The photo below shows the area cleaned of underseal ready for welding.
Welded. Underseal and cavity wax in the seams makes it difficult to get a very neat weld, but I achieved plenty of penetration which is of primary importance. I etch primed the area ready for seam sealant - which will come later.
Driveshaft restoration
My driveshafts were looking tatty so I am in the process of restoring them. There's really little point stripping them at this mileage so the restoration is purely cosmetic.
Keeping the shafts assembled I have left them submersed in brick cleaner, which is a diluted acid. The acid will dissolve the oxide over time.
Bubbles show the acid at work. I'll check on progress tomorrow morning.
mwstewart said:
Keeping the shafts assembled I have left them submersed in brick cleaner, which is a diluted acid. The acid will dissolve the oxide over time.
Bubbles show the acid at work. I'll check on progress tomorrow morning.
Funny that we've both soaked some parts in Brick acid recently - MY LC cat flaps were seized and brick acid was my first choice to free them......Bubbles show the acid at work. I'll check on progress tomorrow morning.
Followed by Coke
B'stard Child said:
Funny that we've both soaked some parts in Brick acid recently - MY LC cat flaps were seized and brick acid was my first choice to free them......
Followed by Coke
I just googled the cat flaps; I can see how they become seized!Followed by Coke
Here are the inner joints fresh out of the acid this morning. All zinc plate and oxide has been dissolved.

Next I used a heat gun to evaporate any remaining acid from the seams and the metal itself; acid can wreak havoc if left in metal seams. I then masked off the CV joint boot and the powder coated bearing race.

Exposed metal was etch primed and then painted with a Plastikote product to mimic the factory zinc plate. A little overspray made it onto the rubber boots but that'll soon be off after a wipe over with thinners.

mwstewart said:
B'stard Child said:
Funny that we've both soaked some parts in Brick acid recently - MY LC cat flaps were seized and brick acid was my first choice to free them......
Followed by Coke
I just googled the cat flaps; I can see how they become seized!Followed by Coke
mwstewart said:
Here are the inner joints fresh out of the acid this morning. All zinc plate and oxide has been dissolved.
Next I used a heat gun to evaporate any remaining acid from the seams and the metal itself; acid can wreak havoc if left in metal seams. I then masked off the CV joint boot and the powder coated bearing race.
Exposed metal was etch primed and then painted with a Plastikote product to mimic the factory zinc plate. A little overspray made it onto the rubber boots but that'll soon be off after a wipe over with thinners.
Damn they look good - excellent workNext I used a heat gun to evaporate any remaining acid from the seams and the metal itself; acid can wreak havoc if left in metal seams. I then masked off the CV joint boot and the powder coated bearing race.
Exposed metal was etch primed and then painted with a Plastikote product to mimic the factory zinc plate. A little overspray made it onto the rubber boots but that'll soon be off after a wipe over with thinners.
B'stard Child said:
Gorilla Boy said:
Does the brick acid not eat the CV boots? (shall be trying this on some bits methinks)
Look far better after the touch up
Doesn't hurt rubber and really only hurts the rust on steel - however my advice is not to put any alloy in it......Look far better after the touch up

Limit exposure when dealing with anything cast. Here's why: https://en.wikipedia.org/wiki/Hydrogen_embrittleme...
I had already bought a new Supersprint decat pipe for my V1 manifolds with a plan in mind to weld in the cats from my stock exhaust. As it happened a set of CPI 'Euro 200R' came up for sale, which are the Supersprint V1 decat pipes with Magnaflow 200 cell cats and Vibrant resonators welded in. I decided to buy them to save some time. The resonators help keep to a minimum the exhaust rasp associated with short length cats.

My DME is back from being converted to CSL spec. In the end I also had the additional H-Bridge chip soldered on so that I can have a working noise flap if I so desire. The codes for the flap have been disabled so that no errors will be reported if I leave the flap disconnected. The other features I had set up include:
- Conversion to CSL spec with deletion of codes for a disconnected flap
- Manual gearbox conversion on CSL software
- Retention of my current VIN and build date etc.
- SMG Shift Lights adapted for manual gearbox
- Top Speed Governor Removal
- Disabled post-cat o2 sensors
- Sport Button Memory
- Permanent Dyno mode

Turner solid subframe mounts. My assumption is that as long as the suspension and diff bushes are stock there will be little added NVH from solid subframe bushes, and I also understand that some of the newer M cars have gone to solid rear subframe bushes too. The downside is this is just a theory at this point hence I have ordered some Powerflex bushes too in case I change my mind!

Custom steering linkage to clear Supersprint V1 manifolds
I've now figured out a steering solution to clear the LHD only SS V1 manifolds: I used Google images to see what other steering shafts were available in the BMW range, and this led me to buy a used F20/F21/F30/F32 steering shaft (middle in photo, below). It turned out that the upper spline fastening was a departure from the traditional BMW 17 * 54 hence no good for the E46 column, however I disassembled the shaft and realised the lower section was a 19mm DD shaft, or 3/4", which was readily available in the aftermarket.
Back to Google images I went to see if I could find another DD equipped BMW shaft but with a 17mm * 54 female spline to suit my E46 column, and as it happened the LHD E46 steering shaft was perfect (far right in photo, below).
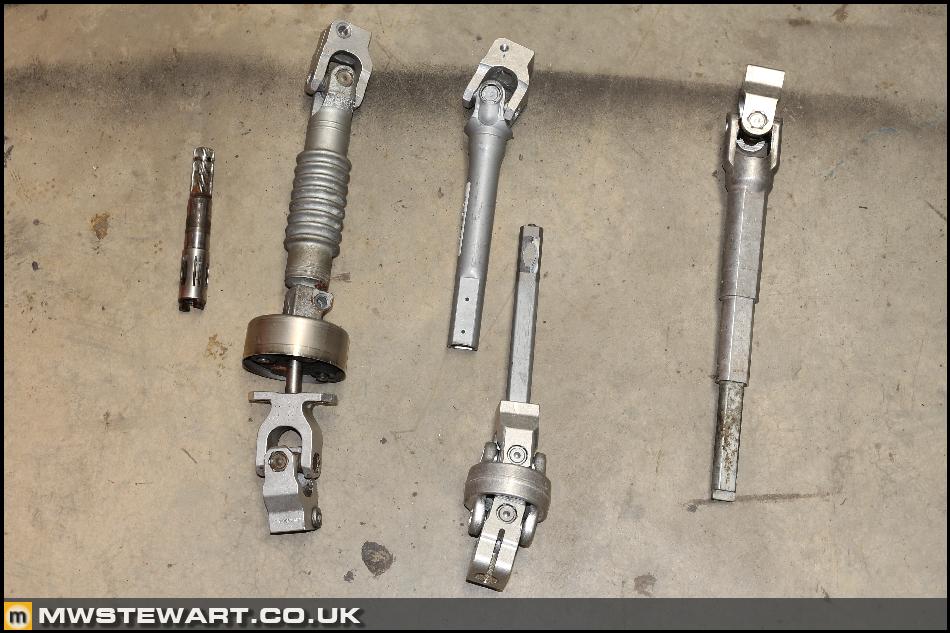
I bought a used E46 LHD shaft to experiment with and the photo below shows the complete custom assembly which comprises:
1) E46 LHD upper shaft,
2) 3/4" DD to 17mm * 54 UJ
3) 17mm * 54 splined shaft (custom),
4)17mm * 54 UJ to 17mm * 54 UJ that joins to the rack.
The custom joints were from Flaming River. They were the only company I could find who manufacture UJs with the BMW specific splines.

The LHD E46 shaft got me where I needed to be in terms of having a collapsible shaft for safety reasons, and a 3/4" DD end, however there are still two outstanding issues:
1) The method BMW use to secure each section of the collapsible shaft together is plastic injection (image below), this bonds the metal with a pre-determined shear point that ensures the assembly collapses in an accident. This construction method was not used in RHD E46's and the difference is the steering assembly passes by hot exhaust manifolds in the RHD car, and I don't want to take a risk with exposing that type of shaft to heat.
2) The orientation of the BMW DD shaft does not allow me to correctly phase the OEM UJ and the Flaming River UJ.
The solution for me is to order another UJ from flaming river to replace the upper UJ, and then use one of their collapsible shafts that is suitable for use next to hot exhausts.

My DME is back from being converted to CSL spec. In the end I also had the additional H-Bridge chip soldered on so that I can have a working noise flap if I so desire. The codes for the flap have been disabled so that no errors will be reported if I leave the flap disconnected. The other features I had set up include:
- Conversion to CSL spec with deletion of codes for a disconnected flap
- Manual gearbox conversion on CSL software
- Retention of my current VIN and build date etc.
- SMG Shift Lights adapted for manual gearbox
- Top Speed Governor Removal
- Disabled post-cat o2 sensors
- Sport Button Memory
- Permanent Dyno mode
Turner solid subframe mounts. My assumption is that as long as the suspension and diff bushes are stock there will be little added NVH from solid subframe bushes, and I also understand that some of the newer M cars have gone to solid rear subframe bushes too. The downside is this is just a theory at this point hence I have ordered some Powerflex bushes too in case I change my mind!
Custom steering linkage to clear Supersprint V1 manifolds
I've now figured out a steering solution to clear the LHD only SS V1 manifolds: I used Google images to see what other steering shafts were available in the BMW range, and this led me to buy a used F20/F21/F30/F32 steering shaft (middle in photo, below). It turned out that the upper spline fastening was a departure from the traditional BMW 17 * 54 hence no good for the E46 column, however I disassembled the shaft and realised the lower section was a 19mm DD shaft, or 3/4", which was readily available in the aftermarket.
Back to Google images I went to see if I could find another DD equipped BMW shaft but with a 17mm * 54 female spline to suit my E46 column, and as it happened the LHD E46 steering shaft was perfect (far right in photo, below).
I bought a used E46 LHD shaft to experiment with and the photo below shows the complete custom assembly which comprises:
1) E46 LHD upper shaft,
2) 3/4" DD to 17mm * 54 UJ
3) 17mm * 54 splined shaft (custom),
4)17mm * 54 UJ to 17mm * 54 UJ that joins to the rack.
The custom joints were from Flaming River. They were the only company I could find who manufacture UJs with the BMW specific splines.
The LHD E46 shaft got me where I needed to be in terms of having a collapsible shaft for safety reasons, and a 3/4" DD end, however there are still two outstanding issues:
1) The method BMW use to secure each section of the collapsible shaft together is plastic injection (image below), this bonds the metal with a pre-determined shear point that ensures the assembly collapses in an accident. This construction method was not used in RHD E46's and the difference is the steering assembly passes by hot exhaust manifolds in the RHD car, and I don't want to take a risk with exposing that type of shaft to heat.
2) The orientation of the BMW DD shaft does not allow me to correctly phase the OEM UJ and the Flaming River UJ.
The solution for me is to order another UJ from flaming river to replace the upper UJ, and then use one of their collapsible shafts that is suitable for use next to hot exhausts.
Edited by mwstewart on Tuesday 17th June 19:32
 t state.

Remaining rear end rebuild parts ordered from http://bmminiparts.com/
I've been asked for part numbers several times since I stated this build so my following sheet may help others rebuilding or reinforcing their subframe. Note there are some additional items here that I needed but the rear end parts are easily identified:

I've been asked for part numbers several times since I stated this build so my following sheet may help others rebuilding or reinforcing their subframe. Note there are some additional items here that I needed but the rear end parts are easily identified:
mwstewart said:
CSL balance rail and MAP sensor
My CSL balance rail and MAP sensor arrived yesterday. These along with a good map are essential parts to ensure good low-RPM driveability with the carbon airbox.
Fitted. I used an O clip to secure the brake vacuum hose. I've yet to order the electrical plug and contacts - it's on the list.
Additional strengthening of rear subframe mounts
I don't believe that reinforcement plates alone are the complete solution for RACP failure. I do think they help prevent localised cracking of the subframe mount areas, but they still leave the issue of the entire panel twisting under load, so I wanted to take an additional step to help make more secure the rear mounting points.
Using a long 5mm drill bit I drilled up from underneath the car inside the rear subrame mount holes, through into the boot area. Then from inside the boot I used a 20mm hole cuter to enlarge the holes drilled from underneath, and then a 13mm bit to bore out the 5mm hole inside the RACP cavity to match the subframe mount bolts. Finally I tapped through the entire floor from underneath using a M12 x 1.5 tap.
My plan is to use a stud that runs through the subframe, RACP into the boot, that will be tightened down to secure the upper floor to the lower subframe mount. The following photo helps illustrate how the stud will enter the boot area.
Next I fabricated some 2mm plates to reinforce the boot floor where the studs will protrude.
I lined the boot with old rags/towels, and then used a garden sprayer to moisten everything to prevent welding sparks causing embers or even fire. I have to say it is really unpleasant performing this kind of work on such a cherished car, but it should prevent failure leading to more drastic remedial work later down the line, and at least by doing it myself I know it's done to an acceptable standard.
Plates welded into place.
Etch primed and silver top coat blended into the rest of the boot area. Once fitted the studs will be secured here with thick washers and a nut.
Seam welding of boot floor/rear spring seat area
Some cars with heavily progressed RACP failure exhibit tearing of the floor panel from the bottom edge of the wheel well. There are actually four panel joins in this area so I wanted to take the precautionary measure of seam welding here. The photo below shows the area cleaned of underseal ready for welding.
Welded. Underseal and cavity wax in the seams makes it difficult to get a very neat weld, but I achieved plenty of penetration which is of primary importance. I etch primed the area ready for seam sealant - which will come later.
Driveshaft restoration
My driveshafts were looking tatty so I am in the process of restoring them. There's really little point stripping them at this mileage so the restoration is purely cosmetic.
Keeping the shafts assembled I have left them submersed in brick cleaner, which is a diluted acid. The acid will dissolve the oxide over time.
Bubbles show the acid at work. I'll check on progress tomorrow morning.
Fitting a CSL air box to mine Friday with Evolve Alpha-N remap. If I have any low-down issues I assume CSL balance rail and MAP sensor are good thing to try? How much did they set you back?My CSL balance rail and MAP sensor arrived yesterday. These along with a good map are essential parts to ensure good low-RPM driveability with the carbon airbox.
Fitted. I used an O clip to secure the brake vacuum hose. I've yet to order the electrical plug and contacts - it's on the list.
Additional strengthening of rear subframe mounts
I don't believe that reinforcement plates alone are the complete solution for RACP failure. I do think they help prevent localised cracking of the subframe mount areas, but they still leave the issue of the entire panel twisting under load, so I wanted to take an additional step to help make more secure the rear mounting points.
Using a long 5mm drill bit I drilled up from underneath the car inside the rear subrame mount holes, through into the boot area. Then from inside the boot I used a 20mm hole cuter to enlarge the holes drilled from underneath, and then a 13mm bit to bore out the 5mm hole inside the RACP cavity to match the subframe mount bolts. Finally I tapped through the entire floor from underneath using a M12 x 1.5 tap.
My plan is to use a stud that runs through the subframe, RACP into the boot, that will be tightened down to secure the upper floor to the lower subframe mount. The following photo helps illustrate how the stud will enter the boot area.
Next I fabricated some 2mm plates to reinforce the boot floor where the studs will protrude.
I lined the boot with old rags/towels, and then used a garden sprayer to moisten everything to prevent welding sparks causing embers or even fire. I have to say it is really unpleasant performing this kind of work on such a cherished car, but it should prevent failure leading to more drastic remedial work later down the line, and at least by doing it myself I know it's done to an acceptable standard.
Plates welded into place.
Etch primed and silver top coat blended into the rest of the boot area. Once fitted the studs will be secured here with thick washers and a nut.
Seam welding of boot floor/rear spring seat area
Some cars with heavily progressed RACP failure exhibit tearing of the floor panel from the bottom edge of the wheel well. There are actually four panel joins in this area so I wanted to take the precautionary measure of seam welding here. The photo below shows the area cleaned of underseal ready for welding.
Welded. Underseal and cavity wax in the seams makes it difficult to get a very neat weld, but I achieved plenty of penetration which is of primary importance. I etch primed the area ready for seam sealant - which will come later.
Driveshaft restoration
My driveshafts were looking tatty so I am in the process of restoring them. There's really little point stripping them at this mileage so the restoration is purely cosmetic.
Keeping the shafts assembled I have left them submersed in brick cleaner, which is a diluted acid. The acid will dissolve the oxide over time.
Bubbles show the acid at work. I'll check on progress tomorrow morning.
Gibbo205 said:
Fitting a CSL air box to mine Friday with Evolve Alpha-N remap. If I have any low-down issues I assume CSL balance rail and MAP sensor are good thing to try? How much did they set you back?
You can't use the CSL sensors with an Alpha-N remap unfortunately. The Alpha-N remap just forces the car into limp mode with the standard M3 ECU software and then uses the limp map to run the car, so there's no provision for any sensors that weren't already there. To run the CSL sensors you will need to have your DME (ECU) converted to CSL spec and flashed with the CSL software. The balance rail and MAP sensor were around £450.
Given your car is a track car and you'll likely be at high revs most of the time it's probably not worth the extra for a CSL DME conversion; you may not even notice the hesitation issue on track.
A smashing read and very, very inspiring. My family have had e46 330ci in blue velvet & and e92 335ci but we always listed after an e46 m3 and for me personally, one in that gorgeous sea blue/green colour.
I fully appreciate your approach that the CSL whilst incredible, doesn't come optioned out and in some ways perhaps you're creating the ultimate M3. Stunning car, true enthusiast approach and genuine attention to detail are a true compliment to the vehicle.
Love it.
I fully appreciate your approach that the CSL whilst incredible, doesn't come optioned out and in some ways perhaps you're creating the ultimate M3. Stunning car, true enthusiast approach and genuine attention to detail are a true compliment to the vehicle.
Love it.
Gassing Station | Readers' Cars | Top of Page | What's New | My Stuff