1992 Peugeot 106 XSi - Strip, Respray, Rebuild OEM+
Discussion


Gaaaaaaaaaaaaaaaaaaaaaah!
Just been to look at my gearbox code after finding the head wasn't an XSi... It's a 20CE09.
Google suggests that is a 1.1 'box. Bugger.
Well, at least I have found a spare.
So, cylinder head and gearbox look 'wrong'... what are the chances of the block being correct?
At least I can pick the new box up, drop it at the reconditioners with the Quaife, drop the whole engine and 'box and bin them (or sell them but they're barely worth it) without worrying about damage etc. Makes life slightly easier!
At least I have spare engines etc!

Kitchski said:
On the plus side, I'm pretty sure the 5th gear cog on the 1.1 box is the same as a VTR box 
You are the man! I had not thought of that! 
Means I need to get that 'box out before I deliver the 'new' XSi 'box for rebuild then.
Well, I guess they're at the end of the case, under the cover, so I could do it after it's back but I should have time to attack it first!
Kitchski said:
Double check it first an all that, but pretty sure they're both 0.77.
0.85 is the sports-gearset version.
I'll have a read up on the 5th gear mod again and count the teeth if I have to.0.85 is the sports-gearset version.
I have a feeling that you're right and it's only the FD that was changed on the non-Sport 'boxes so the actual clusters are the same.
i.e. I think it should work! I guess that's saved me £50-100 on finding an old 'box to steal the 5th off, which lessons the pain of not having an XSi 'box.
Man maths

A lot to do before it goes for paint in 3 weeks but work finishes in 13 days so it'll get 3hrs a day attention, which should be enough.
Than K - looks like that'll all work out!
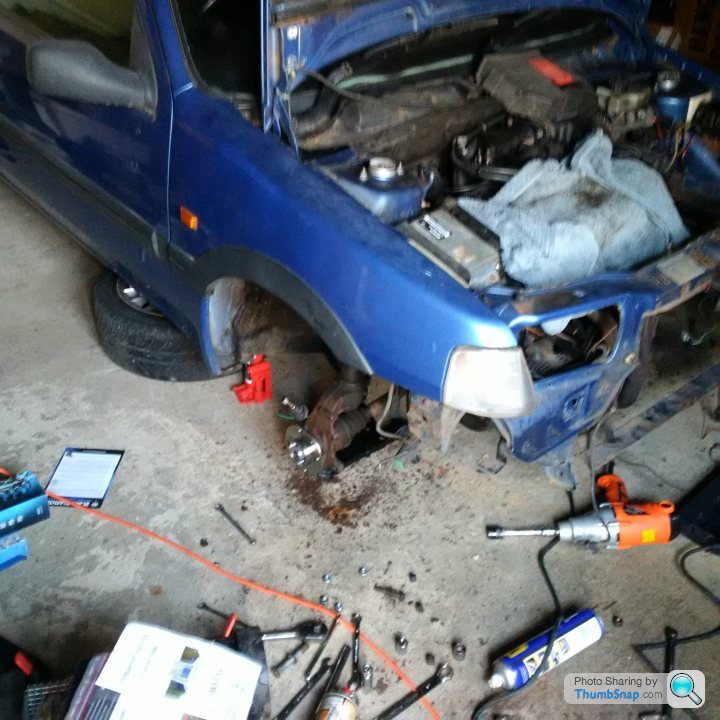
Quick lunchtime update...
After soaking in WD40 for days, the wishbone bolt gave in to the impact wrench!
That's a good thing as the Dremel and a hacksaw were getting me nowhere!
One corner off - I'm hoping the other one will be easier! 2.5 weeks to paint so need a wriggle on!
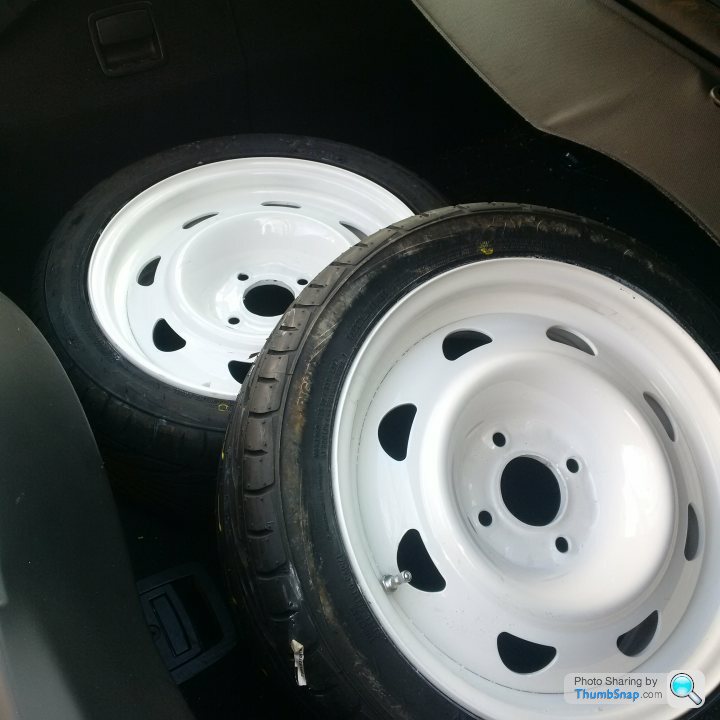
Spring compressors should be on their way to me and the brakes should be back next week. They've been gone 2 weeks+ now!
Excuse the bad pic:

Quick lunchtime update...
After soaking in WD40 for days, the wishbone bolt gave in to the impact wrench!
That's a good thing as the Dremel and a hacksaw were getting me nowhere!
One corner off - I'm hoping the other one will be easier! 2.5 weeks to paint so need a wriggle on!
Spring compressors should be on their way to me and the brakes should be back next week. They've been gone 2 weeks+ now!
Excuse the bad pic:
Been ages since I last updated this - Sorry!
So, work has been progressing but I was busier through February and March than expected between finishing a project at work, starting a new business, having a birthday and savage, savage man-flu!
In the last update you could see one corner off and all the rusty suspension bits. Well, corner 2 was stripped off and the dampers/ struts/ uprights etc all stripped. They are currently being cleaned of rust, ready for painting this week and then all the new parts will go back together.
Will get some pics up when I have some clean parts to show and it's finally going back together.
Received my brake calipers back from Bigg Red and the look great and they gave me a fair discount due to the delays (paid about the cost of 1 new caliper).
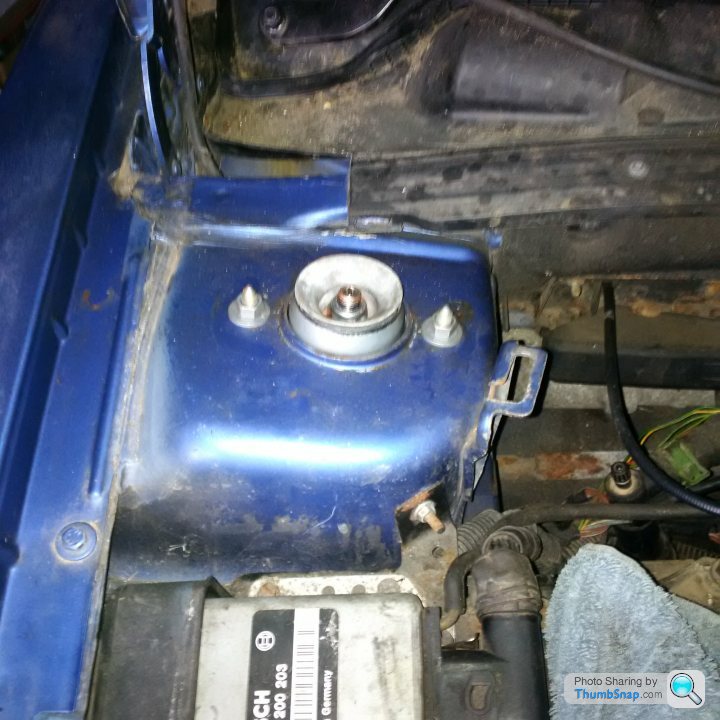
The car should have been in paint this week but it still has the engine and 'box inside it! However, I have new wings, bonnet, lights etc all here and hopefully the suspension will be back on this week, engine out next week and then it'll go and we'll then move house!
Here's a sneak peak of what I finally got done today:
Look out for lots of updates over the coming days before it goes to paint!
So, work has been progressing but I was busier through February and March than expected between finishing a project at work, starting a new business, having a birthday and savage, savage man-flu!
In the last update you could see one corner off and all the rusty suspension bits. Well, corner 2 was stripped off and the dampers/ struts/ uprights etc all stripped. They are currently being cleaned of rust, ready for painting this week and then all the new parts will go back together.
Will get some pics up when I have some clean parts to show and it's finally going back together.
Received my brake calipers back from Bigg Red and the look great and they gave me a fair discount due to the delays (paid about the cost of 1 new caliper).
The car should have been in paint this week but it still has the engine and 'box inside it! However, I have new wings, bonnet, lights etc all here and hopefully the suspension will be back on this week, engine out next week and then it'll go and we'll then move house!
Here's a sneak peak of what I finally got done today:
Look out for lots of updates over the coming days before it goes to paint!
Edited by dom9 on Wednesday 22 March 13:50
Thanks jsmims1
Right - I have fallen behind as usual but with a house move on Friday... It just has to go to paint and be out of the way.
So, the suspension bits have been soaking in rust remover in the ultrasonic cleaner for a few days and came up pretty good.
Will pull it all apart again when it gets back from paint and get them powder coated etc. Consider this a 'test fit' to get it back rolling.
the other issue is that I haven't pulled the engine and 'box so the paint shop won't get at much of the engine bay but we can cross that bridge at a later date.
All went back together quite easily, really, as you might expect with all new parts.
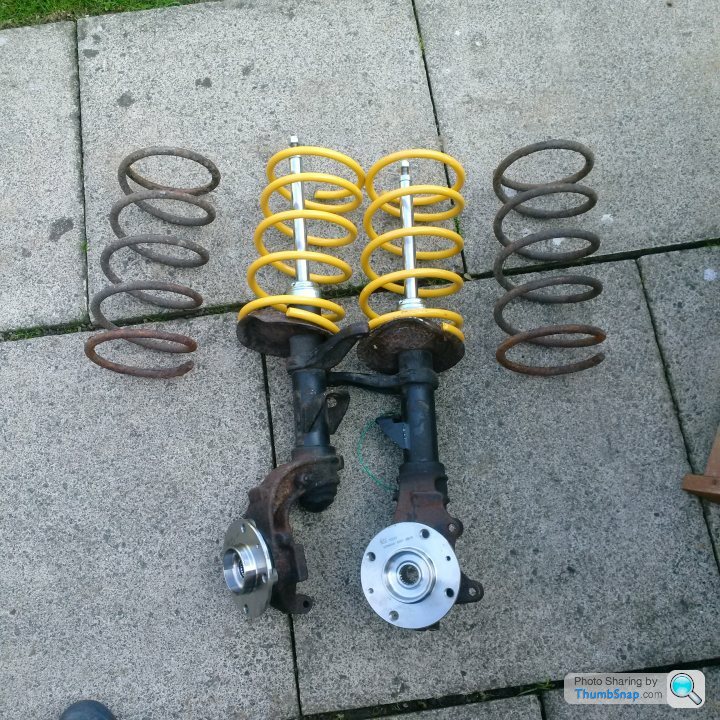
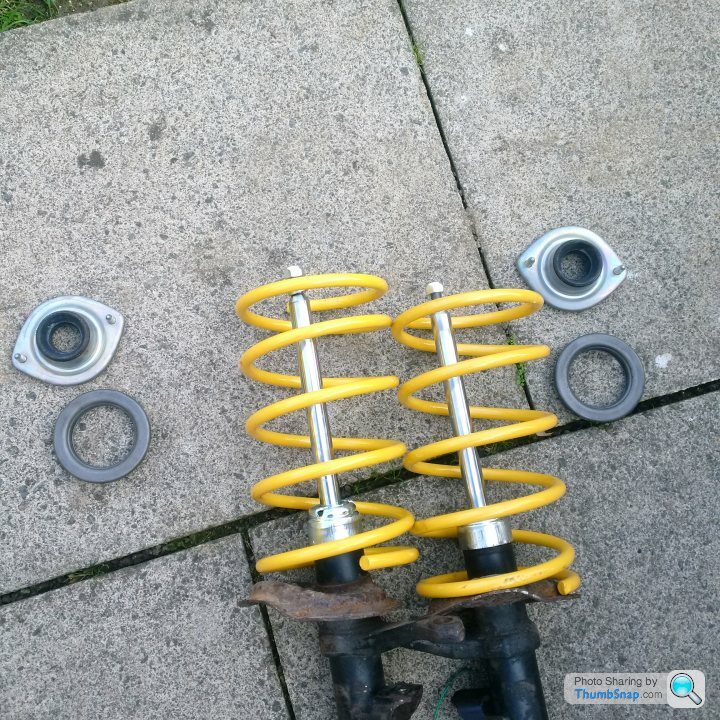
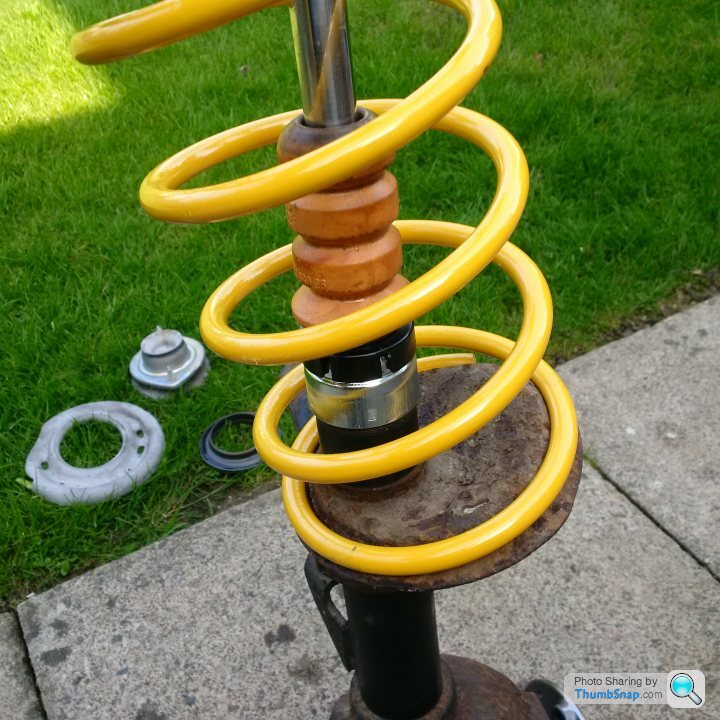
What you can see in the pictures are:
- New wheel bearings
- New hubs
- New dampers
- New springs (-30mm)
- New top mounts
- New top mount bearings
- New nuts and bolts
- New wishbones


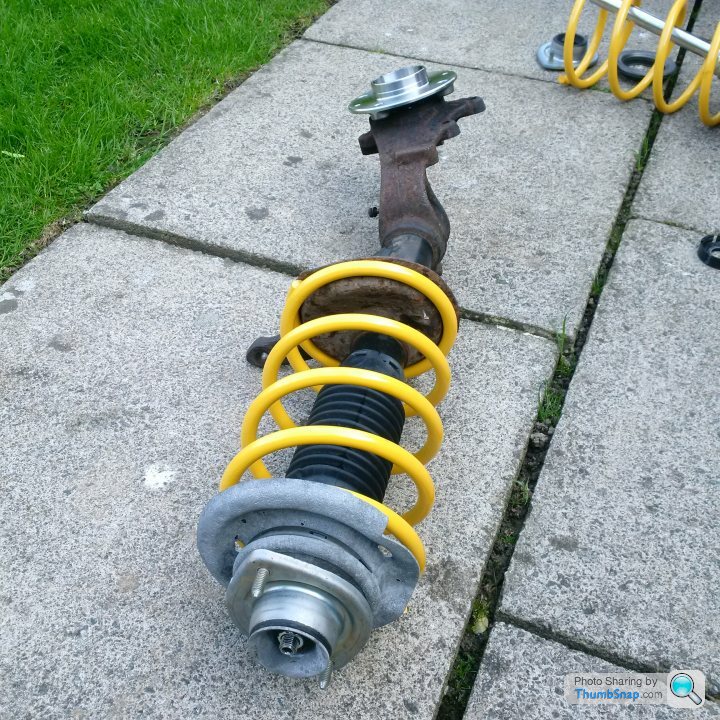
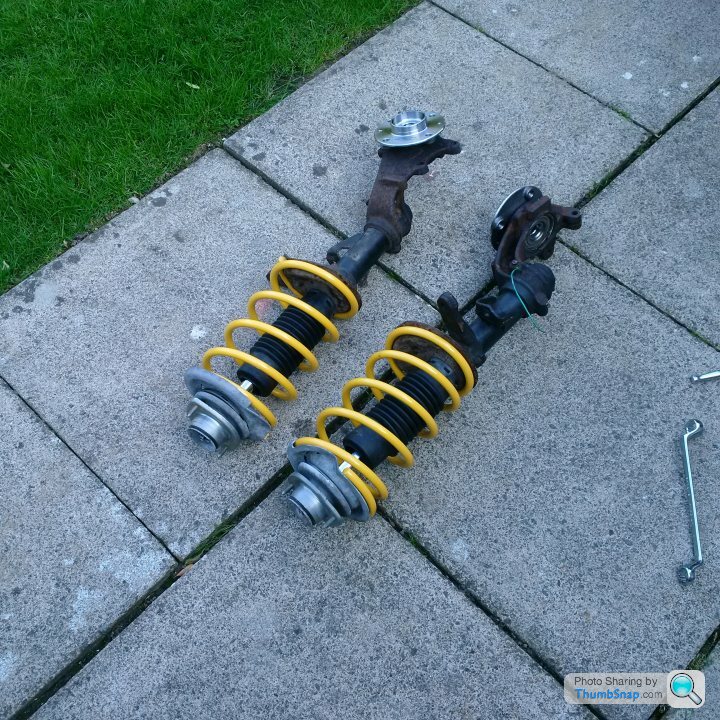
Probably not worth installing the new drop links or steering rod ends before it goes to paint as it'll need to come apart anyway after that.
However, I'll see how much time I get on it in the next day or so and may build it back up with the calipers etc so it all looks nice.
Right - I have fallen behind as usual but with a house move on Friday... It just has to go to paint and be out of the way.
So, the suspension bits have been soaking in rust remover in the ultrasonic cleaner for a few days and came up pretty good.
Will pull it all apart again when it gets back from paint and get them powder coated etc. Consider this a 'test fit' to get it back rolling.
the other issue is that I haven't pulled the engine and 'box so the paint shop won't get at much of the engine bay but we can cross that bridge at a later date.
All went back together quite easily, really, as you might expect with all new parts.
What you can see in the pictures are:
- New wheel bearings
- New hubs
- New dampers
- New springs (-30mm)
- New top mounts
- New top mount bearings
- New nuts and bolts
- New wishbones
Probably not worth installing the new drop links or steering rod ends before it goes to paint as it'll need to come apart anyway after that.
However, I'll see how much time I get on it in the next day or so and may build it back up with the calipers etc so it all looks nice.
Ah ha - Do you mean what looks 'black' in the picture and irregular in shape?
That's just the colour the metal has gone where the cleaner has reacted with rust and turned it black, a bit like charcoal. Basically, I didn't wire brush it enough in my excitement to get it back together!
No holes on any of those parts, thank goodness.
Wheel bearings were a pain though; needed a lot of heat to get the old ones out - seized right in!
Also, both dampers were completely dead and one of them had basically burst and fluid was everywhere.
Car should be night and day from how it arrived, soon.
It's slowly coming together... wishbones, droplinks etc all back on and threw the discs and calipers on as well:
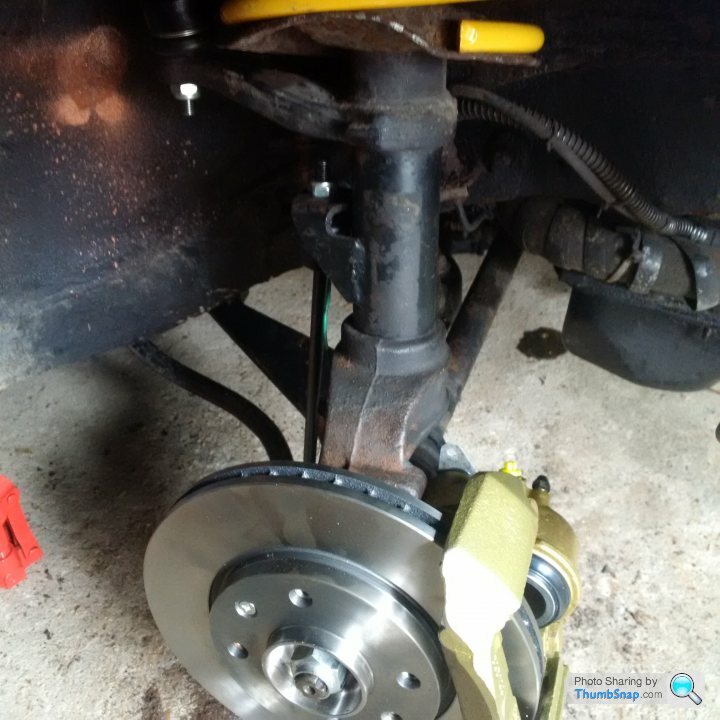
Managed to get the driver's side steering rod end on no problem... the pass side just won't budge so it's the one thing outstanding to get it rolling for paint.
Can leave the old one on but it's a bit battered and getting the nut back on is proving to be a pain.
Still, by 11am tomorrow it should be rolling on 4 steels and off to the paint shop shortly after! Will get a pic on the trailer.
Fitting the new wishbones was not as easy as I thought though! Lots of hammer action, levering and swearing! It's all tight now, thank goodness.
The ultrasonic cleaner is about big enough for the XSi/ Rallye head. It's the ~£200 one on ebay, must be about 50cm x 25cm but I don't remember exactly.
It takes time to get the really rusty stuff clean (like days of soaking and hours of ultrasonic death rays) but they come up really well. I'm surprised how little rust there was, really. Didn't stop almost every single nut and bolt being seized though (and wheel bearings etc).
Don't worry Kitchski - rust free since 1993 (well, 1992). More pics tomorrow - should look smart on the steels!
Jerry Can said:
looks like you are running shorter springs to lower the ride height? if so mount your track rod ends upside down onto the strut, it will reduce bump steer. The passenger side nut for the steering rod is a PITA!
Ah ha - That's good info! Thanks for that... Might flip them over when it is back from paint.The pass side is a nightmare. Need some blowtorch action but don't have one to hand (mine doesn't seem to be playing ball).
The issue was when removing them I battered them with a hammer (in the knowledge I had new ones) and the first couple of threads are screwed and I also don't have a die.
Will work something out in the morning.
Paul106xsi said:
Hi Dom, great thread. I’ve got one of these myself in cherry red. Something I’m especially interested in is the Rallye inlet manifold. I bought one a little while ago for my xsi but bottled it when I started reading about cutting holes in the side etc etc. I think yours is the first post I’ve seen in a long time when it’s being fitted to an S1 rather than a new 106/ saxo. Do you have any pictures of yours set up? Also where did you get the hose connector and what did you do to connect it up?
I’ve got a spare xsi air box if you are still on the lookout for one? Keep up the good work.
Hi Paul - The Rallye manifold is on 'hold' while I get the car running. I actually have two of them now. One 'standard' one and one with the 'hole' in the side. Will get it all fitted up once the car is 'finished' and running on the standard stuff. There is some good info in this thread for how to pipe it all up. I'd actually like to retain the standard XSi throttle as I think that may make things slightly easier and you'd just need an adaptor between the TB and Rallye manifold.I’ve got a spare xsi air box if you are still on the lookout for one? Keep up the good work.
I picked up an XSi airbox a couple of weeks ago. What I didn't notice is that one of the clips has snapped off. Ok, I noticed it didn't have a clip but didn't notice that the 'mounting' for I was battered. So I guess I am still looking for an airbox!
Krikkit said:
They're a bit more expensive (iirc 100 quid-ish), but a chap on the Rallye forum sells rose-jointed arms to correct the bump steer, much easier to adjust than the standard ones too.
Thanks for the heads up on the tank, figured it would be that one... I'll have to invest!
I think I've seen that ad... I might have a look into those! Going to have a bath because my back is hurting like an old man and then I shall be back in the garage ahead of the truck coming at 11am to take it to paint. Really need to secure up this pass side steering arm. The nut goes on a thread or two and then the whole thing just starts spinning. I'll work something out!Thanks for the heads up on the tank, figured it would be that one... I'll have to invest!
Kitchski said:
Are the balljoints not tapered?
Yes - That's a good point! I'll have a look when it comes back. To be honest; I'd be quite happy just getting the old one off and the new one on in standard orientation!Krikkit said:
Probably too late now, but some track rod ends have a flattened side to get an adjustable spanner on to stop that happening.
I also think the ball joints are tapered, but can't remember off-hand, hence the kit mentioned rather than just swapping the arms top->bottom (you also get slight clearance issues with standard arms doing that - at full droop the arm will foul the chassis slightly).
Interestingly, unlike the drop links, they didn't have a 'flat' to get a spanner on... to be honest, it's secure enough to wheel round a paint booth and I'll deal with it when it's back.I also think the ball joints are tapered, but can't remember off-hand, hence the kit mentioned rather than just swapping the arms top->bottom (you also get slight clearance issues with standard arms doing that - at full droop the arm will foul the chassis slightly).
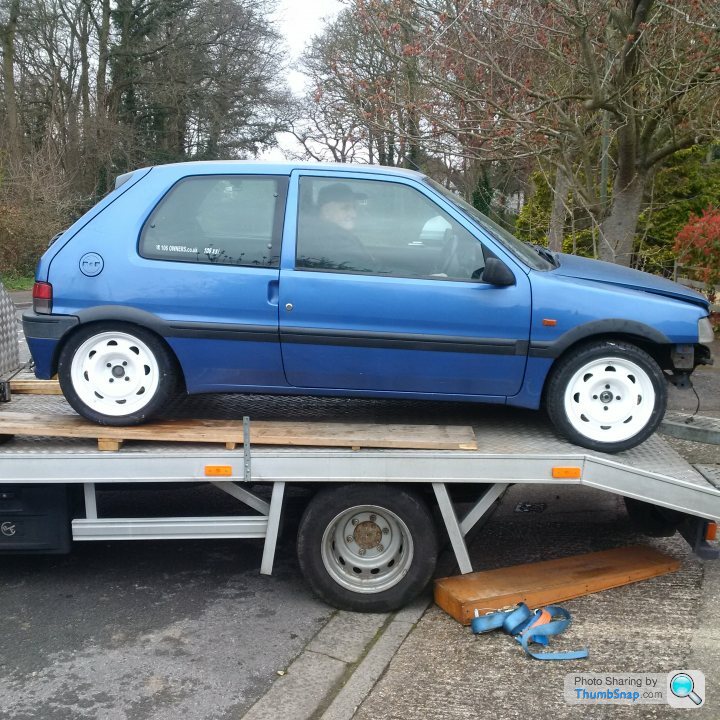
Here's the pic of it on the trailer before we set off - Looks weirdly low at the back but don't the white wheels look great?
So, a few weeks break now... Other than having to sort the drivetrain and move house on Friday!
Will get some pictures from the paint shop guys to keep this alive!

Flats would have helped me secure it but ultimately the old one needs to come off anyway and the new one on... I think that'll require heat!
Anyone know a new supplier of rear bumpers for the XSI? Both sides mounting points broke and I'm not sure I fancy taking the risk on a 2nd hand one in case they're broken.
Our broadband is out today ("problem in the exchange, sir, up to 2 days to fix") so my Google-fu is seriously limited
Anyone know a new supplier of rear bumpers for the XSI? Both sides mounting points broke and I'm not sure I fancy taking the risk on a 2nd hand one in case they're broken.
Our broadband is out today ("problem in the exchange, sir, up to 2 days to fix") so my Google-fu is seriously limited
Thanks guys - my Blackberry seems to know broadband is out so has decided to slow right down as well.
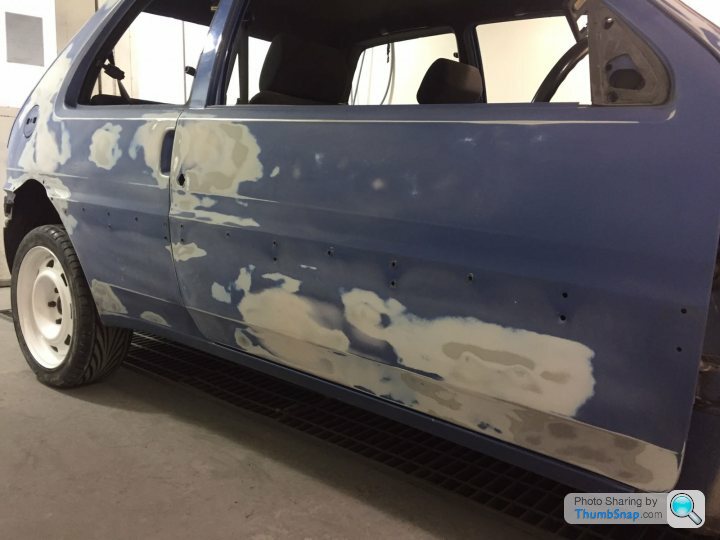
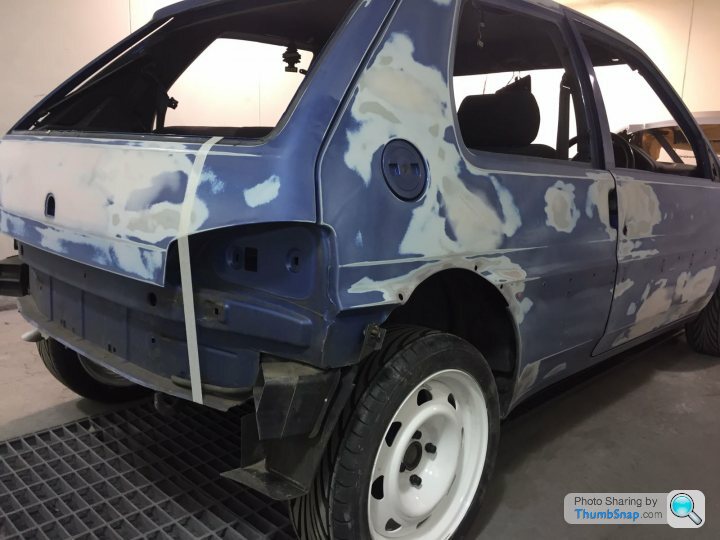
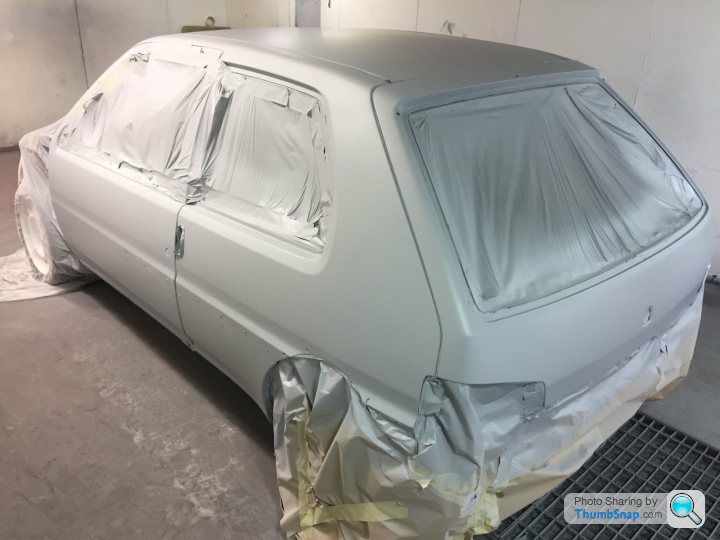
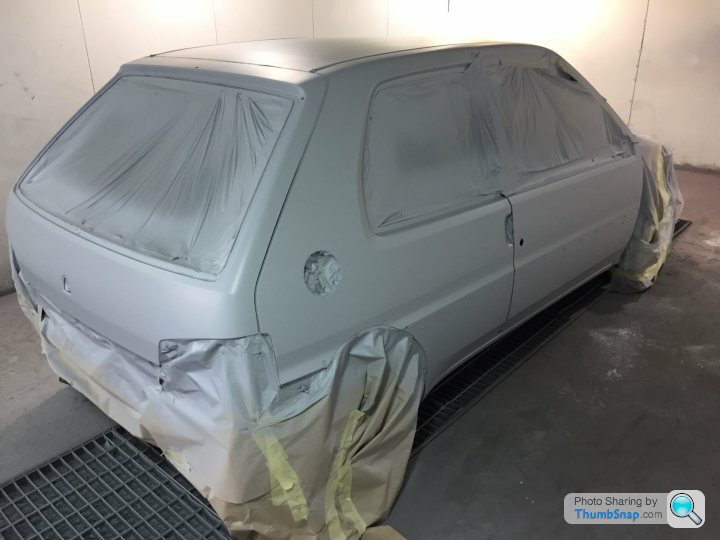
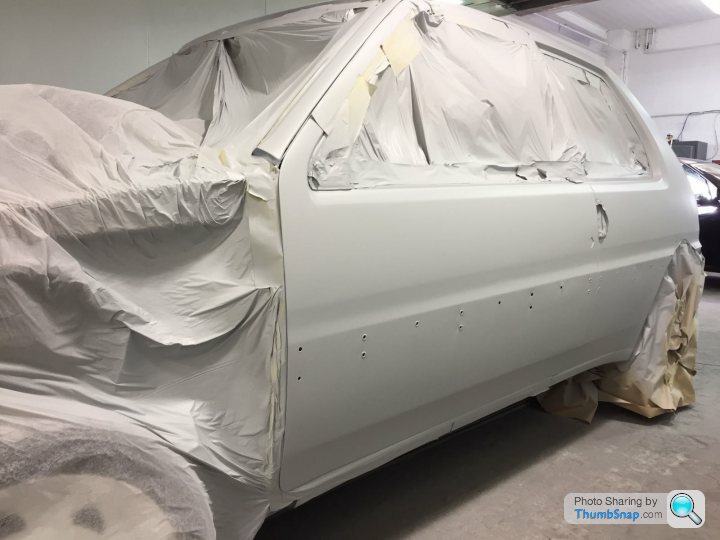
I think the prep work looks really good so I am hoping for a good result and other than the rear bumper, I think all the trim survived and they're going to spray the inserts red for me as a nod to my old Miami 205.
A few GTis with low miles seem to have popped up recently on this forum (check the retro cars thread) in good nick but they do seem rare. A 'working' XSi seems even rarer. That red one I posted a few months back at mega-money is the only one I've seen for a while.
I ought to be in the garage building an engine but the weather is just too good and Mrs9 is a teacher and off at the moment... Bella the labrador agrees as I got a call from a neighbour to say she somehow appeared in their garden, playing with their kids!
Yeah, Google threw up a few pics of blue ones with red inserts that swayed me and it worked so well on the 205 but I think you guys are right as I haven't seen a blue one with red inserts for sale here.
I do think it'll help it 'pop' with the new paint and wheels
I would have LOVED a grey, non-sunny car but there just wasn't one on the market (though there is one for sale in Scotland, which was originally sold as great condition but seems to have gone back up for sale a couple of times with various problems).
I'm happy with Miami, like my first 205 GTi, and it compliments my blue Clio V6 and blue BMW... It's a bit boring in my garage
Thanks Trollied - that's very kind!
Might drop the gearbox at the refurbers with the Quaife ATB - more progress without having to lift a finger!
Still I did have to get two engines in and out of the removal van... on my own with no hoist etc!
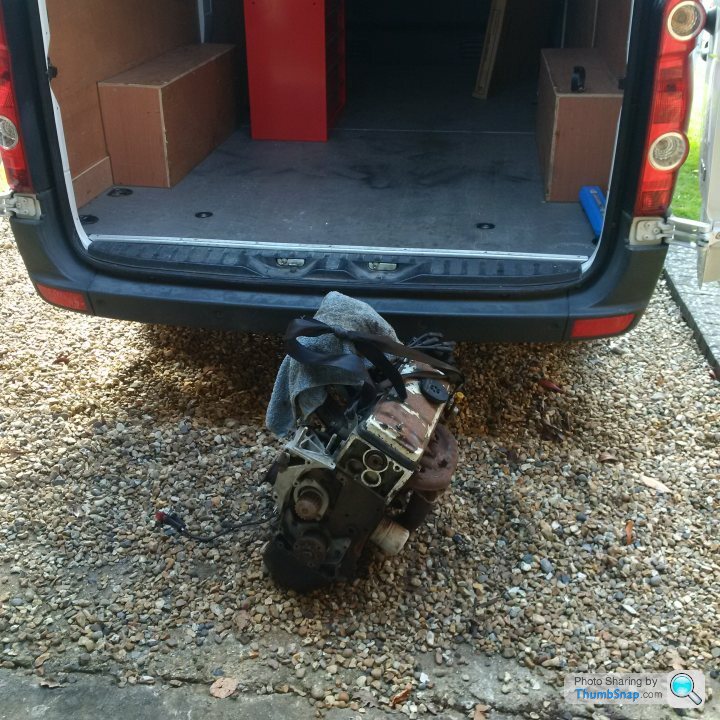
Let's just say that the alloy block 'Cup' engine is significantly lighter! There's no way I'm not going to try and make that work!
Might drop the gearbox at the refurbers with the Quaife ATB - more progress without having to lift a finger!
Still I did have to get two engines in and out of the removal van... on my own with no hoist etc!
Let's just say that the alloy block 'Cup' engine is significantly lighter! There's no way I'm not going to try and make that work!
neilbauer said:
Looking good Dom
Thanks Neil - It's getting there!lowly106 said:
Well..... its a miami blue xsi... its bloody brilliant...
I'm probably bias though
Great to see another being giving some proper TLC.. great work!
Thanks lowly106 - I've been quietly following your build thread I'm probably bias though
Great to see another being giving some proper TLC.. great work!
shedweller said:
Agreed, nice work going on here.
I reckon Dom's will be finished before the one above, but much respect to stu.
Both when completed will be ace, Miami blue does indeed rock. Was the paint on yours really that bad Dom?
I wouldn't count on mine being finished first I reckon Dom's will be finished before the one above, but much respect to stu.
Both when completed will be ace, Miami blue does indeed rock. Was the paint on yours really that bad Dom?

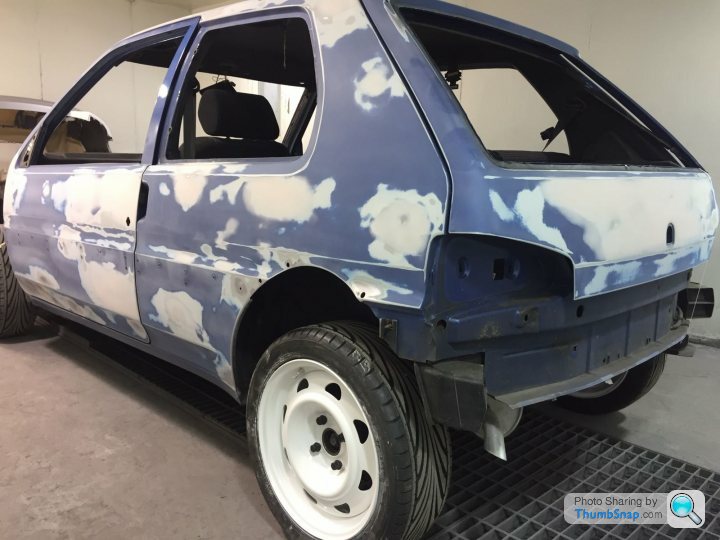
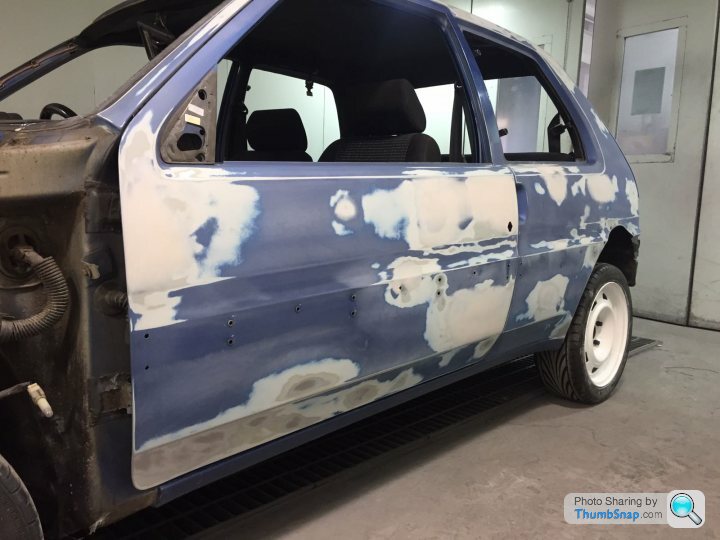
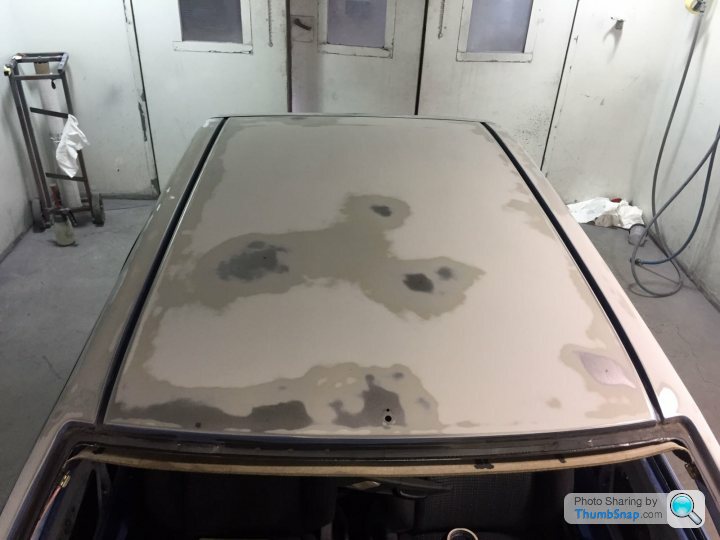
Was the paint that bad? Honestly? I'd say so.
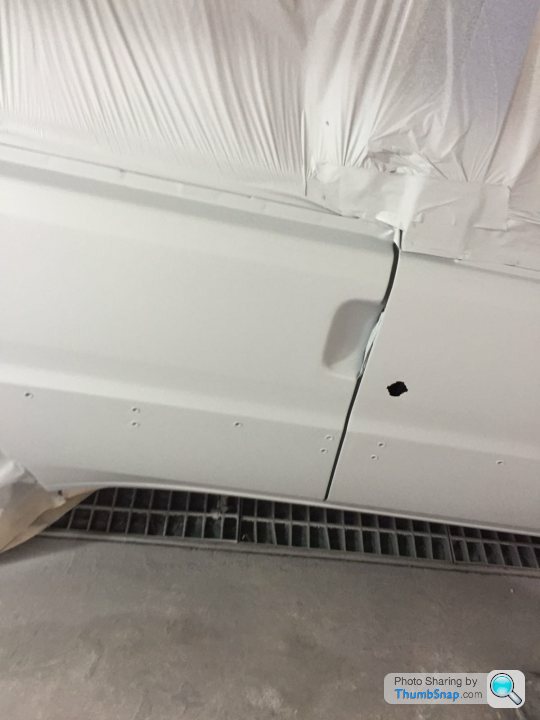
The bonnet and roof were matt and pretty bare in places and although other panels weren't necessarily terrible; there were a lot of dents etc (you can see how much work there was before primer in the earlier pics).
It was worth doing (well, maybe not financially) to end up with the car I want and I think I've tracked down a new rear bumper
Next on the list of annoying to find parts; a bonnet cable! Anyone know where to find a new one?
Hi Spinakerr - that's the car (well, same chap as he has another Miami XSi breaker) that my gearbox came out of, so I've already had a chat and it's a no-go.
I'd really like a new one as they're all apparently 'sticky' at the minimum. I'd found that Rallye thread on the VTR cable last week but couldn't find a new one online, though maybe Citroen stock them.
It's a bit difficult getting it all done as we are still having problems with our BT broadband and have had no Internet for days
Should be picking up the rear bumper and dropping it at the paint shop this afternoon though, which is nice as I thought that that would be the hard thing to find (not that I made it easy)!
You're all wimps
To be fair - I'm never doing it again with them in one piece and that one even had the iron exhaust manifold and downpipe attached.
I could have split it up but it was literally the last thing to move from the old house and it needed doing!
I remember being 19 and moving a 2litre Ford Pinto engine around... that was half my life ago though
Off to get the rear bumper in the next hour and a new front panel is en route as it'll be 'easier' to sort than the old one. Buys the paint shop more time on the important bits.
Will see the car later and hopefully the Internet will return and I can get after the bonnet release cable!
Gassing Station | Readers' Cars | Top of Page | What's New | My Stuff