TVR V8S Rebuild
Discussion


I'm half way through a rebuild of my V8S and at the stage where motivation is at an all time low. I seem to be hitting numerous problems and getting out into the garage is proving more & more difficult. After reading theough some build threads (procrastinating at its best) I thought logging the rebuild on here may help me during htese long dark winter months !! If it proves interesting to someone else then all the better 
Anyway - here it is in better days before I started

Anyway - here it is in better days before I started
And the reason this all started
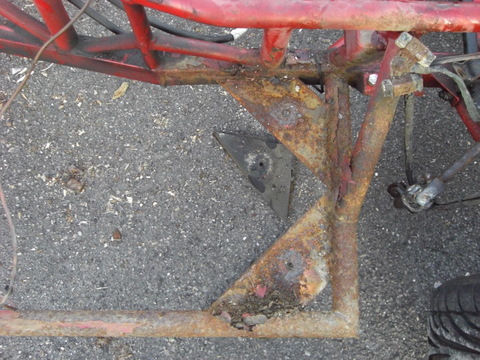
I had a small hole in the outrigger repaired last year to get through the MOT. I knew there would be other issues but I buried my head in the sand to get a few more months hooning in.
Eventually it was time to confront the rot that I knew was lurking below. I lost a lot of pictures from my PC so dont have many of this stage but the first thing was to do a partial lift of the body to inspect the damage. Fortunately the S Forum on PH is brilliant for us amateurs and there are a couple of guides to guide you along this process.
I also took loads of notes in my 'Man-Jotter' which I will write up at some point in case it can help anyone else attempting this. I'm not particularly skilled but managed my way through - learning all the way.
It took a bit of figuring out but I managed to rig up a pulley system on the roof of the grage so I could lift the body up a couple of inches. I don't really know anyone handy locally so I had to have a system which was controllable and didn't realy on anyone else. Eventually it was up and I could see the rot.
Took a couple of cups of tea but I came to realise it was going to have to be a full body-off to sort properly. I didn't want to bodge the job and as the car is a keeper, it would worth the time and effort. I also didn't have a project on the go so this was going to be it !
Once I made the decision I figured in for a penny in for a pound. There isn't a lot of height in my garage so the first job was to lift the engine & gearbox out to make things a bit easier.
So drained coolant, removed the exhaust Y piece, earth straps first. Then came the clutch slave and all the connectors I could find round the gearbox. Disconnected the propshaft and all the other electrical stuff then went for the lift. Again, I used my £40 pulley from Machine Mart but looking back I should have got a proper engine hoist. Never mind - a bit of jiggery pokery and I managed to get it out and on the floor

So drained coolant, removed the exhaust Y piece, earth straps first. Then came the clutch slave and all the connectors I could find round the gearbox. Disconnected the propshaft and all the other electrical stuff then went for the lift. Again, I used my £40 pulley from Machine Mart but looking back I should have got a proper engine hoist. Never mind - a bit of jiggery pokery and I managed to get it out and on the floor
Next step was getting the body fully off. I don't know if all S bodies are the same but the V8S has to come off at a pretty extreme angle. The back needs to lift way up so that the rear suspension turrets clear the bottom of the passenger section so you can slide the body back. This is because at the front of the transmission tunnel there is a taper and the body can't come straight up.
I managed to get hold of some dollys on ebay so put the car on the dollys so it could move around and hoist the body up on the rafter using my pully. I thought this was a genius idea and smugly hoisted it all up only to discover the pulley ran out of range about three-four inches short. Bugger !
So cup of tea later I decided to take the rear wheels off and drop the chassis so that the diff was sitting on the dolly. Now about an inch short....so close I couldn't believe it. In the end I took to twisting the straps which were round the body to get that precious extra inch and finally it cleared.
I've written that in three paragraphs but it actually took about two weeks. I have a two year wee girl and getting garage time is pretty difficult ! I was insanely jealous of some threads on the S forum talking about whipping the body off in a morning but hey -ho, it was done and I did it myself.
There was a wee accident in amongst all this which I'll get back to ( the embarassment is still too much at the moment )

A few years back I went to evening classes at a local college to learn to weld but there were several reasons I decided not to tackle the repairs on the chassis myself :
1) I wasn't great on the MIG and much preferred gas welding
2) I left my welder in the ex's dads garage which is pretty much irretrievable since he is a large Irish ex-rugby player
and 3) I wanted to make sure the chassis stayed straight if sections were cut out and replaced.
After phoning around and picking up recommendations I decided to use Dulfords to do the chassis work. So off it went -
First pictures back from Dulfords after shot blasting


The rot in the bottom pics couldn't have been seen without the body lift. From these and similar pictures from other chassis strips on the forums it's pretty clear that any holes on the bottom of the outriggers usually means there is a lot more unseen.
When Richard at Dulfords sent me these pictures I knew I'd done the right thing by going for a full strip and getting it properly sorted.


I decided to have the chassis powder coated. The TVR original coating wasn't great but after talking it through with Richard at Dulford and doing a bit of research it seemed the best way forward. As long as the prep is good, there's no reason it wouldn't last and I didn't want to take any chances with galvanising warping the chassis
I was originally planning to get the chassis welded & powder coated then back to me but there were some changes at work. Our company (or at least part of it )was bought by a competitor which threw things up in the air and I ended up doing a lot of travelling. I therefore decided to take Richard up on his offer of re-assembling it and returning it as rolling chassis to keep the project going.
He gave me what I reckon was a very competitive price ( I had four other quotes and his was somewhere in the middle). I didn't select on price alone though. I could have got it done cheaper but I had seen some other work they had done and his approach and manner inspired confidence.
Given that the price would vary depending on the state of the chassis and what else is done, I don't think it's fair for me to give out his pricing. If you're interested give him a call. I would certainly recommend the work though. See for yourselves, chassis porn :

I had already fitted Nitrons about 5 years ago (first mod I did) so they were just sent off for refurb and fitted with uprated Eibach springs.


They even cleaned up the diff etc and painted up the ARB etc. I was so excited to see these pics I jumped in the car and went down there to see it for myself !
I was originally planning to get the chassis welded & powder coated then back to me but there were some changes at work. Our company (or at least part of it )was bought by a competitor which threw things up in the air and I ended up doing a lot of travelling. I therefore decided to take Richard up on his offer of re-assembling it and returning it as rolling chassis to keep the project going.
He gave me what I reckon was a very competitive price ( I had four other quotes and his was somewhere in the middle). I didn't select on price alone though. I could have got it done cheaper but I had seen some other work they had done and his approach and manner inspired confidence.
Given that the price would vary depending on the state of the chassis and what else is done, I don't think it's fair for me to give out his pricing. If you're interested give him a call. I would certainly recommend the work though. See for yourselves, chassis porn :
I had already fitted Nitrons about 5 years ago (first mod I did) so they were just sent off for refurb and fitted with uprated Eibach springs.
They even cleaned up the diff etc and painted up the ARB etc. I was so excited to see these pics I jumped in the car and went down there to see it for myself !
Edited by gifdy on Monday 22 November 23:48

V8S said:
Interesting!
I keep asking Richard how my chassis is faring and he always replies it's in good condition, but who knows what nasties are lurking unseen.
I didn't know they have the jigs.
I'm pretty sure that's what he said. Mind you, I only had to have the outrigger tubes done and the seatbelt mounts so they wouldn't have had to use them.I keep asking Richard how my chassis is faring and he always replies it's in good condition, but who knows what nasties are lurking unseen.
I didn't know they have the jigs.
To give myself more space in the garage I put the body back on the chassis. This also gave me the chance to check that it all fitted.

Thankfully everything looks OK - I kept the packing pieces between body and chassis and replaced them in the same place. It's a little bit out but nothing too bad. I was worried I had twisted the body lifting it the way I had but fingers crossed it's OK.
The biggest problem was that Dulford had done such a cracking job on the chassis that it seems a shame putting the tatty body back on it.
Anyway onto the engine.
Back in 2005 I had some mods done to the standard 4.0L engine by TVR Power. The heads were ported, head skimmed and H218 fast road cam fittted. I also fitted ACT flared trumpets, the twin throttle plenum and also the ACT Y piece and manifolds. It was then fitted with the programmable EEPROM and tuned by Mark Adams. Rolling Road dyno below :

What doesn't show up here was how responsive the engine was. I ran it like this for four years and started getting a bit used to it so I decided that since the engine was out, it would be rude not to get a few more horses under the bonnet.
What doesn't show up here was how responsive the engine was. I ran it like this for four years and started getting a bit used to it so I decided that since the engine was out, it would be rude not to get a few more horses under the bonnet.
I took a long time to decide what to get done. Again, PH proved invaluable for research. I don't really have a philosophy for modding the car but I want to keep the 'nature' of the car as much as possible and have been keeping all the bits I change so I can always return it to original if needed, although I have no intention of selling it.
I ruled out supercharging although this is probably the cheapest way of upping the power on the 4.0L. Perhaps it was an emotional decision rather than a logical one - but it just didn't 'feel' right. So, I decided to go for a capacity increase.
I read a lot about 4.6L engines being the 'sweet spot' in terms of power,responsiveness so this was the route I initially started on. It seems TVR stuck to a 94mm bore and increased the stroke to increase capacity. If my research is correct then they went from 71.1 -> 77 -> 80 -> 82 -> 90mm stroke to take them from 4.0L all the way to 5.0L. My concern was that going too far in this way would just give too much low down torque but would lose the 'revvy' nature I had in the 4.0L engine.
So, again, afte doing a bunch of reading and calling around, I decided on V8 developments to do the work. I pestered Sean there with a lot of questions but discovered they did a 5.0L short engine with a 97mm bore ( using tophat liners whatever they are ) and 86mm stroke. With this and a few other mods (which I'll get to) he reckoned I would end up with a powerful engine but still maintain the responsiveness I was after.
So after discussing this with a mate over a few beers and double checking the bank balance I specced up my engine. I went for the 5.0L as above, with larger valves and associated porting in the head, trumpet base etc. I had to go for bigger trumpets so my ACT CF trumpets will end up on ebay. Fortunately the CF Plenum can be re-used.
So engine was packaged up and off it went.

Notice the cargo strap - big mistake. Last time I saw it !
I ruled out supercharging although this is probably the cheapest way of upping the power on the 4.0L. Perhaps it was an emotional decision rather than a logical one - but it just didn't 'feel' right. So, I decided to go for a capacity increase.
I read a lot about 4.6L engines being the 'sweet spot' in terms of power,responsiveness so this was the route I initially started on. It seems TVR stuck to a 94mm bore and increased the stroke to increase capacity. If my research is correct then they went from 71.1 -> 77 -> 80 -> 82 -> 90mm stroke to take them from 4.0L all the way to 5.0L. My concern was that going too far in this way would just give too much low down torque but would lose the 'revvy' nature I had in the 4.0L engine.
So, again, afte doing a bunch of reading and calling around, I decided on V8 developments to do the work. I pestered Sean there with a lot of questions but discovered they did a 5.0L short engine with a 97mm bore ( using tophat liners whatever they are ) and 86mm stroke. With this and a few other mods (which I'll get to) he reckoned I would end up with a powerful engine but still maintain the responsiveness I was after.
So after discussing this with a mate over a few beers and double checking the bank balance I specced up my engine. I went for the 5.0L as above, with larger valves and associated porting in the head, trumpet base etc. I had to go for bigger trumpets so my ACT CF trumpets will end up on ebay. Fortunately the CF Plenum can be re-used.
So engine was packaged up and off it went.
Notice the cargo strap - big mistake. Last time I saw it !
The other thing I was concerned about was remapping the engine. I had some misfire problems last year and couldn't get hold of MA to remap the Tornado chip. Although he is brilliant at what he does - I didn't like being in the hands of only one guy. So - I had plans to fit an aftermarket ECU, although was planning this further down the line.
Sean at V8D told me about the Megasquirt plug and play option they have. It plugs into the existing loom with very few mods- and I could get mappable ignition as well as fuel. Going down this route then opened up a whole new world of tuners - and would also allow me to plug into the ECU for diagnostics. I would also be able to use Dulfords to remap it if required. With my budget already blown I went for it.
Dealing with V8D wasn't the easiest thing in the world - and came at a time I was having major issues at work so was a real PIA .... but I chose them for their Engineering ability rather than their Customer services so I'm hoping that when I get the engine fired up, the experience will be a distant memory.
When I eventually managed to get a bench dyno plot out of them - it certainly helped with the frustration. Peak power still being made up at 5600rpm but had risen to ~ 310bhp and with 330lb/ft of torque. The peak torque is developed lower down the rev range but I'm assuming that is going to translate into better acceleration. I'm no good at reading these charts so I'm going to have to wait to see how it translates onto the road !
Engine as it arrived. I'll tart it up a bit before it goes in, but nothing too garish. I was thinking of Gunmetal grey & black to match the CF.

So that nearly brings me up to date...with one exception, my little accident I mentioned earlier.
When I was lifting the body, at one point it tilted off to one side. Some muppet hadn't closed the door and it swung open and clouted the engine block. The paint work wasn't great beforehand but that was the last straw. I've therefore started to strip down the body for a respray. I haven't decided whether to keep it Mica Blue or go with something without the Mica ( but still blue/black ). At least then it will be worthy of going back down on the chassis
The strip down is proving to be a long job but I'm getting there. I'll take more pictures to show where it is now.
Nearly there with the body strip down.
Just a couple of bits left in the engine bay. This all went pretty smoothly, although I'm not sure what to do about the labels in the there when it comes to paint. The body serial number plate on the RHS is rivetted in so that's OK. The others on the LHS are sort of foil 'stickers' which I doubt will come off in one piece.

Also took the dashboard out as I want to make sure all the heaters etc work and the wiring is OK. I'll also be refurbishing it. The guides for taking this out weren't a huge help. There were all sorts of screws and bolts and it took a bit of persuasion.

Stripped the back. Badges will need to be tarted up as they look a bit tired.


The hood came off OK. The biggest issue was the door lock/jam thingies. Really bad bit of design. They are screwed through the body into a tapped plate which sits behind the door recess. This plate was rusty as hell on the back and the screws were stuck fast in there. The were normal slotted screws and someone had already chewed them up, presumably adjusting the door. I got two out with a large screwdriver, the rest I had to drill out. Anyway all done.
Another couple of hours tidying it up, strip the bonnet and doors then I can send it away for a respray.
I'm going to fit a rollover hoop and have the interior retrimmed so just need to work out what order to do everything. Another cup of tea to mull it over, I reckon.
Just a couple of bits left in the engine bay. This all went pretty smoothly, although I'm not sure what to do about the labels in the there when it comes to paint. The body serial number plate on the RHS is rivetted in so that's OK. The others on the LHS are sort of foil 'stickers' which I doubt will come off in one piece.
Also took the dashboard out as I want to make sure all the heaters etc work and the wiring is OK. I'll also be refurbishing it. The guides for taking this out weren't a huge help. There were all sorts of screws and bolts and it took a bit of persuasion.
Stripped the back. Badges will need to be tarted up as they look a bit tired.
The hood came off OK. The biggest issue was the door lock/jam thingies. Really bad bit of design. They are screwed through the body into a tapped plate which sits behind the door recess. This plate was rusty as hell on the back and the screws were stuck fast in there. The were normal slotted screws and someone had already chewed them up, presumably adjusting the door. I got two out with a large screwdriver, the rest I had to drill out. Anyway all done.
Another couple of hours tidying it up, strip the bonnet and doors then I can send it away for a respray.
I'm going to fit a rollover hoop and have the interior retrimmed so just need to work out what order to do everything. Another cup of tea to mull it over, I reckon.
Gassing Station | Readers' Cars | Top of Page | What's New | My Stuff