Discussion


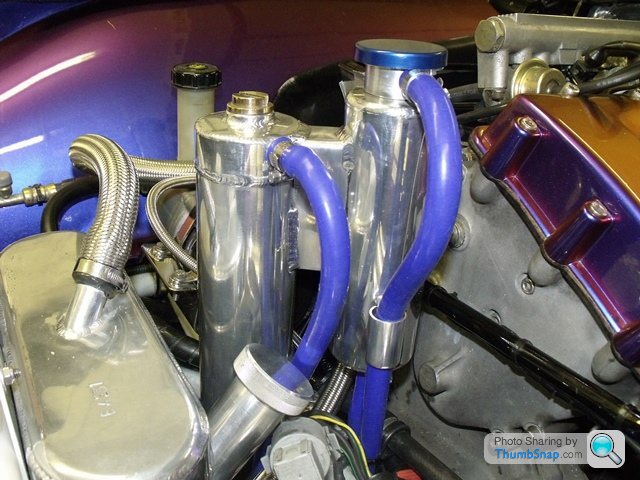
I`ve started playing again, and have now done away with the standard expansion bottle sited in front of the airbox, and after much fiddling have mounted a new smaller one just behind the swirl pot, the top of this fitting nicely up under the rear of the two service bonnet panels, and higher than the top of the swirl pot.

this gives better access to check coolant levels, and more importantly gives me access to run an extra air intake to the front of the airbox, with air taken from the vent under the drivers side headlights, I`ll put up some ics of that side of things next weekend when its finished.
this gives better access to check coolant levels, and more importantly gives me access to run an extra air intake to the front of the airbox, with air taken from the vent under the drivers side headlights, I`ll put up some ics of that side of things next weekend when its finished.
pipe from top of swirl pot goes to bottom of expansion bottle, as per standard set up, pipe from top of expansion bottle goes to ground, the bottle has a 15psi radiator cap on replacing the old vw cap, so if pressure builds up then coolant goes to the floor via the pipe rather than out of the cap and all down the side of the bottle.

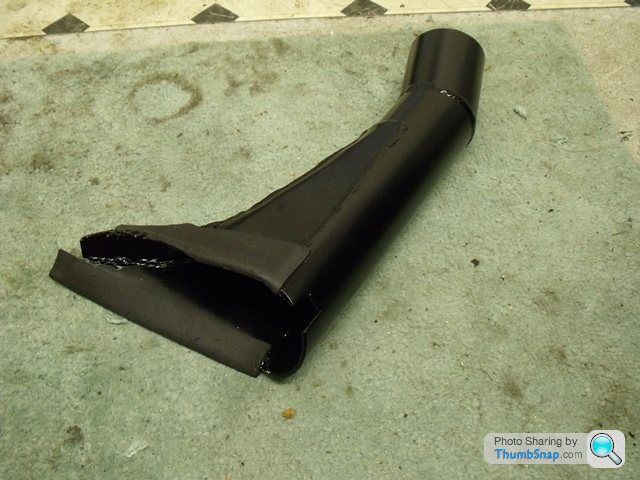
finished the air intake today, this is in addition to the standard intake from under the car, hoping to get a nice extra dose of cold air from the front of the car when on the move.
first addition is a lightwieght aluminium duct made at work,
then a pipe fitted inside the front face of the airbox,

duct fitted in place,

finished job, with airhose wrapped in a layer of bubble wrap with heat shield material over the top.

first addition is a lightwieght aluminium duct made at work,
then a pipe fitted inside the front face of the airbox,
duct fitted in place,
finished job, with airhose wrapped in a layer of bubble wrap with heat shield material over the top.
sibo99, are you my wife in disguise? she tells me things 3 times before I take notice......................apparently
hi dean, will give it a go on a dyno later on, a run with and a run with it disconnected, but dont think you`ll see any possible power gains on a dyno to be honest as the amount of air hitting the front of the car at speed would need to be reciprocated by a very powerful fan.
hi dean, will give it a go on a dyno later on, a run with and a run with it disconnected, but dont think you`ll see any possible power gains on a dyno to be honest as the amount of air hitting the front of the car at speed would need to be reciprocated by a very powerful fan.

very interesting comments guys, I`ve often wondered if 2 entry points will provide an exit for another at the same time, I also have this little mod done to the undertray,(did this last year) a sort of naca duct effect, with a small ledge at the back to help cause a deflection to force the air up into the pipe at the same time.


I`ll have a chat with dnb and see if he can rig up a pressure sensor in the pipes to see whats going on when on the move.
I`ll have a chat with dnb and see if he can rig up a pressure sensor in the pipes to see whats going on when on the move.
10k is a lot, engine wise, if you have regular servicing, tappets done ect and its in fine fettle why worry?
I don`t know how you look after your car, but a full geo set up every year is a must, then perhaps a set of nitrons?
when is the last timeit had a full 12k service and did you get a list of jobs that may need looking at in the future? If so I`d address that first.
I don`t know how you look after your car, but a full geo set up every year is a must, then perhaps a set of nitrons?
when is the last timeit had a full 12k service and did you get a list of jobs that may need looking at in the future? If so I`d address that first.
following on from my thread about a 4 point harness, I thought I`d put the final result on here as it is the cars latest mod.
fitted 4 point Sabelt harness`s,

I made up a harness bar at work that bolts to the seat belt mounting points on the roll bar, the plate that bolts to the car is bolted to the tube, the tube has a 6mm thk plate welded on either end, this is tapped to take 2 countersunk screws, the reason for this is so that when it goes up to DC Trim they can cover the tube in leather to match the interior of the car, then screw the mounting plates back in place, so the only metal on show will be the mounting plates themselves.
it also means the harness tube is mounted about 40mm lower giving more visibility in the rear view mirror, plus the shoulder belts of the harness don`t rub on the underside of the top of the seat headrest, as I`m no 6ft + chap


apologies for the reflection, using a flash in the garage was worse!
the bottom anchor plates that bolt to either side of the seat fitted ok on top of the existing seatbelt mounts, bolt lengths were ample, although the webbing/straps need to be removed and refitted so as to make the plate face in the opposite direction, the plates have a bend in them which is there to keep the strap away from the bodywork so it is free to move,and adjust when the plate is bolted in place, I assume most harness are bolted to the chassis or body of a car which would require the plates to face inwards, as the tvr seat belts are mounted on the seat itself, then these plates need to face outwards.
a short explanation in case anyone wants to do this themselves
fitted 4 point Sabelt harness`s,
I made up a harness bar at work that bolts to the seat belt mounting points on the roll bar, the plate that bolts to the car is bolted to the tube, the tube has a 6mm thk plate welded on either end, this is tapped to take 2 countersunk screws, the reason for this is so that when it goes up to DC Trim they can cover the tube in leather to match the interior of the car, then screw the mounting plates back in place, so the only metal on show will be the mounting plates themselves.
it also means the harness tube is mounted about 40mm lower giving more visibility in the rear view mirror, plus the shoulder belts of the harness don`t rub on the underside of the top of the seat headrest, as I`m no 6ft + chap
apologies for the reflection, using a flash in the garage was worse!
the bottom anchor plates that bolt to either side of the seat fitted ok on top of the existing seatbelt mounts, bolt lengths were ample, although the webbing/straps need to be removed and refitted so as to make the plate face in the opposite direction, the plates have a bend in them which is there to keep the strap away from the bodywork so it is free to move,and adjust when the plate is bolted in place, I assume most harness are bolted to the chassis or body of a car which would require the plates to face inwards, as the tvr seat belts are mounted on the seat itself, then these plates need to face outwards.
a short explanation in case anyone wants to do this themselves


progress so far, escaped wrath of Sue for pinching kitchen floor
have done away with the silencer completely,(similar to the new Act set up) and made 2 x 2 1/2" pipes to curve round to the end cans, you`ll notice that they curve in towards the center of the car, this is to give me sufficient length in the end cans to give adequate silencing, making them too short would make it to loud for trackdays ect.
I have also replaced the plate that supports the 2 exhaust hangers that`s bolted to the underside of the bodywork that the silencer used to hang from, and replaced this with a plate another 10" longer, this means I can now support the end cans as these now being 5" diameter and filled with silencing plates/baffles and packing will be pretty heavy compared to normal empty end cans.
so when finished I`ll have just 1 pair of end cans, with inserts in the ends of each for quiet driving and trackdays, and with these inserts removed, and with other silencing still in place in the other end of the cans I`ll have a reasonable loud`ish system for normal fun stuff.
hope to have the cans polished and on the car for this weekend, test with db meter and fine tune if necessary.
Gassing Station | Tamora, T350 & Sagaris | Top of Page | What's New | My Stuff