1999 Honda S2000 JDM
Discussion


Whilst my old 911 is away on holiday in the south of England getting some shiny paint my son has taken over the garage with a spur of the moment poorly researched purchase 
Having grown up on on a diet of Fast and Furious and Forza Horizon he’s a major fan of all Japanese and car shaped.
Despite the inability to insure it for anything like sensible money, and with a time limited offer on garage space it had to be bought. He’s doing most of the work on it (and it’s all his money), but I’d be lying if I didn’t admit to enjoy having something to work on!
Rough plan is to get it tidied up and driving in straight line then see where the mood takes him, either to move it on or keep it as I can’t see it losing any money as it was cheap enough. Previous owner was also a JDM fan and bought this as an extra project but hadn’t done anything to it and I have a feeling family pressures may have required an N-1 on the acceptable car count!


As bought it drives like a slightly unruly pig... four mismatched tyres, probably suspect geometry and a LH rear brake we now know to be pretty much seized on.
When VTEC kicks in (yo...) it pulls hard to the left and then goes right as you change gear... slightly unnerving given its reputation of chucking you in the ditch with no notice!
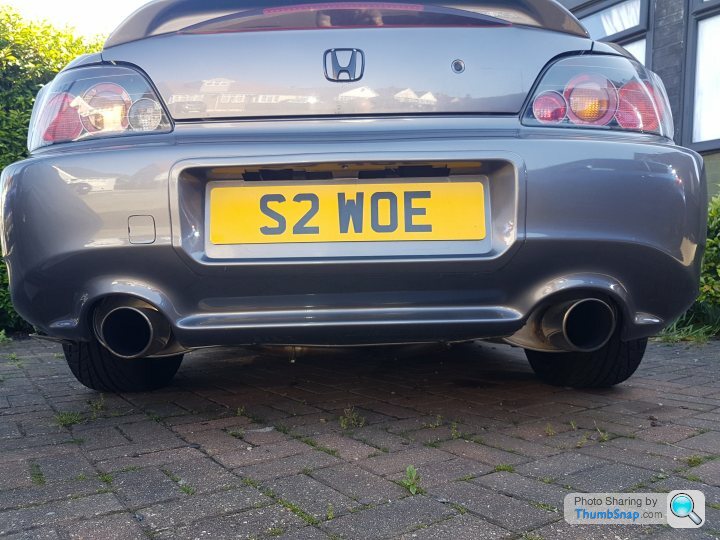
It’s a 1999 JDM car, although currently incorrectly registered as a 2001. As such it gets the full beans 11.7:1 compression ratio giving 247 hp at 8,300 rpm and a 9000 rpm limit!
We’ve already started work (and it escalated!) and I’ll post a few updates later.
Having grown up on on a diet of Fast and Furious and Forza Horizon he’s a major fan of all Japanese and car shaped.
Despite the inability to insure it for anything like sensible money, and with a time limited offer on garage space it had to be bought. He’s doing most of the work on it (and it’s all his money), but I’d be lying if I didn’t admit to enjoy having something to work on!
Rough plan is to get it tidied up and driving in straight line then see where the mood takes him, either to move it on or keep it as I can’t see it losing any money as it was cheap enough. Previous owner was also a JDM fan and bought this as an extra project but hadn’t done anything to it and I have a feeling family pressures may have required an N-1 on the acceptable car count!
As bought it drives like a slightly unruly pig... four mismatched tyres, probably suspect geometry and a LH rear brake we now know to be pretty much seized on.
When VTEC kicks in (yo...) it pulls hard to the left and then goes right as you change gear... slightly unnerving given its reputation of chucking you in the ditch with no notice!
It’s a 1999 JDM car, although currently incorrectly registered as a 2001. As such it gets the full beans 11.7:1 compression ratio giving 247 hp at 8,300 rpm and a 9000 rpm limit!
We’ve already started work (and it escalated!) and I’ll post a few updates later.
First job was to get the rocker cover off and away for fresh crackle red Got his priorities right!
We tried to tow the car out of the garage to wash it (now we can’t start it) and found there was no front bumper beam to put a towing eye in!
Not sure if this normal, but £35 on eBay has one ordered and fitted. Probably best to have one!
He also pulled the back bumper off to have a poke around for rust and found no rear bumper beam either... I’ve confirmed this as JDM correct and it does at least have a steel square fabrication for the towing eye this end.
It had rotted under this towing eye taking the edge of the boot floor with it, but fairly easy to fix.

There were a couple of other small areas that I’ve also repaired so that’s the back panel done!
Got his priorities right! We tried to tow the car out of the garage to wash it (now we can’t start it) and found there was no front bumper beam to put a towing eye in!
Not sure if this normal, but £35 on eBay has one ordered and fitted. Probably best to have one!
He also pulled the back bumper off to have a poke around for rust and found no rear bumper beam either... I’ve confirmed this as JDM correct and it does at least have a steel square fabrication for the towing eye this end.
It had rotted under this towing eye taking the edge of the boot floor with it, but fairly easy to fix.
There were a couple of other small areas that I’ve also repaired so that’s the back panel done!


Now the fun part...
Suspension is adjustable double wishbones on both ends with an additional toe link on the rear.
The cam bolts that enable this adjustment are notorious for seizing in the bush meaning:
A: You can’t adjust it
B: You have to cut through the bolts to get them out
C: Honda won’t sell you the bushes separately...
As I hate the concept of poly bushes the replacement rubber options are Mugen or Hardrace. You can balljoint everything, but this is a road car and that just moves the compliance to the subframe/bodyshell anyway.
New Mugen fronts and Hardrace rears are on order with new hardware. Unfortunately these are on the slow boat from Japan as there’s no overnighting parts on this build...
I knew this was going to be a rubbish job and as we’ve already committed to a underside refurbishment he pulled off the front wings/lights/bumper to improve access. Nothing too grim under there luckily but it will get treated and painted anyway.


The bolts had been sat in penetrating fluid for over a week, not sure it does anything but makes you feel like you’ve tried...
We decided to start at the back and after a day of violence and noise the rear suspension is off. The top bolts (non adjustable) came straight out. The damper bolts came out so those bushes and bolts can be returned when they turn up!
As expected the toe link was seized solid as was the rear lower bolt. My air impact gun simply sat there and made a noise.
I’d bought a reciprocating saw in advance for the job and with a healthy supply of shortened hacksaw blades and cutting grease together with judicious (or not as it turned out) use of an angle grinder with cutting disc they were released from the grasp of the subframe.


Unfortunately there doesn’t seem to be a miracle method for freeing them off. When a impact gun, a blowtorch, club hammer and a long breaker bar have failed them you have to just accept it.
Having all this out the way will make it easier to clean up and paint the arches. Don’t panic about the caliper hanging from a brake hose, new ones are on order as these look a bit too original for me!
Nice to work on something different and with some lovely engineering, even if a smear of grease on those adjuster bolts could have saved a load of problems a few years later!
Suspension is adjustable double wishbones on both ends with an additional toe link on the rear.
The cam bolts that enable this adjustment are notorious for seizing in the bush meaning:
A: You can’t adjust it
B: You have to cut through the bolts to get them out
C: Honda won’t sell you the bushes separately...
As I hate the concept of poly bushes the replacement rubber options are Mugen or Hardrace. You can balljoint everything, but this is a road car and that just moves the compliance to the subframe/bodyshell anyway.
New Mugen fronts and Hardrace rears are on order with new hardware. Unfortunately these are on the slow boat from Japan as there’s no overnighting parts on this build...
I knew this was going to be a rubbish job and as we’ve already committed to a underside refurbishment he pulled off the front wings/lights/bumper to improve access. Nothing too grim under there luckily but it will get treated and painted anyway.
The bolts had been sat in penetrating fluid for over a week, not sure it does anything but makes you feel like you’ve tried...
We decided to start at the back and after a day of violence and noise the rear suspension is off. The top bolts (non adjustable) came straight out. The damper bolts came out so those bushes and bolts can be returned when they turn up!
As expected the toe link was seized solid as was the rear lower bolt. My air impact gun simply sat there and made a noise.
I’d bought a reciprocating saw in advance for the job and with a healthy supply of shortened hacksaw blades and cutting grease together with judicious (or not as it turned out) use of an angle grinder with cutting disc they were released from the grasp of the subframe.
Unfortunately there doesn’t seem to be a miracle method for freeing them off. When a impact gun, a blowtorch, club hammer and a long breaker bar have failed them you have to just accept it.
Having all this out the way will make it easier to clean up and paint the arches. Don’t panic about the caliper hanging from a brake hose, new ones are on order as these look a bit too original for me!
Nice to work on something different and with some lovely engineering, even if a smear of grease on those adjuster bolts could have saved a load of problems a few years later!
Edited by gary71 on Tuesday 8th June 08:06
All the ball joints separated without protest (other than a massive bang and a mildly injured wrist as I was holding one of the arms when it released...), and with the driveshafts off the diff all the suspension was free.

The ARB drop links were seized of course so they just got cut off. Decent aftermarket replacements are available for these, and even if they fail you can replace them four times for the cost of the OEM parts.
He wasn’t planning to drop the subframe as it’s in really good condition, but it was cosmetically challenged and access to do the cleaning and undersealing would be so much easier with it gone so off it came. The exhaust fixings were welded in place on the catalyst so they got cut off.
There is a small crack in a weld at the front of the cat so we might look at aftermarket replacements later on.
Down comes the subframe and diff:

He’s going to take it be blasted today as it’s too complex for manual methods.

We set up a meth lab in the garage, which handily doubles as a spray booth.

All the rear suspension (less one arm I accidentally cut a slot in whilst cutting the bolts out...) caliper carriers etc are now ground back, treated and sprayed in 2K black.


His next grim messy job is to remove the underseal from the sills along the full length as a few bits look flaky, generally at each spot weld. The arches look really good so these will get a more localised approach before 2K epoxy.
He’s bought some colour matched Raptor underbody protection, so that will get used on the arches with some spare black I had from the 911 elsewhere.
That brings it up to date Hope it’s of interest
The ARB drop links were seized of course so they just got cut off. Decent aftermarket replacements are available for these, and even if they fail you can replace them four times for the cost of the OEM parts.
He wasn’t planning to drop the subframe as it’s in really good condition, but it was cosmetically challenged and access to do the cleaning and undersealing would be so much easier with it gone so off it came. The exhaust fixings were welded in place on the catalyst so they got cut off.
There is a small crack in a weld at the front of the cat so we might look at aftermarket replacements later on.
Down comes the subframe and diff:
He’s going to take it be blasted today as it’s too complex for manual methods.
We set up a meth lab in the garage, which handily doubles as a spray booth.
All the rear suspension (less one arm I accidentally cut a slot in whilst cutting the bolts out...) caliper carriers etc are now ground back, treated and sprayed in 2K black.
His next grim messy job is to remove the underseal from the sills along the full length as a few bits look flaky, generally at each spot weld. The arches look really good so these will get a more localised approach before 2K epoxy.
He’s bought some colour matched Raptor underbody protection, so that will get used on the arches with some spare black I had from the 911 elsewhere.
That brings it up to date
Hope it’s of interest Mr Scruff said:
Bookmarking this, definitely of interest. How handy is your son with the spanners??
Pretty good to be honest. Enough to do a brake disc/pad swap and oil change on his MX5 on his own. He also welded up a repair to the towing eye bracket really well. He’s learning, and I’m trying to teach him the right way.
The confidence of how much effort to put into a bolt, or knowing that sometimes taking more apart is quicker than working around it will come with time.
I sprayed the parts last night, but he’s done all the part cleaning and rust treatment himself which is good as it’s not a nice job!
Rear subframe is now at the powder coat place £70 all in for satin black is not worth getting our hands dirty! Should be done by next week.
I can hear grinding noises from the garage so I guess the next batch of bits is being prepped...
His first box from Honda arrived to today, rocker cover gasket and rear discs/pads. For once the OE parts are cheaper than aftermarket!
I can hear grinding noises from the garage so I guess the next batch of bits is being prepped...
His first box from Honda arrived to today, rocker cover gasket and rear discs/pads. For once the OE parts are cheaper than aftermarket!
Always good to pass experience on to the next generation and to show them the correct way. Good effort and she’ll be a gem to enjoy.
Years ago I had the same misfortune working on a friend’s UK spec S2000 replacing those same adjusters.... took blood ages getting the things from Honda, never mind the ball ache stripping the car lol
Smiles per mile though once it was done...!!!
Years ago I had the same misfortune working on a friend’s UK spec S2000 replacing those same adjusters.... took blood ages getting the things from Honda, never mind the ball ache stripping the car lol
Smiles per mile though once it was done...!!!
trails said:
Sounds like a chip off the old block
The bushes on these things really need to be experienced to appreciate how much of a pain double wishbones at all four corners can be!
As you are both pretty darn handy have you thought of DIYing the ‘UK exhaust mod’?
The bushes on these things really need to be experienced to appreciate how much of a pain double wishbones at all four corners can be!
As you are both pretty darn handy have you thought of DIYing the ‘UK exhaust mod’?
What I can’t believe is that 25 odd years ago I cut the bolts off my 200k mile old MX5 wishbones with a hacksaw blade in my hand with a handle made from tape... Only 2 days per bolt... I’m trying to pass on the learning that investment in tools is never wasted money
The ‘UK exhaust’ mod is on the list, not sure on what pipe diameter to use though for the bypass. Any experience with that one?
gary71 said:
What I can’t believe is that 25 odd years ago I cut the bolts off my 200k mile old MX5 wishbones with a hacksaw blade in my hand with a handle made from tape... Only 2 days per bolt... I’m trying to pass on the learning that investment in tools is never wasted money
The ‘UK exhaust’ mod is on the list, not sure on what pipe diameter to use though for the bypass. Any experience with that one?
No; I've gone from OE to Invidia and am now running a Blueflame...25 or 30mm seem to be the most popular choices though. Bigger seems better in this instance as the OE exhaust is so quiet.
gary71 said:
Some details on your Blueflame set up would be great.
They aren’t to far from us. Any issues with EML coming one or MoT emissions? Are you still running the standard cat?
Not too loud and not really that boomy...I run a Tegiwa sports cat and no issues with emission testing once it's warm and no EML as it has the extended mount for the O2 sensor.They aren’t to far from us. Any issues with EML coming one or MoT emissions? Are you still running the standard cat?
Nicer aesthetics that standard but not too bling...
gary71 said:
Looks great.
Do you have size/specs on the back boxes and did you keep the centre box?
The Blueflame web site is very motorbike focussed, nothing about cars, so is it a design they can easily reproduce?
It's cat back and the centre section is resonated.Do you have size/specs on the back boxes and did you keep the centre box?
The Blueflame web site is very motorbike focussed, nothing about cars, so is it a design they can easily reproduce?
I've got to change the oil later so will provide back box sizes and a photo of the centre section for you.
I think these are pretty old systems that they no longer manufacture but presumably they still have the jigs for them, so not too onerous to fab one?
Gassing Station | Readers' Cars | Top of Page | What's New | My Stuff