Chimaera window/door runner wobbles like a badger!
Discussion


Not that I ever drive above 70mph, but if I did, the driver side front window runner would catch the passing air and start to wobble side to side (also lets in a bit of water in bad weather).
The solution is to either stay below 70mph, or pull it in with fingertips, which is obviously not much use.
There are a couple of things I think might be handy to adjust, but with varying degrees of my understanding of the impact:
Firstly, I have noticed the upper hinge on the driver's door has additional packing, which mounts the door slightly further out than the passenger door. If I were to remove it, obviously it would be difficult to do, and there might be a number of significant knock-on effects that fill me with uncertainty, but it could pull the whole thing in.
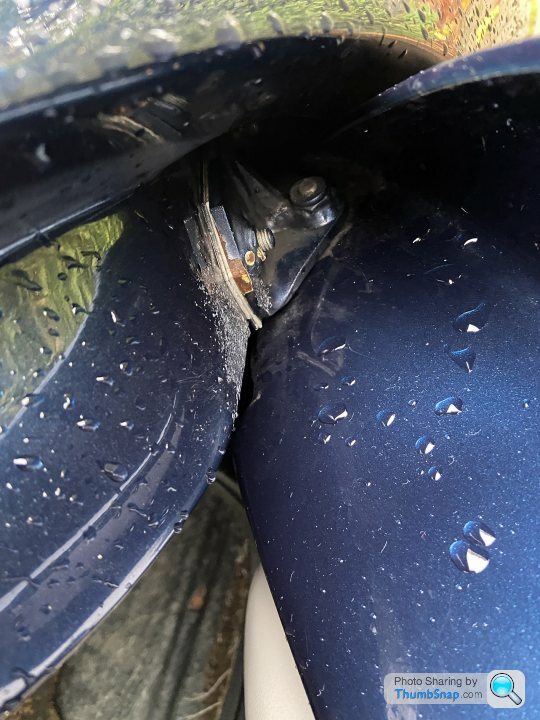

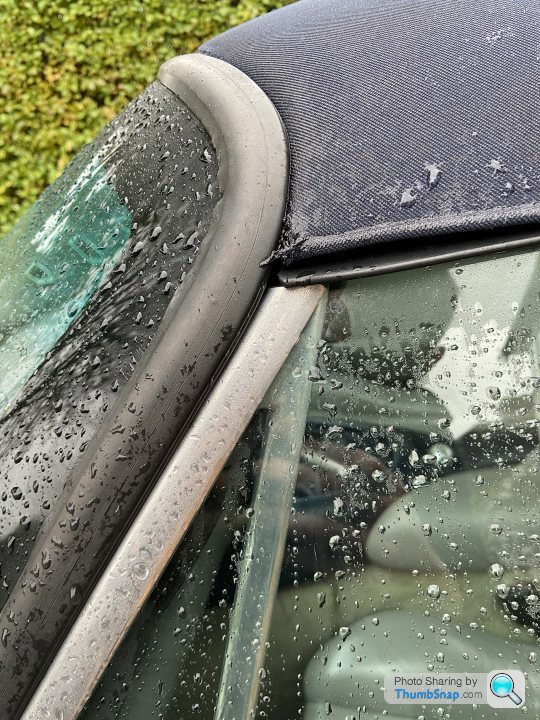
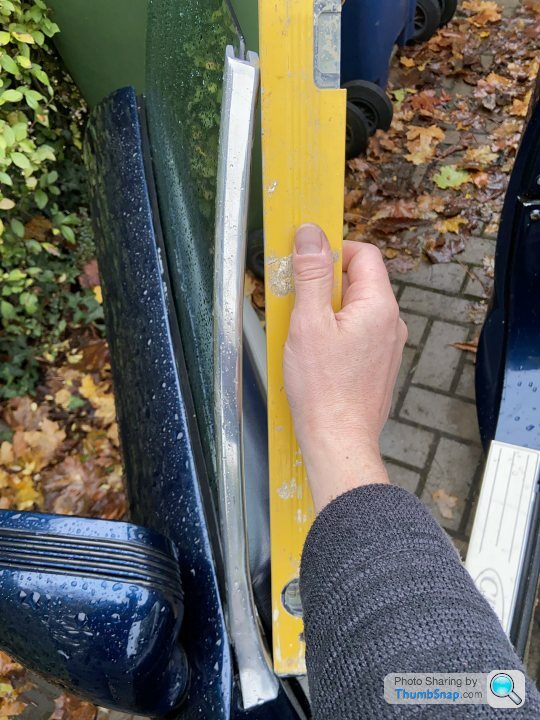
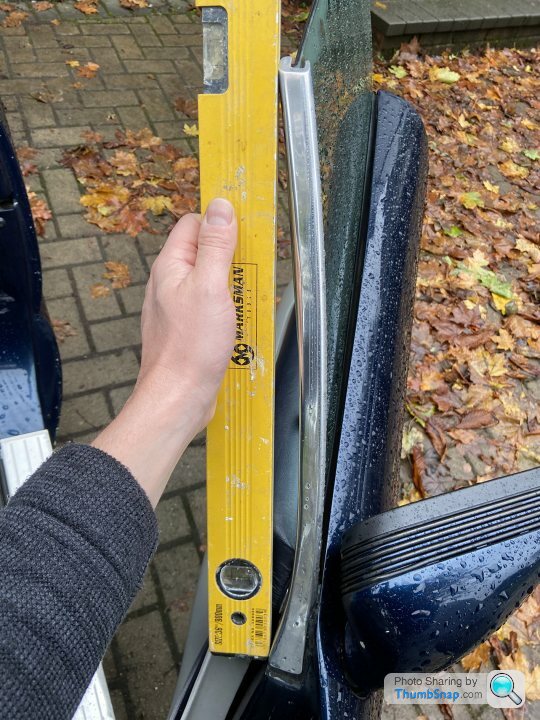
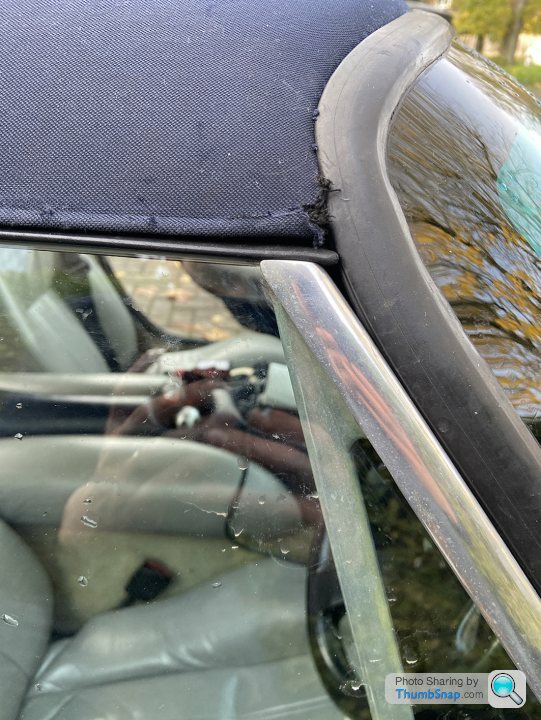
Secondly, the position of the runner itself is slightly different between the two doors (both laterally and height), and with a bit of fiddling I could potentially re-fit that to be both more secure and to reach the top of the glass. Here you can see the driver side runner sits outside the windscreen frame, and short of the top of the window (someone told me there was once a rubber fitting for the top of the runner?), whilst the passenger side sits neatly behind the windscreen frame, and meets the roof and top of window glass.

Obviously I appreciate these are hand-built cars, and it's an art not a science of measurements...
I haven't got as far as removing the door card yet, or even locating how to unbolt the door (looks like from either underneath or in an awkward spot in the footwell), so I wanted to ask if anyone has any experience of this situation?
The solution is to either stay below 70mph, or pull it in with fingertips, which is obviously not much use.
There are a couple of things I think might be handy to adjust, but with varying degrees of my understanding of the impact:
Firstly, I have noticed the upper hinge on the driver's door has additional packing, which mounts the door slightly further out than the passenger door. If I were to remove it, obviously it would be difficult to do, and there might be a number of significant knock-on effects that fill me with uncertainty, but it could pull the whole thing in.
Secondly, the position of the runner itself is slightly different between the two doors (both laterally and height), and with a bit of fiddling I could potentially re-fit that to be both more secure and to reach the top of the glass. Here you can see the driver side runner sits outside the windscreen frame, and short of the top of the window (someone told me there was once a rubber fitting for the top of the runner?), whilst the passenger side sits neatly behind the windscreen frame, and meets the roof and top of window glass.
Obviously I appreciate these are hand-built cars, and it's an art not a science of measurements...
I haven't got as far as removing the door card yet, or even locating how to unbolt the door (looks like from either underneath or in an awkward spot in the footwell), so I wanted to ask if anyone has any experience of this situation?

I had a similar issue, it turned out when I replaced the runner felt I had left a small 5cm gap at the top which was enough for lots of movement in the window and rattling the glass against that metal frame section created a lot of noise.
Quick fix was some bicycle inner tube at the top gap and then replace the runner felt again to the proper length next time I have the door card off.
Quick fix was some bicycle inner tube at the top gap and then replace the runner felt again to the proper length next time I have the door card off.
Have you checked the runner is securely attached?
There is a single bolt securing it about 4" down from where it disappears into the paintwork. You may just be able to see this fixing on the front edge of the door.
Then there is a right angle bracket securing the bottom of the runner to the bottom face of the door.
Steve
There is a single bolt securing it about 4" down from where it disappears into the paintwork. You may just be able to see this fixing on the front edge of the door.
Then there is a right angle bracket securing the bottom of the runner to the bottom face of the door.
Steve
That's probably my first thing to explore - getting the door card off and looking at those fixings.
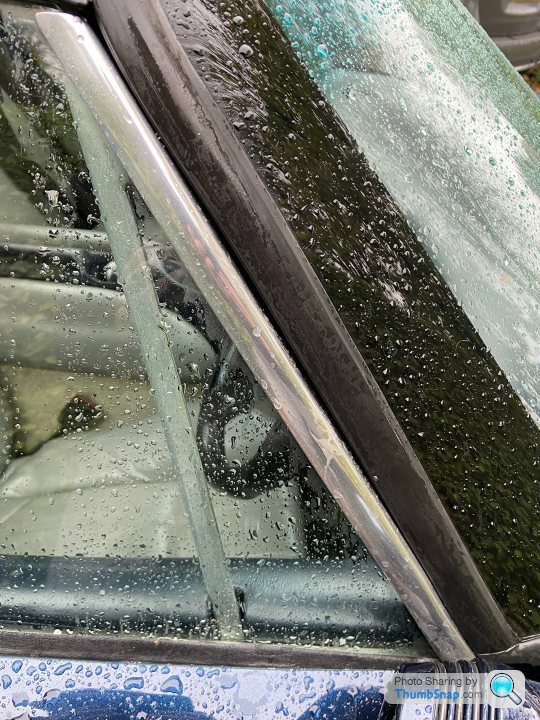
It certainly moves around a little, and the sealant/glued bit at the point it comes out from the door is not well bonded any more.
My main concern with that is that if I pull the runner in to make a tighter fit with the seals when the door is closed, is whether I'll open up the (already crumbly) seal on the outside of the window, and the door will just fill with water. I'll probably look to replace that seal too.
Whereas, if I remove the shim/packing on the top hinge, it might just pull the whole door construct in.

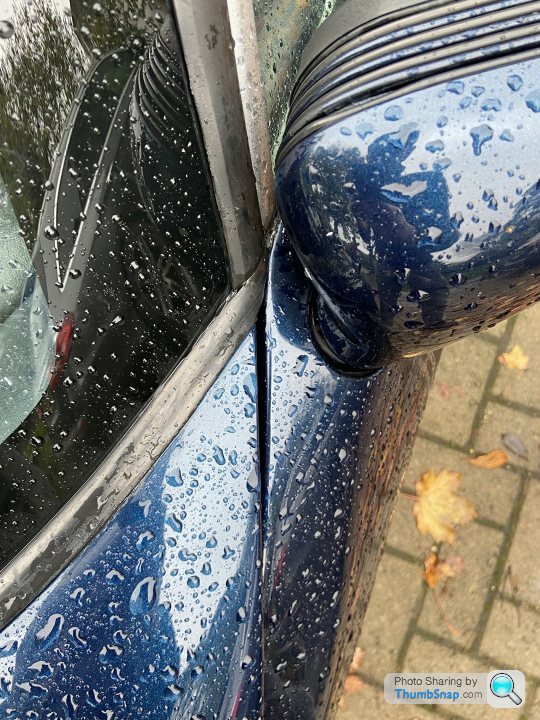
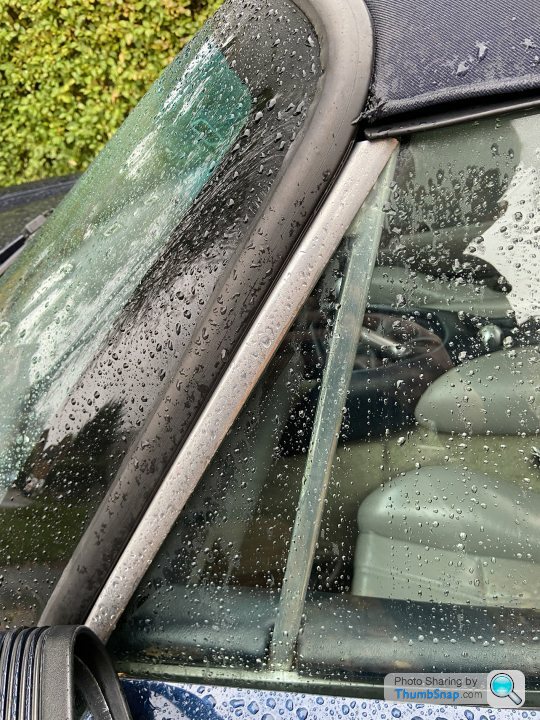
I also noticed that the rubber seal around the windscreen is in a slightly different position on each side - more pushed over onto the windscreen on the drivers side, creating a gap down the front edge of the runner. I might re-mount that too.
It's going to be a fiddle, whichever way!
It certainly moves around a little, and the sealant/glued bit at the point it comes out from the door is not well bonded any more.
My main concern with that is that if I pull the runner in to make a tighter fit with the seals when the door is closed, is whether I'll open up the (already crumbly) seal on the outside of the window, and the door will just fill with water. I'll probably look to replace that seal too.
Whereas, if I remove the shim/packing on the top hinge, it might just pull the whole door construct in.
I also noticed that the rubber seal around the windscreen is in a slightly different position on each side - more pushed over onto the windscreen on the drivers side, creating a gap down the front edge of the runner. I might re-mount that too.
It's going to be a fiddle, whichever way!
PabloGee said:
............My main concern with that is that if I pull the runner in to make a tighter fit with the seals when the door is closed, is whether I'll open up the (already crumbly) seal on the outside of the window, and the door will just fill with water. .................
That is not a seal as such more a cosmetic strip to hide the inner workings of the window. Water will flood in there then just run out of the 3 drain holes in the bottom of the door.By the way that seal is a simple rubber moulding superglued in place.
Steve
That's reassuring, thank you, I wasn't sure!
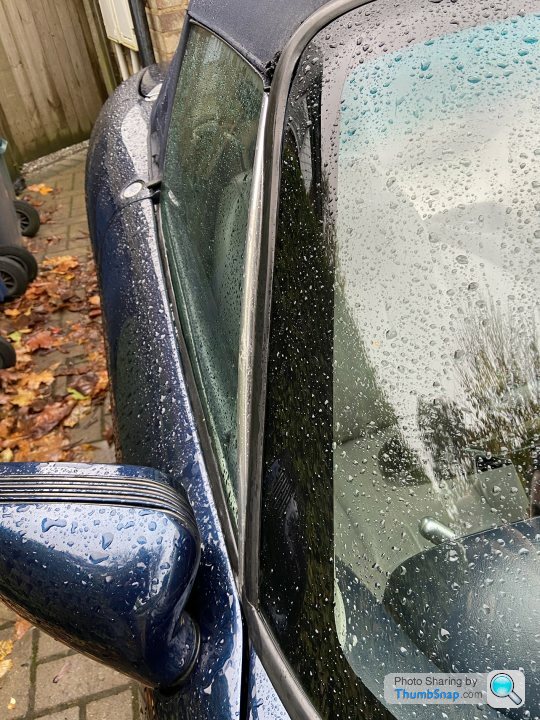
You're absolutely correct about the windscreen moulding, which I discovered last night by pulling at the trim (it came off far too easily, but had been botched a couple of times with clear silicone here and there), which I then fully removed, cleaned up and re-seated with a new dose of Sikaflex (black fingers for days because I didn't have any gloves!).
What I did manage to do though, is position it better against the driver door, to meet the runner (which you can see compared to my earlier photo)...
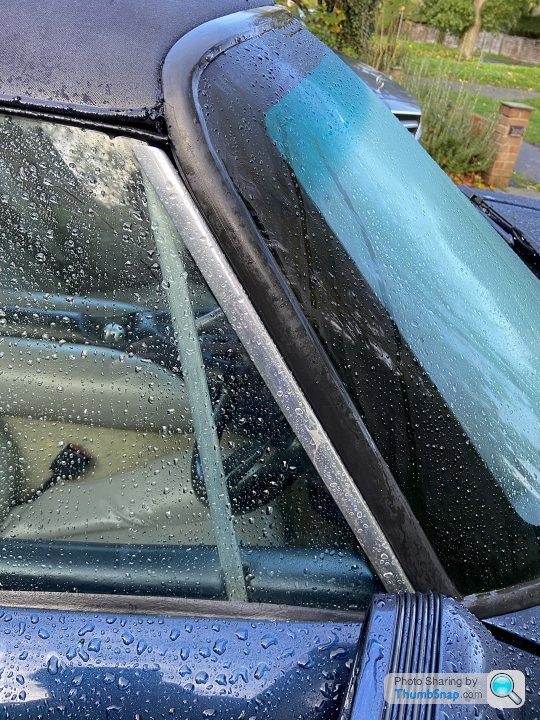
I doubt it will stop the wobbling effect, and the runner is still short of the roof, so there's still a gap, but it might help (at least it looks better).
I think I still need to dismantle and refit the runner in a slightly higher position (possibly more secure if it's loose), and I am considering removing the shims from the top hinge to pull the door in to create a better meeting of runner and seal, but also to tuck it behind the line of the windscreen to try to cure the wobbling.
I must admit I am slightly nervous of undoing the door hinge in case it's a pain to get it back on in a position that still swings and closes properly.
Anyone else done this?
You're absolutely correct about the windscreen moulding, which I discovered last night by pulling at the trim (it came off far too easily, but had been botched a couple of times with clear silicone here and there), which I then fully removed, cleaned up and re-seated with a new dose of Sikaflex (black fingers for days because I didn't have any gloves!).
What I did manage to do though, is position it better against the driver door, to meet the runner (which you can see compared to my earlier photo)...
I doubt it will stop the wobbling effect, and the runner is still short of the roof, so there's still a gap, but it might help (at least it looks better).
I think I still need to dismantle and refit the runner in a slightly higher position (possibly more secure if it's loose), and I am considering removing the shims from the top hinge to pull the door in to create a better meeting of runner and seal, but also to tuck it behind the line of the windscreen to try to cure the wobbling.
I must admit I am slightly nervous of undoing the door hinge in case it's a pain to get it back on in a position that still swings and closes properly.
Anyone else done this?
Edited by PabloGee on Wednesday 9th November 14:07
Took the car out properly yesterday, and this simple adjustment of the windscreen trim seems to be holding the window runner still.
I'm not sure if it's a proper or full fix, but it has certainly helped.
Potential knock on effect of having replaced the seal around the rear hood is that the drivers window comes into firmer contact with it and struggles to make the last 3-4cm of closing on the up/down motor.
Next stop will be to move the runner around, and look at window adjustments to see what happens. It's all very trial and error!
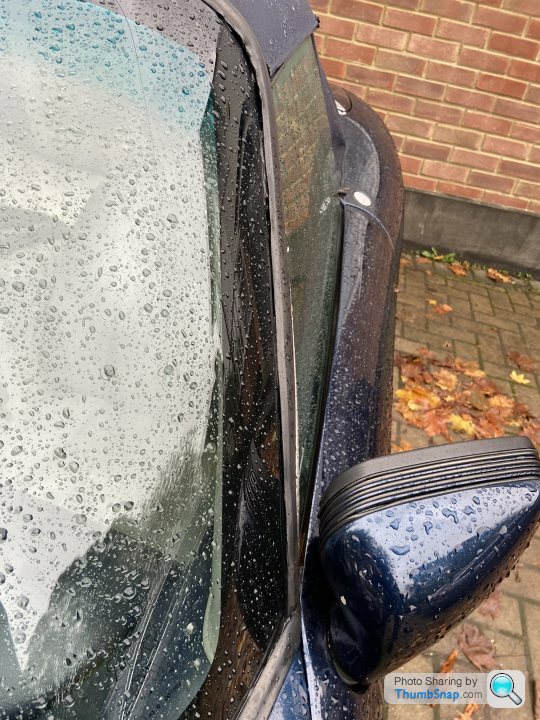
Having looked at my car today, it has a shim on the passenger door and not the driver’s door, so clearly part of the highly accurate alignment process… However my driver’s side window runner similarly protrudes beyond the windscreen frame far more than the passenger side does. It also appears to be more curved!
Both runners are firmly attached to their doors, so no wobble.
Both runners are firmly attached to their doors, so no wobble.
I had a similar thought, I was convinced that the driver door runner was more curved, but these photos suggest that they are the same, it's just the way it's mounted.
I was thinking of trying to gently straighten the driver runner, but I don't have the right tools to do it properly, and I bet it will take a fair bit of force and it would be best applied in a controlled and gradual way.
In my case here, you can see more black gobbo below the runner on the passenger door, which theoretically accounts for the gap to the roof on the driver door, so I'm going to look at adjusting the mounted position when I can carve out the time.
I just replaced the door/windscreen/door seal, which now means I have to give the doors a bit of a slam, but is worth it because the previous seal was short and popped off in the tight turns in the front bottom corner of the door opening - definitely a spot for ingress!
So, after a day of unbolting, bending, packing, adjusting, refitting, re-silicon greasing and probably other things, I have managed to reposition various bits to get the driver's window and its ali runner to sit right. Closed all the gaps, and the window runs up and down better.
A lot of jiggery-pokery, but worth the effort, and even upsetting the wife that she spent a whole Saturday waiting for me to finish...!
Getting the door cards off - tricky, but certainly not impossible since I'm quite skinny and could get my arm in through the speaker hole quite easily - best tip is to use a combination spanner (with an open end and a ring end) with a piece of string tied to the ring end so you can retrieve when dropped. Needs a 10mm spanner, so not too big to wield around. The three bolts are well documented for location, but they are all in the front lower half so you don't need to go too deep with your arm. Take a number of photos of the wiring connections for the door mirrors and ciggie lighter of course, for reconnection later.
Then behind a couple of pieces of plastic and a thick rubber sheet you can see what's going on largely.
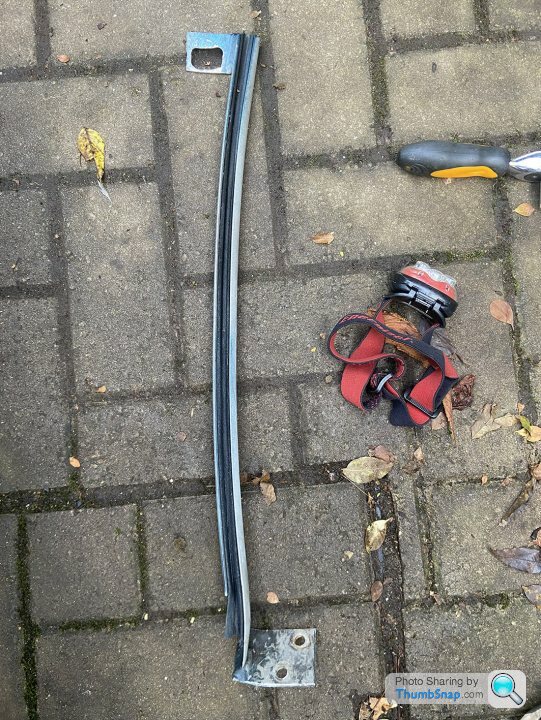
Issue 1 - aluminium runner sitting too low, leaving a gap to the targa top, and positioned slightly out away from the window frame outer shape.
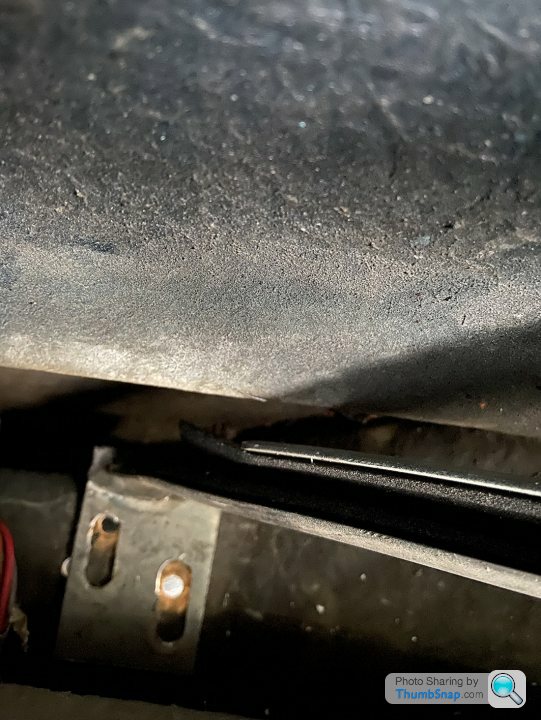
Front runner is fixed in three places - at the bottom there is an L bracket bolted to the base of the door - an inset nut can be felt if you run you finger along the underside of the door near the hinges and the runner is bolt to this bracket - I only loosened that bolt
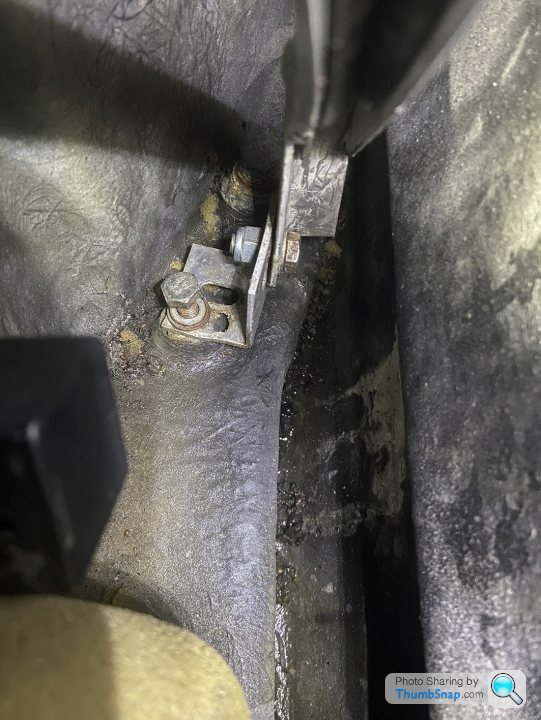
At the top it is fixed into the inset nut you can see when you open the door, and the end of the inner part of the runner bolts to the top of the door with a small M10 through the inner surface just below the draft strip (needed a spanner up between the glass and the door on the back of this bolt).
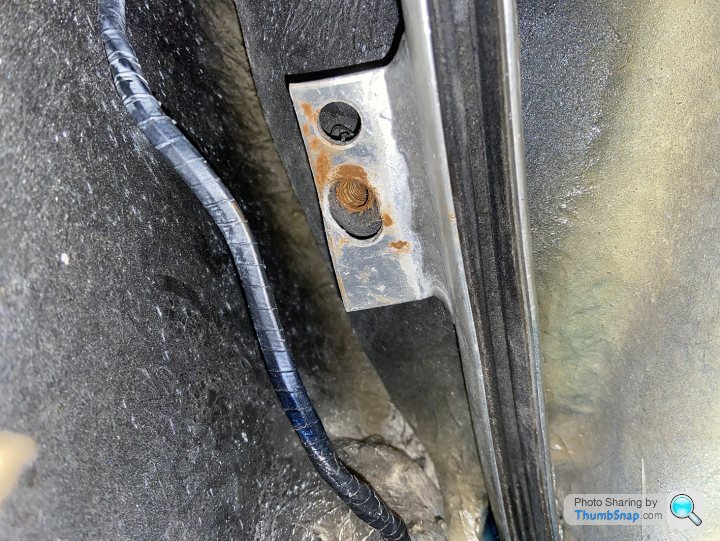
(upper bolt hole inside)
Undoing all these is ok, just needed a mixture of confidence and gently applied force to crack the bolts open. Needed to move all gubbins, wires, a pipe that runs from the window motor, to get to the bottom one, you're largely working blind here though.
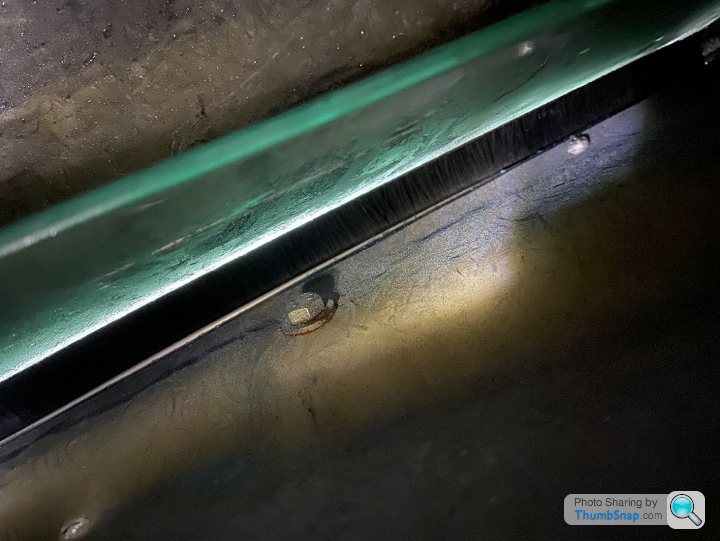
Once I'd cut away the old sealant around the top of the door where this runner comes through the door at the front of the window, I could then move it around quite freely.
Bottom - I packed 6 washers below the L-bracket to raise it by the 10mm needed to fill the gap, had to use a longer bolt that I also packed with nuts to prevent it from protruding through the door, then I could tighten that up again.
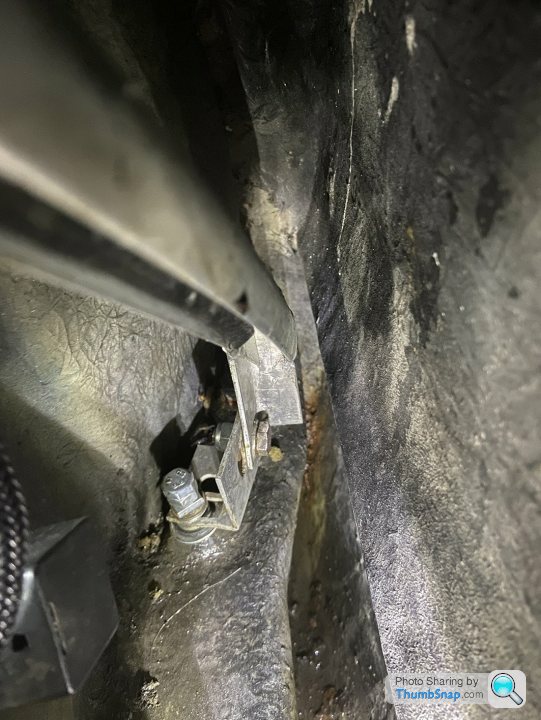
Upper - I had to re-drill the upper bolt hole on the runner, as nothing aligned with the inset nut any more. I did this by carefully drilling with a small bit through the inset nut to get the centre (and to not foul the thread), then I could fit my drill into the door cavity and drill back up to get the hole big enough for the bolt. Not much adjustment available here since the bracket on the runner didn't have much material left on it anyway...
Then the smaller bolt needed a new hole drilling through the fibre glass slightly higher up (not shown here, but you get the idea) - again done tentatively so I didn't drill into the window!
Whilst testing the running of the window, it was sticking quite badly at the bottom of the drop, so I got my grippers and just gently pulled on the inner side of the runner's U channel to bend it open a bit in the lower part. Crude, but seems to have helped.
Whilst I had it all open, I sprayed the running felt thoroughly (should probably have replaced it tbh) with WD40 silicone lubricant.
Fiddly but not impossible.
Issue 2 - rear of glass was hitting the seal on the rear hood too heavily and really pushing into it, preventing the window from being able to close )motor couldn't push through), risking tearing the newly installed seal (the old seal actually was torn in the area, and I could see why). Solution - to move the angle of the rear runner inside the door to see if it would help:
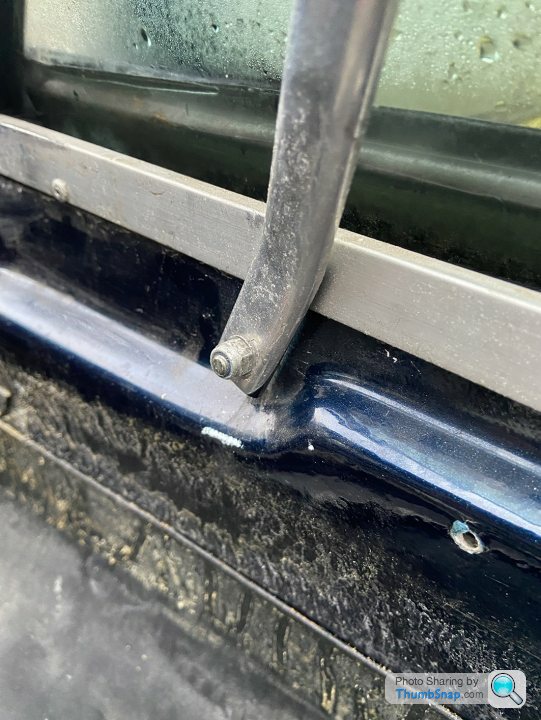
The rear runner is easy to get to, one bolt up at the top/back of the door - in fact with a torch you can see it through the glass from above which makes it easier to see - M13 bolt here for a small socket wrench, bolts into an inset nut that you can see from the end of the door.
The lower two bolts also easy to get to - M10 pan head bolts with the heads sitting along the bottom of the door - I ended using an old chisel to jam into the slot to hold it still when using a socket wrench to undo because a flat head screw driver still wasn't wide enough to get a decent purchase.
The thing I discovered was that the lower part of this runner was bent - I assume to get the running of the glass in an ok position, but in fact it was a bad way to make that adjustment as the glass would run into this bend at the lower point of its descent and get a little jammed into the bend.
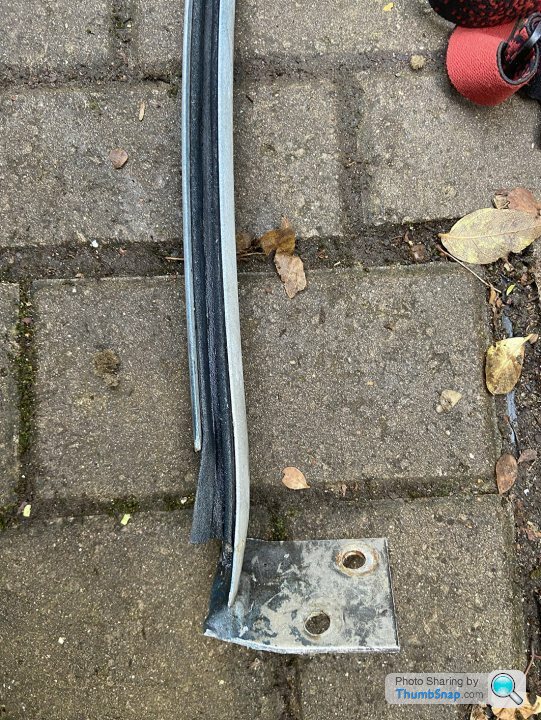
So once out I straightened it up with a hammer, and extended the holes into slots to allow some lateral adjustment before refitting.
I also packed the upper bolt away from the end of the door with two washers to lift the glass up slightly at the rear.
Again, a good dousing of WD40 silicone lubricant, also applied a bit to the targa seal (largely rubbed it on with a finger than just spraying all over the car!). Who knows if that will make any difference.
A bit of a crude guess, but it seems to have worked.
The last bit was to tweak the adjuster screw slightly - tricky to get a driver on, but easy once you've found it - around halfway along the inside of the glass below the draft strip - anticlockwise raises the glass.
A lot of messing about for tweaks, but it's all solidly back in place, and the result is as desired!
I drove the car to work today, a good 40min drive, with areas of bumpy roads, and faster roads, and the issues have been solved:
Gaps are closed - vastly reduced wind noise, windows run smoothly, window doesn't rattle against aluminium runner, and the wobbly runner seems to be completely cured.
And whilst I feel like I've just typed a long post to no one, it's been cathartic!

A lot of jiggery-pokery, but worth the effort, and even upsetting the wife that she spent a whole Saturday waiting for me to finish...!
Getting the door cards off - tricky, but certainly not impossible since I'm quite skinny and could get my arm in through the speaker hole quite easily - best tip is to use a combination spanner (with an open end and a ring end) with a piece of string tied to the ring end so you can retrieve when dropped. Needs a 10mm spanner, so not too big to wield around. The three bolts are well documented for location, but they are all in the front lower half so you don't need to go too deep with your arm. Take a number of photos of the wiring connections for the door mirrors and ciggie lighter of course, for reconnection later.
Then behind a couple of pieces of plastic and a thick rubber sheet you can see what's going on largely.
Issue 1 - aluminium runner sitting too low, leaving a gap to the targa top, and positioned slightly out away from the window frame outer shape.
Front runner is fixed in three places - at the bottom there is an L bracket bolted to the base of the door - an inset nut can be felt if you run you finger along the underside of the door near the hinges and the runner is bolt to this bracket - I only loosened that bolt
At the top it is fixed into the inset nut you can see when you open the door, and the end of the inner part of the runner bolts to the top of the door with a small M10 through the inner surface just below the draft strip (needed a spanner up between the glass and the door on the back of this bolt).
(upper bolt hole inside)
Undoing all these is ok, just needed a mixture of confidence and gently applied force to crack the bolts open. Needed to move all gubbins, wires, a pipe that runs from the window motor, to get to the bottom one, you're largely working blind here though.
Once I'd cut away the old sealant around the top of the door where this runner comes through the door at the front of the window, I could then move it around quite freely.
Bottom - I packed 6 washers below the L-bracket to raise it by the 10mm needed to fill the gap, had to use a longer bolt that I also packed with nuts to prevent it from protruding through the door, then I could tighten that up again.
Upper - I had to re-drill the upper bolt hole on the runner, as nothing aligned with the inset nut any more. I did this by carefully drilling with a small bit through the inset nut to get the centre (and to not foul the thread), then I could fit my drill into the door cavity and drill back up to get the hole big enough for the bolt. Not much adjustment available here since the bracket on the runner didn't have much material left on it anyway...
Then the smaller bolt needed a new hole drilling through the fibre glass slightly higher up (not shown here, but you get the idea) - again done tentatively so I didn't drill into the window!
Whilst testing the running of the window, it was sticking quite badly at the bottom of the drop, so I got my grippers and just gently pulled on the inner side of the runner's U channel to bend it open a bit in the lower part. Crude, but seems to have helped.
Whilst I had it all open, I sprayed the running felt thoroughly (should probably have replaced it tbh) with WD40 silicone lubricant.
Fiddly but not impossible.
Issue 2 - rear of glass was hitting the seal on the rear hood too heavily and really pushing into it, preventing the window from being able to close )motor couldn't push through), risking tearing the newly installed seal (the old seal actually was torn in the area, and I could see why). Solution - to move the angle of the rear runner inside the door to see if it would help:
The rear runner is easy to get to, one bolt up at the top/back of the door - in fact with a torch you can see it through the glass from above which makes it easier to see - M13 bolt here for a small socket wrench, bolts into an inset nut that you can see from the end of the door.
The lower two bolts also easy to get to - M10 pan head bolts with the heads sitting along the bottom of the door - I ended using an old chisel to jam into the slot to hold it still when using a socket wrench to undo because a flat head screw driver still wasn't wide enough to get a decent purchase.
The thing I discovered was that the lower part of this runner was bent - I assume to get the running of the glass in an ok position, but in fact it was a bad way to make that adjustment as the glass would run into this bend at the lower point of its descent and get a little jammed into the bend.
So once out I straightened it up with a hammer, and extended the holes into slots to allow some lateral adjustment before refitting.
I also packed the upper bolt away from the end of the door with two washers to lift the glass up slightly at the rear.
Again, a good dousing of WD40 silicone lubricant, also applied a bit to the targa seal (largely rubbed it on with a finger than just spraying all over the car!). Who knows if that will make any difference.
A bit of a crude guess, but it seems to have worked.
The last bit was to tweak the adjuster screw slightly - tricky to get a driver on, but easy once you've found it - around halfway along the inside of the glass below the draft strip - anticlockwise raises the glass.
A lot of messing about for tweaks, but it's all solidly back in place, and the result is as desired!
I drove the car to work today, a good 40min drive, with areas of bumpy roads, and faster roads, and the issues have been solved:
Gaps are closed - vastly reduced wind noise, windows run smoothly, window doesn't rattle against aluminium runner, and the wobbly runner seems to be completely cured.
And whilst I feel like I've just typed a long post to no one, it's been cathartic!
Yogioes said:
Mine is too tight to the rear hoop and has split the seal.
I’ve already had two goes at fixing it.
Challenged by your success I’ll build myself up for a third attempt.
Thank you for taking the time to record and post.
That was exactly what I had, thankfully the seal is cheap (probably around £10-15 to replace the rear hoop seal), the fiddly bit is replacing the rivet that holds it at the ends - I did this with self-tappers.I’ve already had two goes at fixing it.
Challenged by your success I’ll build myself up for a third attempt.
Thank you for taking the time to record and post.
Adjustment to the rear runner is a lot easier than the front one, so good luck
Great post - really useful.
One trick I found was that I had no adjustment at the rear hoop seal and I found it was easier to adjust the rear hoop.
I put washers between the hoop frame on both sides and the body so that the hoop was pushed in at the base. I needed 2 washers on one side and 4 on the other.
This helped make the hoop seal run parallel with the glass and give a consistent contact all down the glass.
Gassing Station | Chimaera | Top of Page | What's New | My Stuff