Solid tensioner on 150 sigma
Discussion


Hi
I have bought from caterham the following
Colar - http://www.caterhamparts.co.uk/product.php?id_prod...
Washer - http://www.caterhamparts.co.uk/product.php?id_prod...
Boss - http://www.caterhamparts.co.uk/product.php?id_prod...
My car was a 125 originally and I'm converting to the 150 spec, I know the 150 ran the solid tensioner, what I can't work out it how you adjust the tension now and or how this goes together? My understanding is that I need to dissasemble the standard sprung tensioner and adapt these parts onto it?
Can anyone shed any light on this? Or have photos of one installed?
The standard tensioner seems to have the bolt hole in the centre and the boss adapter isn't offset to allow for different angles of setting
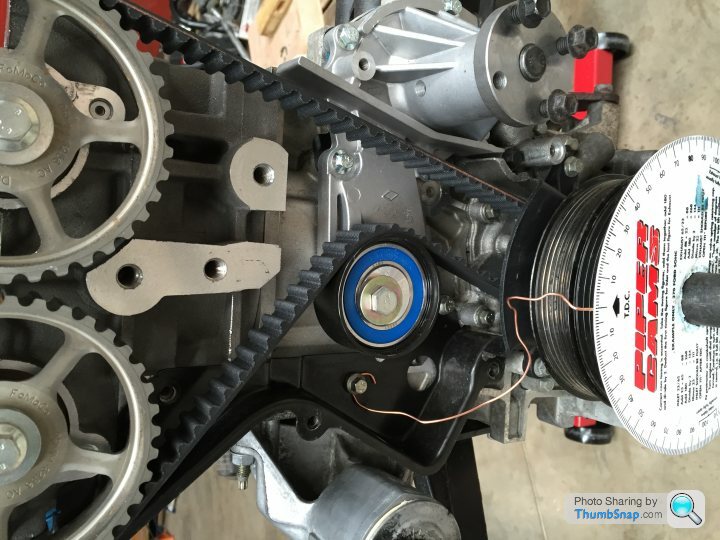
An update for anyone who cares or ever searches this
Caterham sell a solid tensioner boss, washer and collet.
You then have to dissasemble the standard auto tensioner to reveal the bearing section only (I masked off the tensioner face and drilled out the retaining washer)
I can also confirm the gates dayco tensioner fits, aswell as the ford one.
I did find however that I had to place a spacer washer behind the boss to stand it off the block further as the belt was right on the edge. The washer was an m10 from memory about 1.5mm thick
The order of the assemble is -
Washer (not with kit as mentioned above if required)
Boss
Large caterham spacer washer
Tensioner
Collet
Bolt
I set he tension to about 5mm impression with 5kg force applied

I have recently converted the sprung tensioner into the fixed one using the Caterham parts. I found the posts on here invaluable, but it did take a bit of thought. I did a photo guide on Blatchat, so to help Pistonheads owners, I thought I'd post a link here:
https://www.lotus7.club/forum/techtalk/sigma-cam-b...
https://www.lotus7.club/forum/techtalk/sigma-cam-b...
Gassing Station | Caterham | Top of Page | What's New | My Stuff