Car [static] photos at night
Discussion


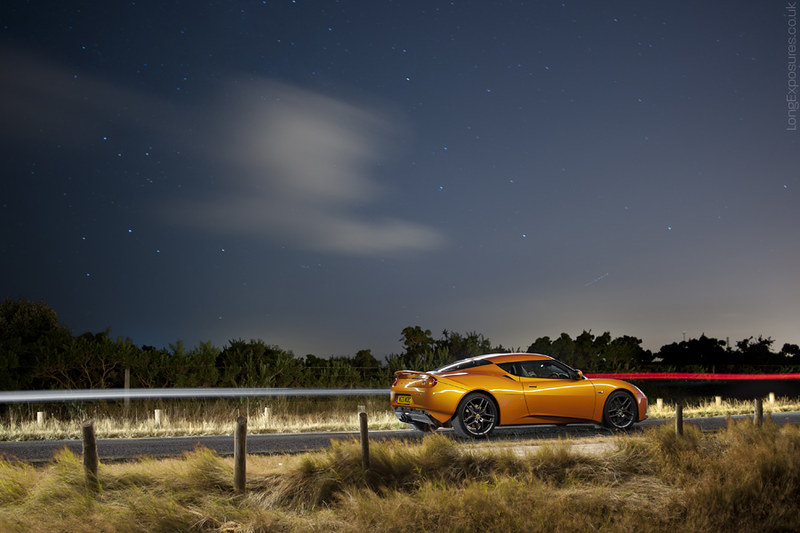
Just come across the website of Nick Williams (evidently a fellow petrolhead, so hello if you're on here  ) and the night shots got me thinking.
Say you wanted to take a photo like this:
http://www.flickr.com/photos/nwvt/10636492744/
Could that be done in a single exposure or would it have to be blended?
Also, what sort of lighting do you need on the main subject? Does it have to be a really white light/flash or can you just use any old light source and tweak it on the white balance?
I've always liked low-light photography, be it dawn/dusk or outright darkness, but my attempts never seem to expose properly for both the highlights and the darker patches.
) and the night shots got me thinking.Say you wanted to take a photo like this:
http://www.flickr.com/photos/nwvt/10636492744/
Could that be done in a single exposure or would it have to be blended?
Also, what sort of lighting do you need on the main subject? Does it have to be a really white light/flash or can you just use any old light source and tweak it on the white balance?
I've always liked low-light photography, be it dawn/dusk or outright darkness, but my attempts never seem to expose properly for both the highlights and the darker patches.
I did an experiment not too long ago with Masher22's V70. It's a 30 second exposure, very narrow aperture and used a head torch to light the front and the LED on the back of my phone for the side.
Obviously it's nowhere near as good as that example, but this is it after a bit of tweaking in PS Touch:
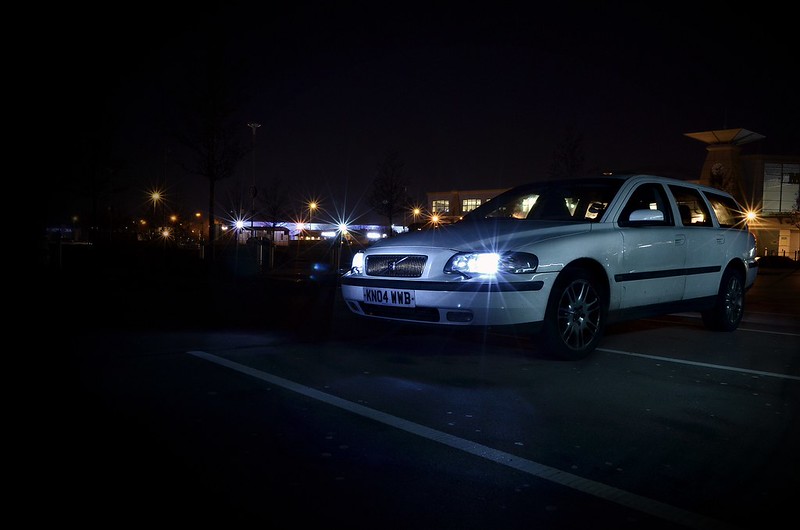
image by Chris_Aero1, on Flickr
Obviously it's nowhere near as good as that example, but this is it after a bit of tweaking in PS Touch:
image by Chris_Aero1, on Flickr
CB2152 said:
I did an experiment not too long ago with Masher22's V70. It's a 30 second exposure, very narrow aperture and used a head torch to light the front and the LED on the back of my phone for the side.
Obviously it's nowhere near as good as that example, but this is it after a bit of tweaking in PS Touch:
image by Chris_Aero1, on Flickr
Cool. So that's a single exposure using regular lights as opposed to a flash gun?Obviously it's nowhere near as good as that example, but this is it after a bit of tweaking in PS Touch:
image by Chris_Aero1, on Flickr
Chris71 said:
Could that be done in a single exposure or would it have to be blended?
Also, what sort of lighting do you need on the main subject? Does it have to be a really white light/flash or can you just use any old light source and tweak it on the white balance?
I've always liked low-light photography, be it dawn/dusk or outright darkness, but my attempts never seem to expose properly for both the highlights and the darker patches.
The technique in Nick's photo is lightpainting - specifically using a handheld, continuous lightsource to illuminate evenly as you pass through the frame. Because you're passing through the frame, you either need to apply a lot of skill & judgement with composition & lighting technique to capture your complete image in a single usable frame; or shoot with the intention of layering - needing probably 3-8 frames for a final image. Also, what sort of lighting do you need on the main subject? Does it have to be a really white light/flash or can you just use any old light source and tweak it on the white balance?
I've always liked low-light photography, be it dawn/dusk or outright darkness, but my attempts never seem to expose properly for both the highlights and the darker patches.
Results vary according to countless factors, the main things being the type of lightsource (you've already identified that one) and the extent of ambient light.
You'll want a bright lightsource, preferably more like a strip light than a torch. I've had better-than-expected results with one of these. The Rolson brand tend to be ok with white balance. At the other end of the scale, I was recently using a Westcott IceLight which, in terms of lighting, delivered great results but was not without its flaws in this application. And, it's *cough* £400.
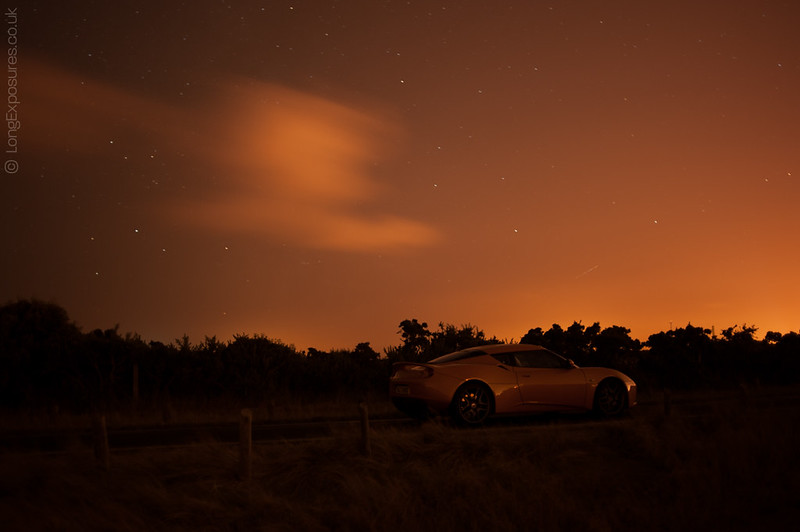
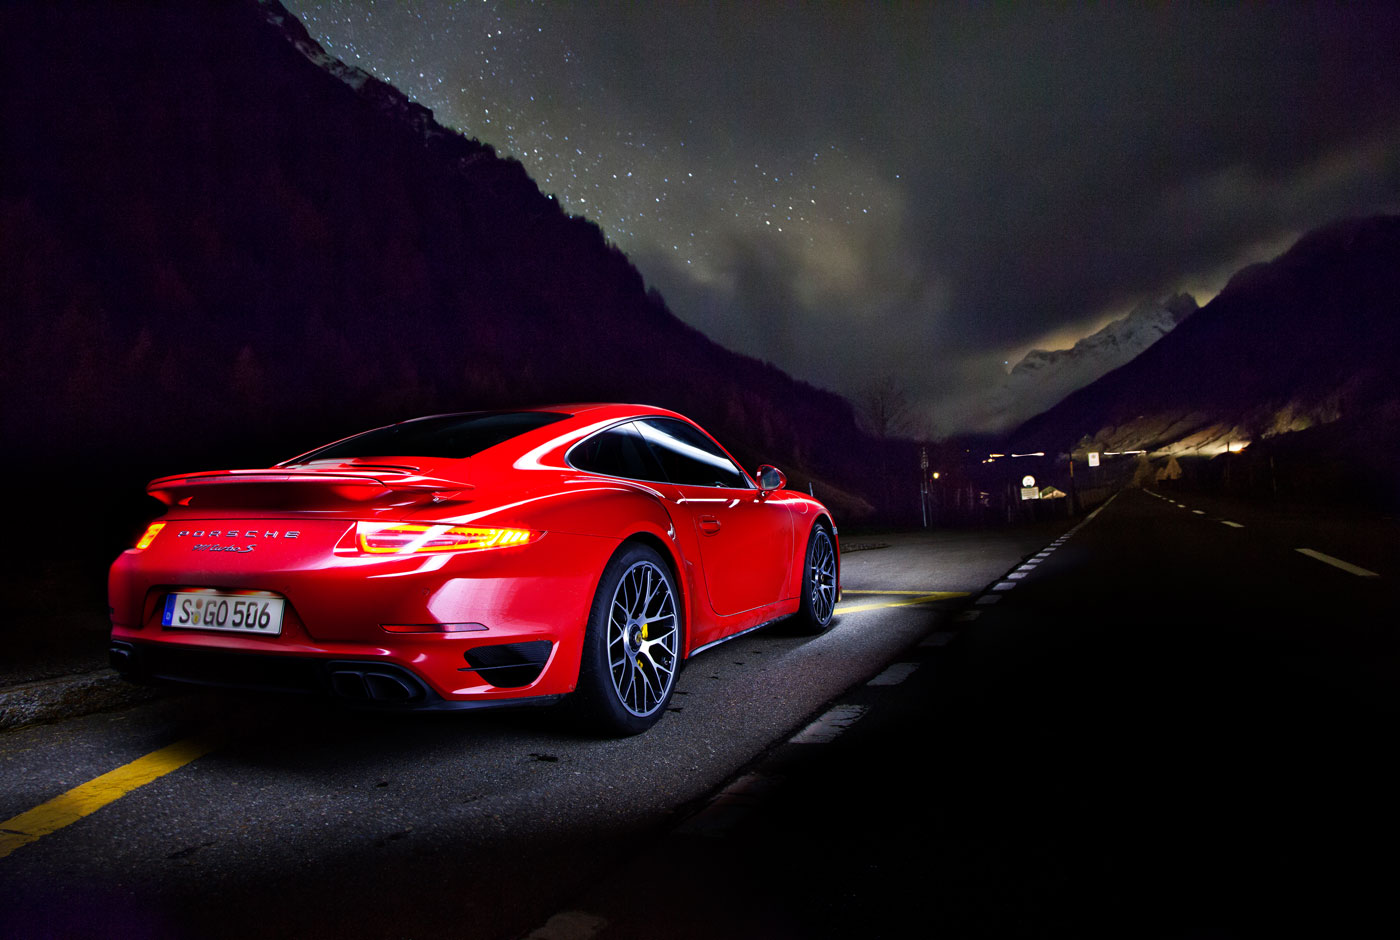
Here's a shot I made with the IceLight - the scene was fully dark with all visible lighting being provided by the Westcott device over several exposures. Adding all your own light is time consuming but this was for a magazine feature about lightpainting so it seemed logical to demonstrate it in the most extreme scenario.
Things become easier if you find yourself a location with a little bit of ambient light. Typically you'll want to compose your image then shoot a background exposure that gives you the right balance of light in the sky/ background- this might take a couple of minutes or more to get to the right levels but it's worth it to achieve the balanced look you said above you struggle with. Don't add any of your own light in this instance- then you can push the white balance around and you've got a clean frame with no light trails to try and mask out.
For instance, this single frame (ISO800; f/2; 30sec)...
...was lightly edited (WB & tonal) to generate this...
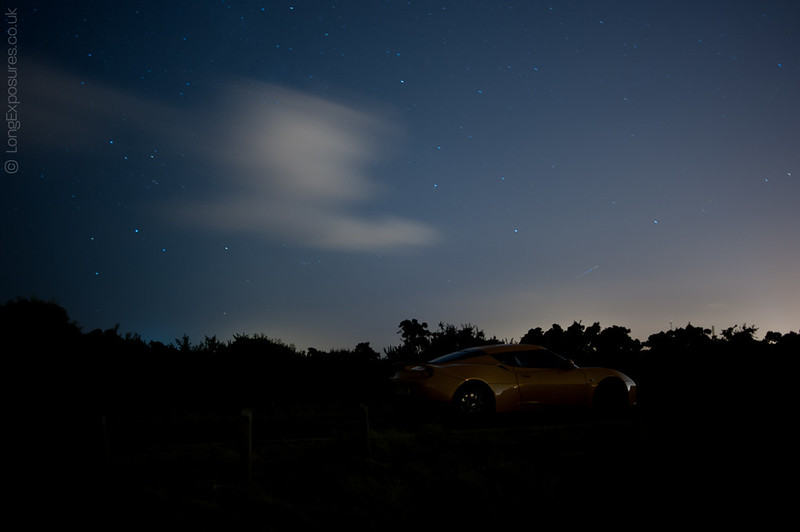
...which became the background for this (with the light on location added at ISO200; f/8; 20sec):
You need a little vision of how you want the shot to look and you need to be familiar with the files your camera produces to know if the file(s) you've created have sufficient latitude to allow you to achieve that vision.
Next shoot a frame for headlights and another (or others) for illuminating the car and lifting any environmental areas of shadow you've noticed. These will usually be much shorter than your background capture - maybe 15-20 seconds, max. You've already got all the ambient light you need so the time it takes to light each bit of car becomes the dictating factor. It's personal preference whether you light all around the car in one go or pick and mix from several frames, which obviously gives you more flexibility but takes longer.
It is possible to shoot in a single exposure but IMO this technique is more suited to standing out of frame and lighting the car with torchlight from static positions, in much the same way as you would with flashes on light stands. Using a torch suits lighter colours whereas the moving technique is great for dark vehicles because of the reflected highlights it leaves to define the car's shape.
AndWhyNot said:
Chris71 said:
Could that be done in a single exposure or would it have to be blended?
Also, what sort of lighting do you need on the main subject? Does it have to be a really white light/flash or can you just use any old light source and tweak it on the white balance?
I've always liked low-light photography, be it dawn/dusk or outright darkness, but my attempts never seem to expose properly for both the highlights and the darker patches.
The technique in Nick's photo is lightpainting - specifically using a handheld, continuous lightsource to illuminate evenly as you pass through the frame. Because you're passing through the frame, you either need to apply a lot of skill & judgement with composition & lighting technique to capture your complete image in a single usable frame; or shoot with the intention of layering - needing probably 3-8 frames for a final image. Also, what sort of lighting do you need on the main subject? Does it have to be a really white light/flash or can you just use any old light source and tweak it on the white balance?
I've always liked low-light photography, be it dawn/dusk or outright darkness, but my attempts never seem to expose properly for both the highlights and the darker patches.
Results vary according to countless factors, the main things being the type of lightsource (you've already identified that one) and the extent of ambient light.
You'll want a bright lightsource, preferably more like a strip light than a torch. I've had better-than-expected results with one of these. The Rolson brand tend to be ok with white balance. At the other end of the scale, I was recently using a Westcott IceLight which, in terms of lighting, delivered great results but was not without its flaws in this application. And, it's *cough* £400.
Here's a shot I made with the IceLight - the scene was fully dark with all visible lighting being provided by the Westcott device over several exposures. Adding all your own light is time consuming but this was for a magazine feature about lightpainting so it seemed logical to demonstrate it in the most extreme scenario.
Things become easier if you find yourself a location with a little bit of ambient light. Typically you'll want to compose your image then shoot a background exposure that gives you the right balance of light in the sky/ background- this might take a couple of minutes or more to get to the right levels but it's worth it to achieve the balanced look you said above you struggle with. Don't add any of your own light in this instance- then you can push the white balance around and you've got a clean frame with no light trails to try and mask out.
For instance, this single frame (ISO800; f/2; 30sec)...
...was lightly edited (WB & tonal) to generate this...
...which became the background for this (with the light on location added at ISO200; f/8; 20sec):
You need a little vision of how you want the shot to look and you need to be familiar with the files your camera produces to know if the file(s) you've created have sufficient latitude to allow you to achieve that vision.
Next shoot a frame for headlights and another (or others) for illuminating the car and lifting any environmental areas of shadow you've noticed. These will usually be much shorter than your background capture - maybe 15-20 seconds, max. You've already got all the ambient light you need so the time it takes to light each bit of car becomes the dictating factor. It's personal preference whether you light all around the car in one go or pick and mix from several frames, which obviously gives you more flexibility but takes longer.
It is possible to shoot in a single exposure but IMO this technique is more suited to standing out of frame and lighting the car with torchlight from static positions, in much the same way as you would with flashes on light stands. Using a torch suits lighter colours whereas the moving technique is great for dark vehicles because of the reflected highlights it leaves to define the car's shape.

So, if you're doing a multiple exposure shoot like the one with the Evora, do you manually remove the bits of each exposure you don't want or do you blend them together?
I've only had a very brief play around with an old copy of Photoshop, but I've found masking the edges of complex shapes - tree branches, for example - incredibly time consuming.
Chris71 said:
Cool. So that's a single exposure using regular lights as opposed to a flash gun?
Yup, I've only had the camera for a couple of weeks, but really wanted to give it a go It was shot JPEG rather than RAW, and the extent of the post production was a bit of desaturation, some sharpening, and some shadow/highlight adjustment. AndWhyNot said:
I was recently using a Westcott IceLight which, in terms of lighting, delivered great results but was not without its flaws in this application. And, it's *cough* £400.
That's not a striplight that's a LIGHTSABER! 
Colin RedGriff said:
AndWhyNot said:
I was recently using a Westcott IceLight which, in terms of lighting, delivered great results but was not without its flaws in this application. And, it's *cough* £400.
That's not a striplight that's a LIGHTSABER! 
...That and a copy of CAR's best of the 1970s to get the order over a tenner for free delivery.
Chris71 said:
Really interesting post, thanks.
So, if you're doing a multiple exposure shoot like the one with the Evora, do you manually remove the bits of each exposure you don't want or do you blend them together?
I've only had a very brief play around with an old copy of Photoshop, but I've found masking the edges of complex shapes - tree branches, for example - incredibly time consuming.
As said above, stack the layers in PS and reveal the brightest parts of each by (usually) using the "Lighten" layer blending mode. Mask over the bits of each that you don't want. Taking time over composition can help reduce time cutting out tiny details in PhotoShop. So, if you're doing a multiple exposure shoot like the one with the Evora, do you manually remove the bits of each exposure you don't want or do you blend them together?
I've only had a very brief play around with an old copy of Photoshop, but I've found masking the edges of complex shapes - tree branches, for example - incredibly time consuming.
For things like the background image above I might take 3 images at different exposure levels to make sure I've got either a) one image (of the three) that fits my needs or b) a set of images, essentially "bracketed", which can be blended in a graduated way as an alternative to cutting out minute details.
AndWhyNot said:
As said above, stack the layers in PS and reveal the brightest parts of each by (usually) using the "Lighten" layer blending mode. Mask over the bits of each that you don't want. Taking time over composition can help reduce time cutting out tiny details in PhotoShop.
For things like the background image above I might take 3 images at different exposure levels to make sure I've got either a) one image (of the three) that fits my needs or b) a set of images, essentially "bracketed", which can be blended in a graduated way as an alternative to cutting out minute details.
Thanks for that and the earlier example, good explanation. I tried some moon light shots with my car, image was heavily toned with street lights. I managed to correct the wb and get rid of the tone as per your example but the resulting image looked flat. Your extra advice about adding light in the way you describe is just the idea I need.For things like the background image above I might take 3 images at different exposure levels to make sure I've got either a) one image (of the three) that fits my needs or b) a set of images, essentially "bracketed", which can be blended in a graduated way as an alternative to cutting out minute details.
Cheers
steveatesh said:
Thanks for that and the earlier example, good explanation. I tried some moon light shots with my car, image was heavily toned with street lights. I managed to correct the wb and get rid of the tone as per your example but the resulting image looked flat. Your extra advice about adding light in the way you describe is just the idea I need.
Cheers
Feel free to post it Cheers
The other thing to bear in mind about shooting under streetlights (and, in fact, about lightpainting generally) is that when light is coming at the subject vehicle from all directions it has a nasty habit of eliminating shadows. That can leave the car looking like it's pasted in. Get around this by composing (or lighting) in such a way that there's a strong shadow from the car onto the road surface. Shooting multiple frames has a further benefit in giving you more freedom to do that.
If you are lightpainting I'd personally avoid shooting under streetlights - you want to be able to control the light completely with your own light source and streetlights dont usually mix well with daylight balanced light sources - unless you can alter the temperature from your light source (using gels etc).
One of the reasons I like the ice light so much is that its pure daylight balanced and has no blue or magenta tint you can get with cheaper alternatives.

One of the reasons I like the ice light so much is that its pure daylight balanced and has no blue or magenta tint you can get with cheaper alternatives.
AndWhyNot said:
Chris71 said:
Really interesting post, thanks.
So, if you're doing a multiple exposure shoot like the one with the Evora, do you manually remove the bits of each exposure you don't want or do you blend them together?
I've only had a very brief play around with an old copy of Photoshop, but I've found masking the edges of complex shapes - tree branches, for example - incredibly time consuming.
As said above, stack the layers in PS and reveal the brightest parts of each by (usually) using the "Lighten" layer blending mode. Mask over the bits of each that you don't want. Taking time over composition can help reduce time cutting out tiny details in PhotoShop. So, if you're doing a multiple exposure shoot like the one with the Evora, do you manually remove the bits of each exposure you don't want or do you blend them together?
I've only had a very brief play around with an old copy of Photoshop, but I've found masking the edges of complex shapes - tree branches, for example - incredibly time consuming.
For things like the background image above I might take 3 images at different exposure levels to make sure I've got either a) one image (of the three) that fits my needs or b) a set of images, essentially "bracketed", which can be blended in a graduated way as an alternative to cutting out minute details.
(Was hoping there was a magic button somewhere that would eliminate some of that - from attempts at similar things before it seems to take for ever!)
Chris71 said:
So the masking all done manually? ... If you've got a really complex skyline, for example, you're going to have to spend a lot of time 'painting' the mask on in PhotoShop?
(Was hoping there was a magic button somewhere that would eliminate some of that - from attempts at similar things before it seems to take for ever!)
no, if you stack the layers one on top of the other and give each layer "Lighten" property then the lighter parts of the images below will "shine trough"... mostly you do not need any masking.. All you need to do is delete leftover parts of the image that you do not need from each layer.. Sometimes you have a light in the scene or similar that you just erase with a soft brush.. (Was hoping there was a magic button somewhere that would eliminate some of that - from attempts at similar things before it seems to take for ever!)
kman said:
kikiturbo said:
Chris71 said:
So the masking all done manually? ... If you've got a really complex skyline, for example, you're going to have to spend a lot of time 'painting' the mask on in PhotoShop?
(Was hoping there was a magic button somewhere that would eliminate some of that - from attempts at similar things before it seems to take for ever!)
no, if you stack the layers one on top of the other and give each layer "Lighten" property then the lighter parts of the images below will "shine trough"... mostly you do not need any masking.. All you need to do is delete leftover parts of the image that you do not need from each layer.. Sometimes you have a light in the scene or similar that you just erase with a soft brush.. (Was hoping there was a magic button somewhere that would eliminate some of that - from attempts at similar things before it seems to take for ever!)
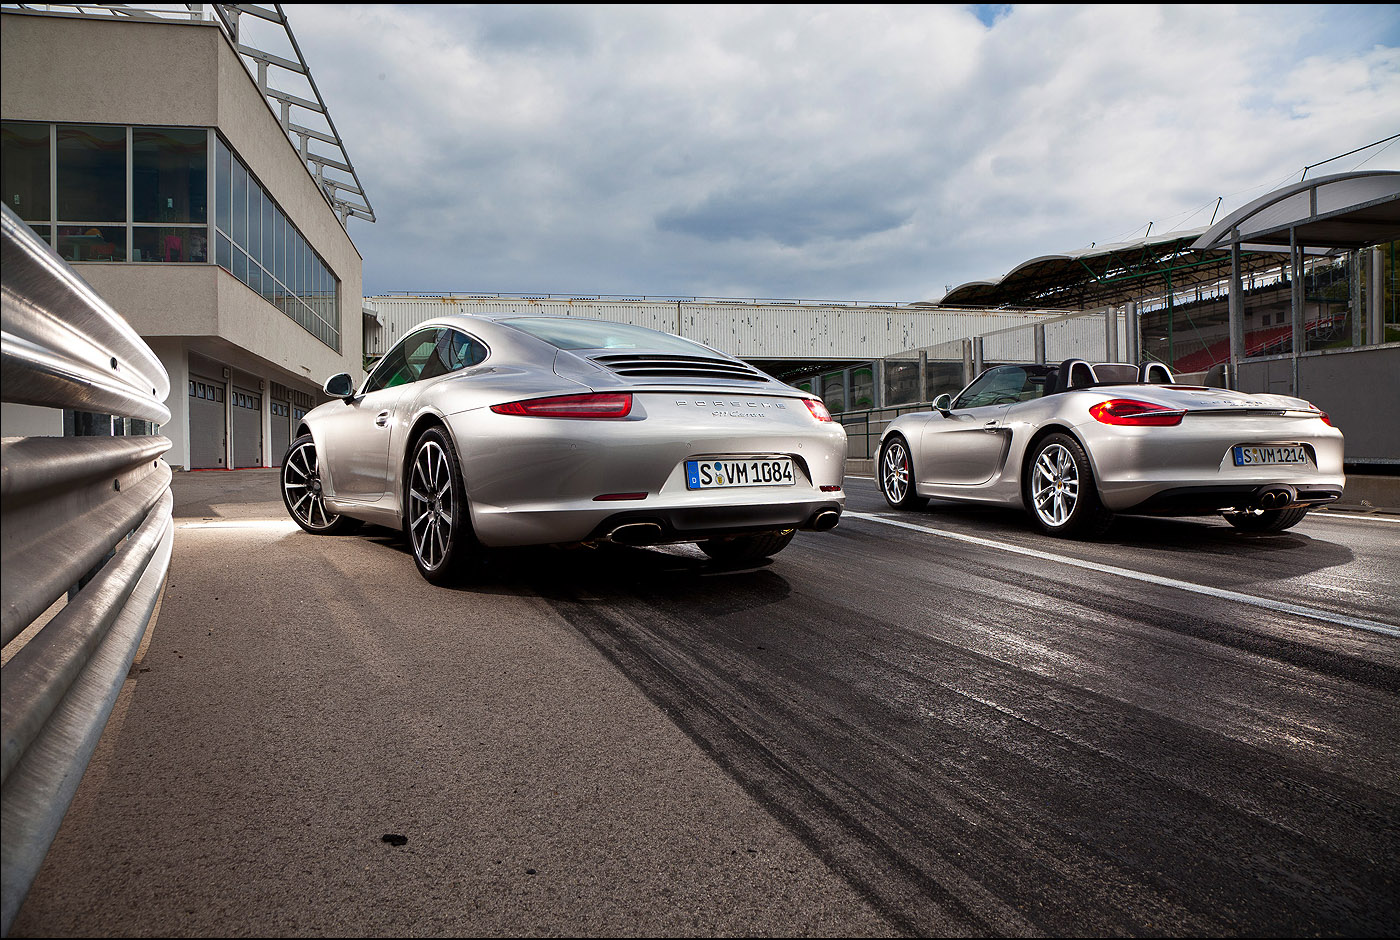
Great light on the car(s)
thanks..
also... If you do not have a really low light environment, and can not do long exposures, switching to flash is a viable alternative.. The light is different of course, but flash + short exposure can really control the balance between the light on the car and background..

one more, and for me the most important result of the layering technique using "Lighten" in combination with flash during daylight (our low light / night) is that you can do multiple exposures using a single flash, even standing in the frame, and easily clean everything up in post..
hell, even in the studio I use a single light now..

also... If you do not have a really low light environment, and can not do long exposures, switching to flash is a viable alternative.. The light is different of course, but flash + short exposure can really control the balance between the light on the car and background..
one more, and for me the most important result of the layering technique using "Lighten" in combination with flash during daylight (our low light / night) is that you can do multiple exposures using a single flash, even standing in the frame, and easily clean everything up in post..
hell, even in the studio I use a single light now..
Gassing Station | Photography & Video | Top of Page | What's New | My Stuff