Pro in 10 days?
Discussion


Well not quite a pro but in ten days I will be traveling to Iceland and NYC.
After months of deliberating, I’ve finally ordered a new camera. It’s the Sony RX100 III. I’ve managed to avoid digital cameras all my life, choosing to use my iPhone to take pictures. As a result my knowledge is very limited.
I’ve been looking at videos on YouTube around ISO, f stop, shutter speed etc but it’s struggling to sink in. Once I have the camera and I can run through some test shots I’d imagine it’ll become a lot clearer.
However, specifically f stop and shutter speed I am struggling with.
I’ve ordered the Kindle guide on how to use the RX100 and at 500 or so pages it’s quite in depth. I feel that it will give me a good grounding of the features and what they mean / do however putting it into practice is another thing.
I really want to understand a few things
- How to capture the Northern Lights. Is there a base setting to use and work from?
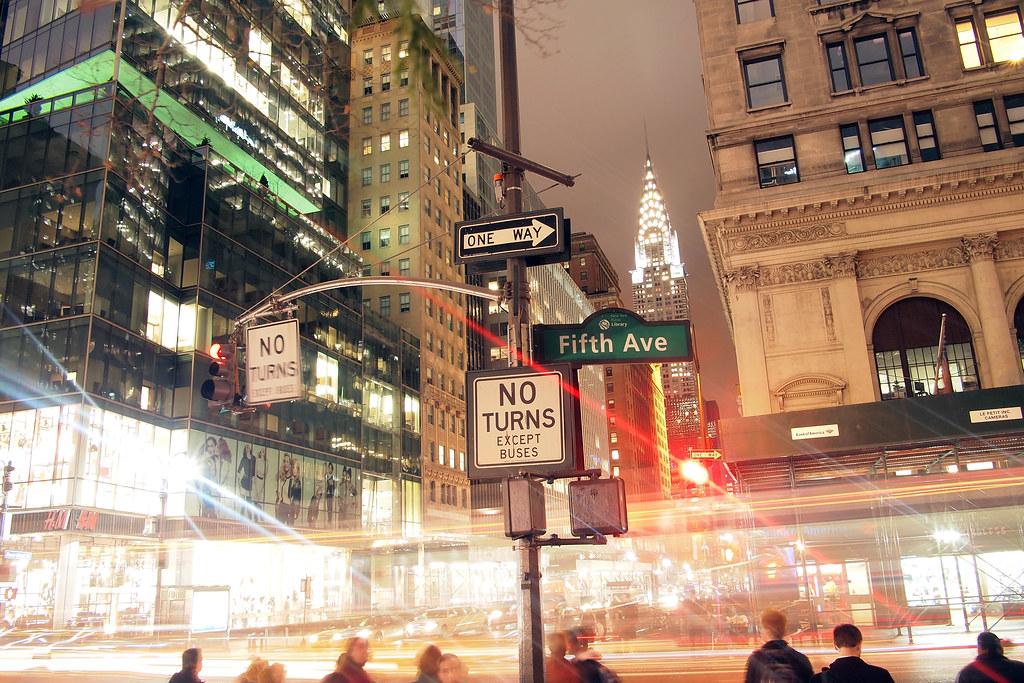
- Could I set up my camera, in Times Square for example, focus on the buildings whilst the cars create a sweep in light? I assume a longer shutter speed is required but how long?
In both cases what do I need to be aware of? I’ve ordered a tripod too.
If anyone has this camera it would be great to hear which setting you default to for certain pictures such as; close up, buildings, scenery and low light.
Can I understand enough to capture some great pictures or is it best to stick it in auto mode and let the camera figure it out?
After months of deliberating, I’ve finally ordered a new camera. It’s the Sony RX100 III. I’ve managed to avoid digital cameras all my life, choosing to use my iPhone to take pictures. As a result my knowledge is very limited.
I’ve been looking at videos on YouTube around ISO, f stop, shutter speed etc but it’s struggling to sink in. Once I have the camera and I can run through some test shots I’d imagine it’ll become a lot clearer.
However, specifically f stop and shutter speed I am struggling with.
I’ve ordered the Kindle guide on how to use the RX100 and at 500 or so pages it’s quite in depth. I feel that it will give me a good grounding of the features and what they mean / do however putting it into practice is another thing.
I really want to understand a few things
- How to capture the Northern Lights. Is there a base setting to use and work from?
- Could I set up my camera, in Times Square for example, focus on the buildings whilst the cars create a sweep in light? I assume a longer shutter speed is required but how long?
In both cases what do I need to be aware of? I’ve ordered a tripod too.
If anyone has this camera it would be great to hear which setting you default to for certain pictures such as; close up, buildings, scenery and low light.
Can I understand enough to capture some great pictures or is it best to stick it in auto mode and let the camera figure it out?
I've got an RX100 mk 3 and have been taking photos for over 40 years.
You'll have a chance at the NYC pic, Northern Lights you'll have no influence over. They don't turn up to order.
To get a good photo, you'll need simple camera knowledge, and either a lot of luck, or a lot of experience.
Good luck.
You'll have a chance at the NYC pic, Northern Lights you'll have no influence over. They don't turn up to order.
To get a good photo, you'll need simple camera knowledge, and either a lot of luck, or a lot of experience.
Good luck.
Edited by GetCarter on Tuesday 22 November 18:26
Shutter speed is easy. That's the amount of time that the sensor is exposed to light. 1/100 is one hundredth of a second. The longer the exposure time, the more sensor the light takes in, although that means that if you shoot something moving it might come out blurry.
the F-stop is the relative size of the aperture. This is a bit harder to explain, but the aperture is like the pupil of your eye. At night the pupil dilates to let a lot more light in. If you move from a dark room to a light one your eyes hurt while the pupil shrinks.
For the why the pupil dilates, imagine a pinhole camera. Nice sharp image, but a bit dim. open the hole up to let a bit more light in and it goes blurry. Exactly the same for your eye, and a camera. Your eye's lens is very adaptable, a camera's less so, and a box with a hole in it not at all.
A camera's lens can't adjust like an eye's can, which allows the eye to keep lots of stuff in focus at a range of distances in a range of light conditions. A camera can only focus on a limited range of distances with a lens, and the wider the aperture is the narrower that range is - that's the depth of field you might have read about.
Every location is different and dependent upon the camera and lens. The beauty of digital is that the pictures are free, so you can experiment as much as you like. Get out there and take as many photos as you can!
Sounds like you could benefit from my Idiot's Guide. PM if interested.
In brief - the camera has a hole in front where the light gets in to make the photograph. The amount of light that gets in is controlled in two ways - the size of the hole and how long it's open for. The size is called 'aperture'; the length of time is called 'shutter speed'. Get you head round that and the rest can build from there.
In brief - the camera has a hole in front where the light gets in to make the photograph. The amount of light that gets in is controlled in two ways - the size of the hole and how long it's open for. The size is called 'aperture'; the length of time is called 'shutter speed'. Get you head round that and the rest can build from there.
Thanks everyone. I agree, might all come together a little easier with the camera in my hand. It arrives on Thursday so I have a little time to figure it out and many years to master it!
Steve, it was your pictures on the RX100 which helped me decide :-) Do you ever shoot with the intelligent modes?
We're in Iceland for 4 nights so if we go get to experience the lights, it will be a big bonus. There has been heavy cloud cover recently so a lot of the tours have been cancelled.
Simpo Two, that'll be great. I shall send you a PM now. Thanks.
You can do a lot on the auto modes - no shame in using them until you get up and running
The northern lights will be a challenge though - suggest you get some nighttime practice with tripod + long exposures. Tricky to get it all right first time and you may only get one chance when you are there! Eg focusing may be an issue and also judging exposure times. At a bit of a guess I'd aim for something in the region of f4, 10-20 seconds shutter and a bit of iso - maybe 400-1600 (lower the the better though on the iso or you'll get 'noise').
Good luck
The camera is just a tool :-) Use auto if you want to, but getting an understanding of the 'exposure triangle' (aperture, shutter, ISO) will always stand you in good stead when you use the camera in manual mode. Look out for Bryan Peterson's book and see how you can creatively control these three elements.
Research composition as well and this will help with what zoom/focal length is best in different situations.
Research composition as well and this will help with what zoom/focal length is best in different situations.
Which book did you buy?
For Sony cameras the books by Gary Friedman are excellent, I have his RX100M3 book (among others)
https://www.friedmanarchives.com/RX-100MK3/index.h...
There's a section in his books which give you guidance on settings for specific situations.
Another source of "settings" for specific situations are the Scott Kelby "Digital Photography" books.
sgrimshaw said:
Which book did you buy?
For Sony cameras the books by Gary Friedman are excellent, I have his RX100M3 book (among others)
https://www.friedmanarchives.com/RX-100MK3/index.h...
There's a section in his books which give you guidance on settings for specific situations.
Another source of "settings" for specific situations are the Scott Kelby "Digital Photography" books.
I've downloaded the following; https://www.amazon.co.uk/Photographers-Guide-Sony-... but I'll take a look at the Gary Friedman book too. For Sony cameras the books by Gary Friedman are excellent, I have his RX100M3 book (among others)
https://www.friedmanarchives.com/RX-100MK3/index.h...
There's a section in his books which give you guidance on settings for specific situations.
Another source of "settings" for specific situations are the Scott Kelby "Digital Photography" books.
Thanks for the tips, will keep reading and learning.
Forget Times Square, it's absurdly bright so you'll blow all the lights out before you get traffic trails. However, as it's NYC you can do it pretty much anywhere else and you'll always have something interesting to point at.
This is literally just a camera put down on a wall, shutter priority for 8 seconds. Nothing else done whatsoever. As long as your camera is on a sturdy base and doesn't move, you can fire away for a few seconds or more and get great results, you'd need to check the manual for exactly how to do it with your camera, but it should be straightforward as the RX100 III by default allows up to 30 second exposures in shutter priority.
 New York City 2011 by Chris Harrison, on Flickr
This is literally just a camera put down on a wall, shutter priority for 8 seconds. Nothing else done whatsoever. As long as your camera is on a sturdy base and doesn't move, you can fire away for a few seconds or more and get great results, you'd need to check the manual for exactly how to do it with your camera, but it should be straightforward as the RX100 III by default allows up to 30 second exposures in shutter priority.
New York City 2011 by Chris Harrison, on FlickrEdited by ukaskew on Wednesday 23 November 11:31
cheshiredj7 said:
I've downloaded the following; https://www.amazon.co.uk/Photographers-Guide-Sony-... but I'll take a look at the Gary Friedman book too.
Thanks for the tips, will keep reading and learning.
I've got that one also, IMHO the Friedman book is better.Thanks for the tips, will keep reading and learning.
It's best to buy it from his website as you get three versions, 2-weeks risk free trial and updates if appropriate.
There is an awful lot on YouTube. Some is awful but a lot is informative and well presented.
Whenever I get new software I use YT to run me through the basics and after a few hours I can use lots of the facilities. Yuo never stop learning of course, but that's the fun.
Don't give up just because the first two you find are given in rap.
Whenever I get new software I use YT to run me through the basics and after a few hours I can use lots of the facilities. Yuo never stop learning of course, but that's the fun.
Don't give up just because the first two you find are given in rap.
Yeah i've been using it daily to watch a variety of tutorials. Good place to start :-)
What's the best mode to shoot video in?
I have AVCHD and XAVC S formats.
AVCHD give the following settings; 50i, 50p, 25p (FX.FH) whilst XAVC S gives; 50p, 25p and 100p 50M. I've seen a lot of American reviews and they recommend 120p, I assume this is a different format to what we have here?
I've got a 64GB SDXC class 10 card. I recorded a little earlier in XAVC S 100p 50M and I wasn't blown away.
Thanks.
For NYC, if you want to know the locations where i took the below plus others on flickr just let me know, happy to divulge
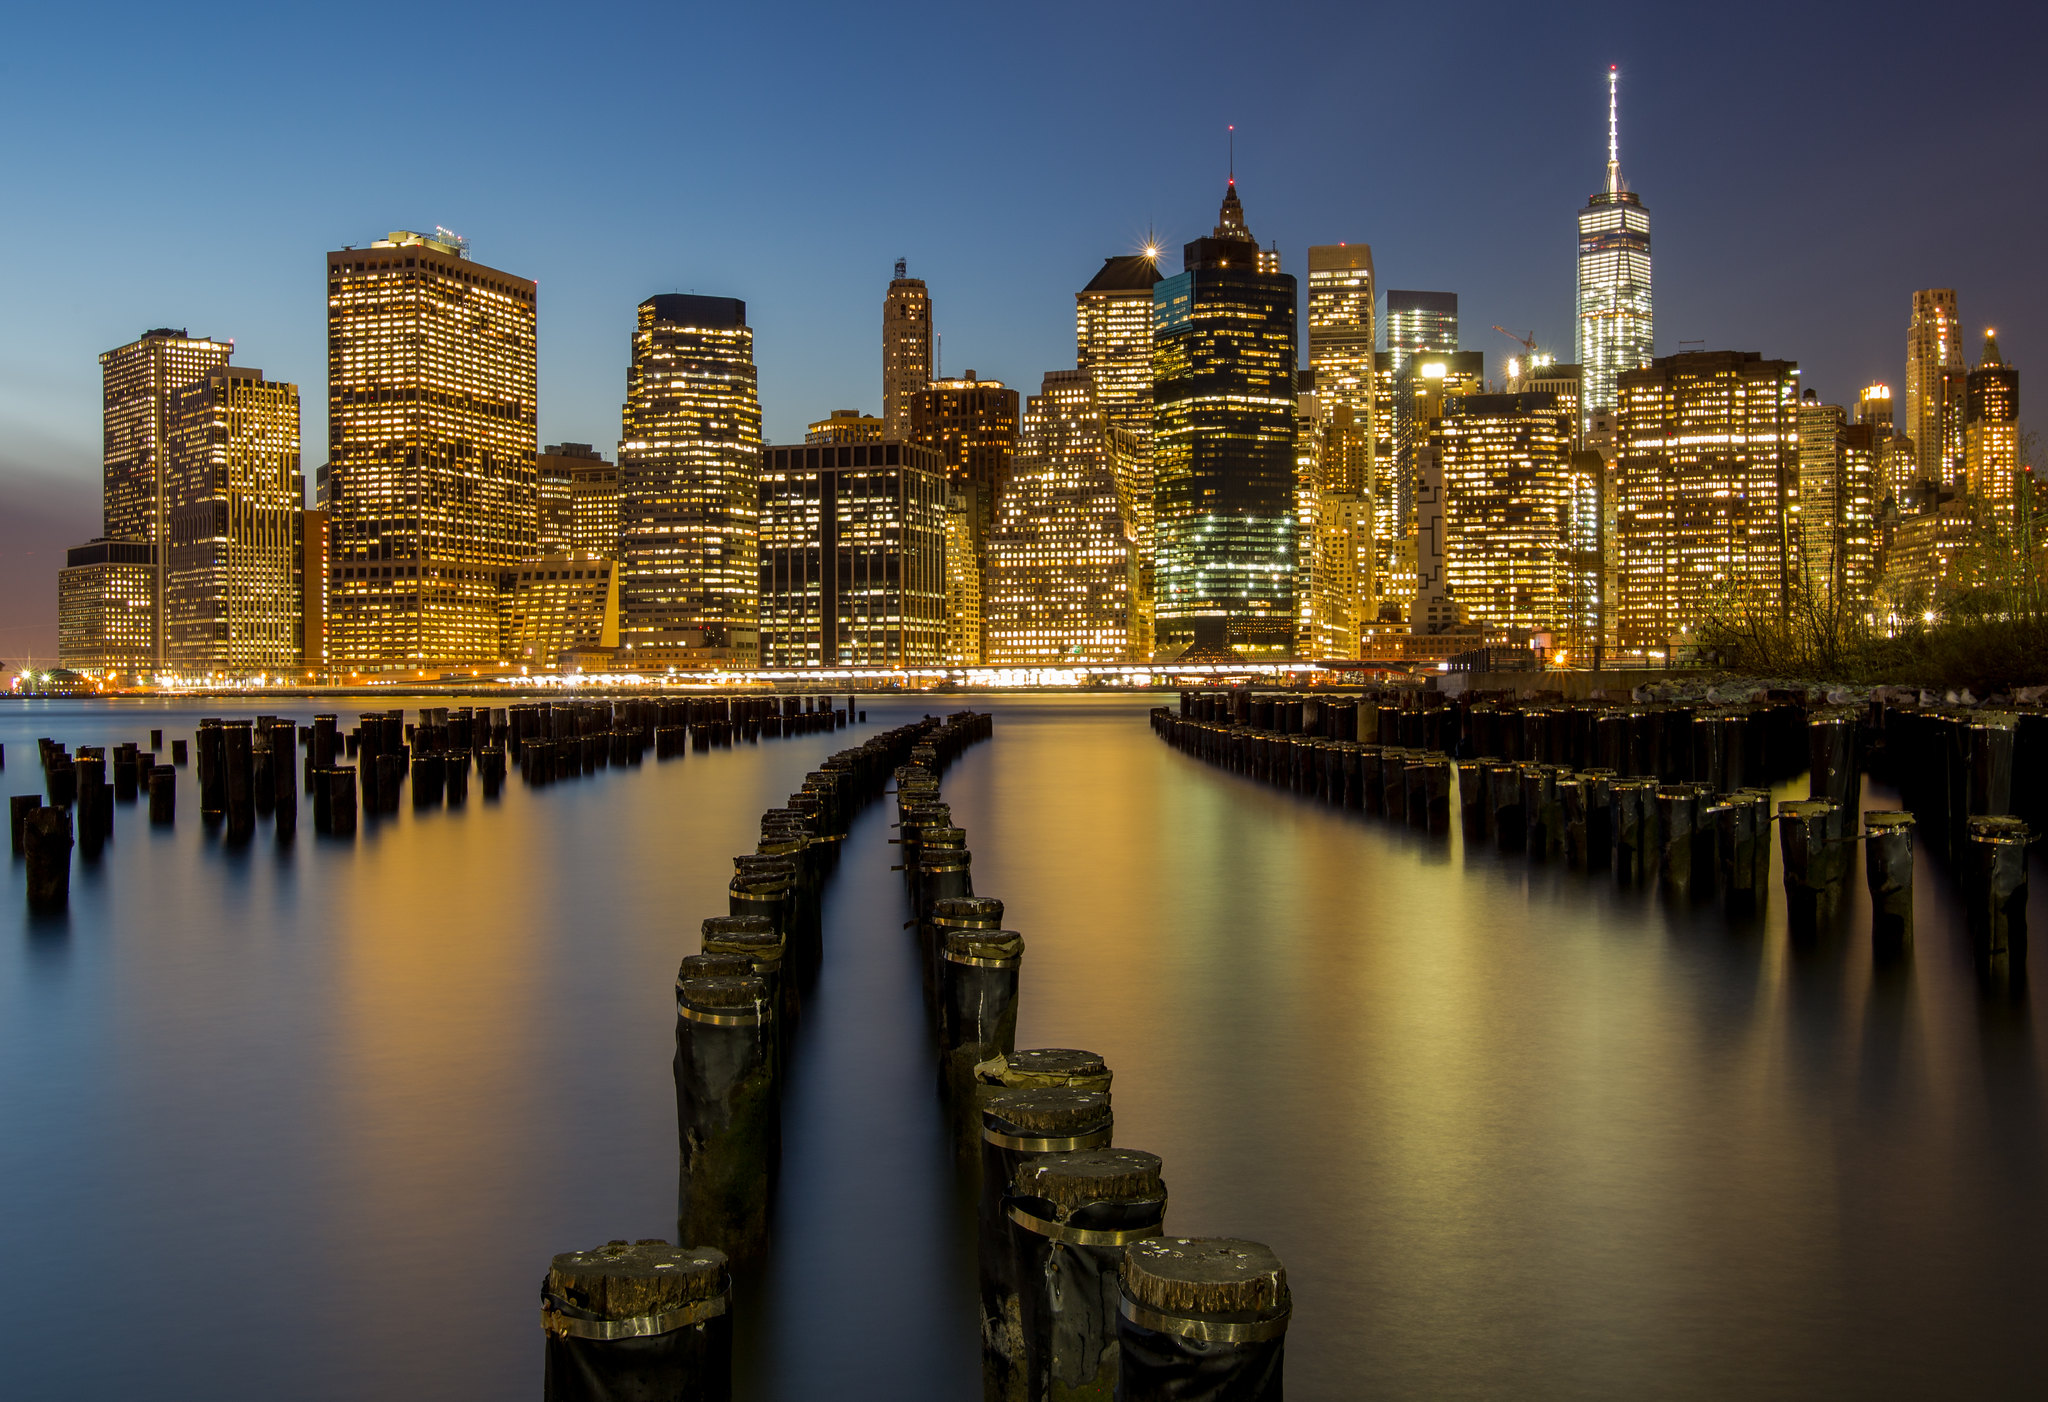 _MG_2790-12 by justin bowdidge, on Flickr
_MG_2790-12 by justin bowdidge, on Flickrcheshiredj7 said:
Great picture - glad that it's achievable without getting too into the settings. It's just arrived, so gives me a good chance to take some test shots. Will report back later.
Newbies can get (innocently) obsessed with 'settings'. Their camera has, thanks to the boys in marketing, got so many buttons that the possible number of permutations is about 482,847. Which combination to choose for which job?Fact is that once you've got your head round the basics of aperture, shutter speed (and ISO) you make up your own settings on the hoof. Most of the rest are fluff you can add on later when you want to.
Here's a comparison. Decades ago when my mum was driving me to primary school, I'd watch her changing gears. I didn't know what gears were for; moving the lever seemed entirely random to me. I concluded that for some reason yet to be determined the lever had to be moved as she went past certain roadside objects. 'How on earth can you memorise all the objects for every road?' I thought. But in fact, when you know what gears are for, you know when to move the lever.
This ended up a bit longer than I’d intended but anyway it’s an attempt to cover the basics and might be of some help.….
As has been said, there are often lots of complex settings on cameras, but the fundamentals are really that to take a well exposed photo in any given lighting conditions, you have to balance 3 variables:
Shutter speed (how long the shutter is open)
Aperture or f-number (how wide the hole in the lens is)
ISO (how sensitive the sensor is)
Shutter speed
Generally variable from several seconds to a fastest speed of maybe 1/4000 of a second. Going to a faster shutter speed (say from 1/250 to 1/500 second) reduces the overall light entering the camera by half.
Aperture
Detailed in a strange scale of f-numbers. The smaller the number, the larger the hole in the lens, so the more light is let in. Typical scale is: 2.8 4 5.6 8 11 16 22
Generally going from one of the above numbers to the next larger (eg from f5.6 to f8) will halve the size of the hole in the lens so let in half the light.
ISO (sensitivity of sensor)
Again settings in a scale typically 100 200 400 800 1600 3200 6400
The higher the number, the more sensitive the sensor, so less light is needed to create a correctly exposed photo. If the ISO number is doubled, the sensitivity is doubled, needing half as much light to create the photo.
Example:
So for a given brightness of a scene (something called the EV or exposure value but don’t worry about this) a combination of camera settings giving a well exposed image might be:
Shutter speed: 1/125th second
Aperture: f8
ISO: 400
But as all are interdependent, you could set a faster shutter speed (e.g. 1/250th) , reducing the time light can enter the camera. If you leave the other settings the same, there will not be enough light to properly expose the photo and it will look dark or underexposed. What you could do to get round this is to change the aperture from f8 to f5.6 effectively opening a larger hole in the lens. As going from f8 to f5.6 doubles the size of the hole, and by reducing the length of time the shutter is open by half, the 2 changes cancel each other out leaving you once again with a well exposed photo:
Shutter speed: 1/250th second
Aperture: f5.6
ISO: 400
from there you could halve the shutter speed again to 1/500th second, leave the aperture the same at f5.6 but double the ISO to 800 (making the sensor twice as sensitive) which will once again give a well exposed photo:
Shutter speed: 1/500th second
Aperture: f5.6
ISO: 800
Effects of changing each variable.
It should not come as a surprise that there are pros and cons of changing these 3 variables:
Shutter speed
Short shutter speeds tend to freeze moving objects and often make for sharper photos as they reduce the blurring effect from you moving the camera when taking the photo (camera shake). An often used “rule of thumb” to reduce camera shake when hand holding the camera is to set a speed “equivalent to the lens” you are using. So if you have a 50mm lens, try to set a speed of at least as quick as 1/60th second. Similarly if you have a longer telephoto of say 200mm, aim to set a shutter speed of 1/250th second or faster.
You’ll need to experiment when it comes to freezing the movement of cars, bikes, people, water etc.
Similarly, longer exposures can give interesting effects. You can mount the camera on a tripod to prevent camera shake, and shoot longer exposures of maybe several seconds. This will show stationary objects sharp (e.g. buildings), but moving objects very blurred (cars/people). This is how to get those photos of light trails from moving cars at night, or the ghostly misty effect shooting breaking waves on a beach, or moving water as a waterfall pours over rocks.
Aperture
Changing the size of the aperture allows more or less light in through the lens. It has another effect on the image in that it changes what is generally known as the “depth of field”. When you focus on a subject often the subject will be in sharp focus, but parts of the image in front and behind the subject will tend to be blurred. Whenever the lens is focussed on a subject, there will be a small area immediately in front of and behind the subject that will appear sharp. The further from the subject, the more blurred the image becomes. The size or extent of this zone of sharpness around the focus point is directly affected by the aperture. A small hole (large f number) such as f16 may give an extended zone of sharpness meaning much (or all) of the photo may appear sharp. A larger hole (smaller f number) such as f2.8 or f4 would tend to give a smaller zone of sharpness around the focus point. The extent of this sharp zone is also affected by which lens you are using - a wide-angle such as a 24mm lens will have a much larger area of sharpness than a telephoto (e.g. 200mm).
How you use this effect is up to you - a landscape may benefit from a smaller aperture (f16) helping to keep all of it sharp. For a portrait, you may want to use a wider aperture (f2.8 or f4) as this can throw the background out of focus concentrating attention on the sharply focussed subject.
ISO
Changing the camera sensitivity generally has one fairly simple effect on the photos. The higher the sensitivity you use, the more “noise” you will see in the photo. In essence noise appears as random tiny dots or small blobs in the picture, reducing the overall quality of the photo. Most modern cameras are pretty good in this respect, and improving all the time. Often noise won’t be a big problem at sensitivity of 1600 or below. Even so, I often try to keep below a setting of 800, and as low as 100 or 200 when in bright conditions.
There are instances where you just cannot get a photo in dim light with a low setting, so in those cases setting a high ISO may make the difference between getting a noisy picture and getting no picture at all.
One bit of advice though, is that if you do need to set a high ISO to get a picture in dim conditions (I believe the RX-100 iii goes as high as 25600), remember to set it back to a much lower number afterwards (800 or below), or you may find yourself shooting noisy photos thereafter in brighter conditions where you didn’t need the high ISO setting.
Again, experiment with your particular camera what ISO settings produce acceptable levels of noise.
Camera controls/modes
Most modern cameras also come with a wide range of different “modes” affecting how they can automatically set combinations of the above variables. Leaving the camera on fully automatic will basically let it set everything for you leaving you just to point and shoot the photos, but the camera will be deciding on what combination of shutter speed, aperture, and even ISO it uses. The Sony’s “scene selection” modes may be helpful here - I assume “portrait” tends towards a wider aperture and “sports action” favours faster shutter speeds.
2 helpful semi-automatic modes (which are available on the Rx100) are aperture priority and shutter priority modes. Often you’ll set a relevant ISO (maybe 400 depending on overall light levels)
Typically when you’re more interested in the effect of a specific aperture (but less worried about the shutter speed), you can use aperture priority mode. You set the aperture and the camera sets the relevant shutter speed to ensure a well exposed photo.
Shutter priority is the reverse where you set the shutter speed you’re interested in (slow to blur moving things, or fast to help freeze action) and the camera will set the correct aperture for a well exposed photo.
Full manual mode enables you to set both the shutter speed and aperture - often with the camera giving some indication as to whether the photo will be well exposed, too light, or too dark.
Exposure compensation
Finally, when deciding on how much light is needed for a specific photo, the camera has a complex metering system to measure how bright the scene is. On occasion, this system can get confused, or struggle with unusual or difficult lighting. The exposure compensation function allows you to override what the camera thinks is the correct exposure. One example might be where there is a bright light behind the subject of the photo. The camera may try to expose for the bright light leaving your subject too dark. Setting an exposure compensation of maybe +2EV (the Sony can set up to +-3EV) would increase the brightness of the scene lightening your subject. Again, this is an area for experimenting, and like the advice on using high ISO in dim light, if you do use exposure compensation for a specific shot, remember to turn it off afterwards to avoid it affecting your other shots.
Anyway - hope this might be of some help, but regardless, before you go, play with the camera and get to know it. As someone said, the photos are free so take a load before you go, experiment, and see what works for you.
Wow, thanks for the post, very useful.
I've been playing around with the camera as much as I can. Even managed to get up to the Lakes on Saturday for some test shots.
Initially impressions are good. If required, the RX100 can shoot amazing quality photos (to my eyes) straight out of the box. Aperture control is a useful way of learning the settings as I go along and the help here along with the information in the G.Friedman guide, it will help me to become more familiar with the camera over time.
Still trying to figure out the best setting for HD video, my improved SDXC card should arrive tomorrow so I can give it a test.
satans worm, would be great if you could share the location of the photos in NYC please?
Thanks
Edited by cheshiredj7 on Wednesday 30th November 16:44
Gassing Station | Photography & Video | Top of Page | What's New | My Stuff