This one foxed me for ages...
Discussion


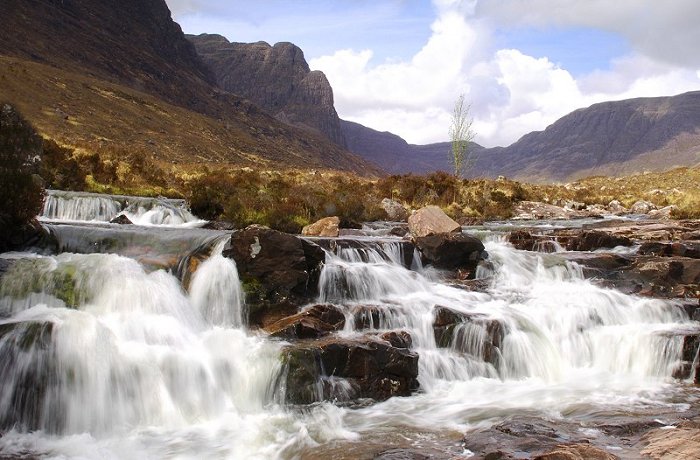
Been waiting for some rain (like one does up here), so I could get the pic of this burn in full flow... but in decent weather.
I've tried several times to get this over the past few weeks, but it's defeated me each time.
I really wanted the water to be 'time lapse'... but each time I've tried - either the water was 'washed' out, or the hills were too dark, or too lght, or the sky would bleach out or the rocks had no detail, or all the colour would be lost from the heather etc, etc. I never seemed to be able to get all the elements exposed correctly at the same time (with the time lapse).
Finally... I realised there was only one way (without being a genius with photoshop) of getting the shot (although I'm sure there are some clever gits out there who will come up with another 20 better ways).
So today I stood there like an idiot for 20 mins and waited for the sun to be on the hills and midground, but the water and foreground to be in shadow, (although it doesn't look like it)... and I used a grey grad filter to deal with the sky.
FYI - D2X & 17/55. ISO, quality etc to max - F22 @ 10th second (5 frames bracketed at 1/3 stops).
It ain't perfect, but at least I don't have to go back and try again tomorrow!
Steve

GetCarter said:
I really wanted the water to be 'time lapse'... FYI - D2X & 17/55. ISO, quality etc to max - F22 @ 10th second (5 frames bracketed at 1/3 stops).
Nice effect. The moving water reminds me of the book of New Zealand landscape photos by Andris Apse. It proved to be an expensive book as I now have to go there!
But - I'm not sure what you mean by 'time-lapse'. Surely to get the moving water effect you just need a slow shutter speed....? Or were you after a different effect?
Ta for the comments chaps.
Yep I meant slow shutter speed (fingers in 6th, brain in 2nd).
... most of the detail of the clouds went awol when I reduced to 700. As I say... it ain't perfect, a darker ND would I'm sure help.
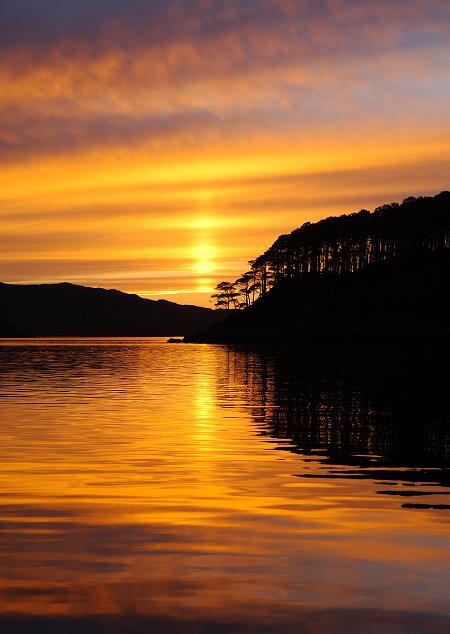
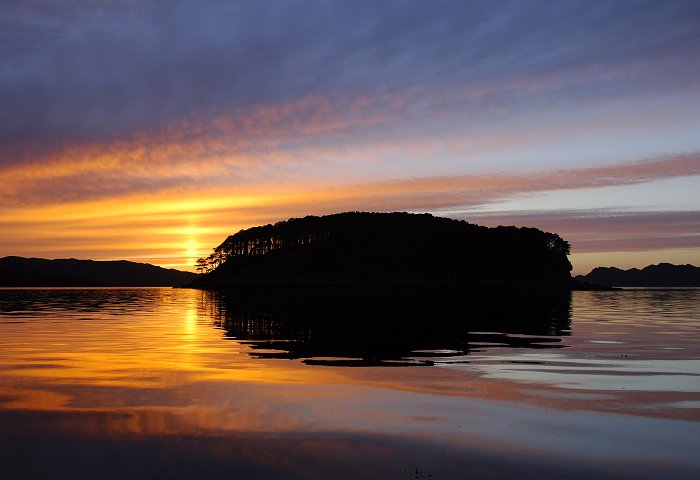
and lastly, been a good light day today, even given a nice sunset FOC
took a whole bunch - these stand out so far:
Yep I meant slow shutter speed (fingers in 6th, brain in 2nd).
... most of the detail of the clouds went awol when I reduced to 700. As I say... it ain't perfect, a darker ND would I'm sure help.
and lastly, been a good light day today, even given a nice sunset FOC
took a whole bunch - these stand out so far:

Great composition and effect as ever Steve.
I was reading a web site recently (think I posted a mention in a link a few weeks ago) where the guy was doing a Big Sur shoot and wanted a well exposed sky but blurred water, all in "nice to have the effect but tricky" light.
His solution was to take 2 shots, one exposed for the sky and one for the sea and merge them along the horizon line (iirc). Similar to using a filter in some ways. Obviously a Photoshop solution but could been done with 'old technology' in the dark room if people had the skill and patience.
Presumably you could take two suitable shots, overlay them on different layers and then 'erase' in the top layer to reveal the preferred rendition beneath?


Here is the article re blending shots that I referred to above:
www.luminous-landscape.com/locations/big-sur.shtml
You will need to scroll down a bit to the photo sample using the T and S lens to read the description of the process.
From the embedded link you can get directly to a tutorial on the normal techniques available here:
www.luminous-landscape.com/tutorials/digital-blending.shtml
There is another link on the page to yet another site with an interesting looking technique explained.
Fascinating. I feel a software upgrade coming on.
LongQ said:
Here is the article re blending shots that I referred to above:
<a href="http://www.luminous-landscape.com/locations/big-sur.shtml">www.luminous-landscape.com/locations/big-sur.shtml</a>
You will need to scroll down a bit to the photo sample using the T and S lens to read the description of the process.
From the embedded link you can get directly to a tutorial on the normal techniques available here:
<a href="http://www.luminous-landscape.com/tutorials/digital-blending.shtml">www.luminous-landscape.com/tutorials/digital-blending.shtml</a>
There is another link on the page to yet another site with an interesting looking technique explained.
Fascinating. I feel a software upgrade coming on.
Just tried that top example on a picture of the London Eye i took the other day. When i took it i bracketed the exposure as i could see the sky was bleached out just by looking up. The technique i used was the layers one. Very quick and suprisingly easy so long as you follow the instructions to the letter
 .
. However i feel this technique would be best used when you can be sure that the original subject is static. As mine (being the eye) clearly was not it was easy to see the difference showing through.
On a side note. Can anyone explain ( for dummies that have trouble following to the letter
 ) how to make an action in ps7? Ie save a whole technique onto one key stroke.
 ps, i loved that sunset Steve.
>> Edited by bilko2 on Sunday 1st May 14:30
Thanks Ian
BTW Kenny - just remembered I drive accross the burn in this 7 mb vid: www.stevecarter.com/911turbo-scotland.wmv - exactly 35 secs from the start
Steve
BTW Kenny - just remembered I drive accross the burn in this 7 mb vid: www.stevecarter.com/911turbo-scotland.wmv - exactly 35 secs from the start
Steve
GetCarter said:
Thanks Ian
BTW Kenny - just remembered I drive accross the burn in this 7 mb vid: www.stevecarter.com/911turbo-scotland.wmv - exactly 35 secs from the start
Steve
I'll have a look. Thanks Steve.
Kenny
Further to the image blending discussion - just found this article relating to Adobe CS2 which might be of interest particularly to regular landscapers.
www.luminous-landscape.com/tutorials/hdr.shtml
It also mentione=s the point about not working with moving subjects and that few cameras currently available will auto-bracket enough frames to make full use of the feature.
www.luminous-landscape.com/tutorials/hdr.shtml
It also mentione=s the point about not working with moving subjects and that few cameras currently available will auto-bracket enough frames to make full use of the feature.
Talking of Photoshop CS2...
I've just got my mitts on it, and there are some very interesting looking new features on it (caveat - I've only had my paws in it for an hour so far).
In addition to the High Dynamic Range (HDRI) facilities, one interesting looking gizmo is the lens correction filter, which claims to be able to correct barrel and pincushion distortion, vignetting and chromatic aberration. Which could be extremely useful, especially with certain cameras that like to produce coloured fringes around high contrast objects.
Image noise reduction allows you to tweak each R/G/B channel individually, and there is also a gadget to reduce JPEG compression artifacts.
There are also new sharpening (smart sharpen - reduces filter generated halos) and blur filters (lens blur - generates an artificial depth of field effect, it's done with an overlay mask channel).
Mike
Gassing Station | Photography & Video | Top of Page | What's New | My Stuff