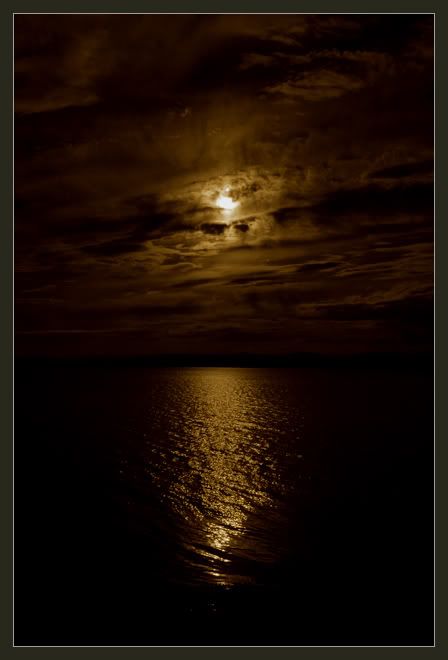
photoshop effort (constructive critiscm needed :P)
Discussion


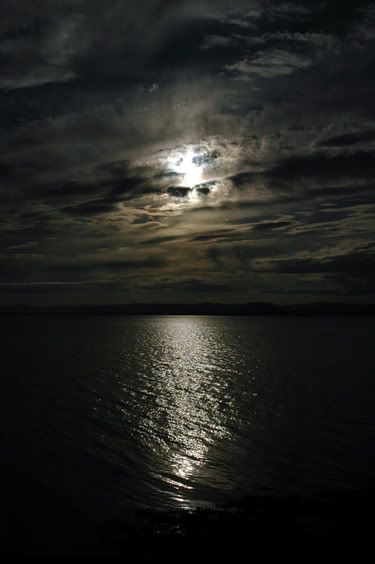
My effort at using photoshop on a photo taken on the beach at tayport.
[pic]http://i3.photobucket.com/albums/y95/sstein/DSC_0291b.jpg[/pic]
Suggestions / Tips appreciated
For some reason my photos never look the same when saved as a jpg as when they do within photoshop ?
Anyone else experienced this?
Mostly they seem darker and have more of an orange / red hue over them. This means it can be a bit of a guess when editing a photo as I have to save it after each change as a jpg to see what it actually will look like!
-
Thanks
Stuart
edited to fix link.
>> Edited by sstein on Tuesday 17th May 19:28
sstein said:
For some reason my photos never look the same when saved as a jpg as when they do within photoshop ?
From my recent experiences I'd say that's not a JPG thing but a colour profile thing. Received wisdom tells me that PhotoSop is colour managed whilst most other apps are not, eg Internet Explorer and Outlook Express!
Someone else cleverer than me can take over from here, or see my post about 10 days ago on this subject.
sstein said:
Since I dont have any filters I was trying to get the same effect in photoshop.
I've found two ways: Photo Filter/sepia or Image/adjust/colour balance and move top slider right, bottom slider left.
I'd much rather take the shot normally and play with it later, than lock myself into a certain colour on the original.
dcw@pr said:
looks very nice, but i would probably lower the white point a bit in levels to make it lighter. Can we see the original too so we can compare?
Thanks for your suggestion.
How do I lower the white point in levels. I have went to image / adjustments / levels and it has opened a window with a histogram in it, a bar with 2 sliders and 3 input values?
Normally to brighten a pic I goto image / adjustments / brightness and contrast and whack up brightness but this seems to put a haze over it.
Thanks
Stuart
sstein said:
looks very nice, but i would probably lower the white point a bit in levels to make it lighter. Can we see the original too so we can compare?
Thanks for your suggestion.
How do I lower the white point in levels. I have went to image / adjustments / levels and it has opened a window with a histogram in it, a bar with 2 sliders and 3 input values?
Normally to brighten a pic I goto image / adjustments / brightness and contrast and whack up brightness but this seems to put a haze over it.
Thanks
Stuart
it looks like you have got the same effect in that that second picture you have posted - but the problem is that the sun area has blown about a bit - i liked the first one where you could see the shape of the sun.
to do the white point go into the levels box and then either move the right hand slider or change the right hand value manually.
getting a "filter" effect (i.e. covering only one part of the picture) is very easy. Select the marquee tool (press M). Press F to make the picture cover the full screen if you are not already doing that. Select the top half of the picture making sure that you start the selection off of the actual canvas (i hope that makes sense). Then you need to feather the selection. Go into Select>Feather. On a 400x600px picture you may want to do a 60px feather. You can check the selection by using the Quickmask - this is toggled by the two buttons directly underneath the things that display what colours you have selected, at the bottom of the tools palette. When the wuickmask is on, the red bit indicate what is not selected. So by this method you can see if you have selected the right bit of the picture that you want to apply your filter effect to. If its not correct then undo all those steps and try again.
hope that's understandable....
dcw@pr said:
to do the white point go into the levels box and then either move the right hand slider or change the right hand value manually.
getting a "filter" effect (i.e. covering only one part of the picture) is very easy. Select the marquee tool (press M). Press F to make the picture cover the full screen if you are not already doing that. Select the top half of the picture making sure that you start the selection off of the actual canvas (i hope that makes sense). Then you need to feather the selection. Go into Select>Feather. On a 400x600px picture you may want to do a 60px feather. You can check the selection by using the Quickmask - this is toggled by the two buttons directly underneath the things that display what colours you have selected, at the bottom of the tools palette. When the wuickmask is on, the red bit indicate what is not selected. So by this method you can see if you have selected the right bit of the picture that you want to apply your filter effect to. If its not correct then undo all those steps and try again.
hope that's understandable....
Thanks for such a detailed response. Just tried it out and it works great

Never knew you could preview things using the buttons below the fore/background colours.
Thanks
Stuart
Gassing Station | Photography & Video | Top of Page | What's New | My Stuff