Discussion


Ladies and gents your help please. Four sheared 10mm headed bolt/screws on my S1 water pump (been in there since 1988). The rest came out ok. Will the pump housing complete, pull off over the remains of the four bolt/studs? The new pump does not have threads in the housing so I assume they are in the block. If so I can deal with these.
Apply plenty of PlusGas penetrating oil to each sheared screw and allow to soak. Give the old water pump casing a good whacking all around the periphery with a hammer and block of wood. It should eventually come free from the block. Do not use steel levers or screwdrivers etc or you may damage the sealing face. Soft wedges of plastic or brass or aluminium are ok if needed.
Once the pump is off, give each sheared stub of screw another good soaking with penetrating fluid, then give each one a sharp tap on the end, and you should be able to unscrew them with a pair of molegrips or similar. If they have sheared off flush with the block, then you will have to drill the centres and use screw extractors.
Good luck.

Thanks gents.
Its as I had thought and hoped for, so I will go with four brass wedges that I have machined up to gently try to lever it free. (thanks Glen). I am in in half a mind to drill and tap out the original holes to a larger size and change to stainless socket head screws as replacement but lets deal with the major problem first. As for getting the remains of the threads out, I am hoping, now the torque is off because of the missing heads, that they will come free without heat, I will keep you posted.
Phill
Cheapest I have found is 500 bucks, Draper tools. Have used something similar to cure off epoxy resin bonding agent. Once the water pump is off, and the remains of the screws can be seen clearly in the block, then it might be oxy/propane torch with a size one/two nozzle to heat the block.
theprof said:
and the remains of the screws can be seen clearly in the block, then it might be oxy/propane torch with a size one/two nozzle .
bolts, or the remains of, will be in the alluminium timing cover, should expand nicely with a little gentle heat.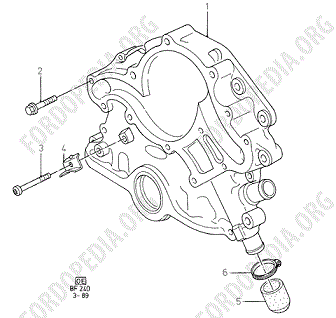
Guess it would be possible to replace bolts with studs and nuts
 although with stainless bolts and everything well greased up it should come apart easy enough if it ever needs to in the future.
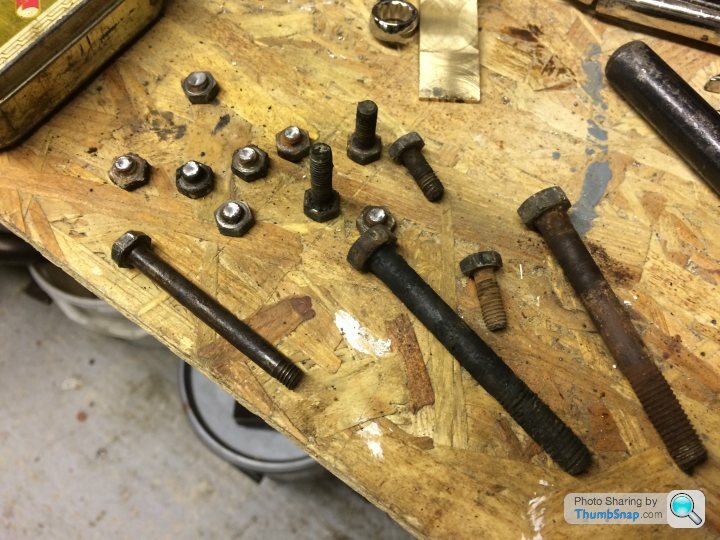
Well, that was painful:eek. All fastners are out, but at what cost. The photo shows seven sheared, and the long one at the bottom comes from the thermostat housing. This is worring, the screw only shows half the thread, guess where the other part is? Deep inside the timing cover housing. All of them are deeply corroded and in a poot state. The second photo shows one of the four brass wedges I machined up, at least I have that started. The thermostat hosuing can be clearly seen with two of the three long screws (minus heads) protruding. the remains of the third is deep inside.
I do not really want to remove the timing cover, which incedntly, is steel and not ally. This is because on first glance it seems the timing cover is attatched to the sump. Lots to think about and decide???!!!


Yours is a 2.8, that schematic drawing is a 2.9 !
The x3 t-stat bolts are not threaded in the cast iron timing gear cover, they go straight through that, into the little alloy rear housing which has the bypass hose outlet. That's where the threads are, but it is likely that the bolts have corroded into the t-stat area of the timing cover. Once you have removed the old water pump you should see the 3 sheared studs going into the rear cover ( as I have described). If you heat them then tap those studs the rear cover should eventually break free, but beware its a bit fragile so watch you don't break it. If you can get the rear cover totally off in one piece, at least you can then put it in a vice to remove the studs.
Yes, the sump does bolt onto the bottom of the timing cover.
Note.. If your old water pump is cast iron, then its most likely to be an original Ford item. Most non Ford replacements are cast alloy. That's a good thing IMHO. But watch out for bent tin impellers, they're ugh and sometimes rub on the timing cover. Best check it has a cast iron impeller as per the original. FirstLine pumps produced a bad batch, but they say they have fixed the problem now.
TerryB
Edited by Blue 30 on Wednesday 1st February 23:14


 . I will undertake some more investigation and post the results, thank you all.
 Blue30 is correct, tap the rear bypass off gently and sort those bolts on the bench, but as he says, be careful the small casting will have become more brittle with age and they are getting harder to find as they are specific to the 2.8 and only in certain applications of the engine.
What you are facing is actually pretty well par for the course unless someone has done it before. Time, care, WD40, rubber hammer and more time and care! Put an anti seize compound on the threads when you put it back together and paint of otherwise protect that bypass casting, it is hidden away and corrodes nicely!
What you are facing is actually pretty well par for the course unless someone has done it before. Time, care, WD40, rubber hammer and more time and care! Put an anti seize compound on the threads when you put it back together and paint of otherwise protect that bypass casting, it is hidden away and corrodes nicely!
Sucsess, of a type. Its off. 
After twenty minuets of careful 'persusaion' with the brass wedges,it came free. The t/stat housing end was the real problem but it came eventually.
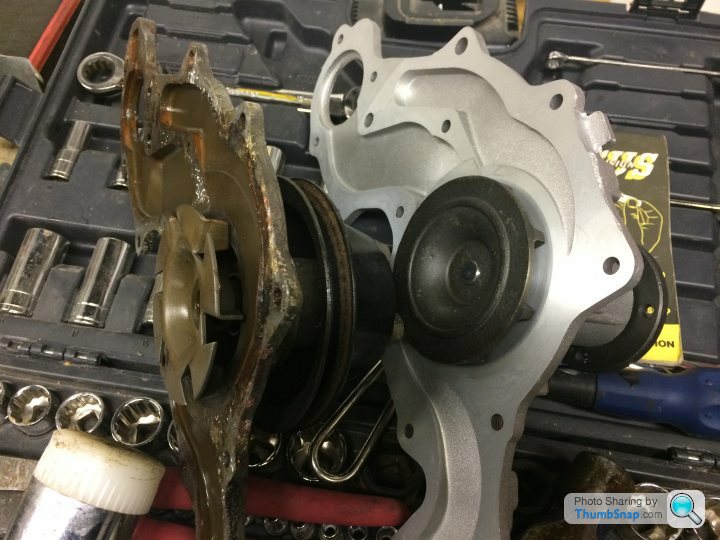
The old one and new one can be seen side by side, the old one being 84.50mm and the new one 83.94 across the diameter of the impeller, note the design difference. The old on being cast ally, so probably not an origonal as I have been lead to belive. And of course the new one is cast ally.
That leaves the remains of the 5 bolts in the timing housing to deal with which are proud by an average of only 3mm (not a lot to work with).
And the two s/stat screws that are now fully exposed.
The upper left hand one rotates cold with mole grips but the bottom right is solid.
I am going to need heat.. Do I bring the heat to the job or the other way around. Job to heat is easier logistically, but that does mean removing the timing housing. 7 bolts in the housing and 5 stud/bolts, I seem to have both i the sump.
Question gentleman. Will removing the timing housing mean a new sump seal and all the huge agro that that will mean?
After twenty minuets of careful 'persusaion' with the brass wedges,it came free. The t/stat housing end was the real problem but it came eventually.
The old one and new one can be seen side by side, the old one being 84.50mm and the new one 83.94 across the diameter of the impeller, note the design difference. The old on being cast ally, so probably not an origonal as I have been lead to belive. And of course the new one is cast ally.
That leaves the remains of the 5 bolts in the timing housing to deal with which are proud by an average of only 3mm (not a lot to work with).
And the two s/stat screws that are now fully exposed.
The upper left hand one rotates cold with mole grips but the bottom right is solid.
I am going to need heat.
. Do I bring the heat to the job or the other way around. Job to heat is easier logistically, but that does mean removing the timing housing. 7 bolts in the housing and 5 stud/bolts, I seem to have both i the sump.Question gentleman. Will removing the timing housing mean a new sump seal and all the huge agro that that will mean?
 one!
one!  How stupid do I feel
  Loser.
theprof said:
Ladies and gents your help please. Four sheared 10mm headed bolt/screws on my S1 water pump (been in there since 1988). The rest came out ok.
Hi prof, so how did three more screws come to seize? Whatever, good work so far. Keep persevering with PlusGas and shocking the ends, it should eventually get results. Failing this, a Butane blowtorch could be used to locally heat the sheared stumps. Just keep working on them with patience.
Good luck again. You'll get there in the end.

Regarding the two types of water pumps for the S1, AFAIK there is a difference in the dimensions of the stand-out of the impellors from the sealing faces.
Edited by glenrobbo on Friday 3rd February 00:53
Gassing Station | S Series | Top of Page | What's New | My Stuff