V8s door mirror
Discussion


I just fitted one of these kits. A plug and socket or bullet connectors means a broken mount can be replaced in about 15 mins. Handy if away on a Eurotour.
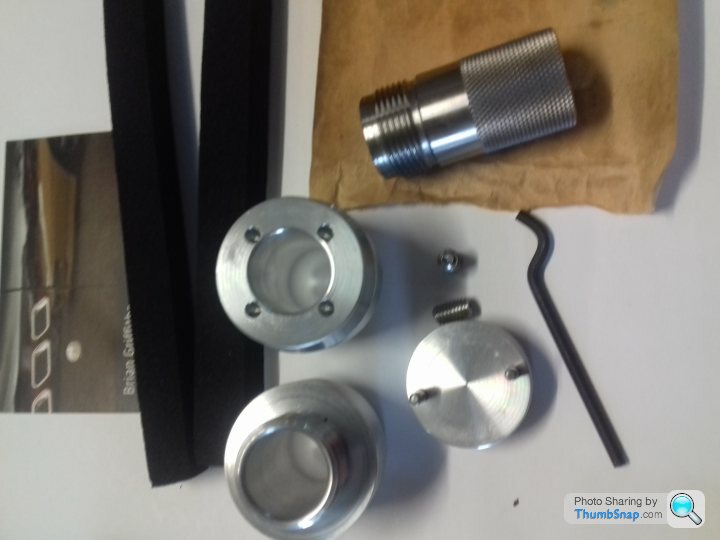
Shiny stuff
The level of workmanship is fantastic!
Shiny stuff
The level of workmanship is fantastic!
https://www.pistonheads.com/gassing/topic.asp?h=0&...
Just got my kit today - superb. Thought i'd do Brian the honour of revitalising this thread. He's still got some kits left......
Just got my kit today - superb. Thought i'd do Brian the honour of revitalising this thread. He's still got some kits left......
Deeman said:
Just got my kit today - superb. Thought i'd do Brian the honour of revitalising this thread. He's still got some kits left......
I'm so glad this topic has come up. 
Percy's mirrors are quite wobbly.
Joe showed me his kit that Brian had made earlier this year before our Spa trip, but I had forgotten who produced them.
The quality is superb.
Now on order.

Now I need to find a supplier of some 4mm dia nitrile rubber section to make up the decorative 'O' rings...
 I'm not really certain that they serve any useful purpose?
glenrobbo said:
Now I need to find a supplier of some 4mm dia nitrile rubber section to make up the decorative 'O' rings..
Is it worth the trouble?............ clickyBut if you must............. 4mm EPDM O ring cord
@ approx 500mm per O ring 4 metres will cost nearly as much as buying "ready made" although there is a saving on postage
Edited by phillpot on Saturday 16th September 21:11

Steve_D said:
v8s4me said:
This part doesn't replace the "sacrificial" bit. It only replaces the boss which screws into the door.
The new boss is about 10mm taller than the original so when you fit the mirror onto it you can get at the grub screw and adjust it to your hearts content.Steve
Extended mirror mounts fitted and, impressed as I am with Paul's stainless mount covers I came up with an alternative..........
1. Purchase a pair of these (originals in foreground)
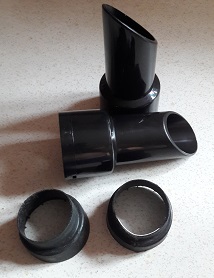 Note they are larger than the normal "Henry Vac" size
2. Set about them with a hacksaw and a Stanley knife
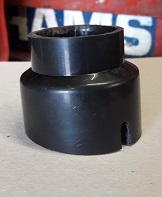
3. The sacrificial mount will need a little bit of modification to fit through them

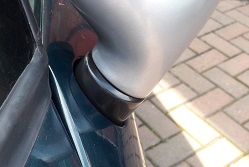
4.Fit 'em
mirrors needed painting, no green paint so thought I'd see how silver looked, it'll do for now
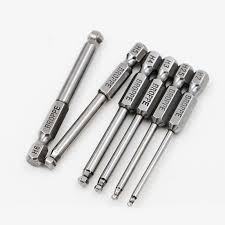
Useful as the funny little Allen key is that Brian supplies I found these ideal for re-fitting............. Ball hex bits
1. Purchase a pair of these (originals in foreground)
Note they are larger than the normal "Henry Vac" size 2. Set about them with a hacksaw and a Stanley knife
3. The sacrificial mount will need a little bit of modification to fit through them
4.Fit 'em
mirrors needed painting, no green paint so thought I'd see how silver looked, it'll do for now
Useful as the funny little Allen key is that Brian supplies I found these ideal for re-fitting............. Ball hex bits
Deeman said:
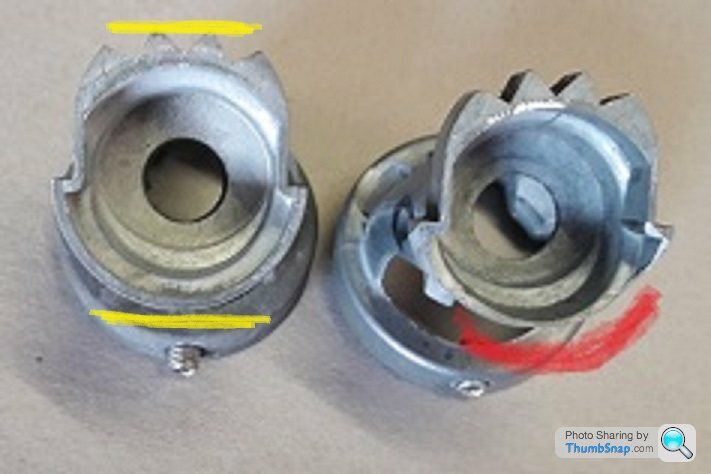
Mike - not clear on the sacrificial mount. The lug bits of the cast where your red marker pen is?
Hi Pete, only took the one photo, I've blown it up a bit to try and make it clearer. Mount is too wide between the yellow lines.Some metal removed where the red marker is. As far as I could see (guess) this shouldn't have any detrimental effects? The vacuum hose nozzles are much thicker than the original covers and wouldn't fit over the mounts, in hind sight soaking them in boiling water may possibly have made them flexible enough to stretch/distort and go over
I too can vouch for the quality of Brian's longer mount, a lovely piece of kit.
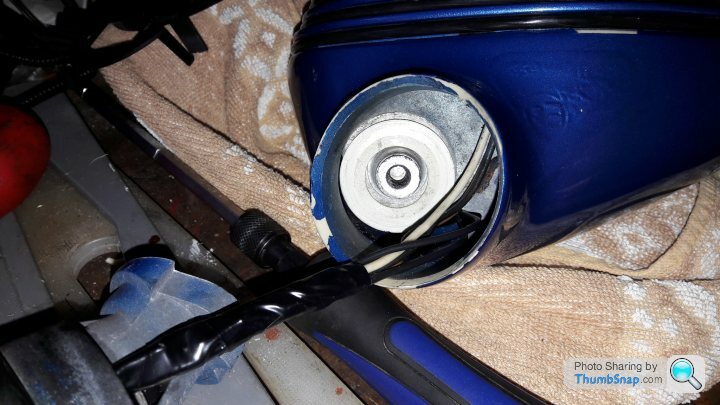
I've fitted it to the driver's mirror, with which I've had a lot of hassle as a previous owner had modified the wiring to the mirror as shown in the photo below and then to compound matters, had also played with the 5 wire connector in the door and swapped the black wire that is part of the mirror movement circuit with one of the black heating element wires. All sorrted now and properly soldered back together and protected with heatshrink.

With the mirror removed from the car, I think there's a part missing that locks the mirror in one of the 3 (?) positions. Here's a photo of the mirror with the Torx bolt and the Citroen aluminium "cage" mounting removed. Should there be any thing else in there ? You can see the cage mount to the left of the photo and it seems to go straight onto a white plastic washer.
Thanks
David
I've fitted it to the driver's mirror, with which I've had a lot of hassle as a previous owner had modified the wiring to the mirror as shown in the photo below and then to compound matters, had also played with the 5 wire connector in the door and swapped the black wire that is part of the mirror movement circuit with one of the black heating element wires. All sorrted now and properly soldered back together and protected with heatshrink.
With the mirror removed from the car, I think there's a part missing that locks the mirror in one of the 3 (?) positions. Here's a photo of the mirror with the Torx bolt and the Citroen aluminium "cage" mounting removed. Should there be any thing else in there ? You can see the cage mount to the left of the photo and it seems to go straight onto a white plastic washer.
Thanks
David
Gassing Station | S Series | Top of Page | What's New | My Stuff