Camshaft Camshaft Camshaft
Discussion


I'm afraid things have escalated a tad.
Engine is now out:
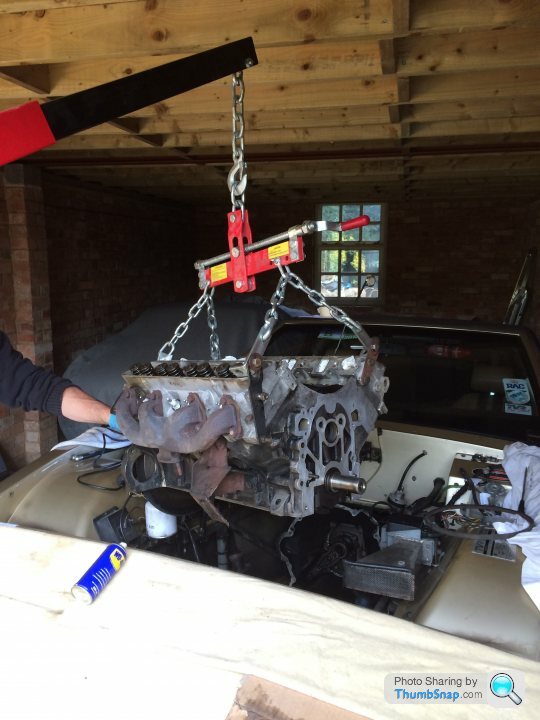
So the camshaft job is now a full rebuild. Brill.
Part of me is looking forward to it, means I can lather up the engine bay and clean it a make it all nice. Paint the odd bracket etc.
Will do the mains, big ends, and rings probably. Camshaft bearings don't look perfect either, whats involved in changing them?
At least I have the bad months to do the engine now and have it ready for next summer!
Tricey
Engine is now out:
So the camshaft job is now a full rebuild. Brill.
Part of me is looking forward to it, means I can lather up the engine bay and clean it a make it all nice. Paint the odd bracket etc.
Will do the mains, big ends, and rings probably. Camshaft bearings don't look perfect either, whats involved in changing them?
At least I have the bad months to do the engine now and have it ready for next summer!
Tricey
I would thoroughly recommend this book:
https://books.google.co.uk/books?id=gmSavy1RPxEC&a...
Even if you're not going to "tune" the engine, there is a wealth of other useful data. Looks like you've also got the original cast manifolds - is there space to get the tubular versions in there?
https://books.google.co.uk/books?id=gmSavy1RPxEC&a...
Even if you're not going to "tune" the engine, there is a wealth of other useful data. Looks like you've also got the original cast manifolds - is there space to get the tubular versions in there?
Manifolds are in great shape, all the bolts were loose! Its an interesting car with many different quirks. The Chassis has been modded to accommodate power steering rack at some point, I'll get some picks tomorrow! Would love to put stainless manifolds on of course. Now that this isn't a stick a cam in job, I'm going to probably really take my time with it so it locks excellent in the engine bay, paint up what I can etc, without going too silly.
Both heads are now off the car. the exhaust valve on the front and back is seriously mucky on cylinder 1 (which is the one that one that the inlet Lobe wore off on the cam) and theres also signs the valve stem seal is leaking on that and one other that side. Not great for 11 year old/4k mile heads really is it. So these will be addressed.
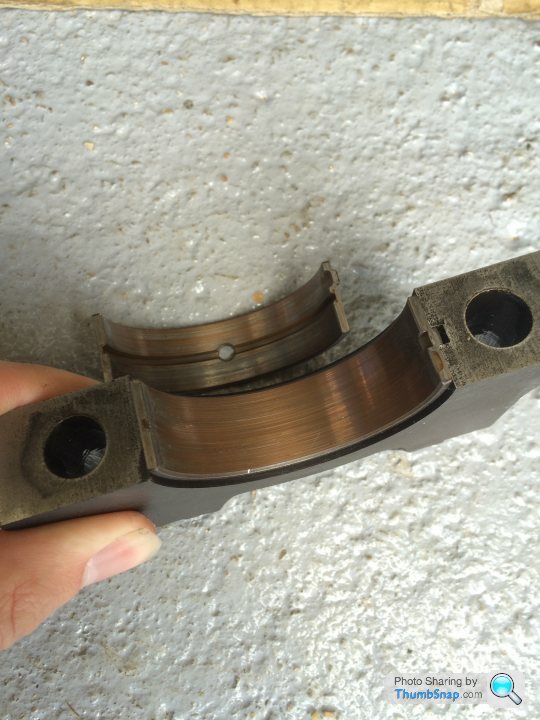
The photographed main bearing is the only one removed so far from the front 2nd one in I think and its pretty bad, others will be similar I'd assume. Had a big end removed too and similar again. Cam bearings look ok on the bottom but I think the upper halves either have oil discolouration or are gone too.
Fingers crossed the crank will be salvageable.
One rather bloody large problem I have managed to make for myself is on removing the heads I have managed to snap a bolt just below flush with the block face. Just one. couldn't believe it! Does anyone have any idea how I'm going to get that out? It was so bloody tight!
I'll try and get lots of pictures tomorrow as the plan is to remove the crank in the morning before I head off anyway for a fortnight.
Tricey
Both heads are now off the car. the exhaust valve on the front and back is seriously mucky on cylinder 1 (which is the one that one that the inlet Lobe wore off on the cam) and theres also signs the valve stem seal is leaking on that and one other that side. Not great for 11 year old/4k mile heads really is it. So these will be addressed.
The photographed main bearing is the only one removed so far from the front 2nd one in I think and its pretty bad, others will be similar I'd assume. Had a big end removed too and similar again. Cam bearings look ok on the bottom but I think the upper halves either have oil discolouration or are gone too.
Fingers crossed the crank will be salvageable.
One rather bloody large problem I have managed to make for myself is on removing the heads I have managed to snap a bolt just below flush with the block face. Just one. couldn't believe it! Does anyone have any idea how I'm going to get that out? It was so bloody tight!
I'll try and get lots of pictures tomorrow as the plan is to remove the crank in the morning before I head off anyway for a fortnight.
Tricey
Yes the Middle head bolt under the rocker covers if you know what I mean. None of it is sticking out which is the problem really. I went round it once just clicking the bolts off to start with so it did move, but on my second time round it snapped off just at the top of the threads, will get a pic tomorrow morning. When I took the second head off, I went round a lot more doing a lot less at a time, must have gone round 6 times opposed to twice on the first side. There seems to be no evidence of any of the thread sealer stuff I think thats supposed to be used, as on some of the bolts there is rust, so some were a pain to get off, more than others.
Tricey
Tricey
Well if it moved once then it might come out reasonably easily. I suppose you could drill a hole in it and try an easy-out. However I have had success welding to stuck bolts in the aly block, with a MiG welder.
The welding heat frees up the bolt, and the MiG wire doesn't stick to the Aly.
In your case drill a 8-10mm hole in some 3mm mild steel plate, place over the bolt hole, and weld onto the bolt drawing the weld up onto the plate. Once it cools tap the plate around anticlockwise to undo the bolt.
The easy-out might be worth a try first but either way you need a steady hand so you don't damage the top face of the block.
Hi Tricky.
if you get stuck, you can bring the block down to Essex, and I'll drill out the bolt on the milling machine.
I got a snap-on set of extractors and worst case I have a Rv8 heli-coil kit.
The cam bearings needs to be pressed / drafted out. each one is bigger than the next so you need a set of difference size drifts. fitting is same but in reverse from other side of block.
Edited by TVRleigh_BBWR on Wednesday 14th October 02:47
Thanks very much for the offer but we managed to punch the rest of the stud round this morning, so it must have been the fact I didn't release the head progressively enough. I have two haynes manuals for the Rover 3500 76-79 and 76-86 I think. Both have completely different tightening sequences for the heads! I chose the more progressive looking one after noticing. Anoyingly this was after i'd broken the bolt, but its out now anyway.
Pistons and crank all out now too so time to get measuring. All the big ends bar 1 were ok but all the mains are scored up like the shot I posted.
Thanks for all the help so far.
Tricey
Pistons and crank all out now too so time to get measuring. All the big ends bar 1 were ok but all the mains are scored up like the shot I posted.
Thanks for all the help so far.
Tricey
Hi Tricey,
the Des Hammill Book is available here:
http://www.amazon.co.uk/Power-Rover-Engines-Track-...
You can convert it to PDF and print it or read it on the Laptop if you have no Kindle.
Two years ago I only wanted to change the clutch and after all it was complete rebuild. Main bearings looked like yours.
Cheers
Bernd
Glad you got it out.
A re-grind +10 thou is not that expensive, just work out if you need it, as your need different shells.
Also all the +10 or +20 shells I've seen seem to be a lot better design that normal ones.
if it's just marks but is too size and not oval, you can get away with a polish. this will take any light score marks out.
Afternoon,
Thinking of putting a piper 285 can in the car, think it will still work ok with the slandard management system? I already have a rising rate pressure regulator.
Any thoughts would be great.
Does anyone know where I could get my block chemically cleaned?
Going to be undertaking a full engine rebuild apart from a crank rebuild and replacement pistons, every other bearing will be changed pretty much, so much for the cam swap!
Tricey.
Most Powder Coaters chemical clean parts before they powder coat them, also they normally do big stuff, so they should be able to do it. this should be quite cheap, but maybe too aggressive on bearing surfaces, esp if your not changing the camshaft bearings.
Also most engine machine shops chemical clean parts before and after machining.
Depends how bad it is. you could use some marine clean in a large tub or bath or dustbin. this is what I use but mainly to make sure there is no swarf or debris left anywhere, before re-building.
Also most engine machine shops chemical clean parts before and after machining.
Depends how bad it is. you could use some marine clean in a large tub or bath or dustbin. this is what I use but mainly to make sure there is no swarf or debris left anywhere, before re-building.
Hi, cheers for that.
I have now decided to replace the cam bearings, as there are signs of some scoring, and its silly not too at this stage. I will probably be getting someone to clean the block and fit the cam bearings, so I can continue with the rest of the build myself. Haven't decided on who will be doing the job yet.
Tricey
Speak to Matt Smith, in Norfolk he's a TVR and race-car specialist, and should be able to recommend a good machine shop.
http://www.matsmithsportscars.com/
http://www.matsmithsportscars.com/

I would never reuse an engine block that as suffered cam failure like this with out de-bunging and cleaning out the galleries the block 1st all these fancy dips etc wont do that for you I would settle on a de-bunged block and 20 litres of cellulose thinners pipe cleaners and an airline over just any of these fancy dips/cleaners any day of the week 
Gassing Station | Wedges | Top of Page | What's New | My Stuff