Vacuum advance removal
Discussion


My vac advance doesn't work so I thought I would replace it, looks an easy enough job, I guess I should have known better, I can remove the screw that locates the slotted end of the unit to the dissy, the other end has a stud with a nut on it, but when I turn the nut the stud turns as well, is this normal?
I guess the only way to get it off is to remove the dissy cover, rotor arm and then the black plate that says "do not remove this cover", is there anything I need to look out for?
Thanks
Paul
I guess the only way to get it off is to remove the dissy cover, rotor arm and then the black plate that says "do not remove this cover", is there anything I need to look out for?
Thanks
Paul
Paulprior said:
My vac advance doesn't work so I thought I would replace it, looks an easy enough job, I guess I should have known better, I can remove the screw that locates the slotted end of the unit to the dissy, the other end has a stud with a nut on it, but when I turn the nut the stud turns as well, is this normal?
I guess the only way to get it off is to remove the dissy cover, rotor arm and then the black plate that says "do not remove this cover", is there anything I need to look out for?
Thanks
Paul
Nothing nasty like springs that pop out- That plastic cover comes off, then you remove the threaded posts from memory the lift the plate out. T think you will need to remove the trigger head and trigger wheel as well, but its nothing nasty. You will need to reset the trigger head when it goes back on so none of the lobes hit it when it spins.I guess the only way to get it off is to remove the dissy cover, rotor arm and then the black plate that says "do not remove this cover", is there anything I need to look out for?
Thanks
Paul

You need remove nothing more than the 2 screws that secure the vac capsule and a wiggle upwards to the dizzy just keep fishing with the arm coming out of the new vac unit until it engages with the base plate pin if it moves too far inside the dizzy pull the pin with a piece of wire etc towards the hole on the dizzy side and start again  (this will all make sense when you 1st remove the old unit) done loads like this just fiddly no need to remove any of the dizzy innards
(this will all make sense when you 1st remove the old unit) done loads like this just fiddly no need to remove any of the dizzy innards Hi Sardonicus, from your message I assume that there should be 2 screws, so probably someone has stripped the thread in one, maybe I can re thread it the next size up.
Before removing the HT leads to let me get the dizzy cap out of the way I thought I would mark the positions, when I look in the bible I should have this
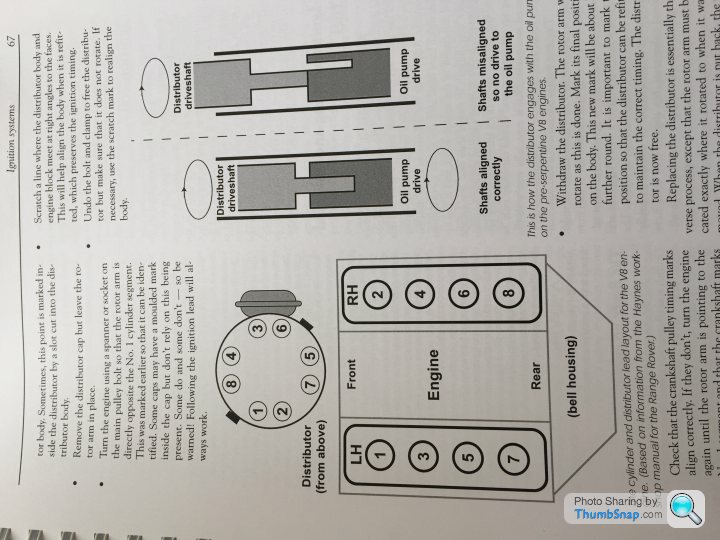
But when I look at my dizzy I have this

Have I just misinterpreted the bibles bit on the right as the vac advance unit and the locating springs or is it an different model to mine from 95?
Paul
Before removing the HT leads to let me get the dizzy cap out of the way I thought I would mark the positions, when I look in the bible I should have this
But when I look at my dizzy I have this
Have I just misinterpreted the bibles bit on the right as the vac advance unit and the locating springs or is it an different model to mine from 95?
Paul
Paulprior said:
.....Have I just misinterpreted the bibles bit on the right as the vac advance unit and the locating springs or is it an different model to mine from 95?
Paul
You can lift the dizzy out and pop it back in again with the rotor anywhere around the rotation. You can also rotate the dizzy in its clamp (by a limited amount).Paul
On that basis it does not matter where the leads are fitted provided number one is firing at the correct time and the other leads are in the correct order.
As you are perhaps not familiar with how to remove and re-time a dizzy then just leave the leads where you found them.
Steve
Hi Steve, that's what I did, as it was running ok I just put them back as they were, just a bit confused as to the relationship to the vac advance and holding clips.
I tested mine by removing the vac pipe from the plenum, if you suck on it you should have a high resistance, if not the pipe or vac advance diaphragm has a leak, if you remove the dissy cap, rotor arm and cover below it you can then suck on the pipe and see the system rotating
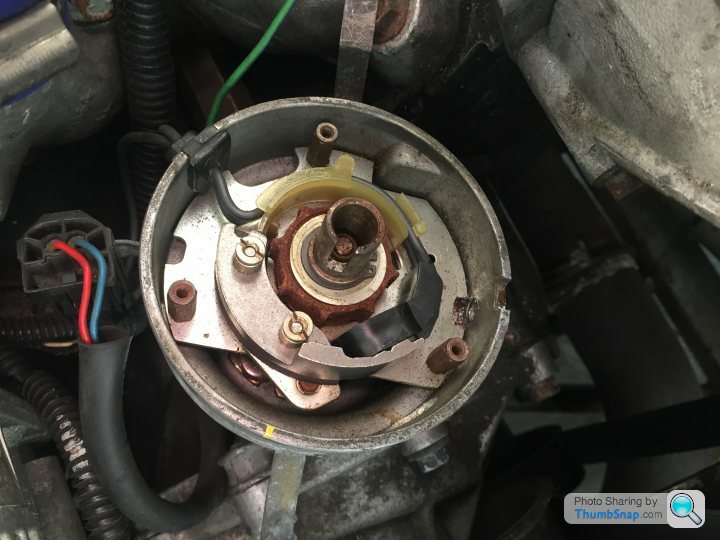
The vac advance has been removed on this picture, but it fits on the left and connect to the internal pin that's a just past the 9 o'clock position, this then rotates the central ring with the cam sensor on (outside the rather rusty looking 8 lobed cam).
I did take the car for a quick spin after and can't say I noticed much difference, but I knew it was faulty so needed to fix it anyway.
Paul
I tested mine by removing the vac pipe from the plenum, if you suck on it you should have a high resistance, if not the pipe or vac advance diaphragm has a leak, if you remove the dissy cap, rotor arm and cover below it you can then suck on the pipe and see the system rotating
The vac advance has been removed on this picture, but it fits on the left and connect to the internal pin that's a just past the 9 o'clock position, this then rotates the central ring with the cam sensor on (outside the rather rusty looking 8 lobed cam).
I did take the car for a quick spin after and can't say I noticed much difference, but I knew it was faulty so needed to fix it anyway.
Paul
Steve_D said:
The vac system is an economy thing.
In a V8 TVR I doubt there is much to 'feel'.
Steve
Not much feel, sure... but your vac advance system is actually your friend In a V8 TVR I doubt there is much to 'feel'.
Steve

If the car is used on the road I just can't see one single valid argument for removing the vacuum advance system, some will claim it causes shunting but that's total BS, the vac advance system there for a reason and is proven to work perfectly without introducing any running or drivability issues at all. If the engine isn't running right don't just remove the vacuum advance system, make sure it's working correctly and treat the fault holistically, the vacuum advance didn't introduce drivability issues when the car was new so if it's working properly it won't cause issues today.
The RV8 distributor ignition starts with 10 degrees of initial timing and no matter how fast you spin it the distributor can only ever give you a 18 degrees of linear timing advance. So if you start at 10 and add 18 you can only ever end up with 28 degrees of total timing! A range of just 18 degrees is really quite limiting, it'll give acceptable results under most circumstances but if you wanted to achieve a more efficient advance curve you'd want a lot more range than that. For example if you look at the ignition maps on my Canems system you'll see I'm operating through a much wider 32 degree band of petrol ignition timing range, IE. 12 degrees initial to 44 degrees of total timing.
For years everyone (including Lucas) understood the limitations a distributor ignition system places on the internal combustion engine which is why they've long been relegated to the history books, under certain circumstances such a device that only responds to engine speed is far from ideal, this is because at higher RPMs (say 3,000rpm) to obtain peak cylinder pressures at light load you could easily add another 10 degrees (or more) on top of the 28 degrees total timing the RV8 distributor as able to give. Under such higher engine speeds at light load initiating the burn later is completely safe (no detonation risk) and only gives benefits (increased cylinder pressures), namely something in the order of an 8% improvement in efficiency (fuel economy) is perfectly achievable under these specific light load cruise conditions if you initiate the burn some 10 degrees (or more) of crankshaft rotation later.
To compensate for this rather narrow range of 18 degrees advance and get up there to or close to our ideal 40 plus degrees of total timing you could just start your initial timing at 20 degrees, if you set the distributor so the engine idled at 20 degrees by the time you've added your distributor's limited 18 degrees of range you'll have yourself 38 degrees of total timing. The problem with this is the car won't idle nicely at 20 degrees and you don't actually want 38 degrees of total timing at 3,000rpm always, indeed it might prove dangerous under heavy load (hard acceleration) situations at these engine speeds to give the engine this much timing as all that extra heat in the combustion chamber could itself initiate the burn before your spark plug does.
When this happens you get two flame fronts, one from the combustion chamber heat initiated burn and one a few milliseconds later initiated by your 38 degrees advanced ignition system, when these two flame fronts meet they create a very destructive and uncontrolled supersonic wave of energy, this condition is known as detonation (pinking) and will quickly destroy the crowns of your pistons and deeply scar your cylinder head.
So with the distributor only capable of advancing your timing by following rpm, the fact you need the engine to idle at 10 degrees and because the distributor can only give you 18 degrees of advance you need another system to add the extra 10 degrees of desired advance, but to only do so safely and when it's actually needed IE when the engine is under very little load. And so was born the vacuum advance system that became the industry standard on all road cars fitted with distributors from the 1950's all the way through to the complete deletion of distributor ignition systems in the 1990's.
The truth is vacuum advance adds another dimension to your rather crude mechanical ignition system and makes it a whole lot more intelligent, because it can now respond to another parameter beyond that of just engine speed. By adding vacuum (engine load) into the equation you've made your very limited and crude rpm governed ignition a truly adaptive system.
So the vacuum advance module is definitely your friend, no question! Indeed it's the nearest thing you have to the way more sophisticated and efficient 3D ignition offered by expensive after market engine management systems; on the road there really are no disadvantages to running a correctly functioning vacuum advance system, only benefits... so you'd be completely mad to remove it

Because when functioning as designed all a vacuum advance system will ever give you is better fuel economy!
If one of your HT leads was found to be faulty you would'nt remove it and just leave it that way, you'd replace it with a new and correctly functioning HT lead. It's the same with your vacuum advance system, if its broken.. replace it with a new module and check it's moving the distributor base plate as it should, this way you'll have an ignition system that works as the manufacturer intended and so you'll enjoy the improved cruising fuel economy it's designed and proven to deliver.
Dave
Paulprior said:
Hi Sardonicus, from your message I assume that there should be 2 screws, so probably someone has stripped the thread in one, maybe I can re thread it the next size up.
Before removing the HT leads to let me get the dizzy cap out of the way I thought I would mark the positions, when I look in the bible I should have this
But when I look at my dizzy I have this
Have I just misinterpreted the bibles bit on the right as the vac advance unit and the locating springs or is it an different model to mine from 95?
Paul
Your drawing of the plug lead order looks wrong and is certainly different to the diagram you posted I don't think the firing order ever changed on the V8 but I could be wrong.Before removing the HT leads to let me get the dizzy cap out of the way I thought I would mark the positions, when I look in the bible I should have this
But when I look at my dizzy I have this
Have I just misinterpreted the bibles bit on the right as the vac advance unit and the locating springs or is it an different model to mine from 95?
Paul
Dave,
Thank you for the very detailed explanation, I'm glad I changed it now😀, I never intended to scare myself with measuring mpg on a TVR, but I couldn't resist after doing a long journey earlier this year to to Burghley meet, I got about 21.5 mpg which I thought was quite good for a 500, maybe I will try it again someday🙂
Colin - the actual sequence is the same, just looks like starting in a different place, but it seems to work ok
Paul

Paulprior said:
Dave,
Thank you for the very detailed explanation, I'm glad I changed it now??, I never intended to scare myself with measuring mpg on a TVR, but I couldn't resist after doing a long journey earlier this year to to Burghley meet, I got about 21.5 mpg which I thought was quite good for a 500, maybe I will try it again someday?? Paul
Now the vac advance system is working you should see your recorded 21.5mpg go up to at least 24mpg with the car driven in exactly the same way Thank you for the very detailed explanation, I'm glad I changed it now??, I never intended to scare myself with measuring mpg on a TVR, but I couldn't resist after doing a long journey earlier this year to to Burghley meet, I got about 21.5 mpg which I thought was quite good for a 500, maybe I will try it again someday?? Paul

Sardonicus said:
You need remove nothing more than the 2 screws that secure the vac capsule and a wiggle upwards to the dizzy just keep fishing with the arm coming out of the new vac unit until it engages with the base plate pin if it moves too far inside the dizzy pull the pin with a piece of wire etc towards the hole on the dizzy side and start again (this will all make sense when you 1st remove the old unit) done loads like this just fiddly no need to remove any of the dizzy innards
Hi, (this will all make sense when you 1st remove the old unit) done loads like this just fiddly no need to remove any of the dizzy innards I want to delete my valve as a temporary fix because it s not well tightned.
I understood i need to cap the plenum where the valve were connected but at the distributor side i m a bit confuse... how can i blank it?some air is getting in by the "socket" of the valve so i think i have to remove the whole air valve. It seems you explain there how to remove the arm that going into the distributor... is that s right that i could remove this arm only by removing the top cap of the distributor (the 8 pinned one) and without disassembling the bottom rotor part? Please my english level is not good enough to understand this procedure could you try it again in easiest words...
If i get it, ill have to block the hole in the distributor (in which the valve was fitted). How do you did that? Did you tap this hole with a big thread and put a screw in it?(at this point maybe i have better to rethread the two torx and stay with the valve).
Thx!!!!
Gassing Station | Chimaera | Top of Page | What's New | My Stuff