What's happening in your garage this weekend ?
Discussion


adam quantrill said:
Don't forget those locking tabs on the handbrake spring bolts (not that they ever move, mind...)
Yeah I know, been sourcing new ones as well as new forked pull-off springs... better be sitting down when you find out how much they are!I wanted to assemble the handbrake calipers to try and establish if the usually-quoted technique for setting them up is correct (or indeed the best way)... so far what I've found is that no matter how much I bend the forks and twiddle the ratchets, the pads end up dragging on the discs when you release the lever, which probably explains why it's fried two full sets of pads so far. I was blaming the hydraulics but now I wonder if it's been the handbrakes all along. At the moment I'm thinking that the h/brake pads could do with the contact face flattening off (they come with a chamfer on them) so that the pad face is more parallel with the disc and the leading edge doesn't drag.
But first I'll try new forks...
Those discs are new, by the way, I bought them for a song off the bay of evil some years ago. They still have the protective wax on apart from the odd spot which is where you can see rust dots. Not bad for the best part of a decade in an unheated garage!
I did actually skim the old ones (as far as I can make out from the service history, the original 1987 discs!) but rather felt it was daft to refit them when the new ones were sat there.
If I can summon the enthusiasm, I reckon with a good weekend at it I can have the old heap back on her wheels by xmas. And Nursy happens to be away for a weekend...

Wedg1e said:
If I can summon the enthusiasm, I reckon with a good weekend at it I can have the old heap back on her wheels by xmas. And Nursy happens to be away for a weekend...
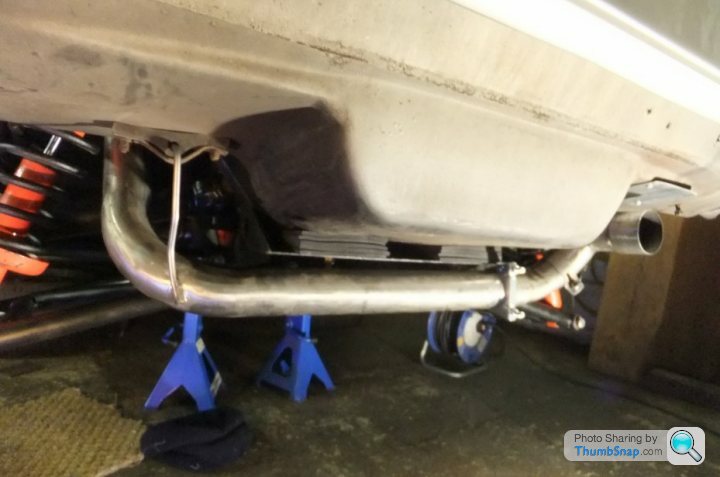
Well this was set to be such a weekend but progress so far hasn't been quite as swift as I would have liked.I started by doing up the exhaust mounts that I'd had to loosen to get the diff cradle forward mounting bolts in.
Then I refitted the handbrake cable and tried to set the handbrakes up but I kept getting the pads dragging on the discs with the lever off. The handbrake lever feels like it wants to go through the headlining before the pads (new ones, remember) are gripping hard enough; if I put a lever through the studs of the brake discs I can make them turn quite easily even with the handbrake on at 9 clicks. If I shorten the handbrake cable any more the pads don't release properly. I suspect it really needs the two long pull-off springs that the Jags usually have, installing, before this will be resolved.
So I shelved tha handbrakes for now and turned to the hydraulics.
I made up a new link from the master cylinder to the bias valve, bent the new front-rear line into shape around the engine bay (keeping clear of the O/S exhaust manifold) and flared the end then connected everything up and poured in new brake fluid.
Which leaked. From two joints; the first just needed nipping up with a spanner. The second wasn't quite as co-operative, so after trying twice I thought sod it, I'll take the line off and remake it with a new length of Cunifer, which I duly did.
And the b45t4rd still leaked

Now, in the rebuild I'd changed the routing of the brake lines so that the end of the line, i.e. the bleed nipple, was on the driver's side caliper. This seemed to make more sense as it would mean that I'd be on the same side as the master cylinder when bleeding.
Eventually, having ruled out poor flaring technique as the cause, I made up yet another line, this time feeding the offside caliper first and putting the bleed nipple back in its original place - the thread that was persistently leaking.
...and the leak stopped

So I bled the system through and had a brew
Next I re-routed the high- and low-pressure fuel lines clear of the offside rear tie-bar mounting (I was worried that the tie-bar might foul the lines if the suspension deflected enough), threw a few litres of fuel in the tanks then linked out the fuel pump relay and turned the ignition on.
The fuel pump primed the rail as shown by the pressure gauge I have on it and I left it running, recirculated fuel splashing merrily into the nearside tank, for half an hour to see if any wet patches appeared but all was OK.
So leaving aside the handbrakes, the real fun starts now - only a dozen major components to refit and the wheels can go back on

Wedg1e said:
The fuel pump primed the rail as shown by the pressure gauge I have on it and I left it running, recirculated fuel splashing merrily into the nearside tank, for half an hour to see if any wet patches appeared but all was OK.
Hi mate..Did the fuel level reach to where it was leaking previously?...Just wondering as it probably wouldn't show a leak if it hasn't been submerged as such...I thought that petrol tanks should be pressure tested?..Im probably talking cobblers as usual...And please tell me if i am....
mrzigazaga said:
Hi mate..Did the fuel level reach to where it was leaking previously?...Just wondering as it probably wouldn't show a leak if it hasn't been submerged as such...I thought that petrol tanks should be pressure tested?..Im probably talking cobblers as usual...And please tell me if i am....
Ah well now Ted... the only leak I'd had was a pin-prick in the top face of the left-hand tank, so it was up against the rubber sheet under the boot floor. I didn't even know I had a leak until I took the tank out, it obviously needed quite a lot of fuel in the tanks for it to splash around and find the hole.I did low-pressure-test the tank and found one tiny hole which was re-welded... I expected there'd be more than that, I impress myself sometimes
I started with a pile of bits that looked like this:
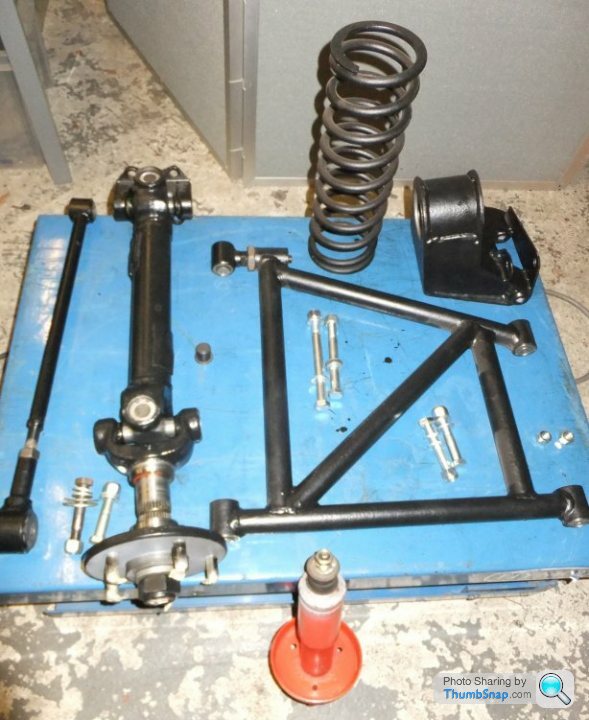
and in two shakes of a lamb's whatsit I'd got the A-frame and propshaft back in (I took a load more pics but it's late and I have to be up early so you're getting the abridged version)...
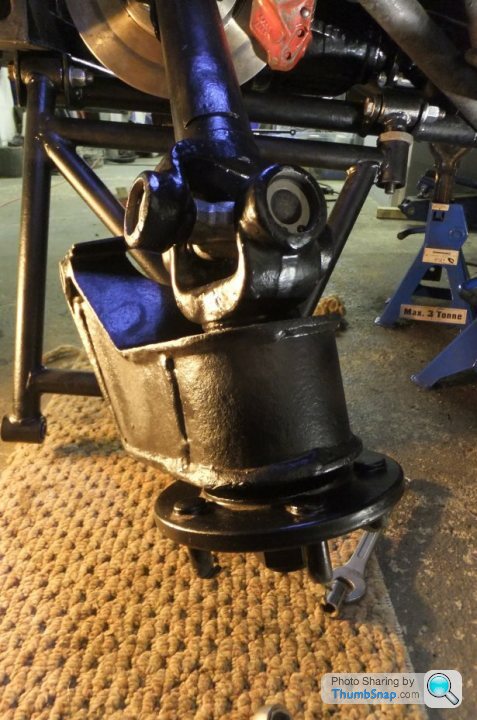
I'd guessed the shim thickness for the camber setting as the new brake disc has slightly different dimensions to the old one, however the tie-rod length and the toe-in settings of the A-frames were reset to what they were before I stripped everything.
Spring compressors were applied to the powder-coated springs:
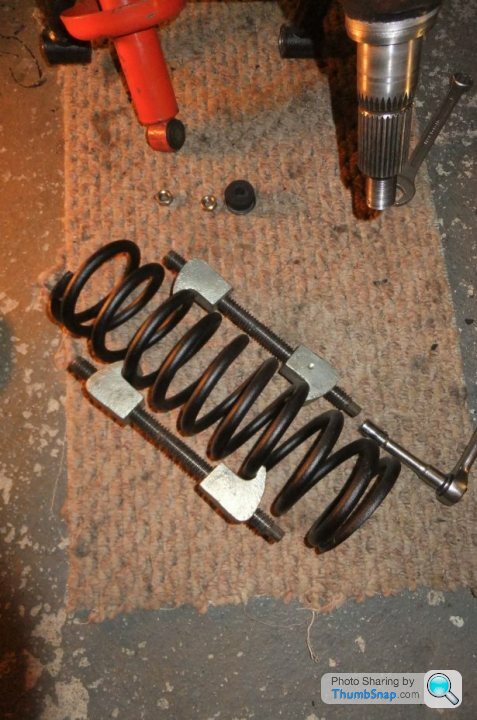
and the spring and Koni damper fitted. The springs don't need to be compressed very far, unlike the front ones.
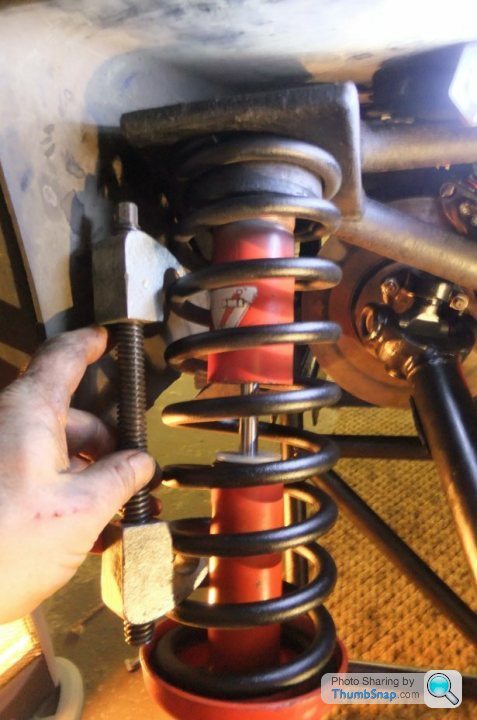
With the damper top nuts fitted the sring compressors were wound off and removed...
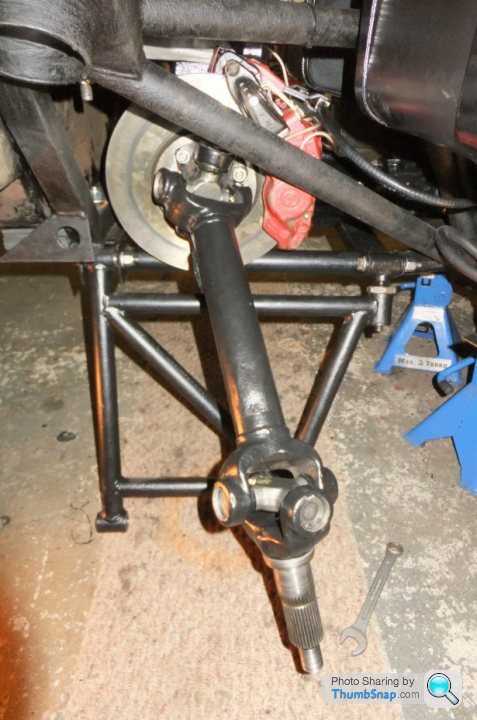
...then the hub carrier was installed to the propshaft...
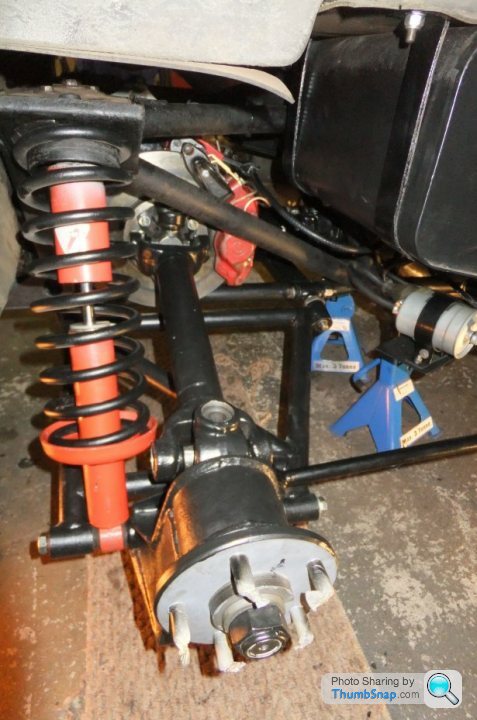
and the carrier and damper bolted to the A-frame.

Lastly, the tie-rod was installed between hub carrier and chassis rail:
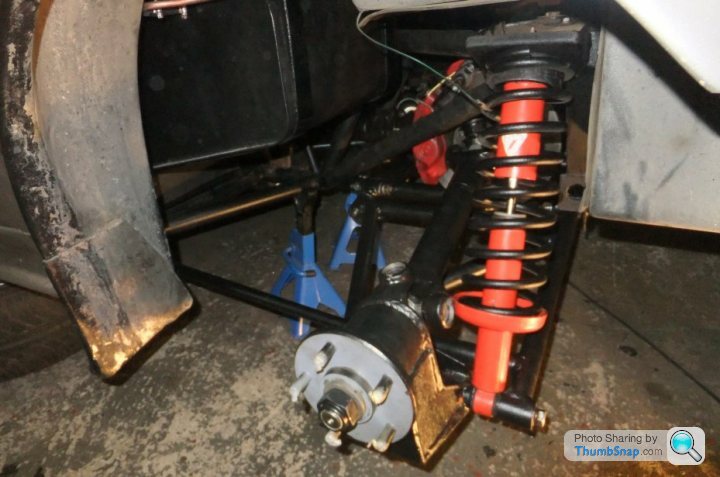
After a swift brew-up it was time to rebuild the other side:
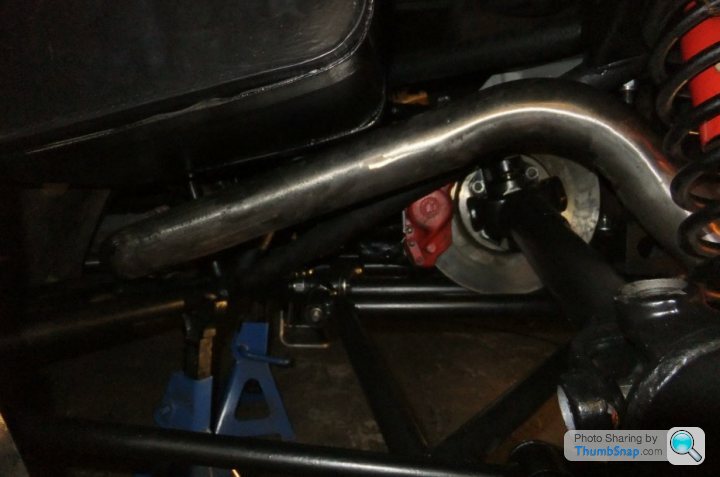
Then the exhaust system was wrestled into place, trying not to scratch any of the new paintwork under there!:
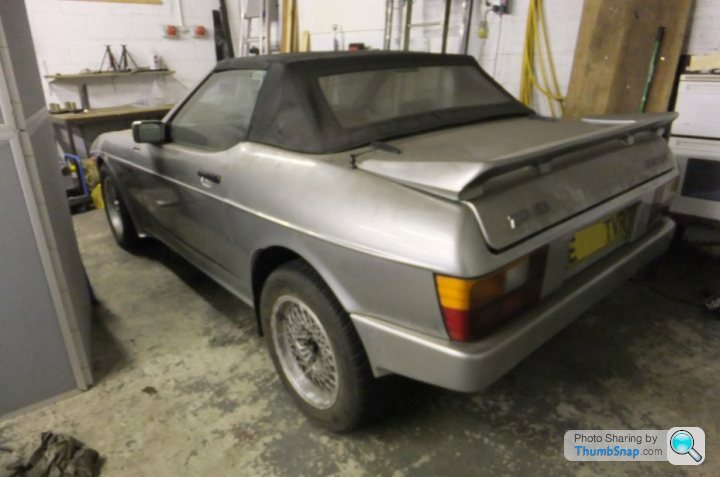
and finally, after two and a half years with its arse in the air, my car sat back down on all four wheels
Oh, it's not finished of course: what you can't see is all the interior trim pulled out to access the fuel filler pipes and the handbrake... and it's lost coolant while it's been sat so I daren't start the engine until I make sure water hasn't found its way into the sump. Then the brakes all need bleeding, and the rear wheel camber adjusting... and of course the hub nuts need torquing.
But for now at least when I walk into the workshop I don't see a pile of vaguely TVR-shaped parts...
and in two shakes of a lamb's whatsit I'd got the A-frame and propshaft back in (I took a load more pics but it's late and I have to be up early so you're getting the abridged version
)...I'd guessed the shim thickness for the camber setting as the new brake disc has slightly different dimensions to the old one, however the tie-rod length and the toe-in settings of the A-frames were reset to what they were before I stripped everything.
Spring compressors were applied to the powder-coated springs:
and the spring and Koni damper fitted. The springs don't need to be compressed very far, unlike the front ones.
With the damper top nuts fitted the sring compressors were wound off and removed...
...then the hub carrier was installed to the propshaft...
and the carrier and damper bolted to the A-frame.
Lastly, the tie-rod was installed between hub carrier and chassis rail:
After a swift brew-up it was time to rebuild the other side:
Then the exhaust system was wrestled into place, trying not to scratch any of the new paintwork under there!:
and finally, after two and a half years with its arse in the air, my car sat back down on all four wheels
Oh, it's not finished of course: what you can't see is all the interior trim pulled out to access the fuel filler pipes and the handbrake... and it's lost coolant while it's been sat so I daren't start the engine until I make sure water hasn't found its way into the sump. Then the brakes all need bleeding, and the rear wheel camber adjusting... and of course the hub nuts need torquing.
But for now at least when I walk into the workshop I don't see a pile of vaguely TVR-shaped parts...
Edited by Wedg1e on Monday 8th December 01:56
Convert said:
Zig, I'd like to nominate Ian for the Wedge personality award...
You...Me and several others want to as well mate but he won't have none of it the bugger...We might have to kidnap him and force beer down his neck...Actually thats the easy bit..And then present him with it while he is very very very drunk...Infact he has been nominated the last three years....
Personally i can't think of anyone else who deserves it more..Well done Ian.....Ziga
mrzigazaga said:
You...Me and several others want to as well mate but he won't have none of it the bugger...We might have to kidnap him and force beer down his neck...Actually thats the easy bit..And then present him with it while he is very very very drunk...Infact he has been nominated the last three years....
Personally i can't think of anyone else who deserves it more..Well done Ian.....Ziga
Me, Rob, Jeff and Trickie could form a raiding party...Personally i can't think of anyone else who deserves it more..Well done Ian.....Ziga
Wedg1e said:
I'm flattered chaps but I'm not a fan of popularity contests. IMHO 'The car's the star' 
Its "Personality" not "Popularity" "We never said we like you".... ....And the car is only the star thanks to you...Left to its own devices it would turn itself to shyte..
IMHO....I think you deserve it for your dedication to the Wedge fold and the work you do documenting very clearly i might add..The workings of the Wedge...For all to access for FREE...And i guess your not a bad egg....Plus you might as well get it over with mate...You can only get crowned once...

mrzigazaga said:
Wedg1e said:
IMHO....I think you deserve it for your dedication to the Wedge fold and the work you do documenting very clearly i might add..The workings of the Wedge...For all to access for FREE...And i guess your not a bad egg....Plus you might as well get it over with mate...You can only get crowned once...
+1Ian, the air filter plate you made me is still perfect and I have not forgotten (you may have though
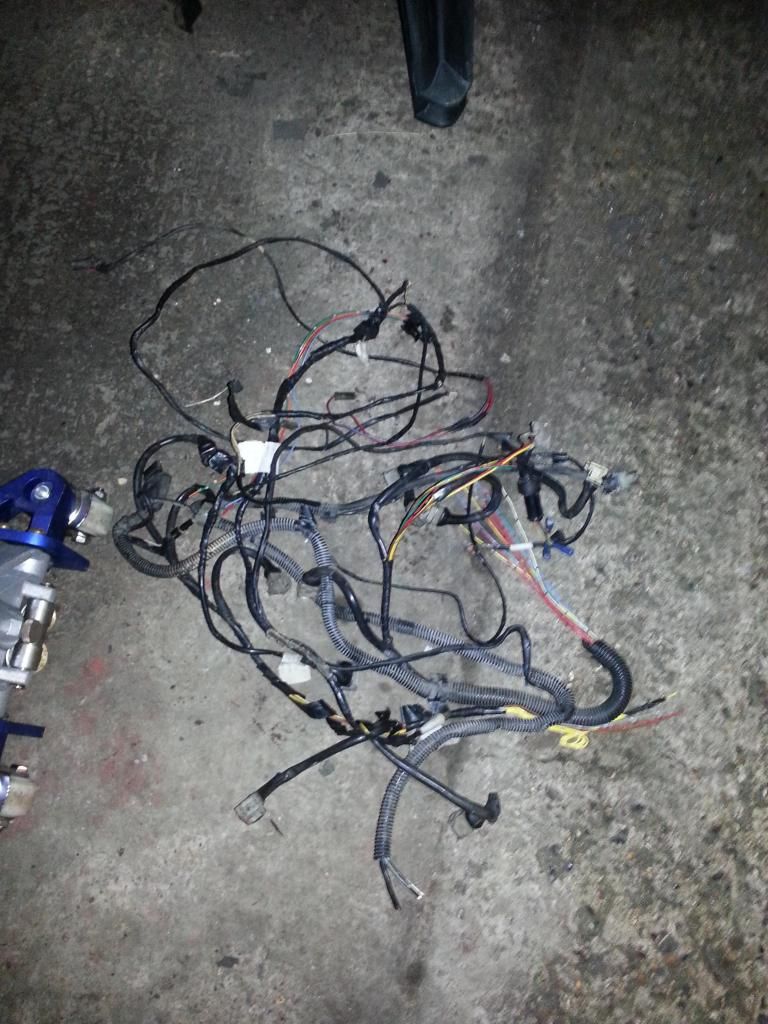
)your kind offer about a year ago to refurb my driving light pods, will get them to you next year Got a few items to do on the wedge .. it's running emerald but it has a few wiring issues which are caused by my rather amateurism wiring, so I have decided to redo them with the aid of a mate.
First task today was to remove the old wiring .. bit of a long task in itself. All wires now identified and straightened out ready to pull back through the bulk head. We started the car to make sure all was still running. Nice 55psi oil pressure with 45psi when on hot idle. Did a little bit more work on the initial map, runs a bit more cleanly now.
First task today was to remove the old wiring .. bit of a long task in itself. All wires now identified and straightened out ready to pull back through the bulk head. We started the car to make sure all was still running. Nice 55psi oil pressure with 45psi when on hot idle. Did a little bit more work on the initial map, runs a bit more cleanly now.
New speedo cable fitted and dash put back together and all is good. Note - speedo cable was a stock item at David Gerald. I ordered it Monday afternoon and it was with me Wednesday morning which was great service. Also fitted a new oil pressure sender unit but it doesn't work at all so took it out, stuffed a long length of hose into the sender connection, ran the engine up until oil pumped up the tube and then put the old one back on again, which has now decided to work a little more smartly. Pressure at 2000rpm around 50psi and approx 20psi at tick over (1000rpm). Happy with that.
Gassing Station | Wedges | Top of Page | What's New | My Stuff