SX technical data
Discussion


Calling SX owners (probably only Jasper will see this but I'd like to hear from more!)
Could you measure the diameters of the pulleys - the one on the supercharger and the one on the crank?
I will do the same & report back. Also I'm trying to put together some technical data on the S102 sprintex unit.
Could you measure the diameters of the pulleys - the one on the supercharger and the one on the crank?
I will do the same & report back. Also I'm trying to put together some technical data on the S102 sprintex unit.
OK here's the gen on the 400SX.
The pulley circumference on the blower is 17.5cm and the crank pulley diameter is approx 14cm giving a circumference of 44cm (approx).
This gives a step-up ratio of about 2.5, so at max revs (5700) the blower is running at 14300 rpm.
The figures on the S102 are as follows (gleaned from sprintex.com.au - I need to confirm this):
Displacement per rev: 1.09 Litres
Max sustained revs: 13000 (don't know what the max peak is).
Of course, the engine displaces 2l/rev, being a 4-stroke, so the blower is attempting to stick in 3/4 of a litre more. That's healthy!
Now the good bit:
I finally got the boost gauge working. After putting some clamps on the pipes and (crucially) defeating the one-way valve in the extra vacuum take-off fitting that I installed onto the spare port on the plenum. (Without this mod you only ever see the vacuum!!!)
With full open throttle the plenum pressure starts building up from 1500 rpm, by 2000 rpm it's hit +4psi, and this climbs to 6psi by about 3000rpm. This holds all the way up to where I get a bit scared to keep watching the gauge ;^)
By my reckoning, at 6psi boost I am getting 43% more air into the cylinders, giving the equivalent of a 5.7 litre engine.
Interestingly, the needle flickers about by 1 psi at high revs, I reckon because as each cylinder fills, it takes a big gulp of air. Must make life interesting for the fuel pressure regulator!
Next little project is to install the water injection ready for the summer.
Edited by adam quantrill on Tuesday 27th March 21:47
Was the pressure readings under load or at idle?
You might find that they will vary especially if there is a blow off valve somewhere in the system.
I also found that the pumps are now getting really hammered on the 520SX - getting close to 55psi fuel pressure and the current drain increases dramatically. So much it took out the original fuse. Ended up using the electric window supplies , one for each pump and that has solved the problem but the current drain is high. Small price to pay for the extra horses though
So when you put your foot down does the window wind down? ;^)
All the plenum pressure readings are taken with full-open throttle. I found that anything less than 90% full throttle, and the plenum pressure drops markedly. So I have to test this on the road under load or the engine wouldn't last too long!
The procedure is to stick it into 4th or 5th and floor it, taking readings as the revs rise.
Just replaced the belt on the 400SX, the part number is a 1360X8MX30, i's an M8 x 30 belt length 1m36.
After "evaluating" 4 belts from Pix over the last 40k miles, and sending one back for analysis after it snapped, Dix eventually said that their belts are not suitable for the application. So don't use Pix belts - they won't last very long.(I was using their PIX-X'ACT ® HTD- Belts).
So now I have just installed a Gates Powergrip HTD 1360-8m-30 at about 50,000 miles so we'll see how long that one lasts.
I took the opportunity to measure the pulleys too:
The drive ratio is therefore 52/22 = 2.36
or 427/183 = 2.33 which aggrees +/-.
So the max rpm of the S102 = 13000 (as I recall) gives an engine rpm of 5500.
After "evaluating" 4 belts from Pix over the last 40k miles, and sending one back for analysis after it snapped, Dix eventually said that their belts are not suitable for the application. So don't use Pix belts - they won't last very long.(I was using their PIX-X'ACT ® HTD- Belts).
So now I have just installed a Gates Powergrip HTD 1360-8m-30 at about 50,000 miles so we'll see how long that one lasts.
I took the opportunity to measure the pulleys too:
| Teeth | Circumference | |
|---|---|---|
| Crank | 52 | 427mm |
| S102 | 22 | 183mm |
The drive ratio is therefore 52/22 = 2.36
or 427/183 = 2.33 which aggrees +/-.
So the max rpm of the S102 = 13000 (as I recall) gives an engine rpm of 5500.
Edited by adam quantrill on Wednesday 5th December 23:05
Hi guys
Just seen the thread- you're a bit premmy replacing your belt Adam - Dennis reckons they're good for 60K miles. I replaced mine as a precaution when I reached that elevated mileage - still got the old one in the boot - looks as good as new!
I'll do some measuring -----No I won't - Dave Haughin was unlikley to have changed the step up ratios without telling me ( He could never keep a secret!) So I don't expect a variation
Funny though - mine runs out of puff at about 4000RPM ( Don't need much more with all that torque)and when they were state of the art this was the accepted wisdom
You've missed Spain AGAIN Adam - when are we going to hear a Sprintex whine in the Gredos Mountains?
Hi Jasper, yeah I'll have to get my act together regarding Spain.
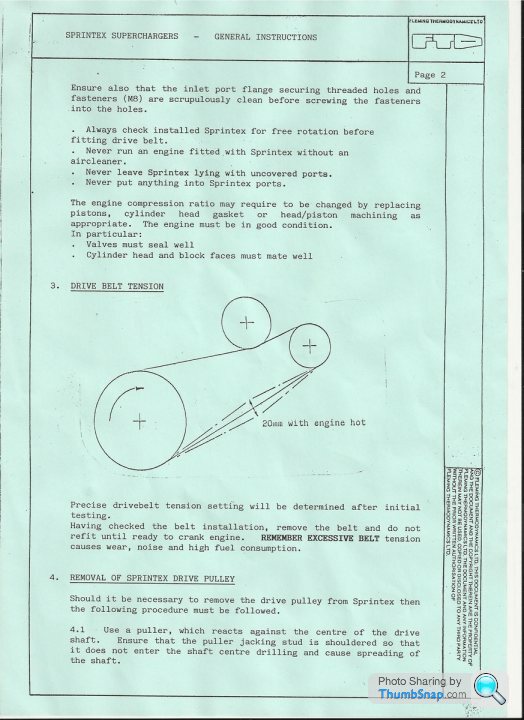
I wonder if the belt snapping was related to my previously tightening it. Having talked to Dennis he recommends that you should be just able to twist the long stretch through 90 degrees by hand when hot.
I also got some data from the belt manufacturers and I worked out that a 13mm deflection should require between 30 and 70 newtons, when taught. So I suppose one method would be to slacken off the idler, then add weights to it. It's just tight enough when an extra 5kg or so gives an extra deflection of 13mm.
As you might recall I installed an air pressure gauge on the plenum, and I still get about 4psi of boost at over 5k rpm. Yours should be a little better than that given it's a 350, so I'm surprised you're running out of oomph at 4k.
P.S. For all you SX wannabe's:
http://cgi.ebay.co.uk/ws/eBayISAPI.dll?ViewItem&am...
Edited by adam quantrill on Monday 17th March 18:14

Changing Spark Plugs
I was expecting a hassle with No. 1 after Jasper's repeated stories about it at various BBWF's... but it turned out to be one of the easiest ones! ;^)
Just need a knuckle end on the spark plug socket, then two extension bars reach under the supercharger, job done in 2 minutes...
Spark plug gap 0.030"
Edited by adam quantrill on Tuesday 28th May 23:48
Supercharger Removal and Refitting
The supercharger bracket is held on with three bolts and three threaded bars that have nuts on the end.
Remove the idler pulley, the belt (let it flop down on the PAS pump), the bolt that goes through the water pump, three nuts on the threaded bars (you'll just see the nuts of course). The other two bolts have hex drive, 6mm, and are close together below the supercharger pulley, and can be very tight.
Remove the various hoses, disconnect the throttle pot, and the accelerator cable.
Then slide the supercharger forward along the threaded bars until it comes free. Some cardboard on the inner wing will protect from scratches.
Refitting is the reversal of removal. ;^)
The two lower hex-drive bolts engage with a special right-angle bracket mounted on the front main cylinder head - which is a stud with a long thread to allow the extra nut to be placed on top. If you have to take of the cylinder head too this bracket has to come off to allow access to the stud nut clamping the head down.
There is a second method, if this is more convenient.
Remove all bolts as above. Also, underneath the supercharger there are 4 allen-=headed bolts holding the blower onto the air collector/bracket. Try getting at the rearward ones first. I found that making a special tool helps here - use a hex drive out of an imact driver set and an 8mm ring ratchet spanner. Superglue the hex drive into the spanner (or else it will drop out). Now you have to slip your arm under the blower from the back until you can feel the bolts. If you can't get your arm in there then you'll have to abandon this method (or find a skinny acomplice). Undo the bolts and you should be able to slide the blower forward leaving the airbox behind.
This second method is useful if you have difficulty making the small right-angle bracket line up with the holes in the airbox to put the two lower bolts in.
in my case I made a whole new bracket that bolts to the block, so I bolted down the air collector first.
... And a third method.
Remove the rear hoses from the blower and undo the lid to the reservoir. Disconnect the throttle pot. Undo the 4 bolts underneath the blower holding it onto the air collector (as above). Undo two allen-headed bolts holding the blower onto the front bracket, and make sure you catch the spacers between the bracket and blower or they will drop somewhere inaccessible!
Then the blower can be stood up on the front end and propped in place with (for example) a jack handle.
This allows access to the rocker cover and nearside manifold.
When refitting the blower, before fully tightening the bolts, tension the belt and run the engine on idle, to make sure the belt rides centrally on the pulleys rather than butting up to the lips (which will wear it at the edge). If it rides OK then stop the engine, finish tightening all the bolts and check the belt tension.
Be very careful to re-fit the spacers between the blower and the bracket - they are about 10mm long, thick tubes. The seal when the bolt is installed is not enough to keep the oil in the blower. The spacers form a seal between the bolt, bracket, and housing and should stop leaks from this area.
Edited by adam quantrill on Sunday 24th July 19:55


adam quantrill said:
So now I have just installed a Gates Powergrip HTD 1360-8m-30 at about 50,000 miles so we'll see how long that one lasts.
So that was fitted in Dev 2012, it's now been 3 years and the belt has stretched almost to the point of being unusable, but not quite snapped. And around 20k miles.When the belt does slack you get all sorts of weird vibrations as it slaps about. A new one has just been ordered - £20 off the flea.
OK so the new belt fitted but the tensioner was at the end of its travel. So it was not that tight, and not going to last long.
I decided to get a shorter belt. The choices are 169 an 168 teeth.
I got a 168 tooth belt which only just goes over the pulley edges - if you out it on the crank first then tweak it over the blower pulley. With this on the tensioner is at a healthy height now.
I think the main crank pulley has been worn down a bit over time, which means the belt gets slacker. Let's see how it lasts - fitted at 75k miles.
Gassing Station | Wedges | Top of Page | What's New | My Stuff