My nightmare... errr restoration thread.
Discussion


Brap_Brap said:
wooly350i said:
i would not galvanize a chassis, after seeing an example of a chimeara one in the flesh, which had been drilled to let the heat out during the galvanizing process. Result = a well twisted chassis beyond repair!
That's very good information! Is there a thread with pics and such? I'm just thinking that the wedge forum might/should have a "do's and dont's" sticky topic listing such suicidal "fixes".Brap_Brap said:
V8TVR1978 said:
Looking very good there Mike. Keep up the good work and soon you will be back on the road. Hope you get a chance to drive it before the snow flys around here.
I guess you weren't here when it snowed 3 times already? Lucky you.Not much to say today other than that I got my tanks done, fuel system in, and the pile of parts to put on is pretty small, as shown in pics below. 

Whatever original fuel pump mounting hardware that came with the car never came into my possession, so I remounted the pump in foam for anti-vibe protection... I re-used my old fuel filter too, it only has about 2,000 miles on it.

There's 2 fuel filters there, one low pressure and see-through to monitor rust in the swirl pot and/or tanks, the other is a high pressure filter.


I'm kinda stumped here. The handbrake line seems to be the right length and distance between handbrake calipers, but I'm damned if I can remember how it all fit into the bracket atop my diff. Hints, pictures and ideas are appreciated.

Here's how things are sitting at the end of the day...


The pile of parts left to put on the car is dwindling quickly. The only major part to put back on is the body!
Whatever original fuel pump mounting hardware that came with the car never came into my possession, so I remounted the pump in foam for anti-vibe protection... I re-used my old fuel filter too, it only has about 2,000 miles on it.
There's 2 fuel filters there, one low pressure and see-through to monitor rust in the swirl pot and/or tanks, the other is a high pressure filter.
I'm kinda stumped here. The handbrake line seems to be the right length and distance between handbrake calipers, but I'm damned if I can remember how it all fit into the bracket atop my diff. Hints, pictures and ideas are appreciated.
Here's how things are sitting at the end of the day...
The pile of parts left to put on the car is dwindling quickly. The only major part to put back on is the body!
Edited by Brap_Brap on Monday 26th October 03:13
Is this any help? I have seen suggestion on here that it might help to have a spring on the inner cable between the levers to help the brakes back off.. 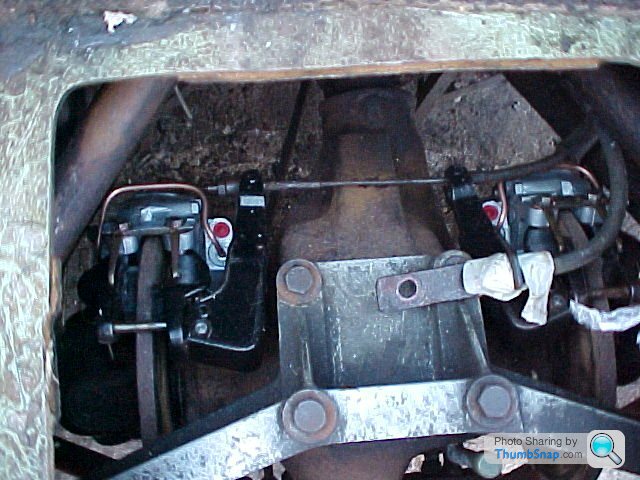
You'll note that I have an access hatch in the boot/trunk floor. It wasn't me but very handy. The brakes have been for a number of years the shiniest bit on the car. I hope to start the rebuild next year but you have set the standard for quality so looks like I will have to make more of an effort.

You'll note that I have an access hatch in the boot/trunk floor. It wasn't me but very handy. The brakes have been for a number of years the shiniest bit on the car. I hope to start the rebuild next year but you have set the standard for quality so looks like I will have to make more of an effort.
You'll note that I have an access hatch in the boot/trunk floor. It wasn't me but very handy. The brakes have been for a number of years the shiniest bit on the car. I hope to start the rebuild next year but you have set the standard for quality so looks like I will have to make more of an effort.
That is the comment that is nice to see on any topic. It is the truth also.
That is the comment that is nice to see on any topic. It is the truth also.

Thanks for that Barrington. Your picture made me realise that I`ve f`d up my rear brake lines. I used to have a lot of pictures of it all, but once my laptop died I lost a lot of reassembly references.
Edit... actually, upon closer inspection, we`ve got the same plumbing for brake fluid. The way mine was routed had one less connection... good enough for me.
Edit... actually, upon closer inspection, we`ve got the same plumbing for brake fluid. The way mine was routed had one less connection... good enough for me.
Edited by Brap_Brap on Saturday 31st October 23:37
adam quantrill said:
Good spot - the last thing you want is to try all the brakes out on the MOT (or equivalent) machine - you will do that won't you - then go barreling down the road, and the rear line has fractured, and the pedal goes to the floor....
LOL...MOT machine? No such thing here... no emissions testing... no laws against complete "non-mechanically inclined" doing their own brake jobs etc etc.With the laws here, a complete idiot could take a used WORN OUT part from a donor car at the boneyard, install it and likely pass a safety inspection.
I actually find this all surprising. Canada wont allow my to import many foreign cars because the do not meet our crash standards, yet at the same time I can work on my own car in a substandard manner quite legally.
For instance, if "canada customs" had actually looked at what TVR calls a "bumper" the car would fail upon importation.
Edited by Brap_Brap on Tuesday 3rd November 05:08
I haven't had the time to post many pictures, but over the past few days this has been accomplished.


A very filthy and disgusting engine bay!

It's far from perfect, but I did manage to get it this clean

I forgot to take a pic of the repair job, but here's a pic of the prep-work I did to my footwell for a GRP patch. It turned out rather nicely.
Today the body went back on, which is a good thing. It felt like a major hurdle and passing it was a relief.

Under the stap on the bottom of the body I used a 2x4 to stop the crushing force of the strap.

When I lifted the body off I ran the strap up and over the plenum which wasn't ideal. This time putting the body back on, my buddy Jay, a former professional rigger for heavy loads suggested this method, with a choker around each wheel well. It left enough space for the engine without scratching anything or breaking anything. It's nice to have clever friends.


To roll the chassis under the body we used a pallet jack last time, ie: the body off... this time lacking a pallet jack we used an engine stand with the upright portion removed to slide the chassis around.

The engine bay looks SO MUCH BETTER with an engine!

Done deal! On to the next phase!
All in all, I found this method to be an excellent budget lift method.
A very filthy and disgusting engine bay!
It's far from perfect, but I did manage to get it this clean
I forgot to take a pic of the repair job, but here's a pic of the prep-work I did to my footwell for a GRP patch. It turned out rather nicely.
Today the body went back on, which is a good thing. It felt like a major hurdle and passing it was a relief.
Under the stap on the bottom of the body I used a 2x4 to stop the crushing force of the strap.
When I lifted the body off I ran the strap up and over the plenum which wasn't ideal. This time putting the body back on, my buddy Jay, a former professional rigger for heavy loads suggested this method, with a choker around each wheel well. It left enough space for the engine without scratching anything or breaking anything. It's nice to have clever friends.
To roll the chassis under the body we used a pallet jack last time, ie: the body off... this time lacking a pallet jack we used an engine stand with the upright portion removed to slide the chassis around.
The engine bay looks SO MUCH BETTER with an engine!
Done deal! On to the next phase!
All in all, I found this method to be an excellent budget lift method.
Edited by Brap_Brap on Monday 16th November 03:41
Edited by Brap_Brap on Monday 16th November 03:53


Gassing Station | Wedges | Top of Page | What's New | My Stuff