Discussion


Temporary 4.2 BV engine is now in place with the help of Mr Zig - Thanks Mark, you know to dress a bit warmer next time you pop round!

I've left this engine wet sumped; the dry sump tank and hoses are still on the car but plugged in the engine bay ready for when the original engine is back up and running.
You can see the difference in crank pulley size in this pic, needed to clear the race chassis cross brace.

I've left this engine wet sumped; the dry sump tank and hoses are still on the car but plugged in the engine bay ready for when the original engine is back up and running.
You can see the difference in crank pulley size in this pic, needed to clear the race chassis cross brace.

I'll still be in with a chance for the rat car... I've been concentrating on the mechanical bits and bringing everything back to life - I'm starting to like the rat look! All I've done with the body is clean it.
I'm in the p[rocess of replacing the body mountings, in particular the washers inside the footwells were well dissolved:
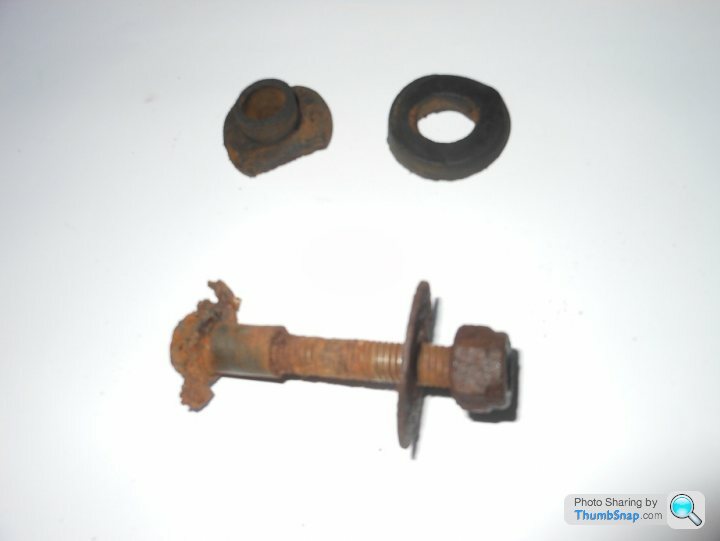
I need to replace the sleeves on the bolts; they're approx 10mm ID, 12.5 OD and 20mm long. I thought it would be easy to source these compression limiter/bushes - but not so! Anyone know where to get some? I could do with new rubbers too, anyone know a source for them as well?
I'm in the p[rocess of replacing the body mountings, in particular the washers inside the footwells were well dissolved:
I need to replace the sleeves on the bolts; they're approx 10mm ID, 12.5 OD and 20mm long. I thought it would be easy to source these compression limiter/bushes - but not so! Anyone know where to get some? I could do with new rubbers too, anyone know a source for them as well?
No response on the body mounts; I can get oilite bushes in the sizes I need for the spacers so I'll go with that - seems overkill though! I'll re-use the body rubbers for the time being but they are compressed so not doing their job properly any more, hopefully I'll find a source in due course.
Tyre time, 245/45 ZR16

Unsurprisingly after 18 years they're cracked and as hard as nylon; frustrating though as the tread is OK. The fronts look like they've never been used, when I found the car it had the old worn out front tyres on the bootlid ducktail. I can get Toyos, Continentals and Fuldas. It's got Fulda currently, but my tyre place favours Toyos, as does various internet sites and user reports, so I'm going with that. Apparently it's a Porsche size, £145 each... ouch!
Proof if anyone needs it that Mercedes wheels fit... and a view of the steamroller tyres.

Comedy wheelage while I get the rims/tyres sorted - has anyone tried driving on these spacesaver spares? Looks scary to me!

Tyre time, 245/45 ZR16
Unsurprisingly after 18 years they're cracked and as hard as nylon; frustrating though as the tread is OK. The fronts look like they've never been used, when I found the car it had the old worn out front tyres on the bootlid ducktail. I can get Toyos, Continentals and Fuldas. It's got Fulda currently, but my tyre place favours Toyos, as does various internet sites and user reports, so I'm going with that. Apparently it's a Porsche size, £145 each... ouch!
Proof if anyone needs it that Mercedes wheels fit... and a view of the steamroller tyres.
Comedy wheelage while I get the rims/tyres sorted - has anyone tried driving on these spacesaver spares? Looks scary to me!

I have the same size of tyres on my SEAC 245/45/ZR16, I drive on BF Goodridge and Toyo and dont cost over a 100 quid.
When I lifted the body up on my SEAC the body sat on rubber sheets onto the chassis with large washers inside the body floor, dose you body site on the chassis with proper rubber mounts?
Car is coming along nicly Hatter....
Cambelt
When I lifted the body up on my SEAC the body sat on rubber sheets onto the chassis with large washers inside the body floor, dose you body site on the chassis with proper rubber mounts?
Car is coming along nicly Hatter....
Cambelt
My body was mounted in the same manner as Campbell's.
I obtained various thicknesses of nitrile rubber jointing sheet material from a local stockist. factory advice was to start at the front and work backwards. The body is slightly flexible and this sequence allows you to adjust rubber thicknesses to get best door gaps etc.
Rgds
Hamish
I obtained various thicknesses of nitrile rubber jointing sheet material from a local stockist. factory advice was to start at the front and work backwards. The body is slightly flexible and this sequence allows you to adjust rubber thicknesses to get best door gaps etc.
Rgds
Hamish
My body mounts do have the sheets of rubber between the body and the chassis; but the holes on the body are about 20mm diameter and there's a top hat rubber bush in that, plus a compression limiter down to the chassis. I've got some rubber bushes to put it together now, thanks Dave (Barrington)!
I thought of just chopping tube to length, but I don't have a lathe to part it off and I didn't reckon my chances of hacksawing a tube to a square end. I've got the overkill oilites and they'll do the job nicely.
I'm getting frighteningly close now... tyres fitted (couldn't get them any cheaper!), windscreen fitted (good deal, I found a local guy who used to fit screens at a TVR dealer), and front panel in place.

I struggled with getting a number plate with adhesive on the front so had to get a conventional vinyl one and use double sided adhesive sheet; not ideal but not too bad. I mounted the plastic panel with velcro to avoid unsightly screw heads.

A couple of jobs to get me to an MOT, the bonnet is cracked so needs some attention and the new engine I put in is not running right (it was running better when first installed); I suspect stale fuel is working it's way around the system so I've got more flushing and cleaning to do. I suspect the issue is the right hand tank, I can't get it off to clean it properly without lifting the body off the chassis... my plan has been to keep flushing it out but I'm not sure it's worked yet. Fortunately my carb fed X1/9 is quite happy running on the stale fuel I pump out of the SEAC!
I thought of just chopping tube to length, but I don't have a lathe to part it off and I didn't reckon my chances of hacksawing a tube to a square end. I've got the overkill oilites and they'll do the job nicely.
I'm getting frighteningly close now... tyres fitted (couldn't get them any cheaper!), windscreen fitted (good deal, I found a local guy who used to fit screens at a TVR dealer), and front panel in place.
I struggled with getting a number plate with adhesive on the front so had to get a conventional vinyl one and use double sided adhesive sheet; not ideal but not too bad. I mounted the plastic panel with velcro to avoid unsightly screw heads.
A couple of jobs to get me to an MOT, the bonnet is cracked so needs some attention and the new engine I put in is not running right (it was running better when first installed); I suspect stale fuel is working it's way around the system so I've got more flushing and cleaning to do. I suspect the issue is the right hand tank, I can't get it off to clean it properly without lifting the body off the chassis... my plan has been to keep flushing it out but I'm not sure it's worked yet. Fortunately my carb fed X1/9 is quite happy running on the stale fuel I pump out of the SEAC!
Edited by The Hatter on Saturday 18th May 19:08
I finally sorted the rough running engine; there was anti-freeze inside the AFM, giving intermittent dodgy signals and overfueling the engine. I can only guess how on earth it got there!! You can see droplets of it on the circuit board:

Now I need to sort the crack in the bonnet:

It makes the bonnet sag and it doesn't line up with the nosecone. It's been caused by someone tryiing to crowbar the bonnet open; I guess in an attempt to steal the car. The bonnet construction is Kevlar woven sheet, with the 'shark gill' vents moulded seperately (but still in kevlar) and bonded in with GRP.

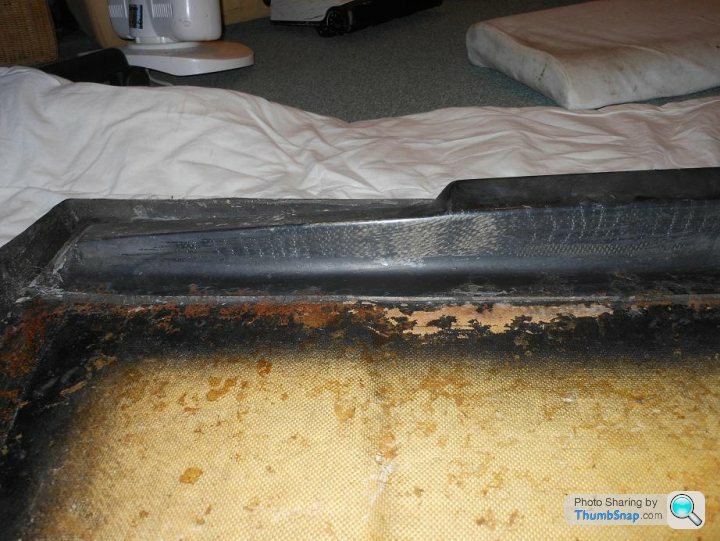
The leading and trailing edge re-inforcements are carbon fibre:
The leading edge re-inforcement has broken away in the area of the crack, and it's presence means I can't get to the back of the crack:

I have no intention of cutting the re-inforcement off, so for now I'll bond the re-inforcement back into place and then repair the crack from the front in due course.
This repair of course doesn't affect the MOT... IT'S NOW INSURED FOR THE ROAD AND THE MOT IS BOOKED FOR JUNE 10TH... it's been off the road since 1995 - scary!
Now I need to sort the crack in the bonnet:
It makes the bonnet sag and it doesn't line up with the nosecone. It's been caused by someone tryiing to crowbar the bonnet open; I guess in an attempt to steal the car. The bonnet construction is Kevlar woven sheet, with the 'shark gill' vents moulded seperately (but still in kevlar) and bonded in with GRP.
The leading and trailing edge re-inforcements are carbon fibre:
The leading edge re-inforcement has broken away in the area of the crack, and it's presence means I can't get to the back of the crack:
I have no intention of cutting the re-inforcement off, so for now I'll bond the re-inforcement back into place and then repair the crack from the front in due course.
This repair of course doesn't affect the MOT... IT'S NOW INSURED FOR THE ROAD AND THE MOT IS BOOKED FOR JUNE 10TH... it's been off the road since 1995 - scary!
The Hatter said:
No response on the body mounts; I can get oilite bushes in the sizes I need for the spacers so I'll go with that - seems overkill though! I'll re-use the body rubbers for the time being but they are compressed so not doing their job properly any more, hopefully I'll find a source in due course.
Tyre time, 245/45 ZR16
Ho ho ho - that's ironic - "find a source in due course" then you show a picture of the source - yes, you chop up the old tyres! I did this and the rubber you get is great for body rubber. Also - is that your X1/9 or SS1 in the background?Tyre time, 245/45 ZR16

 ...Well done mate..I bet you are grinning from ear to ear...Ziga
Gassing Station | Wedges | Top of Page | What's New | My Stuff