Discussion


Interesting... the 390SE ran 93.5mm bores to give 3905cc, whereas Landrover's '3.9' used 94mm bores to give 3948cc.
My 390 engine had done 101K and was on its original flat-topped pistons when I rebuilt it due to bore scoring caused by fractured rings. Apart from the scores the bores were as near unworn as you could wish for; no step at all at the top and no ovalling. I actually sold the pistons on Ebay for more than the (94mm) replacements cost me!
My 390 engine had done 101K and was on its original flat-topped pistons when I rebuilt it due to bore scoring caused by fractured rings. Apart from the scores the bores were as near unworn as you could wish for; no step at all at the top and no ovalling. I actually sold the pistons on Ebay for more than the (94mm) replacements cost me!


I'm glad folks are enjoying the thread; I'm enjoying working on the car too...
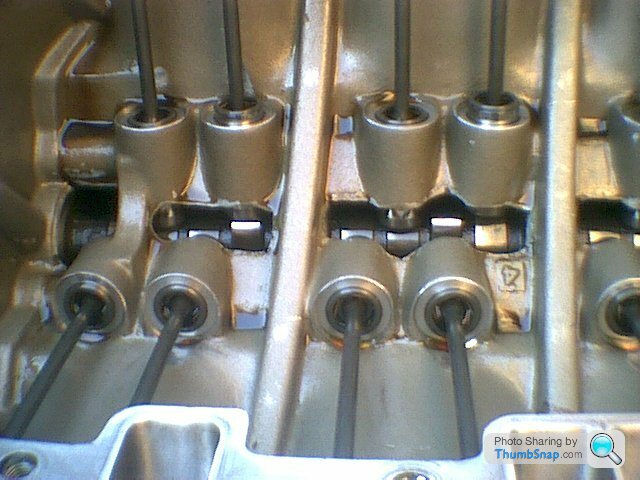
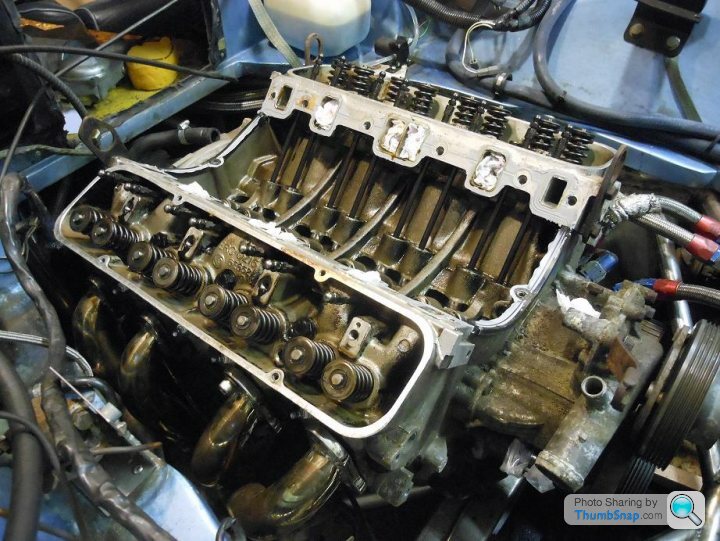
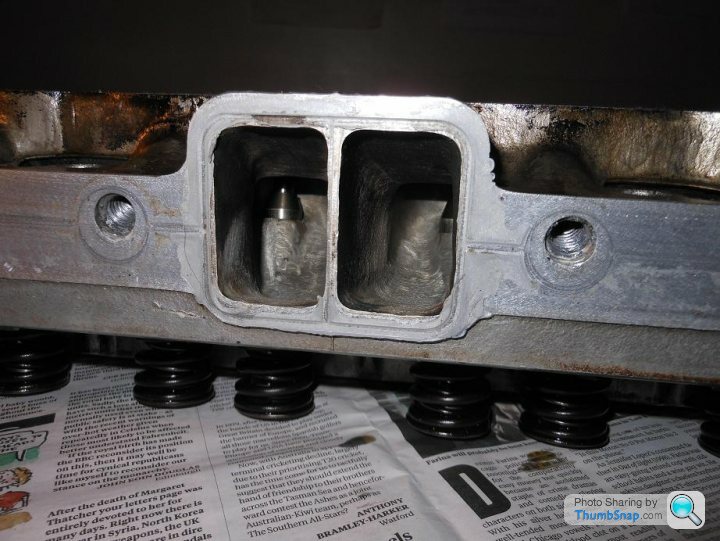
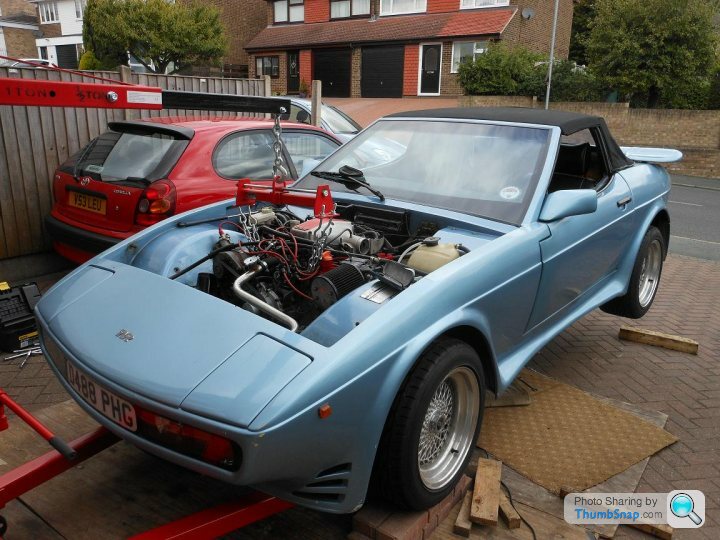
I'll take pics of the valve runners and throats when the heads are stripped, that shouldn't be long. The thin blade between the centre ports on my engine is the same as Ian's as you can see in this pic with the engine in the car:
I've now got the cam out, it's heavily worn:
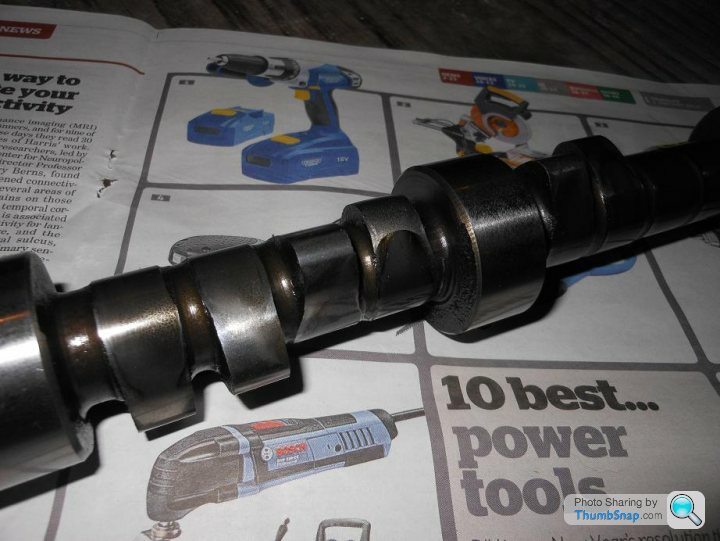
And wasn't difficult to identify:

H234 but running solid lifters...hmmm!! Are there any experts out there who can explain that?
I'll take pics of the valve runners and throats when the heads are stripped, that shouldn't be long. The thin blade between the centre ports on my engine is the same as Ian's as you can see in this pic with the engine in the car:
I've now got the cam out, it's heavily worn:
And wasn't difficult to identify:
H234 but running solid lifters...hmmm!! Are there any experts out there who can explain that?
The Hatter said:
I'm glad folks are enjoying the thread; I'm enjoying working on the car too...
I'll take pics of the valve runners and throats when the heads are stripped, that shouldn't be long. The thin blade between the centre ports on my engine is the same as Ian's as you can see in this pic with the engine in the car:
I've now got the cam out, it's heavily worn:
And wasn't difficult to identify:
H234 but running solid lifters...hmmm!! Are there any experts out there who can explain that?
It lets you individually adjust each valve rather than an entire bank of valves (preload).I'll take pics of the valve runners and throats when the heads are stripped, that shouldn't be long. The thin blade between the centre ports on my engine is the same as Ian's as you can see in this pic with the engine in the car:
I've now got the cam out, it's heavily worn:
And wasn't difficult to identify:
H234 but running solid lifters...hmmm!! Are there any experts out there who can explain that?
Does have the disadvantage that you now need to frequently adjust the valves though.
Hi Martin from San Francisco.... 
That cam looks to be in the same sort of condition to the one in the 500 engine when I got it. You will recall the case hardening had gone on 2 cylinders but due to lack of oil because of the casting and incorrect pre load setting!
As that cam is toast are you going for a Stealth cam?
Chris
That cam looks to be in the same sort of condition to the one in the 500 engine when I got it. You will recall the case hardening had gone on 2 cylinders but due to lack of oil because of the casting and incorrect pre load setting!
As that cam is toast are you going for a Stealth cam?
Chris
Hi Chris,
I hope things are going to plan in the states! I haven't decided what to do with the engine yet but one possibility is to rebuild using the same type of cam and follower that I took out; although it is a racing cam... Established wisdom is that it's intractable for the road but it is supposedly the cam used originally in SEACs. I assume (maybe foolishly!) that the rest of the engine/ECU/injectors/AFM/porting is set up for the 234 cam so it's quite tempting to replace like with like. Chris Schirle said the bottom end is balanced so at least it should like high rpms...
I hope things are going to plan in the states! I haven't decided what to do with the engine yet but one possibility is to rebuild using the same type of cam and follower that I took out; although it is a racing cam... Established wisdom is that it's intractable for the road but it is supposedly the cam used originally in SEACs. I assume (maybe foolishly!) that the rest of the engine/ECU/injectors/AFM/porting is set up for the 234 cam so it's quite tempting to replace like with like. Chris Schirle said the bottom end is balanced so at least it should like high rpms...
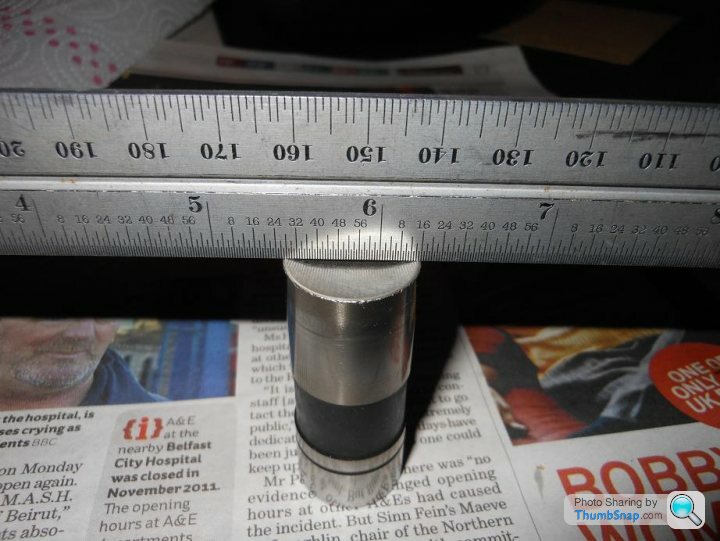
I've managed to extract the offending cam follower through into the block; it's pretty well worn and the edge is chewed up which explains it being unwilling to come out through the top:
They are undoubtably solid lifters; they are hollow but there is a solid stack up between where the surface runs on the cam and the pushrod pocket.
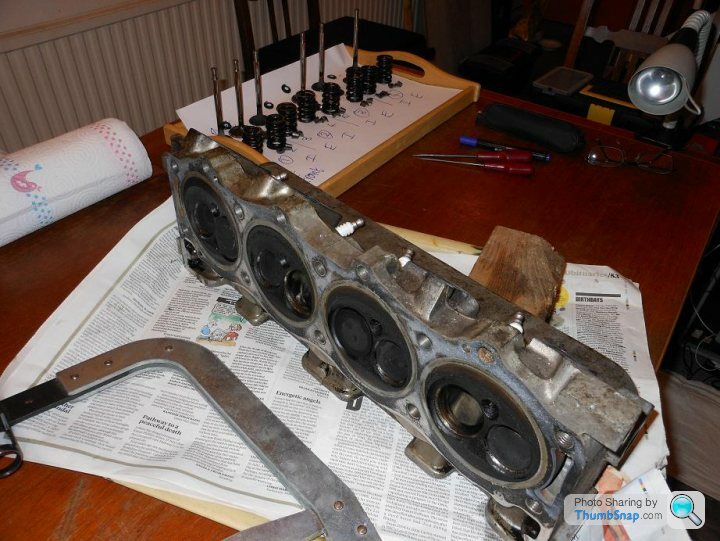
I've started stripping the heads now, the porting is pretty extensive and the valve guides are a large diameter:
I've got most of the valve gear out of the first head, although two of the valve stems have slight burrs under the collet features and won't withdraw through the guides - slight work with a stone is needed. I'm not sure yet what the implications of this might be...
They are undoubtably solid lifters; they are hollow but there is a solid stack up between where the surface runs on the cam and the pushrod pocket.
I've started stripping the heads now, the porting is pretty extensive and the valve guides are a large diameter:
I've got most of the valve gear out of the first head, although two of the valve stems have slight burrs under the collet features and won't withdraw through the guides - slight work with a stone is needed. I'm not sure yet what the implications of this might be...
Edited by The Hatter on Sunday 12th January 21:43

Hi Martin
Making good work on that strip down, there shouldnt be any probs using a stone on the edge of the valve to help it out of the stem, the valves should be SS and stage3 with heavy porting but i would check for woren valve stems, you may have a few of them as i did, did your car have ajustable, correction just checked the pics and it does have ajustable push rods, they may have been badly ajusted and not often enough plus TVR back in the day pushed moble1 oil which was fine for the racing Tuscan with te rv8 running at high revs all the time but out engings with hi lift cams just got the lobes chewed off, good oil wrong application, this would explain the tapets and cam looking like crap as mine looked just as bad on hydraulic tapets, i know you said you would put back and new kent 243 but it will drive like crap on the road and have no bottom end, would be best with the next one down, kent 223...still a little peaky but with better manners but dosnt like a low tick over
The solid lifters were an option at the time and allowed the enging to rev upto 7k ish safely and the hydraulics and good to 6k safe, more than enough
Depending upon if you stick to the flapper or go modern you could see power between 280 and 300bhp wth good torque but the kent 243 will make it very racey.
Keep up the good work and im watching with interest
Just a quick note on my 420SEAC with a fully working flapper produced around 280bhp 290torque but with a fully mapped tuned system 300bhp and 330torque and way better enging feel.
Cambelt
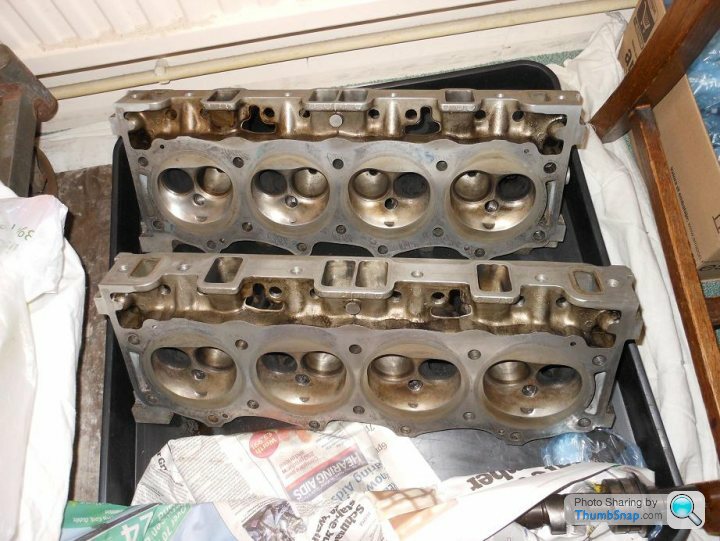
Getting on with the heads, I got the valves out of the heads with a little dremmel assist. Clean up time, looking very good:
I'm not one for polishing the outside of an engine but I can get excited about the inside of an engine...sad!
Adam, I have the Hardcastle books, they're interesting reading...
Campbell, I'm leaning towards a rebuild using the same spec as original, though I'm thinking that a trigger wheel programmable ignition system would be wise... Food for thought!
Edited by The Hatter on Wednesday 5th February 22:30
Nice work Martin, the porting work looks very similar to the condition of the Gredge motor when we got it. I thought very carefully about the after market ECU route when the motor was out. Thing is the power and numbers I am getting now is more that enough for road use for me but who knows for the future !!! I saw a Chim with SC Power blower on a 500 at Torque Developments with Emerald .... it was doing 480 with the minimum boost as they were aiming for 500 with a slightly bigger pulley which was having to be made!!
As I am back from Ca we will have to meet up some time fella
Chris
As I am back from Ca we will have to meet up some time fella
Chris
I've realised that I'm running out of time to get the original engine back into the car for this summer so I decided to put the car back on the road as it is with the surrogate 4.2 engine. I've not had it running very well so I thought I'd invest in an AFR meter to get the engine running properly:
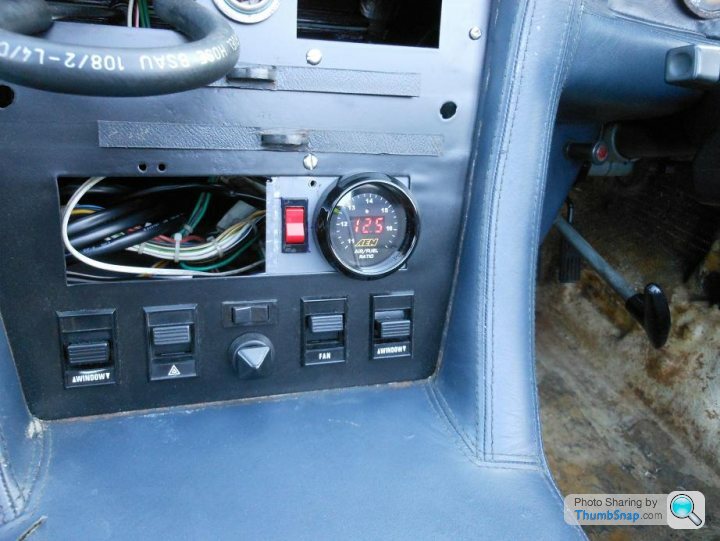
A wonderful investment; took me about 30 mins playing with the AFM to get something reasonable and it now drives very well. It was previously very rich at idle and very lean on part throttle so not surprisingly was coughing when the throttle was opened; it's now much smoother and I know the engine's not leaning out at the top end when floored.
So now I'm MOTed, insured and taxed and ready for the Burghley House 'do' in April...
Hi all,
I've just got one of these for the sx, so I'm also interested where you have located the sensor.
http://wbo2.com.au/2c0/default.htm

For now I can read the info on the laptop...
This will also plug into a megasquirt for future upgrades.
Cheers
Adam
I've just got one of these for the sx, so I'm also interested where you have located the sensor.
http://wbo2.com.au/2c0/default.htm
For now I can read the info on the laptop...
This will also plug into a megasquirt for future upgrades.
Cheers
Adam
Certainly worth having - to set up the engine. My plan is to remove it from the SEAC and rotate it around my other cars to check them out; if the SEAC starts misbehaving I'll re-install it. I'm watching the gauge like a hawk at the moment but I suspect I'll get bored of that!
When I had the exhaust made I got an M18 port put into each manifold just ahead of where they bolt up to the centre section. They're welded in such that the sensor is close to horizontal; that's against the installation guides for the sensors (they should be within 70 Deg of vertical to avoid condensation build up) but I figured I'd be installing them briefly rather than permanently so easy access was more important. I suspect that the proximity to the engine means the heat drives off the moisture anyway. I have some experience of these sensors at work and they are OK for short periods when not vertical.

Looking at the car now I think it would be possible to install the sensor(s) vertically either side of the bellhousing; I'd do that if I was looking for a permanent install.
When I had the exhaust made I got an M18 port put into each manifold just ahead of where they bolt up to the centre section. They're welded in such that the sensor is close to horizontal; that's against the installation guides for the sensors (they should be within 70 Deg of vertical to avoid condensation build up) but I figured I'd be installing them briefly rather than permanently so easy access was more important. I suspect that the proximity to the engine means the heat drives off the moisture anyway. I have some experience of these sensors at work and they are OK for short periods when not vertical.
Looking at the car now I think it would be possible to install the sensor(s) vertically either side of the bellhousing; I'd do that if I was looking for a permanent install.
Hi Martin ... interesting .. I have two lambdas fitted, one in each bank down pipes which the 14CUX ECU uses to trim the fuelling at low rpm. For a meter like this I would need another port after the "Y" in the exhaust. I assume the closer to the manifold the better but takes account of both banks?
Time to work on the SEAC again as the winter sets in... I've been driving it about but getting first, third and fifth was getting a bit of a joke - the gearchange remote bushes were on their way out. They looked fine last time I had the engine out but apparently not.
So; polybushes to replace the dodgy rubber ones, two sets needed as on this car there seems to be extra ones on the top fixings which I guess pushes the gearlever rearwards and down. More importantly it would have fouled the centre console if I hadn't have replaced the bushes as I'd found them.
I thought it would be an easy-ish job from underneath, however the 'side' bolts on the remote linkage lined up precisely with the vertical chassis rails - which are closer together than a regular wedge due to the narrow central spine and wider seats. So there was no way I could get the bolts out without slinging the engine and moving it forwards a tad to be able to get the bolts out...
Easier said than done but I got there in the end!
Now into the next phase... plan is to get the original engine back into the car over the winter. I've been running the surrogate 4.2 with the flapper injection and an air/fuel ratio meter on the dash. It's apparent that the flapper is not very good at controlling the fueling. It's fine at full throttle and barks and pops like a demon, but at idle and part loads the fueling is way off. I'm very tempted by megasquirt; so I have bought a kit for the 350i to see how it goes...
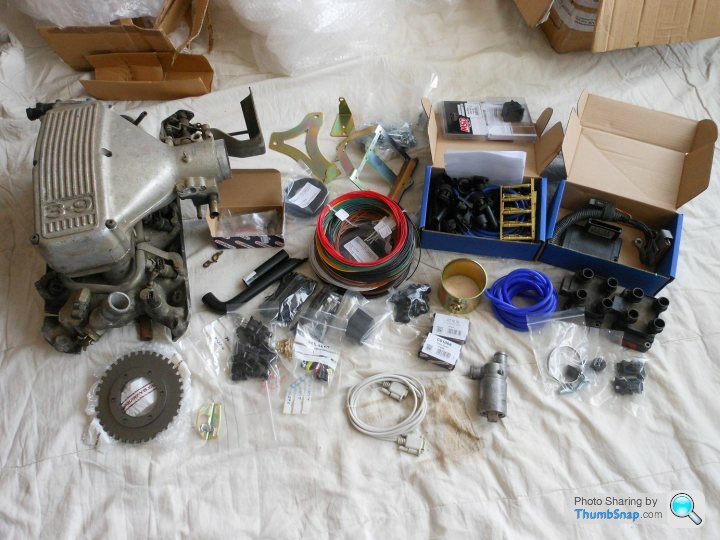
I'm going to fit hotwire injectors (to get rid of the resistor pack), trigger wheel ignition, PWM cold start valve, Lambda sensor(s) and completely replace all the wiring. I'll then have fun and games tuning the thing on a laptop using the lamda sensor. If it's successful on the 350i then I'll probably fit it to the SEAC - and hopefully I'll be able to tame the race cam and solid lifter combo.
So; polybushes to replace the dodgy rubber ones, two sets needed as on this car there seems to be extra ones on the top fixings which I guess pushes the gearlever rearwards and down. More importantly it would have fouled the centre console if I hadn't have replaced the bushes as I'd found them.
I thought it would be an easy-ish job from underneath, however the 'side' bolts on the remote linkage lined up precisely with the vertical chassis rails - which are closer together than a regular wedge due to the narrow central spine and wider seats. So there was no way I could get the bolts out without slinging the engine and moving it forwards a tad to be able to get the bolts out...
Easier said than done but I got there in the end!
Now into the next phase... plan is to get the original engine back into the car over the winter. I've been running the surrogate 4.2 with the flapper injection and an air/fuel ratio meter on the dash. It's apparent that the flapper is not very good at controlling the fueling. It's fine at full throttle and barks and pops like a demon, but at idle and part loads the fueling is way off. I'm very tempted by megasquirt; so I have bought a kit for the 350i to see how it goes...
I'm going to fit hotwire injectors (to get rid of the resistor pack), trigger wheel ignition, PWM cold start valve, Lambda sensor(s) and completely replace all the wiring. I'll then have fun and games tuning the thing on a laptop using the lamda sensor. If it's successful on the 350i then I'll probably fit it to the SEAC - and hopefully I'll be able to tame the race cam and solid lifter combo.
Gassing Station | Wedges | Top of Page | What's New | My Stuff