is there anybody there
Discussion


While looking through my youtube channel i found these images, These pics were taken about 2 days after the fire which damaged the TVR,
https://youtu.be/6o1yqA0ixk8
https://youtu.be/6o1yqA0ixk8
Hi Jim,
it's gonna be a long road, but you will get there in the end. Just be methodical, and photograph and label EVERYTHING, and note where you store the removed parts. A dismantled car takes up an awful lot of space.
The hardest part is keeping up the motivation, but keep making small steps and you will have something to be proud of, and to enjoy at the end.
Good luck.
glenrobbo said:
Hi Jim,
it's gonna be a long road, but you will get there in the end. Just be methodical, and photograph and label EVERYTHING, and note where you store the removed parts. A dismantled car takes up an awful lot of space.
The hardest part is keeping up the motivation, but keep making small steps and you will have something to be proud of, and to enjoy at the end.
Good luck.
Thanks mate, all removed parts are being moved out of the garage to a dedicated shed at home to give me more room, as you can see its a bit cramped, check out the Url labeled TVR, regards jim.it's gonna be a long road, but you will get there in the end. Just be methodical, and photograph and label EVERYTHING, and note where you store the removed parts. A dismantled car takes up an awful lot of space.
The hardest part is keeping up the motivation, but keep making small steps and you will have something to be proud of, and to enjoy at the end.
Good luck.
barnsweeper said:
Heres the conclusion.
https://youtu.be/LA1DRsaPMmc
That's a hell of a conversion, from a beat up boat to a Chimaera !https://youtu.be/LA1DRsaPMmc
Think the link is wrong Barnsweeper ;-)
Barreti said:
That's a hell of a conversion, from a beat up boat to a Chimaera !
Think the link is wrong Barnsweeper ;-)
Hi mate try this link.Think the link is wrong Barnsweeper ;-)
https://youtu.be/6o1yqA0ixk8 Jim.
barnsweeper][url said:
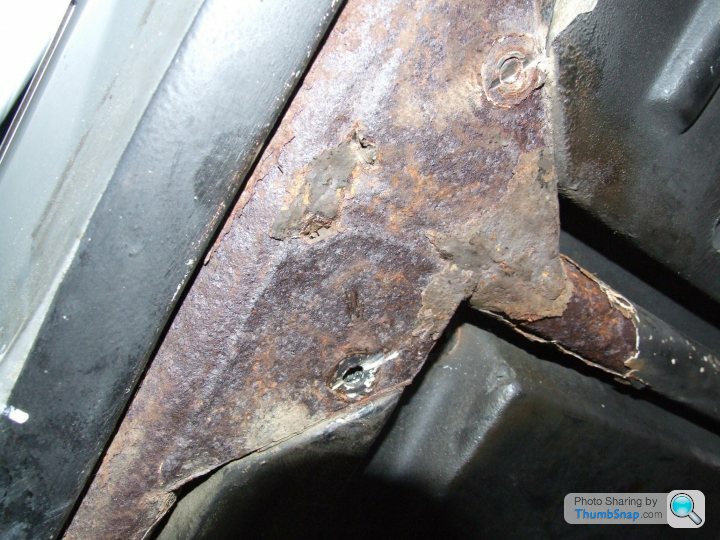 |http://thumbsnap.com/NWm61JwG[/ukorl]
This PIC shows the o/s outriggers
Edited by barnsweeper on Sunday 21st June 09:16

J400GED said:
Hi Jim, sorry mate but I think you should prepare yourself for bad news on the outriggers. I hope I'm wrong but that outrigger in the pic doesn't look good.
Hi Ged I'm always prepared for bad news, its like a horror story when I crawl under the car, I am usually prepared for the worst scenario possible, I've hit the outriggers with a hammer and there is no holes so far, how thick the metal is I don't know, as soon as the chassis is out and stripped its off to xworks for there expert opinion, if it needs outriggers then so be it, Jim.J400GED said:
If you're lifting the engine before the body, don't forget:
The earth strap to the RH outrigger through the RH wheel arch
The main exhaust and Y-piece.
Fuel feed and return hoses at the RH top rear of the engine (near the Heater hoses area)
Front removable cross brace in front of the engine
Rear removable cross brace (under the gearbox but across the chassis back bone
Engine mounts - once you have taken the weight of the engine! these will make things easier if you can remove them completely, leaving the engine mounted portion of the bracket in situ (if you see what I mean)
Gearbox mounts
Prop shaft should slide out as you lift the engine - just protect it from hitting too much
Gearbox remote lever - on top of the gearbox accessed from inside the car.
Bear in mind it is very "snug" and will take some jiggling to get the engine and gearbox through and out.
Probably best to remove the radiator as well
Hope this helps
Ged
Hi Ged when removing the remote gear linkage how many fastenings are there, I presume one at each end and the gearlever itself, would that be right or is there more? Jim.The earth strap to the RH outrigger through the RH wheel arch
The main exhaust and Y-piece.
Fuel feed and return hoses at the RH top rear of the engine (near the Heater hoses area)
Front removable cross brace in front of the engine
Rear removable cross brace (under the gearbox but across the chassis back bone
Engine mounts - once you have taken the weight of the engine! these will make things easier if you can remove them completely, leaving the engine mounted portion of the bracket in situ (if you see what I mean)
Gearbox mounts
Prop shaft should slide out as you lift the engine - just protect it from hitting too much
Gearbox remote lever - on top of the gearbox accessed from inside the car.
Bear in mind it is very "snug" and will take some jiggling to get the engine and gearbox through and out.
Probably best to remove the radiator as well
Hope this helps
Ged
barnsweeper said:
Hi Ged how long did the return take you altogether? and how extensive did you go. Jim.
If you mean the refurb, I started it on 22nd Feb and the car ran on 20th Jun.I basically totally refurbished the chassis and suspension components and inspected the rest, replacing what I considered required replacement.
barnsweeper said:
Hi Ged when removing the remote gear linkage how many fastenings are there, I presume one at each end and the gearlever itself, would that be right or is there more? Jim.
Does these pics help?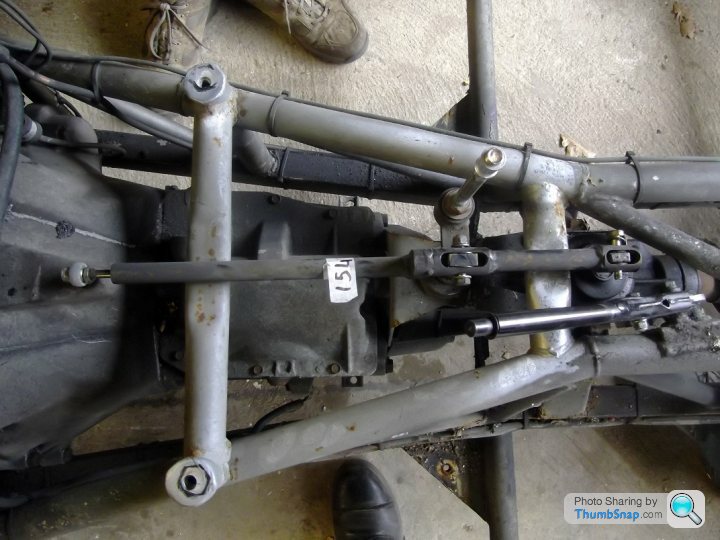
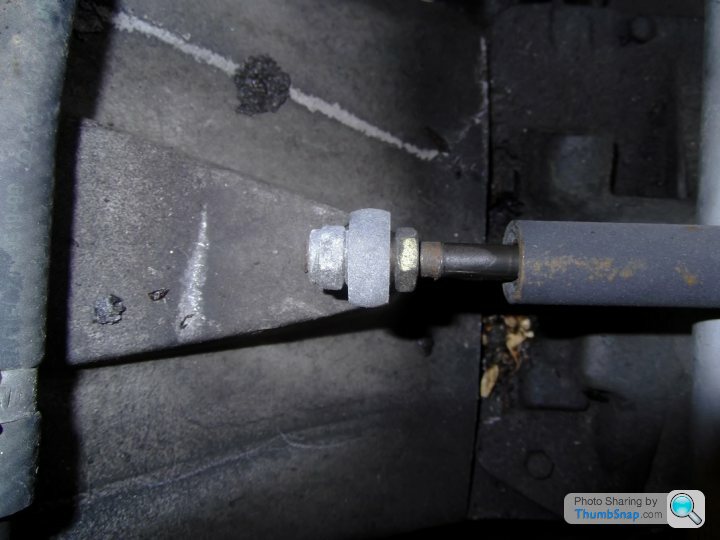
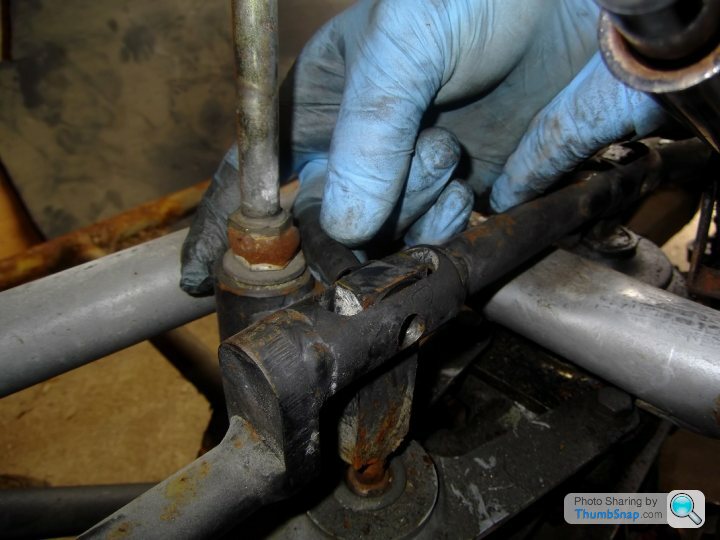

Be careful when disconnecting the mid (at gearlever) and rear (at gearbox) there should be nylon washers either side of the gearlever and gearbox stubs and a nylon sleeve that the relevant bolt goes through.

J400GED said:
Does these pics help?
Be careful when disconnecting the mid (at gearlever) and rear (at gearbox) there should be nylon washers either side of the gearlever and gearbox stubs and a nylon sleeve that the relevant bolt goes through.
Dont bloody remind me right little sod that is and for some reason compared to the previous ones I have refitted mine fit like they have just been taken out of the moulds Be careful when disconnecting the mid (at gearlever) and rear (at gearbox) there should be nylon washers either side of the gearlever and gearbox stubs and a nylon sleeve that the relevant bolt goes through.
 cant quite bring myself to remove all the silicon and foam from under the center console to make top access available though ...... yet
J400GED said:
Does these pics help?
Be careful when disconnecting the mid (at gearlever) and rear (at gearbox) there should be nylon washers either side of the gearlever and gearbox stubs and a nylon sleeve that the relevant bolt goes through.
Hi Ged, yes the pics help a lot I'm going to tackle it tomorrow, hopefully this is the last thing to remove before I lift it, with a bit of luck I will lift the body on Saturday, Jim.Be careful when disconnecting the mid (at gearlever) and rear (at gearbox) there should be nylon washers either side of the gearlever and gearbox stubs and a nylon sleeve that the relevant bolt goes through.
J400GED said:
 Well done mate. Those manifold bolts will just fall out now!

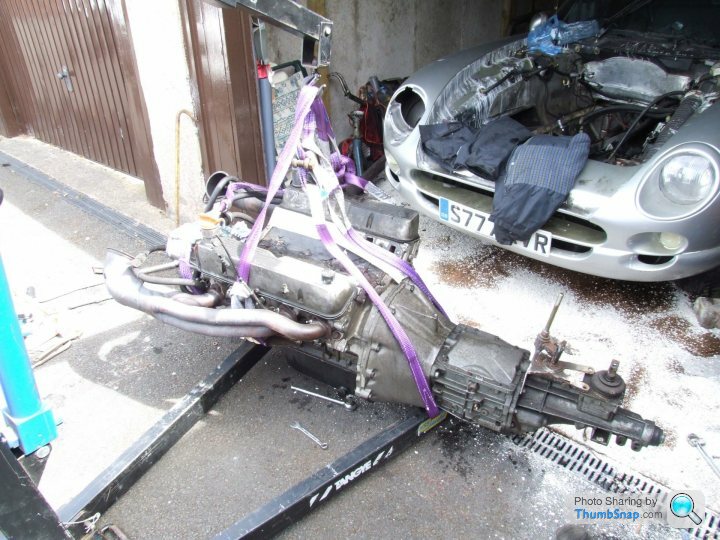
The body was lifted at 20.00hours tonight I will take some pics tomorrow, I had to work with the garage door closed so it was too hot to take the pics I just had to get out of there, I had a quick look round the chassis and its not good, as far as I could see the main backbone is OK but the front and rear wishbones look goosed as do the outriggers shockers and springs front discs, I will have a better idea tomorrow, but heyho its off now that's the main thing.
barnsweeper said:
The body was lifted at 20.00hours tonight I will take some pics tomorrow, I had to work with the garage door closed so it was too hot to take the pics I just had to get out of there, I had a quick look round the chassis and its not good, as far as I could see the main backbone is OK but the front and rear wishbones look goosed as do the outriggers shockers and springs front discs, I will have a better idea tomorrow, but heyho its off now that's the main thing.
Glad you got the body off - quite an achievement isn't it. Well done mate. 
I did warn you about the outriggers didn't I.
Just don't panic or get disheartened. Everything is repairable.

Pics will be good.
Best of luck mate.
Gassing Station | General TVR Stuff & Gossip | Top of Page | What's New | My Stuff